AWS Database Blog
Simplify data integration using zero-ETL from self-managed databases to Amazon Redshift
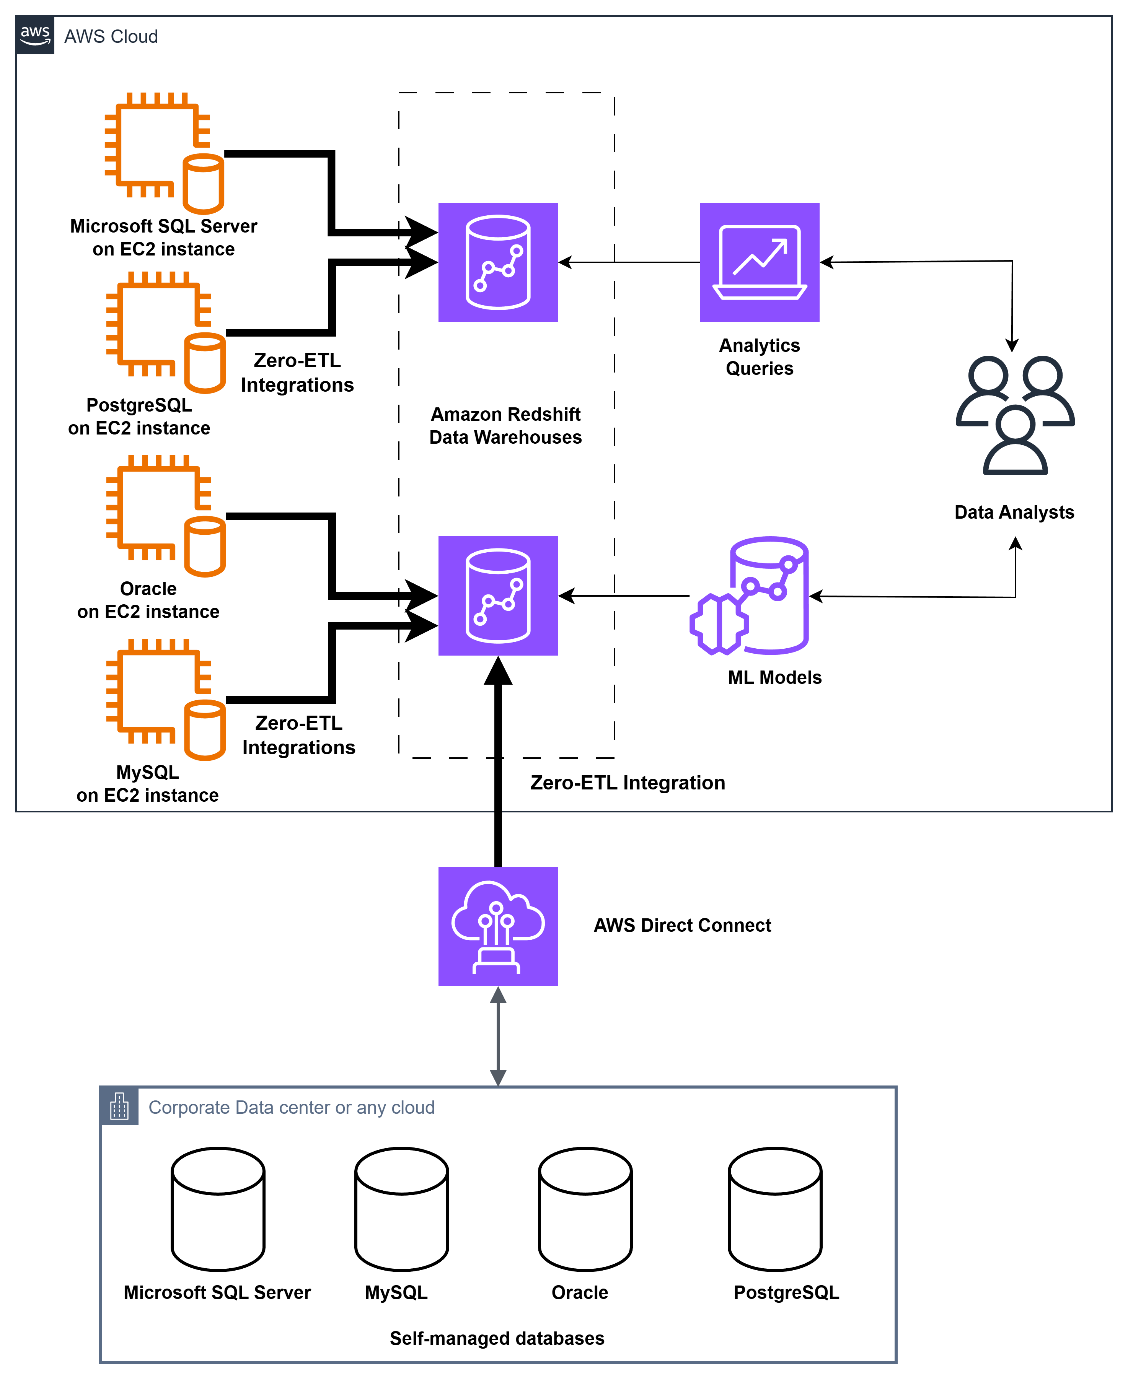
In this post, we demonstrate how to set up a zero-ETL integration between self-managed databases such as MySQL, PostgreSQL, SQL Server, and Oracle to Amazon Redshift. The transactional data from the source gets replicated in near real time on the destination, which processes analytical queries.
Organizations need real-time access to their data across multiple sources to make informed business decisions. Although extract, transform, and load (ETL) processes have traditionally helped integrate data, they can be complex and time-consuming to maintain. ETL is the process of combining, cleaning, and normalizing data from different sources to prepare it for analytics, AI, and machine learning (ML) workloads. Moving to zero-ETL architecture gives your teams more responsive analytics capabilities while eliminating complex data pipeline maintenance, so insights are available when decisions need to be made.
A self-managed database refers to a database environment where you have complete control and responsibility over the database instance running on your own infrastructure, whether that’s an Amazon Elastic Compute Cloud (Amazon EC2) instance, an on-premises virtual machine (VM), or any other cloud provider’s virtual machine.
Solution overview
To create a zero-ETL integration, you specify a self-managed database as the source and an Amazon Redshift data warehouse as the target. The integration replicates data from the source database into the target data warehouse. The following diagram illustrates this architecture.
Prerequisites
Before you begin, ensure you have the following prerequisites in place:
- On-premises database server or an EC2 instance with database configured with:
- Network connectivity to Amazon Web Services (AWS) using AWS Direct Connect, AWS Site-to-Site VPN, or Amazon Virtual Private Cloud (Amazon VPC).
- VPC security groups allowing database port connection to zero-ETL integration.
- Appropriate subnets and network configuration for zero-ETL replication traffic.
- Database configured for on-going replication. Refer to AWS Database Migration Service (AWS DMS) documentation for more information: Oracle, Microsoft SQL Server, MySQL, or PostgreSQL.
- Create a new Redshift cluster or modify an existing cluster to use a custom parameter group with the enable_case_sensitive_identifier parameter set to
on, which must be enabled to create zero-ETL integrations in the data warehouse. - Make sure your AWS user or role has the necessary AWS Identity and Access Management (IAM) permissions. Complete the following steps to configure the permissions:
- On the IAM console, choose Policies in the navigation pane.
- Choose Create policy.
- Create a new policy called
zeroetl-selfmanaged-integrationsusing the following JSON:
- Attach the policy you created to your IAM user or role permissions.
Solution walkthrough
To create a DMS endpoint, follow these steps:
- Open the AWS DMS console.
- In the navigation pane, under Migrate or replicate, choose Endpoints.
- Choose Create endpoint, select Source endpoint.
- Select the Source engine, such as Oracle, MySQL, PostgreSQL and Microsoft SQL Server.
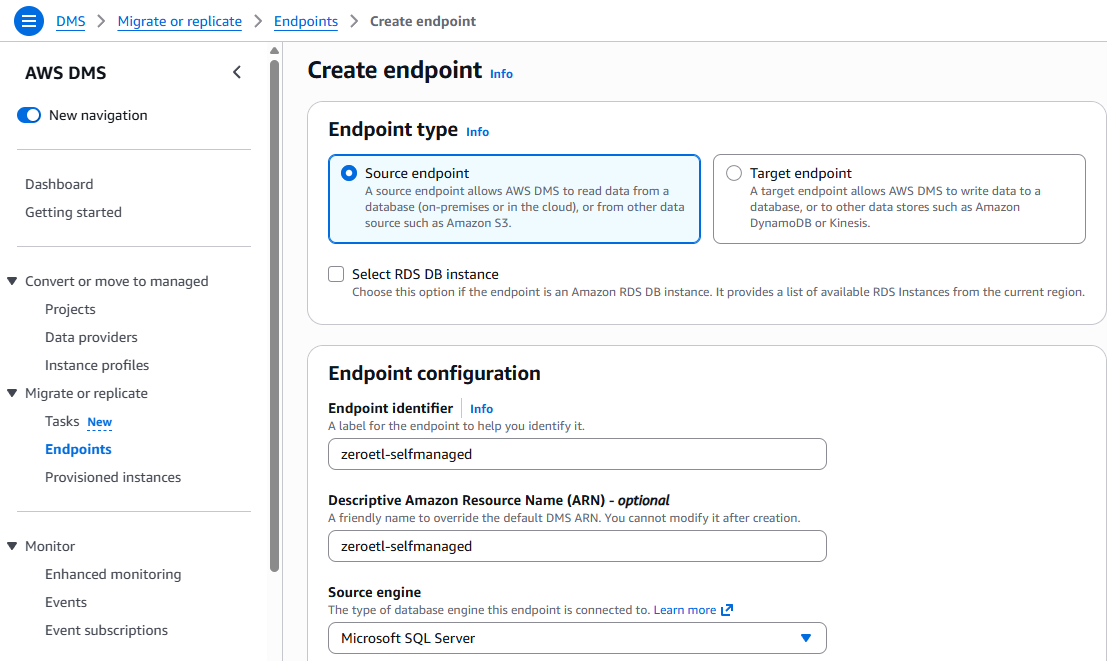
- Choose access endpoint type and provide information. Select Choose AWS Secrets Manager to provide a secret ID and IAM role.

- Choose Create endpoint.
- Upon creation of source DMS endpoint, copy DMS endpoint ARN.
To configure the Redshift cluster destination, follow these steps:
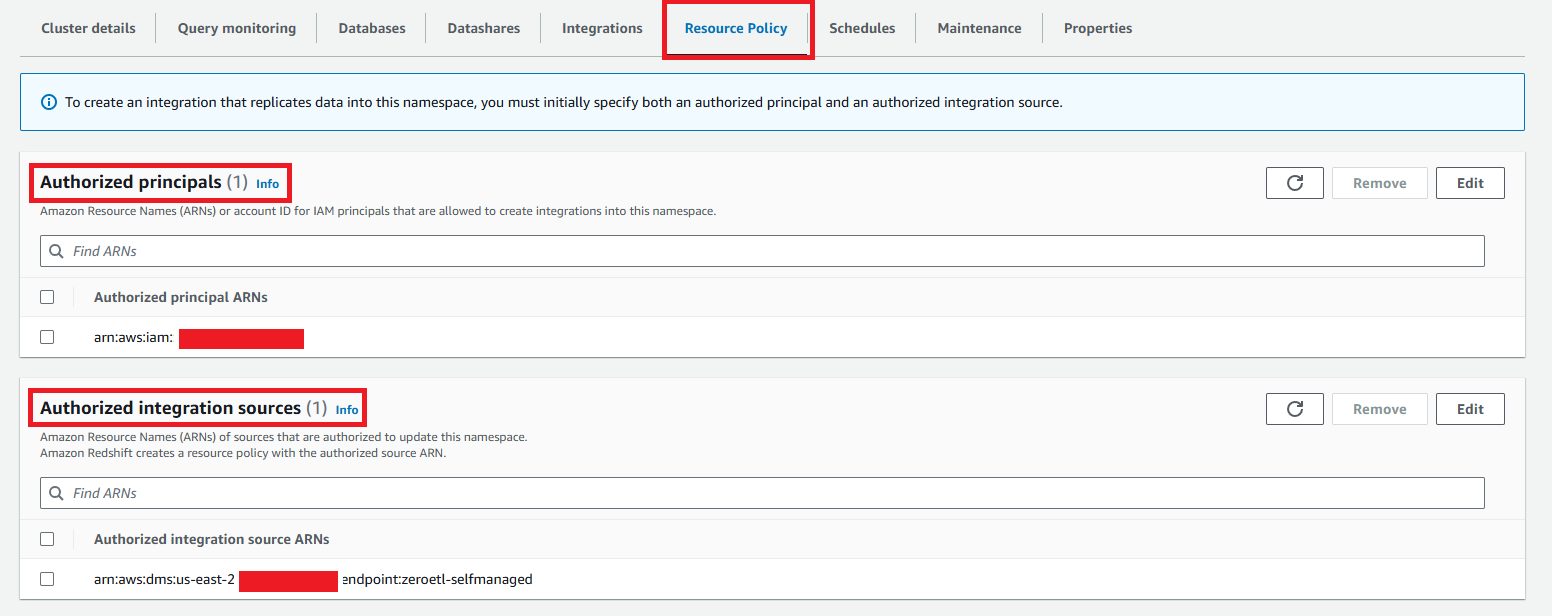
- Navigate to the Redshift cluster and choose the Resource policy tab.
- Choose Edit Authorized principals.
- Enter either the ARN of the AWS user or role or the AWS account ID (IAM principals) that are allowed to create integrations in this namespace.
- Choose Save changes.
- Choose Edit Authorized integration sources.
- Enter the ARN of the DMS source endpoint that’s the data source for the zero-ETL integration.
- Choose Save changes.
To create a zero-ETL integration, follow these steps:
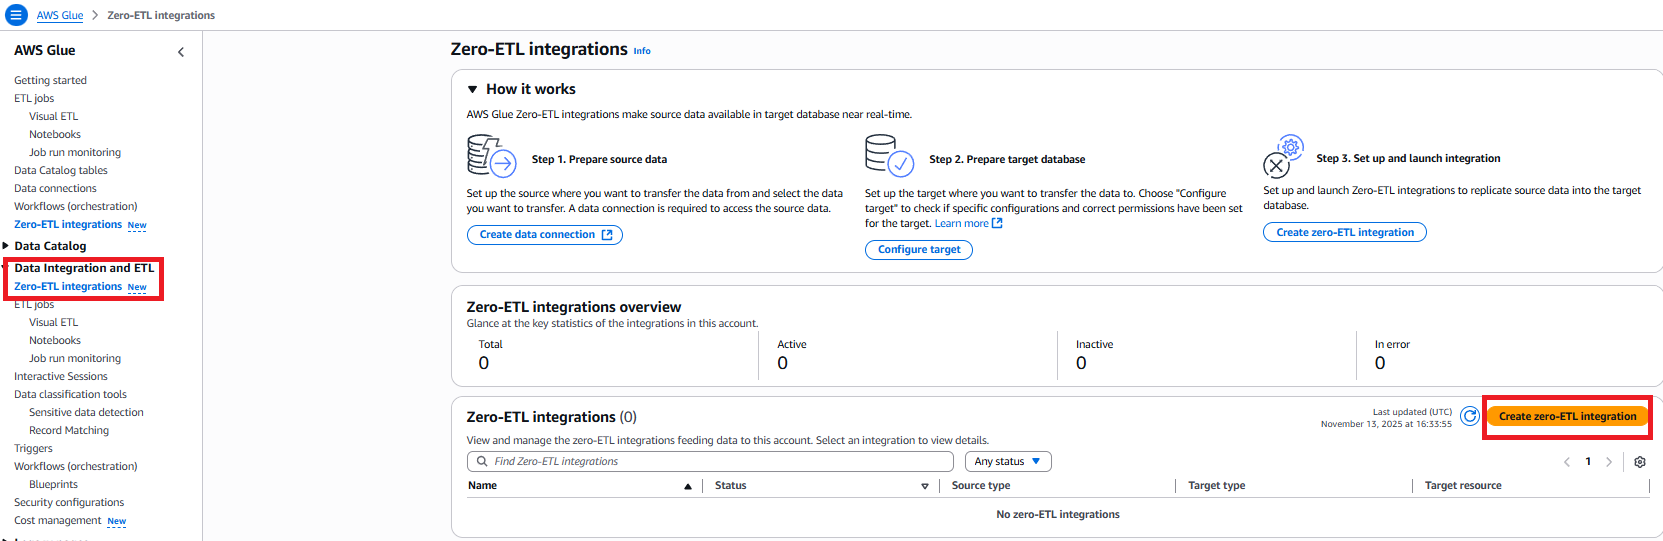
- Open AWS Glue console.
- In the navigation pane, under Data Integration and ETL, select Zero-ETL integrations.
- Choose Create zero-ETL integration.
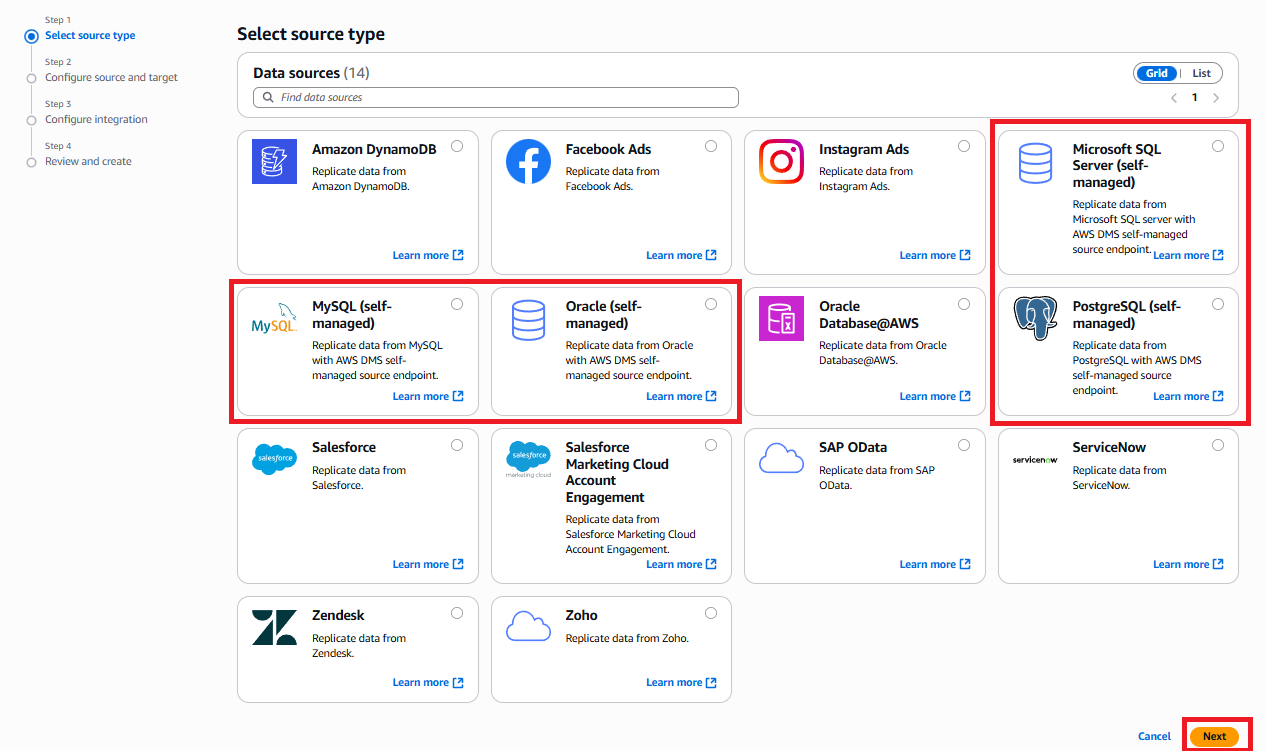
- Select the source type, as shown in the following screenshot. It can be any of the self-managed databases such as Microsoft SQL Server, MySQL, Oracle, or PostgreSQL. Choose Next.
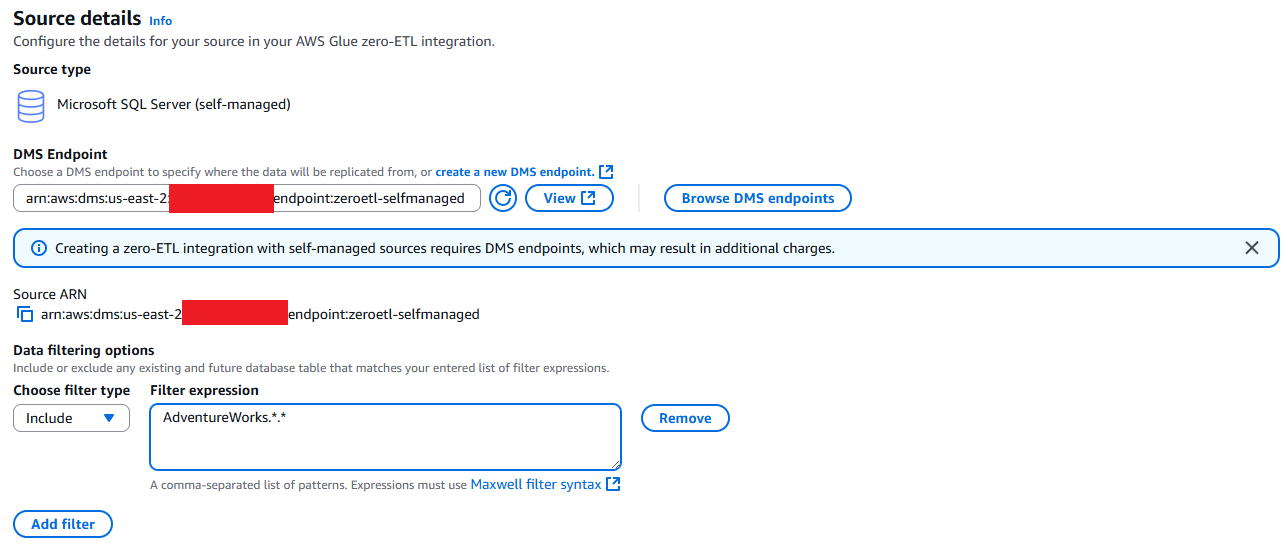
- On this page, configure the source and target.
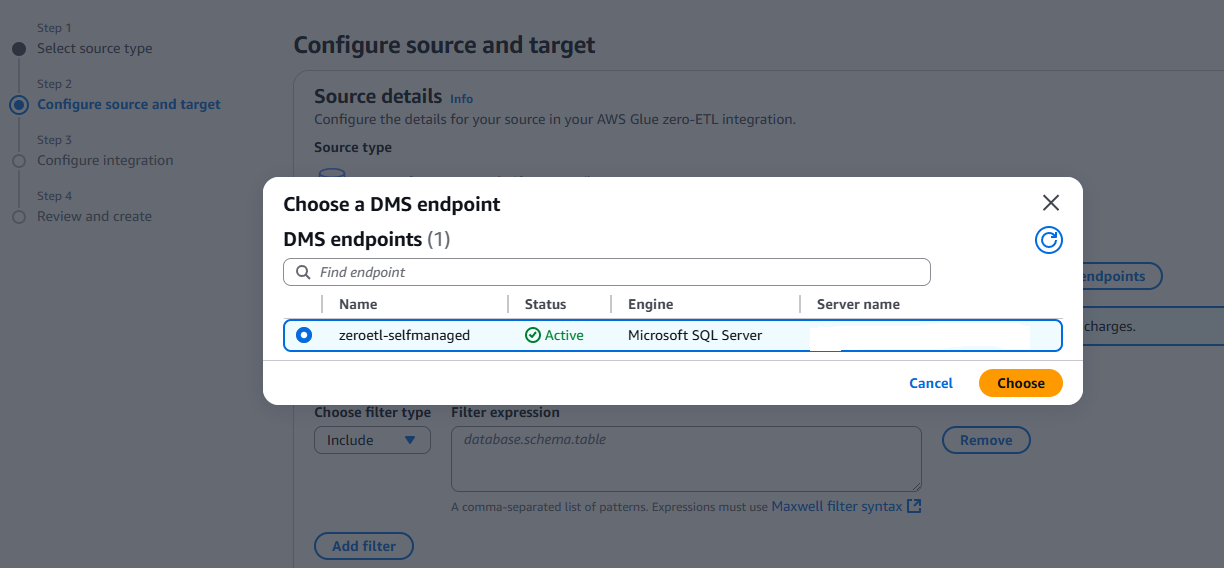
- To complete source details, Browse DMS endpoints and select the DMS endpoint created in step 1.
- Under Data filtering options, in the Choose filter type dropdown menu, select either Include or Exclude, as shown in the following screenshot. Expressions must use Maxwell filter syntax.
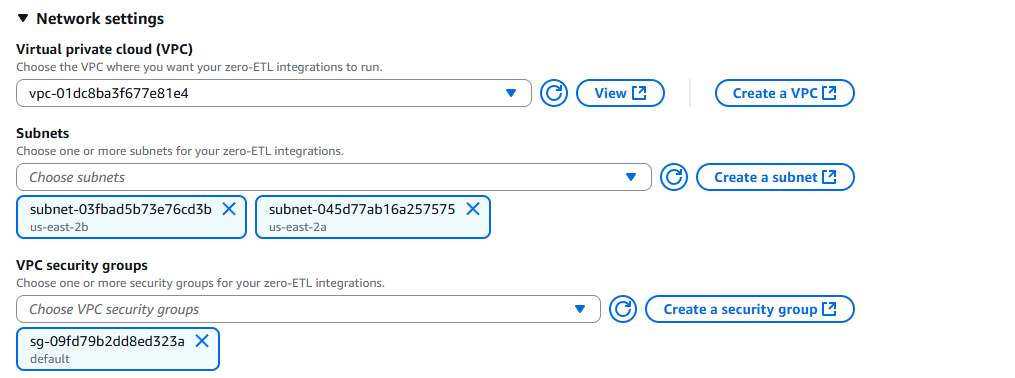
- In Network settings, provide details such as Virtual private cloud (VPC), Subnets, and VPC security groups to make a successful connection to the source and run zero-ETL integrations, as shown in the following screenshot.
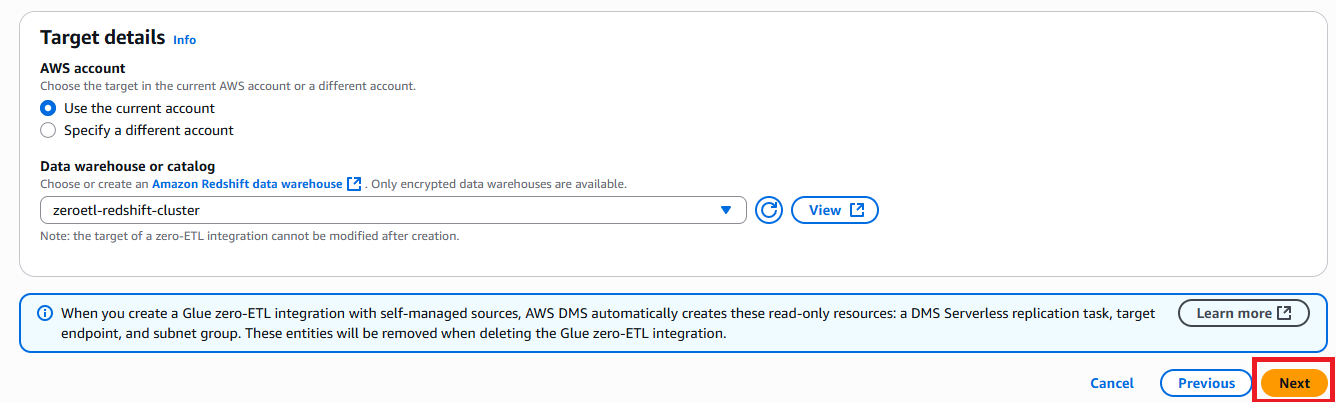
- To complete target details, under AWS account select the option appropriate for where the Amazon Redshift data warehouse is hosted, either Use the current account or Specify a different account, as shown in the following screenshot.
- To complete source details, Browse DMS endpoints and select the DMS endpoint created in step 1.
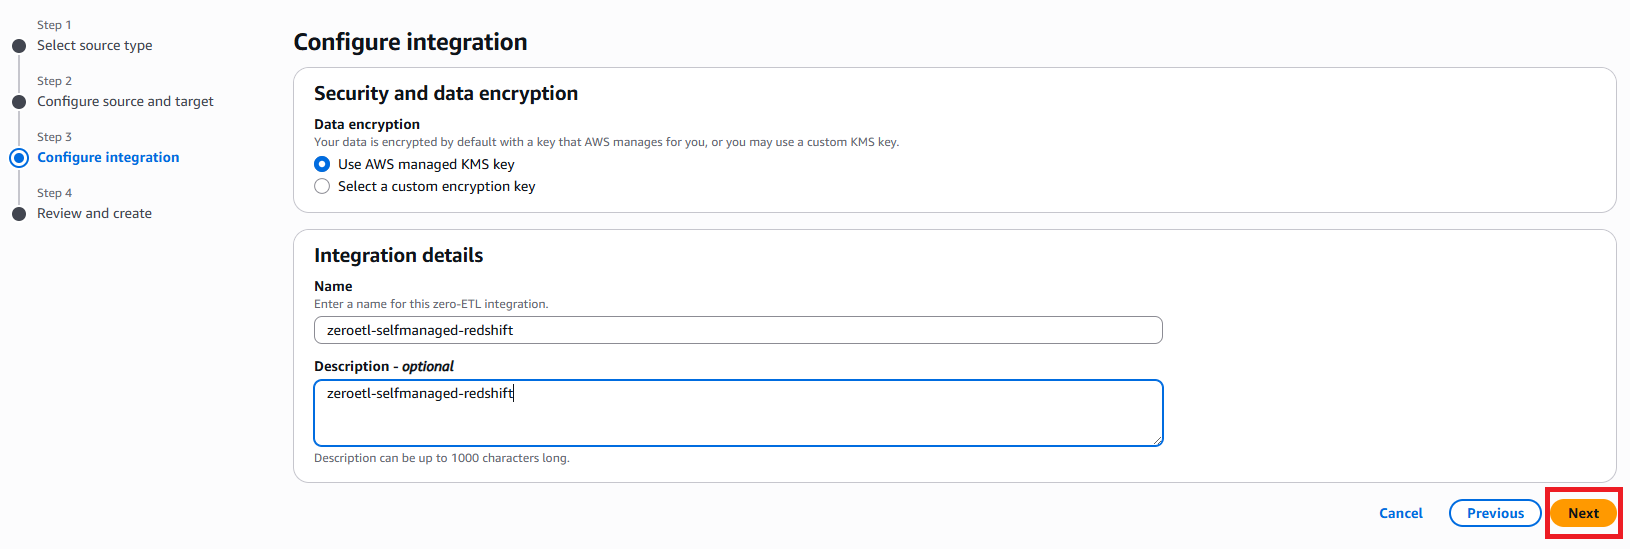
- For Security and data encryption, you can select either AWS managed KMS key or a custom AWS KMS key managed by AWS Key Management Service (AWS KMS).
- In the Integration details section, for Name, enter
zeroetl-selfmanaged-redshiftand choose Next.
- Review the details and choose Create and launch integration.
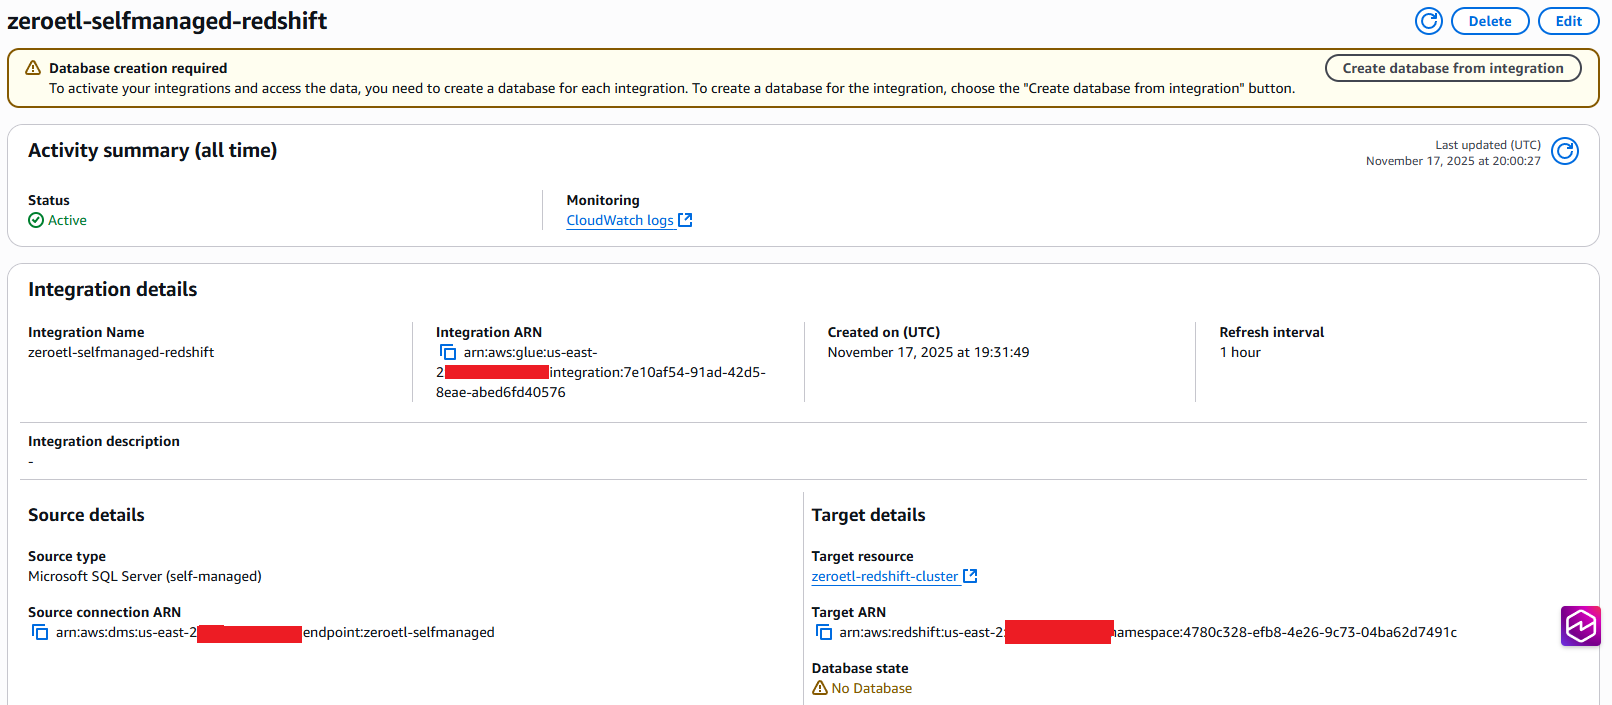
- The newly created zero-ETL integration will show as Active in about a minute, as shown in the following screenshot.
To create a database from the integration in AWS Glue, follow the instructions in the next section.To create your database, complete the following steps:
- Open AWS Glue console.
- In the navigation pane, under Data integration and ETL, choose zero-ETL integrations.
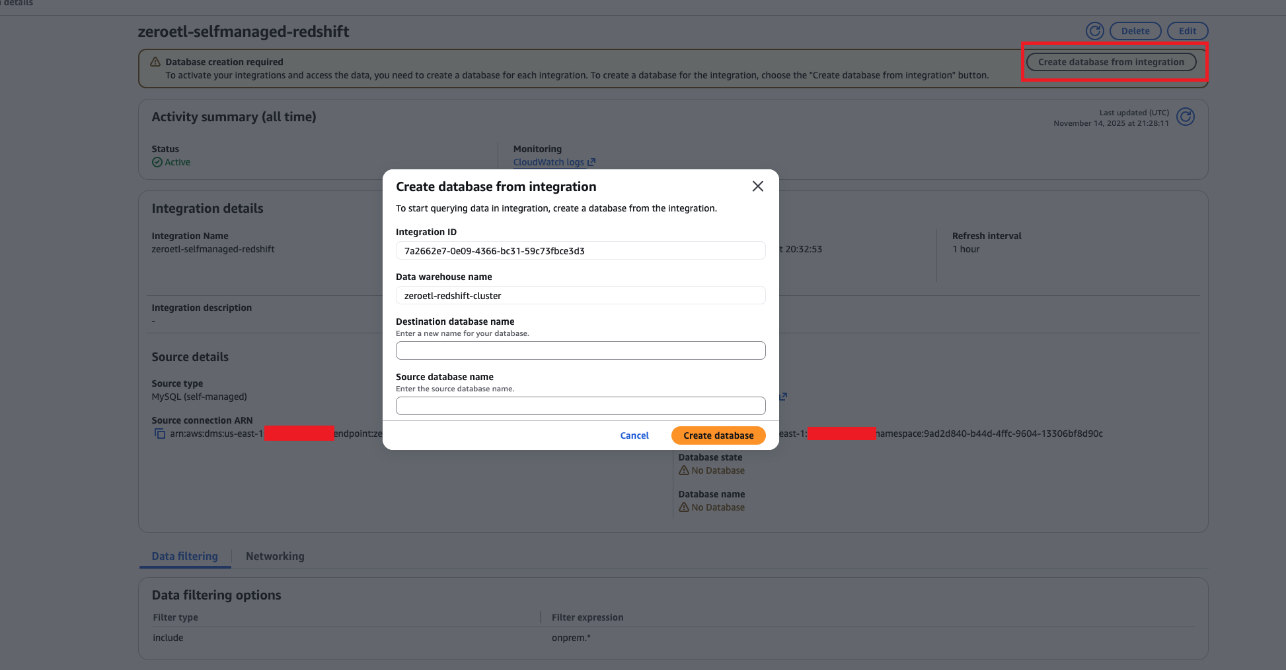
- Choose Create database from integration
- Enter Destination database name that will be created in Amazon Redshift.
- Enter Source database name from which data will be replicated, as shown in the following screenshot.
To validate the zero-ETL integration, perform the following steps:
- Open Amazon Redshift.
- In the navigation pane, under Integrations, choose zero-ETL integrations.
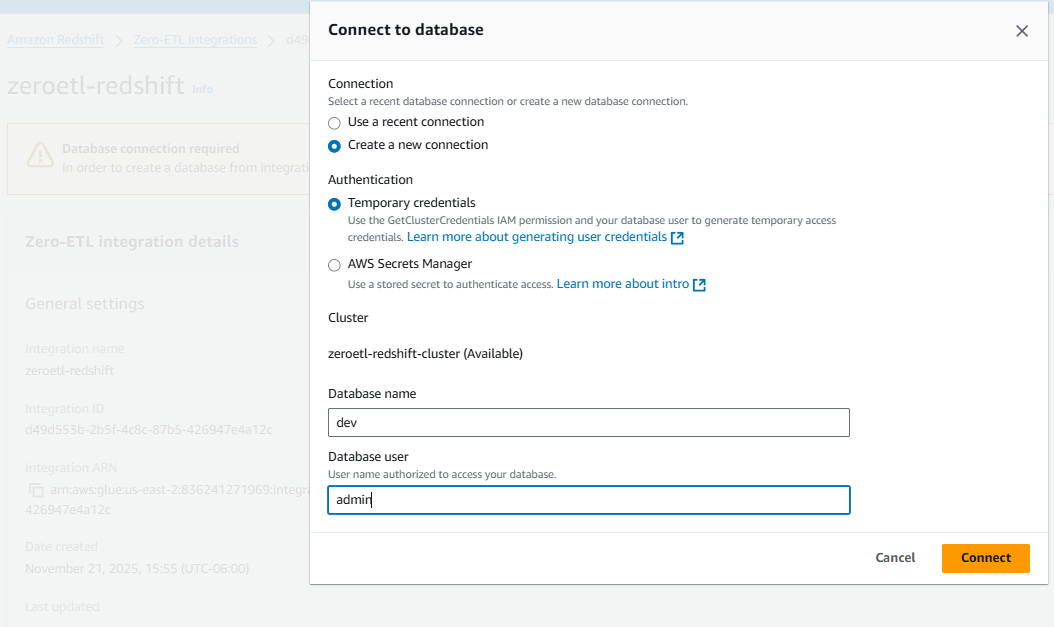
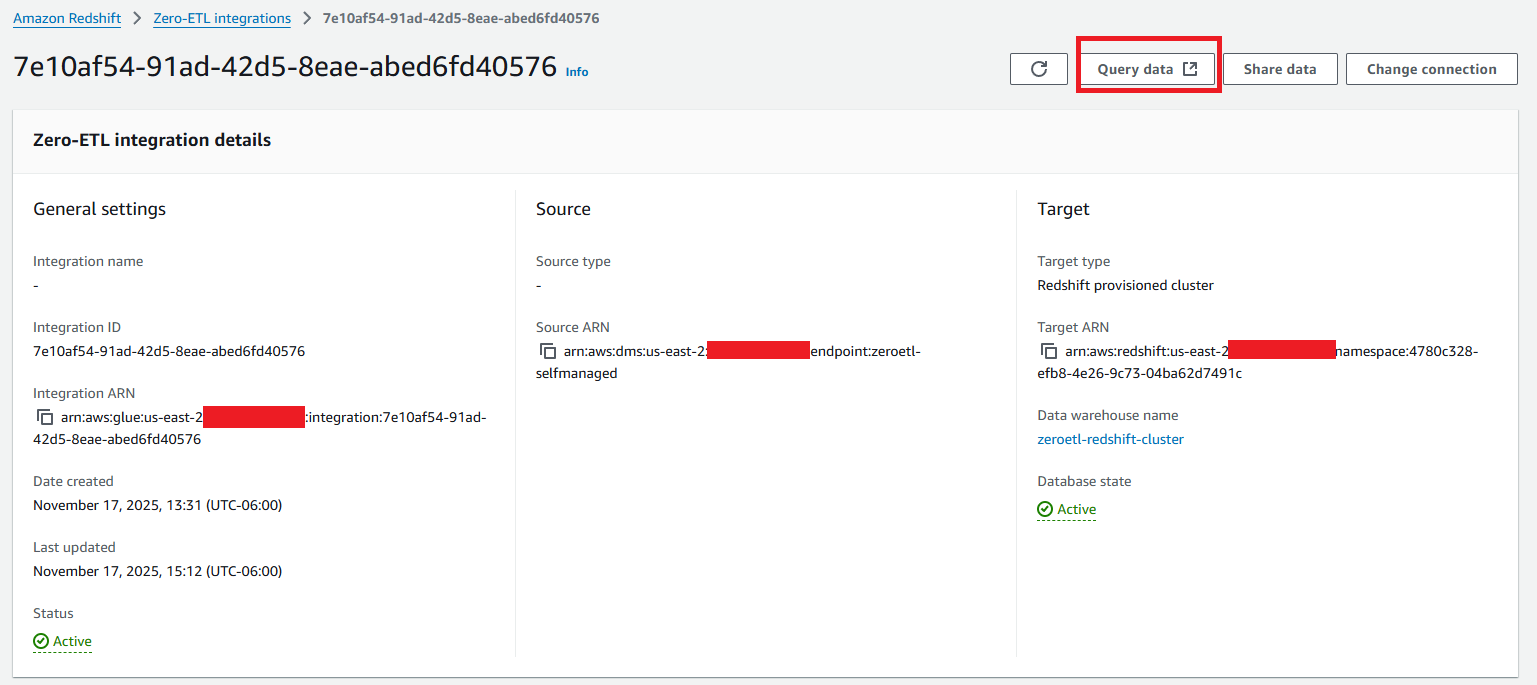
- Navigate to the zeroetl-selfmanaged-redshift integration. Review the details of zero-ETL integration.
- Choose Connect to database and provide Database name and Database user, as shown in the following screenshot.
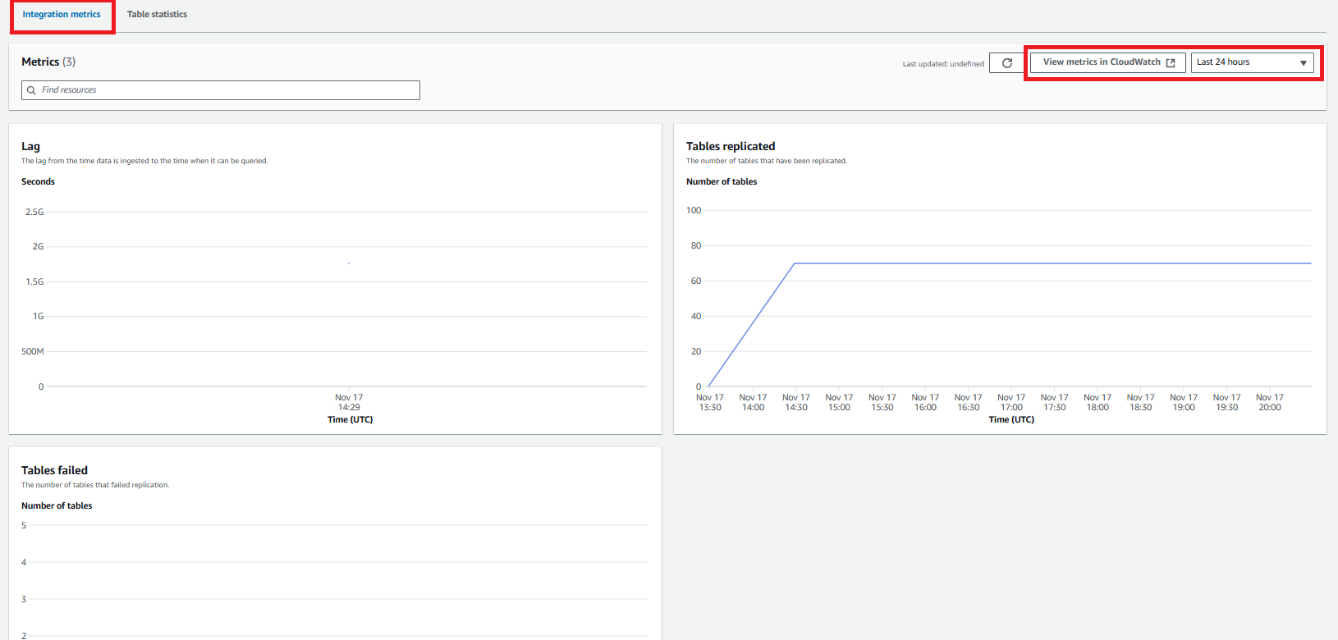
- To view the integration-related metrics published to Amazon CloudWatch, choose the Integration metrics, as shown in the following screenshot.
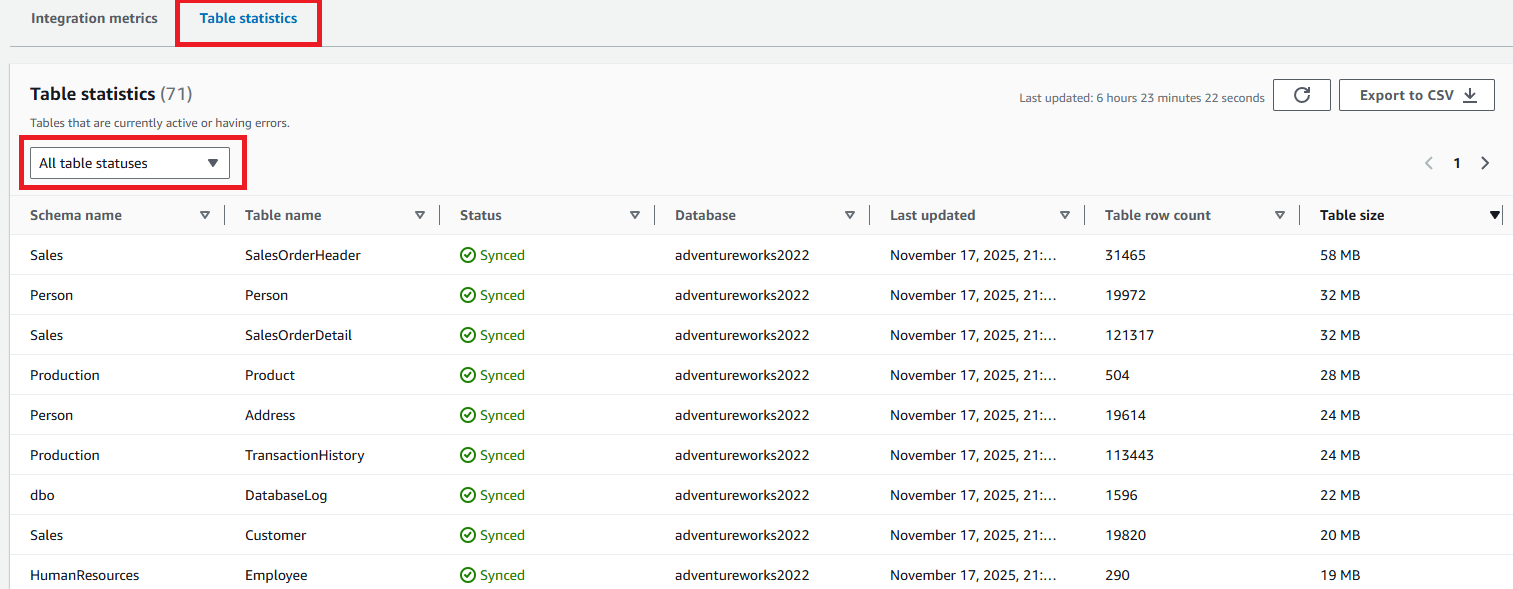
- Switch to Table statistics to view all tables that are currently active or having errors.
- Query the following system views and tables in Amazon Redshift to get information about the zero-ETL integrations with Amazon Redshift:
- SVV_INTEGRATION provides configuration details of zero-ETL integrations.
- SYS_INTEGRATION_ACTIVITY provides completed zero-ETL integrations.
- SVV_INTEGRATION_TABLE_MAPPING provides mapping metadata values from source to target.
- SVV_INTEGRATION_TABLE_STATE provides information about integration state.
- SYS_INTEGRATION_TABLE_ACTIVITY provides information about insert, delete, and update activity of integrations.
- SYS_INTEGRATION_TABLE_STATE_CHANGE provides information about table state change log for integrations.
- To query the preceding tables or query the data from the replicated database, choose Query data on the Zero-ETL integrations.
Clean up
When you delete zero-ETL integration, your transactional data isn’t deleted from self-managed database or Amazon Redshift, but source database doesn’t send any new data to Amazon Redshift.
To avoid incurring future charges, remove the resources used in this post from your AWS account by taking the following steps:
- Delete the zero-ETL integration:
- On the AWS Glue console, choose Zero-ETL integrations in the navigation panel.
- Select the zero-ETL integration that you want to delete and on the Actions menu, choose Delete.
- To confirm the deletion, enter
confirmand choose Delete.
- Delete Redshift cluster:
- On the Amazon Redshift console, choose the Clusters in the navigation panel.
- Select the Redshift cluster that you want to delete and on the Actions menu, choose Delete.
- If a final snapshot is required, select Create final snapshot and provide Final snapshot identifier.
- To confirm the deletion, enter
confirmand choose Delete.
- Delete source DMS endpoint:
- On the AWS DMS console, choose the Endpoints in the navigation panel.
- Select the DMS endpoint that you want to delete and on the Actions menu, choose Delete.
- Delete the AWS Secrets Manager secret
Conclusion
In this post, we showed how you can run zero-ETL integration from Oracle, PostgreSQL, MySQL, or SQL Server databases to Amazon Redshift. This minimizes the need to maintain complex data pipelines and enables near real-time analytics on transactional and operational data. With zero-ETL integrations, you can focus more on deriving value from your data and less on managing data movement.
As next steps, review the Amazon Redshift zero-ETL integration documentation to understand implementation details. Consider expanding your analytics capabilities by exploring Amazon Redshift ML for machine learning (ML) integration or implementing federated queries for cross-database analytics. For additional insights, learn how other customers are implementing zero-ETL with Amazon Aurora (MySQL-Compatible and PostgreSQL-Compatible) in the zero-ETL integration with Amazon Aurora blog post.