AWS DevOps & Developer Productivity Blog
Best practices for managing Terraform State files in AWS CI/CD Pipeline
Introduction
Today customers want to reduce manual operations for deploying and maintaining their infrastructure. The recommended method to deploy and manage infrastructure on AWS is to follow Infrastructure-As-Code (IaC) model using tools like AWS CloudFormation, AWS Cloud Development Kit (AWS CDK) or Terraform.
One of the critical components in terraform is managing the state file which keeps track of your configuration and resources. When you run terraform in an AWS CI/CD pipeline the state file has to be stored in a secured, common path to which the pipeline has access to. You need a mechanism to lock it when multiple developers in the team want to access it at the same time.
In this blog post, we will explain how to manage terraform state files in AWS, best practices on configuring them in AWS and an example of how you can manage it efficiently in your Continuous Integration pipeline in AWS when used with AWS Developer Tools such as AWS CodeCommit and AWS CodeBuild. This blog post assumes you have a basic knowledge of terraform, AWS Developer Tools and AWS CI/CD pipeline. Let’s dive in!
Challenges with handling state files
By default, the state file is stored locally where terraform runs, which is not a problem if you are a single developer working on the deployment. However if not, it is not ideal to store state files locally as you may run into following problems:
- When working in teams or collaborative environments, multiple people need access to the state file
- Data in the state file is stored in plain text which may contain secrets or sensitive information
- Local files can get lost, corrupted, or deleted
Best practices for handling state files
The recommended practice for managing state files is to use terraform’s built-in support for remote backends. These are:
Remote backend on Amazon Simple Storage Service (Amazon S3): You can configure terraform to store state files in an Amazon S3 bucket which provides a durable and scalable storage solution. Storing on Amazon S3 also enables collaboration that allows you to share state file with others.
Remote backend on Amazon S3 with Amazon DynamoDB: In addition to using an Amazon S3 bucket for managing the files, you can use an Amazon DynamoDB table to lock the state file. This will allow only one person to modify a particular state file at any given time. It will help to avoid conflicts and enable safe concurrent access to the state file.
There are other options available as well such as remote backend on terraform cloud and third party backends. Ultimately, the best method for managing terraform state files on AWS will depend on your specific requirements.
When deploying terraform on AWS, the preferred choice of managing state is using Amazon S3 with Amazon DynamoDB.
AWS configurations for managing state files
- Create an Amazon S3 bucket using terraform. Implement security measures for Amazon S3 bucket by creating an AWS Identity and Access Management (AWS IAM) policy or Amazon S3 Bucket Policy. Thus you can restrict access, configure object versioning for data protection and recovery, and enable AES256 encryption with SSE-KMS for encryption control.
- Next create an Amazon DynamoDB table using terraform with Primary key set to LockID. You can also set any additional configuration options such as read/write capacity units. Once the table is created, you will configure the terraform backend to use it for state locking by specifying the table name in the terraform block of your configuration.
- For a single AWS account with multiple environments and projects, you can use a single Amazon S3 bucket. If you have multiple applications in multiple environments across multiple AWS accounts, you can create one Amazon S3 bucket for each account. In that Amazon S3 bucket, you can create appropriate folders for each environment, storing project state files with specific prefixes.
Now that you know how to handle terraform state files on AWS, let’s look at an example of how you can configure them in a Continuous Integration pipeline in AWS.
Architecture

Figure 1: Example architecture on how to use terraform in an AWS CI pipeline
This diagram outlines the workflow implemented in this blog:
- The AWS CodeCommit repository contains the application code
- The AWS CodeBuild job contains the buildspec files and references the source code in AWS CodeCommit
- The AWS Lambda function contains the application code created after running terraform apply
- Amazon S3 contains the state file created after running terraform apply. Amazon DynamoDB locks the state file present in Amazon S3
Implementation
Pre-requisites
Before you begin, you must complete the following prerequisites:
- Install the latest version of AWS Command Line Interface (AWS CLI)
- Install terraform latest version
- Install latest Git version and setup git-remote-codecommit
- Use an existing AWS account or create a new one
- Use AWS IAM role with role profile, role permissions, role trust relationship and user permissions to access your AWS account via local terminal
Setting up the environment
- You need an AWS access key ID and secret access key to configure AWS CLI. To learn more about configuring the AWS CLI, follow these instructions.
- Clone the repo for complete example: git clone https://github.com/aws-samples/manage-terraform-statefiles-in-aws-pipeline
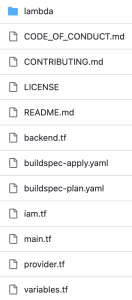
- After cloning, you could see the following folder structure:

Figure 2: AWS CodeCommit repository structure
Let’s break down the terraform code into 2 parts – one for preparing the infrastructure and another for preparing the application.
Preparing the Infrastructure
- The main.tf file is the core component that does below:
-
- It creates an Amazon S3 bucket to store the state file. We configure bucket ACL, bucket versioning and encryption so that the state file is secure.
- It creates an Amazon DynamoDB table which will be used to lock the state file.
- It creates two AWS CodeBuild projects, one for ‘terraform plan’ and another for ‘terraform apply’.
Note – It also has the code block (commented out by default) to create AWS Lambda which you will use at a later stage.
-
- AWS CodeBuild projects should be able to access Amazon S3, Amazon DynamoDB, AWS CodeCommit and AWS Lambda. So, the AWS IAM role with appropriate permissions required to access these resources are created via iam.tf file.
- Next you will find two buildspec files named buildspec-plan.yaml and buildspec-apply.yaml that will execute terraform commands –
terraform planandterraform applyrespectively.
- Modify AWS region in the provider.tf file.
- Update Amazon S3 bucket name, Amazon DynamoDB table name, AWS CodeBuild compute types, AWS Lambda role and policy names to required values using variable.tf file. You can also use this file to easily customize parameters for different environments.
With this, the infrastructure setup is complete.
You can use your local terminal and execute below commands in the same order to deploy the above-mentioned resources in your AWS account.
Once the apply is successful and all the above resources have been successfully deployed in your AWS account, proceed with deploying your application.
Preparing the Application
- In the cloned repository, use the backend.tf file to create your own Amazon S3 backend to store the state file. By default, it will have below values. You can override them with your required values.
- The repository has sample python code stored in main.py that returns a simple message when invoked.
- In the main.tf file, you can find the below block of code to create and deploy the Lambda function that uses the main.py code (uncomment these code blocks).
- Now you can deploy the application using AWS CodeBuild instead of running terraform commands locally which is the whole point and advantage of using AWS CodeBuild.
- Run the two AWS CodeBuild projects to execute
terraform planandterraform applyagain.
- Once successful, you can verify your deployment by testing the code in AWS Lambda. To test a lambda function (console):
-
- Open AWS Lambda console and select your function “tf-codebuild”
- In the navigation pane, in Code section, click Test to create a test event
- Provide your required name, for example “test-lambda”
- Accept default values and click Save
- Click Test again to trigger your test event “test-lambda”
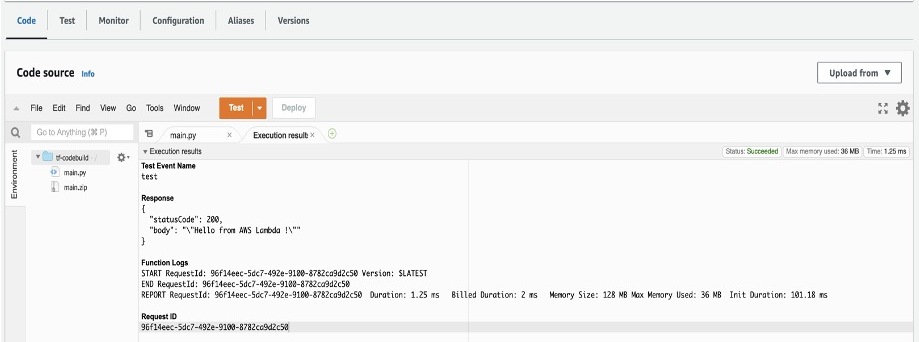
It should return the sample message you provided in your main.py file. In the default case, it will display “Hello from AWS Lambda !” message as shown below.

Figure 3: Sample Amazon Lambda function response
- To verify your state file, go to Amazon S3 console and select the backend bucket created (tfbackend-bucket). It will contain your state file.

Figure 4: Amazon S3 bucket with terraform state file
- Open Amazon DynamoDB console and check your table tfstate-lock and it will have an entry with LockID.

Figure 5: Amazon DynamoDB table with LockID
Thus, you have securely stored and locked your terraform state file using terraform backend in a Continuous Integration pipeline.
Cleanup
To delete all the resources created as part of the repository, run the below command from your terminal.
terraform destroy
Conclusion
In this blog post, we explored the fundamentals of terraform state files, discussed best practices for their secure storage within AWS environments and also mechanisms for locking these files to prevent unauthorized team access. And finally, we showed you an example of how efficiently you can manage them in a Continuous Integration pipeline in AWS.
You can apply the same methodology to manage state files in a Continuous Delivery pipeline in AWS. For more information, see CI/CD pipeline on AWS, Terraform backends types, Purpose of terraform state.