AWS DevOps & Developer Productivity Blog
How to deploy workloads in a multicloud environment with AWS developer tools
As organizations embrace cloud computing as part of “cloud first” strategy, and migrate to the cloud, some of the enterprises end up in a multicloud environment. We see that enterprise customers get the best experience, performance and cost structure when they choose a primary cloud provider. However, for a variety of reasons, some organizations end up operating in a multicloud environment. For example, in case of mergers & acquisitions, an organization may acquire an entity which runs on a different cloud platform, resulting in the organization operating in a multicloud environment. Another example is in the case where an ISV (Independent Software Vendor) provides services to customers operating on different cloud providers. One more example is the scenario where an organization needs to adhere to data residency and data sovereignty requirements, and ends up with workloads deployed to multiple cloud platforms across locations. Thus, the organization ends up running in a multicloud environment.
In the scenarios described above, one of the challenges organizations face operating such a complex environment is managing release process (building, testing, and deploying applications at scale) across multiple cloud platforms. If an organization’s primary cloud provider is AWS, they may want to continue using AWS developer tools to deploy workloads in other cloud platforms. Organizations facing such scenarios can leverage AWS services to develop their end-to-end CI/CD and release process instead of developing a release pipeline for each platform, which is complex, and not sustainable in the long run.
In this post we show how organizations can continue using AWS developer tools in a hybrid and multicloud environment. We walk the audience through a scenario where we deploy an application to VMs running on-premises and Azure, showcasing AWS’ hybrid and multicloud DevOps capabilities.
Solution and scenario overview
In this post we’re demonstrating the following steps:
- Setup a CI/CD pipeline using AWS CodePipeline, and show how it’s run when application code is updated, and checked into the code repository (GitHub).
- Check out application code from the code repository, and use an IDE (Visual Studio Code) to make changes, and check-in the code to the code repository.
- Check in the modified application code to automatically run the release process built using AWS CodePipeline. It makes use of AWS CodeBuild to retrieve the latest version of code from code repository, compile it, build the deployment package, and test the application.
- Deploy the updated application to VMs across on-premises, and Azure using AWS CodeDeploy.
The high-level solution is shown below. This post does not show all of the possible combinations and integrations available to build the CI/CD pipeline. As an example, you can integrate the pipeline with your existing tools for test and build such as Selenium, Jenkins, SonarQube etc.
This post focuses on deploying application in a multicloud environment, and how AWS Developer Tools can support virtually any scenario or use case specific to your organization. We will be deploying a sample application from this AWS tutorial to an on-premises server, and an Azure Virtual Machine (VM) running Red Hat Enterprise Linux (RHEL). In future posts in this series, we will cover how you can deploy any type of workload using AWS tools, including containers, and serverless applications.

CI/CD pipeline setup
This section describes instructions for setting up a multicloud CI/CD pipeline.
Note: A key point to note is that the CI/CD pipeline setup, and related sub-sections in this post, are a one-time activity, and you’ll not need to perform these steps every time an application is deployed or modified.
Install CodeDeploy agent
The AWS CodeDeploy agent is a software package that is used to execute deployments on an instance. You can install the CodeDeploy agent on an on-premises server and Azure VM by either using the command line, or AWS Systems Manager.
Setup GitHub code repository
Setup GitHub code repository using the following steps:
- Create a new GitHub code repository or use a repository that already exists.
- Copy the Sample_App_Linux app (zip) from Amazon S3 as described in Step 3 of Upload a sample application to your GitHub repository tutorial.
- Commit the files to code repository
git add .
git commit -m 'Initial Commit'
git push
You will use this repository to deploy your code across environments.
Configure AWS CodePipeline
Follow the steps outlined below to setup and configure CodePipeline to orchestrate the CI/CD pipeline of our application.
- Navigate to CodePipeline in the AWS console and click on ‘Create pipeline’
- Give your pipeline a name (eg: MyWebApp-CICD) and allow CodePipeline to create a service role on your behalf.
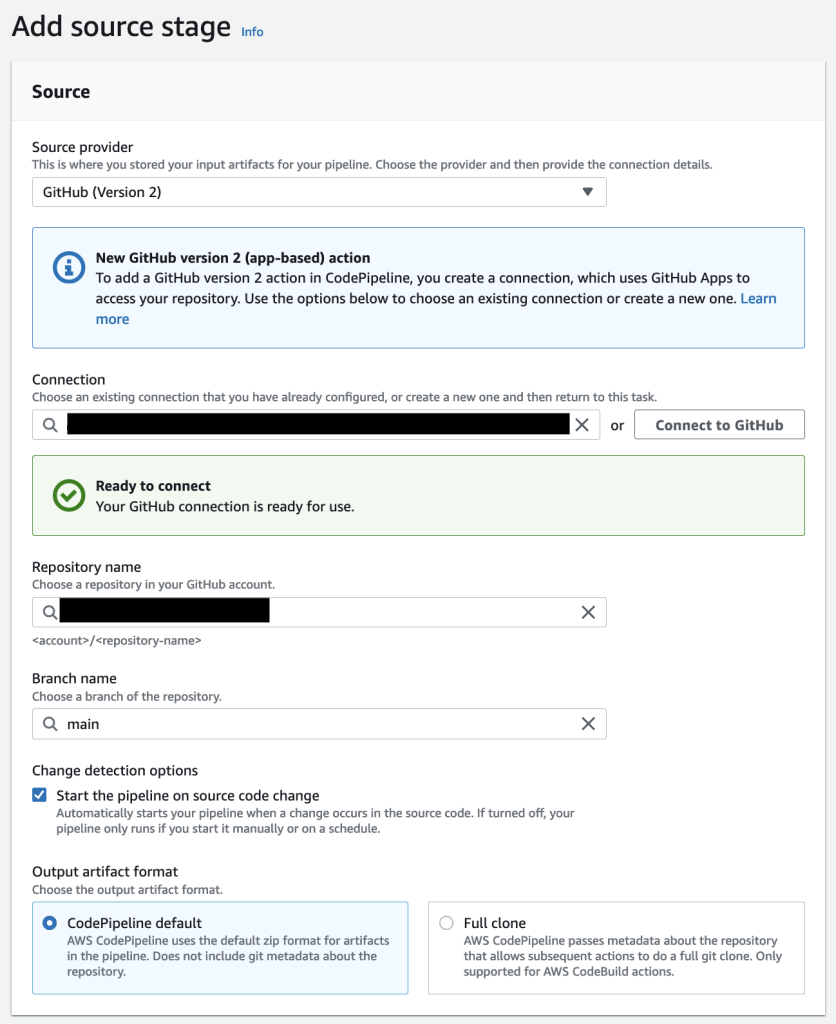
- For the source stage, select GitHub (v2) as your source provide and click on the Connect to GitHub button to give CodePipeline access to your git repository.
- Create a new GitHub connection and click on the Install a new App button to install the AWS Connector in your GitHub account.
- Back in the CodePipeline console select the repository and branch you would like to build and deploy.
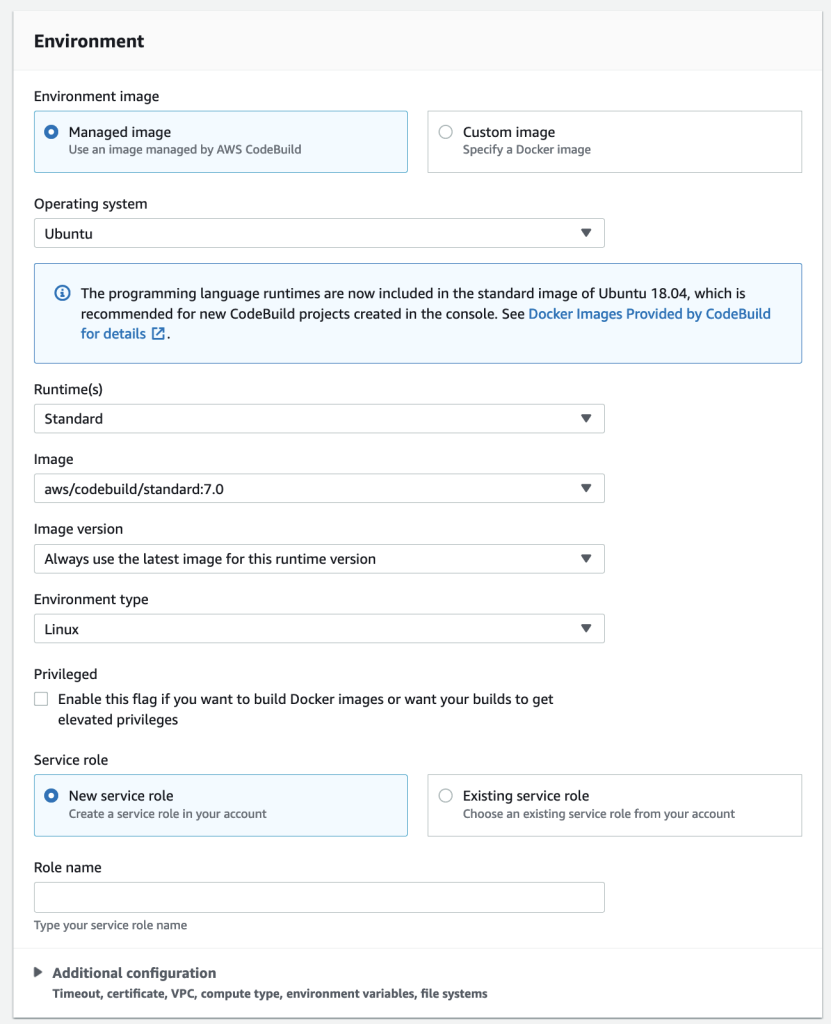
- Now we create the build stage; Select AWS CodeBuild as the build provider.
- Click on the ‘Create project’ button to create the project for your build stage, and give your project a name.
- Select Ubuntu as the operating system for your managed image, chose the standard runtime and select the ‘aws/codebuild/standard’ image with the latest version.
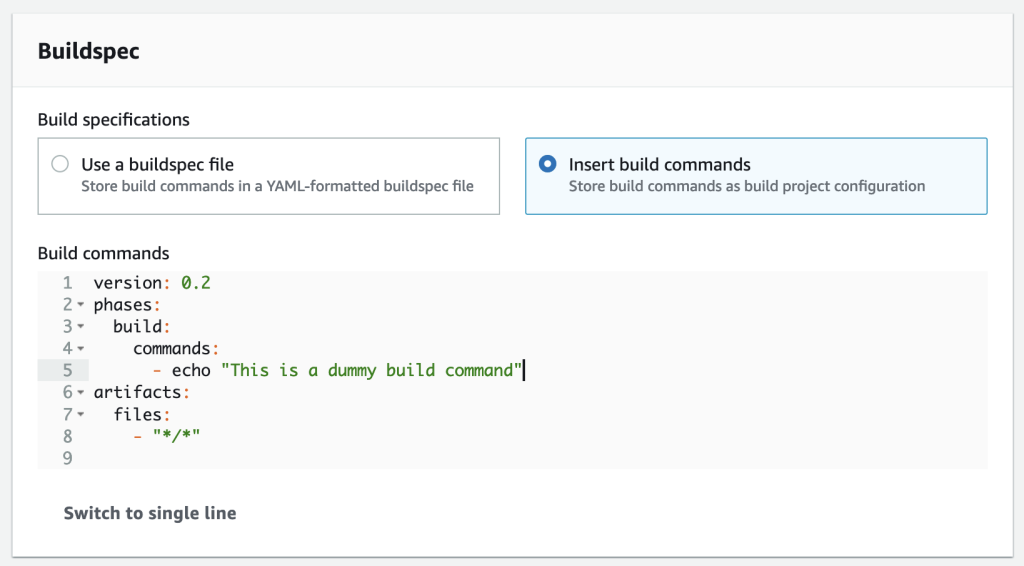
- In the Buildspec section select “Insert build commands” and click on switch to editor. Enter the following yaml code as your build commands:
version: 0.2
phases:
    build:
        commands:
            - echo "This is a dummy build command"
artifacts:
    files:
        - "*/*"
Note: you can also integrate build commands to your git repository by using a buildspec yaml file. More information can be found at Build specification reference for CodeBuild.
- Leave all other options as default and click on ‘Continue to CodePipeline’
- Back in the CodePipeline console your Project name will automatically be filled in. You can now continue to the next step.
- Click the “Skip deploy stage” button; We will create this in the next section.
- Review your changes and click “Create pipeline”. Your newly created pipeline will now build for the first time!

Configure AWS CodeDeploy on Azure and on-premises VMs
Now that we have built our application, we want to deploy it to both the environments – Azure, and on-premises. In the “Install CodeDeploy agent” section we’ve already installed the CodeDeploy agent. As a one-time step we now have to give the CodeDeploy agents access to the AWS environment. You can leverage AWS Identity and Access Management (IAM) Roles Anywhere in combination with the code-deploy-session-helper to give access to the AWS resources needed.
The IAM Role should at least have the AWSCodeDeployFullAccess AWS managed policy and Read only access to the CodePipeline S3 bucket in your account (called codepipeline-<region>-<account-id>) .
For more information on how to setup IAM Roles Anywhere please refer how to extend AWS IAM roles to workloads outside of AWS with IAM Roles Anywhere. Alternative ways to configure access can be found in the AWS CodeDeploy user guide. Follow the steps below for instances you want to configure.
- Configure your CodeDeploy agent as described in the user guide. Ensure the AWS Command Line Interface (CLI) is installed on your VM and execute the following command to register the instance with CodeDeploy.
aws deploy register-on-premises-instance --instance-name <name_for_your_instance> --iam-role-arn <arn_of_your_iam_role>
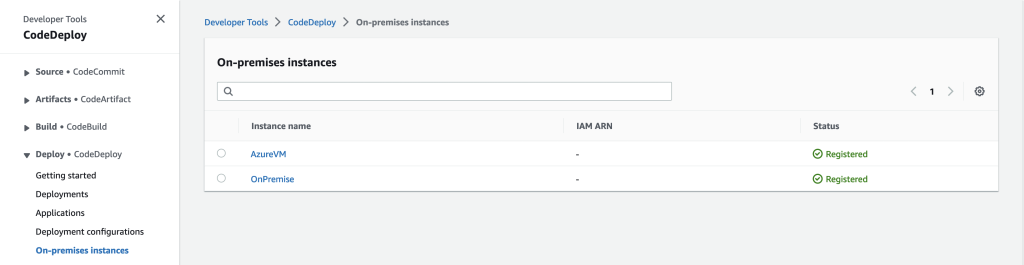
- Tag the instance as follows
aws deploy add-tags-to-on-premises-instances --instance-names <name_for_your_instance> --tags Key=Application,Value=MyWebApp - You should now see both instances registered in the “CodeDeploy > On-premises instances” panel. You can now deploy application to your Azure VM and on premises VMs!
Configure AWS CodeDeploy to deploy WebApp
Follow the steps mentioned below to modify the CI/CD pipeline to deploy the application to Azure, and on-premises environments.
- Create an IAM role named CodeDeployServiceRole and select CodeDeploy > CodeDeploy as your use case. IAM will automatically select the right policy for you. CodeDeploy will use this role to manage the deployments of your application.
- In the AWS console navigate to CodeDeploy > Applications. Click on “Create application”.
- Give your application a name and choose “EC2/On-premises” as the compute platform.
- Configure the instances we want to deploy to. In the detail view of your application click on “Create deployment group”.
- Give your deployment group a name and select the CodeDeployServiceRole.
- In the environment configuration section choose On-premises Instances.
- Configure the Application, MyWebApp key value pair.
- Disable load balancing and leave all other options default.
- Click on create deployment group. You should now see your newly created deployment group.

- We can now edit our pipeline to deploy to the newly created deployment group.
- Navigate to your previously created Pipeline in the CodePipeline section and click edit. Add the deploy stage by clicking on Add stage and name it Deploy. Aftewards click Add action.
- Name your action and choose CodeDeploy as your action provider.
- Select “BuildArtifact” as your input artifact and select your newly created application and deployment group.
- Click on Done and on Save in your pipeline to confirm the changes. You have now added the deploy step to your pipeline!

This completes the on-time devops pipeline setup, and you will not need to repeat the process.
Automated DevOps pipeline in action
This section demonstrates how the devops pipeline operates end-to-end, and automatically deploys application to Azure VM, and on-premises server when the application code changes.
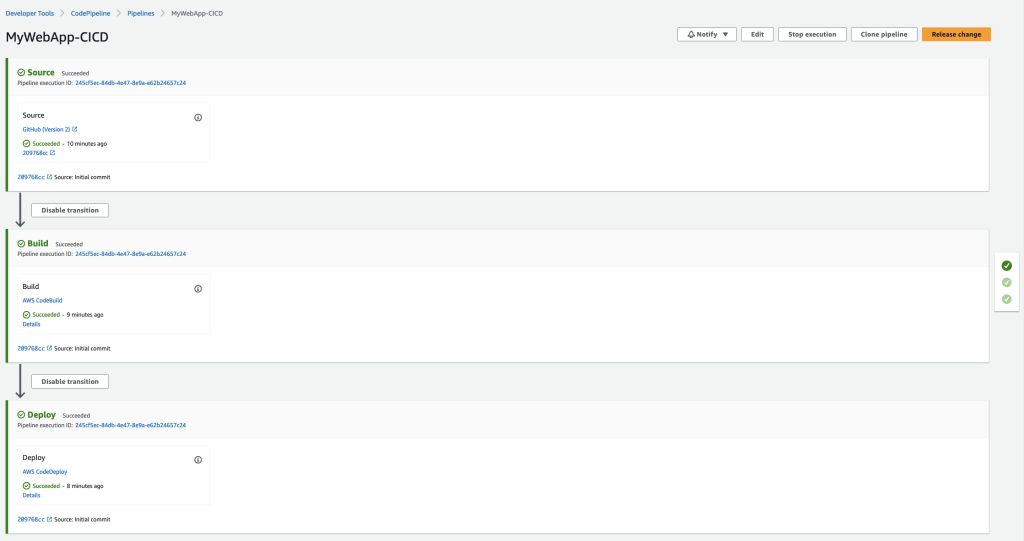
- Click on Release Change to deploy your application for the first time. The release change button manually triggers CodePipeline to update your code. In the next section we will make changes to the repository which triggers the pipeline automatically.
- During the “Source” stage your pipeline fetches the latest version from github.
- During the “Build” stage your pipeline uses CodeBuild to build your application and generate the deployment artifacts for your pipeline. It uses the buildspec.yml file to determine the build steps.
- During the “Deploy” stage your pipeline uses CodeDeploy to deploy the build artifacts to the configured Deployment group – Azure VM and on-premises VM. Navigate to the url of your application to see the results of the deployment process.

Update application code in IDE
You can modify the application code using your favorite IDE. In this example we will change the background color and a paragraph of the sample application.
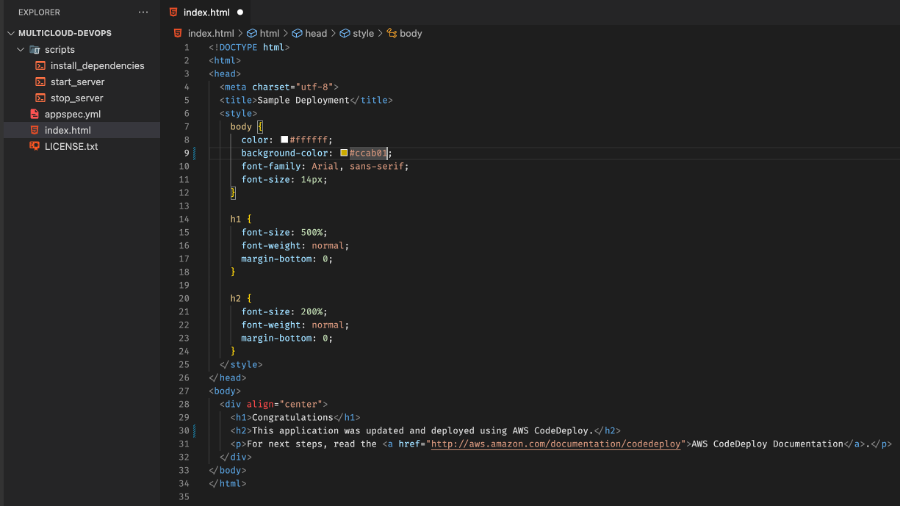
Once you’ve modified the code, save the updated file followed by pushing the code to the code repository.
git add .
git commit -m "I made changes to the index.html file "
git push
DevOps pipeline (CodePipeline) – compile, build, and test
Once the code is updated, and pushed to GitHub, the DevOps pipeline (CodePipeline) automatically compiles, builds and tests the modified application. You can navigate to your pipeline (CodePipeline) in the AWS Console, and should see the pipeline running (or has recently completed). CodePipeline automatically executes the Build and Deploy steps. In this case we’re not adding any complex logic, but based on your organization’s requirements you can add any build step, or integrate with other tools.
Deployment process using CodeDeploy
In this section, we describe how the modified application is deployed to the Azure, and on-premises VMs.
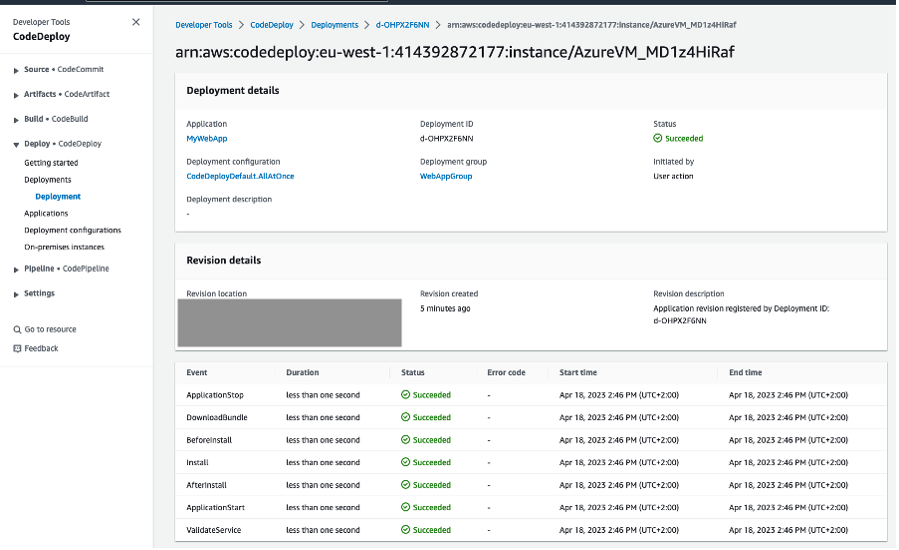
- Open your pipeline in the CodePipeline console, and click on the “AWS CodeDeploy” link in the Deploy step to navigate to your deployment group. Open the “Deployments” tab.

- Click on the first deployment in the Application deployment history section. This will show the details of your latest deployment.

- In the “Deployment lifecycle events” section click on one of the “View events” links. This shows you the lifecycle steps executed by CodeDeploy and will display the error log output if any of the steps have failed.
- Navigate back to your application. You should now see your changes in the application. You’ve successfully set up a multicloud DevOps pipeline!

Conclusion
In summary, the post demonstrated how AWS DevOps tools and services can help organizations build a single release pipeline to deploy applications and workloads in a hybrid and multicloud environment. The post also showed how to set up CI/CD pipeline to deploy applications to AWS, on-premises, and Azure VMs.
If you have any questions or feedback, leave them in the comments section.