IBM & Red Hat on AWS
Automate Observability for AWS with IBM Instana self-hosted
In today’s rapidly evolving IT landscape, IT Ops teams need to ensure optimal application performance of environments that are constantly changing. The rapid pace of innovation, adoption of development pipelines and complexity of modern application stacks, have made it challenging for IT teams to maintain comprehensive oversight of their application environments.
To address these challenges, organizations need observability solutions that are capable of delivering real-time, holistic views and insights of their applications, eliminating visibility gaps.
To address these requirements, automated observability tools like IBM Instana (Instana) are essential. By providing a comprehensive and contextual view of application performance data, solutions such as IBM Instana empower stakeholders to access the information, they need to keep all of their applications and the business running smoothly.
In this blog, we will explain how customers can implement a fully-automated observability solution, by running IBM Instana on their AWS accounts.
Real-time automated observability
IBM Instana is real-time automated observability for anyone and everyone. It automatically and continuously discovers and understands the most dynamic and complex application, with real-time change detection to keep up with high-velocity pipelines and helps all application stakeholders solve problems as quickly as possible, delivering quick time-to-value. Instana can monitor over 300 technologies out of the box including Amazon Elastic Kubernetes Service (EKS), Amazon Relational Database Service and Amazon Bedrock. Pricing is done by the number of monitored hosts and can be checked on Instana’s website.
Instana automates the entire monitoring lifecycle and includes built-in AI, discovering and mapping all applications and their infrastructure stacks, including cloud-native infrastructure pieces like EKS, Red Hat OpenShift Service on AWS and AWS Lambda. Instana collects data at 1 second granularity so that every distributed trace is captured, so teams can quickly solve any problem when it occurs and effectively manage rapid change.
Built-in machine learning automates health determination, predicts incidents and automatically remediates them.
In this blog post you will learn how to deploy IBM Instana self-hosted on AWS by using the provided AWS CloudFormation template.
Running self-hosted Instana on AWS
Architecture Overview
In this section you will see what components Instana needs to run on AWS and how they work together. In the following image you can see the architecture when running Instana self-hosted on AWS.
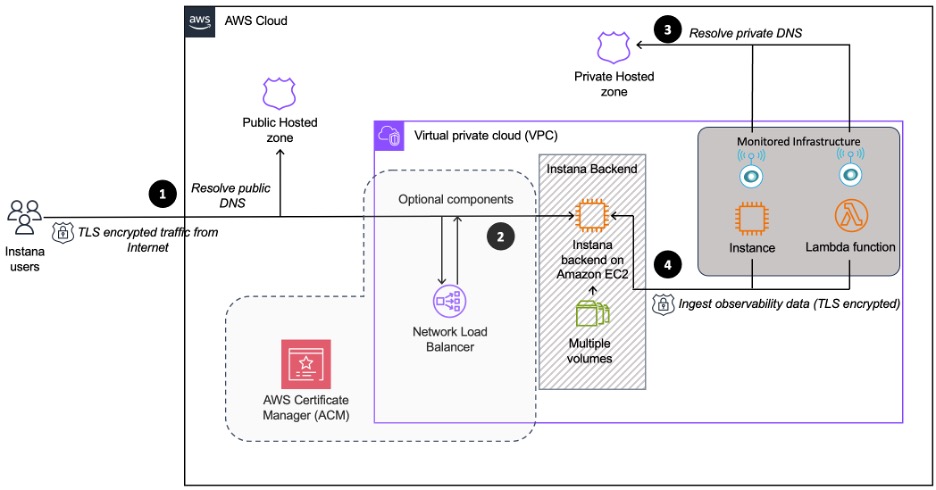
Figure 1. IBM Instana self-hosted architecture on AWS.
Let’s explore the individual components of the diagram:
- End-user dashboard access
An end-user accesses the Instana UI via HTTPS. The domain name is resolved via Amazon Route 53 hosted zone. Traffic is encrypted using TLS certificates, that are provided by the operator or AWS Certificate Manager (ACM). Certificates issued by ACM can only be used with a supported AWS services such as Amazon CloudFront, Elastic Load Balancing, Amazon API Gateway and others.
- Instana backend instance
By default, no load balancer is deployed with the AWS CloudFormation template. You can follow the instructions in this blog’s section how to add a public certificate from AWS Certificate Manager and Network Load Balancer, to do so yourself. The Instana backend instance uses several Amazon Elastic Block Store (EBS) volumes to store the data.
IBM Instana supports AWS Graviton processors that delivers up to 40% better price performance over comparable x86-based instances.
More information on this can be also found in the Instana documentation.
- Hosts reporting to Instana
Hosts report observability data like metrics, traces etc. to Instana. Hosts resolve the endpoint via a private hosted zone on Route53.
- Data ingestion
Data is ingested via HTTPS from hosts to the Instana backend server.
Pre-requisites
To run Instana self-hosted on AWS you need the following prerequisites:
- A valid Instana self-hosted license
- An AWS account
- AWS IAM permissions to create the required resources, including:
- Amazon EC2 instances
- AWS IAM roles
- Network Load Balancer and target groups
- AWS Certificate Manager (ACM) TLS certificates
Costs
You are responsible for the cost of the AWS services used when deploying the solution described in this blog, on your AWS account. For cost estimates, see the pricing pages for Amazon EC2, Elastic Load Balancer, AWS Certificate Manager Amazon Route 53 and Amazon VPC and any other services that you choose to use as part of your implementation. You can use the AWS Pricing Calculator to estimate your deployment costs.
Walkthrough
In this section you will deploy Instana self-hosted in your own AWS account. Click on the Launch Stack button to start the AWS CloudFormation stack creation.

Define a Stack name of your choice like instana-self-hosted. You will be asked to provide several parameters. A detailed description of each parameter is available on the IBM Instana documentation.
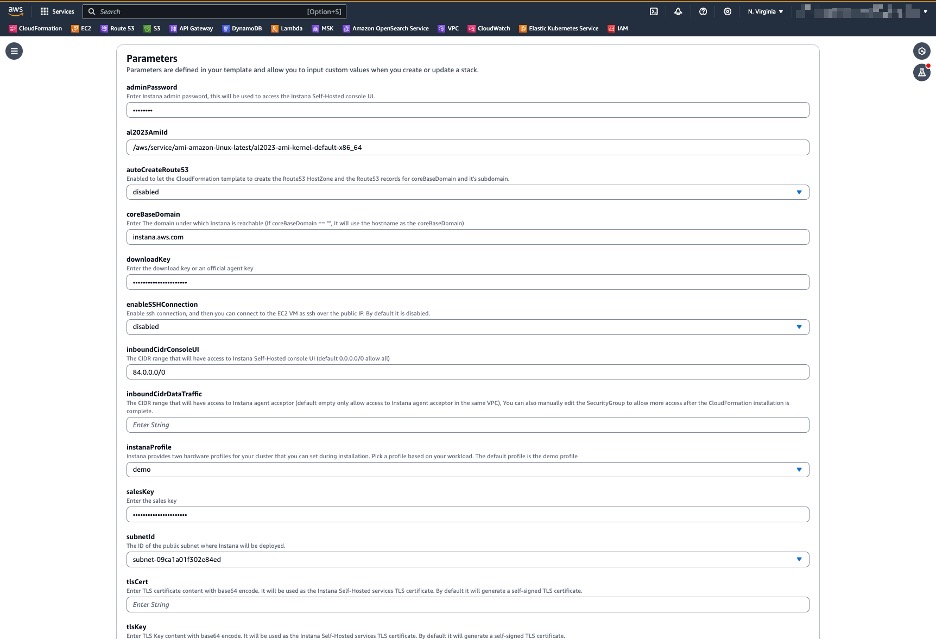
FIgure 2. AWS CloudFormation Template parameters for IBM Instana deployment.
Make sure that you use the salesKey and downloadKey from your Instana licence. You can optionally configure your own TLS certificate by pasting the values in the corresponding parameters. Make sure to select the vpcId for the correct Amazon Virtual Private Cloud (VPC) and the subnet (that is publicly reachable, if that’s how you want to access Instana). The deployment does not need SSH access but you can enable it via enableSSHConnection parameter. Make sure to set your adminPassword as shown in Figure2.
Optional: If you want to use a signed TLS certificate from AWS you need to set your coreBaseDomain. This can be set to something like instana.amazon.com. Later in the blog you will learn how to setup a TLS certificate for your domain with AWS Certificate Manager.
After you have provided the parameters confirm I acknowledge that AWS CloudFormation might create IAM resources and click Create Stack as shown in figure 3 below.
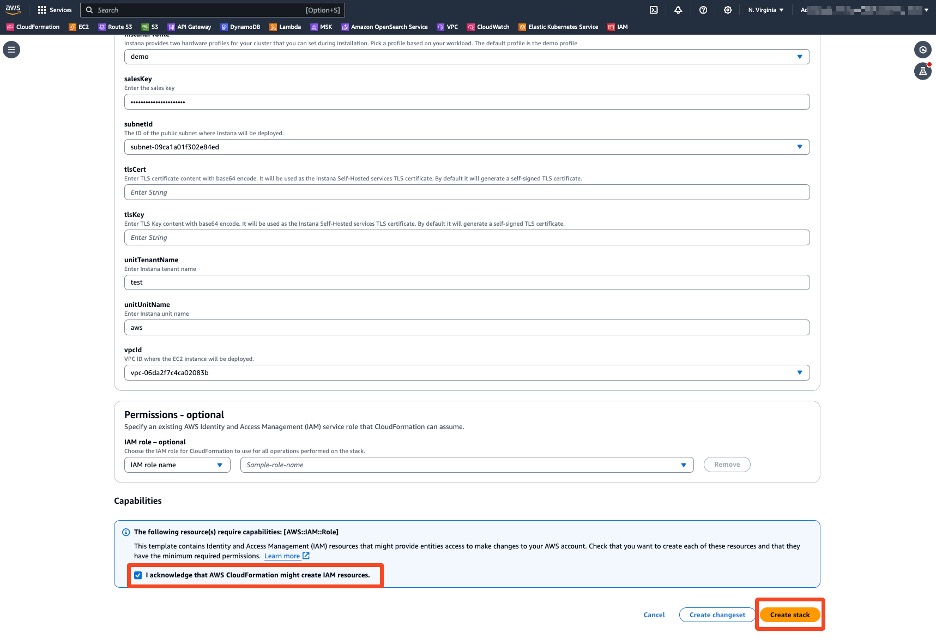
Figure 3. Create IBM Instana AWS CloudFormation stack.
The creation of the CloudFormation stack can take up to 20 minutes, which is shown in figure 4 below.
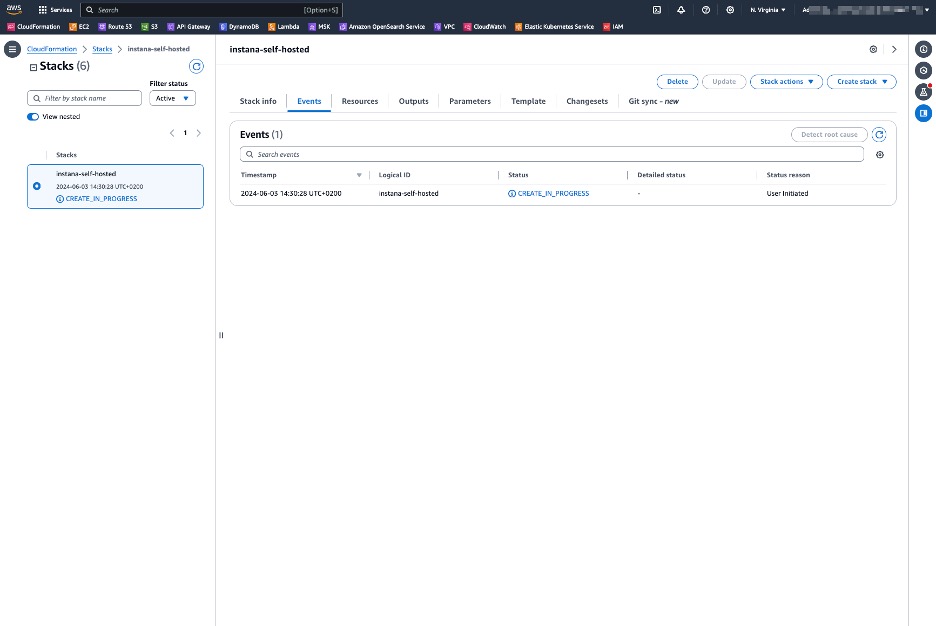
Figure 4. IBM Instana stack is being created.
In the Outputs tab of the CloudFormation stack you will find the InstanaSelfHostedUrl where you can access Instana, as shown in figure 5 below.
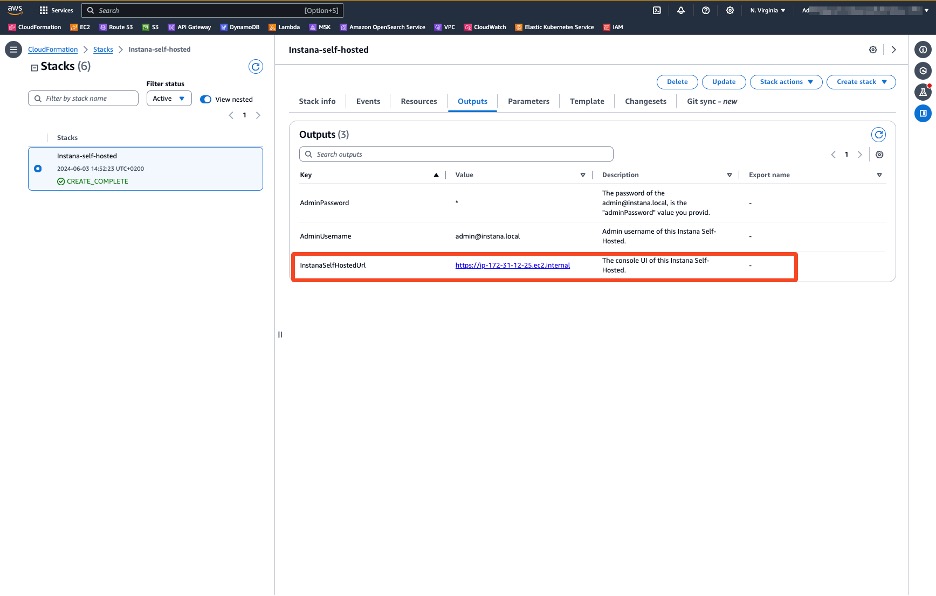
Figure 5. Copy the value of InstanaSelfHostedUrl from the AWS CloudFormation output section.
If you configured a coreBaseDomain you can now access it via HTTPS. If you did not define a domain during the deployment you need to modify /etc/hosts file as follows:
These steps will need to be done on your local machine (or whatever device you want to access the Instana UI from). Add the mapping of <PUBLIC_IP> <INTERNAL_HOSTNAME> to your file. Add a value for your coreBaseDomain and the unit-tenant and agent-acceptor subdomain. Your /etc/hosts file should look similar to the one shown in figure 6 below
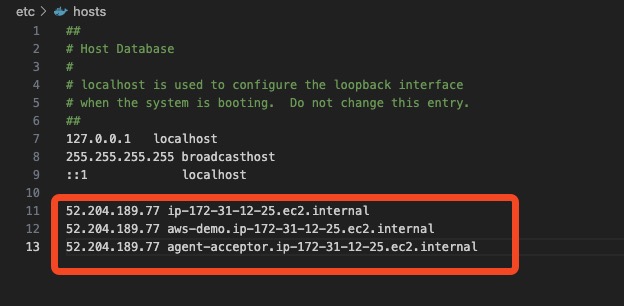
Figure 6. Host file configuration with the public IP and hostname to access IBM Instana.
After this you can access Instana by calling https://Private IP DNS name> in your browser. You might receive a warning because the Instana service is using a self-signed certificate. You can now sign in using the username admin@instana.local and the password you defined during the deployment. After logging in the Instana UI will show you instructions how to deploy the Instana agent in different environments, as shown in figure 7 below.
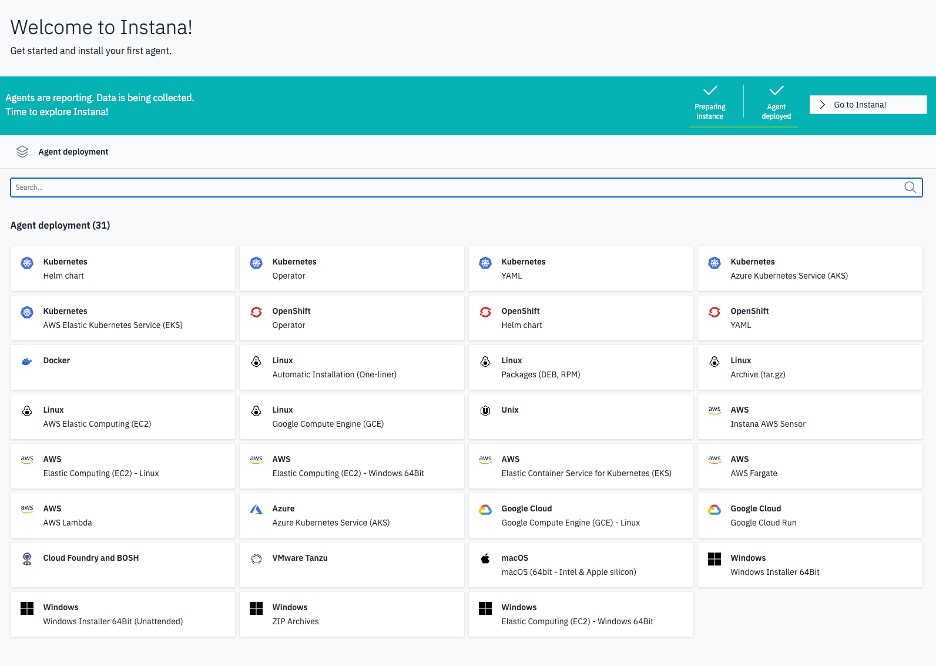
IBM Figure 7. Instana welcome screen.
Optional: Add a public certificate from AWS Certificate Manager and Network Load Balancer
If you don’t want to use a self-signed certificate you can use AWS Certificate Manager to provide a valid TLS certificate. In the following steps you will setup a Network Load Balancer that handles TLS termination from clients and then sends traffic to your previously deployed Instana backend on EC2. This will work with HTTP and HTTPS.
This requires that you have set the baseDomain parameter during CloudFormation deployment.
Follow the steps described in request a public certificate to request a certificate. Make sure its valid for the coreBaseDomain and *.coreBaseDomain fully qualified domain names (FQDNs) and validate them so the status says Success as seen in figure 8 below.
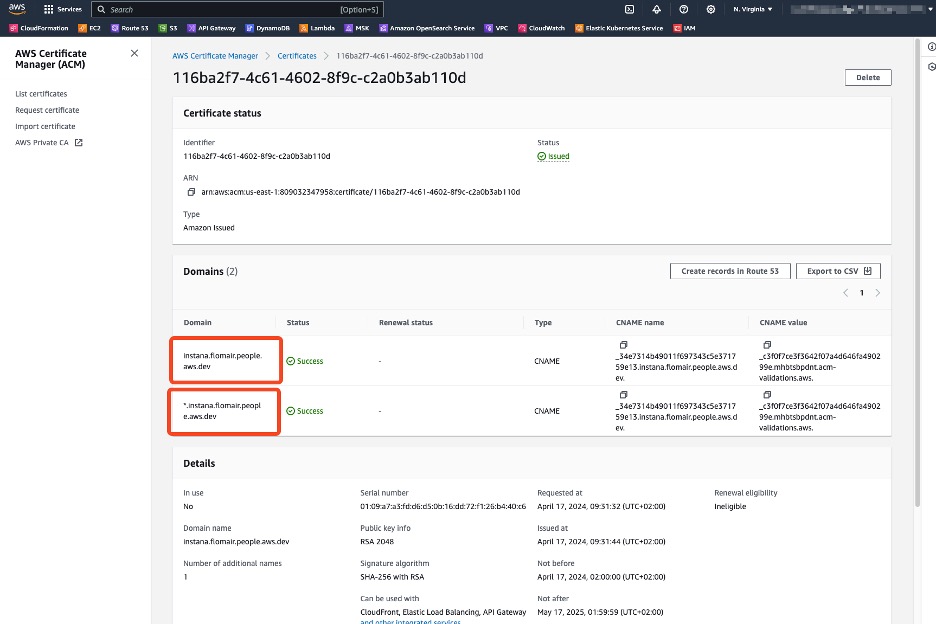
Figure 8. Valid AWS Certificate Manager certificates.
To use this certificate, you will use a Network Load Balancer. Before you can create the load balancer you will need a target group.
Create a target group
Navigate to the Amazon EC2 console and click on Target Groups and Create target group like shown in figure 9.
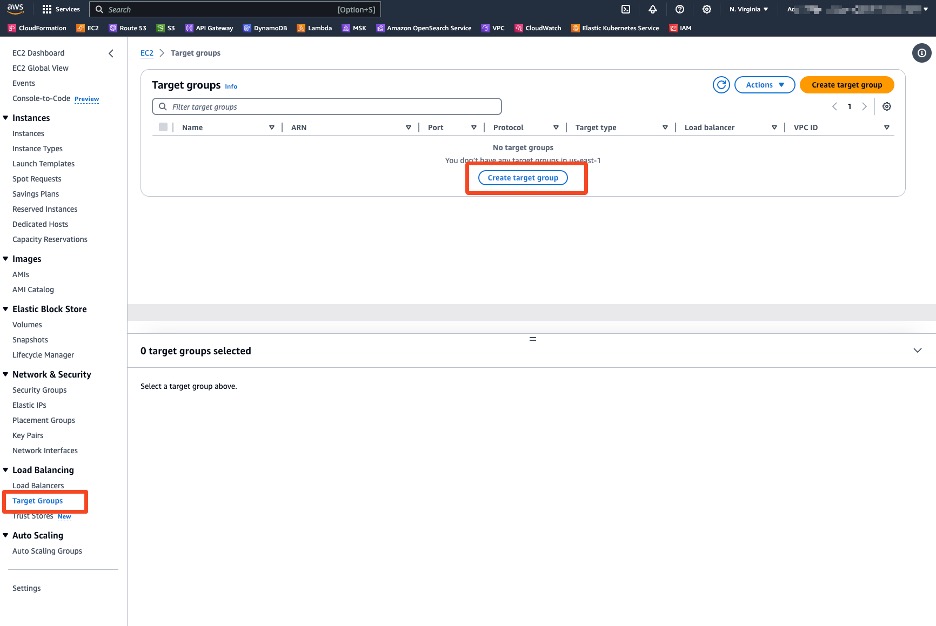
Figure 9. Create a new target group from the Amazon EC2 console.
If you don’t want to use HTTP skip this step and only create target groups for the other ports.
As target type choose Instances, and set the target group name to Instana. Choose protocol TCP and port 80. Choose the VPC you deployed the CloudFormation stack into and set the health check protocol to TCP and click Next. This is shown in figure 10.
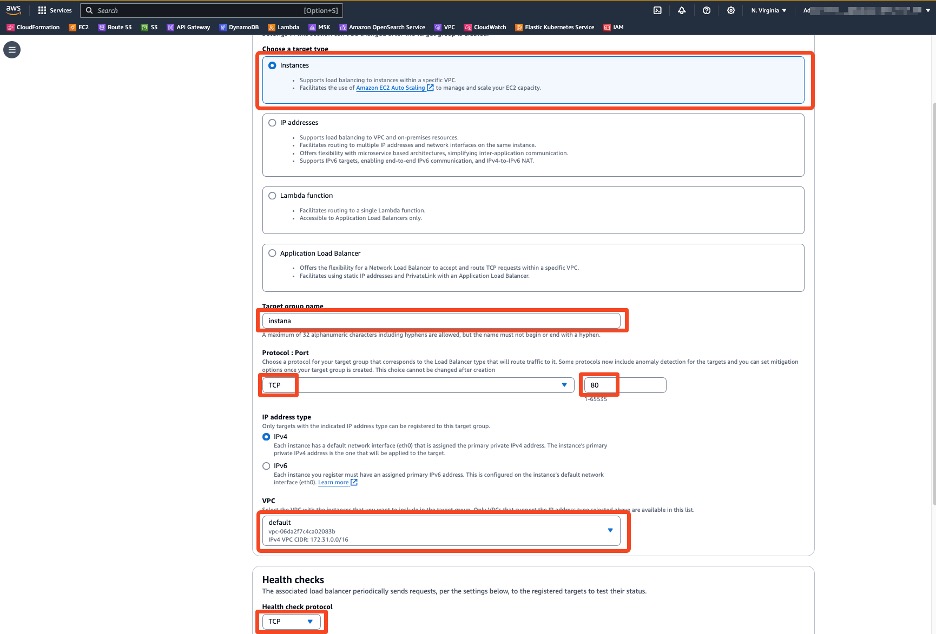
Figure 10. Configure the new target group to send traffic to the IBM Instana instances.
Next, select the instanaBackendHost instance and click Include as pending below, and click Create target group like in figure 11.
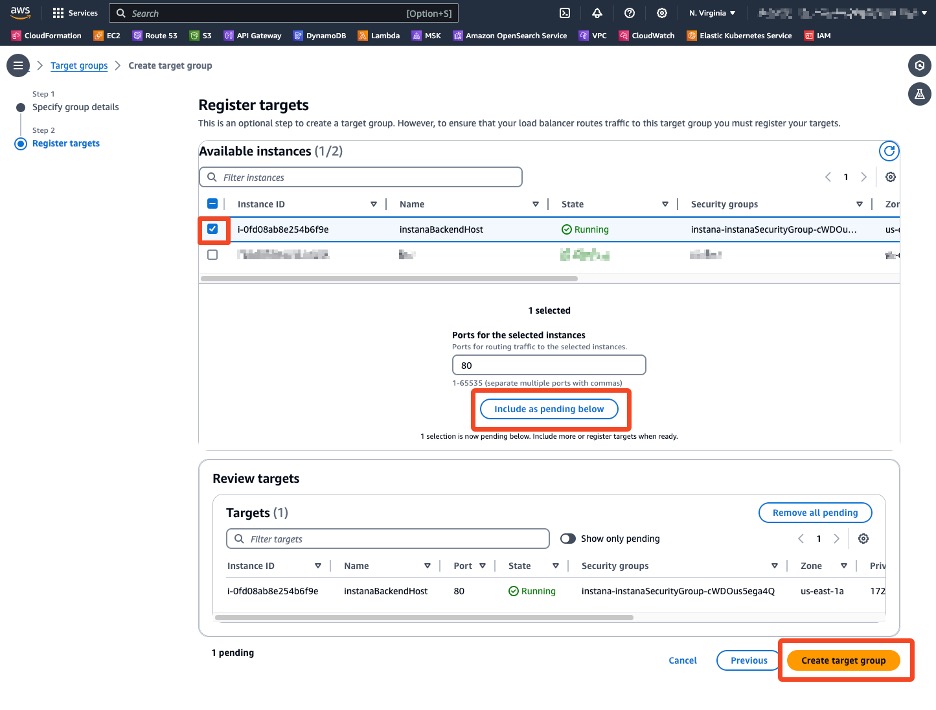
Figure 11. Register the IBM Instana backend instance(s) as targets for the new target group.
Repeat the steps to create 4 more target groups for the ports 443, 6433, 8433 and 10250 with the same configuration. Make sure to select the TLS protocol as shown in figure 12. You should now have a total of 5 target groups.
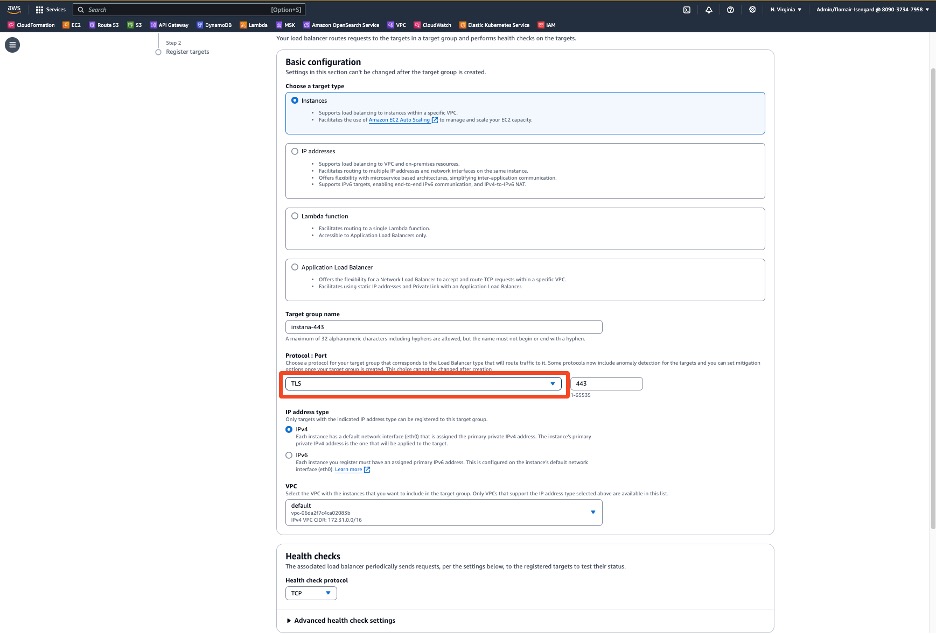
Figure 12. Create additional target groups for encrypted traffic with TLS protocol.
After you have created the target groups, create a network load balancer. Click on Load Balancers, Create Load Balancer and Create Network Load Balancer as shown in figure 13.
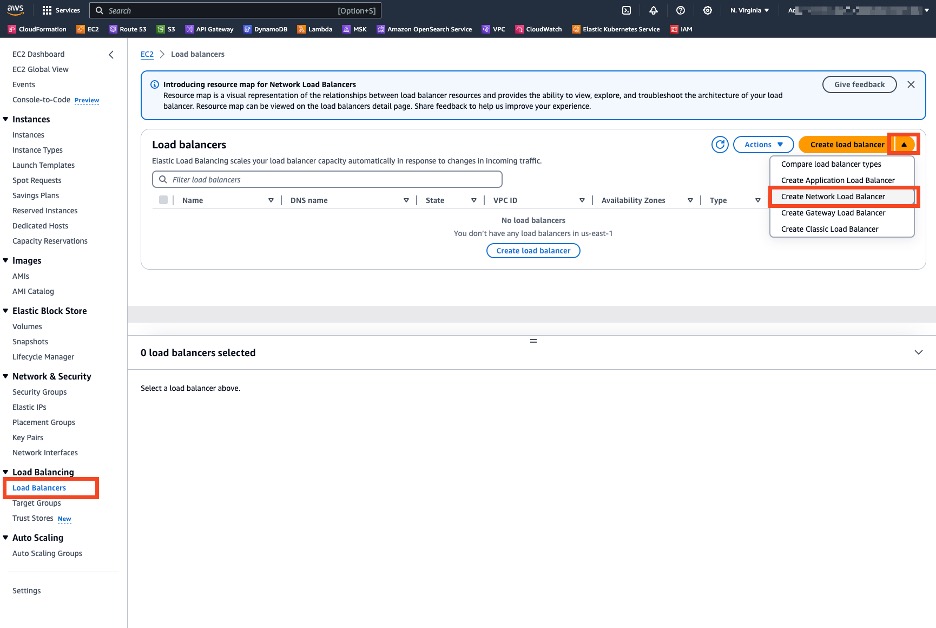
Figure 13. Create a Network Load Balancer from the Amazon EC2 console.
Set the load balancer name to Instana, select the VPC where you deployed Instana and the corresponding subnets as shown in figure 14. Make sure to select the instana-self-hosted-* Security Group. Otherwise, your EC2 instance will not accept traffic from the NLB.

Figure 14. Specify the Amazon VPC, subnets and security group to configure your internet facing Network Load Balancer.
Created listeners with Protocol TCP and the ports 80,443,6443,8443,10250 and assign the corresponding target group to each as shown in figure 15.
Select the created certificate and click Create load balancer.

Figure 15. Configure the Network Load Balancer Listeners with the Target Groups to forward traffic to and ACM certificate.
After the load balancer has been provisioned navigate to Amazon Route 53 console and click on Hosted zones. Click the public zone that CloudFormation has created and click Create Record as shown in figure 16.
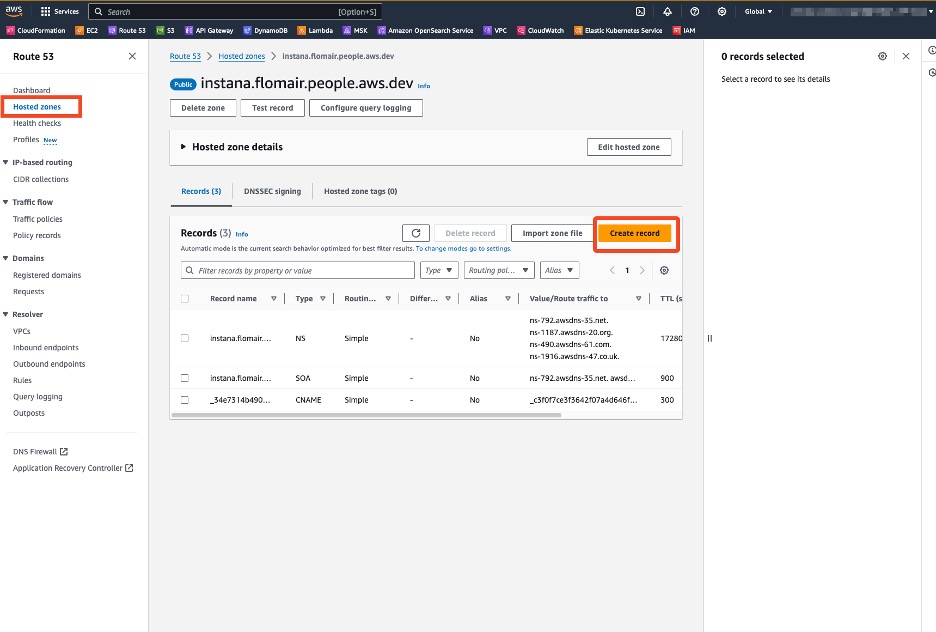
Figure 16. Create a new DNS public Hosted Zone.
Create an Alias record with Simple routing to route the traffic to your Network Load Balancer. Click on Define simple record and set configure the DNS record as shown in figure 17.
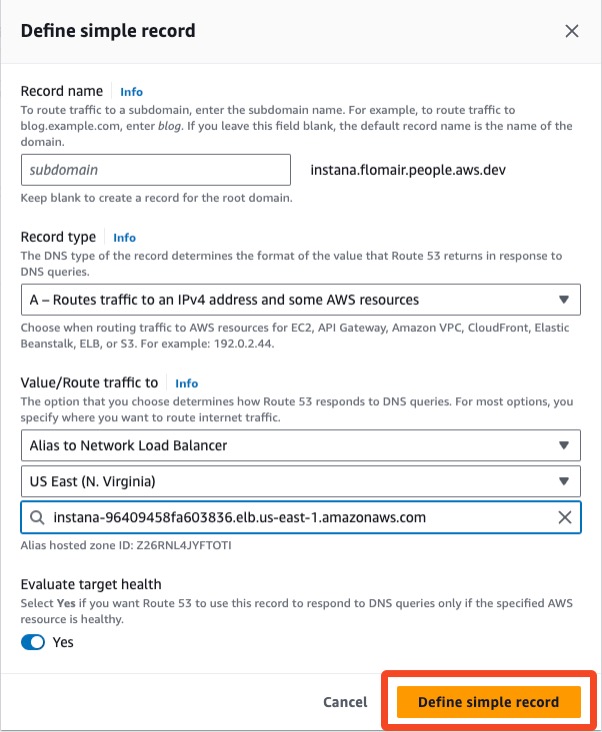
Figure 17. Create an Alias record with Simple routing to send traffic to your Network Load Balancer.
You can now access IBM Instana using your own domain and a signed TLS certificate.
Cleaning up
To delete created resources delete the entire CloudFormation stack via the console or the CLI. If you have followed the steps for creating an NLB complete the following steps beforehand:
- Delete the Amazon Route53 DNS entries (and Hosted Zone if you created one)
- Delete the Target Groups in the Amazon EC2 console
- Delete the Network Load Balancer in the Amazon EC2 console
- Delete the TLS certificate from the AWS Certificate Manager console
Summary
In this blog you learned how you can run IBM Instana in your own AWS account. This allows you to tailor the IBM Instana configuration to your needs and you can benefit from existing AWS savings like AWS Savings Plans or Amazon EC2 Reserved Instances.
Visit the AWS Marketplace to subscribed to the IBM Instana solutions on AWS:
- IBM Instana Observability
- IBM Instana Observability PayPerUse
- IBM Instana Observability Self-Hosted
- IBM on AWS Partner Page
- Try out IBM Instana today, on the IBM Instana product page
Further content:
- Realtime monitoring of microservices and cloud-native applications with IBM Instana SaaS on AWS
- What is IBM Instana
- Using IBM Instana for full stack observability on AWS
- To learn more about self-hosted Instana visit the IBM Instana documentation