Artificial Intelligence
Automate repetitive tasks with Amazon Quick Flows
Consider a typical Monday morning: you’re manually copying data from several different systems to create a weekly report, then formatting it for different stakeholders. This single task can consume several hours that could be spent on more strategic work. Multiply this across your team, and these repetitive tasks add up quickly.
Amazon Quick Flows automates these tasks using AI workflows. With Quick Flows, you create intelligent workflows using natural language—no coding or machine learning (ML) expertise required. You describe what you want automated, and Quick Flows builds it for you. This post shows you how to build your first AI-powered workflow, starting with a financial analysis tool and progressing to an advanced employee onboarding automation.
What is Amazon Quick Flows?
Amazon Quick Flows is part of Amazon Quick, a collection of AI-powered features that work together to help you analyze data, automate tasks, and get insights through natural language conversations. This post focuses specifically on Quick Flows for task automation.
With Quick Flows, you turn your everyday tasks into automated workflows for individual and team productivity. You create, customize, and share purpose-built AI workflows using your data, insights, and actions available within Amazon Quick.
Prerequisites
Before building your first flow, ensure that you have an active AWS account with Amazon Quick enabled with permissions to access Quick Flows. For setup instructions, see the Amazon Quick User Guide.
Note: Amazon Quick uses generative AI. The specific outputs, responses, and generated content might vary from the examples shown. These variations are normal and expected. Focus on understanding the concepts and benefits rather than matching exact outputs.
Build your first flow
In this example, you build a Financial Performance Analyzer that gathers real-time market data from the web, analyzes key metrics, and compiles a professional summary based on the information.
1. Navigate to Quick Flows
Open your browser, and log in to Quick. Then go to Quick Flows. The flow creation interface appears with a text area to describe your workflow and sample prompts to get you started.
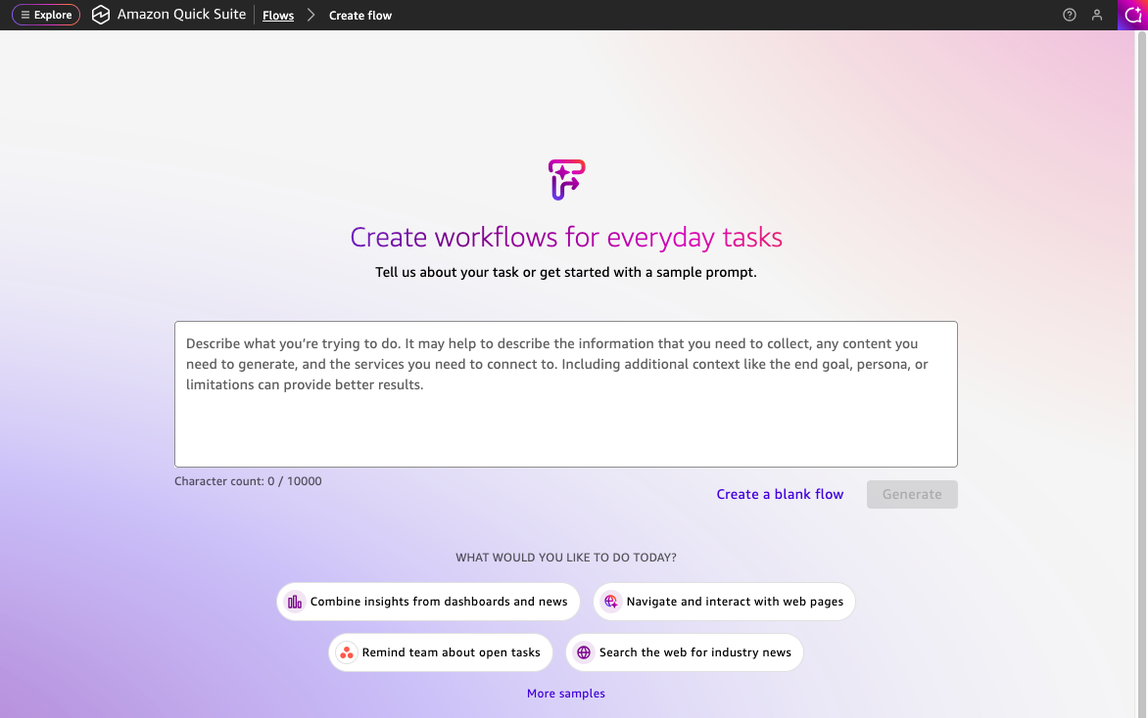
Figure 1: The Quick Flows creation interface where you describe your workflow in natural language
2. Enter your prompt
In the text area, enter the following prompt:
Create a flow that gathers comprehensive company financial research by designing a tool with four key components: (1) Real-Time Market Data gathering current stock prices and daily changes, (2) Financial Metrics Analysis retrieving key ratios like P/E, market cap, and revenue, (3) News Intelligence collecting recent financial headlines and market-moving events, and (4) Professional Analysis compiling analyst recommendations and ratings, each triggered by a company name or ticker symbol input.
Quick Flows now knows exactly what you want: a workflow that takes a company name as input and returns a complete financial picture.
Quick Tip: You can also create flows directly from your conversations with chat agents in Quick. If you’re already discussing a task or process with an agent, you can convert that conversation into a flow without starting from scratch.
3. Generate your flow
Select the Generate button. Quick Flows analyzes your prompt and maps your requirements to available capabilities. It identifies that it must gather data from web search, extract key financial metrics using AI analysis, and format the results into a structured report. The AI works through your requirements, identifies the specific steps needed, and assembles them into a connected flow.
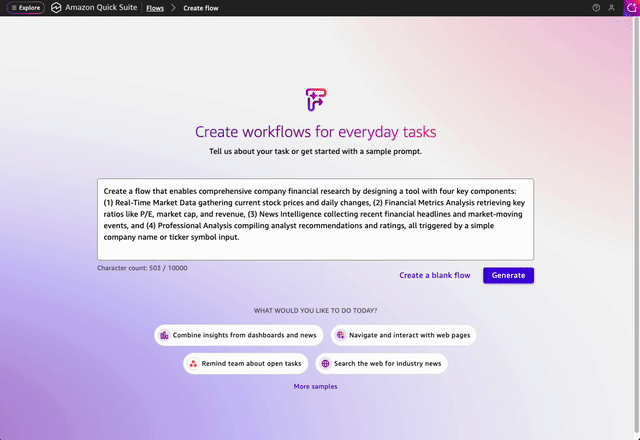
Figure 2: Quick Flows generating your workflow from the natural language prompt
4. Run your flow
After the generation completes, you can test your flow immediately. Enter a company name or ticker symbol (like Amazon or AMZN) and select Run. Watch as the flow executes each step in topological order, gathering market data, analyzing metrics, collecting news, and compiling the final analysis.
After reviewing the results, you can chat directly with the flow to refine the output. For example, you might ask it to focus on specific metrics, adjust the analysis depth, or format the results differently. The flow understands your requests and can modify its output accordingly.
5. Refine the flow in the editor
After your first run, go into the editor view to see how Quick Flows built your workflow from a single prompt. Each step is laid out visually, showing the connections between them and how data moves from your input through each component to the final output.
Your flow starts with a text input step where you enter a company name or ticker symbol.
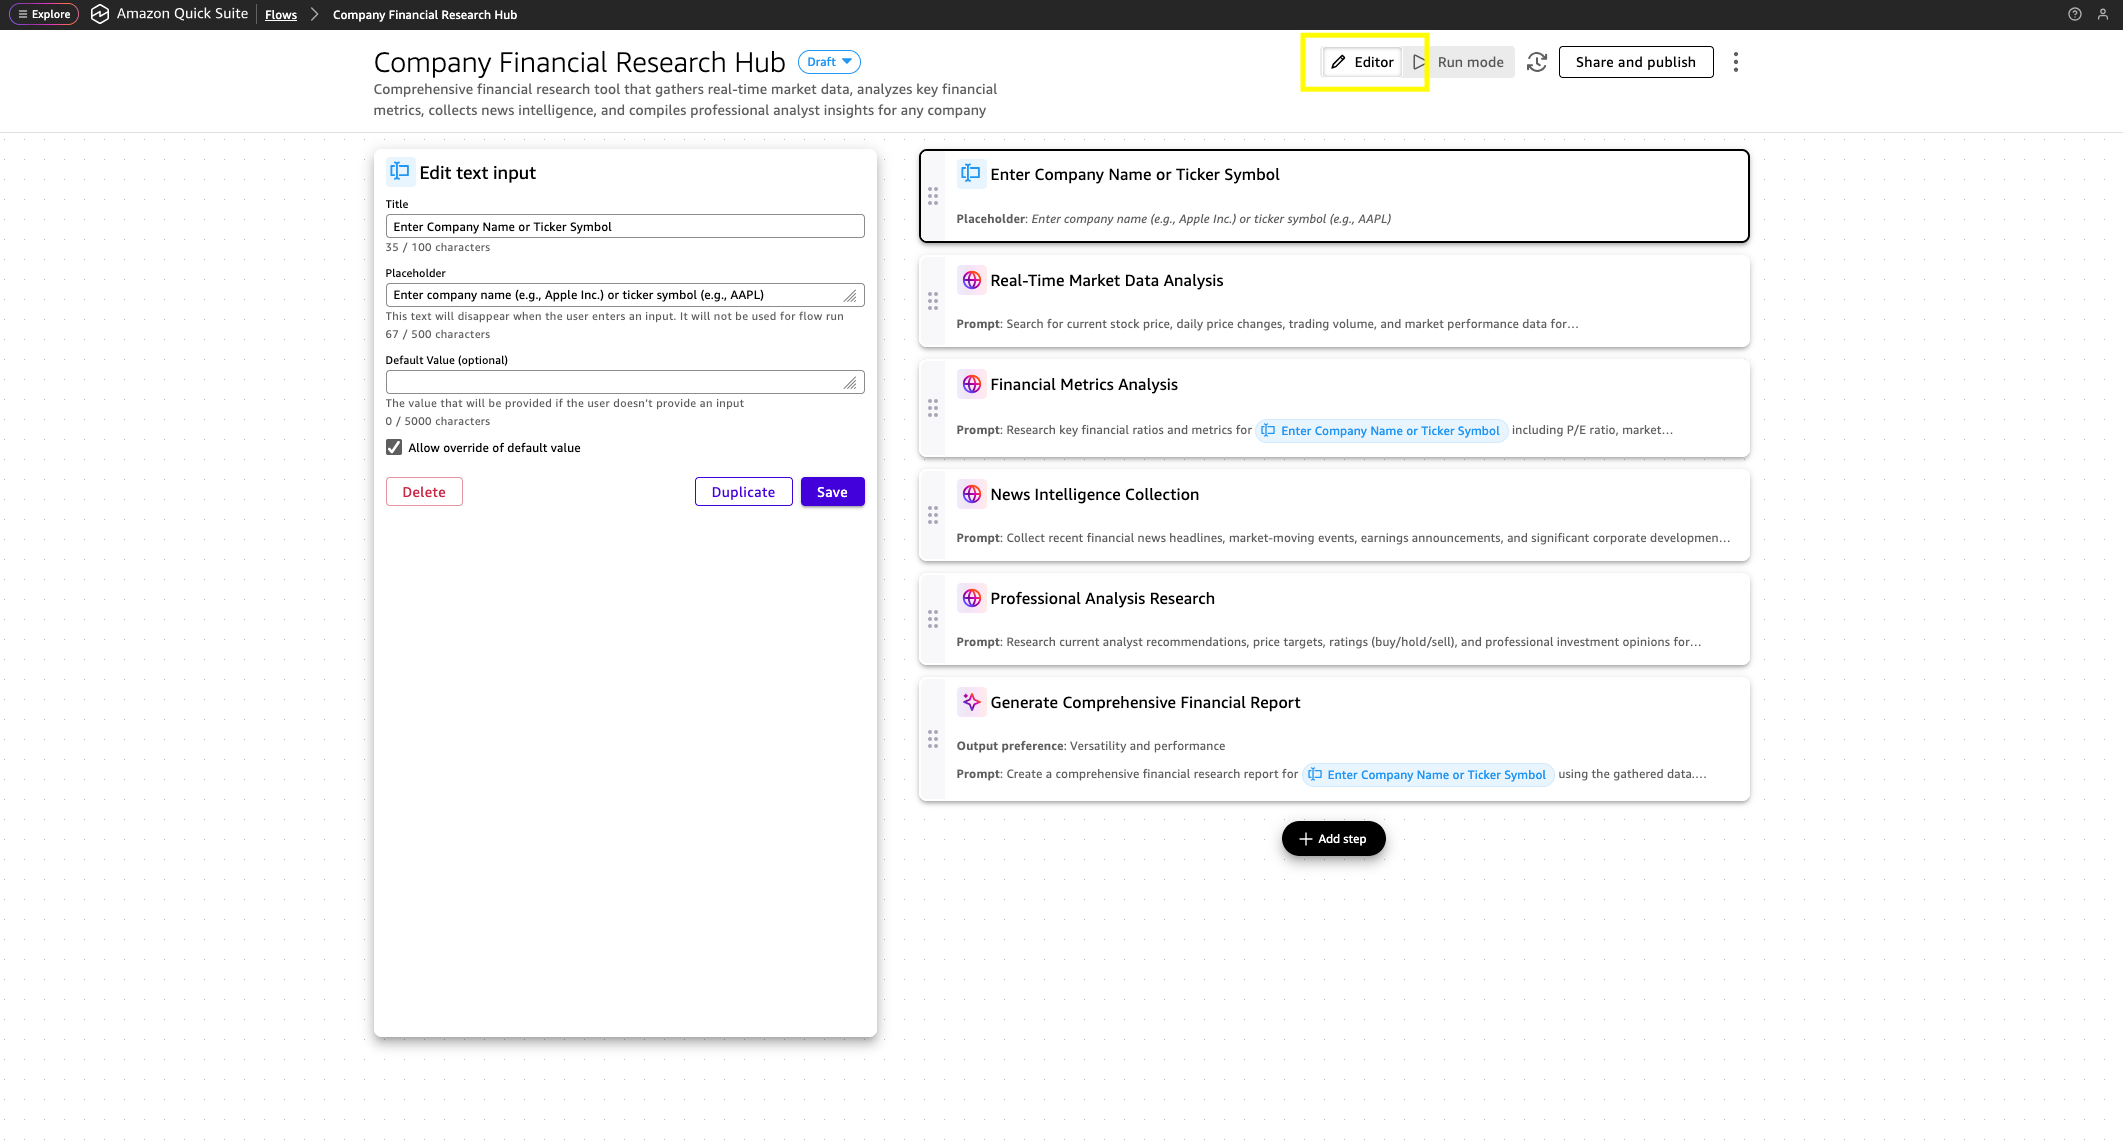
Figure 3: The Flow editor showing each step in the workflow with the input step selected.
Because this flow works with market data, Quick Flows automatically configured each research step with the built-in web search functionality of Quick. It gathers real-time information from the web rather than relying on static data.
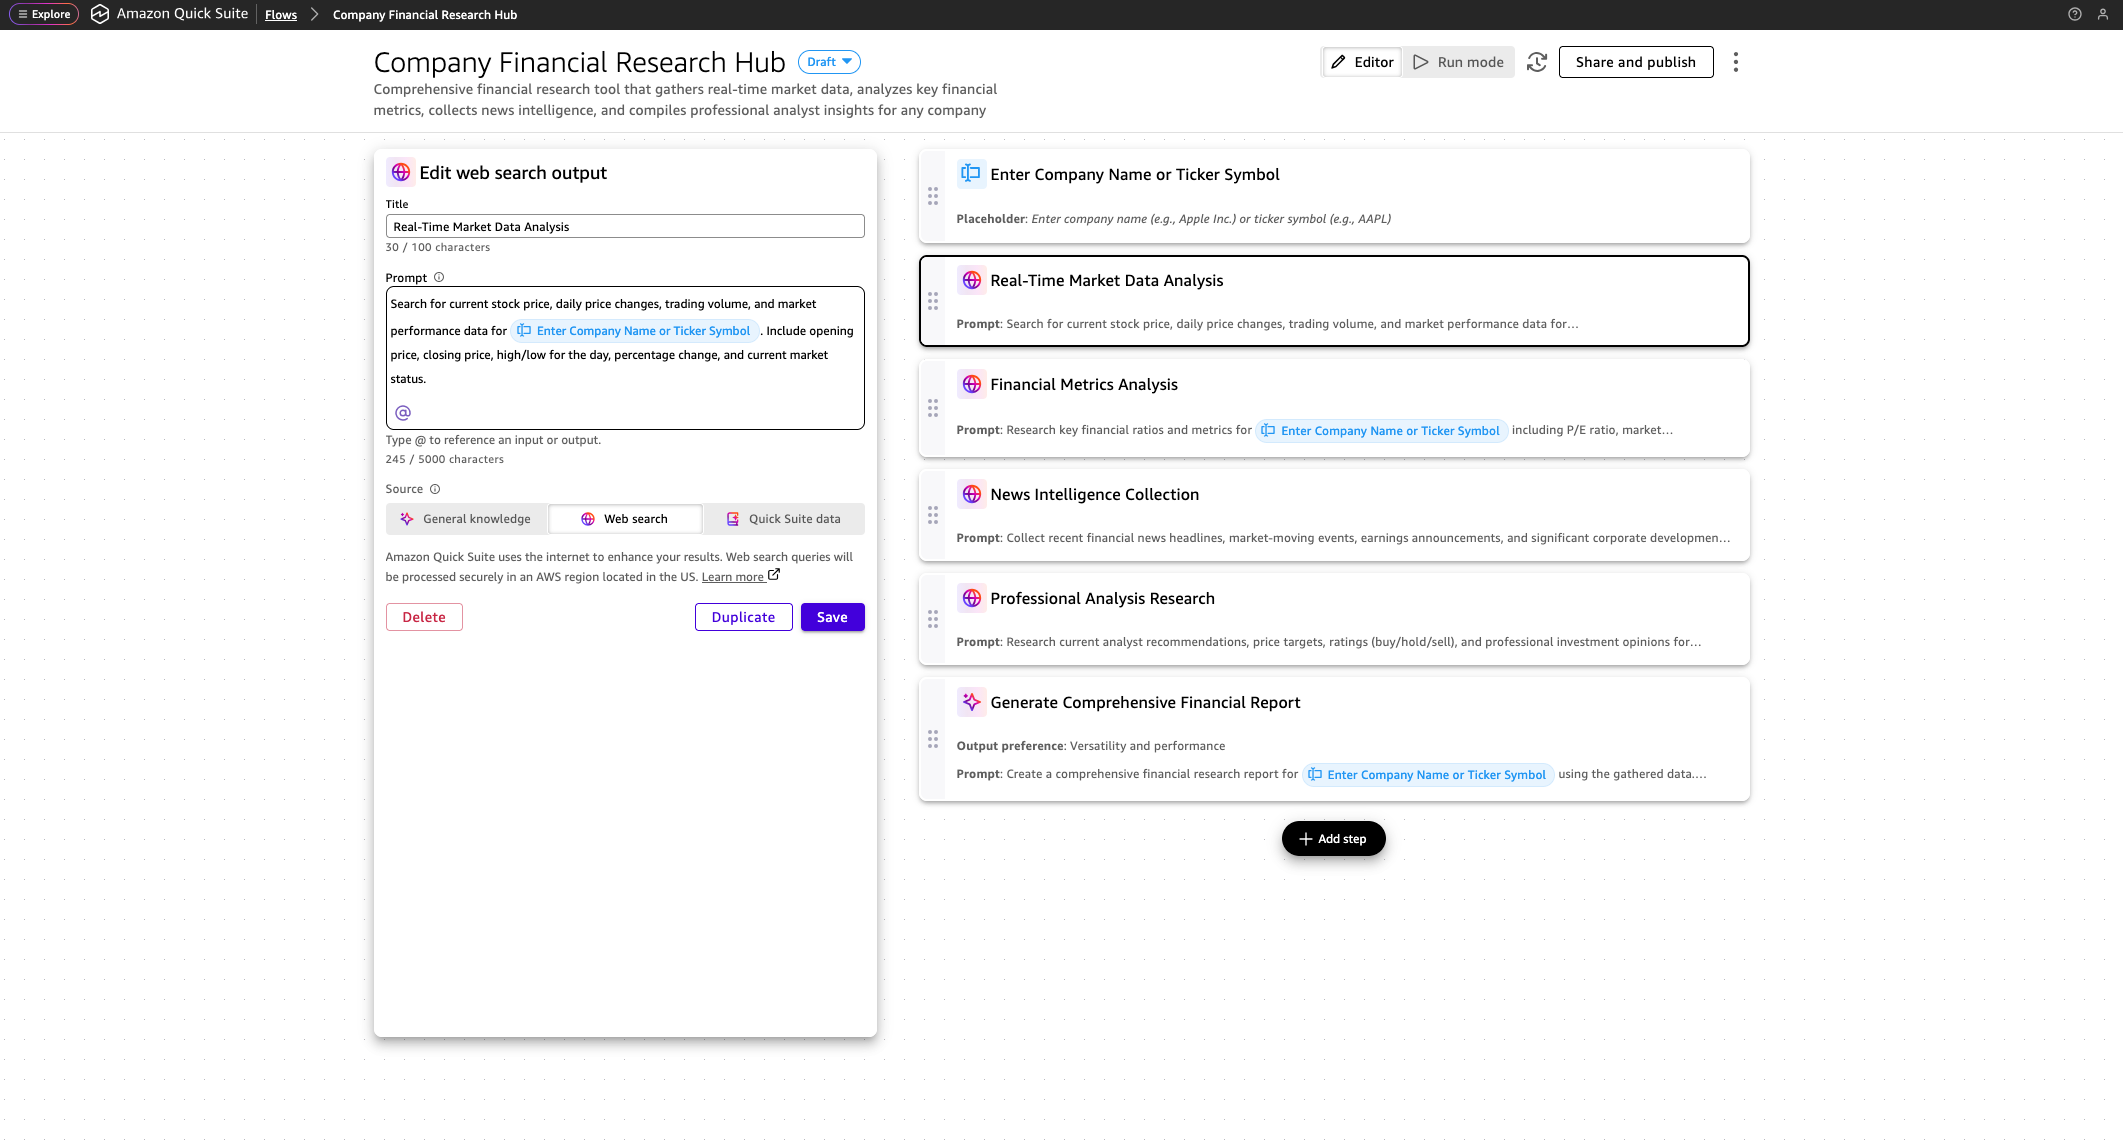
Figure 4: The Flow editor showing each step in the workflow with the web search step selected.
Different web searches gather relevant data that you requested based on the prompt for the step.
The final step uses a general knowledge step to synthesize everything that the flow gathered. It takes the market data, financial metrics, news headlines, and analyst ratings from previous steps and compiles a financial report.
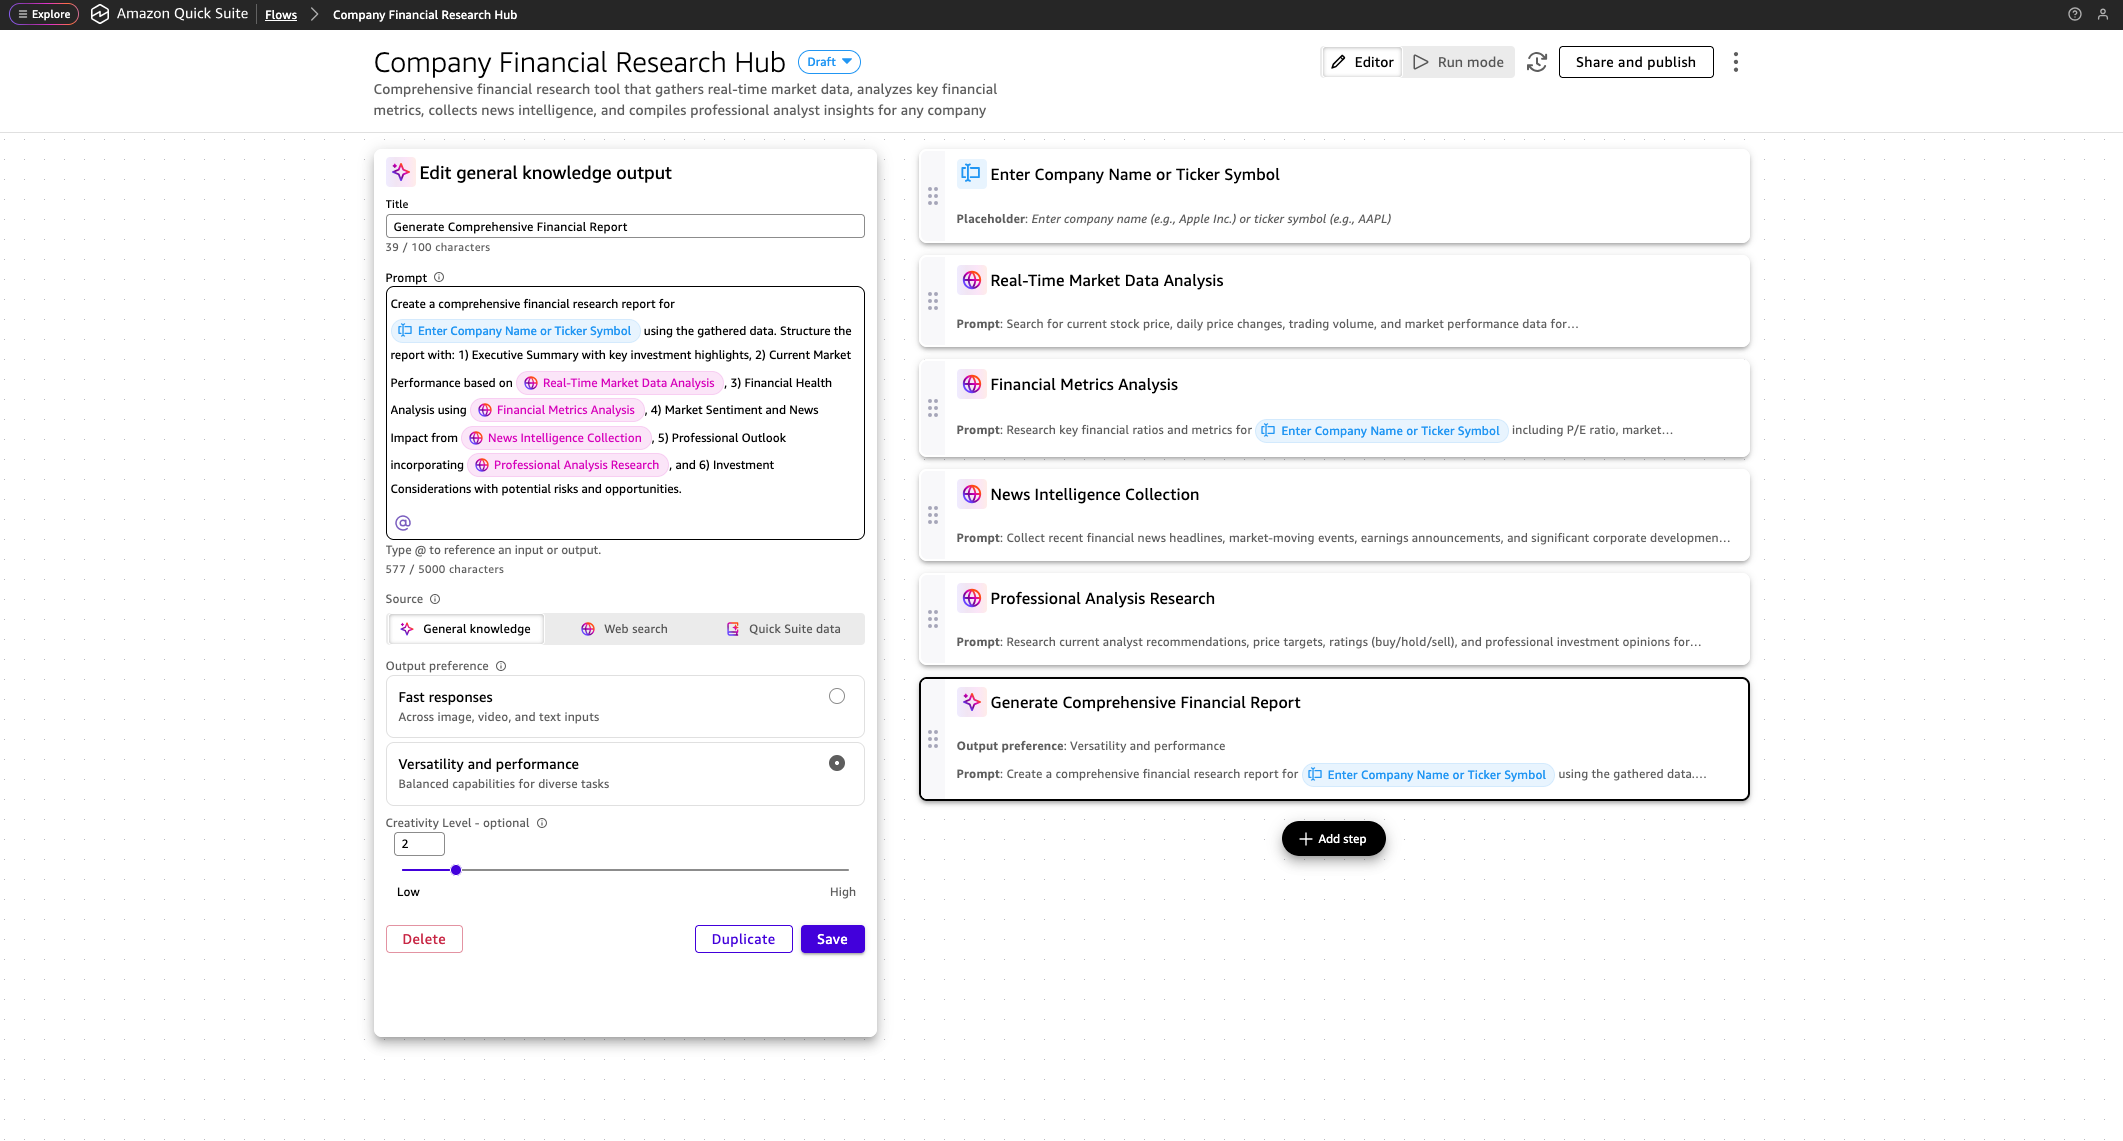
Figure 5: The Flow editor showing each step in the workflow with the general knowledge step selected.
From here, you can customize the flow to fit your needs. You can add a step to email the report to your team, post it to Slack, save it to a file in SharePoint, or export the output as a PDF or Microsoft Word document. Given this information changes over time, you might want to schedule your flow to run periodically.
Understanding key concepts
Now that you’ve built your first flow, here are the building blocks that you just used. A step is a discrete component that performs a specific function within a flow. Steps are the fundamental units that you chain together to create a complete flow.
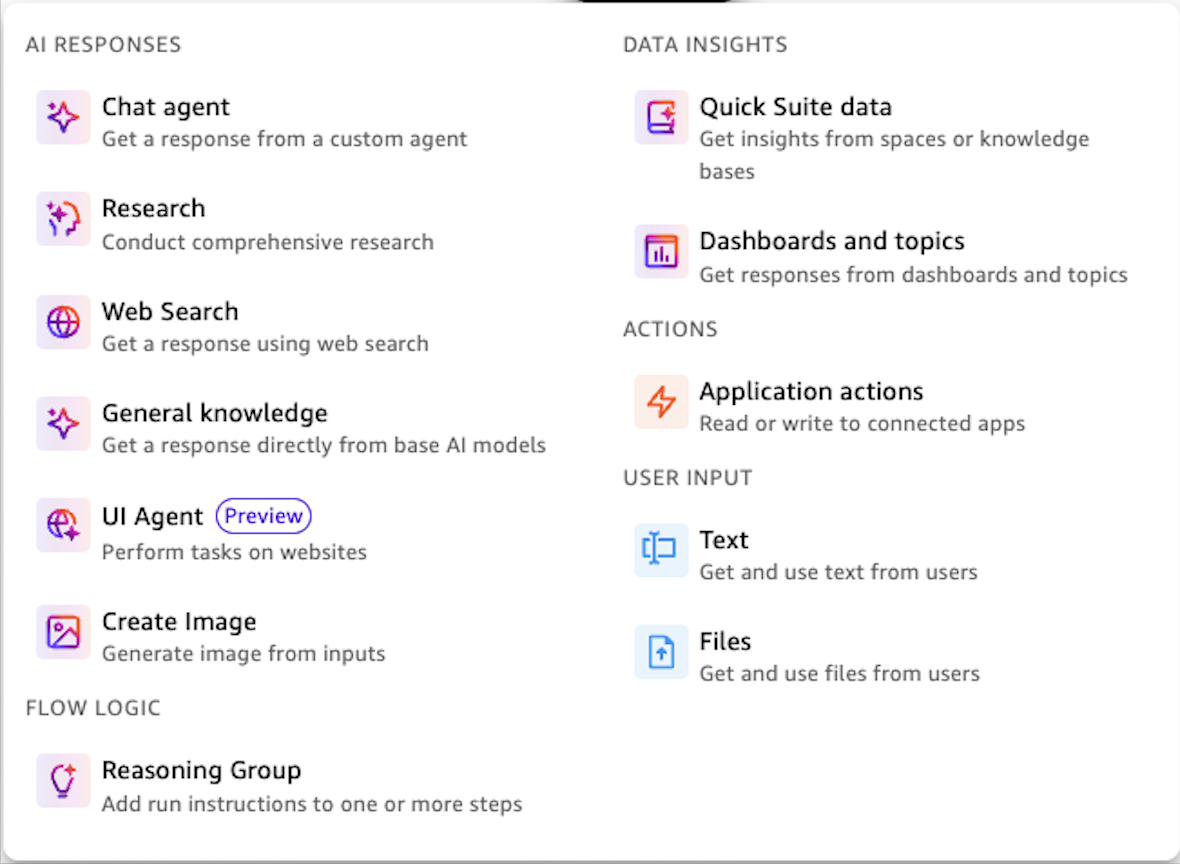
Figure 6: Quick Flows offers five categories of steps—AI responses, flow logic, data insights, actions, and user input—that you combine to build workflows.
Quick Flows organizes steps into five categories:
- AI responses generate outputs, create images from text, prompt custom agents, search the web, invoke Quick Research, and perform tasks on websites.
- Flow logic controls workflow execution with reasoning groups that define conditions, loops, or validations.
- Data insights retrieve information from your company data in spaces and knowledge bases or analytics from dashboards and topics.
- Actions perform read or write operations in connected external systems and applications through pre-built or custom integrations.
- User input gathers information from users through text fields or file uploads to initiate and provide context for your workflow.
Quick Flows works with your company data wherever it lives. You can connect spreadsheets and databases using Amazon Quick, document stores, such as SharePoint, OneDrive, Google Drive, or Amazon Simple Storage Service (Amazon S3) through integrations, and take action through purpose built or custom integrations.
Beyond the basics: Employee onboarding automation
Now that you’ve built your first flow and understand the fundamentals, it’s time to tackle a more complex scenario. This example demonstrates advanced capabilities like conditional logic and system integrations, showing how the same principles that you just learned can automate multi-step business processes. Imagine you’re a human resources (HR) specialist with three new employees joining this week. For each one, you must create employee records in your HR information system, write personalized welcome emails that reference company policies, and coordinate with information technology (IT) for badge creation, equipment ordering, and email setup. These manual tasks add up to hours each week that take you away from strategic priorities. The following example walks you through building a flow that automates these onboarding tasks.
Prerequisites for the employee onboarding example
This employee onboarding example demonstrates advanced Quick Flows capabilities. You can follow along conceptually right now to understand the approach with no setup required. For hands-on experience with this specific example, the following optional workshop setup instructions helps you build this in your own AWS account with simulated HR and IT systems. It will take approximately 30 minutes to complete.
If you want to build this flow in your own AWS account, complete the setup steps from the A Complete Guide to Amazon Quick workshop:
- First, deploy the workshop infrastructure by following the self-paced setup instructions. This creates the foundational AWS resources and simulated HR and IT systems that your flow will integrate with.
- Second, follow the instructions within the Flows module, including the prerequisite instructions.
After you complete these setup steps, you can build and execute the employee onboarding flow. The workshop provides sample employee data and step-by-step testing instructions, so you can see exactly how the automation works in practice.
Understanding the employee onboarding workflow
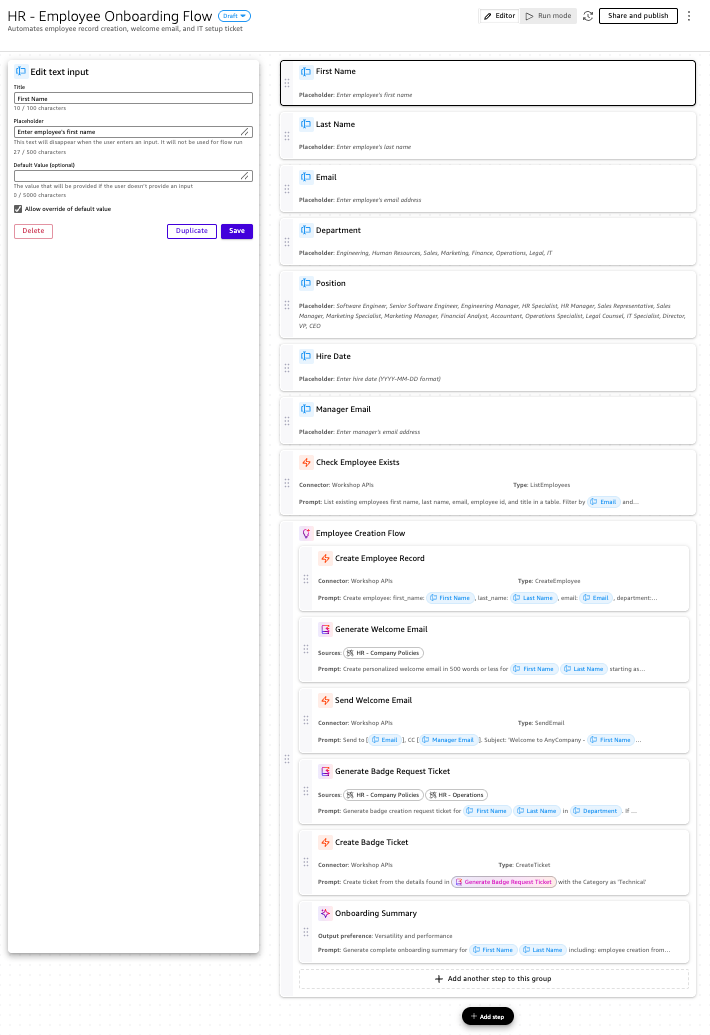
Figure 7: The employee onboarding workflow uses reasoning groups to create conditional logic, executing different steps based on whether an employee already exists in the system
The workflow represents the sequence of steps from input collection and data retrieval to executing actions. It begins by collecting employee information through text input fields (first name, last name, email address). Next, the flow calls the workshop’s employee information API using an action step. This step determines if the employee’s email address is registered in the system. A reasoning group in this flow works like an if-then statement in everyday logic. Think of it as a fork in the road: if the employee already exists, the workflow ends; if they don’t exist, the workflow continues and creates their records. In this flow, the reasoning group evaluates whether the email for the new employee was found in the previous step, creating two possible execution paths. If the employee exists, the workflow ends because the record has already been created. If the employee doesn’t exist, the flow executes six sequential steps within the reasoning group: create the employee record, generate a welcome email, send the welcome email, generate a badge request ticket, create the badge request ticket, and summarize the onboarding results.
Creating the employee onboarding flow with natural language
Next, create your flow using a natural language prompt. You can describe what you want your flow to do in natural language, and Amazon Quick Flows interprets your description and automatically creates the workflow for you.
Navigate to the flows in Amazon Quick and select Create Flow. In the flow creation interface, you see an option to describe your flow in natural language. Enter a prompt similar to the following example:
Create an employee onboarding flow that collects new hire information, checks if they already exist in our system, creates their employee record if they’re new, generates a personalized welcome email using our company policies, sends the email with their manager CC’d, creates IT tickets for badge and equipment setup, and provides a summary of all actions completed.
Note that this prompt is a simplified version of the actual prompt used in the workshop. For the complete, detailed prompt and manual step-by-step instructions, refer to the workshop’s automating daily tasks guide, which provides both the detailed natural language prompt and manual flow construction steps.
How to write effective prompts for Quick Flows
Your prompt should include four elements: what information to collect (“gather employee details”), what decisions to make (“check if they already exist”), what actions to take (“create employee record”), and what content to generate (“personalized welcome email”). Looking at the example prompt, you can see how different phrases map to workflow components. The phrase “Create an employee onboarding flow” states the goal. “Collects new hire information” signals that the flow must gather data from users, which translates to input steps. When you describe operations like “creates their employee record,” “sends the email,” and “creates IT tickets,” you’re describing actions that modify external systems. These become action steps that integrate with your Quick integrations. Phrases like “generates a personalized welcome email using our company policies” indicate that the flow must produce content by accessing organizational knowledge. These become output steps that connect to spaces, knowledge bases, dashboards, or topics. Branching logic emerges from language like “checks if they already exist” and “if they’re new.” These phrases suggest conditional logic, prompting Quick Flows to add reasoning groups that determine if steps should execute or how many times.
Understanding the building blocks
Your flow consists of four main groups of components that work together to create the automation.
Input components are where your flow gathers the information that it needs to operate. In the employee onboarding example, these are text input steps that collect employee details like first name, last name, and email address.
Logic components control flow decisions or branches. The reasoning group step uses natural language to define when and how other steps should run. In the onboarding flow, the reasoning group contains the instruction “Run if @Email is not found in @Check Employee Exists results.” This alleviates duplicate employee creation by controlling the logic of the workflow.
AI response and data insights components produce content and responses using your underlying data. The flow includes steps that prepare personalized welcome emails by combining employee information stored within a space.
Action components connect your flow to external systems and perform actions in real time. In the onboarding flow, these steps create employee records in HR systems, send emails through your organization’s email service, and generate tickets in IT systems. Each action step specifies what system to connect to, what operation to perform, and the data required to call those systems.
Each step in your workflow creates a variable—a labeled container that holds information for other parts of your flow. Variables are important because they let you pass information between steps. For example, when someone enters “John Doe” in the First Name field, that information becomes available as “@First Name” throughout your entire workflow. Without variables, each step would operate in isolation, unable to use data from previous steps. Variables serve as the connective tissue that lets information flow from one step to another. In the following image from the “Create Employee Record” step from the workflow created previously, notice the blue highlighted text in the prompt. These are variables referenced from other steps. The prompt is written as follows: “Create employee: first_name: @First Name, last_name: @Last Name, email: @Email …”, where the referenced variables are used as input to the “CreateEmployee” API.
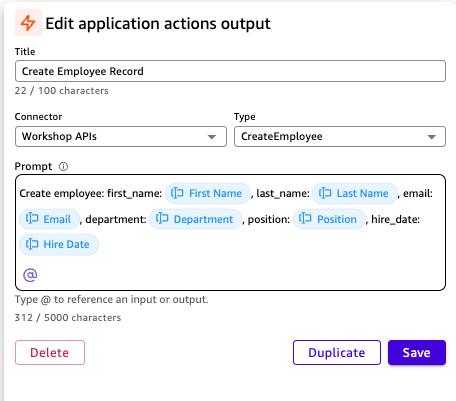
Figure 8: The “Create Employee Record” step within the employee onboarding flow showing how variables from previous steps are referenced using the @ symbol.
Quick tips when building your automations
Now that you have a solid foundation for Amazon Quick Flows, you’re ready to begin automating your tasks. Here are some tips to help you get started when building flows.
Tip 1: Test your prompts first. Before building a flow, test your prompt with the chat assistant. For example, if you want to automate report generation, first ask: “How do I extract data from a dashboard and format it as a weekly report?” This helps you refine your approach before building the flow. The chat assistant has built-in knowledge on the product itself. For example, you can ask “What is Quick Flows and how do I get started?”
Tip 2: Start small with your data. Begin with a smaller dataset. You can start with a space with fewer resources or files. Quick has a limit to the size of data that it can fit within its context window. For example, imagine you have a list of emails and you must respond to each one. You might initially want to operate over all emails at once, but if you use the reasoning group step looping functionality, you can operate over one email at a time. This breaks down the problem into smaller pieces. Refer to the documentation for flows limits.
Tip 3: Write an effective one-shot prompt. Flows is an orchestration service that uses the underlying capabilities of Quick. Writing an effective one-shot prompt will help support the success of your use case. Conversely, you can ask Quick to improve your prompt. To learn more on prompting, read through the prompting best practices module in the Amazon Quick workshop.
Tip 4: Ask about action integrations. When working with action integrations, you don’t need to be an expert to understand the APIs or how to work with them in natural language. For example, if you’re using the Microsoft Outlook integration, you can ask the chat assistant how to work with it. Your prompt might look like the following: “What action do I use to send an email for the Microsoft Outlook connector and what parameters does that action have?” This will outline the appropriate action and the parameters (input) used for that connector.
Tip 5: Map out your workflow. Understand the task that you’re trying to automate, the data involved, what actions must be executed, and in what order. Try writing down or drawing each step of your workflow.
Tip 6: Get help from a chat agent. You can ask a chat agent to help design and build your flows. An example can be found within the Amazon Quick workshop.
Clean up resources
To avoid incurring charges for resources you’re no longer using, complete the following cleanup steps. Amazon Quick charges are based on usage, so removing unused flows and scheduled runs helps keep costs down.
Delete the flows that you created for testing by navigating to the flows list and selecting Delete. If you completed the workshop, follow the cleanup instructions in the workshop guide to remove the deployed infrastructure. Cancel scheduled flow runs by editing the flow and removing the schedule.
Conclusion
In this post, you built two AI-powered workflows using Amazon Quick Flows. You also learned how to use natural language prompts to generate workflows, how Quick Flows building blocks work, and how to customize flows for your specific needs. With Amazon Quick Flows, you turn repetitive work into intelligent, AI-powered automations using natural language. You combine data collection, content generation, and system integration to reduce time spent on manual tasks—no coding required. Here are your next steps:
- Log in to Amazon Quick and create your first flow using one of the sample prompts.
- Complete the Amazon Quick workshop to get hands on experience.
- Identify a repetitive task in your daily work and describe it in natural language. Quick Flows can likely automate it.
To learn more, join the Amazon Quick Community to ask questions and find learning resources or events.