Artificial Intelligence
Build Strands Agents with SageMaker AI models and MLflow
Enterprises building AI agents often require more than what managed foundation model (FM) services can provide. They need precise control over performance tuning, cost optimization at scale, compliance and data residency, model selection, and networking configurations that integrate with existing security architectures. Amazon SageMaker AI endpoints align with these requirements by giving organizations control over compute resources, scaling behavior, and infrastructure placement, while benefiting from the managed operational layer of AWS. These models that are deployed by SageMaker AI, can power AI agents, handle conversational workloads, and integrate with orchestration frameworks like the FMs that are available on Amazon Bedrock. The difference is that the organization retains architectural control over how and where inference happens.
In this post, we demonstrate how to build AI agents using Strands Agents SDK with models deployed on SageMaker AI endpoints. You will learn how to deploy foundation models from SageMaker JumpStart, integrate them with Strands Agents, and establish production-grade observability using SageMaker Serverless MLflow for agent tracing. We also cover how to implement A/B testing across multiple model variants and evaluate agent performance using MLflow metrics and show how you can build, deploy, and continuously improve AI agents on infrastructure you control.
Strands Agents SDK is an open source SDK that takes a model-driven approach to building and running AI agents in only a few lines of code. Strands scales from simple to complex agent use cases, and from local development to deployment in production.
Amazon SageMaker JumpStart is a machine learning (ML) hub that can help you accelerate your ML journey. With SageMaker JumpStart, you can evaluate, compare, and select FMs quickly based on predefined quality and responsibility metrics to perform tasks, like article summarization and image generation.
SageMaker AI MLflow is a managed capability that streamlines the machine learning lifecycle through experiment tracking, model versioning, and deployment management.
In this post we:
- Deploy models on SageMaker AI – Deploy foundation models from SageMaker JumpStart.
- Integrate Strands with SageMaker AI – Use deployed SageMaker AI models with Strands Agents.
- Set up Agent Observability – Configure SageMaker AI MLflow App for agent tracing.
- Implement A/B Testing with evaluation – Deploy multiple model variants and evaluate agent with MLflow metrics.
A Jupyter notebook with complete code to use with this post can be found in the GitHub repo.
Building your first Strands Agent
Strands agents put together a model, a system prompt, and a set of tools to build a simple AI agent. Strands offers many model providers, including Amazon SageMaker AI. It also provides many commonly used tools as part of strands-agent-tools SDK, so organizations can quickly build AI agents for their business needs.
The following code snippet shows how to create your first agent using the Strands Agents SDK. A detailed sample of agents built using Strands Agents SDK can be found in the GitHub repo.
This agent uses Claude 4.5 Sonnet multi-Region inference model on Amazon Bedrock. A list of available inference profiles can be found in the Amazon Bedrock User Guide.
Amazon Bedrock gives you a choice of models. The model ID for available models can be found in the Amazon Bedrock User Guide.
Why use models deployed on SageMaker AI?
Organizations can consider deploying foundation models on SageMaker AI for the following reasons.
- Infrastructure Control – SageMaker AI provides control over compute instances, networking configurations, and scaling policies. This is crucial for organizations with strict latency SLAs or specific hardware requirements.
- Model Flexibility – SageMaker AI enables deployment of different models, whether it’s a custom architecture, fine-tuned variant, or open-source alternative like Llama or Mistral.
- Cost Predictability – The SageMaker AI dedicated endpoints enable precise cost forecasting and optimization through reserved instances, spot pricing, and right-sized compute resources. This can be especially beneficial for high-volume workloads.
- Advanced MLOps – The SageMaker AI integration with MLflow model registry, and A/B testing capabilities provides enterprise-grade model governance that many organizations require for production AI systems.
Building a Strands Agent with SageMaker AI models
The Strands Agents SDK implements a SageMaker AI provider, so you can run agents against models deployed on SageMaker AI inference endpoints. This includes both pre-trained models from SageMaker JumpStart and custom fine-tuned models. The model that you use with Strands Agents SDK should support OpenAI compatible chat completions APIs.In this post, we see how Qwen3 4B and Qwen3 8B models available on SageMaker AI JumpStart are used with Strands Agents.
Prerequisites
To execute the code from this post you must have the following:
- An AWS Account with access to Amazon Bedrock and Amazon SageMaker AI.
- A role with access to SageMaker AI, Amazon Bedrock models, SageMaker AI Serverless MLflow, Amazon Simple Storage Service (Amazon S3), and Amazon SageMaker AI JumpStart. You can use trust policy to assume that role.
- A Jupyter notebook running locally on your desktop or on SageMaker AI Studio. When running locally, make sure that you authenticate into your AWS Account and assume the role that has the required permissions.
Step 1: Install required packages
First, we install the required Python packages in our environment.
Step 2: Deploy model as SageMaker AI endpoint
Now that the packages are available, we use SageMaker JumpStart API to deploy Qwen3-4B model as a SageMaker AI endpoint.
Step 3: Use with Strands agent
With the model deployed, we create a SageMakerAIModel and use it with Strands Agents.
from strands.models.sagemaker import SageMakerAIModel
from strands import Agent, tool
from strands_tools import http_request, calculator

model_sagemaker = SageMakerAIModel(
    endpoint_config={
        "endpoint_name": ENDPOINT_NAME,
        "region_name": region
    },
    payload_config={
        "max_tokens": 2048,
        "temperature": 0.2,
        "stream": True,
    }
)

# Test the agent
agent = Agent(model=model_sagemaker, tools=[http_request])
agent("Where is the international space station now? (Use: <a href="http://api.open-notify.org/iss-now.json" target="_blank" rel="noopener noreferrer">http://api.open-notify.org/iss-now.json</a>")
For more information about SageMaker AI as a Model Provider for Strands Agents, see Amazon SageMaker on the Strands Agent website.
Using SageMaker AI Serverless MLflow App for Agent Observability
SageMaker AI Serverless MLflow helps provide comprehensive observability for AI agents by automatically capturing execution traces, tool usage patterns, and decision-making workflows without requiring custom instrumentation. The managed service helps reduce operational overhead while offering native integration with Strands Agents SDK. This enables the tracking of agent conversation flows. With this centralized observability service, teams can monitor agent behavior across multiple deployments, identify performance bottlenecks, and maintain audit trails for compliance requirements.
Step 1: Setting up SageMaker AI Serverless MLflow App
The first step of setting observability for your AI agent is to set up a MLflow App. You have two primary options for deployment:
- using the intuitive SageMaker AI Studio UI for quick setup with guided configuration
- using Boto3 for programmatic deployment that enables automation and infrastructure-as-code practices.
Both approaches create a Serverless MLflow App, so you can focus on building and monitoring your Strands Agents rather than managing the underlying observability infrastructure.In this post, we use the Boto3 SDK to deploy a MLflow App.
Step 2: Set up MLflow App for Strands Agent tracing
Now that you’ve created an MLflow App, you enable automatic logging for Strands Agents so that the agent interactions, tool usage, and performance metrics are automatically captured and sent to the MLflow App without requiring manual instrumentation.
Step 3: Run the agent
With MLflow App setup and auto logging enabled, you’re now ready to invoke our Strands Agent exactly like you did at the beginning.
Traces and metrics will be available on your MLflow App that can be accessed using the signed URL constructed using information from mlflow_app_details and AWS Region variables.
Step 4: Review traces in MLflow
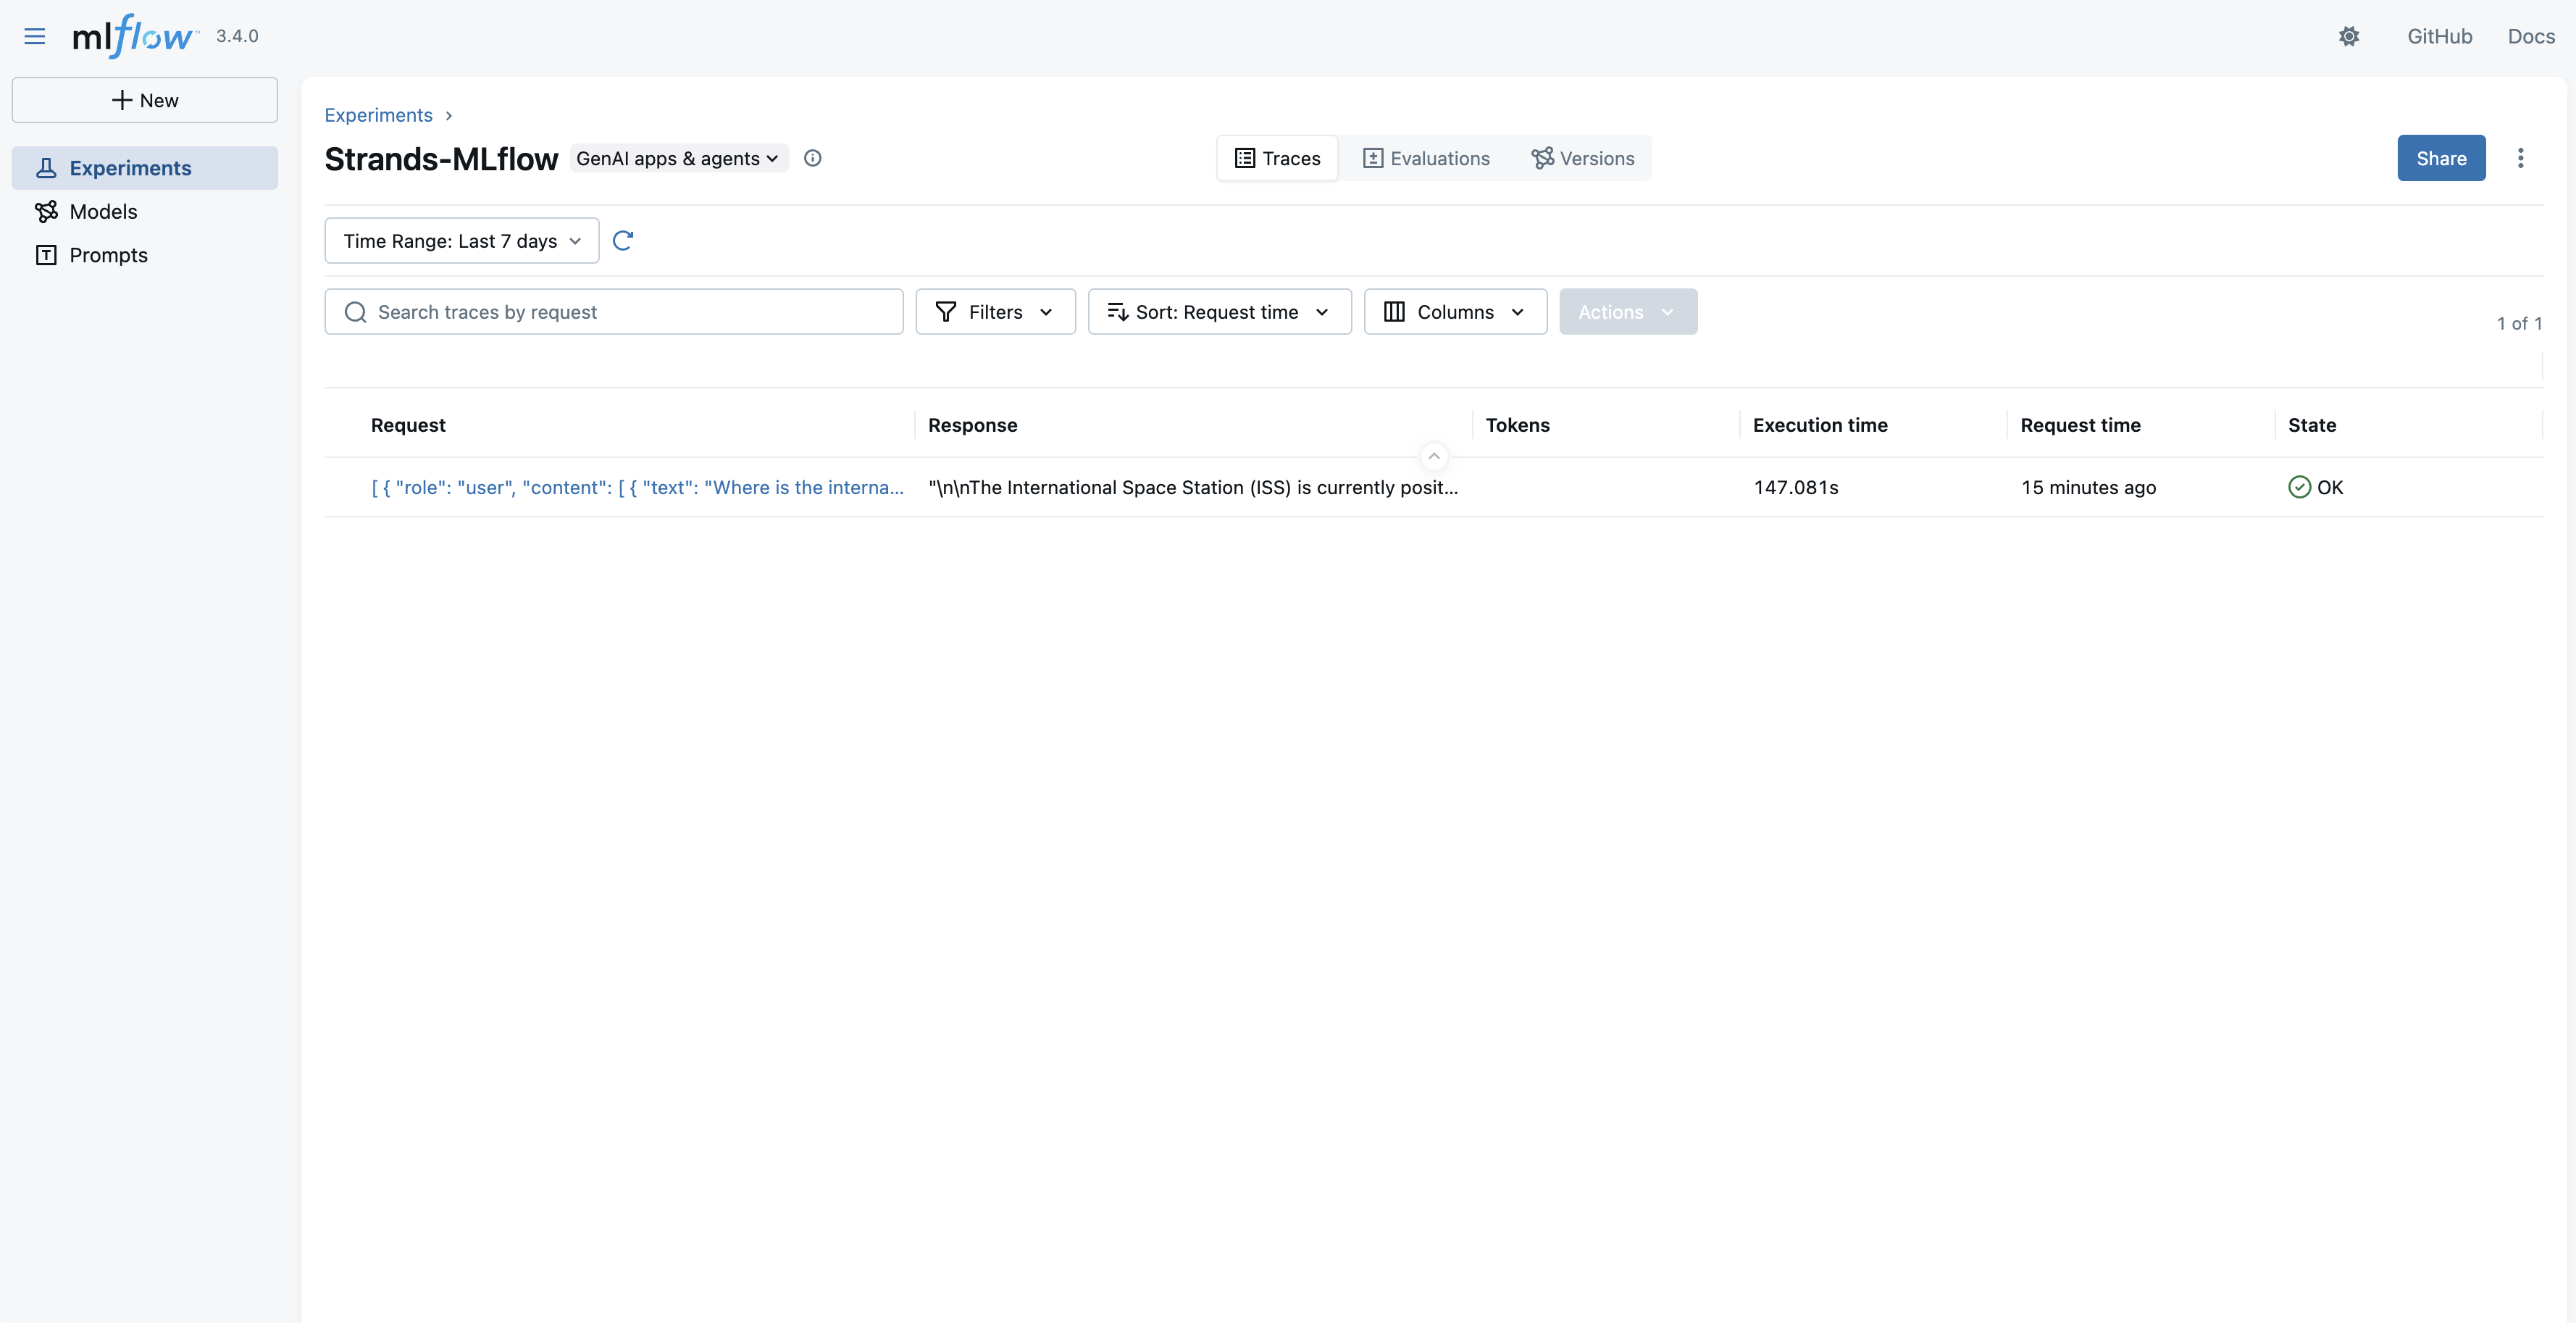
Post agent run, your agent trace, tool calling, and other metrics will be available through the MLflow App UI’s Traces section.
The traces in an experiment are available in a list view to inspect further.
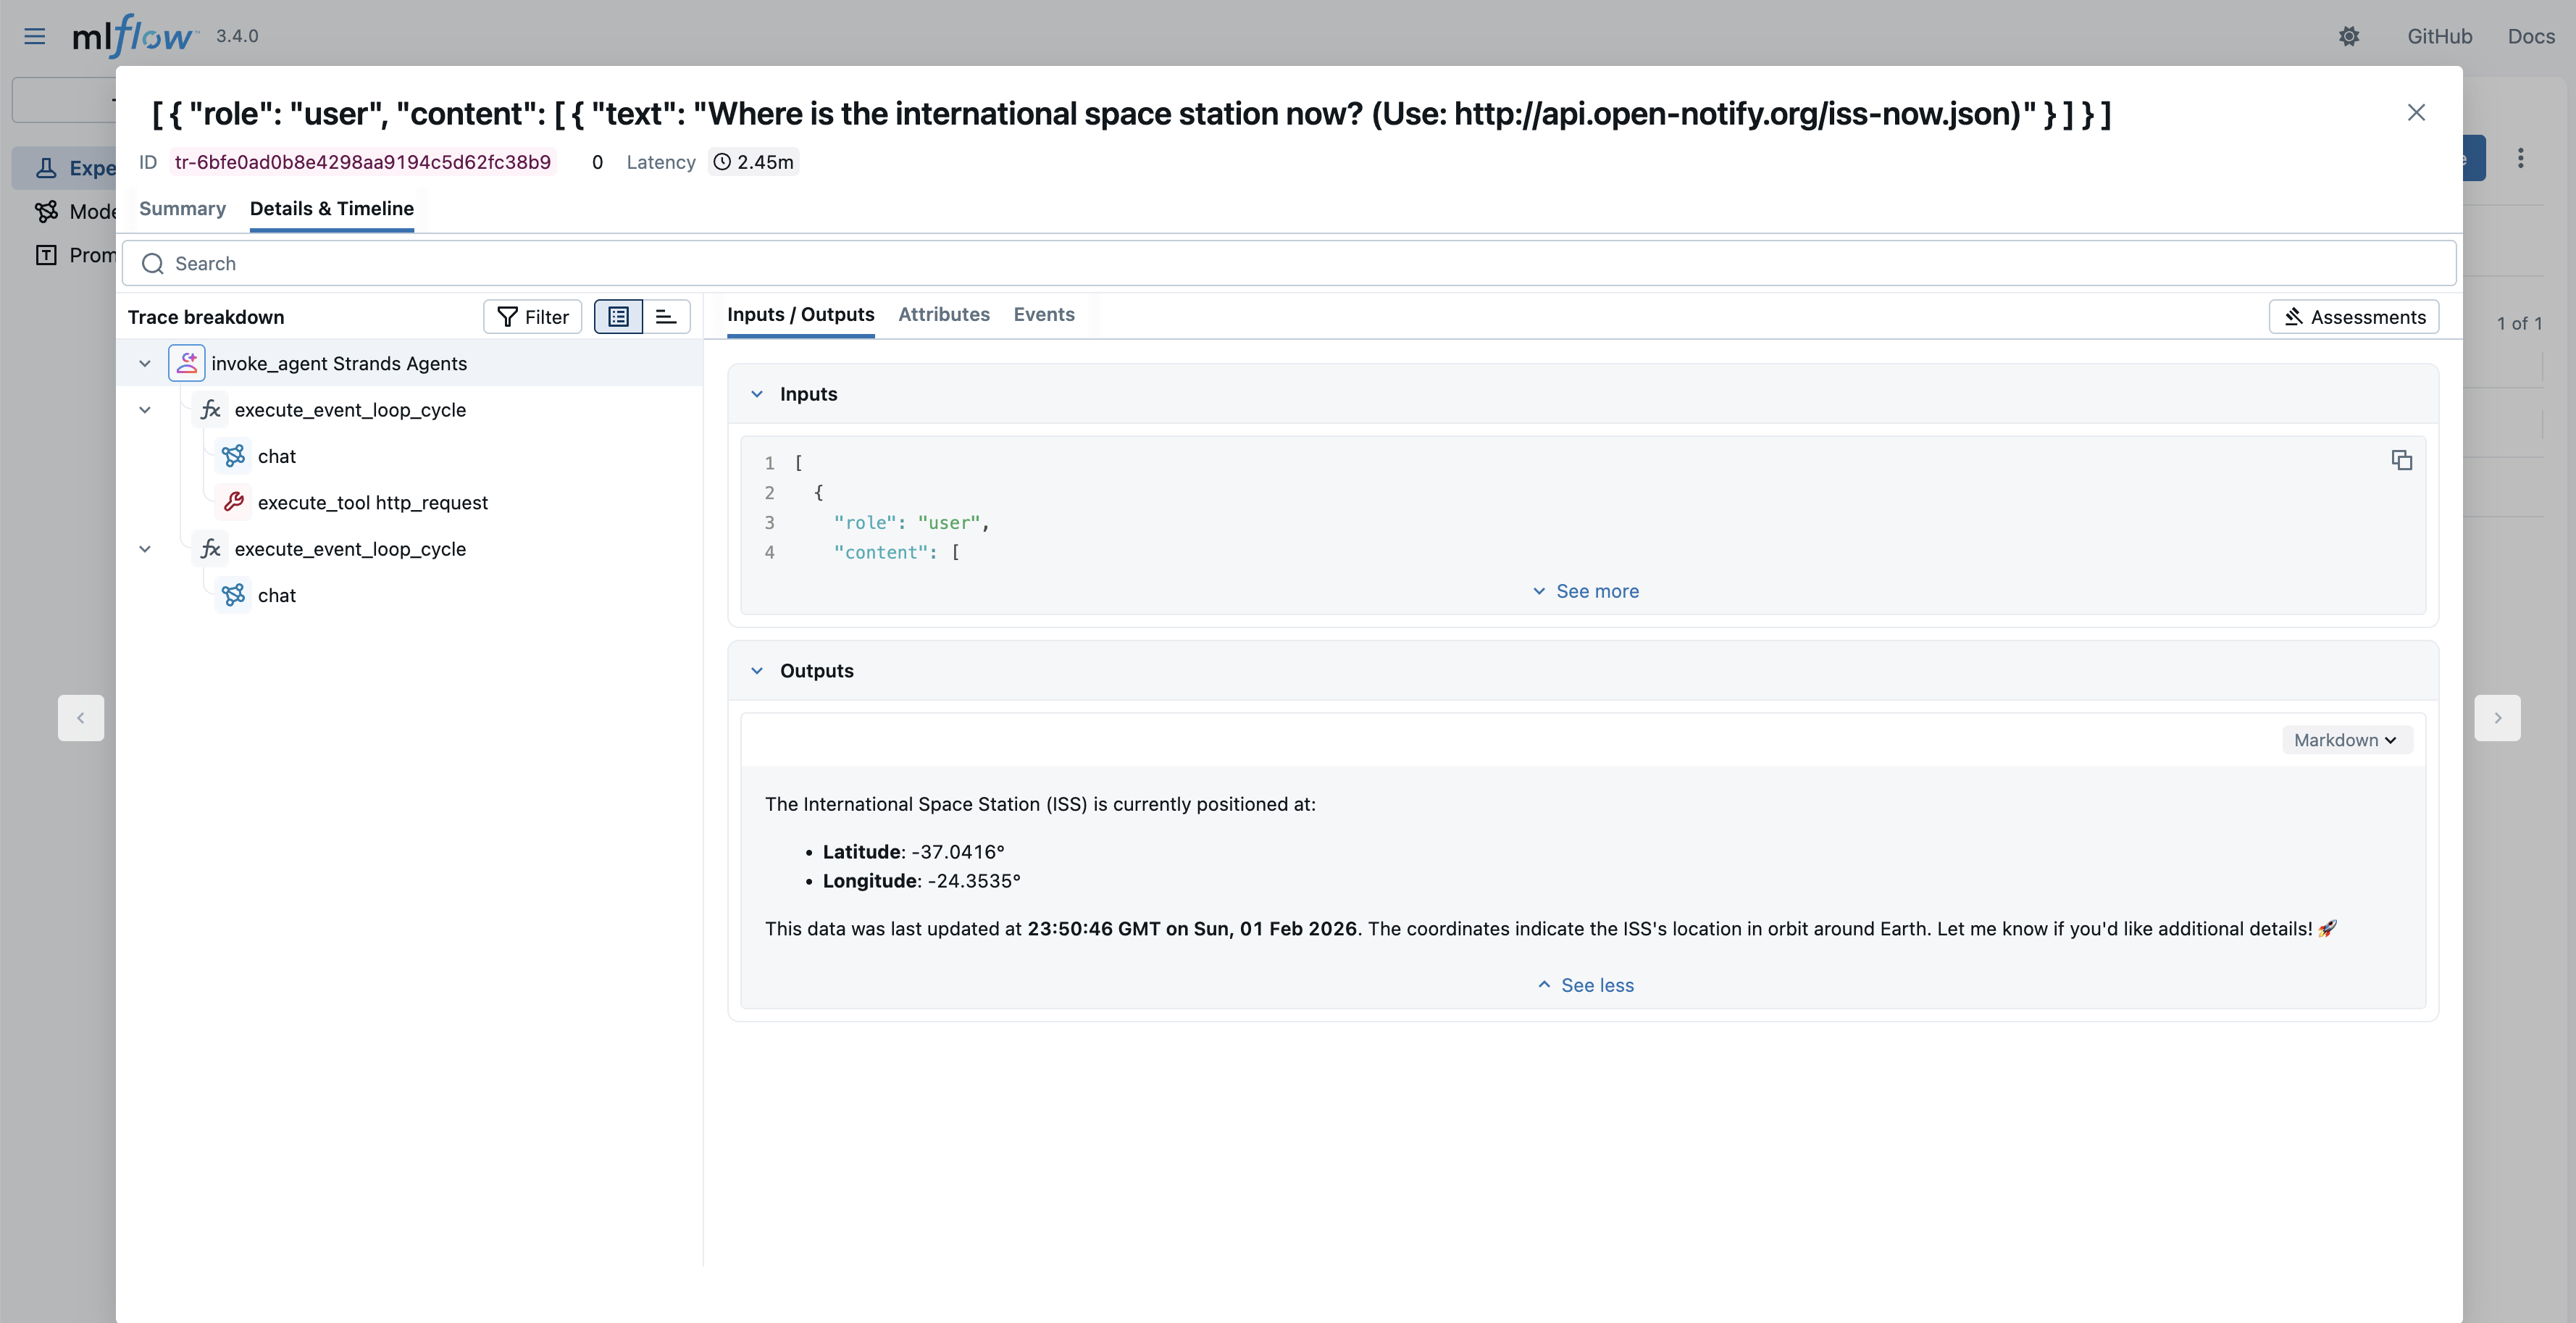
When you select a specific trace, you have the option to see the details as an Execution Timeline or as a Span Tree. In both views, you can see the Agent Loop, tool calls, input/output to each step, and other information.
Manual tracing
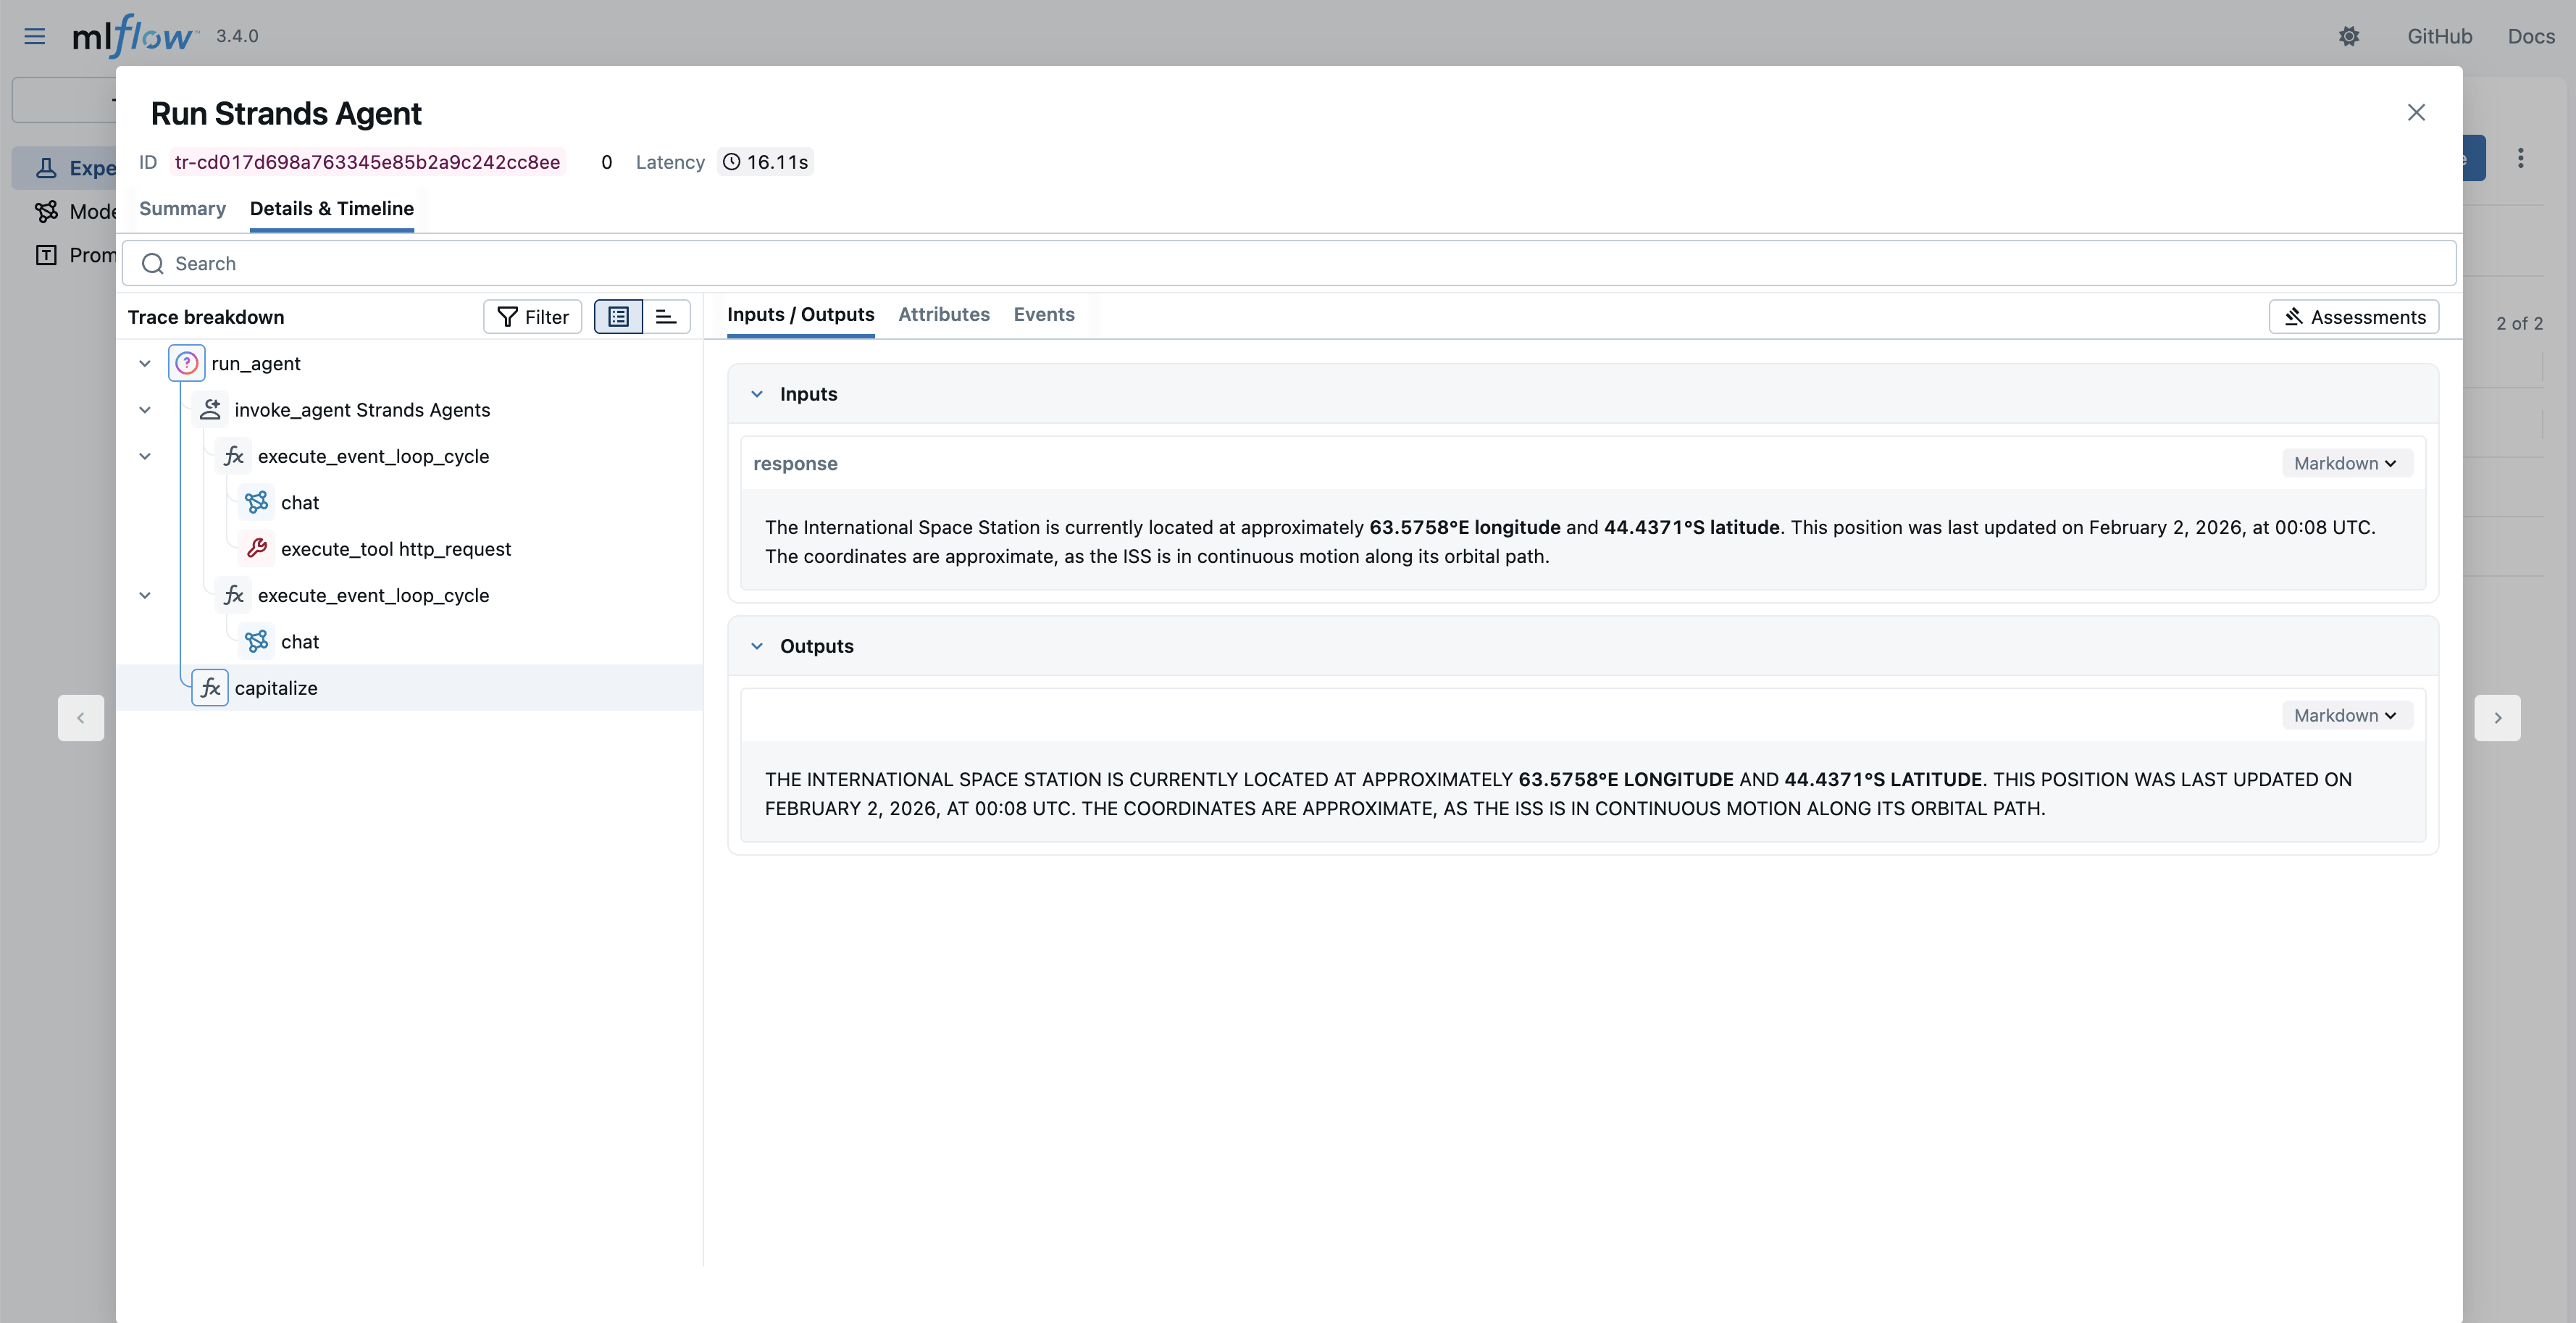
While the previous code block had capitalize(response.message['content'][0]['text']), the capitalize function isn’t visible in the MLflow trace. MLflow Strands automated tracing logs agent invocation (and its tool and FM invocations). Other function calls aren’t logged. If you need trace for a complete block of code, you can use MLflow’s manual tracing capability as shown in the following code block.
In this code block, the capitalize function is decorated with @mlflow.trace to make sure that its execution, input, and output are seen in MLflow. As a result, you will see the following trace in MLflow that includes the agent invocation and “capitalize” function call.
Deploying a new LLM for A/B testing
With Amazon SageMaker AI, you can optimize large language models (LLMs) for your agent applications. For example, to enhance your application’s performance by upgrading from a smaller Qwen3-4B model to the larger Qwen3-8B model, you don’t need to perform a complete migration immediately. Because your current agent with Qwen3-4B is functioning well, you can deploy the new Qwen3-8B model alongside it and distribute traffic between both LLM endpoints. With this approach, you can conduct A/B testing to measure the impact and effectiveness of the larger model before fully committing to the upgrade. First, deploy a new model behind the same endpoint as a second variant:
After the update is done, the agent that you created with this endpoint will use both LLMs with a 50/50 chance. For a controlled experiment, you can create two new agents that will point to specific variants.
Evaluating agent using Model Variants with MLflow GenAI
With both model variants deployed behind your A/B testing endpoint, the next step is to use them in Strands Agents, which are the same in other aspects except for the model itself. We will then systematically evaluate these agents using MLflow’s GenAI evaluation framework, which provides a structured approach using both custom metrics and LLM-based judges.
Create an evaluation dataset
To measure agent performance objectively, you need a consistent set of test cases that represent your real-world workloads. Each entry in the evaluation dataset includes the input query along with expectations, the ground truth values that scorers will use to assess whether the agent responded correctly. This structure facilitates reproducible evaluations across model variants.
Define evaluation scorers
Scorers determine how agent responses are assessed against your expectations. MLflow supports both custom scorers for deterministic checks (like verifying that the correct tool was used) and built-in LLM judges that evaluate subjective qualities like factual correctness and relevance. Combining these scorer types helps provide a comprehensive view of agent performance, from basic capability verification to nuanced response quality.
Run the evaluation
With your dataset and scorers defined, you can now run the evaluation against each model variant. The mlflow.genai.evaluate() function runs your agent on every test case, applies the scorers to assess the responses, and logs the results to MLflow for analysis. Running separate evaluations for each variant helps make sure that you can directly compare their performance under identical conditions.
Compare results
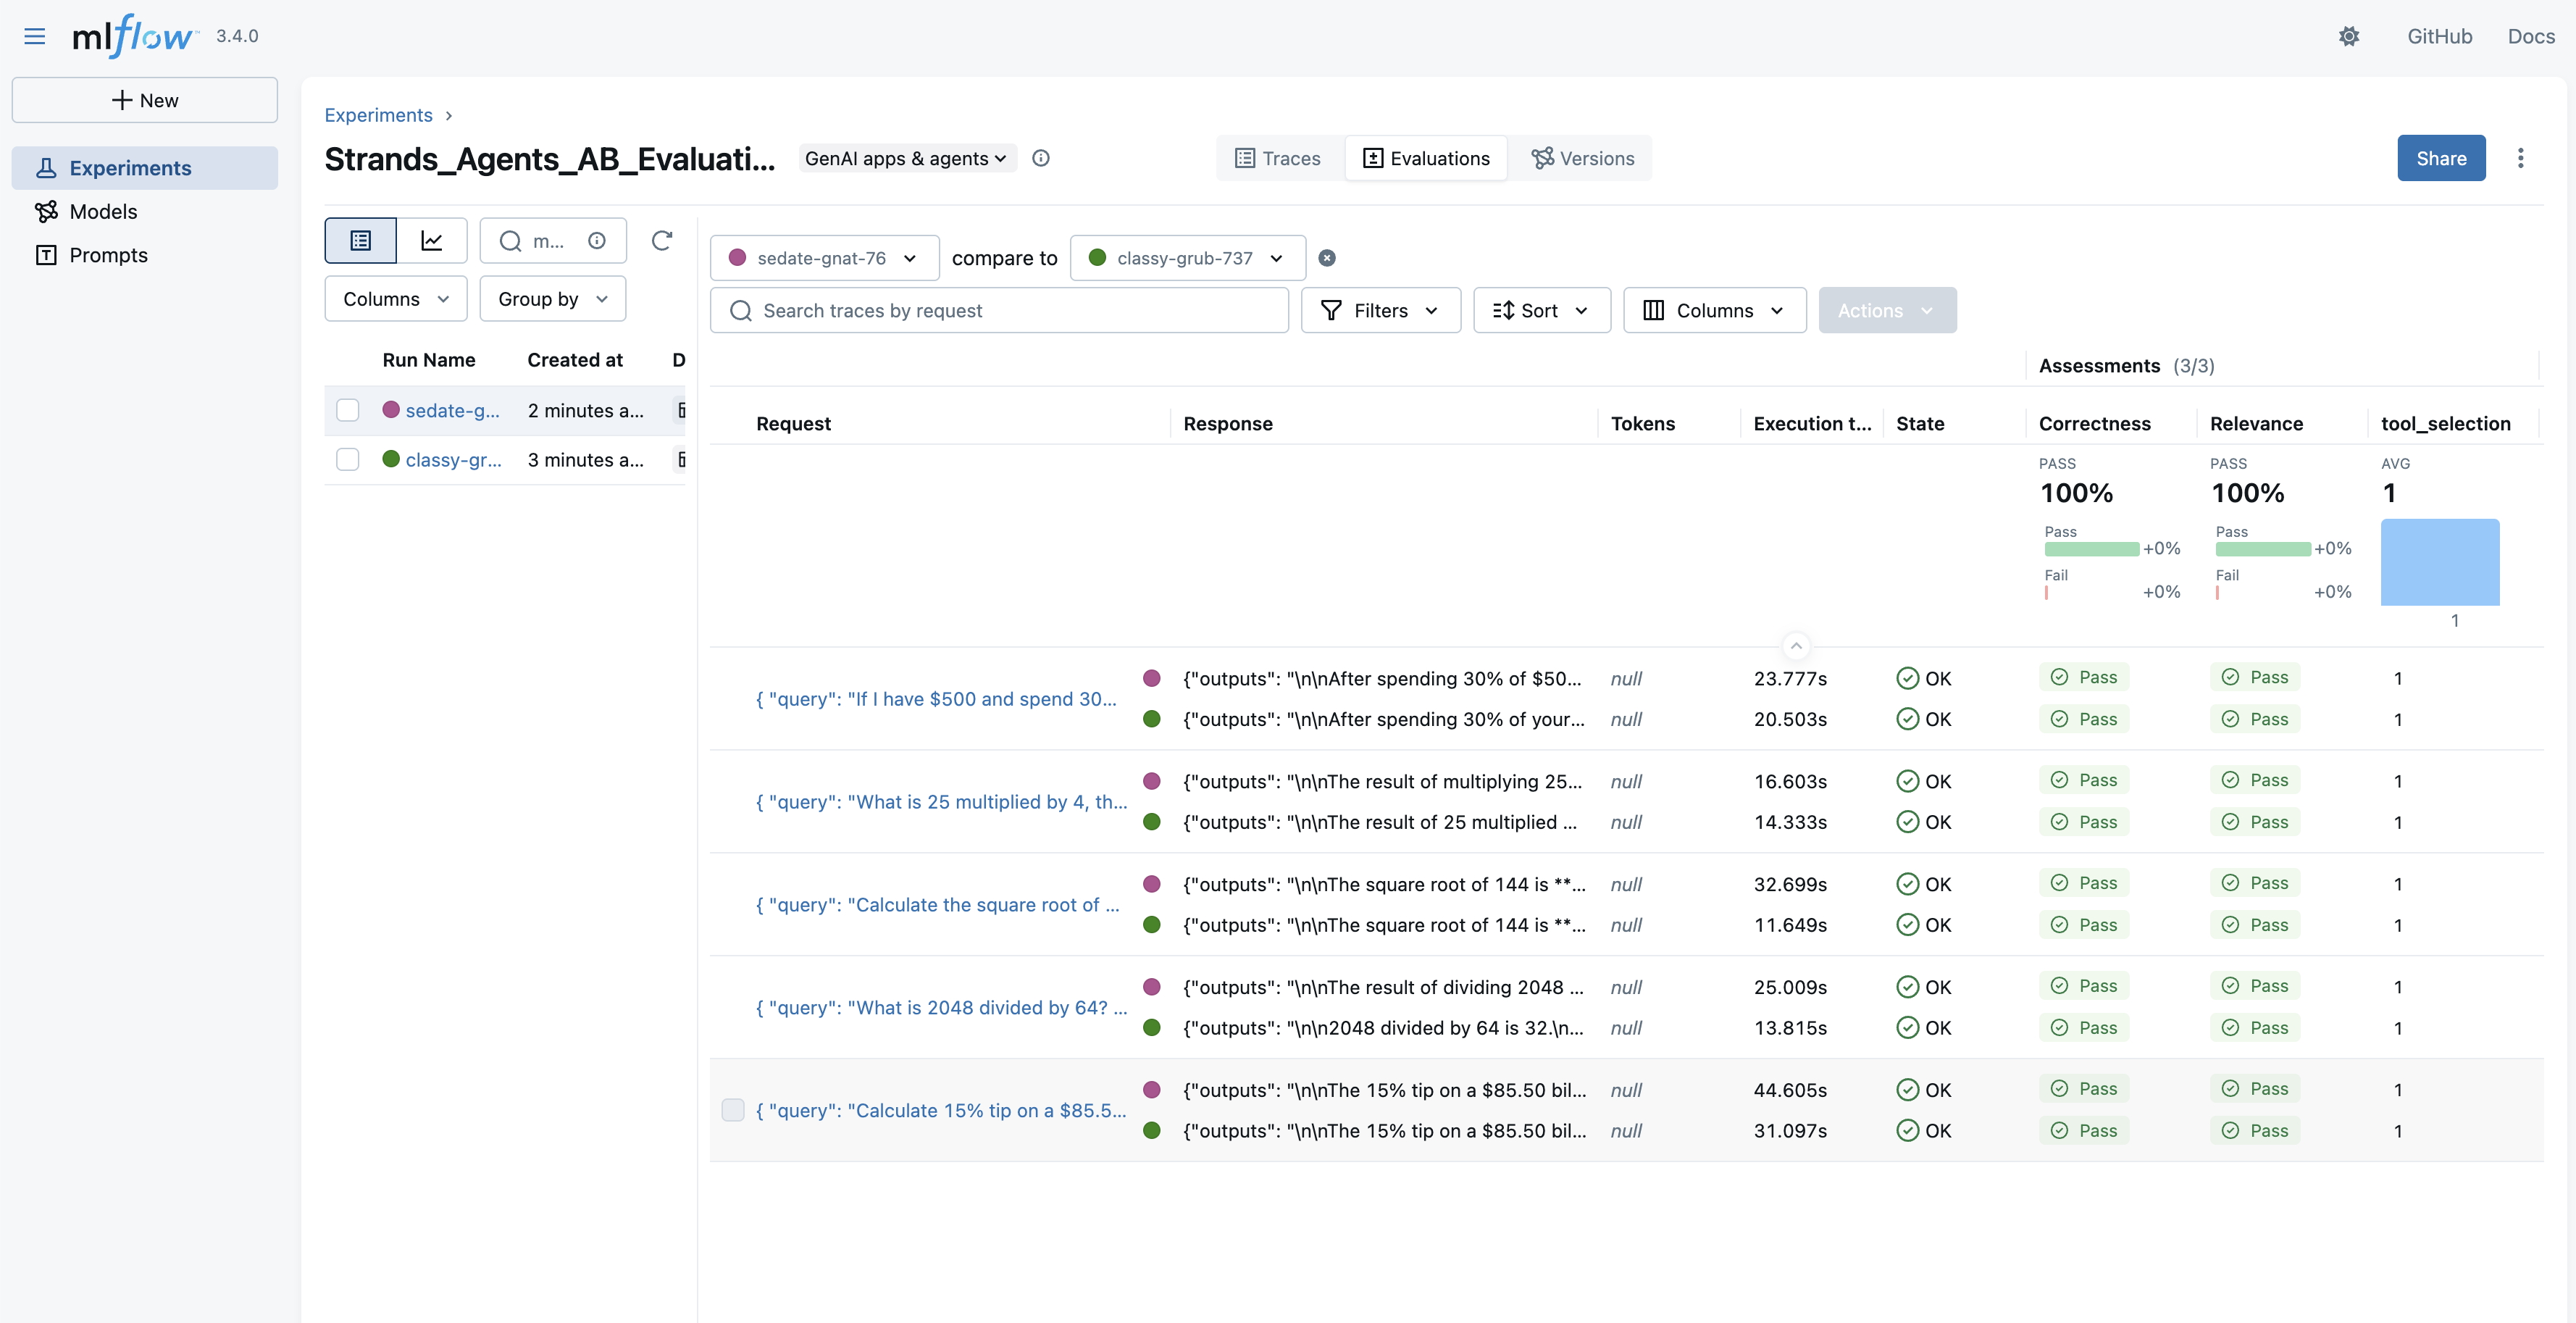
After both evaluations complete, you can compare the aggregated metrics to determine which model variant performs better for your specific workloads. This comparison provides the data-driven evidence that you need to make informed decisions about model selection, rather than relying on assumptions or general benchmarks.
metrics_4b = eval_results_4b.metrics
metrics_8b = eval_results_8b.metrics

for metric in metrics_4b: print(f"{metric}:
    4B={metrics_4b[metric]:.3f}, 8B={metrics_8b[metric]:.3f}")
You can also view detailed comparisons in the MLflow UI by navigating to the Evaluations tab and selecting both runs for side-by-side analysis.
Transition to the new model
If the new model is proven to be better, you can make a transition to the new model by adjusting weights:
Debugging issues with MLflow tracing
In the case of “ImportError: cannot import name ‘TokenUsageKey’ from ‘mlflow.tracing.constant’ (/opt/conda/lib/python3.12/site-packages/mlflow/tracing/constant.py)” or other issues with tracing Strands Agents in MLflow, check the following:
- Check the version of MLflow installed. It should be 3.4.0 or greater.
- Make sure that the role you’re using to execute the Strands Agent has the permission to:
- read, write, and list the s3:bucket used as the artifact location for MLflow Tracking Server
- access MLflow App
Clean up created resources
The following code will delete the SageMaker AI endpoint and MLflow App that you created.
Conclusion
In this post, we explored how to build AI agents using Strands Agents SDK with models deployed on Amazon SageMaker AI endpoints, while using SageMaker AI Serverless MLflow for comprehensive agent observability. This approach helps provide organizations with greater flexibility and control over their AI infrastructure.Deploying models on SageMaker AI gives you precise control over compute resources, networking configurations, and scaling policies that are especially valuable for organizations with specific performance, cost, or compliance requirements. The integration with MLflow provides robust observability capabilities, so you can track agent behavior, monitor performance metrics, and maintain audit trails.The combination of Strands Agents SDK, SageMaker AI, and MLflow creates a powerful framework for building, deploying, and monitoring AI agents that you can customize to meet your specific business needs.
Next steps
To get started with building your own AI agents using this approach, we recommend the following resources:
- Learn more about Amazon SageMaker AI and its capabilities for model deployment and management
- Explore Strands Agents SDK to understand how to build and customize AI agents
- Dive deeper into SageMaker Serverless MLflow for comprehensive agent observability
- Check out the Amazon Bedrock or Amazon SageMaker AI decision guide to understand which service is right for your use case
By following the steps outlined in this post, you can build sophisticated AI agents that can leverage the full power of the flexible infrastructure of SageMaker AI and the comprehensive observability capabilities of MLflow. We’re excited to see what you will build!