Artificial Intelligence
From Hugging Face to Amazon SageMaker Studio in one click
Today, we’re excited to announce a deep-link integration between Hugging Face and Amazon SageMaker AI. Developers can now go from model discovery to hands-on experimentation in SageMaker Studio with a single selection. Whether you fine-tune a foundation model (FM) from Amazon SageMaker JumpStart or deploy it to an Amazon SageMaker Inference endpoint, you can now land directly inside the relevant SageMaker Studio workflow. Your selected model is pre-loaded, and the environment is fully configured and ready to go.
Previously, getting started on SageMaker Studio after discovering a model on Hugging Face required navigating multiple steps. These included opening Amazon SageMaker AI on the AWS Management Console, creating a domain, configuring AWS Identity and Access Management (IAM) permissions, and sometimes requesting graphics processing unit (GPU) quota. For developers who want to iterate quickly, this friction slows down the path from inspiration to experimentation. The integration creates a more direct path from discovery to enterprise deployment.
“At Arcee, we build open models so developers and enterprises can actually own what they run: inspect the weights, post-train on their own data, and deploy on their own terms. This integration takes that promise the last mile. Going from an open model on Hugging Face straight into SageMaker Studio in a single click, then fine-tuning or deploying it inside your own AWS environment with nothing to wire up, is the kind of experience open models have been missing. Open weights you own, running in the cloud you control. That is exactly the combination our customers have been asking for.”
— Mark McQuade, Founder and CEO, Arcee AI
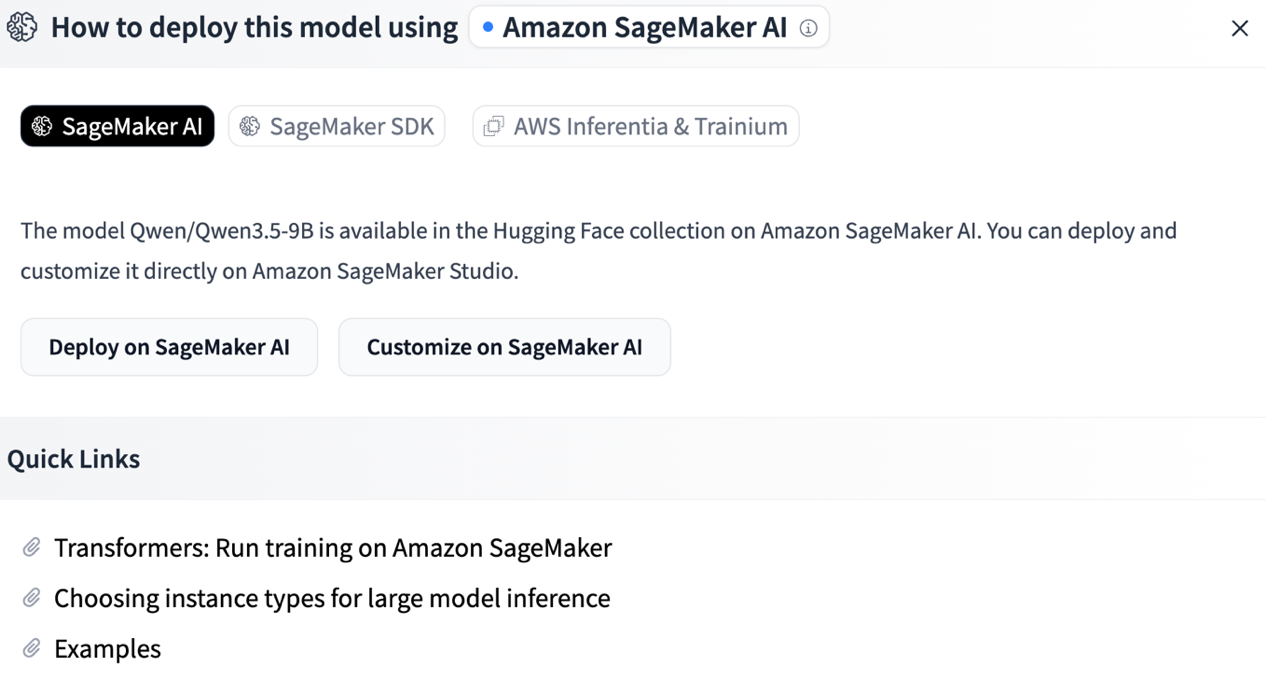
With the launch of a one-click Studio landing experience, choosing Customize on SageMaker AI or Deploy on SageMaker AI on a supported Hugging Face model page takes you directly to the console. SageMaker AI then automatically provisions a new domain with pre-configured permissions in seconds and carries the model context through.
What’s new
This launch introduces three capabilities that shorten the path from a Hugging Face model to a working SageMaker Studio workflow.
Deep links from Hugging Face into SageMaker Studio
When you browse models on Hugging Face, you’ll now see action buttons alongside supported models that map directly to SageMaker Studio workflows:
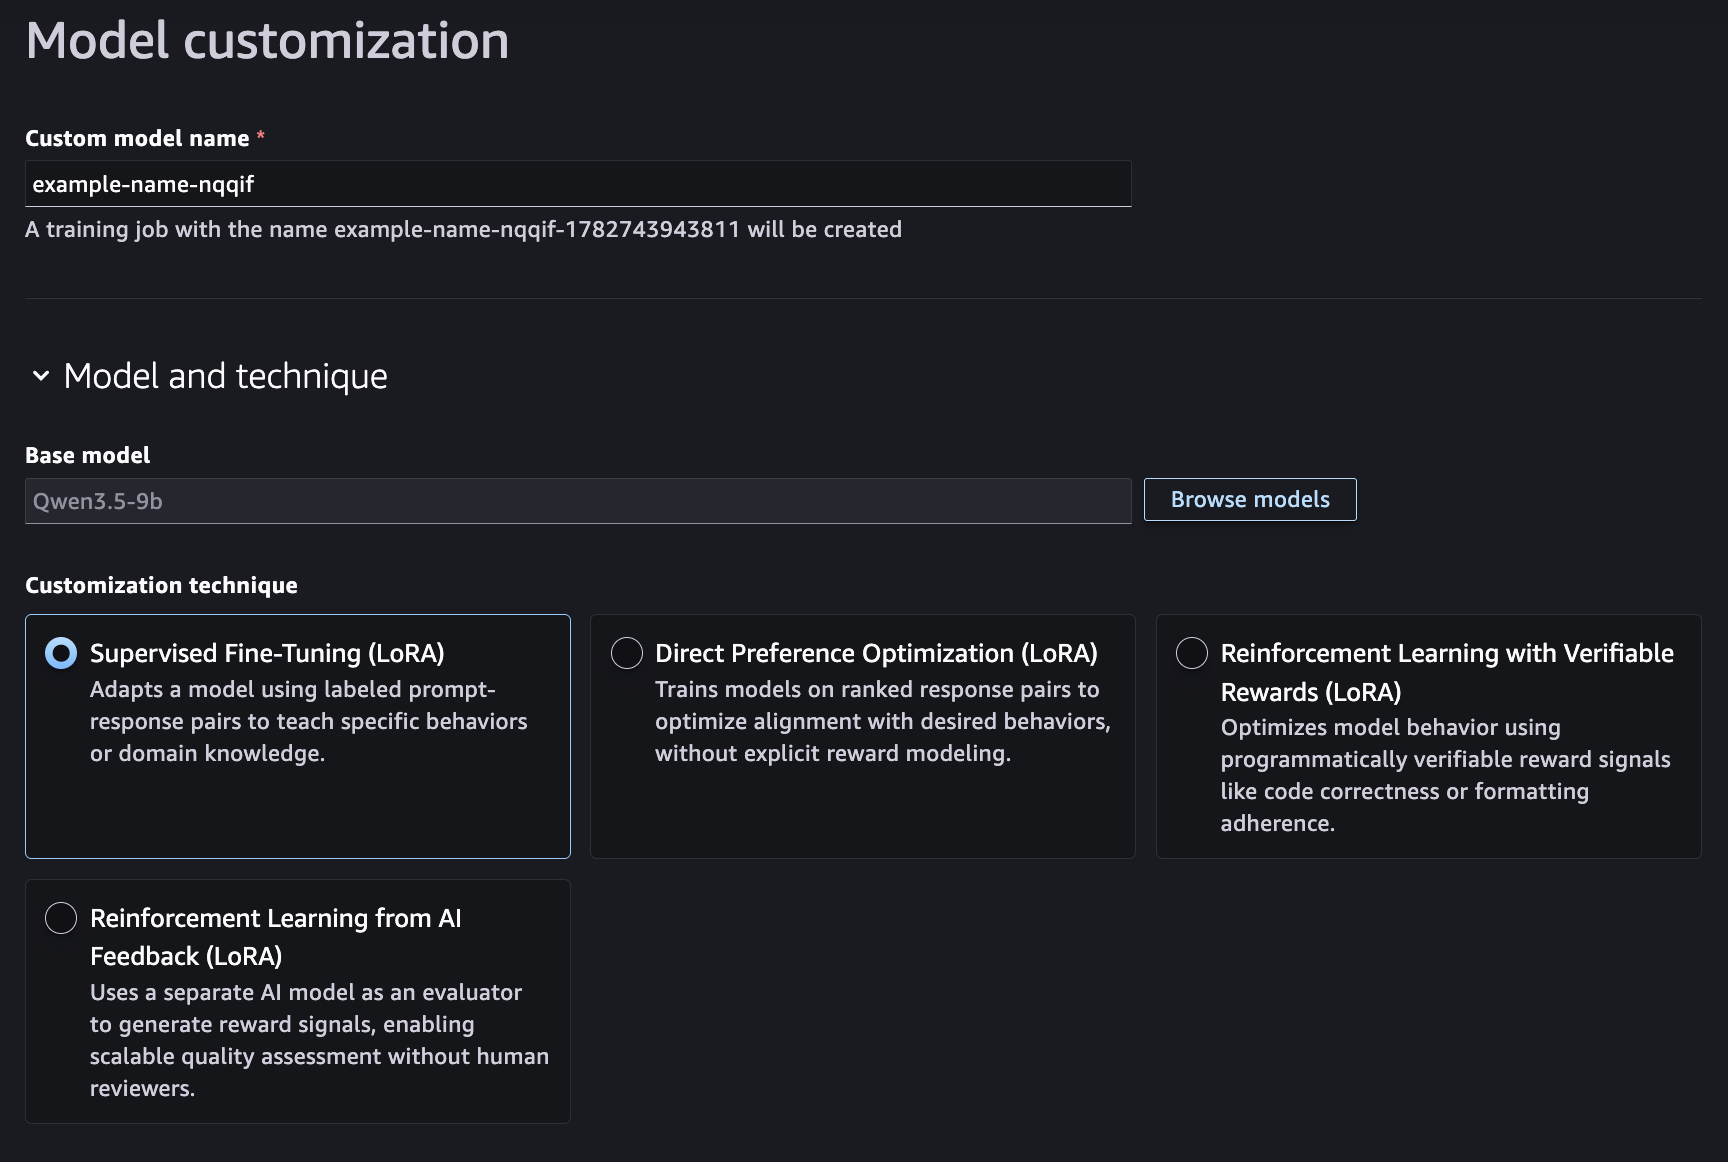
- Customize on SageMaker AI opens the Model Customization page in Studio with the selected model pre-loaded, ready to fine-tune.
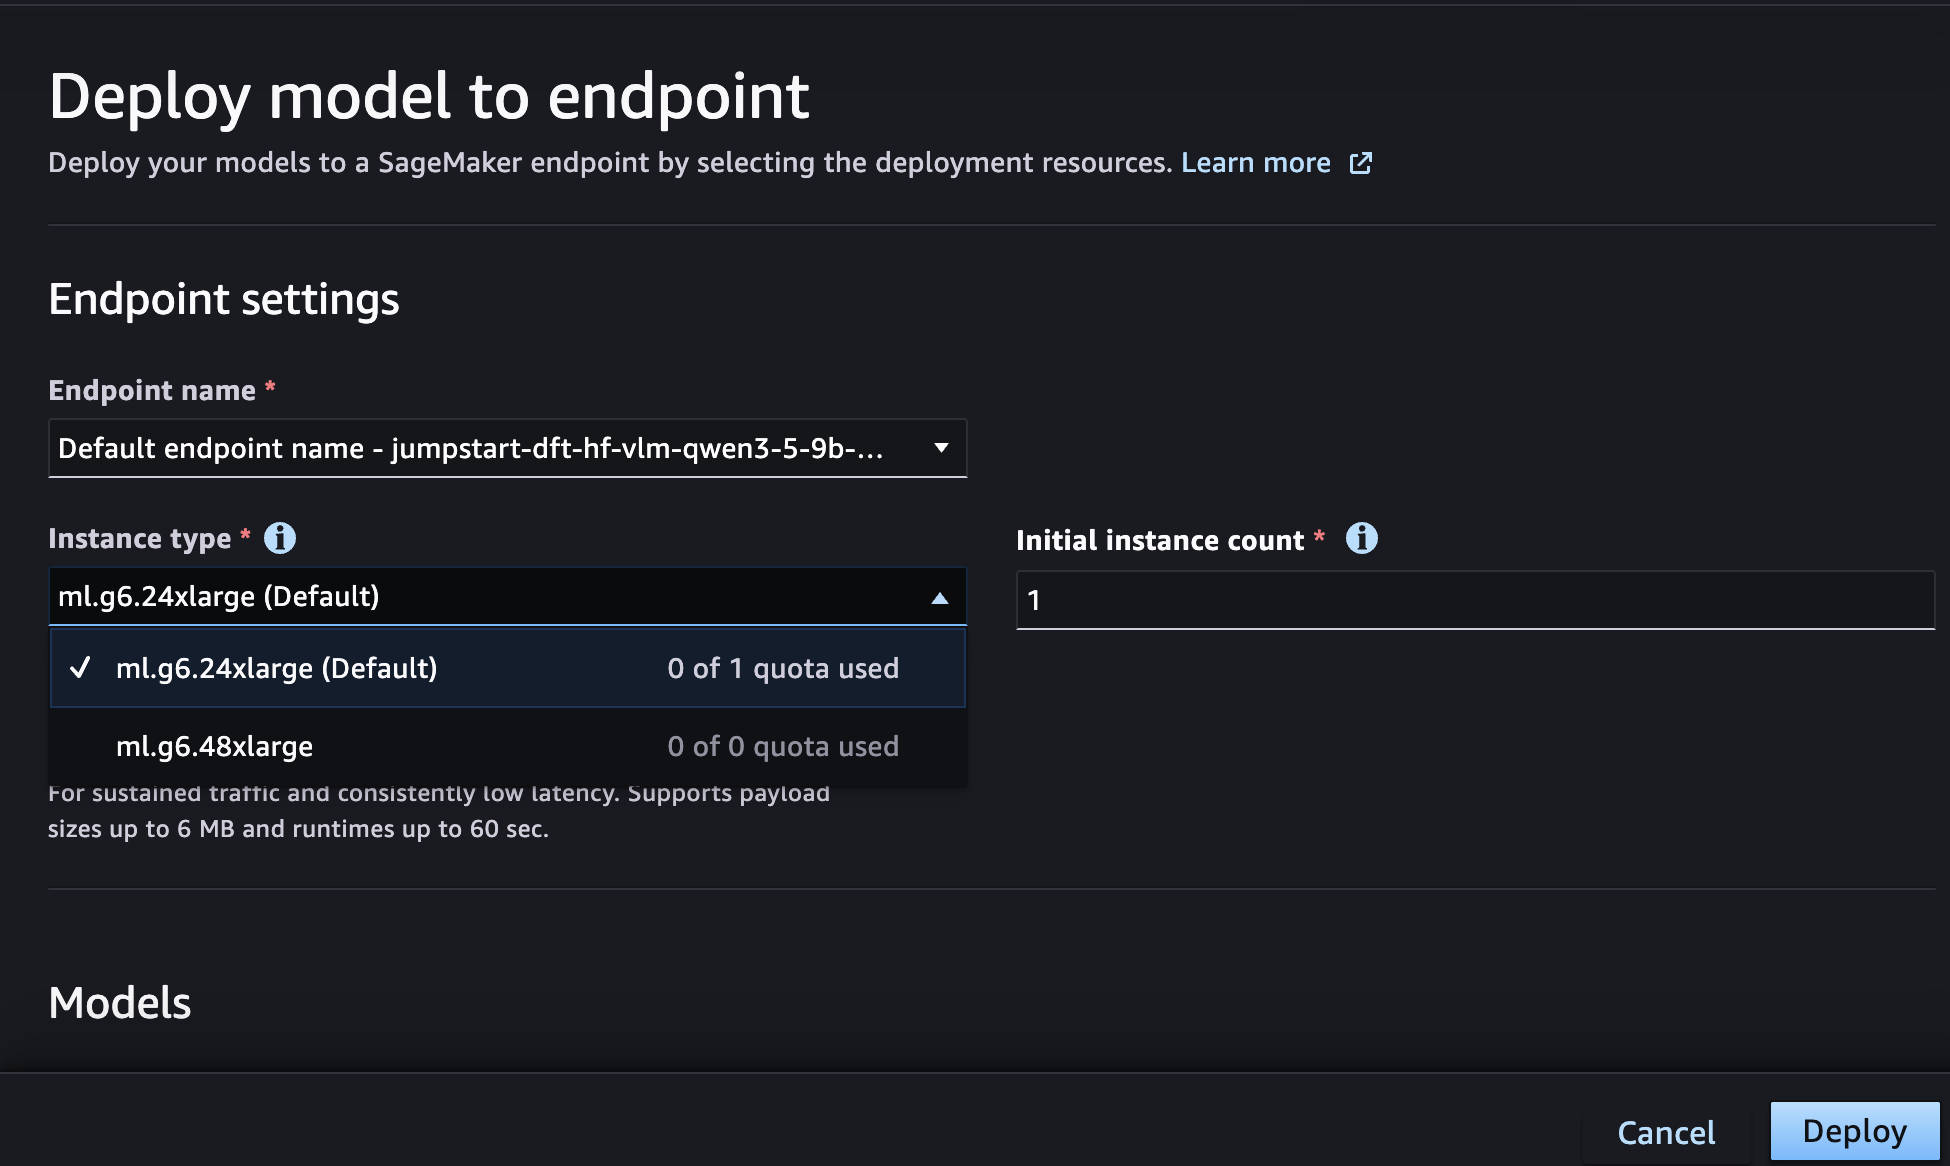
- Deploy on SageMaker AI opens the Deployment page in Studio with the model pre-configured for endpoint deployment.
Each entry point preserves the context, meaning you don’t need to search for the model again once inside Studio.
Pre-configured permissions
New Studio environments created through this flow come with permissions already configured for the full range of SageMaker AI capabilities, including model customization, training jobs, notebook experimentation, and endpoint deployment. A new managed policy, AmazonSageMakerModelCustomizationCoreAccess, is created and attached for you. It provides permissions for serverless model customization jobs using supervised fine-tuning (SFT), direct preference optimization (DPO), reinforcement learning with verifiable rewards (RLVR), and reinforcement learning from AI feedback (RLAIF), with supported deployment to SageMaker AI or Amazon Bedrock endpoints. This alleviates the need to manually create and configure AWS Identity and Access Management (IAM) roles and policies before you can start experimenting. For existing Studio environments, actionable messages with direct links to documentation guide you through adding these permissions.
GPU quota visibility
When selecting instance types for deployment or training, the Studio UI now surfaces quota availability directly in the instance selection list. You can immediately see which GPU instance types (G5, G6) are available under your account’s current limits. You don’t need to navigate separately to Service Quotas. If you still need to request a limit increase, you’re redirected directly to the Service Quotas page for the respective instance type.
Walkthrough: Deep-linking from Hugging Face to SageMaker Studio
Let’s walk through the experience of customizing or deploying a model starting from Hugging Face.
Step 1: Discover and select
On the Hugging Face model page, select Customize on SageMaker AI for a supported model.
Step 2: Sign in
You’re prompted to sign in to AWS using your existing credentials. If you already have an active console session, this step is skipped automatically. For more information, see Sign in to the AWS Management Console.
Step 3: Land in Studio
You arrive directly on the Model Customization page inside SageMaker Studio with your model pre-selected. Next, configure your fine-tuning parameters such as training data, hyperparameters, and instance type, then submit the customization job.
Alternatively, selecting Deploy on SageMaker AI opens the endpoint deployment page in Studio with the model pre-configured. Select your instance type (quota visibility included), review the settings, and deploy.
Step 4: Test your endpoint
After you deploy your endpoint, test inference directly from Studio’s endpoint testing interface.
Getting started
You can try this experience today:
- Browse models on Hugging Face.
- Look for the Customize on SageMaker AI or Deploy on SageMaker AI buttons on supported models.
- Select and follow the streamlined sign-in flow.
- Start building in a fully configured SageMaker Studio environment.
Conclusion
The launch of a one-click Studio landing experience minimizes the friction between discovering a model and experimenting with it. By connecting Hugging Face directly to the SageMaker Studio workflows, developers can stay in their flow. There’s no context switching, no manual environment setup, and no permission troubleshooting.
To get started, visit the Amazon SageMaker Studio page or explore models on Hugging Face and choose Deploy or Customize on SageMaker AI.