Artificial Intelligence
Launching UI for generative AI inference recommendations in Amazon SageMaker AI
Deploying generative AI models to production requires finding the right combination of instance type, serving container with settings, and optimization strategy. This process typically requires a long iteration cycle of optimization and manual benchmarking. In April 2026, Amazon SageMaker AI launched this inference recommendations, so customers can programmatically get data-driven, production-ready configurations through APIs. This feature compresses that cycle to minutes for common workloads, and a few hours for custom workloads.
In this post, we introduce the UI for optimized generative AI inference recommendations in Amazon SageMaker AI Studio, a low-code no-code (LCNC) experience. The API already gives you programmatic access to recommendations, but it assumes you know which parameters to set and how to interpret raw benchmark output. The UI removes that assumption. It guides you through preset use-case profiles, visual comparisons of results, and one-click deployment, so teams without deep infrastructure expertise can get a validated configuration on their own.
With this launch, you can configure optimization jobs and select from preset use-case profiles. You can compare performance results and deploy recommended configurations to production endpoints. You can do this without writing a single line of code. Advanced users can still use the APIs for fine-grained configurations.
Machine learning (ML) engineers can validate their next deployment while technical leaders evaluate cost-performance trade-offs. In both cases, the Studio experience speeds up the path from model selection to a configuration that is production-ready.
Overview of the new Studio experience
Amazon SageMaker AI Studio now includes the generative AI inference recommendations UI under Jobs, then Inference optimization. It provides a guided, end-to-end workflow that walks you through workload configuration, optimization, model selection, and deployment.
Preset use-case profiles
The workflow starts by defining the workload configuration. Rather than manually specifying token distributions and concurrency, you can select a preset use-case profile that captures a common traffic pattern. The Interact profile models chat-style workloads with short inputs and moderate outputs. Generate is tuned for content generation with longer outputs, and Summarize is optimized for the high input-to-output ratios of document summarization. When none of these match your workload, you can use the Custom profile to bring your own dataset and set concurrency, token lengths, and evaluation data yourself. The profile you select sets the benchmark parameters, so you don’t need to reason about them directly.
Optimization goals
Alongside a use-case profile, select an optimization goal that tells SageMaker AI what to prioritize. Minimize latency tunes for the lowest possible response time, which suits interactive applications where users wait on each token. Maximize throughput serves the highest number of tokens per second, a better fit for batch or high-volume workloads. Minimize cost finds the most cost-efficient configuration for the traffic you expect. The goal that you pick shapes both the techniques SageMaker AI applies and the way that it ranks the resulting recommendations.
Supported model sources
Now, you select the model that requires inference optimization. The UI meets that model wherever it already lives. You can pull a foundation model (FM) from the Amazon SageMaker JumpStart catalog, which offers a variety of pre-trained models. Alternatively, you can point to your own model artifact on Amazon Simple Storage Service (Amazon S3), reuse a registered package from your Model Registry, or select an existing SageMaker model from a previous deployment or training job.
Walkthrough: Getting recommendations through the console
In the following sections, we walk through a complete run, from creating a job to deploying the best configuration. Each step builds on the previous one, so you can read them in order the first time and then jump directly to the step you need on later runs.
Prerequisites:
You must have the following prerequisites to follow along:
- An AWS account with an Amazon SageMaker AI Studio domain.
- AWS Identity and Access Management (IAM) permissions for Amazon SageMaker AI inference optimization operations.
- An IAM execution role with access to your model artifacts in Amazon S3.
Pricing: No additional cost for generating recommendations. Standard compute costs apply for optimization jobs and endpoints provisioned during benchmarking.
Step 1: Create an optimization job
In the Studio left navigation pane, choose Jobs, then Inference optimization. Then choose Create (or Optimize inference). With the job created, the next step is to tell SageMaker AI what you’re optimizing for.
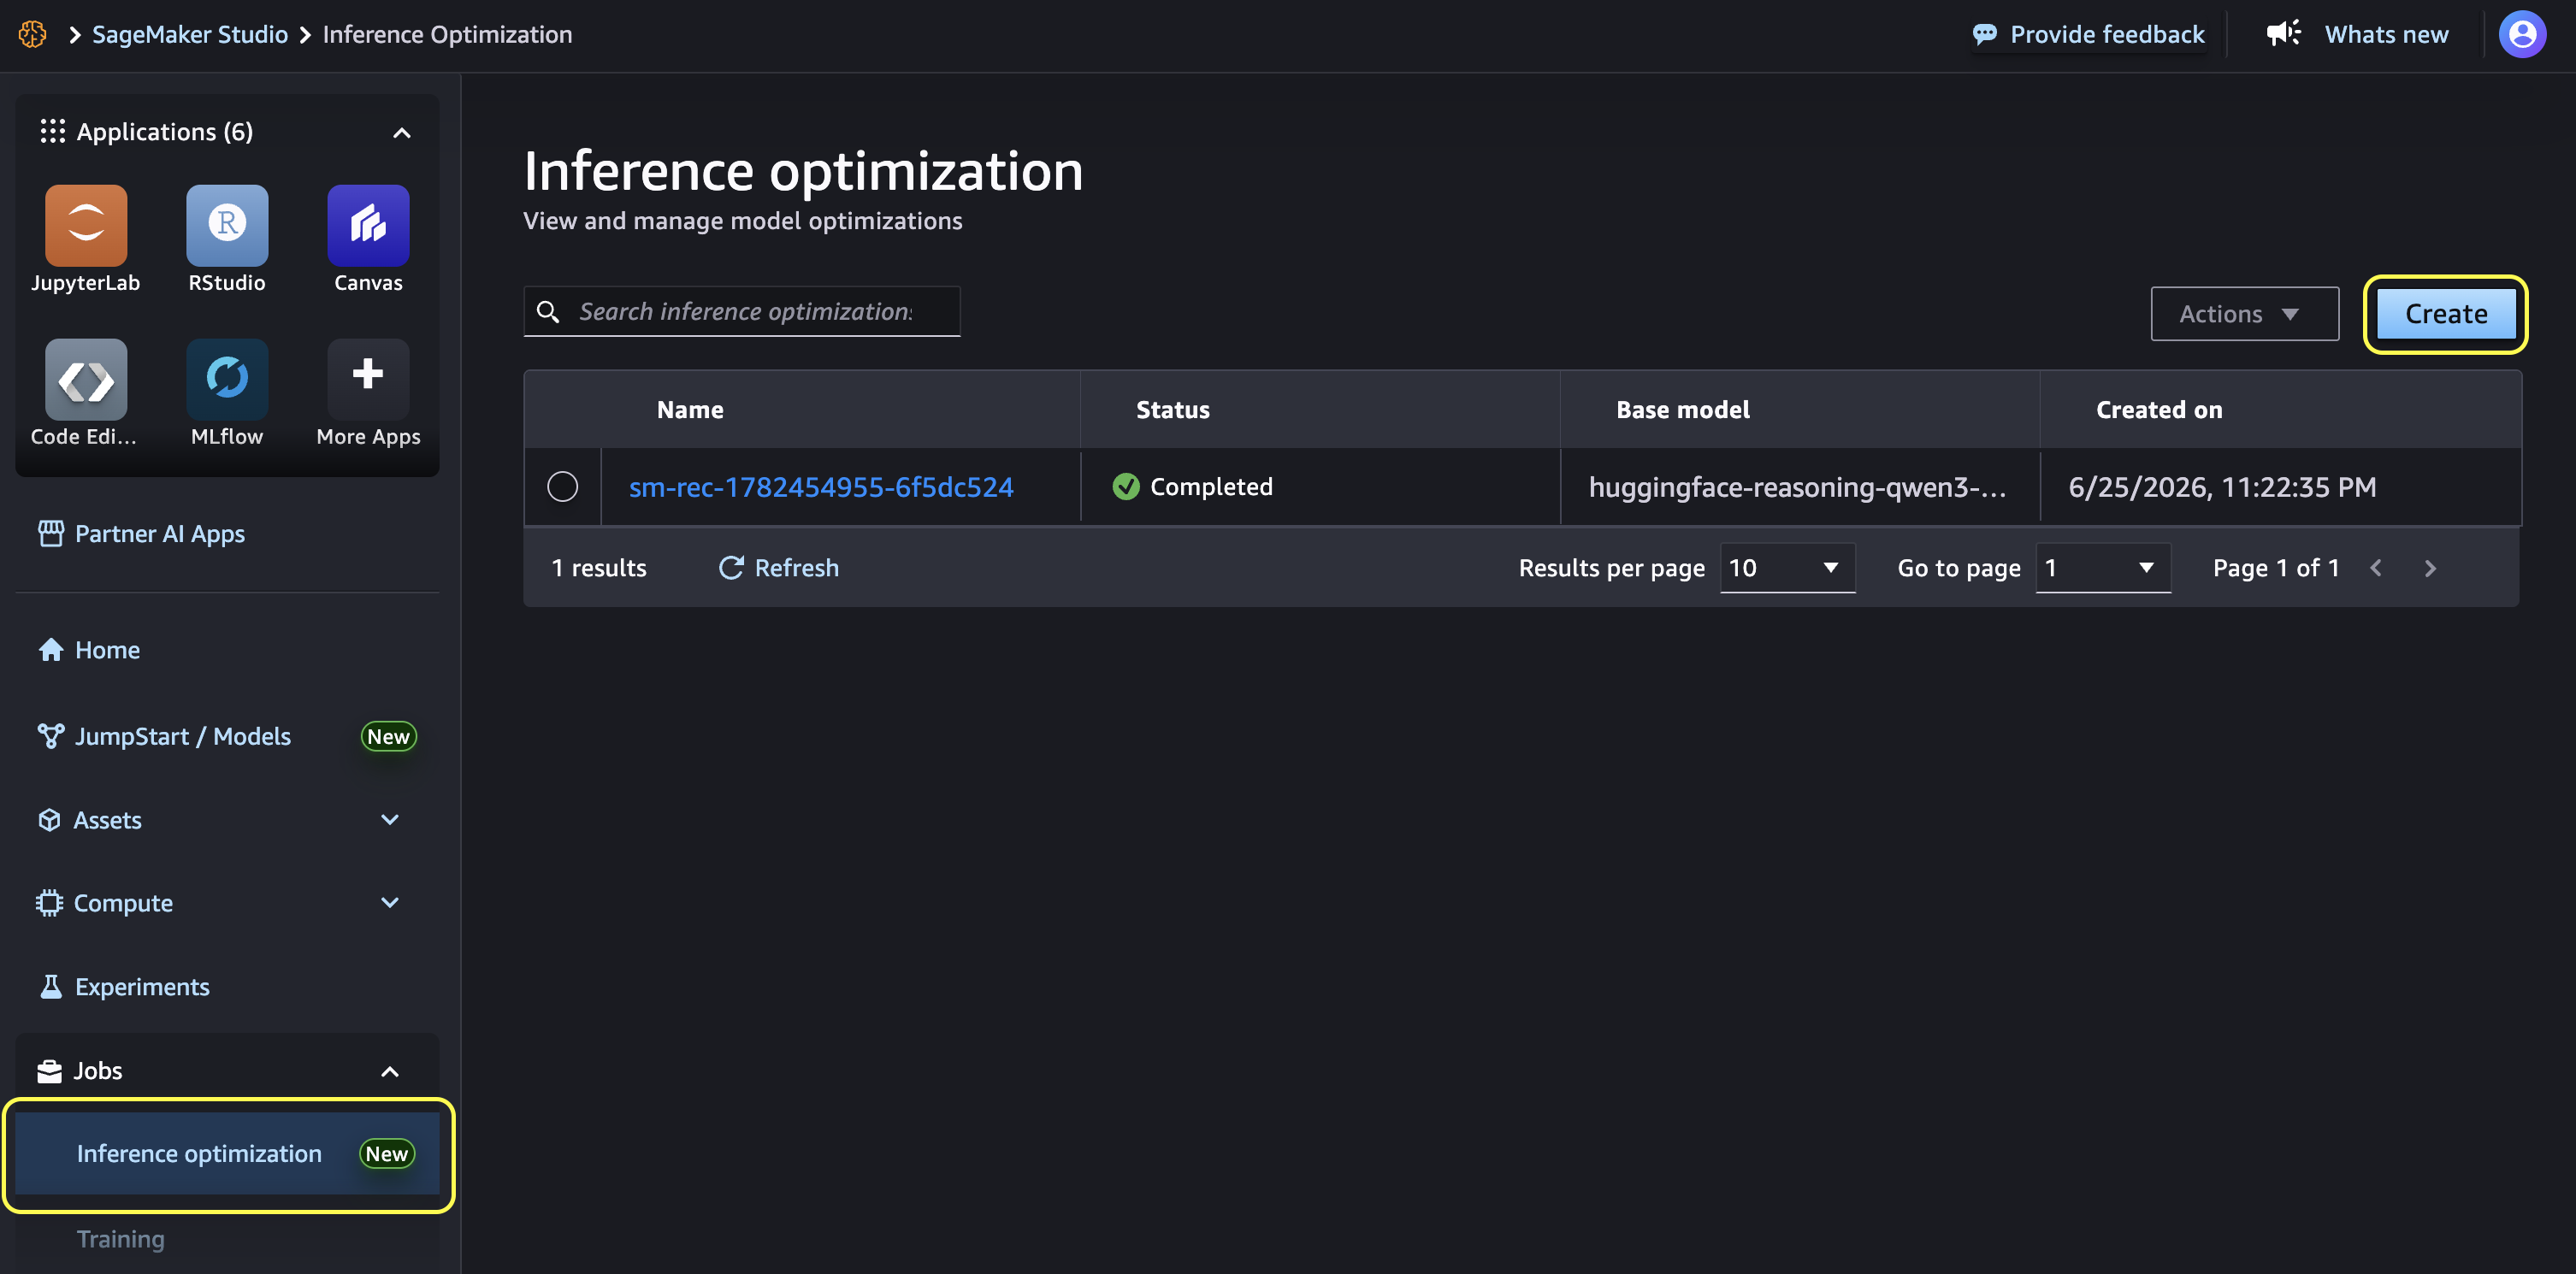
Figure 1: The Inference optimization landing page showing existing jobs
Step 2: Configure your strategy
Every business use case has different requirements: some have a very tight latency budget, while others have a stringent cost budget. Depending on your use case, select one of the use case profiles (Interact, Generate, Summarize, or Custom) and an optimization goal (Minimize cost, Minimize latency, or Maximize throughput).
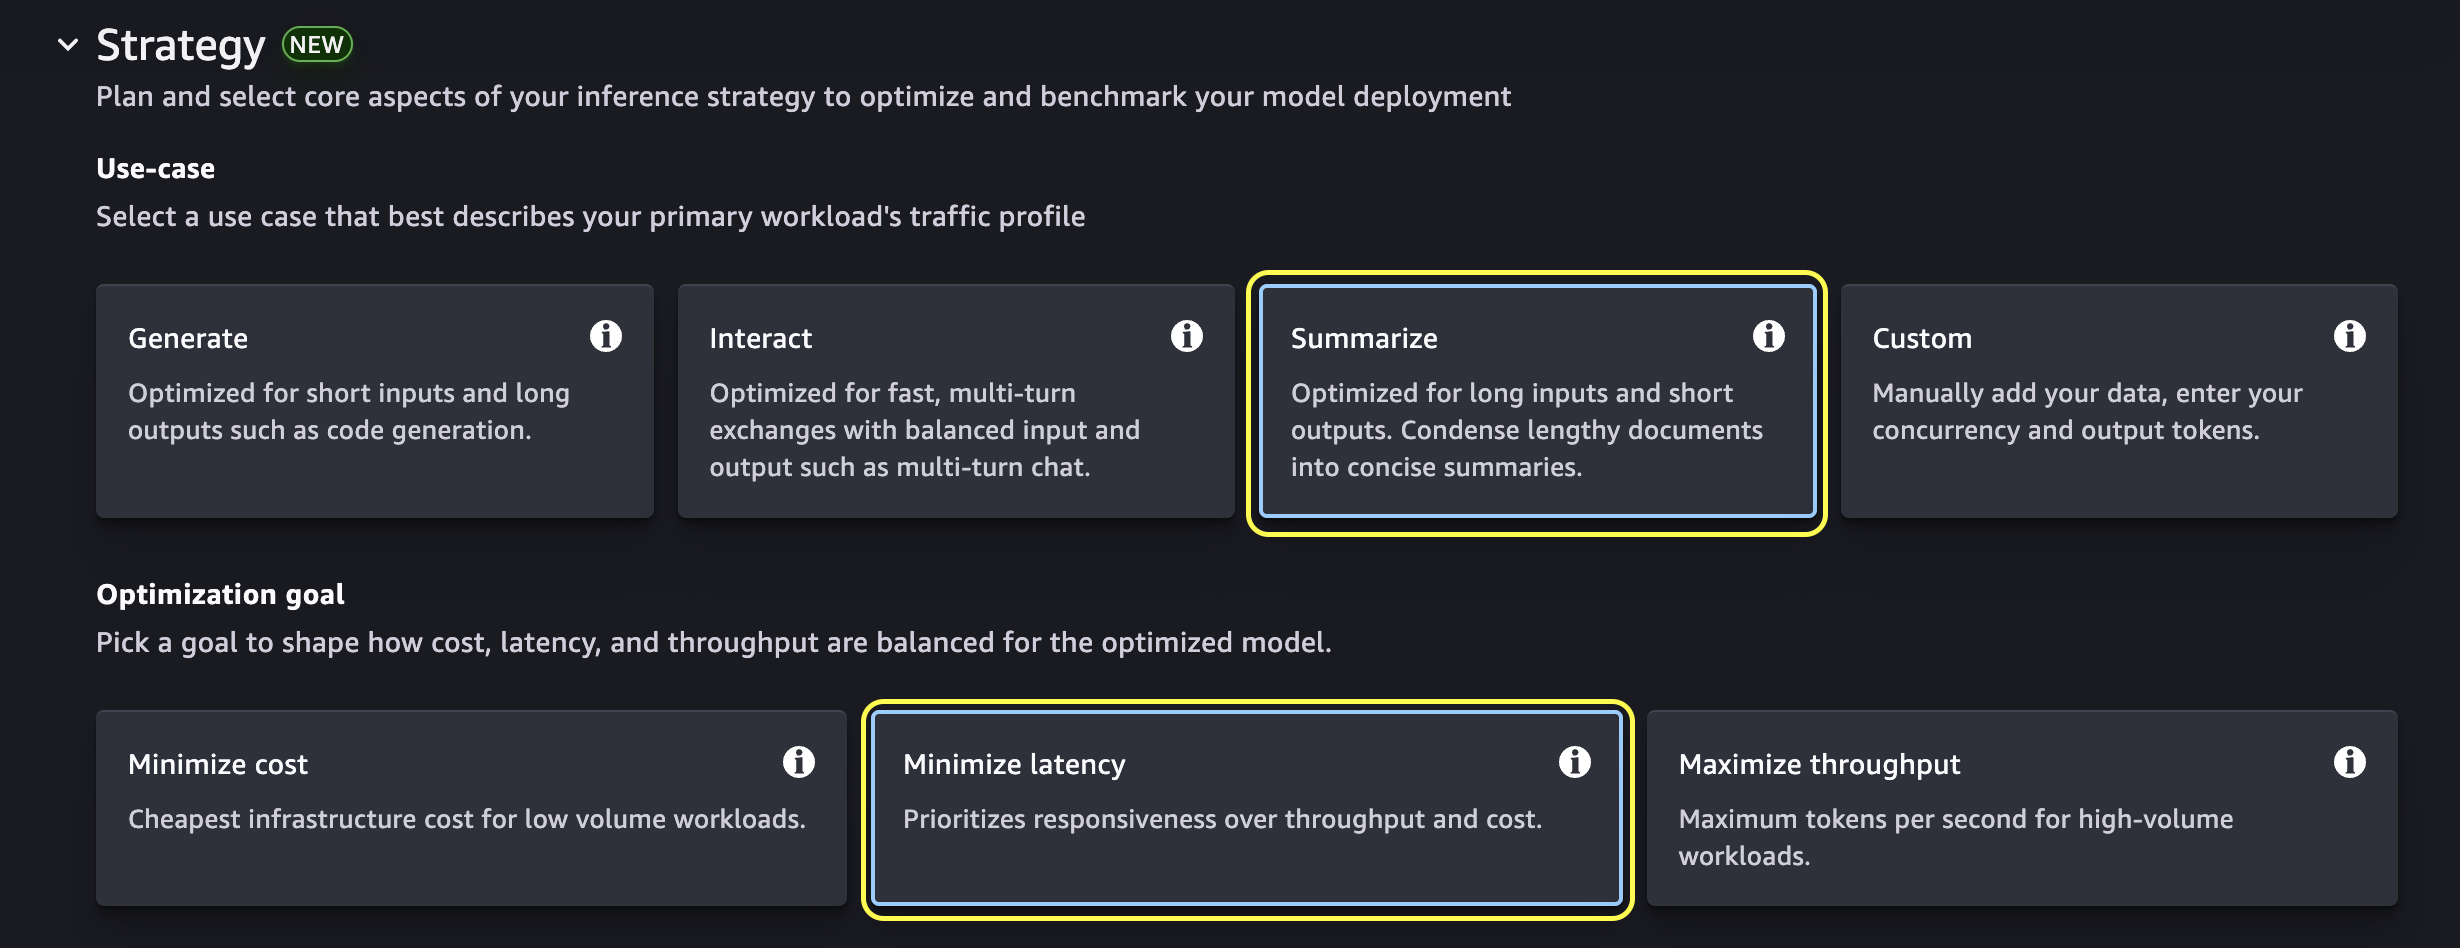
Figure 2a: Strategy configuration showing use-case presets (Generate, Interact, Summarize, Custom) and optimization goals
If you select Custom, additional fields appear. You can paste an S3 URI to your evaluation dataset in JSONL format, specify the number of simultaneous requests to simulate for concurrency, and set the maximum output token length.
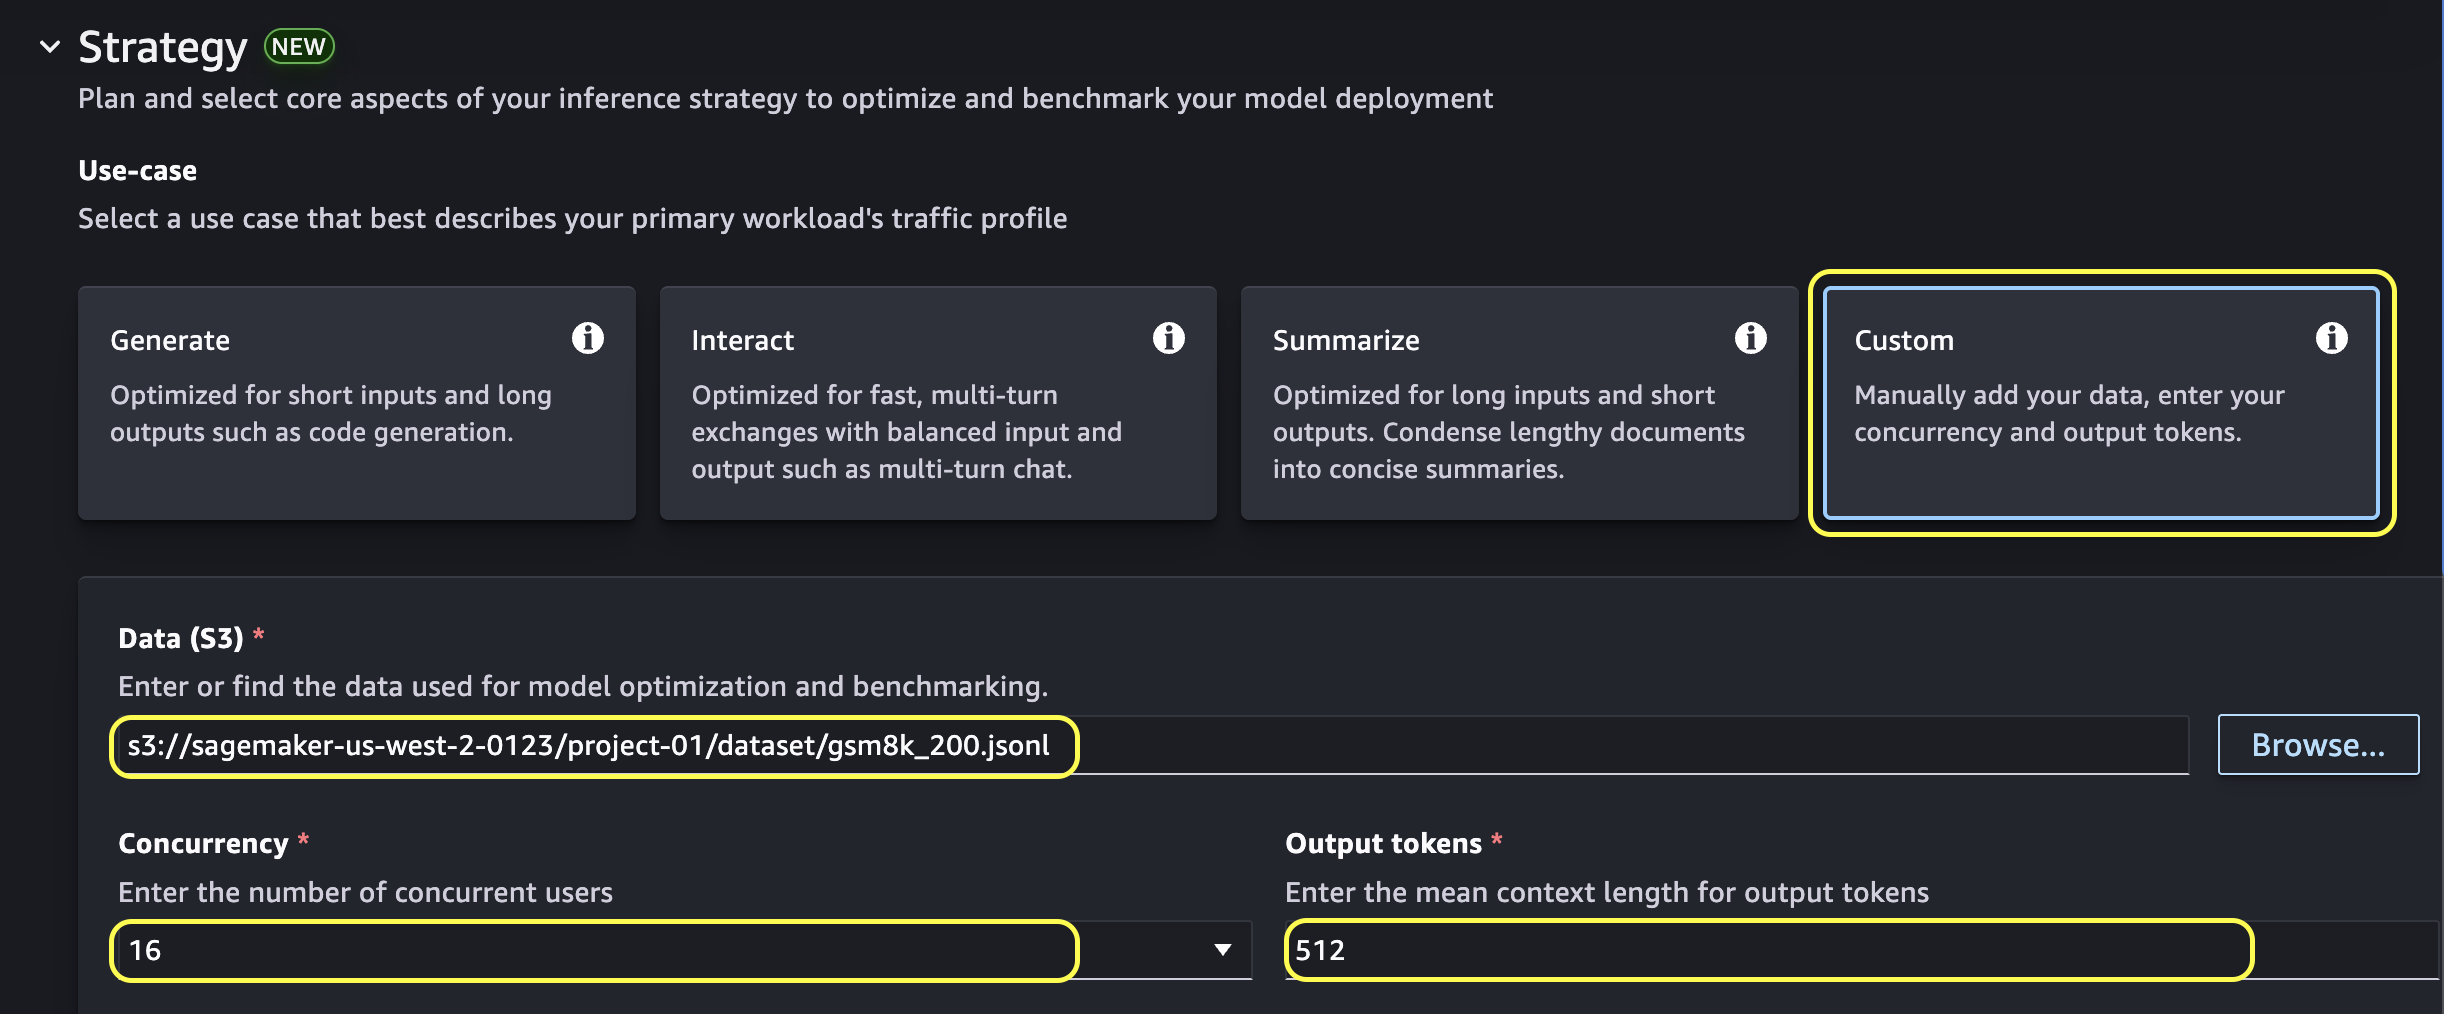
Figure 2b: Custom workflow showing dataset path, concurrency, and output tokens
Step 3: Select your model and compute
Use the Select button in the Model section to select the model that you want. A window appears with tabs for each model source.
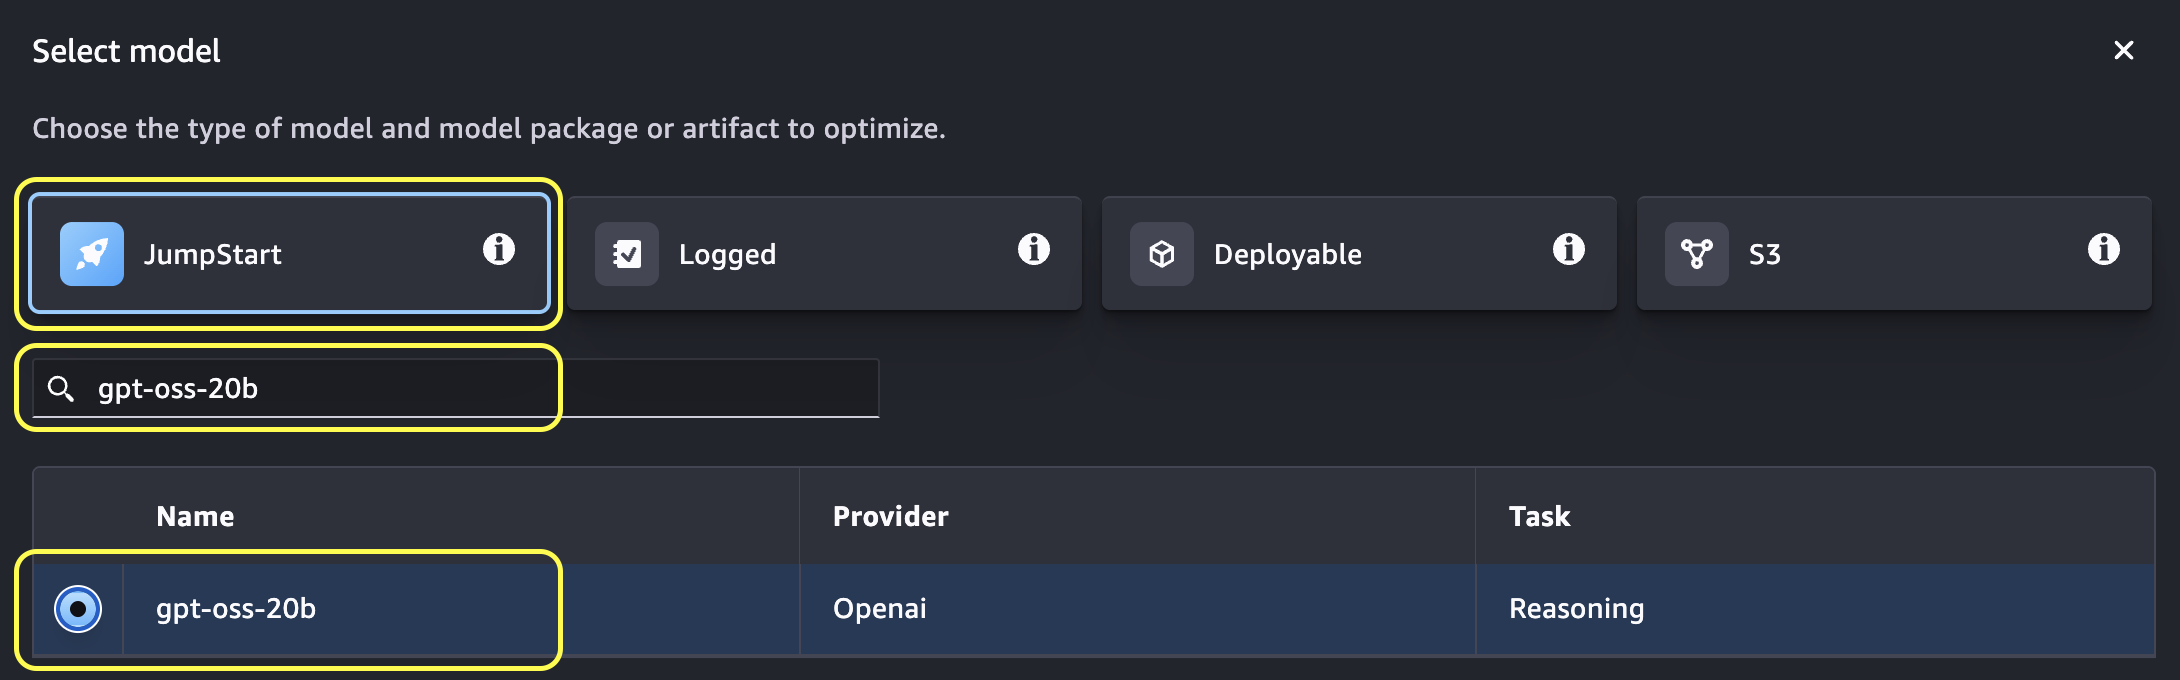
Figure 3a: Model selection modal showing the JumpStart tab with tabs for JumpStart, S3, Logged, and Deployable
If you select S3, you must provide a name and your model artifact’s S3 URI path.
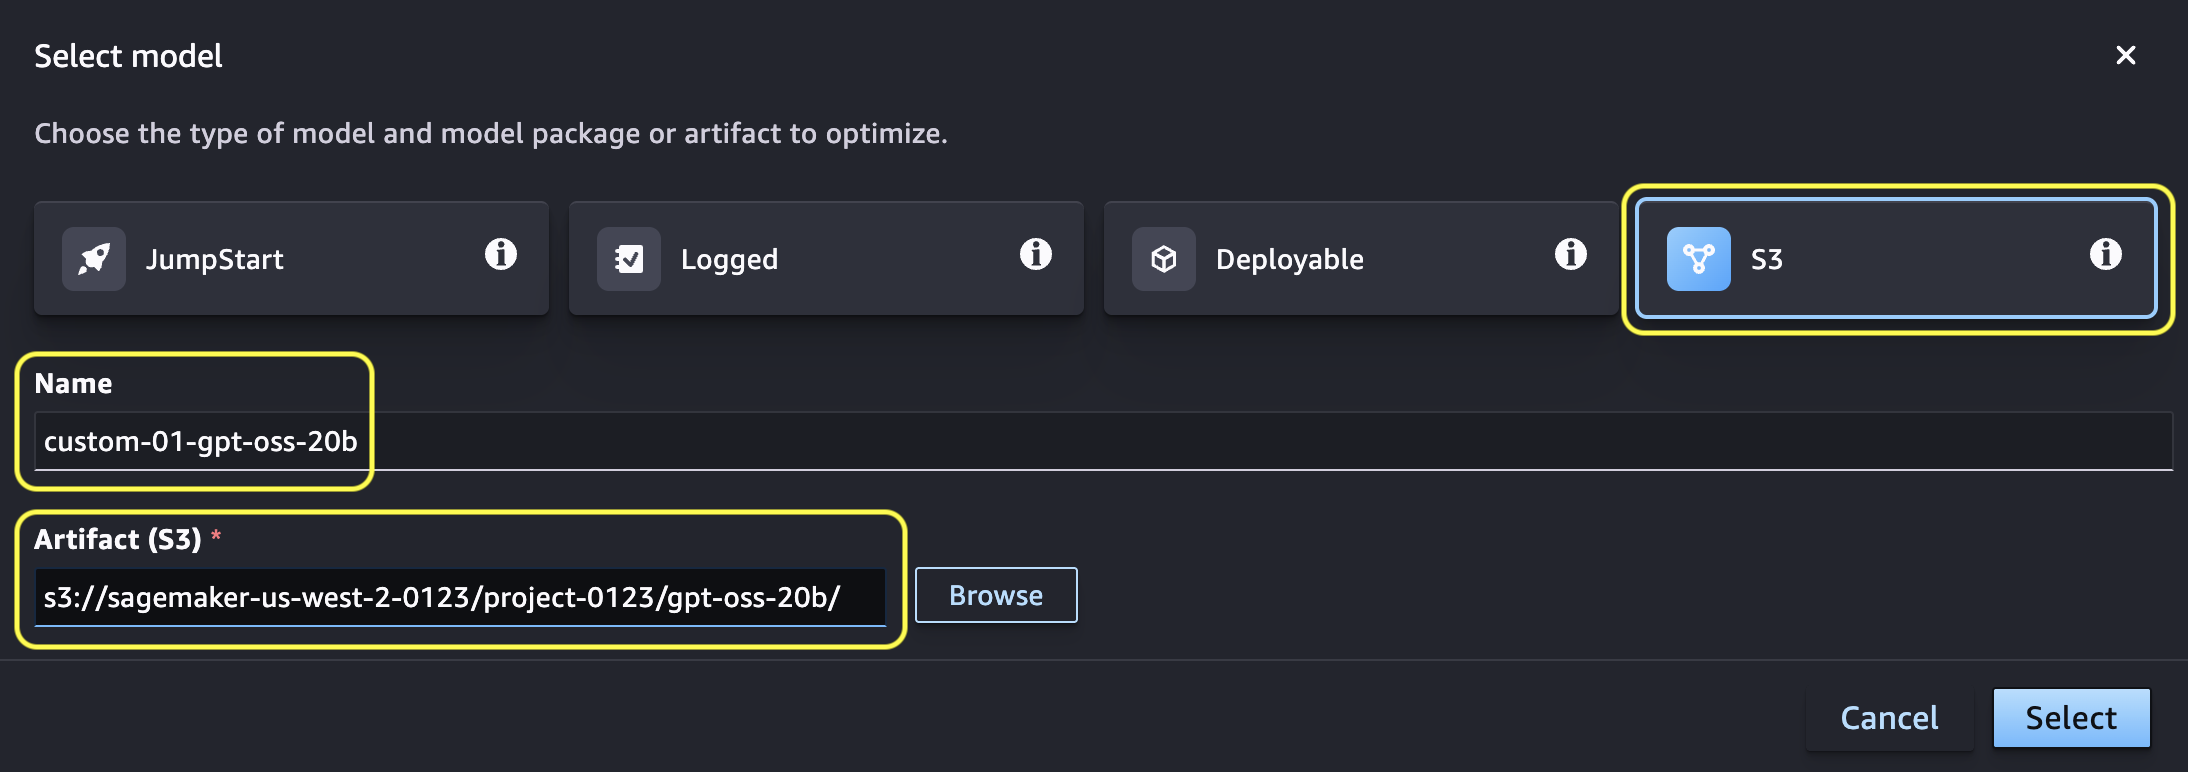
Figure 3b: Model selection modal showing the S3 tab with tabs for JumpStart, S3, Logged, and Deployable
With a model selected, you can either let SageMaker AI select the hardware for you or narrow the search to specific instance types.
Selecting compute is optional.
In step 2, if you select Minimize latency or Maximize throughput as your optimization goal, you can optionally expand the Compute section. From there, select specific instance types (for example, ml.g6e.2xl or g7e.2xl) for the job to evaluate. If you don’t specify, SageMaker AI selects compatible instances based on your model requirements. If you have reserved capacity through a flexible training plan, you can see it in the Source list.
Note: SageMaker AI selects a recommended instance for the Minimize cost use case.

Figure 3c: Compute section showing three instance types selected for the recommendations job to evaluate
Your configuration is now complete, and you’re ready to launch the job and watch it run.
Step 4: Launch and monitor
Choose Optimize to submit the job. You land on the job Detail page, where you can watch the status transition from Running to Completed. Preset use cases like Interact can return recommendations quickly because they are matched against pre-validated configurations, while custom benchmarks might take longer depending on model size, instance types, and dataset. To stop a job while it’s running, use the Actions menu.
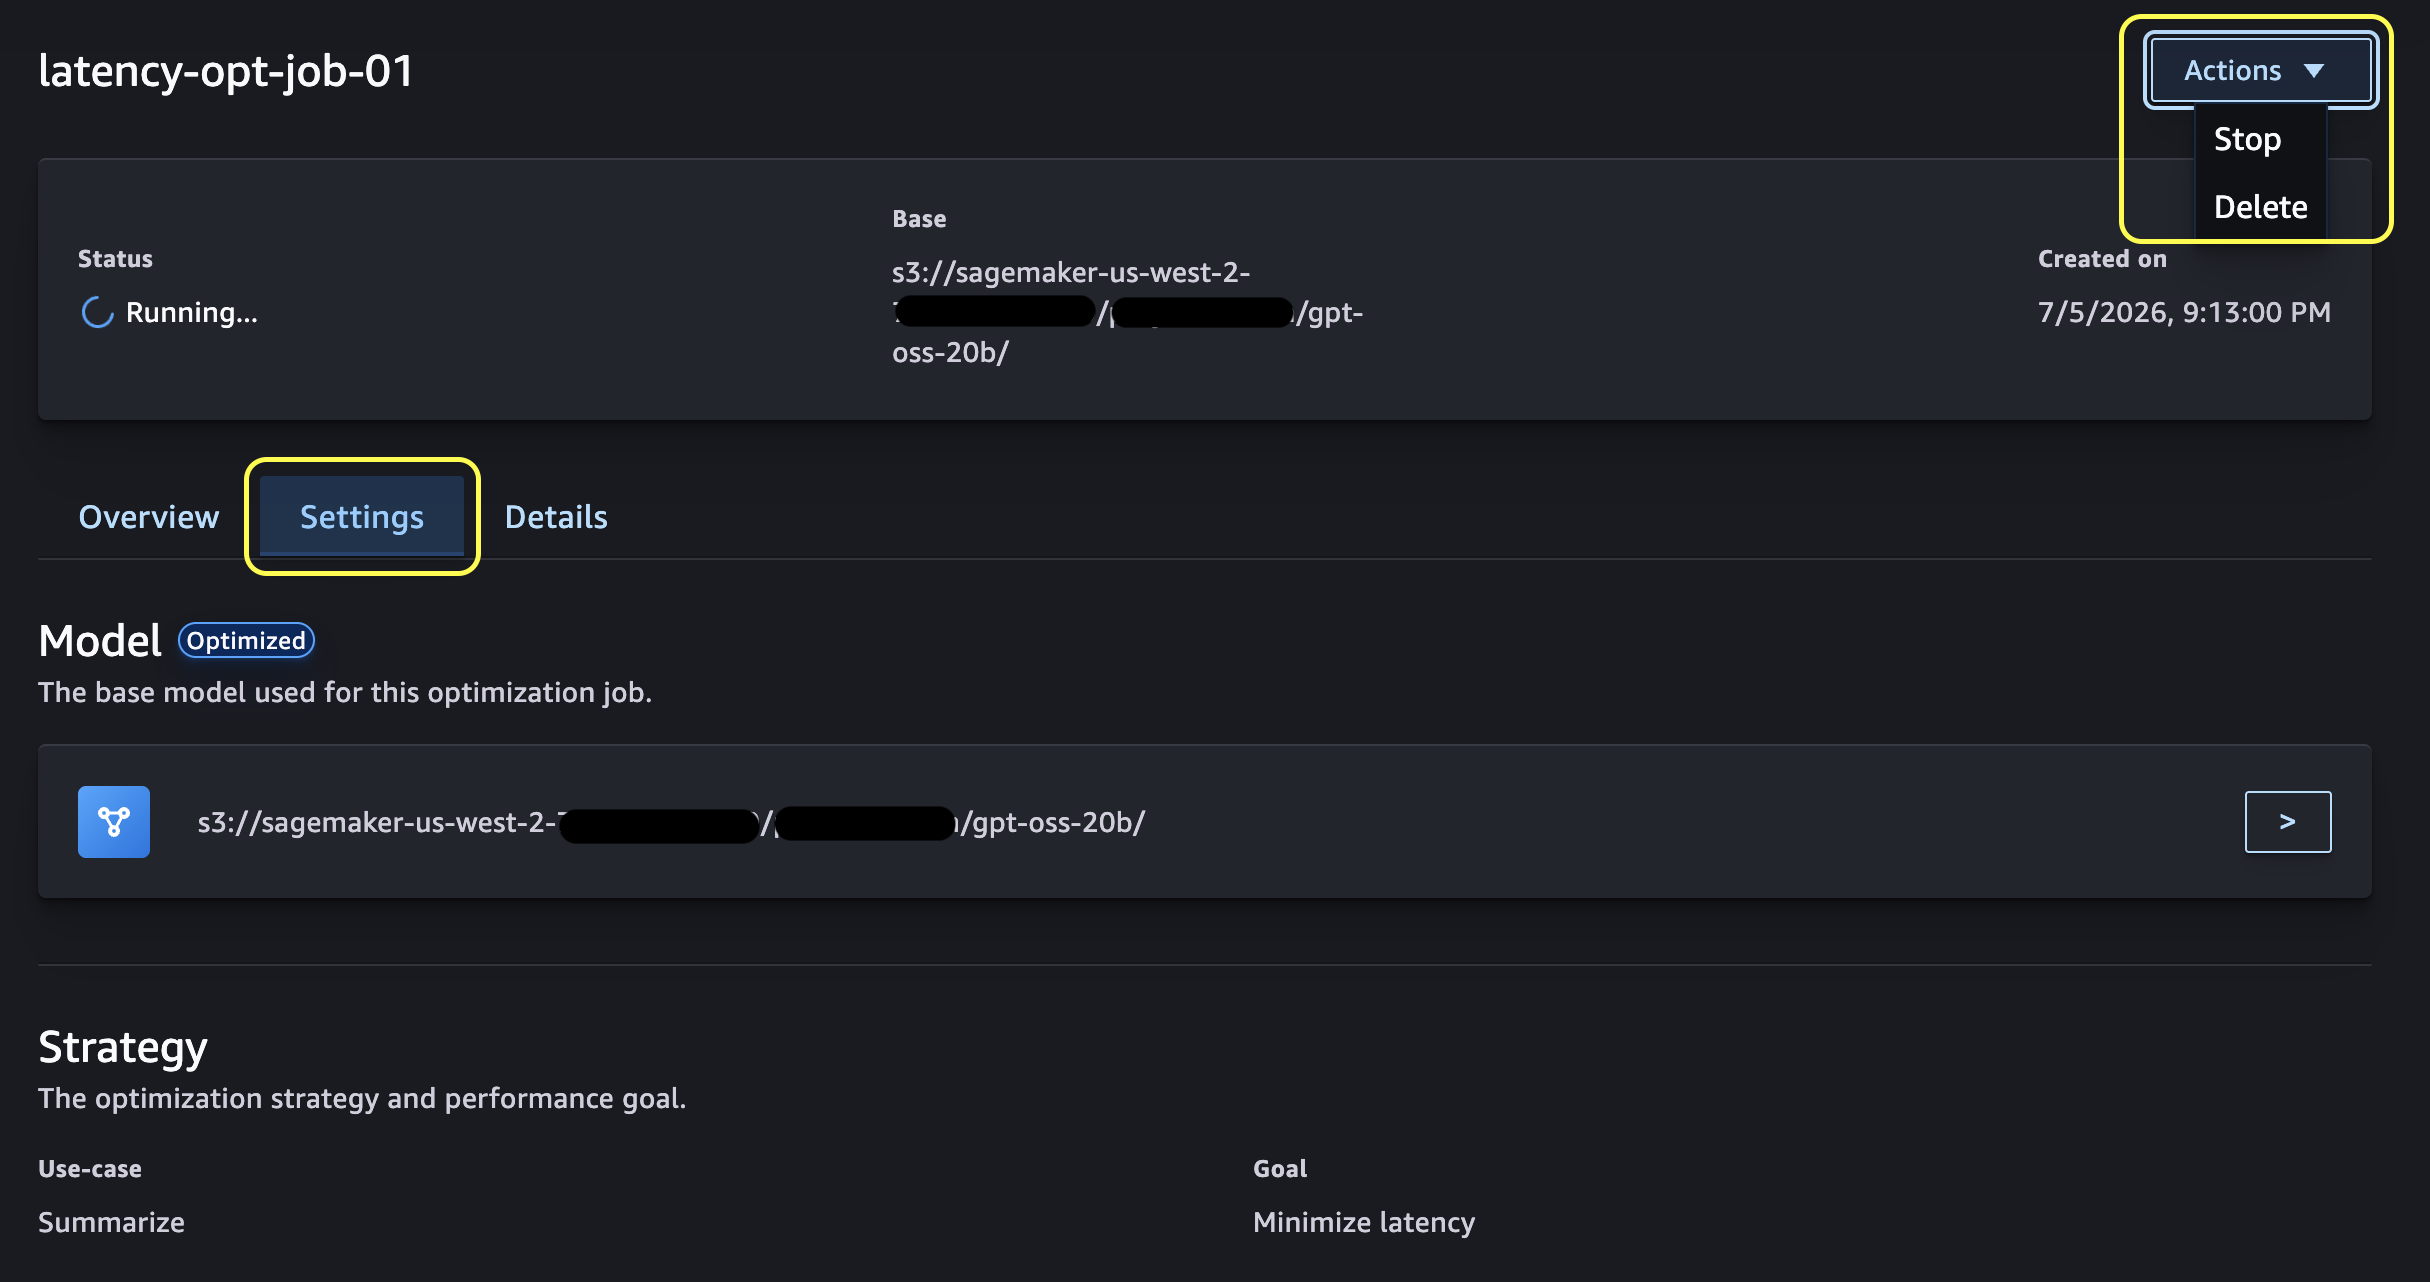
Figure 4: A running optimization job showing the Actions button, Settings tab, and status
Use the Detail page tabs to inspect your job. The Overview tab shows ranked recommendations with performance metrics, which appear after the job is complete. The Settings tab displays the configuration you submitted, including your use case, goal, and compute selections. The Details tab contains job metadata, timestamps, and output artifacts.
Step 5: Review recommendations and deploy
The Overview tab displays ranked inference packages. Each package shows the optimized configuration, performance metrics (time to first token (TTFT), inter-token latency (ITL), throughput, and cost), and a Deploy button.
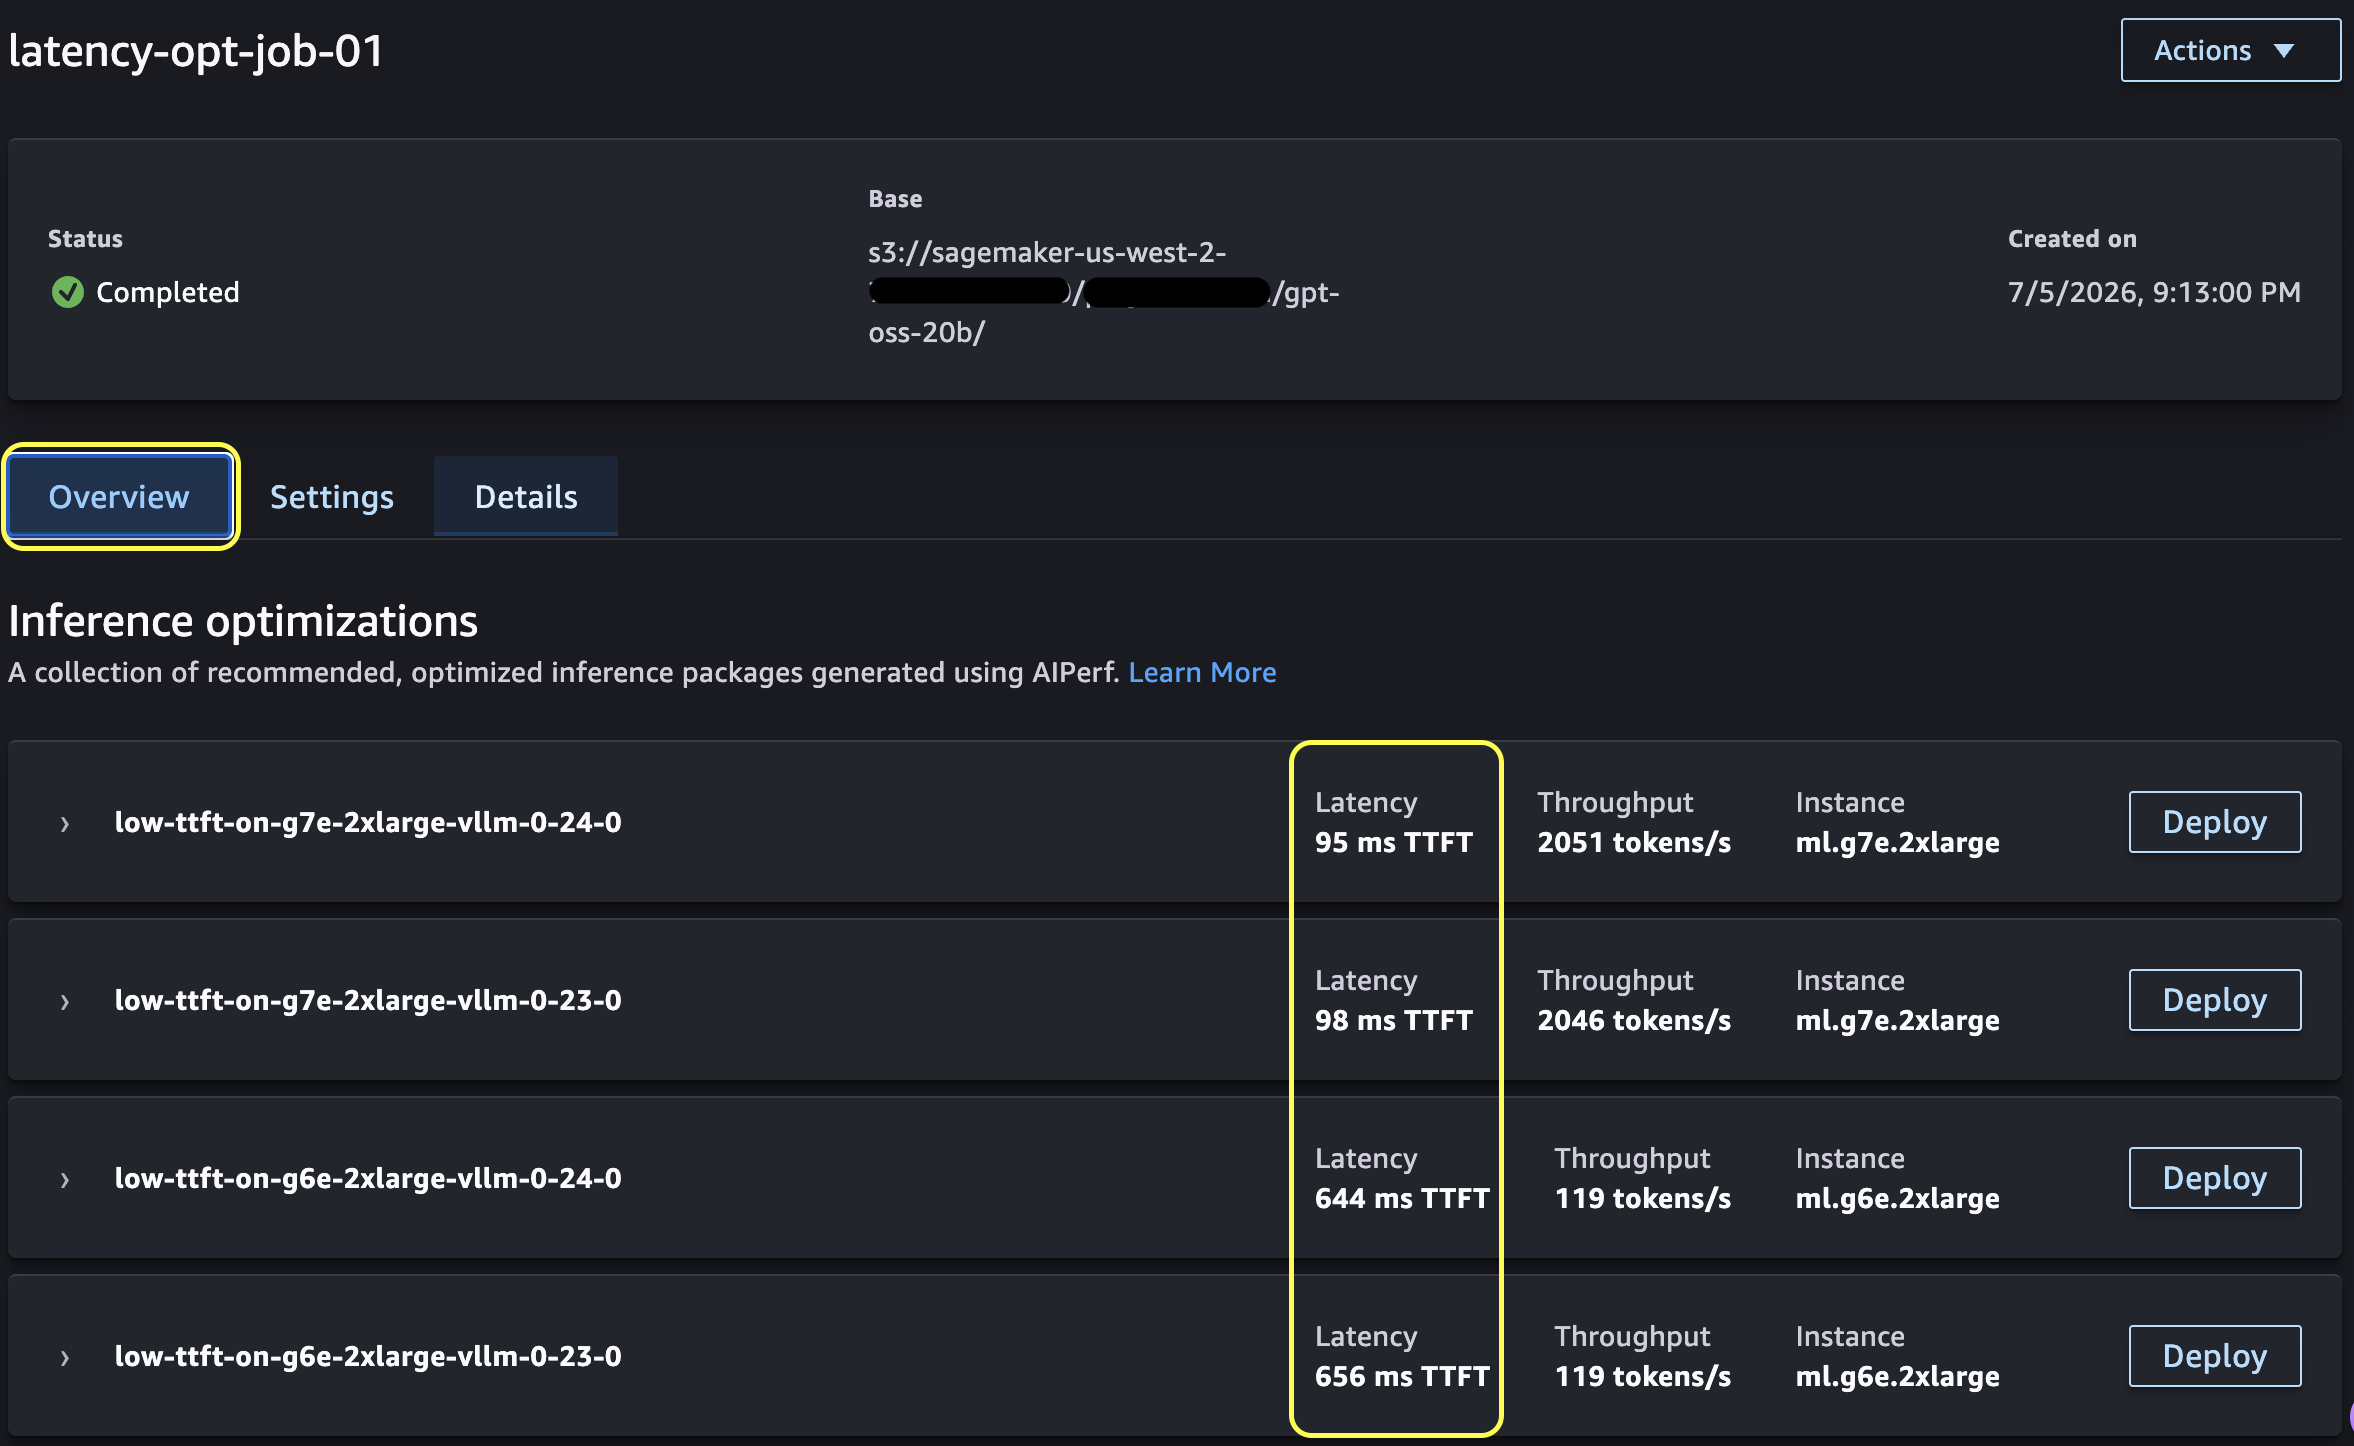
Figure 5: Completed job showing optimized inference packages with Deploy buttons
Choose Deploy on your preferred package. A window pre-fills the endpoint name and instance type. You can deploy to a new endpoint or update an existing one. SageMaker AI then runs three steps in sequence: it registers the optimized model, sets up the endpoint configuration, and provisions the endpoint. After the endpoint reaches In Service, you can invoke it immediately.
Managing optimization jobs
The Jobs, Inference optimization landing page gives you centralized management of your optimization jobs. You can use the search bar to filter jobs by name. To stop a running job, select the job, choose Actions, then choose Stop, and confirm. To delete old jobs, select a completed or failed job, choose Actions, then choose Delete, and confirm. You can also choose any job to view its Detail page, which includes Overview, Settings, and Details tabs.
How it works
The console experience and the API use the same recommendations and benchmarking infrastructure. SageMaker AI first analyzes your model architecture and memory requirements to reduce the configuration space and identify viable options. It then applies goal-aligned optimizations: speculative decoding for throughput or kernel tuning for latency, depending on your selected goal. SageMaker AI benchmarks every configuration on real GPU infrastructure using NVIDIA AIPerf with multi-run confidence intervals. Finally, it scores the results against your optimization goal and returns production-ready configurations, ranked from best to worst.
The inference optimization job runs multiple steps depending on the optimization goal that you selected. For minimum cost, SageMaker AI creates an endpoint using the instance type it recommends and runs benchmark jobs against it. To check the In Service status while the job runs, open Deployments and then Endpoints. To review the benchmark runs, open Training and then Training Jobs, and select your job.
For minimum latency, if the model architecture and instance type support it, SageMaker AI uses a kernel fine-tuned deployment. Otherwise, it creates one or more standard endpoints, each corresponding to an instance type. SageMaker AI then runs benchmark jobs as a training job for each combination. You can review the Endpoints and Training logs to monitor progress and troubleshoot issues.
For maximum throughput, if the model architecture and instance type support speculative decoding, a training job runs first to train the draft model before the endpoints are deployed. SageMaker AI then runs benchmark jobs as a training job for each combination. As with the other goals, you can review the Endpoints and Training logs to monitor progress and troubleshoot issues.
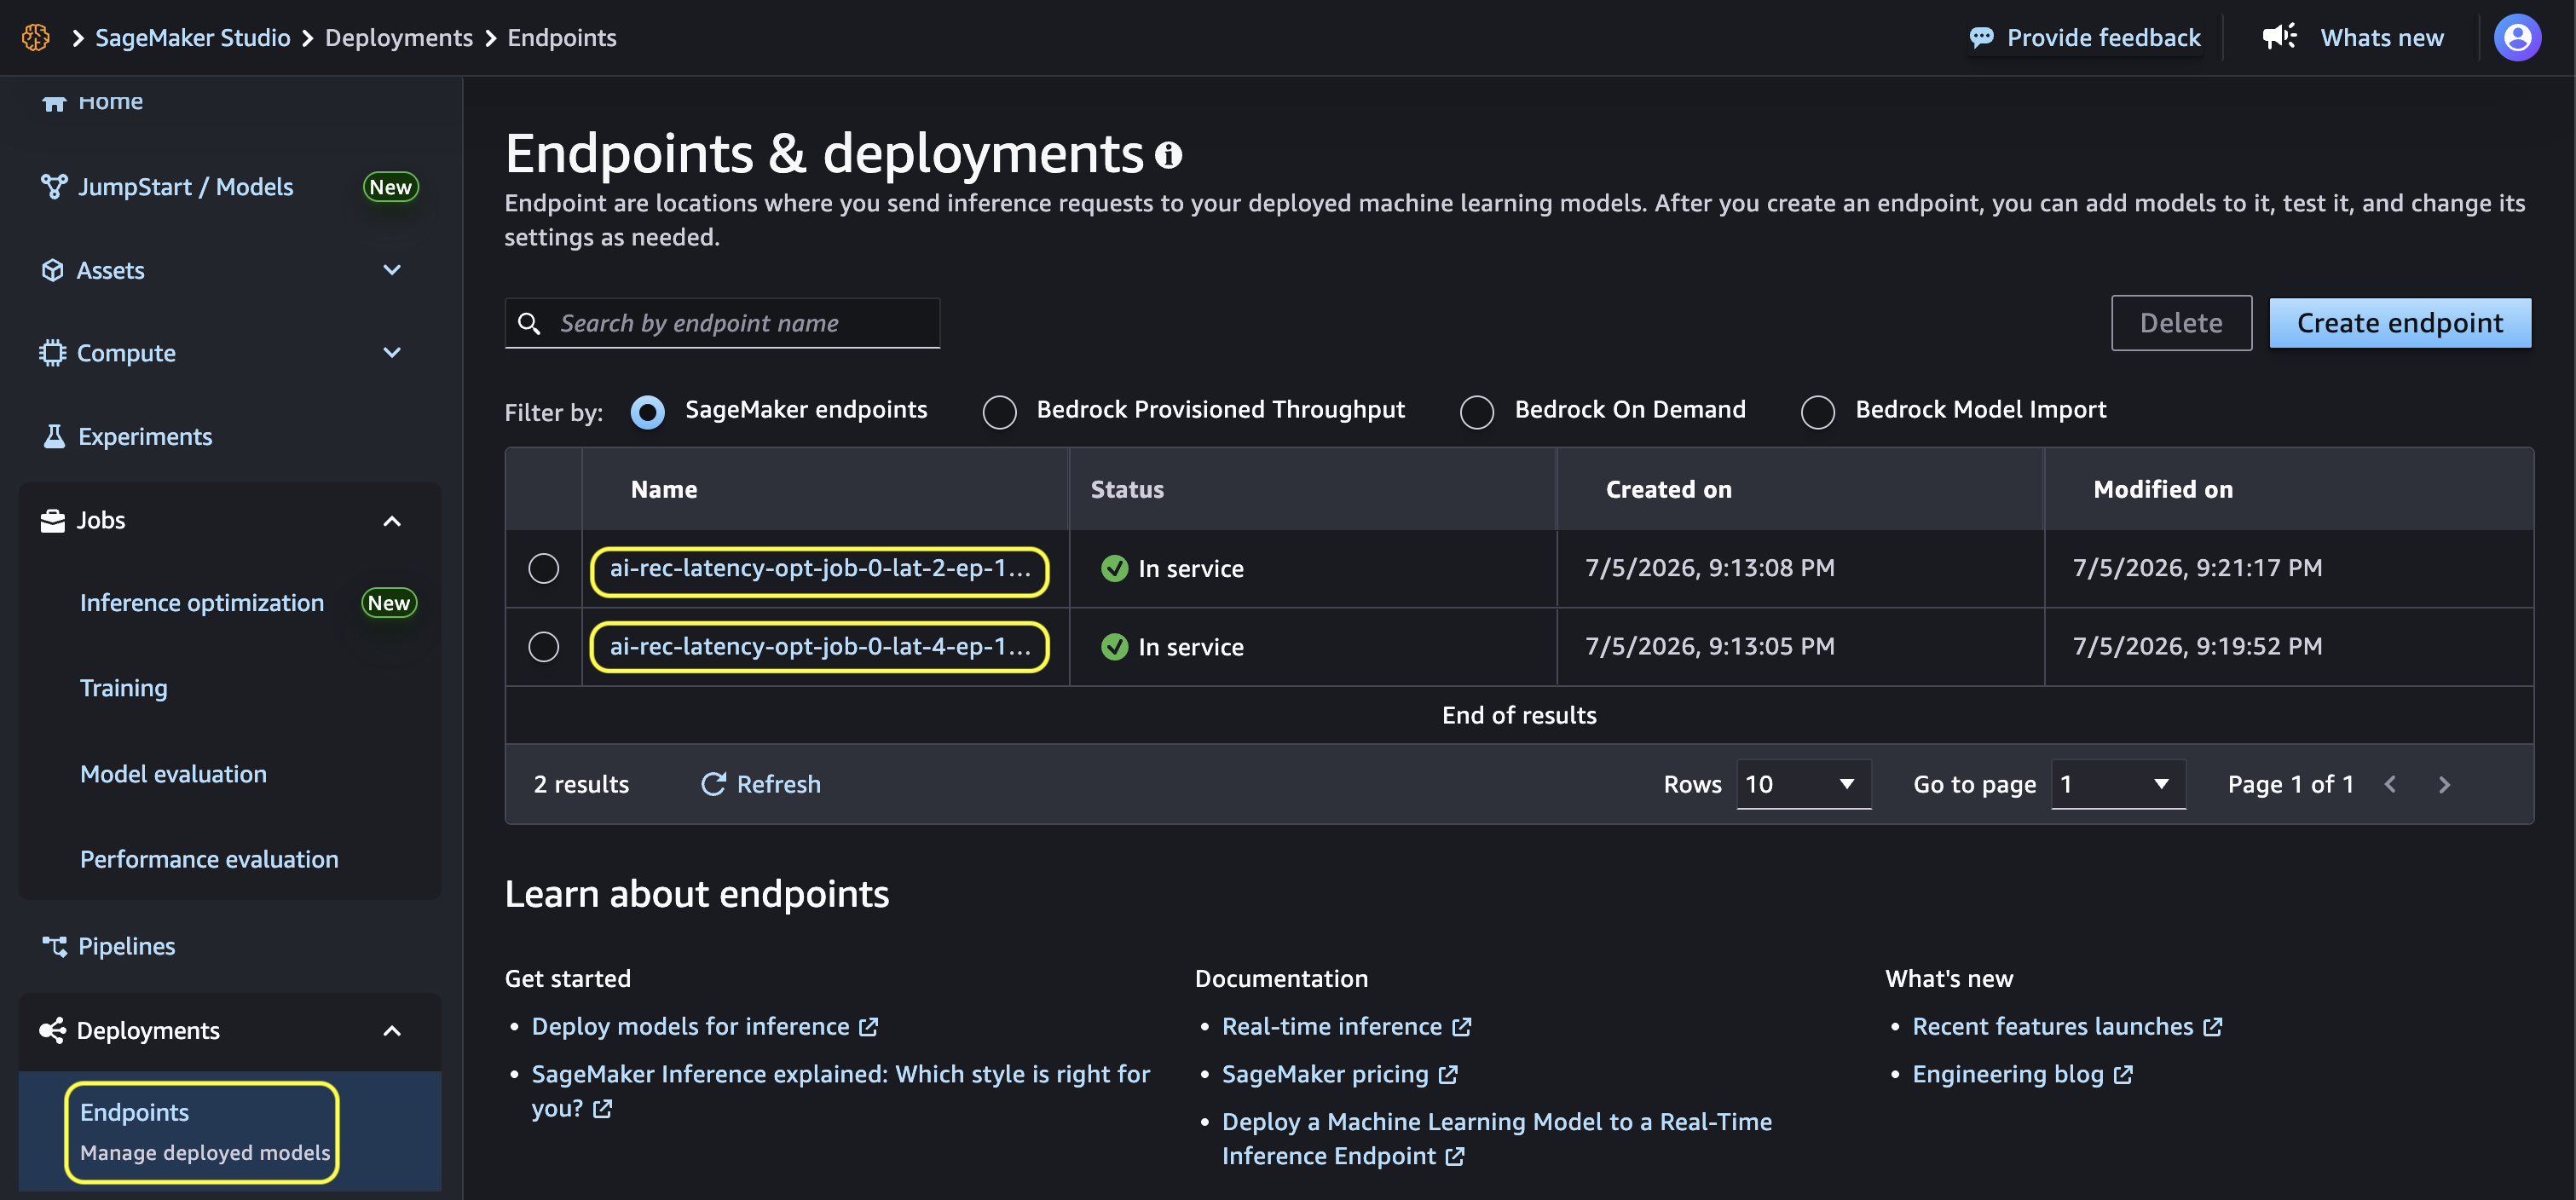
Figure 6a: In Service endpoints created by the inference optimization job for each instance type selected in Step 4
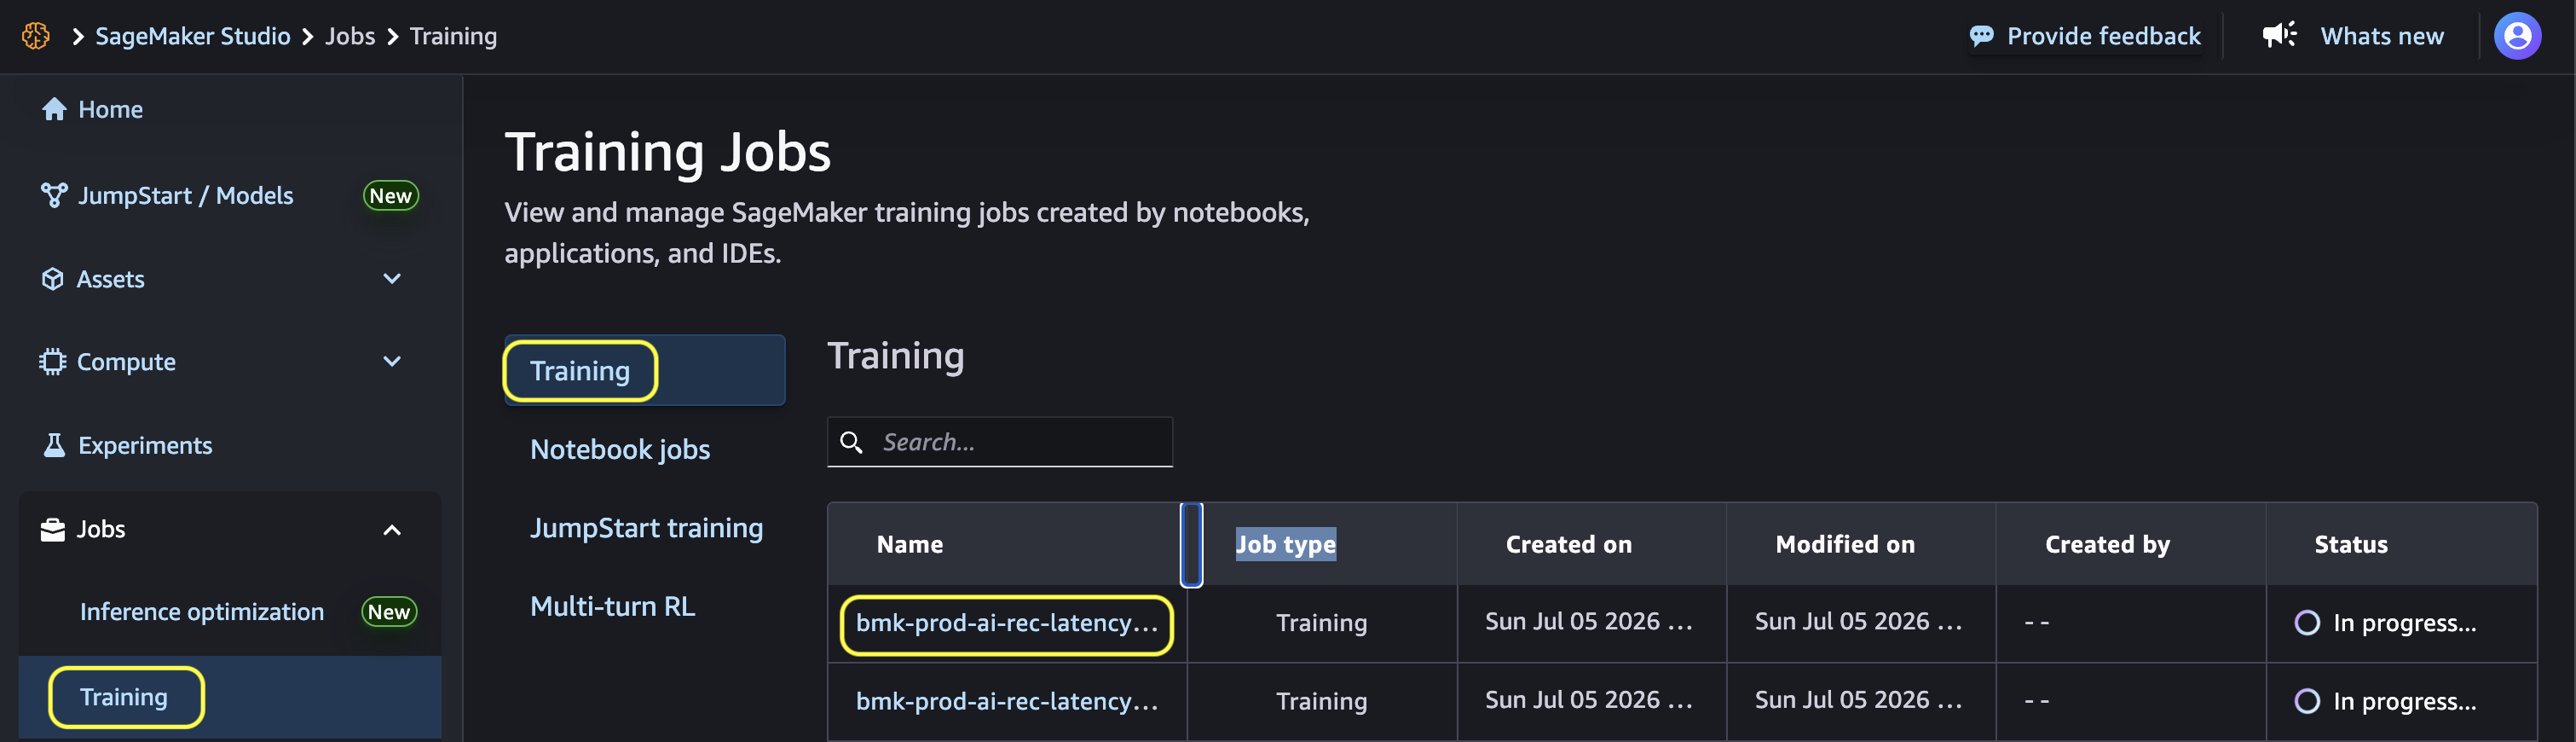
Figure 6b: In Progress training jobs shown for each benchmark test configuration
Note: The optimization job automatically deletes the endpoints after it completes.
Best practices
There are a few best practices to keep in mind. You should re-run optimization jobs after fine-tuning or updating your model. You should also re-run them when new instance types become available in your AWS Region, when traffic patterns change significantly, or after serving container or framework upgrades. It’s also a good idea to run them at a regular cadence, for example every few weeks, because the Amazon SageMaker AI team continuously adds new findings.
Conclusion
The console experience for generative AI inference recommendations in Amazon SageMaker AI Studio makes data-driven infrastructure decisions accessible to teams across your organization. With preset use-case profiles, a guided optimization workflow, visual recommendation comparisons, and one-click deployment, you can move from model selection to a configuration validated against your workload faster.
Start by creating your first optimization job in Amazon SageMaker AI Studio, and explore the documentation for detailed guidance.
Related resources
- Blog: Amazon SageMaker AI now supports optimized generative AI inference recommendations (API launch).
- Documentation: Optimize model inference in Amazon SageMaker AI.
- Sample notebooks: Generative AI inference recommendations examples on the GitHub website.