Artificial Intelligence
Production MLOps at GS Caltex with Amazon SageMaker Canvas, part 1
GS Caltex uses Amazon SageMaker Canvas and Amazon SageMaker Pipelines to connect process engineers’ models to production workflows. The South Korean energy and chemical company divides model development and operations between engineers with complementary skills.
Process engineers build and validate models in SageMaker Canvas without writing code, drawing on their process knowledge. Machine learning (ML) engineers configure SageMaker Pipelines workflows for deployment and scheduled inference.
Moving assets from SageMaker Canvas into SageMaker Pipelines still required integration work. ML engineers had to set data paths for production, supply the model configuration, and connect preprocessing and inference jobs. GS Caltex automated this handoff while reusing the assets created in SageMaker Canvas.
GS Caltex reports that its ML engineers now deploy models within a few hours, compared with about a week before. The company runs batch inference every 30 minutes, reducing the need for continuously running endpoints. GS Caltex reports that this has meaningfully lowered its inference costs.
This post explains how GS Caltex connects SageMaker Canvas to SageMaker Pipelines and reuses validated preprocessing flows and models in production.
Solution overview
The machine learning operations (MLOps) workflow has two paths: preparing a new model version for deployment, and running batch inference with the deployed model.
From a validated model to a repeatable workflow
You can use SageMaker Canvas to prepare data visually, build models, and generate batch predictions. You can also register validated models in Amazon SageMaker Model Registry from SageMaker Canvas. GS Caltex built a separate handoff process to turn these assets into executable SageMaker Pipelines steps.
Process engineers understand the variables and data behind a process and assess whether a model’s predictions are useful. ML engineers turn the resulting assets into production jobs and manage model versions and execution history.
| Area | What is prepared in SageMaker Canvas | What is managed in the production workflow |
| Data preparation | A preprocessing flow built with Data Wrangler | Preprocessing jobs in Amazon SageMaker Processing |
| Model development | A trained model and evaluation results | Model versions and approval status in Model Registry |
| Prediction | Validation of model predictions | Batch inference every 30 minutes using an approved model |
| Operations | Development and validation of individual models | Step execution history, stored results, and failure handling |
Reference architecture
The following diagram shows how process engineers hand off SageMaker Canvas assets to ML engineers for deployment and scheduled inference. ML engineers use Amazon Simple Storage Service (Amazon S3) for preprocessing flows and Model Registry for model versions, then schedule pipeline runs through Amazon EventBridge.
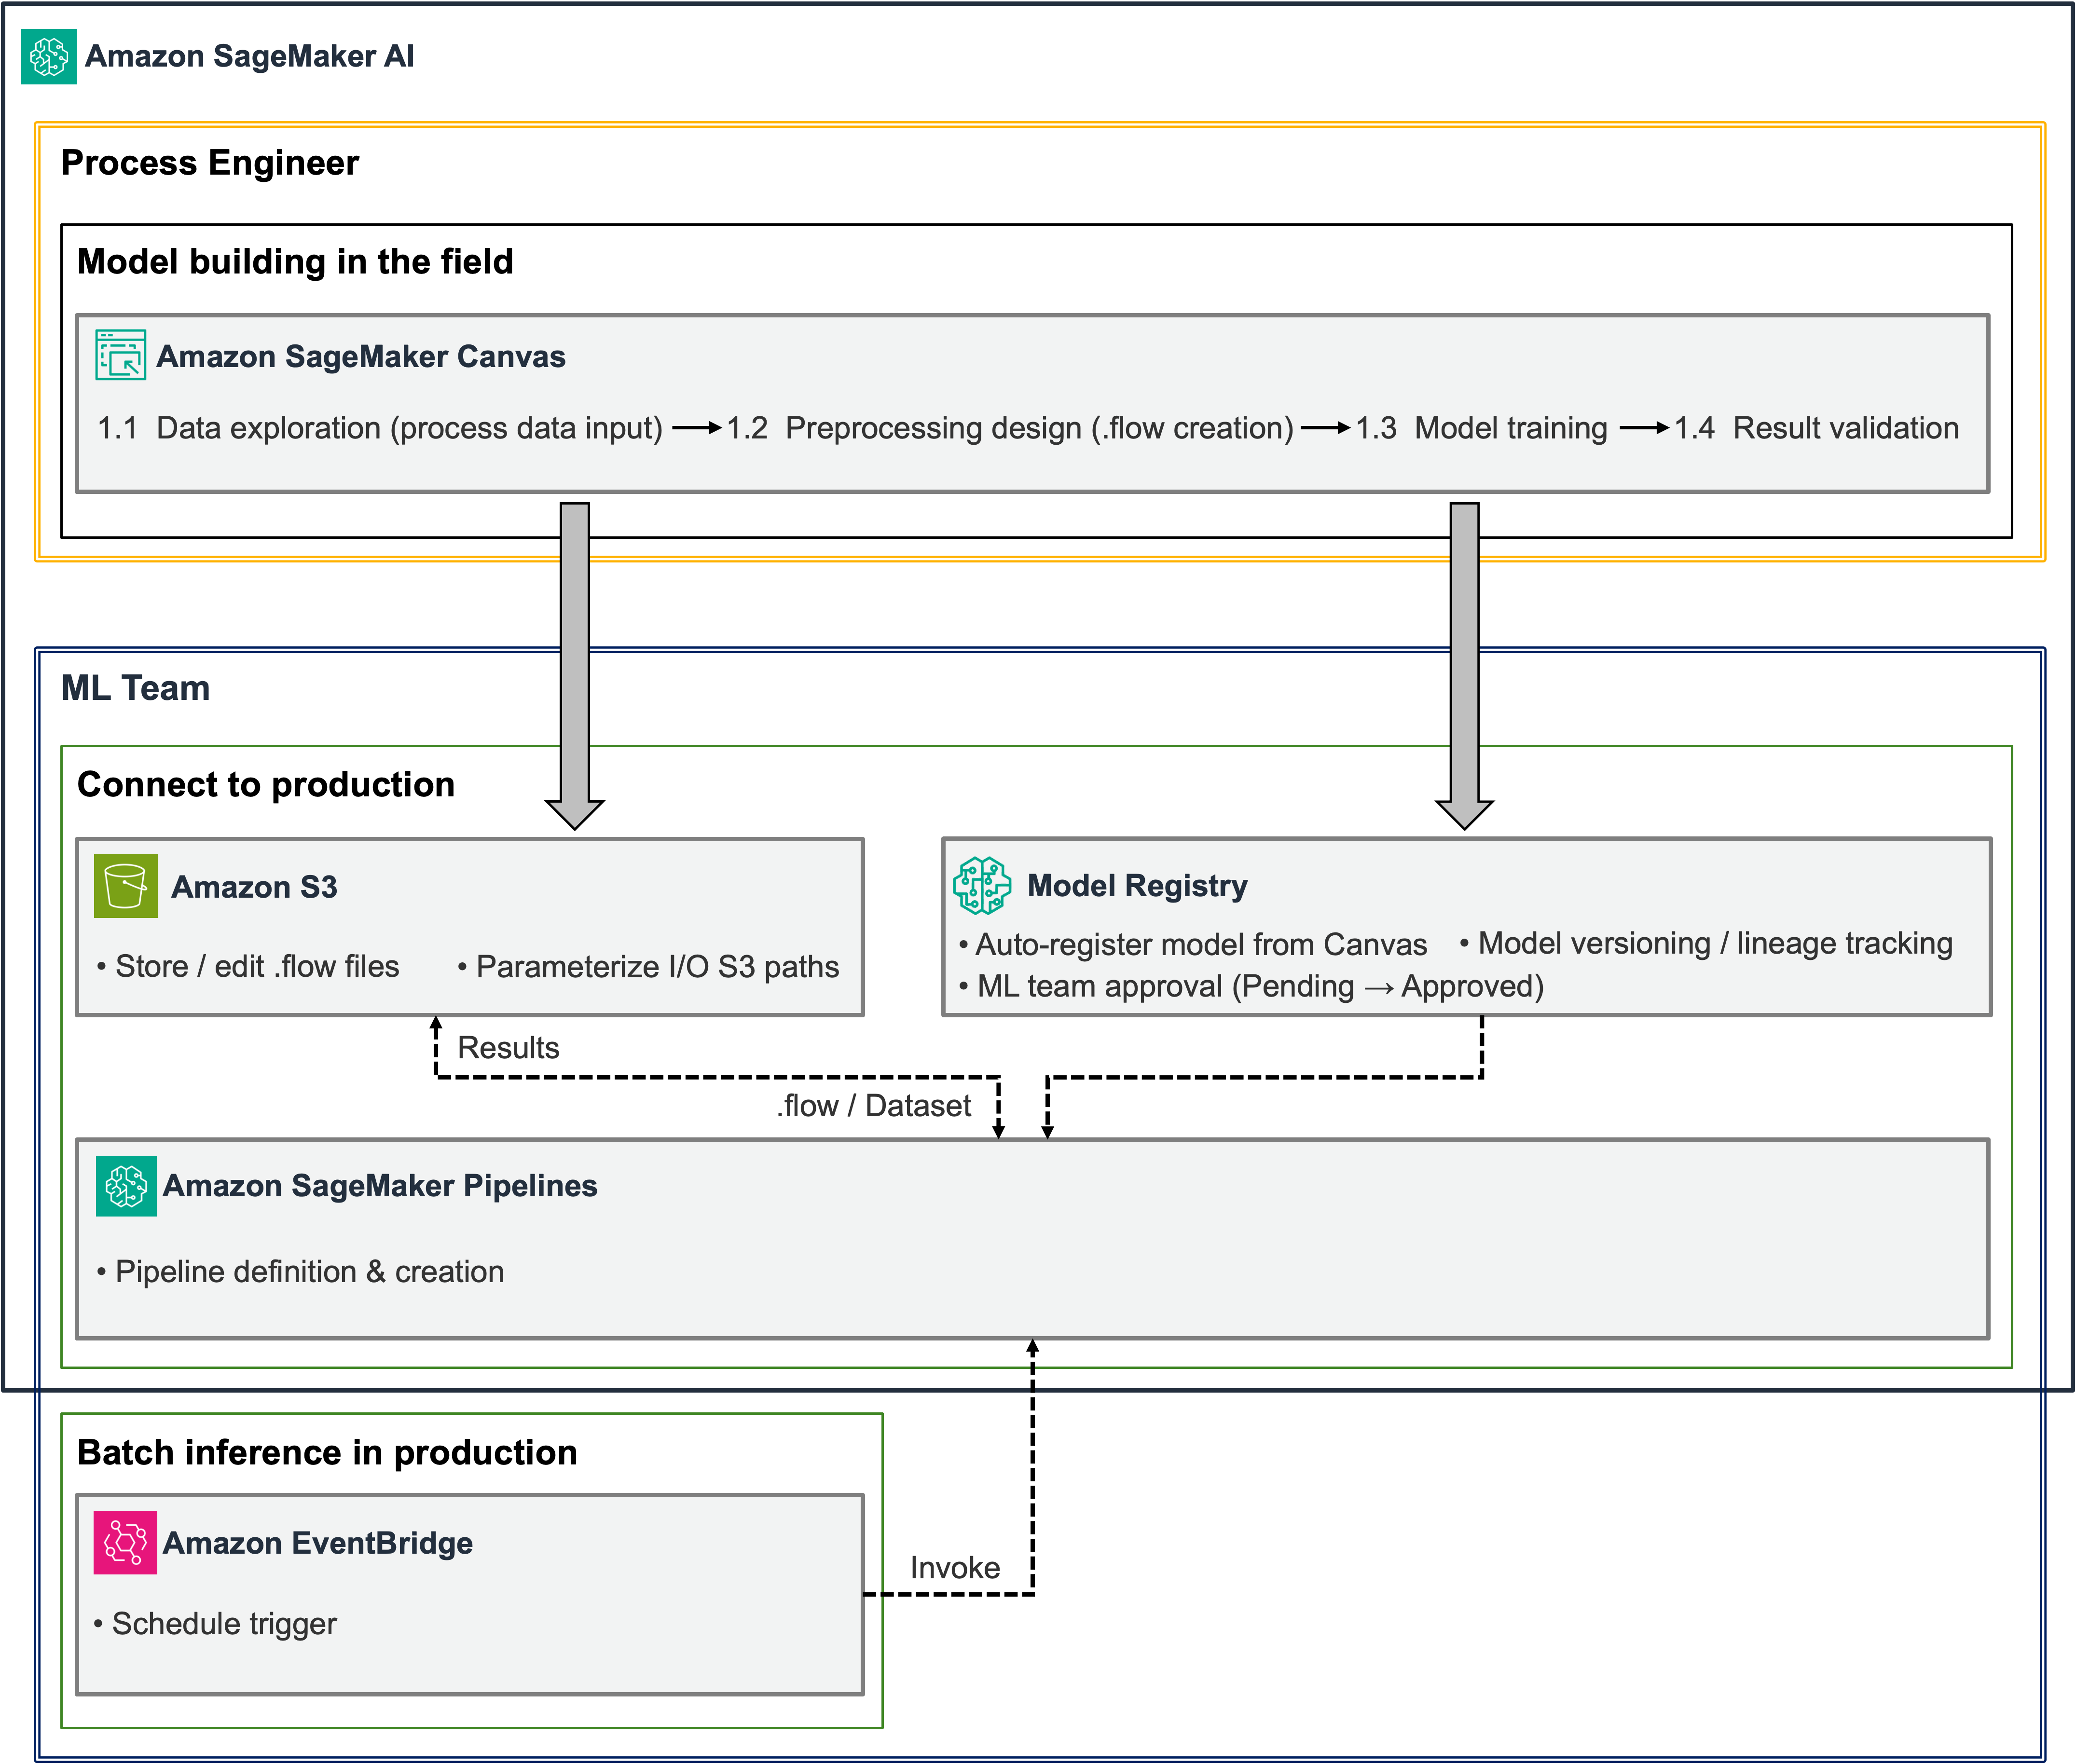
Figure 1: SageMaker Canvas assets connected to a SageMaker Pipelines workflow for scheduled batch inference
ML engineers receive the preprocessing flow and model from SageMaker Canvas and review the data formats and prediction results. After that review, they approve the model in Model Registry and deploy it. This preparation takes place when a new model version is deployed. Subsequent inference runs reuse the deployed model.
Amazon EventBridge starts each scheduled run. SageMaker Pipelines prepares the input data from Amazon Simple Storage Service (Amazon S3), runs preprocessing and SageMaker Batch Transform, and stores the results in S3. ML engineers can inspect step status and Amazon CloudWatch logs to monitor the workflow.
The production pipeline reuses the preprocessing logic and trained model created in SageMaker Canvas. ML engineers configure the input and output paths, set the order of execution, and write the code that connects approval and scheduling to the workflow.
Prerequisites
Before you begin, prepare the following:
- A model built and evaluated in SageMaker Canvas, along with its Data Wrangler preprocessing flow
- CSV data for inference and an S3 bucket to store the files.
- A SageMaker execution role and an Amazon EventBridge role with permission to start the pipeline
- A Python environment with Boto3 and SageMaker Python SDK 2.x installed.
The full reference implementation is available in the GitHub repository. The code examples in this post focus on the connections between components. The repository uses a sample loan classification model, so adjust the configuration to match your model’s input and output formats.
Technical implementation
The following steps cover preprocessing reuse, model approval and deployment, pipeline construction, and scheduled inference.
1. Run the SageMaker Canvas preprocessing flow with SageMaker Processing
A preprocessing flow created with Data Wrangler in SageMaker Canvas records the data sources and transformation steps. To set up the reference implementation, export data to Amazon S3 using SageMaker Processing, then retrieve the job settings and the .flow file used by that job.
In the export settings, turn off Auto job configuration and select SageMaker Processing. After the export starts, open the Processing job details on the Amazon SageMaker AI console. Record the container image URI, the S3 URI of the input named flow, the execution role, and the output settings. Use these values to configure the pipeline step that runs the .flow file.
The SageMaker execution role must have permissions to read the required S3 data, write the results, and access the container image. Choose the instance type and count based on the volume of data you need to process.
Keep the preprocessing logic validated by the process engineer, and adjust the data sources, paths, and other settings for the production environment. Check the container image and output node against the original job configuration.
| Item to check | What to do |
| Input location | Check the S3 URI referenced by the data source in the .flow file. Uploading raw data to another location does not update this reference. |
| Container image | Use the image from the Processing job created during the S3 export, and pin a version that reproduces the validated transformations. |
| Output ID | Use the output node and output name from the exported configuration. If the required format is {node_id}.{output_name}, match it exactly. |
| Learned transformation values | Preserve values learned during training, such as scaling and encoding parameters. Do not refit them on each inference batch. |
| Validation | Compare the columns, data types, and transformed values produced by SageMaker Canvas and Processing for the same input. |
Some .flow files contain execution metadata such as internal_metadata.dw_job.container_uri. Check the actual Processing job settings rather than assuming that every export contains this field. If you move the workflow to another AWS Region, verify that the container image is available there.
The reference implementation separates intermediate and final outputs by execution under runs/<execution-id>/. Its PrepareInput step writes data to a fixed S3 location referenced by the .flow file. Prevent executions that share that input path from overlapping.
To isolate input data for each execution as well, add a preparation step that updates the source URI in a copy of the .flow file. Declaring a SageMaker Pipelines parameter does not automatically replace a URI inside the file.
2. Handle differences between training and inference inputs
The target column is one difference between training and inference data. A flow built with training data can contain transformations that expect the target column in the input schema. Inference data does not contain that known outcome.
The reference implementation adds a PrepareInput step before preprocessing. If the target column is missing, this step adds it with a placeholder value. After preprocessing, DropTargetColumn removes the column. Match the placeholder’s data type and column position to the training schema, and pass only the expected features to the model in their original order.
Use this approach only when the placeholder target does not affect feature values. A flow that filters rows by the target, derives features from it, or applies target encoding needs additional treatment. In those cases, separate the transformations and learned state required for inference.
Validation should cover column order and count, data types, missing-value handling, and row count. After removing the target, check that the remaining columns match the feature order used during training.
3. Register, approve, and deploy the model
Register the validated SageMaker Canvas model version in Model Registry. The registered version can include the model files, inference configuration, and evaluation results. ML engineers review this information before changing the approval status.
The model file, such as model.tar.gz, must be used with the correct inference container and environment settings. A model package in Model Registry groups this information together. In this batch architecture, deployment creates a SageMaker model resource from an approved package for Batch Transform to reference.
The following example checks a package that has already been approved, then creates the model resource. Supply model_package_arn, model_name, and sagemaker_role_arn during deployment. This example uses a unique model name for each version.
Model Registry records approval status, but it does not enforce an approval check on every inference request. Check that status in the deployment code and retain the selected package ARN and model name in the pipeline configuration. If approval is revoked, update the schedules and execution configurations that use the model.
Registration and deployment take place when a model version is released. The pipeline that runs every 30 minutes creates Batch Transform jobs using that model, so it does not need to register the model again on each run.
4. Connect preprocessing, inference, and result assembly
The inference pipeline has five steps.
| Step | Function | Input and output |
PrepareInput |
Add a placeholder target column if needed | New inference data -> data with the target column supplied |
PreprocessNewData |
Run the SageMaker Canvas preprocessing flow | Prepared input and .flow -> transformed data |
DropTargetColumn |
Remove the target column and CSV header | Transformed data -> feature CSV without a header |
BatchPredict |
Run batch inference with the approved model | Feature CSV -> prediction files |
AssembleResults |
Combine the preprocessed data with predictions | Preprocessed data and prediction files -> final result CSV |
Configure each job before connecting the steps. In the following example, prepare_args, preprocess_args, drop_target_args, and assemble_args hold the step arguments returned by run() calls on processors that use a PipelineSession. The processors and transformer share the pipeline_session object. Configure the transformer with the previously deployed model_name.
The following execution graph shows the five steps in the sample loan model’s inference workflow. They prepare inputs, apply preprocessing, remove the target column, run batch inference, and assemble results. The execution was in the Executing state when this screenshot was taken.
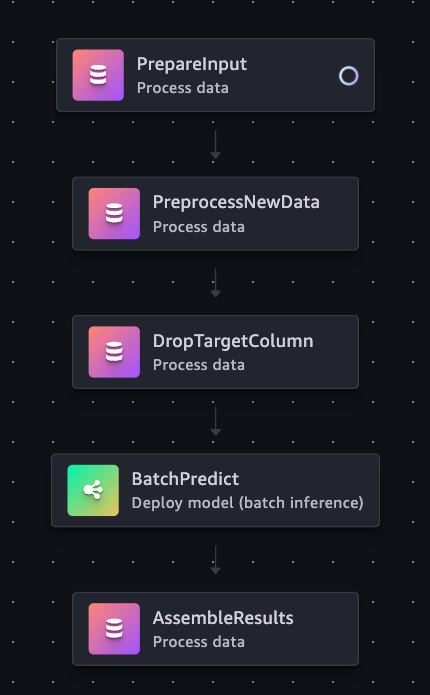
Figure 2: SageMaker Pipelines execution graph for the sample loan model
Use depends_on to control execution order, and pass data through step output properties. For example, assemble_args must receive the location of the preprocessed data and predict.properties.TransformOutput.S3OutputPath. The output name "features" belongs to DropTargetColumn. The Data Wrangler step uses the output ID defined in its preprocessing flow.
In the reference implementation, AssembleResults combines the preprocessed data and predictions by row position. Before using it in production, add checks that file order and row counts match, and stop result generation if they do not. If preprocessing sorts or removes rows, maintain an explicit mapping between source record IDs and predictions.
5. Schedule inference every 30 minutes
GS Caltex runs inference every 30 minutes. The following example uses an Amazon EventBridge rule to schedule SageMaker Pipelines executions. Create the pipeline and verify it with a manual run before attaching the schedule.
Set eventbridge_role_arn to a role that trusts the Amazon EventBridge service principal, events.amazonaws.com, and has sagemaker:StartPipelineExecution permission for the target pipeline. The pipeline_arn value identifies the pipeline created in the previous step.
The expression rate(30 minutes) schedules runs at 30-minute intervals. To run on the hour and half hour, use cron(0/30 * * * ? *). Decide which data window each run processes in the input preparation step, and record it with the execution.
Operational considerations
Before enabling scheduled runs, check the total cost, execution time, and handling of invalid or mismatched data.
Evaluate batch costs across the full workflow
Amazon SageMaker Pipelines is a serverless workflow orchestration service. It manages execution order and dependencies without a workflow server for you to provision or maintain. Processing and Batch Transform jobs use separate compute resources and are billed according to instance type and duration.
A provisioned real-time endpoint is a good fit for requests that need a consistently low-latency response. Batch Transform suits workloads that can process a set of records together. It releases the job’s compute resources when the job finishes, so you can run predictions without keeping an inference endpoint running continuously for each model.
| Consideration | Provisioned real-time endpoint | SageMaker Pipelines with Batch Transform |
| Resource lifecycle | Instances remain available to serve requests | Resources are provisioned and released for each job |
| Cost drivers | Endpoint uptime and capacity | Job duration, frequency, instance count, and supporting services |
| Suitable workloads | Immediate responses and ongoing online requests | Processing accumulated data at scheduled intervals |
| Adding a model | Endpoint capacity and ongoing hosting costs | Additional processing, job duration, and concurrency limits |
A 30-minute schedule produces 48 scheduled runs per day. Include preprocessing, instance startup, inference, and postprocessing when estimating total runtime. The cost comparison should also account for Processing, S3, CloudWatch, and other services used by the workflow.
Assess the cost of each workload using its measured usage, including the supporting services and the full runtime of every scheduled job.
Check runtime and overlapping executions
A schedule that starts a run every 30 minutes does not guarantee that each run finishes within that interval. Measure the full pipeline runtime with representative data, including instance startup and the time needed to retry failed jobs.
Decide how to handle a scheduled run that arrives before the previous execution has finished. Controlling parallel steps within a pipeline does not prevent separate pipeline executions from overlapping. Check active executions, prevent duplicate processing of the same input window, and separate the output paths for each run.
Record the input data window, preprocessing flow version, model package ARN, pipeline execution ARN, and output location for each run. These details help reproduce results and investigate errors.
Validate outputs and failure behavior
Complete the following checks before you enable the schedule:
- Run a validation dataset through SageMaker Canvas and Processing. Compare the output columns, data types, row counts, and key transformed values.
- Check that adding a placeholder target does not change feature values, and that the target is removed from the model input.
- Run Batch Transform with the approved model version and verify the association between source records and predictions.
- Confirm that an invalid input schema or preprocessing failure prevents downstream inference and result publication.
- Measure runtime and cost, test overlapping executions and reprocessing of the same input window, and then enable the 30-minute schedule.
Add CloudWatch alerts for job failures and processing delays, together with data quality or model monitoring as needed. Set initial thresholds from measured runtime and data characteristics, and review them when the model or data volume changes.
Adoption approach and results
With a staged rollout, a team can verify the handoff before standardizing it across models. The following sections describe an adoption approach and the results GS Caltex reported.
Move from model development to regular operation
Start by validating the path to production for one model, then standardize the steps that repeat across deployments. The following sequence is a suggested adoption approach based on the GS Caltex experience.
| Stage | Goal | Scope |
| Crawl | Reproduce development results in production | Validate the SageMaker Canvas model, register it in Model Registry, and run the pipeline manually |
| Walk | Establish reliable scheduled operation | Check approvals, schedule runs at the required interval, add failure alerts, and manage outputs by execution |
| Run | Reuse the operating process across models | Introduce common templates, continuous integration and continuous delivery (CI/CD), change validation, and procedures for transferring operational responsibility |
As automation expands, process engineers continue to assess whether the predictions are useful for the process. ML engineers manage pipeline execution and changes.
Results at GS Caltex
GS Caltex reduced the repeated work needed to connect SageMaker Canvas models to production. ML engineers now deploy models within a few hours, compared with about a week previously. They also reuse the assets that process engineers validated in SageMaker Canvas.
Process engineers began proposing applications in other processes after seeing their models used in production. ML engineers spent less time repeating integration work and could focus on operating and monitoring the pipelines.
| Outcome | Reported result |
| Model deployment time | Previously about a week. Now within a few hours |
| Inference frequency | Every 30 minutes |
| Cost impact | Meaningful cost savings |
| Engineering work | Process engineers proposed new applications; ML engineers focused on pipeline operation and monitoring |
Clean up test resources
For a test deployment, disable the Amazon EventBridge rule and remove its targets first. After active pipeline executions and jobs have finished, delete the test pipeline and its SageMaker model resources.
If you created a real-time endpoint for testing, delete it as well. Remove input, intermediate, and prediction files from S3, and clean up CloudWatch logs according to your retention policy. Check whether other executions or audit requirements still depend on model files and Model Registry versions before deleting them.
Conclusion
At GS Caltex, process engineers create and validate models in SageMaker Canvas, and ML engineers use those assets to run production workflows in SageMaker Pipelines. This handoff reduced repeated integration work. GS Caltex reports that ML engineers now complete model deployments within a few hours, compared with about a week before.
The handoff needs to include the preprocessing flow, input schema, inference configuration, and approval process alongside the model files. Verify that the workflow reproduces the expected results and can run reliably on the required schedule.
To try this approach, start with one model you have validated in SageMaker Canvas and use the GitHub repository. See the SageMaker Pipelines developer guide for details on defining and running workflows. Check preprocessing and batch prediction results with a manual execution, then schedule runs at the interval your application needs.
In part 2, we show how GS Caltex used Amazon Bedrock to automate moving existing models onto this pipeline.