Artificial Intelligence
Right-size generative AI endpoints with concurrency sweeps on Amazon SageMaker AI
Concurrency sweeps help you right-size a generative AI endpoint by finding the instance type and serving configuration that maximizes price-performance while holding latency within acceptable bounds. Without a systematic approach, right-sizing means deploying, load-testing manually, adjusting, and repeating until the numbers look acceptable. Choose five ml.g7e.2xlarge instances when one would suffice, and you burn your budget on idle GPUs. Choose too few, and requests queue, latency spikes, and users experience degraded service.
Concurrency sweeps address this problem. A concurrency sweep is a systematic benchmarking approach that sends controlled, increasing levels of concurrent traffic to your Amazon SageMaker AI endpoint and analyzes its performance. Concurrency sweeps are built into Amazon SageMaker AI Inference Recommendations, so there’s no custom load-testing infrastructure to build or maintain.
In this post, we walk through deploying the NVIDIA Nemotron-3 Nano 30B model, running automated concurrency sweeps, and using the results to make data-driven capacity decisions. By the end, you will know how many concurrent requests your endpoint can handle before latency becomes unacceptable, and how to automate that discovery.
What is a concurrency sweep?
A concurrency sweep sends a controlled number of simultaneous requests to your SageMaker AI endpoint and measures two metrics at each level:
- Throughput: how many tokens per second your endpoint produces.
- Latency: how long each request takes.
By progressively increasing the concurrency (for example, 64 to 256, and then 1,024 simultaneous requests), you can trace a curve that reveals your endpoint’s saturation point. This is the point where adding more concurrent traffic stops improving throughput and degrades latency.
A concurrency sweep gives you three data points for production planning:
- The ideal balance: the concurrency level where throughput is maximized with acceptable latency.
- The breaking point: where latency crosses your service level agreement (SLA) threshold.
- The right-size factor: how many instances you need to cover your peak traffic, given the per-instance capacity.
Let’s now look at how the end-to-end workflow comes together.
Solution overview
The concurrency sweep workflow has four steps:
- Deploy the model to a SageMaker AI endpoint using the native vLLM container.
- Configure the workload profile (input and output token counts, streaming mode).
- Run the concurrency sweep using the CreateAIBenchmarkJob API.
- Analyze the results to identify optimal concurrency and right-size your fleet.
The following diagram illustrates this process.
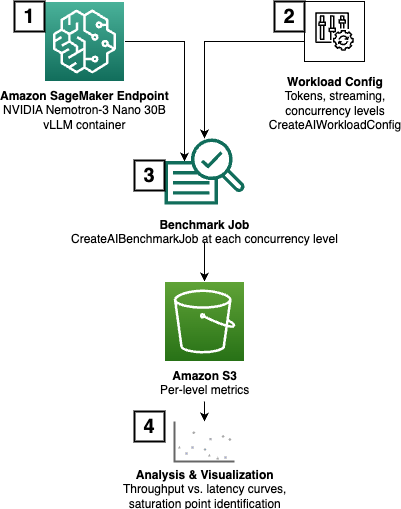
Figure 1: The four-step concurrency sweep workflow
Walkthrough
The following four steps will take you from a fresh deployment to a complete capacity profile. Each step builds on the previous one, so we recommend following along with the accompanying notebook.
Prerequisites
Before getting started, make sure that you have:
- An AWS account with Amazon SageMaker AI access.
- An AWS Identity and Access Management (IAM) execution role with permissions for SageMaker AI and Amazon Simple Storage Service (Amazon S3). You can check instructions in the notebook.
- Service quota for
ml.g7e.2xlargeendpoints.
Step 1: Deploy the model with the native vLLM container
We deploy NVIDIA Nemotron-3 Nano 30B, a Mixture-of-Experts (MoE) model with only 3B active parameters, to an ml.g7e.2xlarge instance. This instance is backed by an NVIDIA Blackwell GPU, which provides a strong price-performance ratio for inference workloads.
We use the vLLM Deep Learning Container for SageMaker AI, configured through SM_VLLM_* environment variables:
Three of these settings are worth explaining. The SM_VLLM_ENFORCE_EAGER flag is required because Nemotron-3 Nano uses a Mamba-Transformer hybrid architecture that requires eager execution mode. We set the GPU memory utilization to 0.85 to leave headroom for KV cache growth under high concurrency. Prefix caching is enabled to improve performance in scenarios where system prompts are repeated across requests to benefit from reusing cached key-value pairs.
After creating the model, endpoint configuration, and endpoint, we verify the deployment with a validation before moving on to benchmarking.
Step 2: Configure the workload profile
Before running any load test, the benchmark engine needs to know what kind of traffic to simulate. We define a workload profile that mirrors a realistic generative AI inference pattern using CreateAIWorkloadConfig. The following table summarizes the values we used for defining the workload. You can follow the code in the accompanying notebook.
| Parameter | Value | Description |
tokenizer |
Model tokenizer ID | Used to count tokens accurately |
streaming |
True |
Enables streaming responses (required for TTFT metrics) |
prompt_input_tokens_mean |
1,024 | Average input prompt length |
output_tokens_mean |
256 | Average generated response length |
The choice of 1,024 input tokens and 256 output tokens is representative of Retrieval Augmented Generation (RAG) or summarization workloads. If your application uses shorter prompts and longer completions (such as code generation), adjust these values accordingly. Streaming is enabled to capture time to first token (TTFT) metrics, which are important for interactive user experiences where perceived responsiveness matters as much as raw throughput.
With the workload profile defined, the next step is to launch the sweep.
Step 3: Run the concurrency sweep
We can now create the benchmark job with the CreateAIBenchmarkJob API with the parameters to use in the sweep. In the scenario illustrated in the sample notebook, we have:
The benchmark engine (AIPerf) runs each concurrency level sequentially within a single job, sending the total number of requests defined under request_count at each level. Running the levels sequentially instead of in parallel means each measurement reflects a clean, isolated load. This approach gives you statistically stable estimates while keeping costs contained.
When the job completes, the results are written to the Amazon S3 path defined under OutputConfig as a tarball containing per-level metrics in JSON format.
Step 4: Analyze the results
After the job completes, we can download and parse the output for analysis. Four metrics matter most when reading the results:
- Throughput (output tokens/sec): Does it plateau or keep climbing?
- p99 end-to-end latency: Where does it cross your SLA?
- p50 to p99 latency spread: A widening gap signals queuing under load.
- Time to first token (TTFT): Critical for streaming user experiences.
When you plot throughput against latency across the concurrency levels, the saturation point is visible as a “knee” in the curve: throughput flattens while p99 latency bends sharply upward. This happens at 256 concurrent requests in our test scenario. Concurrency levels below the knee are your safe operating region. Above it, the endpoint is overloaded and users are waiting.
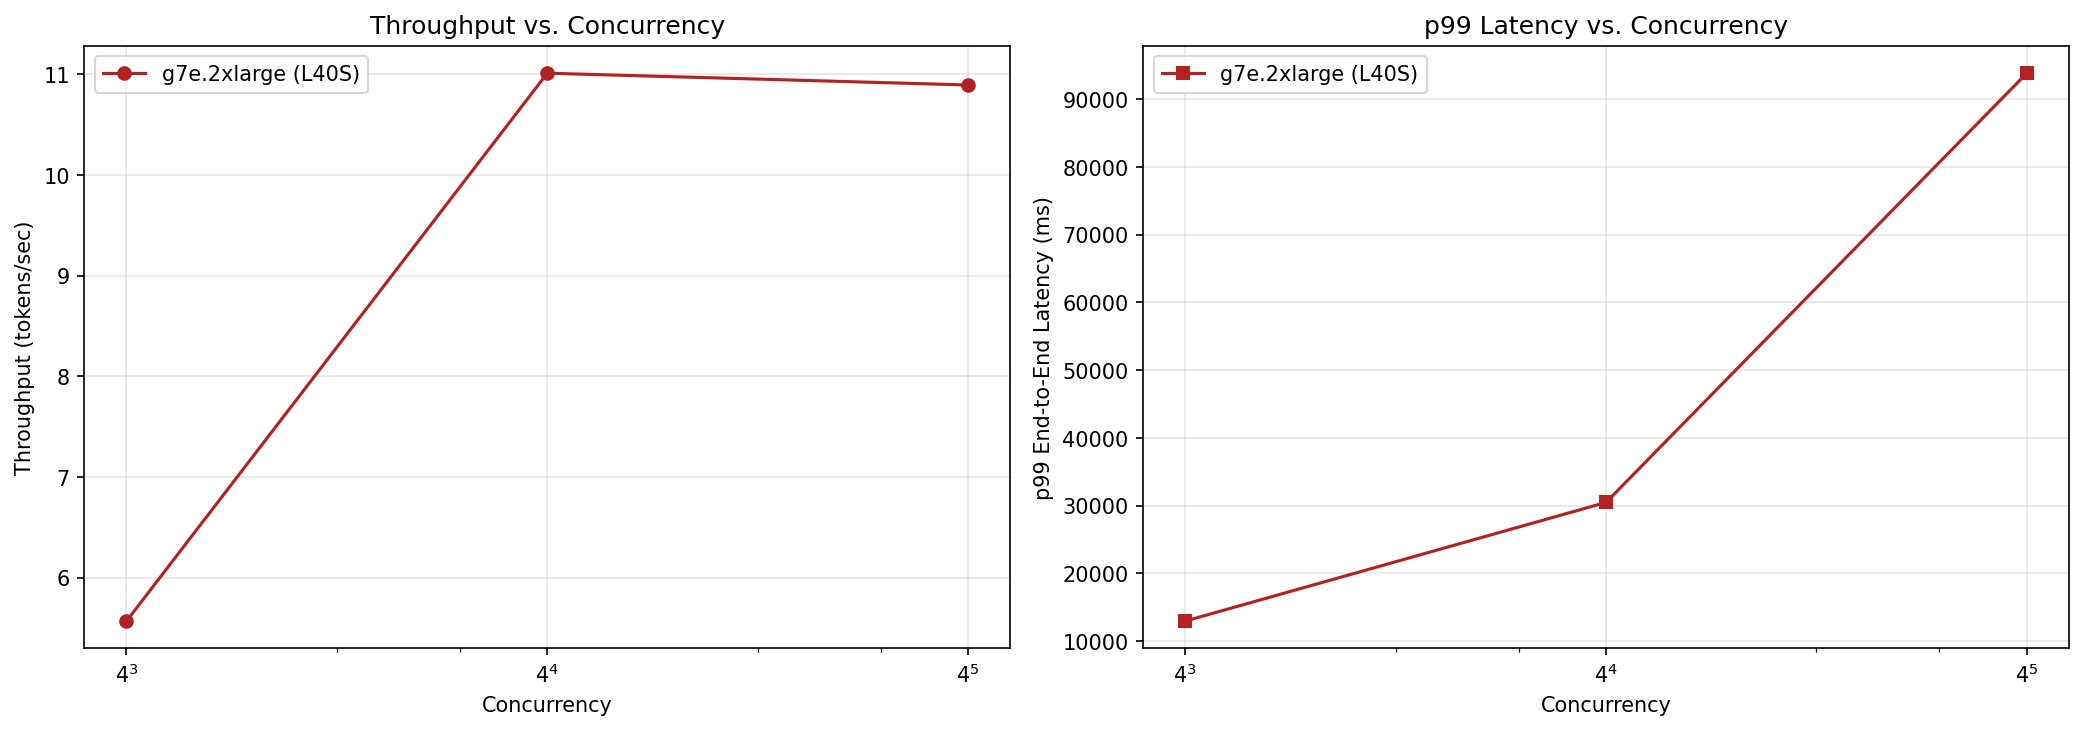
Figure 2: Throughput and p99 latency across concurrency levels, with the saturation knee at 256 concurrent requests
At this point you have a complete picture of how your endpoint behaves under load. For many teams, this is sufficient to make a confident capacity decision. If you want to automate the search for the optimal operating point across model versions or instance types, the benchmark engine offers an automated alternative.
Going further: Automatic SLA-based concurrency search
The concurrency sweep in Step 3 requires you to choose the concurrency levels to test. You might not know the right range, or you might want to automate capacity planning across model versions. In either case, replace the fixed concurrency list with a search recipe in the same CreateAIBenchmarkJob call. The max-concurrency-under-sla recipe accepts one or more SLA thresholds and searches for the highest concurrency that satisfies all of them.
The following table describes the available SLA threshold parameters:
| Parameter | Meaning | Statistic | Requires streaming? |
ttft_sla_ms |
Max Time To First Token (ms) | p95 | Yes |
tpot_sla_ms |
Max Time Per Output Token (ms) | p95 | Yes |
e2e_sla_ms |
Max end-to-end request latency (ms) | p99 | No |
error_rate_sla |
Max fraction of failed requests | avg | No |
For example, we can use the following search parameters to find the maximum concurrency where p99 end-to-end latency stays under 50 seconds:
The search engine uses an optimization planner that can converge on the answer in fewer iterations than a linear sweep. It starts with a broad range and narrows progressively, evaluating only the concurrency levels needed to identify the boundary. This can reduce both the number of iterations and the total cost of the search.
| Iteration | Concurrency | Throughput (OTPS) | Passed SLA? |
| 1 | 16 | 492.5 | ✓ |
| 2 | 32 | 904.2 | ✓ |
| 3 | 64 | 1433.4 | ✓ |
| 4 | 128 | 2066.8 | ✓ |
| 5 | 256 | 2823.4 | ✓ |
| 6 | 512 | 2782.3 | ✗ |
| 7 | 320 | 2781.8 | ✓ |
| 8 | 284 | 2788.6 | ✗ |
In this example, the planner starts at concurrency 16 and doubles through each iteration. At concurrency 512, the first SLA violation occurs, either because the p99 end-to-end latency exceeded the threshold or because invocations failed. The planner then narrows the search to the 256–512 range and finds that concurrency 320 meets the SLA at 2,782 tokens per second. The search runs for at most the number of iterations you define in search_max_iterations.
Combining multiple SLAs
A single SLA threshold is insufficient for most production workloads, as some scenarios require that a model must meet multiple SLAs at the same time. For instance, in interactive user experiences, you might need to control both the end-to-end latency and the time to first token. You can still use the max-concurrency-under-sla search recipe by passing multiple SLAs under search parameters:
| Iteration | Concurrency | Throughput (OTPS) | Passed SLA? |
| 1 | 16 | 480.2 | ✓ |
| 2 | 32 | 888.6 | ✓ |
| 3 | 64 | 1429.9 | ✓ |
| 4 | 128 | 2061.4 | ✗ |
| 5 | 80 | 1599.3 | ✓ |
In this case, we observe that when putting SLAs in both the end-to-end latency and time to first token, the maximum level of concurrency supported is 80.
With the benchmarking complete, let’s clean up the resources we created during this walkthrough.
Cleaning up
To avoid ongoing charges, delete your SageMaker endpoints, endpoint configurations, and models after testing. Endpoints bill by the hour whether or not they’re receiving traffic.
Conclusion
Concurrency sweeps replace guesswork with data in the capacity planning process for generative AI endpoints. Instead of over-provisioning as a precaution or discovering bottlenecks in production, you can systematically map your endpoint’s performance envelope. You can then make informed decisions about fleet size before a single user request hits your system.
In this post, you learned how to:
- Deploy a model using the native vLLM container on Amazon SageMaker AI.
- Run concurrency sweeps using the
CreateAIBenchmarkJobAPI. - Plot throughput against latency to identify the saturation point.
- Use the
max-concurrency-under-slarecipe to automatically discover the optimal concurrency for your SLA targets.
The complete notebook is available in the GitHub repository. To get started with your own models, see the Generative AI Inference Recommendations documentation. We have also created another example that benchmarks GLM 5.3 Flash on Amazon SageMaker AI using this feature.
Related resources:
- Amazon SageMaker AI now supports optimized generative AI inference recommendations
- Benchmark and optimize deployment of generative AI models on Amazon SageMaker AI
- Amazon SageMaker AI