Artificial Intelligence
Streamlining data labeling for YOLO object detection in Amazon SageMaker Ground Truth
Object detection is a common task in computer vision (CV), and the YOLOv3 model is state-of-the-art in terms of accuracy and speed. In transfer learning, you obtain a model trained on a large but generic dataset and retrain the model on your custom dataset. One of the most time-consuming parts in transfer learning is collecting and labeling image data to generate a custom training dataset. This post explores how to do this in Amazon SageMaker Ground Truth.
Ground Truth offers a comprehensive platform for annotating the most common data labeling jobs in CV: image classification, object detection, semantic segmentation, and instance segmentation. You can perform labeling using Amazon Mechanical Turk or create your own private team to label collaboratively. You can also use one of the third-party data labeling service providers listed on the AWS Marketplace. Ground Truth offers an intuitive interface that is easy to work with. You can communicate with labelers about specific needs for your particular task using examples and notes through the interface.
Labeling data is already hard work. Creating training data for a CV modeling task requires data collection and storage, setting up labeling jobs, and post-processing the labeled data. Moreover, not all object detection models expect the data in the same format. For example, the Faster RCNN model expects the data in the popular Pascal VOC format, which the YOLO models can’t work with. These associated steps are part of any machine learning pipeline for CV. You sometimes need to run the pipeline multiple times to improve the model incrementally. This post shows how to perform these steps efficiently by using Python scripts and get to model training as quickly as possible. This post uses the YOLO format for its use case, but the steps are mostly independent of the data format.
The image labeling step of a training data generation task is inherently manual. This post shows how to create a reusable framework to create training data for model building efficiently. Specifically, you can do the following:
- Create the required directory structure in Amazon S3 before starting a Ground Truth job
- Create a private team of annotators and start a Ground Truth job
- Collect the annotations when labeling is complete and save it in a pandas dataframe
- Post-process the dataset for model training
You can download the code presented in this post from this GitHub repo. This post demonstrates how to run the code from the AWS CLI on a local machine that can access an AWS account. For more information about setting up AWS CLI, see What Is the AWS Command Line Interface? Make sure that you configure it to access the S3 buckets in this post. Alternatively, you can run it in AWS Cloud9 or by spinning up an Amazon EC2 instance. You can also run the code blocks in an Amazon SageMaker notebook.
If you’re using an Amazon SageMaker notebook, you can still access the Linux shell of the underlying EC2 instance and follow along by opening a new terminal from the Jupyter main page and running the scripts from the /home/ec2-user/SageMaker folder.
Setting up your S3 bucket
The first thing you need to do is to upload the training images to an S3 bucket. Name the bucket ground-truth-data-labeling. You want each labeling task to have its own self-contained folder under this bucket. If you start labeling a small set of images that you keep in the first folder, but find that the model performed poorly after the first round because the data was insufficient, you can upload more images to a different folder under the same bucket and start another labeling task.
For the first labeling task, create the folder bounding_box and the following three subfolders under it:
- images – You upload all the images in the Ground Truth labeling job to this subfolder.
- ground_truth_annots – This subfolder starts empty; the Ground Truth job populates it automatically, and you retrieve the final annotations from here.
- yolo_annot_files – This subfolder also starts empty, but eventually holds the annotation files ready for model training. The script populates it automatically.
If your images are in .jpeg format and available in the current working directory, you can upload the images with the following code:
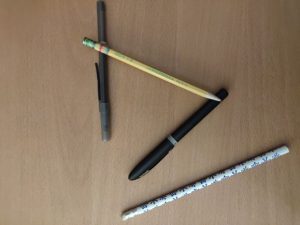
For this use case, you use five images. There are two types of objects in the images—pencil and pen. You need to draw bounding boxes around each object in the images. The following images are examples of what you need to label. All images are available in the GitHub repo.

Creating the manifest file
A Ground Truth job requires a manifest file in JSON format that contains the Amazon S3 paths of all the images to label. You need to create this file before you can start the first Ground Truth job. The format of this file is simple:
However, creating the manifest file by hand would be tedious for a large number of images. Therefore, you can automate the process by running a script. You first need to create a file holding the parameters required for the scripts. Create a file input.json in your local file system with the following content:
Save the following code block in a file called prep_gt_job.py:
Run the following script:
python prep_gt_job.py
This script reads the S3 bucket and job names from the input file, creates a list of images available in the images folder, creates the manifest.json file, and uploads the manifest file to the S3 bucket at s3://ground-truth-data-labeling/bounding_box/.
This method illustrates a programmatic control of the process, but you can also create the file from the Ground Truth API. For instructions, see Create a Manifest File.
At this point, the folder structure in the S3 bucket should look like the following:
Creating the Ground Truth job
You’re now ready to create your Ground Truth job. You need to specify the job details and task type, and create your team of labelers and labeling task details. Then you can sign in to begin the labeling job.
Specifying the job details
To specify the job details, complete the following steps:
- On the Amazon SageMaker console, under Ground Truth, choose Labeling jobs.
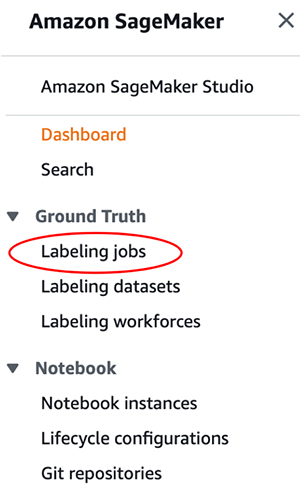
- On the Labeling jobs page, choose Create labeling job.

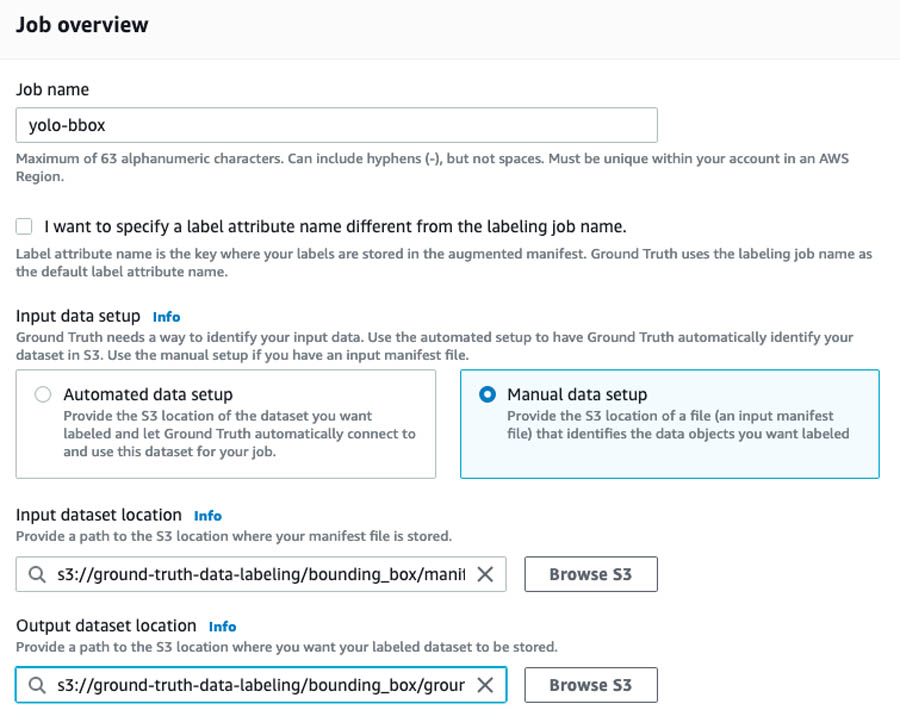
- In the Job overview section, for Job name, enter
yolo-bbox. It should be the name you defined in theinput.jsonfile earlier. - Pick Manual Data Setup under Input Data Setup.
- For Input dataset location, enter
s3://ground-truth-data-labeling/bounding_box/manifest.json. - For Output dataset location, enter
s3://ground-truth-data-labeling/bounding_box/ground_truth_annots.
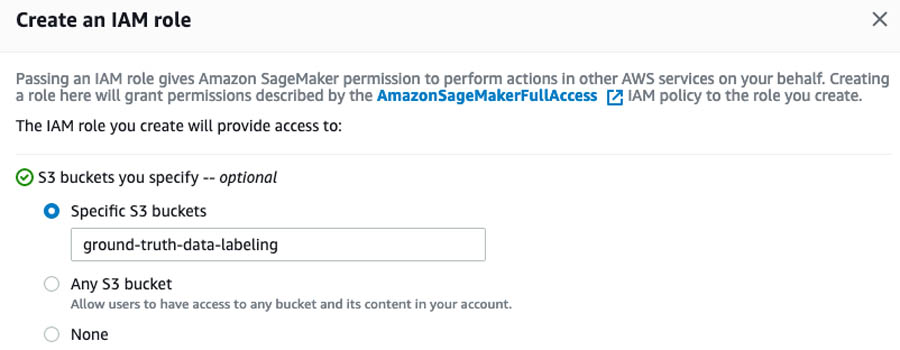
- In the Create an IAM role section, first select Create a new role from the drop down menu and then select Specific S3 buckets.
- Enter ground-truth-data-labeling.
- Choose Create.
Specifying the task type
To specify the task type, complete the following steps:
- In the Task selection section, from the Task Category drop-down menu, choose Image.
- Select Bounding box.
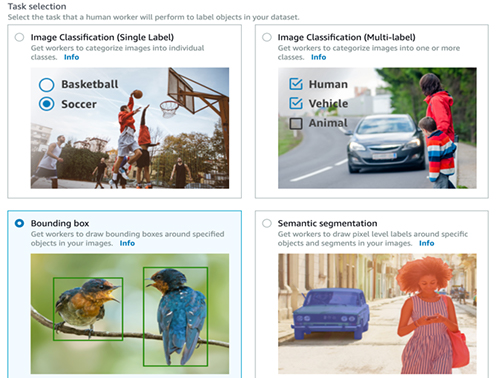
- Don’t change Enable enhanced image access, which is selected by default. It enables Cross-Origin Resource Sharing (CORS) that may be required for some workers to complete the annotation task.
- Choose Next.
Creating a team of labelers
To create your team of labelers, complete the following steps:
- In the Workers section, select Private.
- Follow the instructions to create a new team.

Each member of the team receives a notification email titled, “You’re invited to work on a labeling project” that has initial sign-in credentials. For this use case, create a team with just yourself as a member.
Specifying labeling task details
In the Bounding box labeling tool section, you should see the images you uploaded to Amazon S3. You should check that the paths are correct in the previous steps. To specify your task details, complete the following steps:
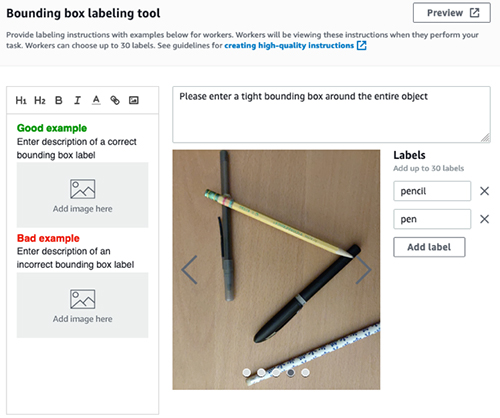
- In the text box, enter a brief description of the task.
This is critical if the data labeling team has more than one members and you want to make sure everyone follows the same rule when drawing the boxes. Any inconsistency in bounding box creation may end up confusing your object detection model. For example, if you’re labeling beverage cans and want to create a tight bounding box only around the visible logo, instead of the entire can, you should specify that to get consistent labeling from all the workers. For this use case, you can enter Please enter a tight bounding box around the entire object.
- Optionally, you can upload examples of a good and a bad bounding box.
You can make sure your team is consistent in their labels by providing good and bad examples.
- Under Labels, enter the names of the labels you’re using to identify each bounding box; in this case,
pencilandpen.
A color is assigned to each label automatically, which helps to visualize the boxes created for overlapping objects.
- To run a final sanity check, choose Preview.
- Choose Create job.
Job creation can take up to a few minutes. When it’s complete, you should see a job titled yolo-bbox on the Ground Truth Labeling jobs page with In progress as the status.
- To view the job details, select the job.
This is a good time to verify the paths are correct; the scripts don’t run if there’s any inconsistency in names.
For more information about providing labeling instructions, see Create high-quality instructions for Amazon SageMaker Ground Truth labeling jobs.
Sign in and start labeling
After you receive the initial credentials to register as a labeler for this job, follow the link to reset the password and start labeling.
If you need to interrupt your labeling session, you can resume labeling by choosing Labeling workforces under Ground Truth on the SageMaker console.
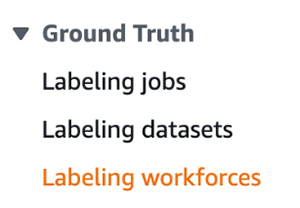
You can find the link to the labeling portal on the Private tab. The page also lists the teams and individuals involved in this private labeling task.
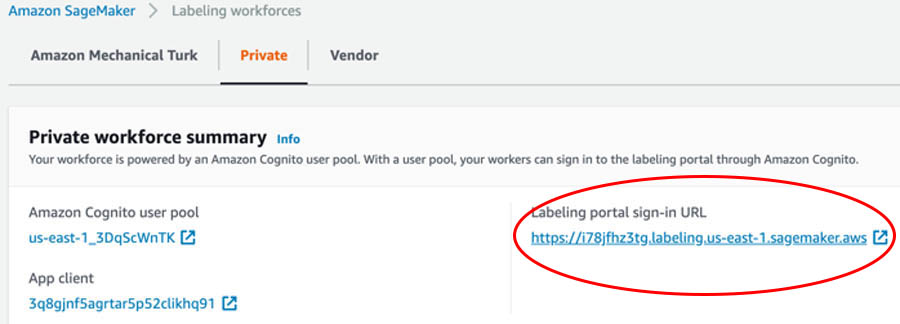
After you sign in, start labeling by choosing Start working.

Because you only have five images in the dataset to label, you can finish the entire task in a single session. For larger datasets, you can pause the task by choosing Stop working and return to the task later to finish it.
Checking job status
After the labeling is complete, the status of the labeling job changes to Complete and a new JSON file called output.manifest containing the annotations appears at s3://ground-truth-data-labeling/bounding_box/ground_truth_annots/yolo-bbox/manifests/output /output.manifest.
Parsing Ground Truth annotations
You can now parse through the annotations and perform the necessary post-processing steps to make it ready for model training. Start by running the following code block:
From the AWS CLI, save the preceding code block in the file parse_annot.py and run:
python parse_annot.py
Ground Truth returns the bounding box information using the following four numbers: x and y coordinates, and its height and width. The procedure parse_gt_output scans through the output.manifest file and stores the information for every bounding box for each image in a pandas dataframe. The procedure save_df_to_s3 saves it in a tabular format as annot.csv to the S3 bucket for further processing.
The creation of the dataframe is useful for a few reasons. JSON files are hard to read and the output.manifest file contains more information, like label metadata, than you need for the next step. The dataframe contains only the relevant information and you can visualize it easily to make sure everything looks fine.
To grab the annot.csv file from Amazon S3 and save a local copy, run the following:
You can read it back into a pandas dataframe and inspect the first few lines. See the following code:
The following screenshot shows the results.

You also capture the size of the image through img_width and img_height. This is necessary because the object detection models need to know the location of each bounding box within the image. In this case, you can see that images in the dataset were captured with a 4608×3456 pixel resolution.
There are quite a few reasons why it is a good idea to save the annotation information into a dataframe:
- In a subsequent step, you need to rescale the bounding box coordinates into a YOLO-readable format. You can do this operation easily in a dataframe.
- If you decide to capture and label more images in the future to augment the existing dataset, all you need to do is join the newly created dataframe with the existing one. Again, you can perform this easily using a dataframe.
- As of this writing, Ground Truth doesn’t allow through the console more than 30 different categories to label in the same job. If you have more categories in your dataset, you have to label them under multiple Ground Truth jobs and combine them. Ground Truth associates each bounding box to an integer index in the
output.manifestfile. Therefore, the integer labels are different across multiple Ground Truth jobs if you have more than 30 categories. Having the annotations as dataframes makes the task of combining them easier and takes care of the conflict of category names across multiple jobs. In the preceding screenshot, you can see that you used the actual names under the category column instead of the integer index.
Generating YOLO annotations
You’re now ready to reformat the bounding box coordinates Ground Truth provided into a format the YOLO model accepts.
In the YOLO format, each bounding box is described by the center coordinates of the box and its width and height. Each number is scaled by the dimensions of the image; therefore, they all range between 0 and 1. Instead of category names, YOLO models expect the corresponding integer categories.
Therefore, you need to map each name in the category column of the dataframe into a unique integer. Moreover, the official Darknet implementation of YOLOv3 needs to have the name of the image match the annotation text file name. For example, if the image file is pic01.jpg, the corresponding annotation file should be named pic01.txt.
The following code block performs all these tasks:
From the AWS CLI, save the preceding code block in a file create_annot.py and run:
python create_annot.py
The annot_yolo procedure transforms the dataframe you created by rescaling the box coordinates by the image size, and the save_annots_to_s3 procedure saves the annotations corresponding to each image into a text file and stores it in Amazon S3.
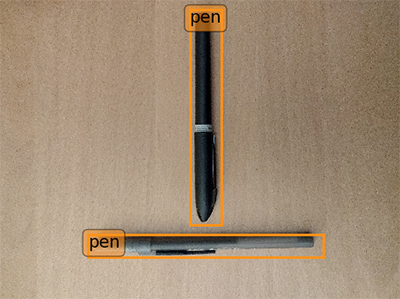
You can now inspect a couple of images and their corresponding annotations to make sure they’re properly formatted for model training. However, you first need to write a procedure to draw YOLO formatted bounding boxes on an image. Save the following code block in visualize.py:
Download an image and the corresponding annotation file from Amazon S3. See the following code:
To display the correct label of each bounding box, you need to specify the names of the objects you labeled in a dictionary and pass it to visualize_bbox. For this use case, you only have two items in the list. However, the order of the labels is important—it should match the order you used while creating the Ground Truth labeling job. If you can’t remember the order, you can access the information from the s3://data-labeling-ground-truth/bounding_box/ground_truth_annots/bbox-yolo/annotation-tool/data.json
file in Amazon S3, which the Ground Truth job creates automatically.
The contents of the data.json file the task look like the following code:
Therefore, a dictionary with the labels as follows was created in visualize.py:
Now run the following to visualize the image:
The following screenshot shows the bounding boxes correctly drawn around two pens.
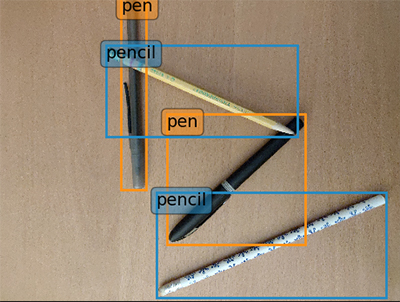
To plot an image with a mix of pens and pencils, get the image and the corresponding annotation text from Amazon S3. See the following code:
Override the default image size in the visualize_bbox procedure to (10, 12) and run the following:
The following screenshot shows three bounding boxes correctly drawn around two types of objects.
Conclusion
This post described how to create an efficient, end-to-end data-gathering pipeline in Amazon Ground Truth for an object detection model. Try out this process yourself next time you are creating an object detection model. You can modify the post-processing annotations to produce labeled data in the Pascal VOC format, which is required for models like Faster RCNN. You can also adopt the basic framework to other data-labeling pipelines with job-specific modifications. For example, you can rewrite the annotation post-processing procedures to adopt the framework for an instance segmentation task, in which an object is labeled at the pixel level instead of drawing a rectangle around the object. Amazon Ground Truth gets regularly updated with enhanced capabilities. Therefore, check the documentation for the most up to date features.
About the Author
 Arkajyoti Misra is a Data Scientist working in AWS Professional Services. He loves to dig into Machine Learning algorithms and enjoys reading about new frontiers in Deep Learning.