Migration & Modernization
Simplify application migrations to AWS with Elastic Beanstalk
Today, AWS Elastic Beanstalk introduces a new deployment mode that manages multiple applications on shared infrastructure that AWS creates, operates, and upgrades for you. Whether you provide source code, a Dockerfile, or a prebuilt container image, Elastic Beanstalk takes care of building and deploying your application. It also configures networking, autoscaling, and observability. You manage your application. AWS manages everything else.Teams migrating to AWS tend to start from one of the two places. Some run applications on platform-as-a-service offerings such as Heroku, Render, or Railway. Costs grow, security teams need controls the platform does not expose, and the data these applications use already lives on AWS. Others run legacy application portfolios, often .NET, Java, or PHP, in data centers or on virtual machines, and need to move them without re-architecting first. For teams focused on shipping applications rather than operating infrastructure, both migrations are hard.In this post, we cover two migration scenarios: a lift and shift of a Windows .NET application to an Elastic Beanstalk Standard environment, and a migration of a PaaS-hosted application to Elastic Beanstalk, which we walk through in detail.
Who is Elastic Beanstalk for
Elastic Beanstalk is built for teams that need production-grade operations without owning them:
Regulated enterprises with established application portfolios: If you are running Java, .NET, or PHP applications that need to reach AWS with their compliance posture and continuity intact, the application code stays as it is. A Java application that arrives as a source bundle runs as a container image on managed infrastructure, automatically instrumented, patched on a managed schedule, and scaling on demand.
Mid-market application teams shipping faster than they can operate: If you are a 50-to-1,000-person organization whose web application portfolio has grown faster than your operations capacity, you get one platform for every application instead of a different arrangement for each one.
Teams migrating from other platforms: If you have outgrown Heroku, Render, or Railway, you keep the deployment experience you like to push an application, get a URL. You gain multi-AZ availability, enterprise security, and an AWS account where your data and the rest of your stack already live.
Solution Overview: Elastic Beanstalk Deployment Modes
Elastic Beanstalk has managed applications on Amazon EC2 since 2011 using three concepts: an application, its versions, and the environments that run them. The service now offers two deployment modes built on those same concepts.
Standard (on EC2) is the existing mode, and it continues unchanged. It fits single applications, Windows/.NET Framework workloads, and any stack where one environment per application is in the right shape. Each environment provisions its own EC2 instances and, optionally, a load balancer and Auto Scaling group. Managed platform updates handle OS and runtime patching.
Cluster Mode (Powered by Amazon EKS) is the new mode. It fits teams running multiple applications that benefit from shared infrastructure. You provide your application and a small set of settings: CPU and memory, replica counts, a health check path, environment variables. Beanstalk handles everything below that line. Behind the scenes, Elastic Beanstalk creates and abstracts EKS clusters with EKS Auto Mode. It provisions load balancers, configures service discovery and autoscaling, patches cluster add-ons and performs Kubernetes version upgrades.
With Cluster Mode, you can provide your application in three ways: 1/ source code: Elastic Beanstalk builds a container image for you using Cloud Native Buildpacks; 2/ provide source code with a Dockerfile, and the integrated build uses that; 3/ bring your own image from Amazon ECR or another registry, built by the CI/CD pipeline you already have. Image builds run on AWS CodeBuild in your account.
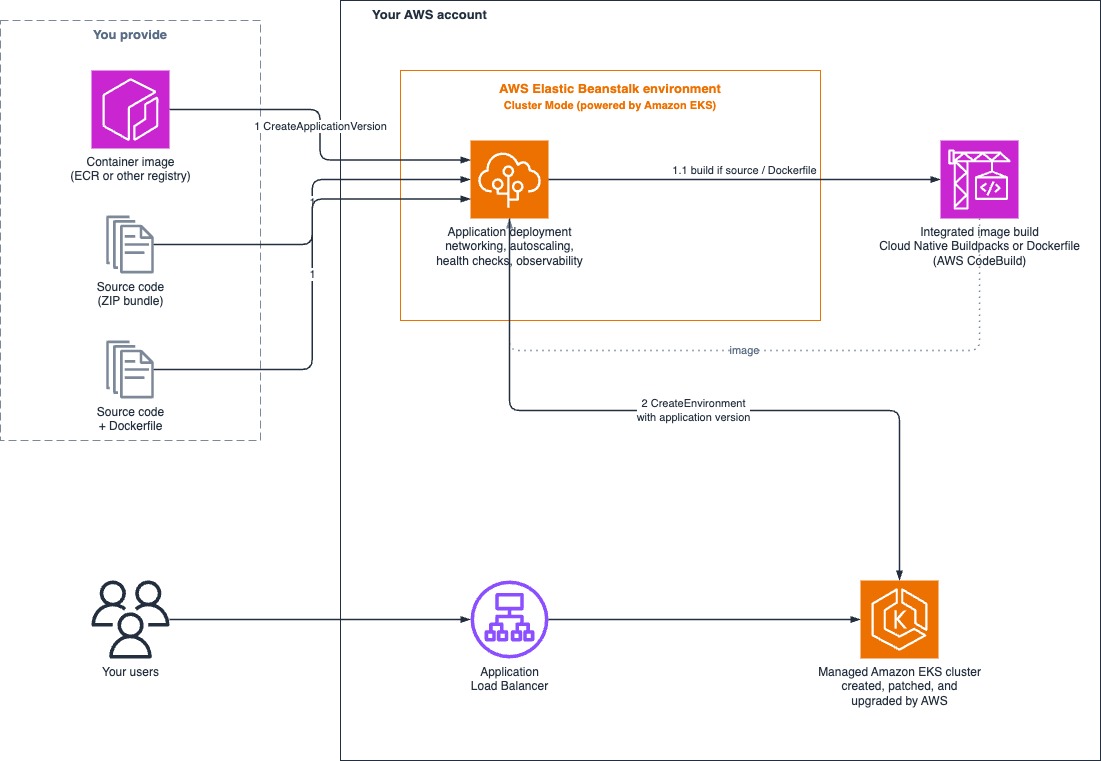
Figure 1: From source code, Dockerfile, or container image to a running environment on a managed EKS cluster in your account.
Why Choose Elastic Beanstalk for your migration?
A familiar developer experience: On a PaaS, you push code and get a running application with a URL. Beanstalk Cluster preserves this model and lets you deploy from source, from a Dockerfile, or from a prebuilt image, and you get back an endpoint, health monitoring, and logs. Buildpacks detect your language and produce the image, covering Java, Go, Python, .NET, Node.js, PHP, Ruby, and more.
Managed configuration: Cluster Mode manages Kubernetes configuration on your behalf. You don’t need to write Kubernetes manifests or Helm charts. Cluster creation, node management, ingress, service discovery, autoscaling, and observability are configured for you.
The full AWS suite of services: On a PaaS, your application runs in the provider’s account and reaches AWS services over the public internet. With Beanstalk, every resource runs in your AWS account and your Amazon VPC. The core AWS security and governance controls apply here as well: AWS IAM governs access, and Amazon CloudWatch receives logs and metrics. Environment variables and secrets load by reference from AWS Systems Manager Parameter Store and AWS Secrets Manager. Your databases on managed services, such as Amazon RDS, can be configured for private connectivity with the applications that use them.
Cost efficiency at scale: As your portfolio grows, shared infrastructure reduces per-application cost without adding operational complexity. Multiple applications share managed infrastructure rather than running independently provisioned resources. Compute scales automatically as demand changes, and you can run fault-tolerant workloads on EC2 Spot Instances. Elastic Beanstalk adds no service fee. You pay only for the AWS resources your applications consume. Details are on the AWS Elastic Beanstalk pricing page.
Security and isolation from day one: Each environment gets its own Kubernetes namespace, with network policies enforcing boundaries between environments on a shared cluster. Traffic terminates on an Application Load Balancer with TLS certificates from AWS Certificate Manager. API activity is recorded in AWS CloudTrail, and cluster add-ons are scanned and patched by AWS.
Scenario 1: Lift and shift a Windows .NET application to Beanstalk Standard
Consider a .NET Framework application running on virtual machines in a data center. It belongs to a team in a regulated industry that needs the application on AWS with its compliance controls intact.This application maps to a lift and shift onto a Standard (on EC2) environment. The team packages the application as a deployable bundle and creates an environment on the .NET on Windows Server platform. For a single application, a single-instance environment is the lowest-cost option: one EC2 instance and no load balancer. Elastic Beanstalk provisions the instance, deploys the application, and applies Windows and runtime patches through managed platform updates.
The environment runs in your VPC, IAM governs access, and CloudTrail records API activity. If traffic grows, a configuration change converts the environment to a load-balanced setup with autoscaling across Availability Zones. When the team is later ready to containerize, the same application, version, and environment concepts carry across to Cluster Mode, so the Workload can move to shared container-based infrastructure at its own pace. You can try this scenario with the sample Windows application.
Scenario 2: Migrate a PaaS application to Cluster Mode (Powered by Amazon EKS)
The example application is typical of what runs on a PaaS: a containerized web service, a background worker, a managed PostgreSQL database, a Redis cache, configuration in environment variables, and a nightly scheduled job.
Prerequisites
To follow the walkthrough, you need:
- An AWS account, with permissions to create the IAM service roles Elastic Beanstalk uses to manage EKS and related resources on your behalf. This is a one-time setup, described in the documentation.
- Basic familiarity with Elastic Beanstalk concepts: applications, application versions, and environments.
- Your application as a deployable artifact: a source bundle (ZIP), source with a Dockerfile, or a container image in a registry.
- Optionally, a VPC with private subnets for your workloads. If you skip this, Elastic Beanstalk uses your default VPC.
Architecture overview
Elastic Beanstalk provisions an EKS cluster with EKS Auto Mode in your VPC. Each environment you create is deployed into its own namespace on the cluster, and environments that use the same subnets share the cluster.
An Application Load Balancer routes requests to your application containers, managed by the AWS Load Balancer Controller. A set of AWS-managed add-ons runs on the cluster, including an OpenTelemetry Collector that ships logs, metrics, and traces to the backends you choose: CloudWatch, AWS X-Ray, or Amazon Managed Service for Prometheus. Each environment autoscales on CPU and memory through its own autoscaler.
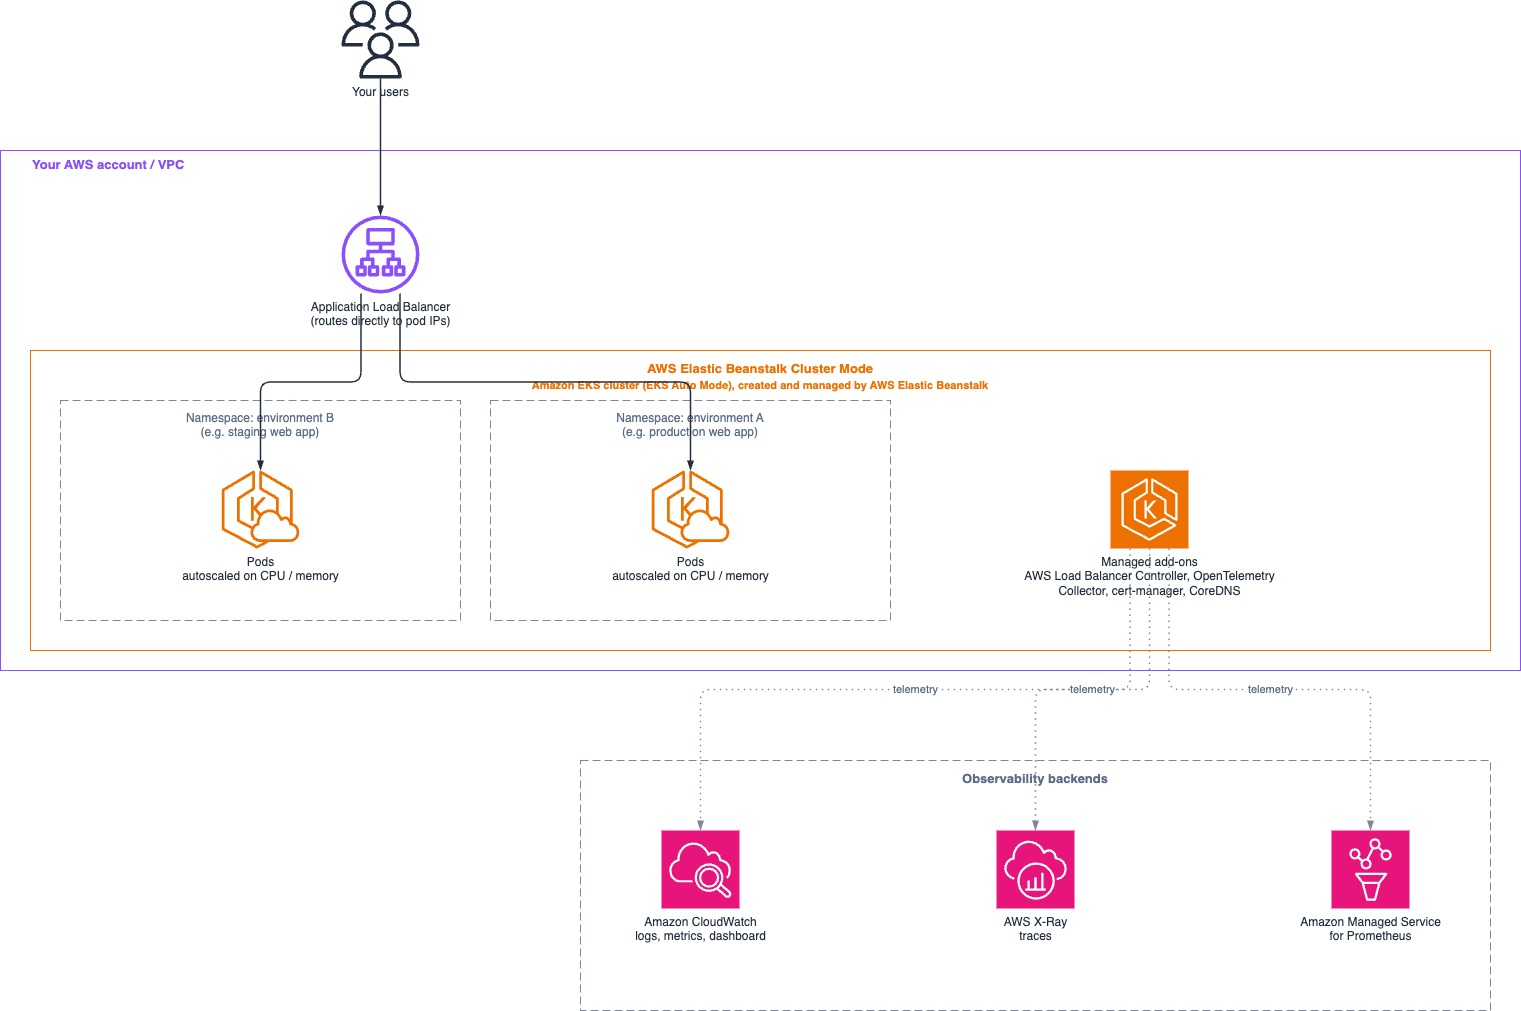
Figure 2: Runtime architecture. Multiple environments share one managed EKS cluster, each isolated in its own namespace.
Migration walkthrough
Step 1: Assess
We start with an inventory of what the PaaS platform runs today:
- Processes: Web processes serving HTTP, long-running workers, and scheduled jobs.
- Runtime details: The port each web process listens to and its health check endpoint.
- Configuration: Every environment variable, and which of them are secrets.
- Extras: Add-ons, databases, caches, queues, logging and monitoring services attached to the application.
- Traffic: Where DNS points today and what a safe cutover looks like.
This list becomes the migration checklist and everything on it maps to either a Beanstalk Cluster environment or an AWS service.
Step 2: Prepare
Next, we decide how each process ships. Our web service already has a Dockerfile, so we can hand Elastic Beanstalk the source and let the integrated build produce the image. If it had no Dockerfile, we would upload the source bundle and let Buildpacks containerize it. If our pipeline already publishes images, we would point Elastic Beanstalk at the image URI instead. Then, we map the platform add-ons to AWS services:
| PaaS add-on or feature | AWS service |
| Managed PostgreSQL | Amazon RDS or Amazon Aurora |
| Managed Redis | Amazon ElastiCache |
| Config vars and secrets | AWS Systems Manager Parameter Store and AWS Secrets Manager |
| Scheduled jobs | Amazon EventBridge Scheduler |
| Logging and metrics add-ons | Amazon CloudWatch |
| Custom domains and TLS | Amazon Route 53 and AWS Certificate Manager |
We first handle data migration. For PostgreSQL, that means restoring a dump into RDS, or using AWS Database Migration Service for a low-downtime migration. The PaaS application keeps running against its existing database until cutover, so nothing breaks. We load the secrets into Secrets Manager and the plain configuration values into Parameter Store.
Step 3: Deploy
On the Elastic Beanstalk console, we choose Create environment and select the Cluster (Powered by EKS) deployment mode.
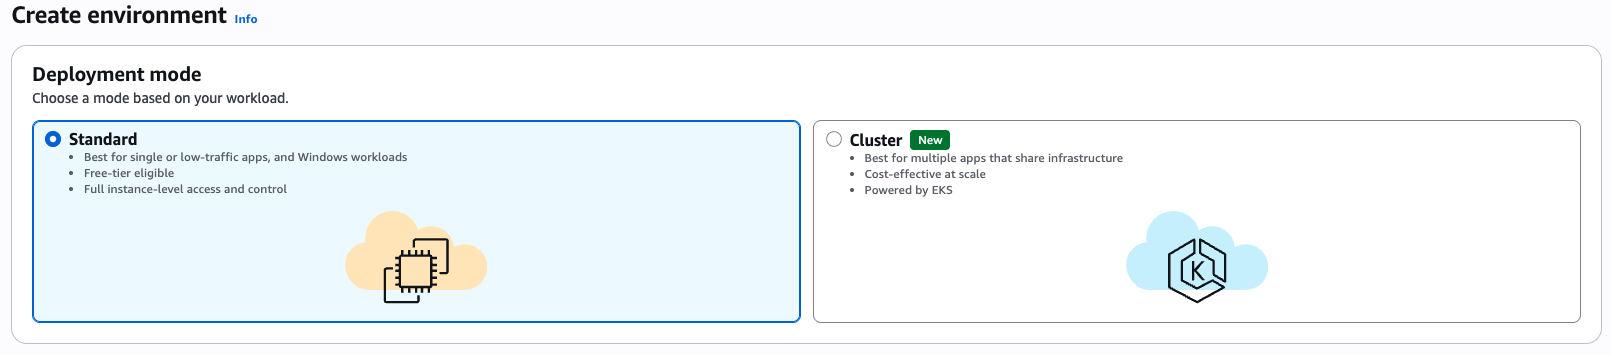
Figure 3: New experience for choosing between the 2 Elastic Beanstalk deployment modes in the AWS console.
In the Environment details section, provide your application name, and optionally environment name, any domain name prefix, environment description and tags.
In the Application code section, we upload our source bundle and choose Dockerfile as the Image build type. Elastic Beanstalk will build the image with CodeBuild in our account. Teams without a Dockerfile can select the Buildpack option, and teams with an existing pipeline enter an image URI instead. You can optionally add version labels and any environment variables needed.
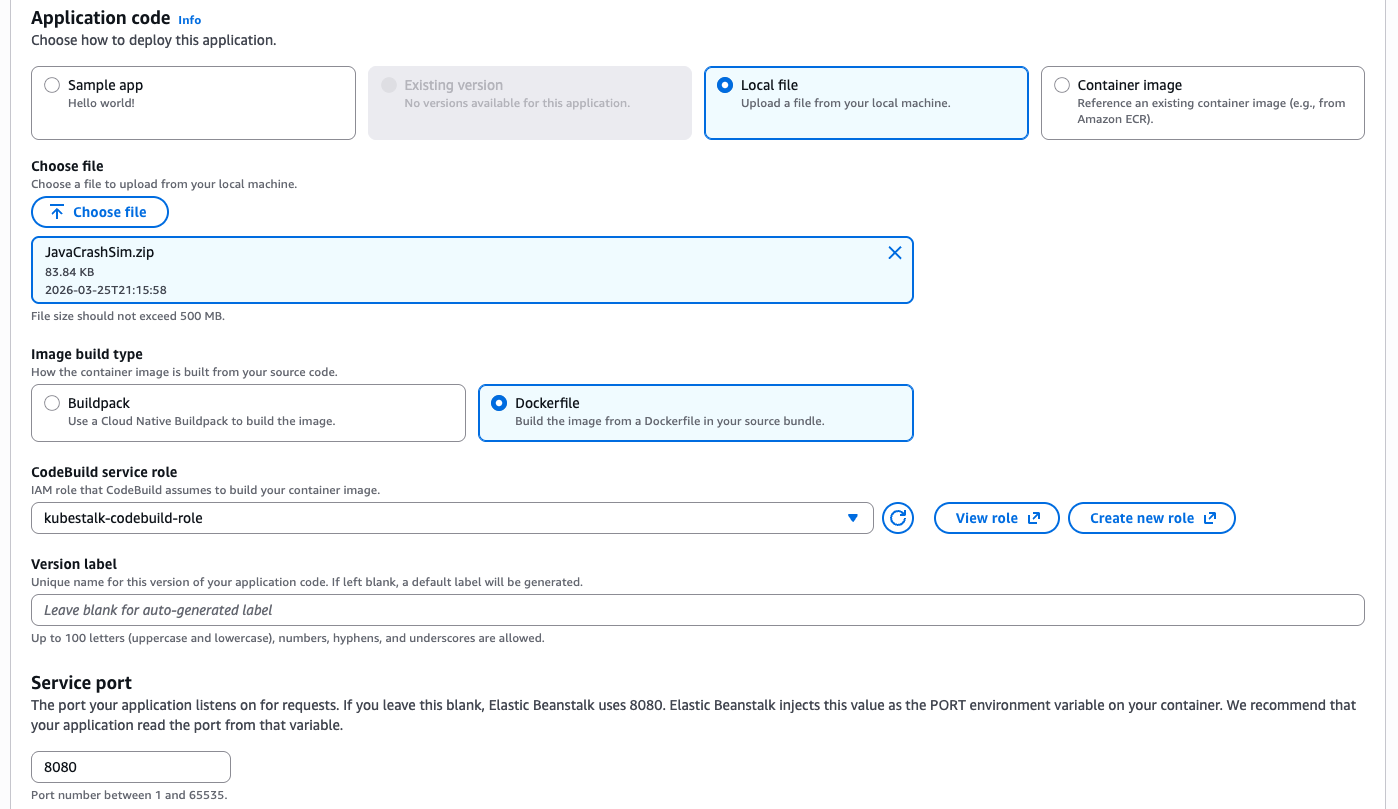
Figure 4: Configure Application Code options.
In the Infrastructure section, we can select the container, compute, and autoscaling configuration.
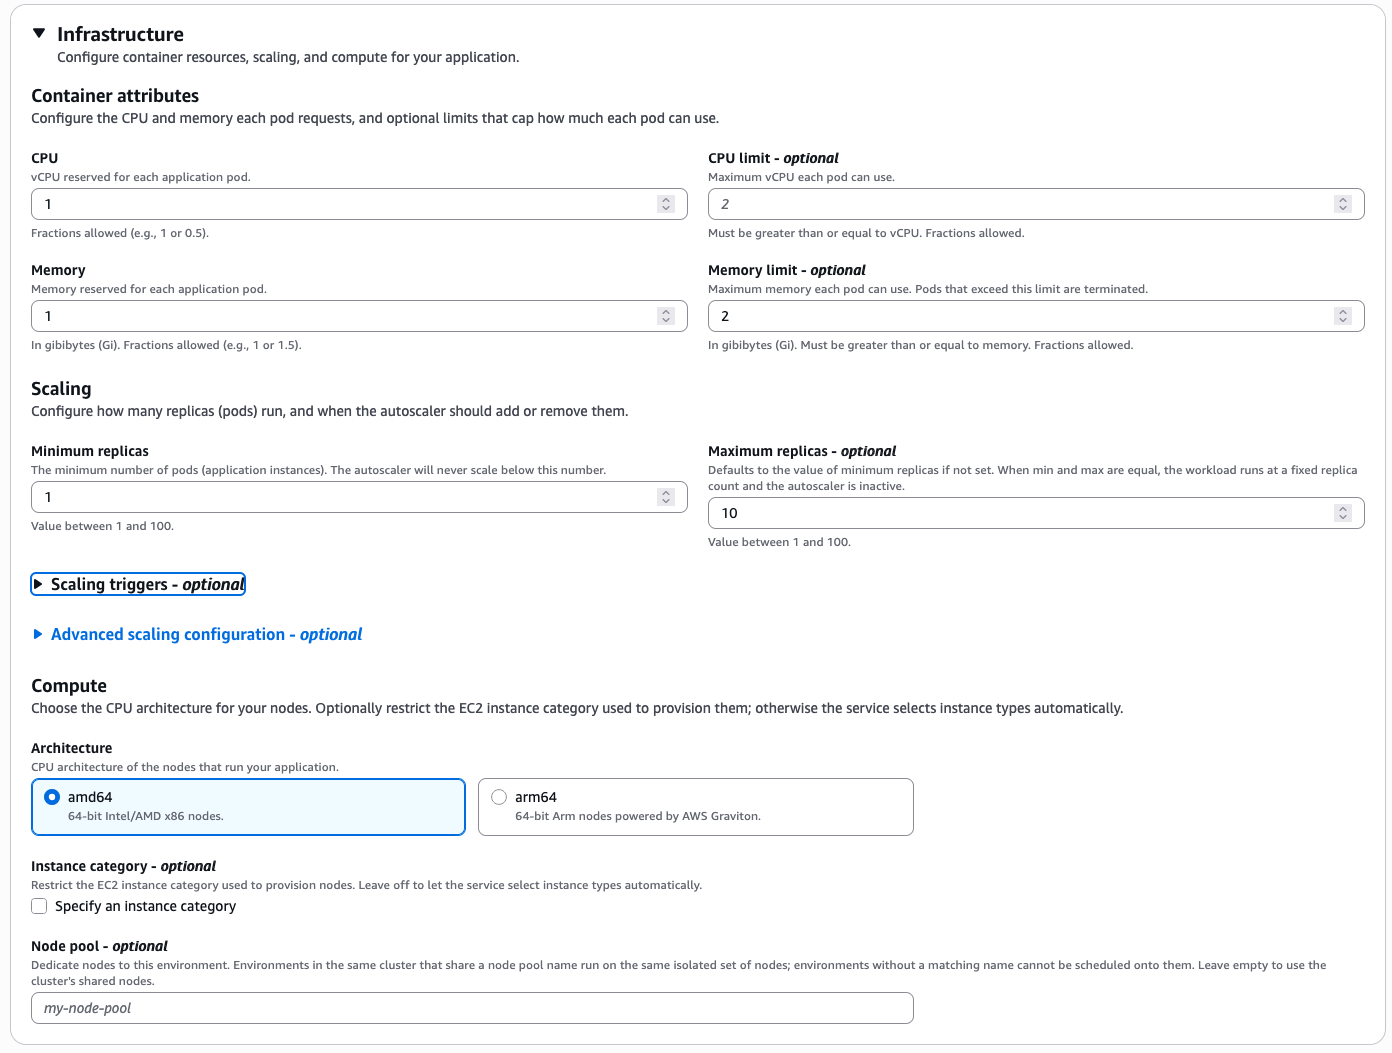
Figure 5: Configure container, compute, and autoscaling configuration.
In the Networking section, we select our VPC, subnets, and security groups. We can also select a Load Balancer type, its listeners and health checks according to what we had on the PaaS platform.
In the Monitoring and updates section, we can select logging configuration options to CloudWatch Logs, Amazon S3 or custom endpoint with OpenTelemetry collector config. Metrics can be sent to CloudWatch, Amazon Managed Service for Prometheus, or custom with OpenTelemetry collector config. Similarly, traces can be sent to AWS X-Ray or custom with OpenTelemetry. Instrumentation is injected at deployment through OpenTelemetry, so we get distributed traces and runtime metrics without changing a line of code.
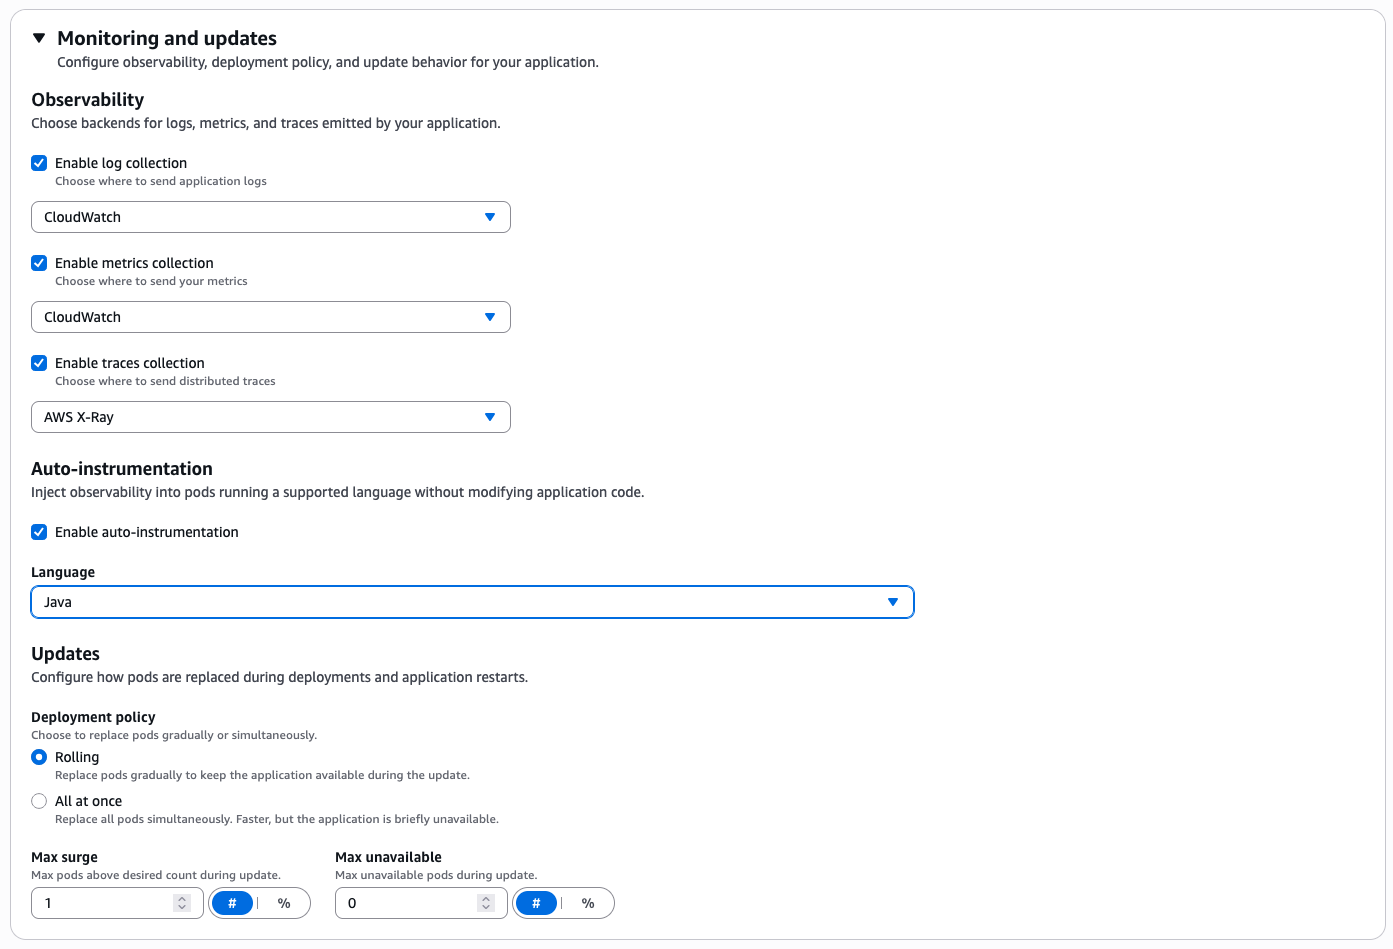
Figure 6: Configure observability and deployment options.
Finally, we can configure the deployment policy and rolling update behavior for our environment.
Next, you can review all your options and choose Create. The first deployment triggers cluster creation, which should take a few minutes. The environment events show each stage: the image build, cluster assignment, resource deployment, and health checks. Subsequent deployments reuse the cluster and complete faster. When the environment turns green, we have a Domain URL serving our application.
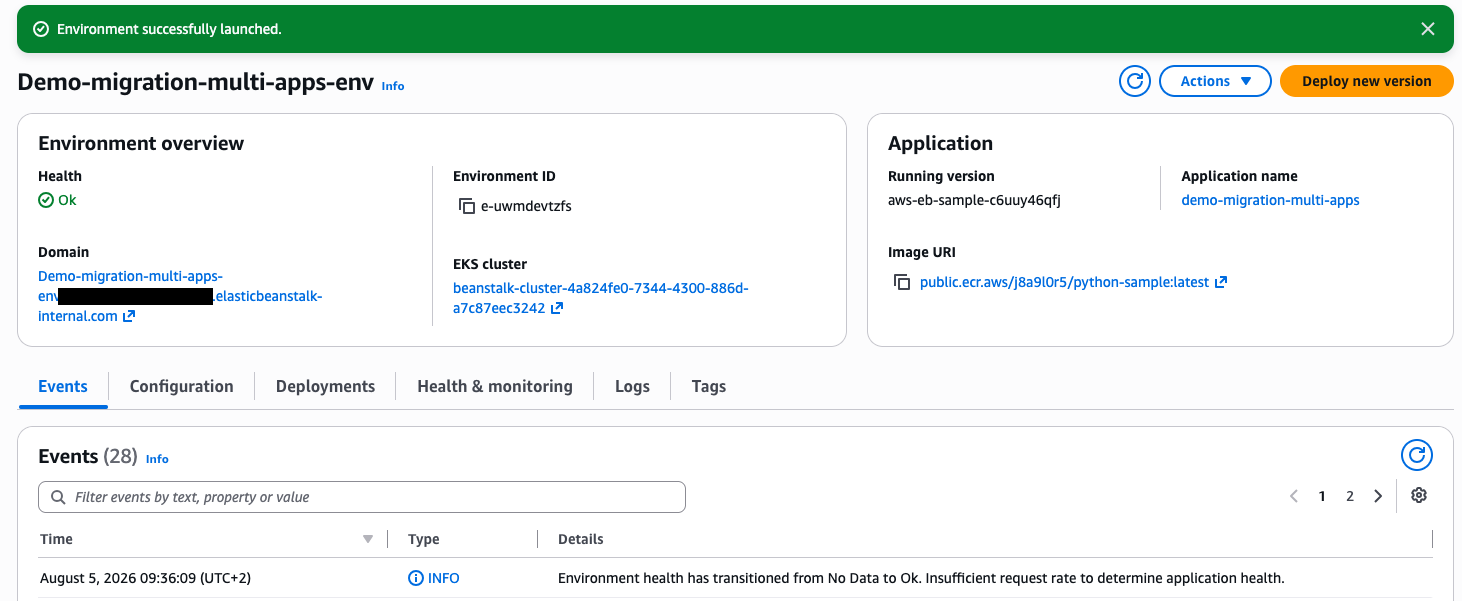
Figure 7: Deployed environment and application.
Step 4: Validate
Before any traffic moves, we verify the environment. In the Health and Monitoring tab, we can check environment health, CPU, memory, request latency, throughput, and error rates. Application logs stream to CloudWatch Logs, and the X-Ray service map shows requests flowing through the service, including calls to RDS and ElastiCache.
For cutovers, we can use different strategies. One of them is weighted routing in Route 53. We start by sending a small percentage of production traffic to the new environment while the PaaS deployment serves the rest. We watch error rates and latency on the dashboard, then raise the weight in stages until the new environment serves 100 percent. If anything looks wrong, shifting the weight back is a quick change.
Step 5: Optimize
With traffic running, we can review CloudWatch data and tighten the CPU and memory settings to match observed usage. We then adjust the autoscaling triggers to fit our traffic patterns, and we can enable Spot Instances for workloads that tolerate interruption.
Step 6: Clean up
If we follow along with a test application, terminate the environment from the console or CLI to stop incurring charges. When the last environment on a cluster is terminated, Elastic Beanstalk deletes the cluster in 3 hours. After our cutover is completed and the retention window we set for rollback passes, we can decommission the old PaaS application and its add-ons.
Conclusion
Both scenarios land on the same service, with the same application, version, and environment concepts, and the same division of responsibility: you own the application, and AWS runs the environment, from creation through every patch and upgrade, in your own account where the rest of your stack already lives. A legacy Windows application moves as-is onto a managed single-instance environment and modernizes later. A PaaS-hosted application keeps its push-and-deploy workflow on infrastructure that AWS operates.
Cluster Mode (Powered by Amazon EKS) is available today in 30 commercial regions: us-east-1, us-east-2, us-west-1, us-west-2, af-south-1, ap-east-1, ap-northeast-1, ap-northeast-2, ap-northeast-3, ap-south-1, ap-south-2, ap-southeast-1, ap-southeast-2, ap-southeast-3, ap-southeast-4, ap-southeast-5, ap-southeast-6, ap-southeast-7, ca-central-1, ca-west-1, eu-central-1, eu-central-2, eu-north-1, eu-south-1, eu-south-2, eu-west-1, eu-west-2, eu-west-3, il-central-1, sa-east-1
To get started, create your first environment in the Elastic Beanstalk console, read the developer guide , or deploy one of the sample applications from our GitHub repository.