AWS Open Source Blog
Deploying Open Policy Agent (OPA) as a sidecar on Amazon Elastic Container Service (Amazon ECS)
Introduction
The sidecar deployment pattern lets developers decouple monolithic applications into separate processes with high levels of isolation and encapsulation. To address cross-cutting concerns like logging, monitoring, and authorization, organizations can decouple these operations into sidecar containers shared across multiple microservices within a deployment. In order to perform operations like authorization, microservice deployments often depend on external services or lengthy database queries to make authorization decisions. By using a policy engine like Open Policy Agent (OPA) for authorization, microservices deployments eliminate latency-intensive network calls and deliver authorization decisions within milliseconds.
This blog post will demonstrate how Open Policy Agent (OPA) can be deployed in a sidecar pattern to provide authorization decisions for microservices deployed on Amazon Elastic Container Service (Amazon ECS).
Deploying Open Policy Agent as a sidecar using Amazon ECS
Amazon ECS is a fully managed container orchestration service that helps you deploy, manage, and scale containerized applications. Amazon ECS supports Docker container orchestration using a managed fleet of Amazon Elastic Compute Cloud (Amazon EC2) instances, or using a fully managed, serverless AWS Fargate cluster.
Open Policy Agent (OPA) is an open source, general-purpose policy engine that lets you specify policy as code and provides simple APIs to offload policy decision-making from your applications.
Let’s build a sample web application that receives the caller’s identity in a combination of headers and converts them as structured context data for OPA to make a policy decision that will authorize or deny access to your data.
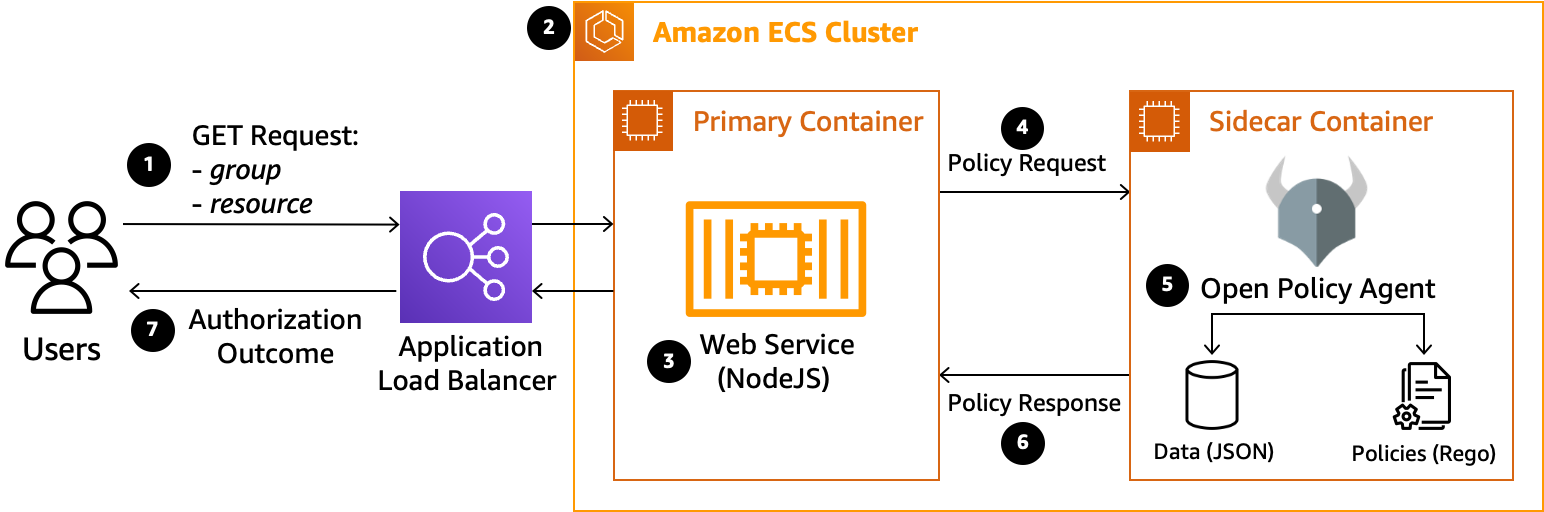
The diagram above demonstrates the authorization workflow that will be implemented in this blog:
- Users first make an HTTP GET request to an Application Load Balancer (ALB) endpoint with attributes stored in the header defining their assigned group and the resource identifier to be accessed.
- The Application Load Balancer will route requests into an Amazon Elastic Container Service (Amazon ECS) Cluster containing the Primary and Sidecar containers deployed in a sidecar pattern.
- Incoming requests will first reach the primary container, where a NodeJS web service uses the group and resource values stored in the request header to form a policy request.
- The web service will then send the policy request to the sidecar container running Open Policy Agent (OPA) to evaluate the request.
- The OPA daemon receives the incoming request and performs a policy evaluation against stored data and policy documents.
- Once the policy evaluation is complete, OPA will return a boolean (true/false) policy response to the web service.
- Depending on the policy response, the web service will return an authorization decision to the requesting user with an HTTP response stating that the user is either Authorized or Not Authorized to access the requested resource.
Project setup and walkthrough
Prerequisites
This walkthrough assumes the following two steps have already been completed.
- Install AWS Command Line Interface (AWS CLI) version 2 on your local machine.
- Install Docker on your local machine.
Primary container (web service) build steps
First, create a folder called helloopa-service where we will store the files and folders for the web application that we’ll building in the following steps.
Within the helloopa-service folder, create a file called app.js and copy the code below into this file. This web application exposes an API path called /request that requires two header values: “group” and “resource”. The webservice forwards this request to Open Policy Agent which will evaluate and returns the authorization decision back to the web service to perform any additional operations. Additionally, the web service exposes a /health path returning a HTTP 200 response for Amazon ECS health checks to complete successfully.
const express = require('express'); // Express.js
const axios = require('axios') // Axios is middleware that handles async requests

const app = express();
app.use(express.json());
app.use(express.urlencoded({ extended: false }));

const port = 80;
app.listen(port, () => {
    console.log("HelloOPA Service is running on port: " + port);
});

// HelloOPA Service router for /health endpoint.
app.get('/health', function (req, res, next) {
    res.status(200).send('Welcome to Hello OPA Service. Please make GET policy requests using /request endpoint.');
});

// HelloOPA Service router for /request endpoint.
app.get('/request', async (req, res, next) => {
    let requestGroup = req.header('group')
    let requestResource = req.header('resource')
    let requestData = { "input": { "group": requestGroup, "resource": requestResource } }

    // Make HTTP Request to Policy Service (OPA) with Request Data
    let policyServiceURL = 'http://localhost:8181/v1/data/opablog/allow'
    const policyServiceRequest = async () => {
        try {
            const policyResponse = await axios.post(policyServiceURL, requestData);
            return (policyResponse.data.result)
        } catch (err) {
            console.error(err);
        }
    }

    // After evaluation, return Policy Decision to the user.
    let policyServiceResult = await policyServiceRequest()
    if (policyServiceResult) {
        res.status(200).send("Policy Decision: " + policyServiceResult + ". User IS authorized to access " + requestResource);
        return
    }
    else if (!policyServiceResult) {
        res.status(401).send("Policy Decision: " + policyServiceResult + ". User NOT authorized to access " + requestResource);
        return
    }
    else {
        res.status(500).send("Policy Decision: " + policyServiceResult + ". Policy Service (OPA) unreachable or malformed response.");
        return
    }
});
module.exports = app;
Next, create a file called package.json in the same folder as app.js, and paste the following snippet into the file. This will define structure of the web application and will ensure the dependencies required by the web service are installed.
{
  "name": "helloopa-service",
  "version": "1.0.0",
  "description": "helloopa-service: Receives authorization requests, forwards to OPA.",
  "main": "app.js",
  "scripts": {
    "start": "node app.js"
  },
  "dependencies": {
    "axios": "^0.26.1",
    "express": "~4.17.3"
  }
}
Finally, you’ll create a file called Dockerfile within the same folder, pasting the following snippet into the file. This will be used to create a container for the web application with all of the necessary steps and requirements for a successful deployment.
# Build NodeJS Web Service directory, Install Dependencies, Run Service
FROM node:16-alpine
RUN mkdir -p /app/node_modules
WORKDIR /app
COPY . .
RUN npm install
EXPOSE 80
CMD ["node", "app.js"]
Sidecar container (OPA) build steps
Create a new folder called opa-service. Within it, create a folder called data where you will store the data and policies required by OPA.
First, we’ll create a JSON data file called data.json in the data directory, which will provide contextual information to OPA for policy evaluation. The following data describes the permissions policy for resources.
file1can be accessed by users that are members of eitherGuest,Dev, orAdmingroup.file2can only be accessed by users that are members ofDevorAdmingroups.file_secretcan only be accessed by users that are members of theAdmingroup.
{
  "GroupPermissions":{
    "file1":["Guest", "Dev", "Admin"],
    "file2":["Dev", "Admin"],
    "file_secret":["Admin"]
  }
}
Next, we’ll create an OPA policy file inside the data folder called policies.rego, written in the Rego language, and paste the following code snippet into the file. This policy will deny access to all requests by default, but will allow access only if the user’s group matches a group with valid permissions to access the requested resource.
package opablog
default allow=false
allow=true{
    input.group == data.GroupPermissions[input.resource][_]
}
Finally, you’ll create a file called Dockerfile within the opa-service folder, and paste the following code snippet into the file. This file will be used to create a container for the OPA service with all of the necessary data and policies and uses the latest release of the OPA executable.
# Build OPA Service directory, load policies and data, install and run OPA daemon
FROM alpine:latest
RUN apk --no-cache add curl
ADD $PWD/data /data
VOLUME /data RUN curl -L -o opa https://openpolicyagent.org/downloads/latest/opa_linux_amd64_static
RUN chmod 755 ./opa EXPOSE 8181
CMD ./opa run -s ./data --skip-version-check
Build and push containers to Amazon Elastic Container Registry (Amazon ECR)
For these next steps, make sure that you’ve installed the AWS CLI and Docker onto your local machine. Also make sure that you’ve configured your AWS CLI with your AWS Account Credentials.
First, create a file outside of the helloopa-service and opa-service folders called called build-push-ecr.sh, and copy the following code snippet into the file. To execute the script use chmod 755 build-push-ecr.sh in your terminal to set the correct permissions to the file. This script creates the Amazon Elastic Container Registry (Amazon ECR) repository, builds the specified Docker image locally, and then pushes that image to Amazon ECR.
#!/bin/bash
# 'build-push-ecr.sh' Automates the process to build and deploy a container to ECR.
# USAGE EXAMPLE: ./build-push-ecr.sh 123456789101 us-east-1 opa-service
if [ $# -eq 0 ]; then
   echo "No arguments supplied"
   echo "Usage:<script name> accountid, region, repo"
   exit 1
fi
declare -r AccountID=$1
declare -r Region=$2
declare -r Repo=$3

# Create an ECR Repository for your service, if one doesn't already exist.
out=$(aws ecr create-repository --region ${Region} --repository-name ${Repo} --image-scanning-configuration scanOnPush=true)
RepoURI=${AccountID}.dkr.ecr.${Region}.amazonaws.com/${Repo}
Registry=${AccountID}.dkr.ecr.${Region}.amazonaws.com/

# Authenticate with ECR for the specified registry. Make sure Docker Client is running on your local machine
aws ecr get-login-password | docker login --username AWS --password-stdin $Registry

# Build your Docker container image locally
cd ./${Repo}
docker build --platform linux/amd64 -t ${Repo}:latest .

# Tag your Docker Image for ECR
docker tag ${Repo}:latest ${RepoURI}:latest

# Push your Docker Image to ECR
docker push ${RepoURI}:latest
exit 0;
Note: If you are using an M1-based Mac, you have to use Docker Buildx instead of docker build. If you are building for x86-based systems use --platform linux/amd64, and for ARM-based systems use --platform linux/arm64. In the script above, make sure to comment out docker build, docker tag, and docker push commands and add the following command instead.
docker buildx build -t ${RepoURI}:latest --platform linux/amd64 --push .
Primary container (web service)
- First, we’ll be building and pushing the helloopa-service container. To do this, run the script we’ve created in your terminal by entering
./build-push-ecr.sh [AccountID] [AWSRegion] helloopa-service.
Sidecar container (OPA service)
- Next, we’ll be building and pushing the opa-service container. To do this, run the script we’ve created in your terminal by entering
./build-push-ecr.sh [AccountID] [AWSRegion] opa-service.
AWS CloudFormation templates
To automate the deployment of all the necessary resources for this project, we’ll be using three AWS CloudFormation templates. Create a new folder called templates outside of your helloopa-service and opa-service directories. This new folder is where you will create and store the following AWS CloudFormation templates.
helloopa-root stack
Inside the templates folder, create a file called helloopa-root.yml and copy the following code snippet into your file. This template defines all the necessary parameters and will call the other two nested stacks in sequence to complete this deployment.
AWSTemplateFormatVersion: '2010-09-09'
Description: HelloOPA Blog Cloudformation Stack Root Template,
            This template will define the parameters, and will serve as the "root" stack
            for the network stack and the service Stack.

## Define all parameters, labels for all stacks
Metadata:
  AWS::CloudFormation::Interface:
    ## ParameterGroups defines the labels for each group and the parameters in them
    ParameterGroups:
      - Label:
          default: Environment Configuration
        Parameters:
          - EnvironmentName
      - Label:
          default: Network Stack Configuration
        Parameters:
          - DesiredCapacity
          - MaxSize
          - VPCCIDR
          - PublicCIDRA
          - PublicCIDRB
      - Label:
          default: Service Stack Configuration
        Parameters:
          - ServiceName
          - DesiredCount

    # ParameterLabels provides a human friendly name for each parameter instead of a variable name.
    ParameterLabels:
      EnvironmentName:
        default: "Environment Name"

      # helloopa-network.yml Parameters
      DesiredCapacity:
        default: "Desired Number of EC2 Instances to provision"
      MaxSize:
        default: "Maximum Number of EC2 Instances to provision"
      VpcCIDR:
        default: CIDR value to use for VPC the app environment VPC.
      PublicCIDRA:
        default: CIDR to use for public subnet A for app environment.
      PublicCIDRB:
        default: CIDR to use for public subnet B for app environment.

      # helloopa-service.yml Parameters
      ServiceName:
        default: 'helloopa-blog'
      DesiredCount:
        default: 1

Parameters:
  EnvironmentName:
    Type: String
    Default: helloopa-blog-env
    Description: 'A friendly environment name that will be used for namespacing all cluster resources. Example: staging, qa, or production'

  # helloopa-network.yml Parameters
  DesiredCapacity:
    Type: Number
    Default: 1
    Description: Number of EC2 instances to launch in your ECS cluster.
  MaxSize:
    Type: Number
    Default: 1
    Description: Maximum number of EC2 instances that can be launched in your ECS cluster.
  VpcCIDR:
    Type: String
    Description: Please enter the IP range (CIDR notation) for this VPC
    Default: 10.10.0.0/16
  PublicCIDRA:
    Type: String
    Description: Please enter the IP range (CIDR notation) for the public subnet in the first Availability Zone
    MinLength: 9
    MaxLength: 18
    Default: 10.10.10.0/24
    AllowedPattern: "(\\d{1,3})\\.(\\d{1,3})\\.(\\d{1,3})\\.(\\d{1,3})/(\\d{1,2})"
    ConstraintDescription: Must be a valid CIDR range in the form x.x.x.x/24
  PublicCIDRB:
    Type: String
    Description: Please enter the IP range (CIDR notation) for the public subnet in the second Availability Zone
    MinLength: 9
    MaxLength: 18
    Default: 10.10.11.0/24
    AllowedPattern: "(\\d{1,3})\\.(\\d{1,3})\\.(\\d{1,3})\\.(\\d{1,3})/(\\d{1,2})"
    ConstraintDescription: Must be a valid CIDR range in the form x.x.x.x/24

  ## helloopa-service.yml Parameters
  ServiceName:
    Type: String
    Default: 'helloopa-blog'
    Description: A human-readable name for the service.
  DesiredCount:
    Type: Number
    Default: 1
    Description: How many copies of the service task to run.

Resources:
  NetworkStack:
    Type: AWS::CloudFormation::Stack
    Properties:
      TemplateURL: "./helloopa-network.yml"
      Parameters:
        EnvironmentName: !Ref EnvironmentName
        DesiredCapacity: !Ref DesiredCapacity
        MaxSize: !Ref MaxSize
        VpcCIDR: !Ref VpcCIDR
        PublicCIDRA: !Ref PublicCIDRA
        PublicCIDRB: !Ref PublicCIDRB

  ServiceStack:
    Type: AWS::CloudFormation::Stack
    Properties:
      TemplateURL: "./helloopa-service.yml"
      Parameters:
        EnvironmentName: !Ref EnvironmentName
        VPCId: !GetAtt NetworkStack.Outputs.VPCId
        ClusterName: !GetAtt NetworkStack.Outputs.ClusterName
        PublicListener: !GetAtt NetworkStack.Outputs.PublicListener
        ServiceName: !Ref ServiceName
        DesiredCount: !Ref DesiredCount
        ImageUrl: !Sub ${AWS::AccountId}.dkr.ecr.${AWS::Region}.amazonaws.com/helloopa-service:latest
        SidecarImageUrl: !Sub ${AWS::AccountId}.dkr.ecr.${AWS::Region}.amazonaws.com/opa-service:latest

Outputs:
    ApiUrl:
        Value: !GetAtt NetworkStack.Outputs.ExternalUrl
helloopa-network stack
Next, we’ll create a file called helloopa-network.yml and copy the following code snippet into the file. This stack will deploy all of the required networking, security, and cluster resources into your AWS environment.
AWSTemplateFormatVersion: '2010-09-09'
Description: HelloOPA Blog Cloudformation Network Template,
            Creates a VPC, two public subnets, internet gateway, and a public loadbalancer.
            Creates an ECS Cluster, Security Groups, and IAM Roles required for ECS.

Parameters:
  EnvironmentName:
    Type: String
  VpcCIDR:
    Type: String
  PublicCIDRA:
    Type: String
  PublicCIDRB:
    Type: String
  DesiredCapacity:
    Type: Number
  MaxSize:
    Type: Number
  InstanceType:
    Type: String
    Default: t3.small
    Description: Class of EC2 instance used to host containers.
  ECSAMI:
    Type: AWS::SSM::Parameter::Value<AWS::EC2::Image::Id>
    Default: /aws/service/ecs/optimized-ami/amazon-linux-2/recommended/image_id
    Description: The Amazon Machine Image ID used for the cluster, leave it as the default value to get the latest AMI

Resources:
  # START VPC Creation with Cluster and Resource Creation
  VPC:
    Type: AWS::EC2::VPC
    Properties:
      CidrBlock: !Ref VpcCIDR
      EnableDnsSupport: true
      EnableDnsHostnames: true
  PublicSubnetOne:
    Type: AWS::EC2::Subnet
    Properties:
      AvailabilityZone:
        Fn::Select:
          - 0
          - Fn::GetAZs: {Ref: 'AWS::Region'}
      VpcId: !Ref 'VPC'
      CidrBlock: !Ref PublicCIDRA
      MapPublicIpOnLaunch: true
  PublicSubnetTwo:
    Type: AWS::EC2::Subnet
    Properties:
      AvailabilityZone:
        Fn::Select:
          - 1
          - Fn::GetAZs: {Ref: 'AWS::Region'}
      VpcId: !Ref 'VPC'
      CidrBlock: !Ref PublicCIDRB
      MapPublicIpOnLaunch: true
  InternetGateway:
    Type: AWS::EC2::InternetGateway
  GatewayAttachement:
    Type: AWS::EC2::VPCGatewayAttachment
    Properties:
      VpcId: !Ref 'VPC'
      InternetGatewayId: !Ref 'InternetGateway'
  PublicRouteTable:
    Type: AWS::EC2::RouteTable
    Properties:
      VpcId: !Ref 'VPC'
  PublicSubnetOneRouteTableAssociation:
    Type: AWS::EC2::SubnetRouteTableAssociation
    Properties:
      SubnetId: !Ref PublicSubnetOne
      RouteTableId: !Ref PublicRouteTable
  PublicSubnetTwoRouteTableAssociation:
    Type: AWS::EC2::SubnetRouteTableAssociation
    Properties:
      SubnetId: !Ref PublicSubnetTwo
      RouteTableId: !Ref PublicRouteTable

  PublicRoute:
    Type: AWS::EC2::Route
    DependsOn: GatewayAttachement
    Properties:
      RouteTableId: !Ref 'PublicRouteTable'
      DestinationCidrBlock: '0.0.0.0/0'
      GatewayId: !Ref 'InternetGateway'

  PublicLoadBalancerSecurityGroup:
    Type: AWS::EC2::SecurityGroup
    Properties:
      GroupDescription: Access to the public facing load balancer
      VpcId: !Ref 'VPC'
      SecurityGroupIngress: # Allow access to ALB from anywhere on the internet
        - CidrIp: 0.0.0.0/0
          IpProtocol: -1
  PublicLoadBalancer:
    Type: AWS::ElasticLoadBalancingV2::LoadBalancer
    DependsOn: GatewayAttachement
    Properties:
      Scheme: internet-facing
      Subnets: # Load balancer is placed into public subnets, allowing internet traffic can reach it directly via the internet gateway
        - !Ref PublicSubnetOne
        - !Ref PublicSubnetTwo
      SecurityGroups: [!Ref 'PublicLoadBalancerSecurityGroup']
  DummyTargetGroupPublic:
    Type: AWS::ElasticLoadBalancingV2::TargetGroup
    Properties:
      HealthCheckIntervalSeconds: 6
      HealthCheckPath: /
      HealthCheckProtocol: HTTP
      HealthCheckTimeoutSeconds: 5
      HealthyThresholdCount: 2
      Name: "no-op"
      Port: 80
      Protocol: HTTP
      UnhealthyThresholdCount: 2
      VpcId: !Ref 'VPC'
  PublicLoadBalancerListener:
    Type: AWS::ElasticLoadBalancingV2::Listener
    Properties:
      DefaultActions:
        - TargetGroupArn: !Ref 'DummyTargetGroupPublic'
          Type: 'forward'
      LoadBalancerArn: !Ref 'PublicLoadBalancer'
      Port: 80
      Protocol: HTTP
  # Create ECS Cluster, Security Groups and Roles
  ECSCluster:
    Type: AWS::ECS::Cluster
  ECSSecurityGroup:
    Type: AWS::EC2::SecurityGroup
    Properties:
      GroupDescription: Access to the ECS containers
      VpcId: !Ref 'VPC'
  ECSSecurityGroupIngressFromPublicALB:
    Type: AWS::EC2::SecurityGroupIngress
    Properties:
      Description: Ingress from the public ALB
      GroupId: !Ref 'ECSSecurityGroup'
      IpProtocol: -1
      SourceSecurityGroupId: !Ref 'PublicLoadBalancerSecurityGroup'
  ECSSecurityGroupIngressFromSelf:
    Type: AWS::EC2::SecurityGroupIngress
    Properties:
      Description: Ingress from other containers in the same security group
      GroupId: !Ref 'ECSSecurityGroup'
      IpProtocol: -1
      SourceSecurityGroupId: !Ref 'ECSSecurityGroup'
  ECSAutoScalingGroup: # Will launch EC2 instances and register them to the ECS cluster.
    Type: AWS::AutoScaling::AutoScalingGroup
    Properties:
      VPCZoneIdentifier:
        - !Ref PublicSubnetOne
        - !Ref PublicSubnetTwo
      LaunchConfigurationName: !Ref 'ContainerInstances'
      MinSize: '1'
      MaxSize: !Ref 'MaxSize'
      DesiredCapacity: !Ref 'DesiredCapacity'
    CreationPolicy:
      ResourceSignal:
        Timeout: PT15M
    UpdatePolicy:
      AutoScalingReplacingUpdate:
        WillReplace: true
  ContainerInstances:
    Type: AWS::AutoScaling::LaunchConfiguration
    Properties:
      ImageId: !Ref 'ECSAMI'
      SecurityGroups: [!Ref 'ECSSecurityGroup']
      InstanceType: !Ref 'InstanceType'
      IamInstanceProfile: !Ref 'EC2InstanceProfile'
      UserData:
        Fn::Base64: !Sub |
          #!/bin/bash -xe
          echo ECS_CLUSTER=${ECSCluster} >> /etc/ecs/ecs.config
          yum install -y aws-cfn-bootstrap
          /opt/aws/bin/cfn-signal -e $? --stack ${AWS::StackName} --resource ECSAutoScalingGroup --region ${AWS::Region}
  EC2InstanceProfile:
    Type: AWS::IAM::InstanceProfile
    Properties:
      Path: /
      Roles: [!Ref 'EC2Role']
  # A role used to allow AWS Autoscaling to inspect stats and adjust scaleable targets on your AWS account
  AutoscalingRole:
    Type: AWS::IAM::Role
    Properties:
      AssumeRolePolicyDocument:
        Statement:
        - Effect: Allow
          Principal:
            Service: [application-autoscaling.amazonaws.com]
          Action: ['sts:AssumeRole']
      Path: /
      Policies:
      - PolicyName: service-autoscaling
        PolicyDocument:
          Statement:
          - Effect: Allow
            Action:
              - 'application-autoscaling:*'
              - 'cloudwatch:DescribeAlarms'
              - 'cloudwatch:PutMetricAlarm'
              - 'ecs:DescribeServices'
              - 'ecs:UpdateService'
            Resource: '*'
  # Allows ECS agent running on EC2 hosts to communciate with the ECS control plane allowing it to download docker images from ECR to run on your host.
  EC2Role:
    Type: AWS::IAM::Role
    Properties:
      AssumeRolePolicyDocument:
        Statement:
        - Effect: Allow
          Principal:
            Service: [ec2.amazonaws.com]
          Action: ['sts:AssumeRole']
      Path: /
      Policies:
      - PolicyName: ecs-service
        PolicyDocument:
          Statement:
          - Effect: Allow
            Action:
              - 'ecs:CreateCluster'
              - 'ecs:DeregisterContainerInstance'
              - 'ecs:DiscoverPollEndpoint'
              - 'ecs:Poll'
              - 'ecs:RegisterContainerInstance'
              - 'ecs:StartTelemetrySession'
              - 'ecs:Submit*'
              - 'logs:CreateLogStream'
              - 'logs:PutLogEvents'
              - 'ecr:GetAuthorizationToken'
              - 'ecr:BatchGetImage'
              - 'ecr:GetDownloadUrlForLayer'
            Resource: '*'
  # This is an IAM role which Authorizes ECS to manage resources onyour behalf
  # ex. updating load balancer with container details to route traffic correctly.
  ECSRole:
    Type: AWS::IAM::Role
    Properties:
      AssumeRolePolicyDocument:
        Statement:
          - Effect: Allow
            Principal:
              Service: [ecs.amazonaws.com]
            Action: ['sts:AssumeRole']
      Path: /
      Policies:
        - PolicyName: ecs-service
          PolicyDocument:
            Statement:
              - Effect: Allow
                Action:
                  # Rules allowing ECS to attach network interfaces to instances on your behalf in order for awsvpc networking mode to work correctly
                  - 'ec2:AttachNetworkInterface'
                  - 'ec2:CreateNetworkInterface'
                  - 'ec2:CreateNetworkInterfacePermission'
                  - 'ec2:DeleteNetworkInterface'
                  - 'ec2:DeleteNetworkInterfacePermission'
                  - 'ec2:Describe*'
                  - 'ec2:DetachNetworkInterface'
                  # Rules allowing ECS to update load balancers on your behalf with information about how to send traffic to your containers
                  - 'elasticloadbalancing:DeregisterInstancesFromLoadBalancer'
                  - 'elasticloadbalancing:DeregisterTargets'
                  - 'elasticloadbalancing:Describe*'
                  - 'elasticloadbalancing:RegisterInstancesWithLoadBalancer'
                  - 'elasticloadbalancing:RegisterTargets'
                Resource: '*'
  ECSTaskExecutionRole:
    Type: AWS::IAM::Role
    Properties:
      AssumeRolePolicyDocument:
        Statement:
          - Effect: Allow
            Principal:
              Service: [ecs-tasks.amazonaws.com]
            Action: ['sts:AssumeRole']
      Path: /
      Policies:
        - PolicyName: AmazonECSTaskExecutionRolePolicy
          PolicyDocument:
            Statement:
              - Effect: Allow
                Action:
                  # Allow the ECS Tasks to download images from ECR
                  - 'ecr:GetAuthorizationToken'
                  - 'ecr:BatchCheckLayerAvailability'
                  - 'ecr:GetDownloadUrlForLayer'
                  - 'ecr:BatchGetImage'
                  # Allow the ECS tasks to upload logs to CloudWatch
                  - 'logs:CreateLogStream'
                  - 'logs:PutLogEvents'
                Resource: '*'

Outputs:
  VPCId:
    Description: The ID of the VPC that this stack is deployed in
    Value: !Ref 'VPC'
    Export:
      Name: !Join [ ':', [ !Ref 'AWS::StackName', 'VPCId' ] ]
  ExternalUrl:
    Description: The url of the external load balancer
    Value: !Join ['', ['http://', !GetAtt 'PublicLoadBalancer.DNSName']]
    Export:
      Name: !Join [ ':', [ !Ref 'AWS::StackName', 'ExternalUrl' ] ]
  PublicListener:
    Description: The ARN of the public load balancer Listener
    Value: !Ref PublicLoadBalancerListener
    Export:
      Name: !Join [ ':', [ !Ref 'AWS::StackName', 'PublicListener' ] ]
  ClusterName:
    Description: The name of the ECS cluster
    Value: !Ref 'ECSCluster'
    Export:
      Name: !Join [ ':', [ !Ref 'AWS::StackName', 'ClusterName' ] ]
helloopa-service Stack
For our third stack, create a file called helloopa-service.yml and copy the following code snippet into the file. This stack will configure load balancing to our ECS cluster, define the service and task definition for our deployment, and will configure each of the containers themselves.
AWSTemplateFormatVersion: '2010-09-09'
Description: HelloOPA Blog Cloudformation Network Template,
            Deploy an ECS service using EC2 Launch Type, hosted in two public subnets, accessible via a public load balancer.
            Creates the target group for load balancer, ECS Task Definition, ECS Service Definition

## Parameters recieved from root stack.
Parameters:
  EnvironmentName:
    Type: String
    Default: helloopa-blog-cfn
    Description: Unique prefix used for resources
  ClusterName:
    Type: String
    Description: Cluster Name
  ServiceName:
    Type: String
  DesiredCount:
    Type: String
  VPCId:
    Type: String
    Description: "VPC to place helloopa resources into, passed in as parameter from root stack as output from network stack"
  PublicListener:
    Type: String
    Description: "Public Load Balancer Listener"
  Path:
    Type: String
    Default: "*"
    Description: A path on the public load balancer that this service should be connected to. Use * to send all load balancer traffic to this service.
  HealthCheckPath:
    Type: String
    Default: /health
    Description: Path to perform the healthcheck on each instance.
  ImageUrl: # Container1: helloopa-service
    Type: String
    Description: The url of a docker image that will handle incoming traffic.
  SidecarImageUrl: # Container2: opa-service
    Type: String
    Description: The url of the ECR image for the sidecar container that will handle traffic from primary container.
  Role:
    Type: String
    Default: ""
    Description: (Optional) An IAM role to give the services containers if the code within needs to access other AWS resources like S3 buckets, DynamoDB tables, etc

Conditions:
  HasCustomRole: !Not [ !Equals [!Ref 'Role', ''] ]

Resources:
  ## ECS Resources
  LogGroup:
    Type: AWS::Logs::LogGroup
    Properties:
      LogGroupName: !Sub ${EnvironmentName}-service-${ServiceName}
      RetentionInDays: 1
  # Task Definition to deploy Main and Sidecar Containers
  TaskDefinition:
    Type: AWS::ECS::TaskDefinition
    Properties:
      Family: !Ref 'ServiceName'
      Cpu: 1024
      Memory: 1024
      NetworkMode: "host" # important to ensure containers can communicate with one another in same host
      TaskRoleArn:
        Fn::If:
          - 'HasCustomRole'
          - !Ref 'Role'
          - !Ref "AWS::NoValue"
      ContainerDefinitions:
        - Name: 'helloopa-service'
          Image: !Ref 'ImageUrl'
          Cpu: 512
          Memory: 512
          PortMappings:
            - ContainerPort: 80
          LogConfiguration:
            LogDriver: 'awslogs'
            Options:
              awslogs-group: !Sub ${EnvironmentName}-service-${ServiceName}
              awslogs-region: !Ref 'AWS::Region'
              awslogs-stream-prefix: !Ref 'ServiceName'
        - Name: 'opa-service-sidecar'
          Image: !Ref 'SidecarImageUrl'
          Cpu: 512
          Memory: 512
          PortMappings:
            - ContainerPort: 8181
          LogConfiguration:
            LogDriver: 'awslogs'
            Options:
              awslogs-group: !Sub ${EnvironmentName}-service-${ServiceName}
              awslogs-region: !Ref 'AWS::Region'
              awslogs-stream-prefix: !Ref 'ServiceName'
  Service:
    Type: AWS::ECS::Service
    DependsOn: LoadBalancerRule
    Properties:
      ServiceName: !Ref 'ServiceName'
      Cluster: !Ref ClusterName
      DeploymentConfiguration:
        MaximumPercent: 200
        MinimumHealthyPercent: 100
      DesiredCount: !Ref 'DesiredCount'
      TaskDefinition: !Ref 'TaskDefinition'
      LoadBalancers:
        - ContainerName: 'helloopa-service'
          ContainerPort: 80
          TargetGroupArn: !Ref 'TargetGroup'

  ## Load Balancer Resources
  # Creates target group pointing to the running ECS service, sets port and healthcheck path.
  TargetGroup:
    Type: AWS::ElasticLoadBalancingV2::TargetGroup
    Properties:
      HealthCheckIntervalSeconds: 6
      HealthCheckPath: !Ref HealthCheckPath
      HealthCheckProtocol: HTTP
      HealthCheckTimeoutSeconds: 5
      HealthyThresholdCount: 2
      Name: !Ref 'ServiceName'
      Port: 80
      Protocol: HTTP
      UnhealthyThresholdCount: 2
      VpcId: !Ref 'VPCId'

  # Create a rule updating the load balancer to route traffic to TargetGroup instead of DummyTargetGroup
  LoadBalancerRule:
    Type: AWS::ElasticLoadBalancingV2::ListenerRule
    Properties:
      Actions:
        - TargetGroupArn: !Ref 'TargetGroup'
          Type: 'forward'
      Conditions:
        - Field: path-pattern
          Values: [!Ref 'Path']
      ListenerArn: !Ref PublicListener
      Priority: 1
Deployment
Now that you’ve created all three CloudFormation templates, create an Amazon Simple Storage Service (S3) bucket for your CloudFormation templates on your AWS account. To deploy the stacks that you just created, create a file called “package-deploy-cfn.sh” and copy the code snippet below into the file. Make sure to set execute permissions on the file by running chmod 755 package-deploy-cfn.sh. Make sure to modify the script with the parameters you want to use for VpcCIDR, PublicCIDRA, and PublicCIDRB under --parameter-overrides.
Run the following script ./package-deploy-cfn.sh with your AWS Region, S3 bucket name, root stack name, and the name of the environment you want to deploy resources into.
#!/bin/bash
# 'package-deploy-cfn.sh' Automates the process to build and deploy a container to ECR.
# EXAMPLE: ./package-deploy-cfn.sh us-east-1 helloopa-root my-bucket my-stack my-env
if [ $# -eq 0 ]; then
   echo "No arguments supplied"
   echo "Usage:<script name> region bucket_name stack_name environment"
   exit 1
fi
declare -r Region=$1
declare -r S3BucketName=$2
declare -r StackName=$3
declare -r EnvironmentName=$4
# This command will create a packaged CloudFormation template, uploads any nested stacks to given S3 Bucket.
aws cloudformation package --region ${Region} --template-file ./templates/helloopa-root.yml --output-template ./templates/packed-helloopa-root.yml --s3-bucket ${S3BucketName}
# This command will deploy your packed CloudFormation template
aws cloudformation deploy --region ${Region} --template-file templates/packed-helloopa-root.yml --stack-name ${StackName} --capabilities CAPABILITY_AUTO_EXPAND CAPABILITY_NAMED_IAM CAPABILITY_IAM --parameter-overrides EnvironmentName=${EnvironmentName} VpcCIDR=10.10.0.0/16 PublicCIDRA=10.10.10.0/24 PublicCIDRB=10.10.11.0/24
exit 0;
Testing
Once you AWS CloudFormation shows CREATE_COMPLETE for the helloopa-root stack, all of your resources have been successfully deployed into your AWS environment.
To start testing your deployment, first navigate to the “Outputs” section of the helloopa-root stack and save the ApiUrl value. In the following CURL commands, replace the ELBADDRESS with the ApiUrl value you just saved. Using the command line on your local machine, run each command and verify that the result you receive matches the expected result value.
To reference why each of these commands evaluate the way that they do, refer back to the “Sidecar container (OPA) build steps” section above.
Test case 1 — Guest accessing file1:
# Expected Result: True (don't copy this line into terminal)
curl --location --request GET 'ELBADDRESS/request' \
--header 'group: Guest' \
--header 'resource: file1'
Test case 2 — Guest accessing file2:
# Expected Result: False (don't copy this line into terminal)
curl --location --request GET 'ELBADDRESS/request' \
--header 'group: Guest' \
--header 'resource: file2'
Test case 3 — Dev accessing file2:
# Expected Result: True (don't copy this line into terminal)
curl --location --request GET 'ELBADDRESS/request' \
--header 'group: Dev' \
--header 'resource: file2'
Test case 4 — Dev accessing file_secret:
# Expected Result: False (don't copy this line into terminal)
curl --location --request GET 'ELBADDRESS/request' \
--header 'group: Dev' \
--header 'resource: file_secret'
Test case 5 — Admin accessing file_secret:
# Expected Result: True (don't copy this line into terminal)
curl --location --request GET 'ELBADDRESS/request' \
--header 'group: Admin' \
--header 'resource: file_secret'
Troubleshooting
- If you receive an “undefined” response after running any these commands.
- In your AWS Console, navigate to Amazon ECS using the search bar, and make sure both of your containers are running correctly under the service definition.
- You can also navigate to Amazon CloudWatch and check the logs for your Amazon ECS environment that you have configured, checking to see if the OPA container is receiving and responding to requests.
Cleanup
To clean up your deployment, navigate to the AWS Console and search for AWS CloudFormation. From there, select the helloopa-root stack and select Delete. Next, navigate to Amazon ECR, and delete the ECR repositories you created. Finally, make sure to delete the Amazon S3 bucket containing your AWS Cloudformation templates that you created in Deployment section.
Conclusion
In this post, we built a sample web application that offloads authorization decisions to a sidecar container running Open Policy Agent (OPA) as a sidecar on Amazon ECS. The OPA evaluation speed is possible because OPA keeps contextual data and policies in memory. When deployed as a sidecar, calls made to OPA are local host calls, bypassing any possible network latency.
For use cases where policies and context data need to be updated or to be dynamic, there are different methods to integrate with external data.
The AWS CloudFormation templates in this post can be extended to deploy multiple microservices, each using OPA sidecar containers with policies and context data specifically required for that service.