AWS Storage Blog
Build a data lake for streaming data with Amazon S3 Tables and Amazon Data Firehose
UPDATE (7/31/2025): Firehose can directly access S3 Tables in Glue Data Catalog without requiring resource links.
Businesses are increasingly adopting real-time data processing to stay ahead of user expectations and market changes. Industries such as retail, finance, manufacturing, and smart cities are using streaming data for everything from optimizing supply chains to detecting fraud and improving urban planning. The ability to use data as it is generated has become a critical competitive advantage for businesses, driving demand for a scalable data lake architecture for storing and managing streaming data. More recently, users are increasingly using Apache Iceberg to organize their streaming data in data lakes to use its database-like features, such as schema evolution, time travel, and ACID transactions.
Amazon S3 Tables provide purpose-built storage with a simple, performant, and cost-effective way to store and query Apache Iceberg tables. S3 Tables continuously optimize storage to maximize query performance and minimize costs, making it an excellent choice for businesses looking to streamline their data lake operations without further infrastructure setup. Businesses can stream and query tables in S3 table buckets through AWS analytics services, such as Amazon Data Firehose and Amazon Athena, by integrating the table buckets with AWS Glue Data Catalog and AWS Lake Formation. The S3 Tables integration with AWS analytics services for table buckets is in preview. Firehose is a fully managed serverless service that streams data from various sources to data lakes, data warehouses, and analytics data stores. With built-in support for Iceberg, Firehose can deliver real-time data from multiple sources to Iceberg tables in Amazon S3 without provisioning further resources or paying for idle streams during non-use hours. It streamlines data ingestion by processing streaming records as they arrive, and eliminates multi-step processes involved in writing streaming data in raw formats and converting it to Apache Iceberg format.
In this post, we walk through building a fully managed data lake using Firehose and S3 Tables to store and analyze real-time streaming data. We use a custom streaming source to deliver data into a table in an S3 table bucket, but the same workflow can be followed for other sources supported by Firehose that are listed in this Amazon Data Firehose user guide.
Solution overview
In this solution, we demonstrate an example where a user ingests streaming data from a source directly into a table in S3 table buckets. We start with creating an S3 table bucket and integrating it with AWS analytics services through AWS Glue Data Catalog and AWS Lake Formation. Then, we use Amazon Kinesis Data Generator to simulate and publish real-time data streams to Firehose and use Athena to view the data that is streamed into the table in table bucket.

Prerequisites
To follow along, you need the following setup:
- An AWS account with access to the following AWS services:
- Make sure the latest version of AWS Command Line Interface (AWS CLI) is installed and configured.
- Familiarity with the AWS Management Console.
Walkthrough
The following steps walk you through this solution.
- Create an S3 table bucket and integrate with AWS Analytics services
Navigate to Amazon S3 in the Console. Choose Table buckets and then Enable integration if the integration with AWS Analytics services isn’t already enabled, as shown in the following figure. This integration allows users to discover all the tables created in this AWS Region and this account in AWS Glue Data Catalog and AWS Lake Formation, and access them through AWS services, such as Firehose, Athena, Amazon Redshift, and Amazon EMR. When the integration is complete, all existing and future table buckets are automatically added as a sub-catalog, namespaces are organized as databases, and the tables within those namespaces are populated as tables in the AWS Glue Data Catalog. To learn more about this integration, refer to Using Amazon S3 with Analytics services.

Specify a name for your table bucket and continue with Create table bucket, as shown in the following figure.
 2. Create a namespace in the table bucket
Using the AWS CLI, create a namespace s3tables_demo_namespace in the table bucket created previously, as shown in the following. Namespaces are logical constructs that help you organize your tables in a scalable manner.
aws s3tables create-namespace \
--table-bucket-arn arn:aws:s3tables:<region>:<account-id>:bucket/<s3tablebucket>\
--namespace s3tables_demo_namespace

3. Create a table in the table bucket
Using AWS CLI, create a table in the existing namespace in the table bucket as s3tables_demo_table. When you create a table, you can also define a schema for the table. For this post, we create a table with a schema consisting of three fields: ID, name, and value.
aws s3tables create-table --cli-input-json
file://mytabledefinition.json
The following is the sample mytabledefinition.json used to set the table schema.
{
    "tableBucketARN": "arn:aws:s3tables:ap-northeast-1:<account-id>:bucket/<s3tablebucket>",
    "namespace": "s3tables_demo_namespace",
    "name": "s3tables_demo_table",
    "format": "ICEBERG",
    "metadata": {
        "iceberg": {
            "schema": {
                "fields": [
                     {"name": "id", "type": "int","required": true},
                     {"name": "name", "type": "string"},
                     {"name": "value", "type": "int"}
                ]
            }
        }
    }
}
The following image shows the sample output from the command:

4. Create an IAM role for Firehose
Create an IAM role that grants permissions to Firehose to perform operations on tables in the default AWS Glue Data Catalog, to back up failed records during streaming in a general-purpose S3 bucket, and to interact with Kinesis Data Stream. Additionally, depending on your Firehose configuration, you may choose to grant extra permissions for Amazon CloudWatch logging, and AWS Lambda function operations. To configure, navigate to IAM in the Console, and create an IAM role with permissions policy as mentioned in this Amazon S3 Tables user guide. Keep track of the role you create, as you need it later to grant AWS Lake Formation permissions.
5. Configure AWS Lake Formation permissions
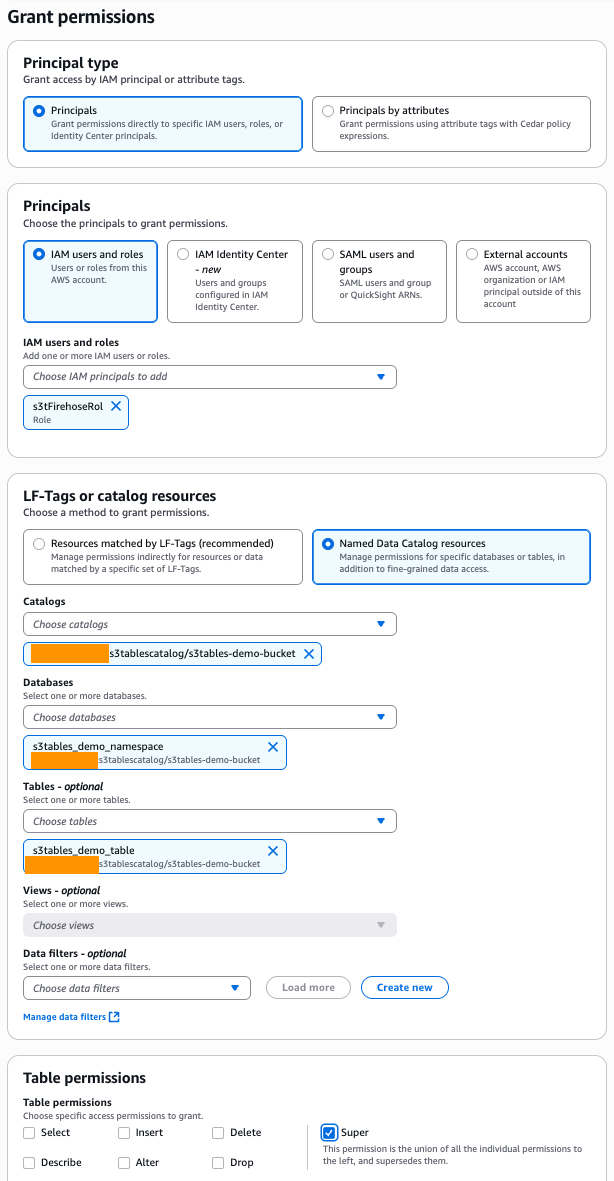
AWS Lake Formation manages access to your table resources. Lake Formation uses its own permissions model that enables fine-grained access control for Data Catalog resources. For Firehose to ingest data into table buckets, you must give permissions to the Firehose role created in the previous step. Navigate to Lake Formation in the Console, select Data permissions on the left menu, and then choose Grant. On the Grant Permissions page, under Principals, choose IAM users and roles, and select the IAM role created in previous step. In this example, the Firehose role is named s3tFirehoseRole. Under LF-Tags or catalog resources, choose Named Data Catalog resources. For Catalogs, choose the sub-catalog that you created when you integrated your table bucket. For Databases, choose the S3 table bucket namespace that you created. For Tables, choose the table that you created in your table bucket. For Table permissions, choose Super. Choose Grant.
6. Set up a Firehose stream
To create a Firehose stream, open Firehose in the Console and choose Create Firehose Stream. Choose Direct PUT as the source and Apache Iceberg Tables as the destination. Then, choose a name for your Firehose stream, adhering to the naming conventions displayed in the interface, as shown in the following figure.

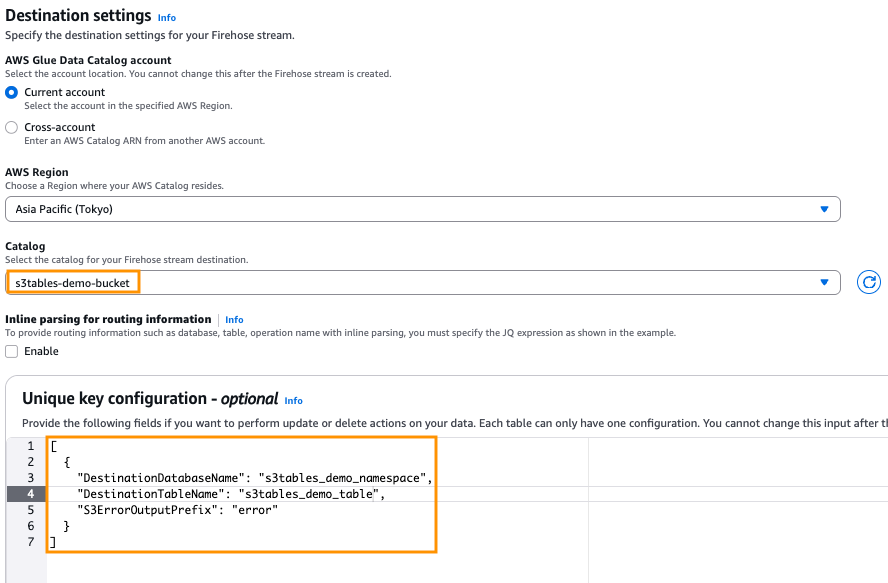
To configure Destination settings for your table bucket, you need to configure the database and table names to which Firehose should write. If you want the Firehose stream to write to one table only, then you can configure the Unique key configuration section. To configure this section, choose the namespace name that you created in Step 2 (s3tables_demo_namespace) as your database name and the table you created in Step 3 (s3tables_demo_table) as your table name. Firehose delivers to S3ErrorOutputPrefix if it fails to deliver to the configured table.
If you want Firehose to deliver to more than one S3 table, then you must use inline parsing option shown below. For more information on routing data to different S3 Tables, refer to Route incoming data to different Iceberg tables.
Specify an Amazon S3 general purpose bucket to store records that fail to be delivered to your S3 table bucket, as shown in the following figure.

Under IAM role, choose the role you previously created for Firehose to access S3 table buckets, then choose Create Firehose stream to create your Firehose stream, as shown in the following figure.

When the stream is created, monitor the Firehose delivery stream status until it changes to Active, as shown in the following figure.

7. Send streaming data using Kinesis Data Generator
Kinesis Data Generator is an application that allows you to send streaming data to Firehose. To begin, first configure Kinesis Data Generator for your account. Then, set the Region to match your Firehose, and choose the Firehose stream created in Step 7. Use the following template that matches the table schema defined in Step 3, as shown in the following figure. Depending on the buffer interval set when creating the Firehose stream, it may take up to 900 seconds for the data to appear in your table. For this post, we leave it at the default value of 300 seconds.
{
"id": {{random.number(99999)}},
"name": "{{random.arrayElement( ["CHECKIN","CHECKOUT","PAYMENT_FULL","PAYMENT_PARTIAL"] )}}",
"value": {{random.number(99999)}}
}

8. Verify and query data using Athena
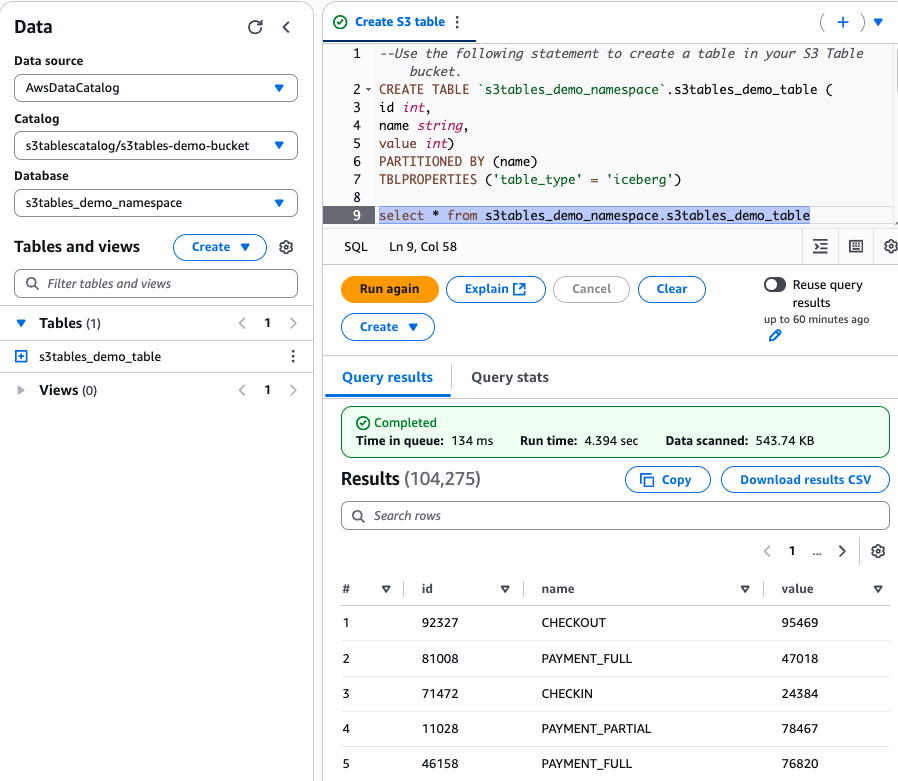
Now, you can query the S3 table using Athena. To query and verify data ingested from Firehose, run a SELECT command in Athena as shown in the following figure. As long as data is being streamed from Kinesis Data Generator, you should continue to see the row count increasing in this table, confirming successful data ingestion.
Cleaning up
To avoid future charges, delete the resources you created in Amazon S3 Tables and Firehose.
Considerations and limitations
Before using Firehose with Apache Iceberg, you should be aware of the considerations and limitations. For more information, see considerations and limitations.
Conclusion
In this post, we showed you how to build a managed data lake from a streaming data source using Amazon Data Firehose and Amazon S3 Tables. We also showed how to query these tables from S3 table buckets using Amazon Athena. This integration enables businesses to automatically capture, store, and analyze streaming data without managing complex infrastructure, thereby accelerating data-driven decision making.