Artificial Intelligence
De-identify medical images with the help of Amazon Comprehend Medical and Amazon Rekognition
Medical images are a foundational tool in modern medicine that enable clinicians to visualize critical information about a patient to help diagnose and treat them. The digitization of medical images has vastly improved our ability to reliably store, share, view, search, and curate these images to assist our medical professionals. The number of modalities for medical images has also increased. From CT scans to MRIs, digital pathology to ultrasounds, there are vast amounts of medical data collected in medical image archives.
These medical images are also useful for medical research. Using machine learning, scientists at global medical research institutions can analyze hundreds of thousands or millions of images to deepen their insight into medical issues. The challenge for health professionals is how to use these images while complying with regulatory obligations like the Health Information Portability and Accountability Act (HIPAA). Often, medical images contain Protected Health Information (PHI) stored as text within the image itself. This has historically presented a challenge because the process of removing PHI, called de-identifying, required the manual review and editing of images. This manual process can easily take many minutes per image and makes de-identifying large datasets time consuming and expensive.
In 2017, Amazon Web Services (AWS) announced the ability to easily detect and extract text from images using our machine learning service Amazon Rekognition. In 2018, we announced a new machine learning Natural Language Processing (NLP) service for medical text called Amazon Comprehend Medical that can help customers to detect and identify PHI in a string of text. You can use these two services, plus some Python code, as demonstrated in this blog post, to inexpensively and quickly detect, identify, and redact PHI from within medical images.
De-identification architecture
In this example, we will use the Jupyter Notebooks feature of Amazon SageMaker to create an interactive notebook with Python code. Amazon SageMaker is an end-to-end machine learning platform that enables you to prepare training data and build machine learning models quickly using pre-built Jupyter notebook with pre-built algorithms. In this blog post, for the actual machine learning and prediction, we will be using Amazon Rekognition to extract text from the images and Amazon Comprehend Medical to help us to identify and detect the PHI. All of our image files will be read from and written to a bucket in Amazon Simple Storage Service (Amazon S3), an object storage service that offers industry-leading scalability, data availability, security, and performance.
When using Amazon Comprehend Medical to detect and identify protected health information, note that the service provides confidence scores for each identified entity that indicate the level of confidence in the accuracy of the detected entity. You should take these confidence scores into account and review identified entities to make sure they are correct and appropriate for your use case. For more information about confidence scores, see the Amazon Comprehend Medical documentation.
Using the notebook
You can download the Jupyter Notebook that supports this blog post from GitHub.
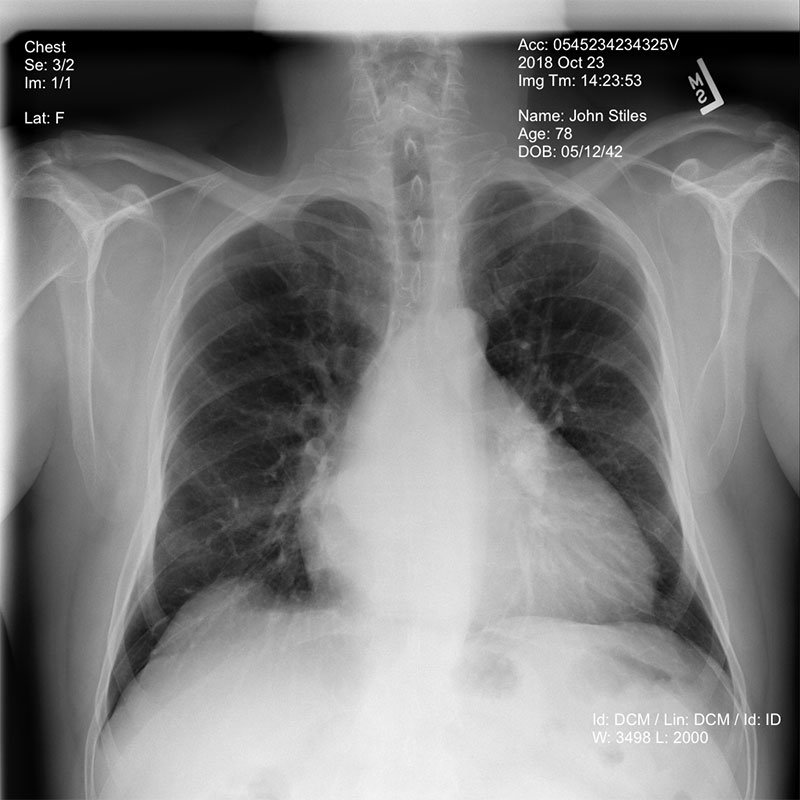
This notebook shows an example chest x-ray image from a dataset made available by the NIH Clinical Center. The dataset can be downloaded from this link. See the NIH Clinical Center’s CVPR 2017 paper for more information.
At the very beginning of the notebook, you will see 5 parameters you can adjust to control the de-identification process outlined in this example.
- bucket defines the Amazon S3 bucket where images will be read from and written to.
- object defines the identified image that you want to de-identify. These can be PNG, JPG, or DICOM images. If the object ends with the extension .dcm, then the image is assumed to be a DICOM image, and the ImageMagick utility will be used to convert it to PNG format before processing it.
- redacted_box_color defines the color that will be used to cover up identified PHI text within the image.
- dpi defines the dpi setting that will be used in the output image.
- phi_detection_threshold is the threshold for the confidence score mentioned earlier (between 0.00 and 1.00). Text detected and identified by Amazon Comprehend Medical must meet the minimum confidence score you set to be redacted from the output image. The default value of 0.00 will redact all text that Amazon Comprehend Medical has detected an identified as PHI, regardless of the confidence score.
After these parameters are set, you can execute all of the cells in the Jupyter Notebook. The first cell converts the image file you specified from DICOM format to PNG, if necessary, and then reads the resulting file from S3 into memory.
From there, the image can be sent to Amazon Rekognition for text detection using the DetectText feature. Amazon Rekognition returns a JSON object that contains a list of the text blocks detected within the image, as well as a bounding box that defines each text block, letting you know where the text is located within the image.
After we have all of the text detected within the image, we can send that text to Amazon Comprehend Medical to determine which text blocks may contain PHI using the DetectPHI feature. Amazon Comprehend Medical then returns a JSON object containing the entities that may be PHI, a type that defines what kind of information it believes the text to be (name, date, address, ID), and a confidence score for each detection. We can use this to determine which bounding boxes contain PHI.
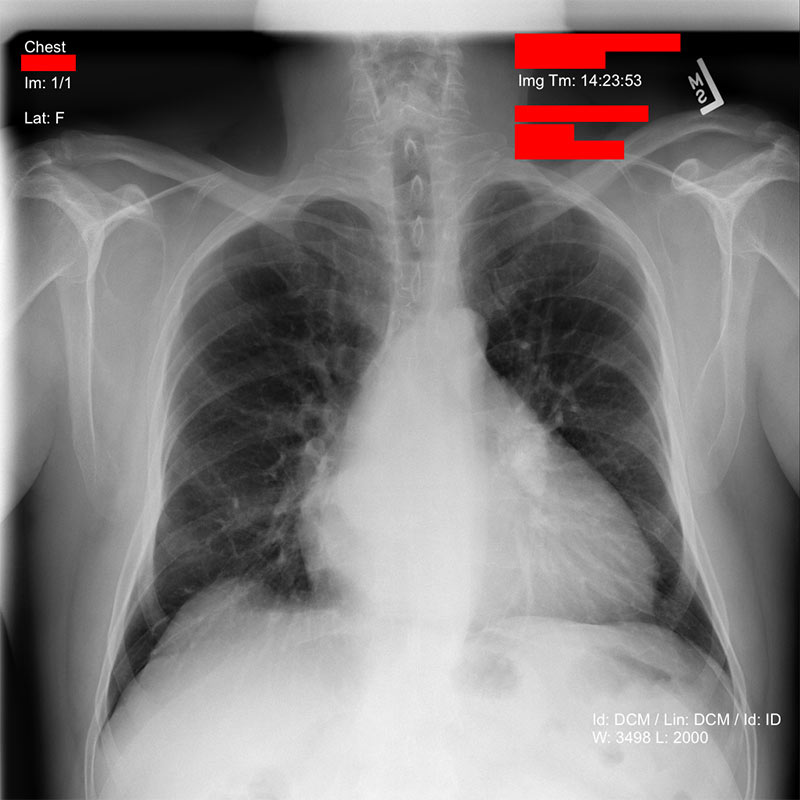
After we know which areas of the image might contain PHI text, we can draw redacting boxes over those areas.
The resulting de-identified image is then written to the S3 bucket that you specified, in PNG format, and with the text “de-id-“ prepended to the original file name.
Conclusion
This blog post has shown you the power and agility of using pre-trained machine learning models. It doesn’t take much development effort to combine AI services to accomplish complex tasks. When you use these services within a pre-configured machine learning development environment, such as Amazon SageMaker notebooks, you can execute your entire software development life cycle on fully managed infrastructure.
Running this example within an Amazon SageMaker notebook provides an ideal environment for you to understand the process used here and see the results. In addition, if you want to batch process thousands or millions of images, this same code could be implemented using AWS Lambda or AWS Batch. You could even associate a Lambda function containing this code with an Amazon S3 bucket so that every time a new image is added it would be de-identified.
About the Author
 James Wiggins is a senior healthcare solutions architect at AWS. He is passionate about using technology to help organizations positively impact world health. He also loves spending time with his wife and three children.