Amazon EC2 Auto Scaling with EC2 Spot Instances
TUTORIAL
Overview
In this tutorial, you will learn how to create a stateless, fault-tolerant workload using Amazon EC2 Auto Scaling with launch templates to request Amazon EC2 Spot Instances. Amazon EC2 Auto Scaling allows creation of collections of instances known as Amazon EC2 Auto Scaling groups (ASGs) and will maintain, scale up, or scale down the number of instances needed based on scaling policies that are defined based on the demands of that particular application.
Amazon EC2 Spot Instances are spare capacity available at steep discounts compared to the EC2 On-Demand price, typically between 70% and 90% off. EC2 Spot Instances can be interrupted with a two-minute notification whenever spare capacity is no longer available. It is important that applications using EC2 Spot Instances be stateless, fault-tolerant, and loosely coupled. Instances should be ephemeral so they can be easily removed and replaced as needed. In this tutorial, we will do this by creating an AWS Application Load Balancer and using it in concert with Amazon EC2 Auto Scaling to add and remove instances as needed. The tutorial will also use launch templates and a capacity-optimized allocation strategy which will automatically provision EC2 Spot Instances from the most-available Spot Instance pools by analyzing capacity metrics.
What you will accomplish
In this tutorial, you will create:
- a Load Balancer and a Security Group
- the launch template for the Amazon EC2 Auto Scaling group
- the Amazon EC2 Auto Scaling group
Prerequisites
This tutorial makes use of the default VPC of your AWS account. If your account doesn’t have a default VPC, you can use your own VPC. If you use your own VPC, the AWS Application Load Balancer that will be created must be configured to use public subnets, and the EC2 instances must be either in the same public subnets with public IP addresses auto-assigned, or in private subnets with a NAT Gateway configured to permit outbound internet access. We recommend that you map a VPC to each Availability Zone of the AWS Region you are working in to help maximize the number of Spot capacity pools available to Amazon EC2 Auto Scaling.
AWS experience
Time to complete
10–20 minutes
Cost to complete
Less than $3
Requires
- An AWS account*
- Amazon VPC set up in your account
Services used
Last updated
February 8, 2023
Implementation
Step 1: Create the Load Balancer and Security Group
1.1 — Log in to the AWS Console and open the AWS Application Load Balancers console. We will create an AWS Application Load Balancer along with a new Security Group that our sample workload will use for the remainder of the tutorial. Choose Create load balancer.
Load balancing will distribute HTTP requests to the fleet of Amazon EC2 Spot Instances that you will create later in the tutorial.
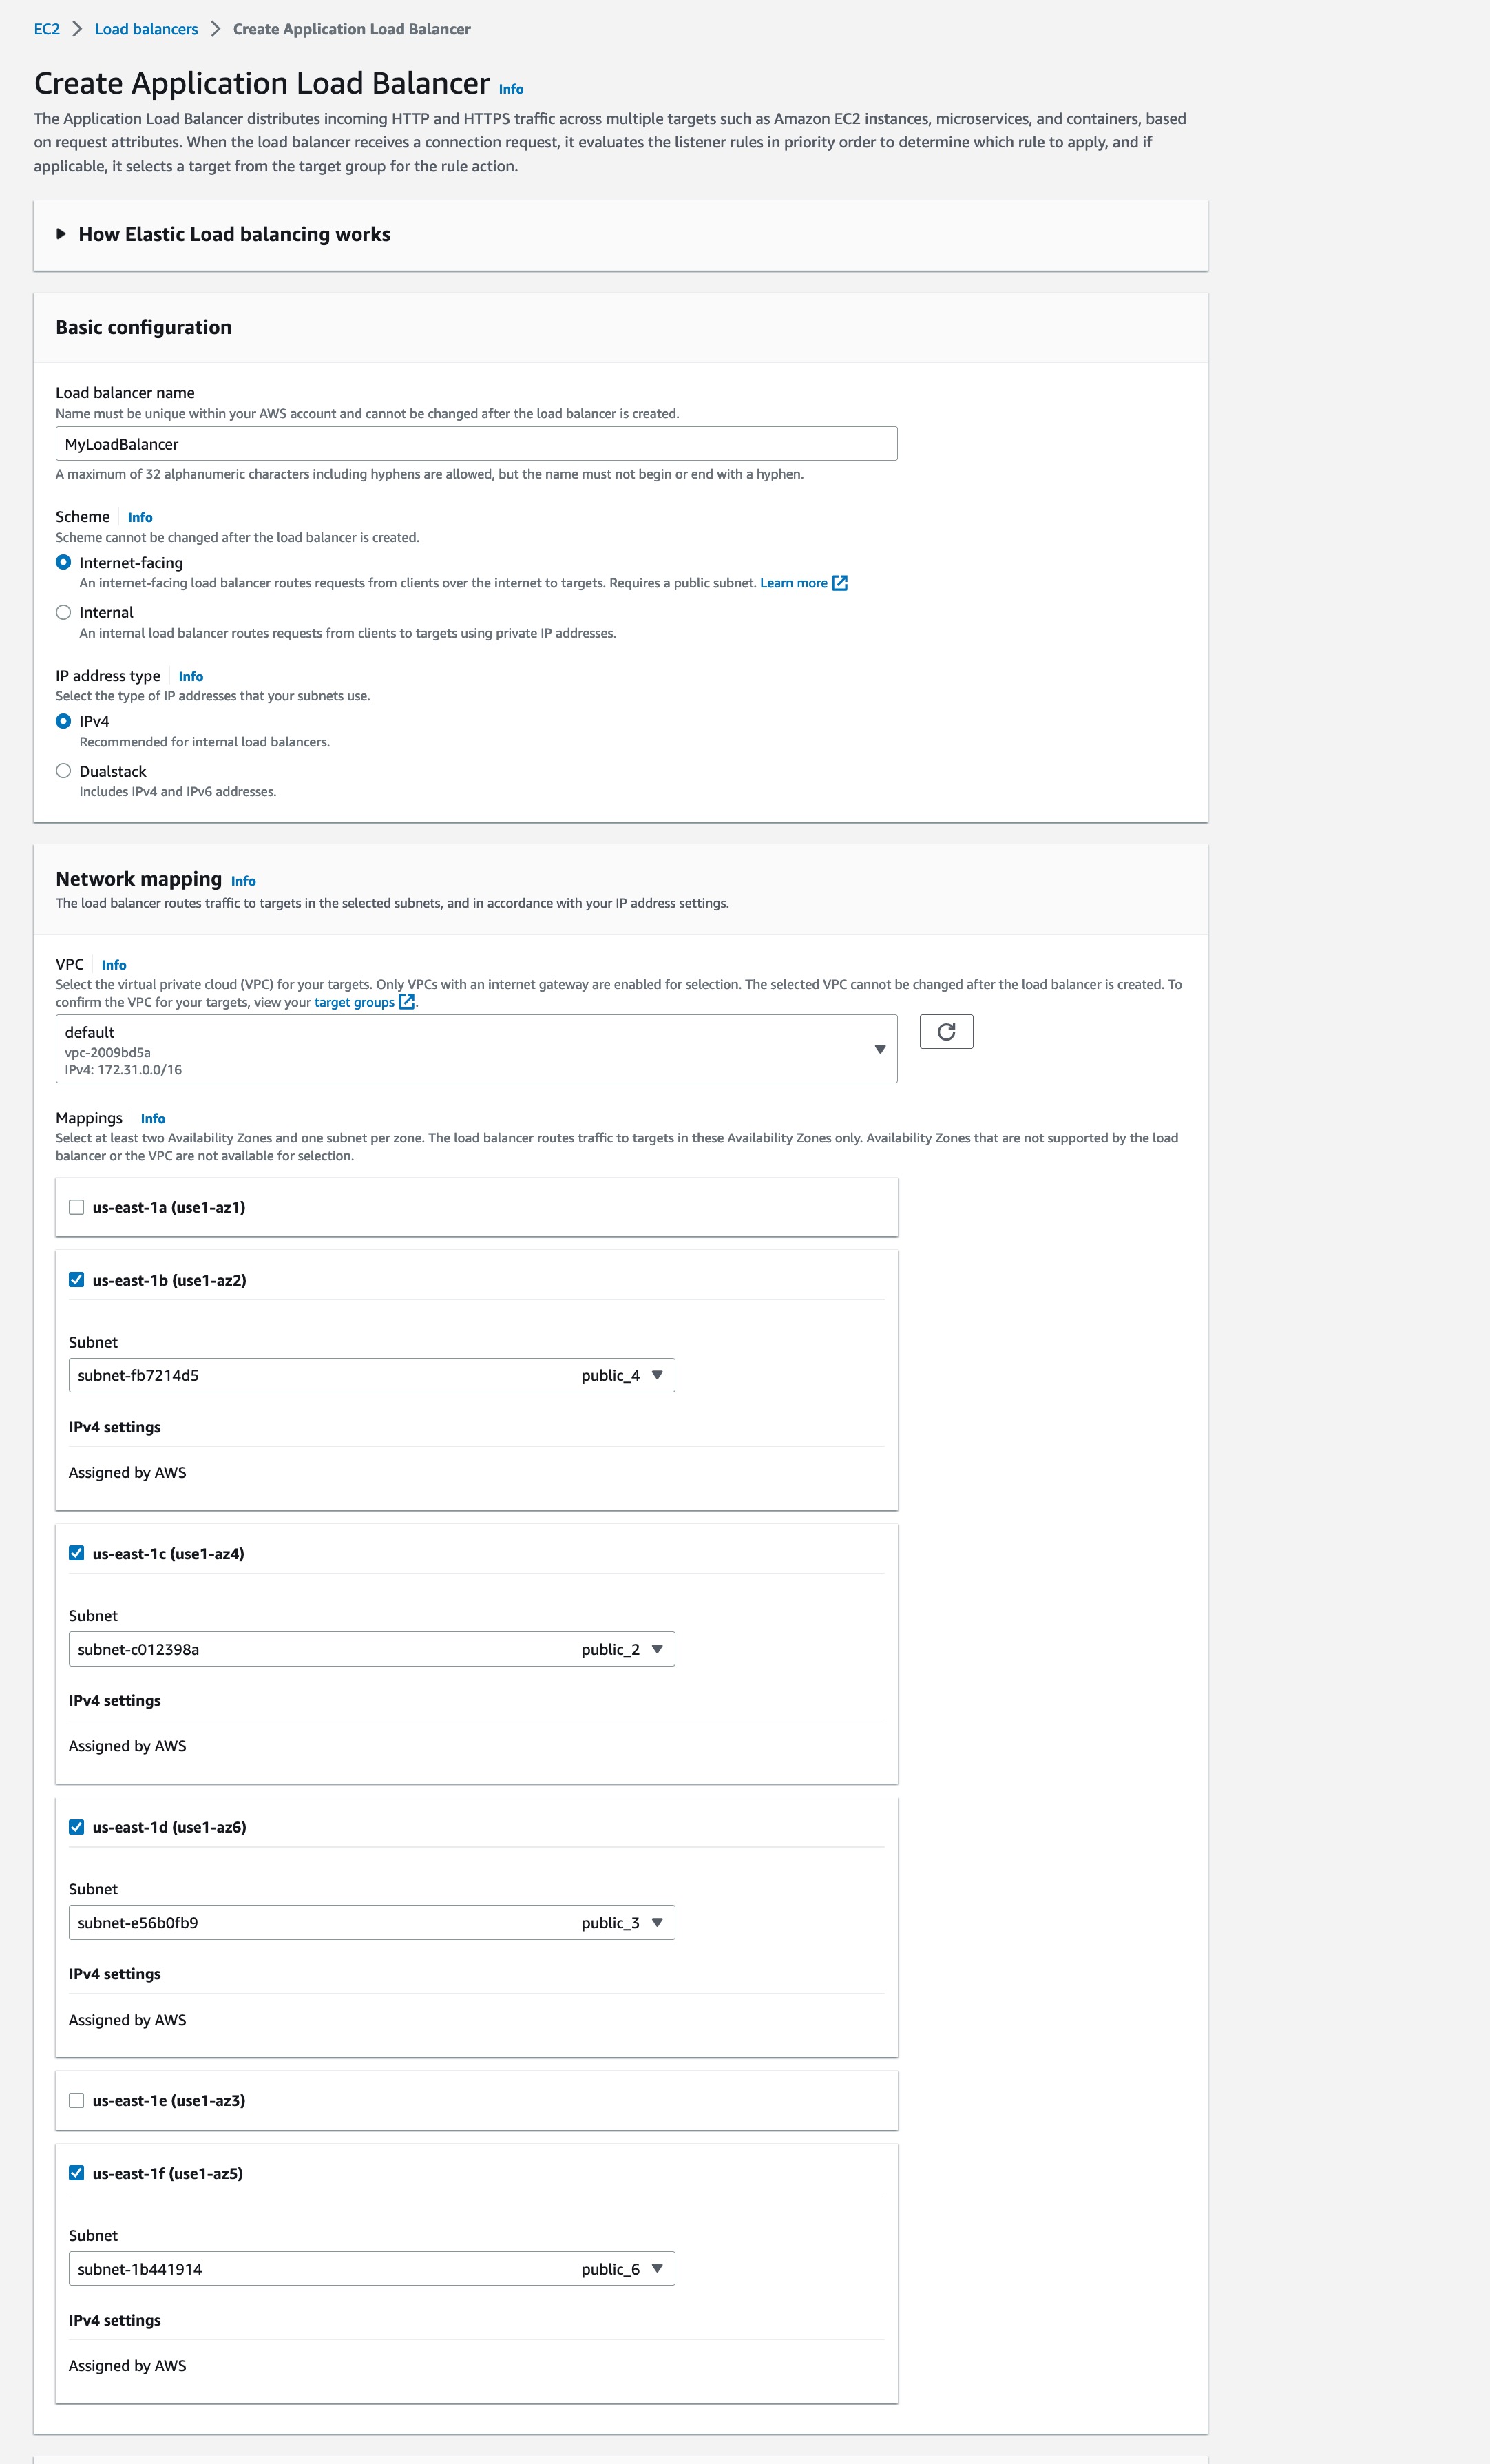
1.3 — Name your load balancer. Leave the Scheme set to Internet-facing and the IP address type as IPv4. Choose the default VPC or another that meets the requirements for this tutorial. Choose every possible Availability Zone from the list and ensure that only public subnets are selected. The number of subnets will vary depending on the Region and VPC configuration.
1.6 — In the Create target group window, leave the target type as Instances, specify a target group name, and keep Protocol as HTTP on port 80.
Choose default for the VPC and HTTP1 as the Protocol version.
For Health checks, leave the protocol as HTTP and the path as /.
Expand the Advanced health check settings and change the Healthy threshold to 2 and the Interval to 10. Leave the other settings as they are. This will help speed up our testing later on.
Choose Next.
Step 2: Create the launch template for the Amazon EC2 Auto Scaling group
2.1 — Open the Amazon EC2 Auto Scaling console. Look carefully at any banners and switch to the new EC2 console using the provided banner links if you are still using the old console. Once you are in the new console, choose Create Auto Scaling group.
2.2 — A launch template includes parameters required to launch an Amazon EC2 instance such as the ID of the Amazon Machine Image (AMI) and an instance type. To create an Amazon EC2 Auto Scaling group, we need either a launch template or a launch configuration. We will use a launch template because it offers improvements over using a launch configuration. To better understand the benefits of launch templates, see Launch an instance from a launch template. Choose the Create a launch template link near the bottom of the page. A new tab will open in your browser.
2.4 — Several items are required for this launch template. The first is the Amazon Machine Image (AMI). For this tutorial, select Amazon Linux 2 AMI (HVM), SSD Volume Type. Ensure you choose the x86 version, and not ARM.
Scroll down to Network settings and select the security group that was created for the Application Load Balancer during Step 1.
Take some time to review all of the options offered in a launch template. For this tutorial, all of the remaining items can be left with the default selection of Don’t include in launch template except the last one—Advanced details.
2.5 — Expand the Advanced details section and scroll to the bottom and locate the User data section. Do not select the Request Spot Instances checkbox—we will select and enable Spot Instances when setting up Auto Scaling in a later step.
Copy and paste the following text into the User data field:
#!/bin/bash
 yum install httpd -y
systemctl start httpd
systemctl stop firewalld
cd /var/www/html
echo "this is my test site and the instance-id is " > index.html curl http://169.254.169.254/latest/meta-data/instance-id >> index.htmlThis above code will create a simple web server that will show the instance-id when queried. This will help later as you are testing your Auto Scaling group.
Choose Create launch template.
A confirmation screen will be shown with several options, including the option to Create an Auto Scaling group from your template. Do not select this option as an older version of the Auto Scaling console may be launched. This tutorial uses the latest version of the console. Close this browser tab, and continue to Step 3.
Important note: The instances must be in a subnet that provides outbound Internet access—this can be a public subnet that auto-assigns a public IPv4 address to the instance, or it can be a private subnet with a NAT Gateway configured. Without this, the web server cannot be downloaded and installed, which will cause a 502 Bad Gateway issue with your Load Balancer as you test.
Step 3: Create the Amazon EC2 Auto Scaling group—launch template, instances, and network subnet selection
3.1 — Return to the original Create Auto Scaling group browser tab. Enter a name for the Auto Scaling group. Feel free to use your own name or enter the example name provided.
3.2 — Choose the refresh button in the Launch template box and select the template created in Step 2. Once selected, additional details about the template will be visible. Change the Version from Default (1) to Latest (1). This change means that whenever we update this launch template and a new version is created in the future, our Auto Scaling group will automatically begin to use that latest version on the very next instance it needs to launch. This is a powerful capability that makes, among other things, updating the Amazon Machine Image very easy, for example.
Once that is completed, choose Next.
3.3 — Select the same VPC that the Load Balancer was created in, and choose either public subnets, or private subnets that have a NAT Gateway configured. Select as many subnets as possible for maximum instance diversity.
In this example, a total of four Availability Zones (with public subnets) have been chosen. The more Availability Zones you choose, the better, as this provides access to more Spot instance pools. This will reduce the impact of Spot interruptions because each pool is completely independent of any other pool.
3.4 — In Instance type requirements, select the Specify instance attributes option to use attribute-based instance type selection. With this, you can express your instance type requirements as a set of attributes, such as vCPU, memory, and storage when provisioning EC2 instances with ASG, EC2 Fleet, or Spot Fleet.
In this example, we have specified minimum and maximum vCPU and memory limits. You can set more specific attributes in the Additional instance attributes section.
3.6 — Under Instances distribution, both On-Demand Instances and Spot Instances will be mixed in the same Auto Scaling group—this is also known as a MixedInstancesPolicy. Further information is available in the Amazon EC2 Auto Scaling API Reference.
Because the application is stateless and fault tolerant and can handle an instance being interrupted, mostly Spot Instances will be used, with a small number of On-Demand Instances to balance things out. Set the % On-Demand to 10%. As this is done, the % Spot will automatically adjust to 90%. This can be adjusted as desired as long as the mix of both are maintained.
Notice that there is also a section about the Spot allocation strategy. The Price capacity optimized allocation strategy has been selected automatically and is what is recommended for nearly all applications. Read more about this feature in this blog post.
Also keep the Capacity rebalance option checked to use rebalance notifications for high availability of Spot Instances.
Choose Next.
Step 4: Create the Amazon EC2 Auto Scaling group—load balancing and scaling policies
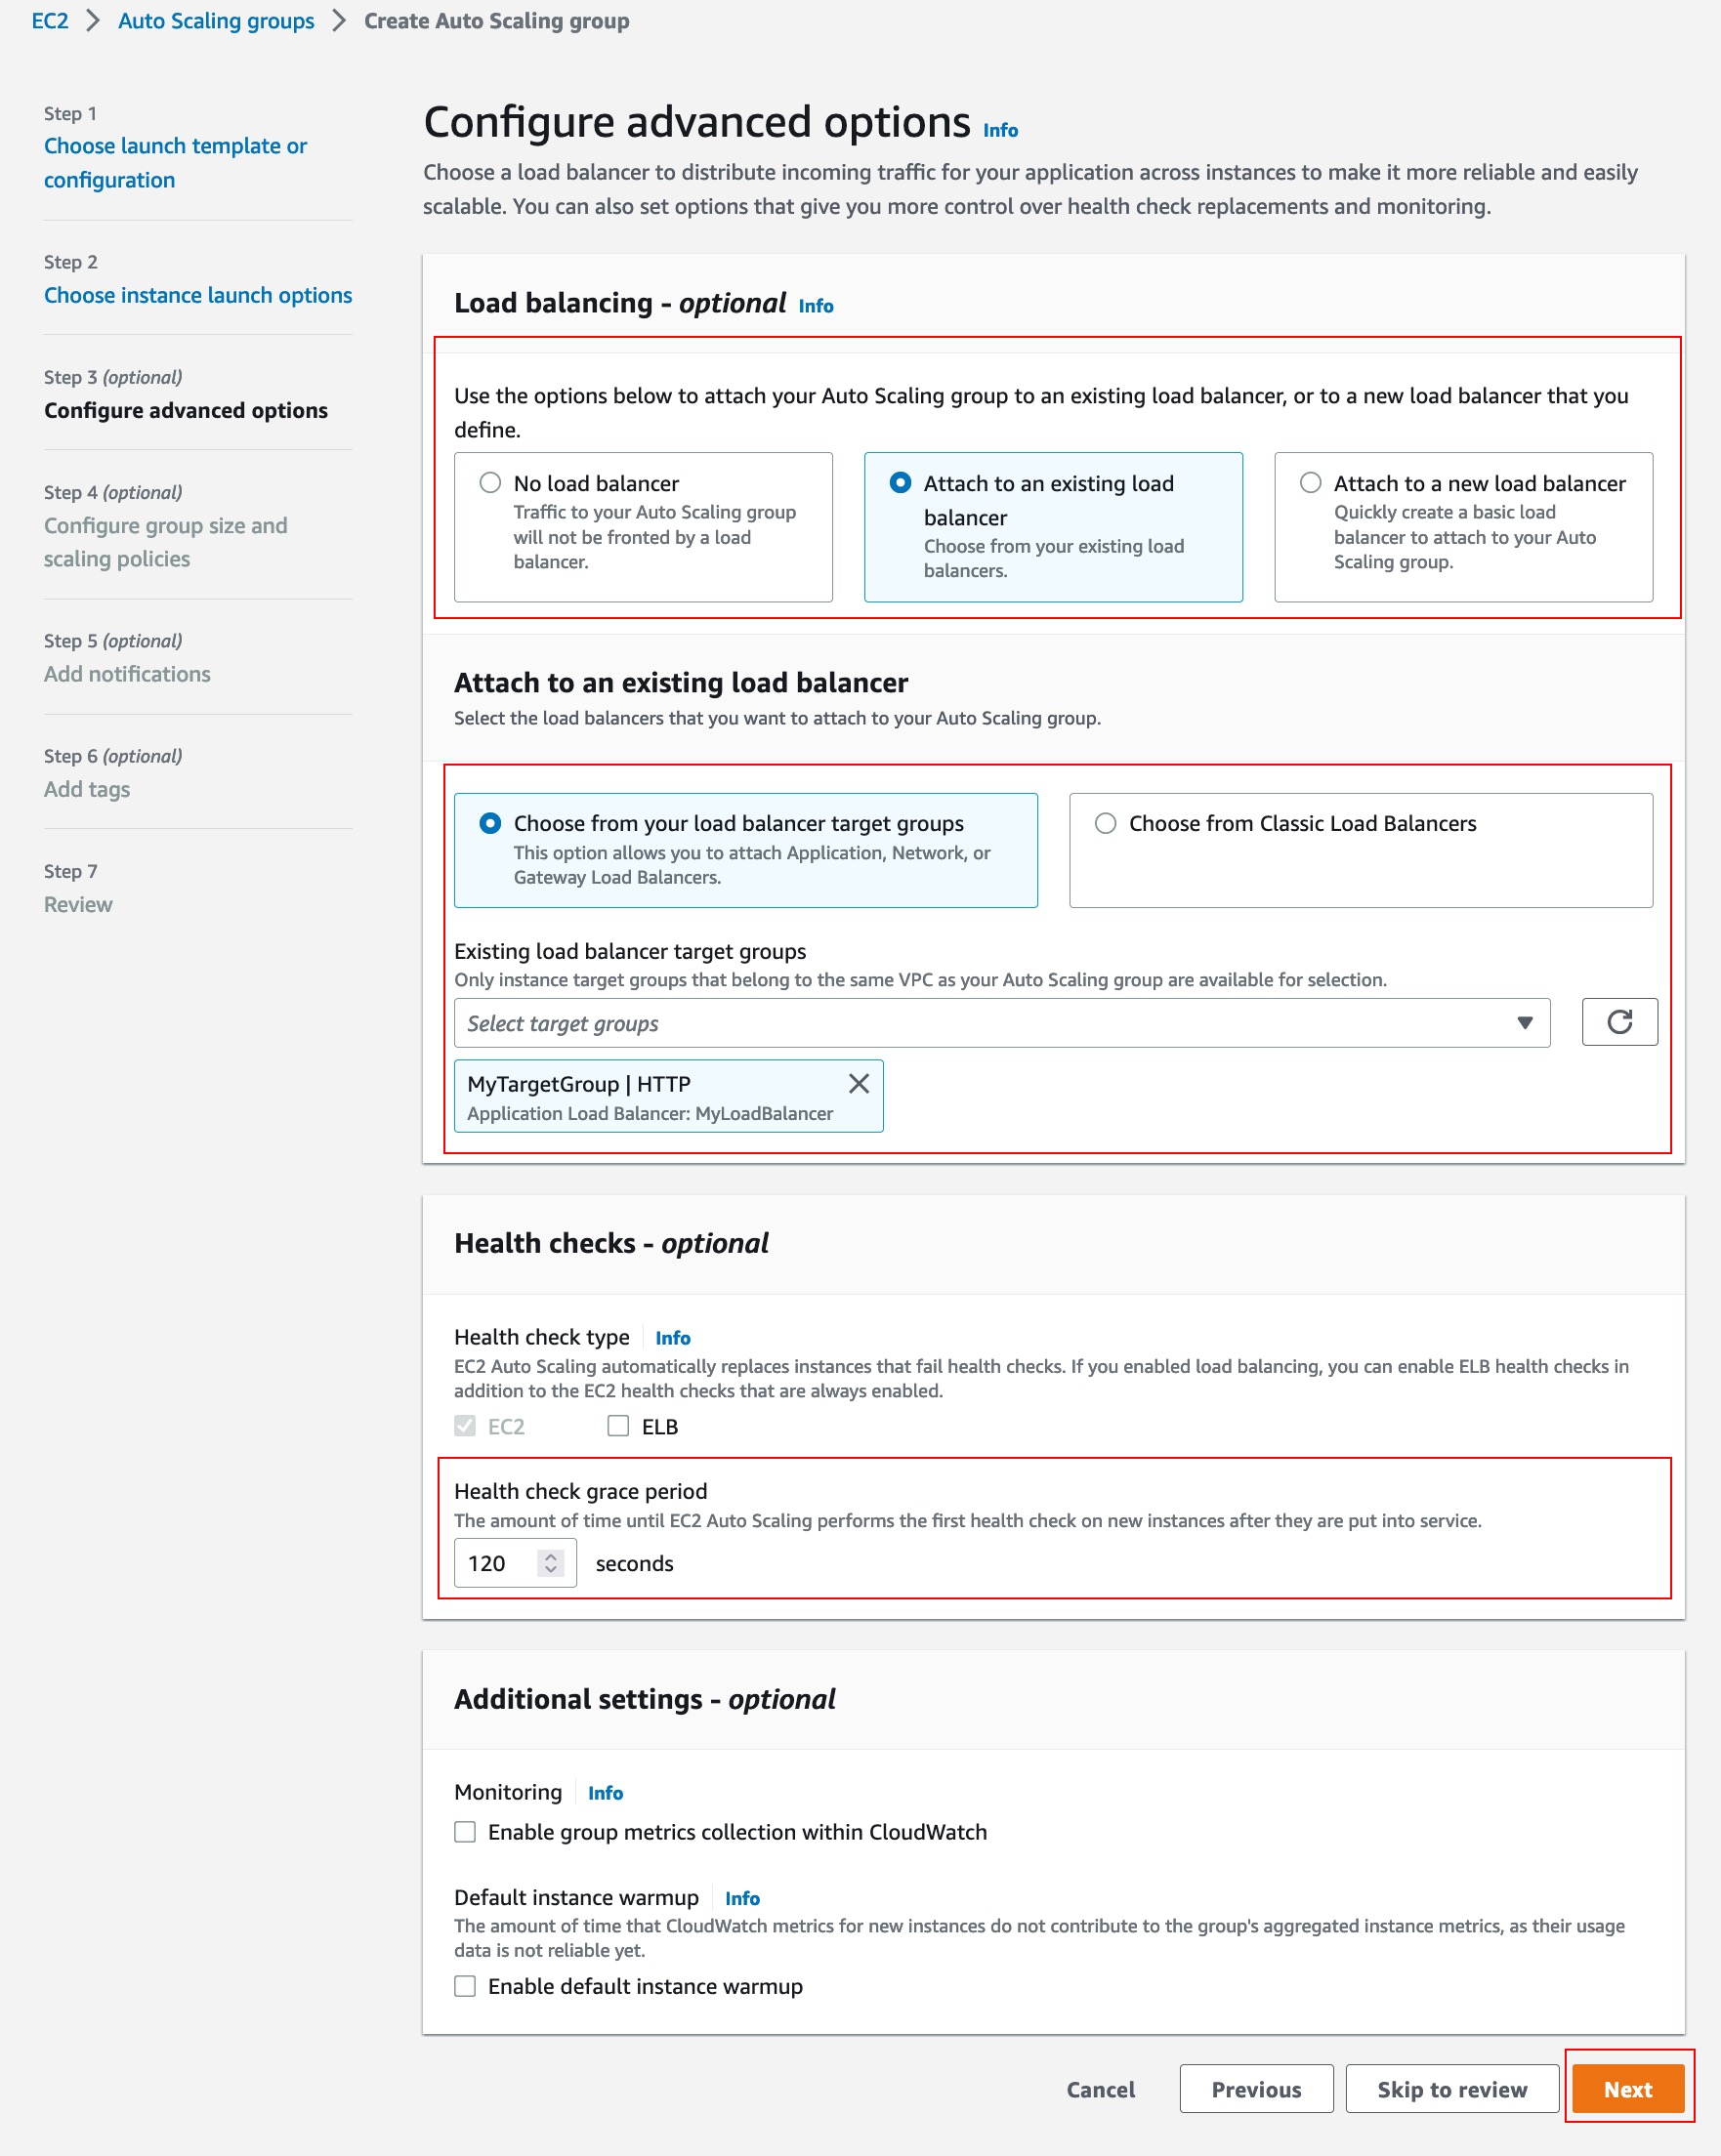
4.1 — In the Load balancing section, select Attach to an existing load balancer. In the Attach to an existing load balancer section, select Choose from your load balancer target groups. Select the target group we created for the load balancer in Step 1.
In the Health checks section, lower the Health check grace period to 120 seconds—this will help speed up testing. Each launched instance will automatically install and start a simple web server and typically boot up quickly.
Keep other settings as default and choose Next.
4.2 — Set the Desired capacity to 12, the Minimum capacity to 6, and the Maximum capacity to 12. These settings set guardrails and keep our Auto Scaling group within them.
The Desired capacity is how many instances we will start with, but you will see this scale down to Minimum capacity of six instances because of the Scaling policy, which we will set next.
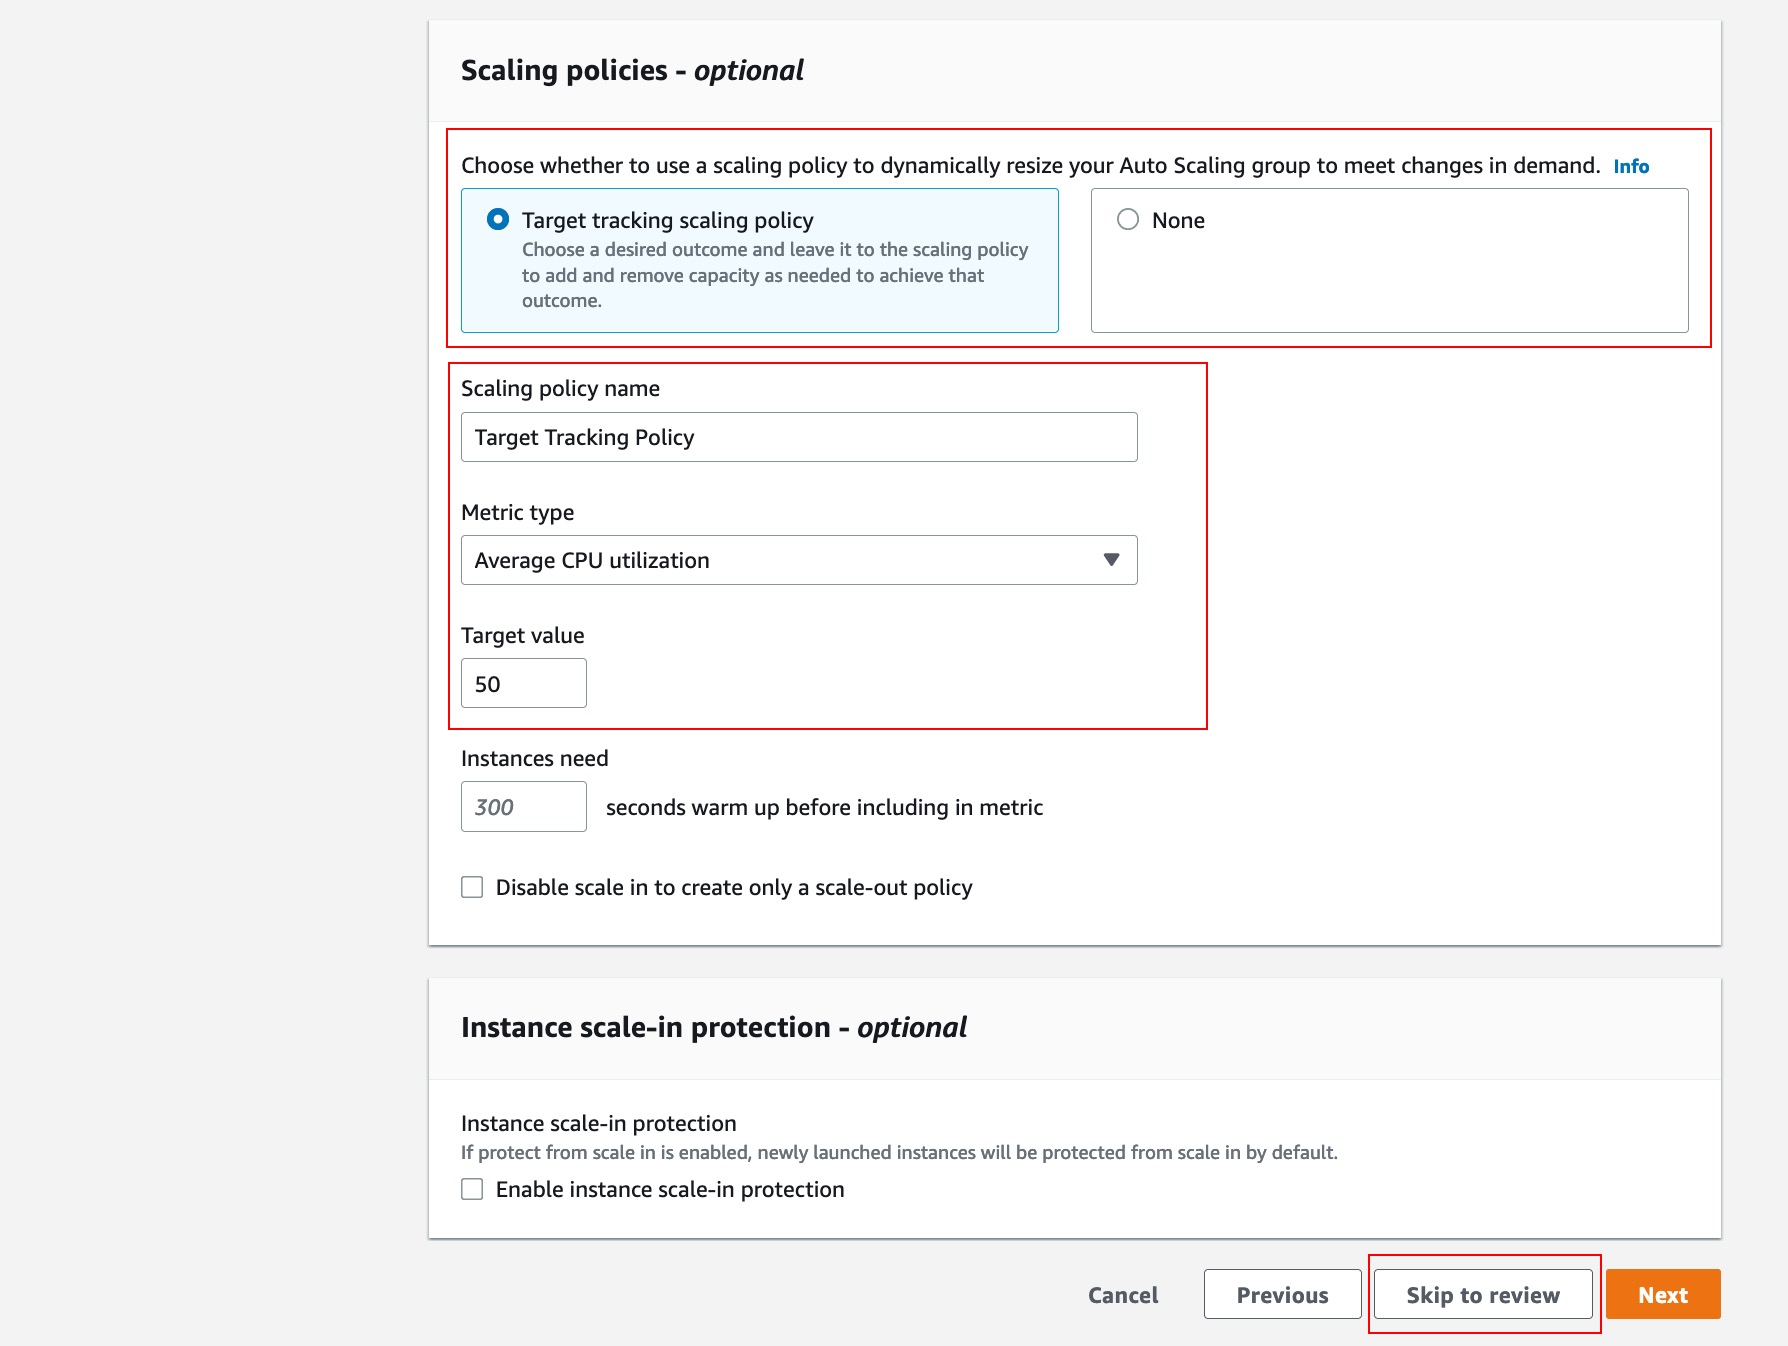
4.3 — Choose Target tracking scaling policy and leave the default settings of 50% Average CPU utilization. This policy would scale out with more instances when the average CPU across all instances goes above 50% and scale in when it falls back below this. You should see this happen as it scales in from the Desired capacity of 12 down to the Minimum capacity of 6 once Auto Scaling determines that the CPUs are well below 50%.
Because we won’t be setting any Instance scale-in protection, notifications, or tagging for this tutorial, you can select Skip to review.
4.4 — A screen showing a full summary of everything you just configured will be shown. Take a moment to review it both for accuracy, but also to get a sense of everything you just configured. This is the final step before EC2 Instances will be launched. Once you are satisfied, choose Create Auto Scaling group.
Step 5: Monitor and test the Auto Scaling group
5.2 — Select the Instance management tab—take a look at what was launched, including the Instance type and Availability Zone. You should see an equal distribution of instances across each Availability Zone. You may see a lot of the same instance type or you may see a wide variety of instance types—this is price capacity optimized at work and the result of the decisions it has made in terms of which instance types to launch in each Availability Zone.
5.3 — Go back to the Load balancers console. Select the load balancer name to see additional details. Find the DNS name for the load balancer created in Step 1. Choose the copy icon next to the A Record to copy it to the clipboard and then paste it into a web browser.
5.4 — A simple website will be shown in the browser. Keep choosing the refresh button—each time you do this, the load balancer sends your request to a different instance. You should see the instance-id change with each request. This is also known as round-robin load balancing and is the default setting.
5.5 — Spend some time playing around with your Auto Scaling group. You can simulate Spot Interruptions by simply selecting some running instances from the EC2 Instances console and terminating them. Your website will continue to work as long as you have some instances running. EC2 Auto Scaling will detect that the instances have failed or been terminated and will replace them with fresh instances and automatically add them back to the load balancer within a short period of time, while maintaining an even spread across all of the Availability Zones.
What happens if you terminate all but one instance? How about if you terminate all of them? Give it try and observe how Auto Scaling responds. This is meant to illustrate how Auto Scaling works to keep your application running whenever instances are no longer available for any reason (such as human error)—not just an EC2 Spot interruption. Because we are using multiple Availability Zones and EC2 Spot pools and following diversification best practices, having all our EC2 Spot Instances interrupted simultaneously isn’t a concern.
Hint: Choose the gear settings icon in the upper right—scroll down through the Instance Attributes and choose Lifecycle. Choose Confirm. Note you can now see which instances are Spot easily by scrolling all the way to the right.
Step 6: Clean up resources
6.1 — Although the Amazon EC2 Spot Instances are typically 70% to 90% less than an On-Demand EC2 instance, it is still a good idea to clean up and delete resources once you have completed the tutorial. This is a quick and easy process.
6.2 — Delete the Auto Scaling group you created—this will automatically terminate any instances that it currently manages. Enter delete when asked to confirm. Within a few moments, the group will be fully deleted and will disappear from the console. Double-check the Instances console to be sure that nothing is still running.
6.5 — Finally, open the Launch templates console, located below the Instances console, and delete your launch template. Once you enter Delete to confirm, the template will disappear.
6.6 — You have finished cleaning up and should no longer be incurring any costs.
Conclusion
Congratulations!! You just learned how to create an Auto Scaling group using EC2 Spot Instances with launch templates. Auto Scaling with load balancing will keep your stateless, fault-tolerant workload such as a web application running even after some instances are interrupted or experience other issues. You also learned how to see the actions taken by Auto Scaling.
Next steps
To learn more about using Spot Instances to run web applications, review this blog.
Want to learn more about Spot Instances? Check out the self-guided Spot Instance workshops to learn more about additional use cases for Spot Instances.
If you want to learn more about Amazon EC2 Spot Instances, visit the Amazon EC2 Spot Instances product page to explore documentation, videos, blogs, and more.


