AWS Compute Blog
Introducing AWS Virtual Waiting Room
This post is written by Justin Pirtle, Principal Solutions Architect, Joan Morgan, Software Developer Engineer, and Jim Thario, Software Developer Engineer.
Today, AWS is introducing an official AWS Virtual Waiting Room solution. You can integrate this new, open-source solution with existing web and mobile applications. It can help buffer users during times of peak demand and sudden bursts of traffic, preventing systems from resource exhaustion.
Events commonly use virtual waiting rooms where there is either unknown demand or expected large bursts of traffic. Examples of such events include concert ticket sales, Black Friday promotions, COVID-19 vaccine registrations, and more. Virtual waiting rooms allow a quota of users to view, select, and complete their transactions directly. They shield the application’s backend environment from traffic by buffering users in a waiting room until it is their turn in line.
Like any real-life queuing system, a user enters the AWS Virtual Waiting Room and requests a number in line. After receiving a number corresponding to the unique device ID, the browser then polls regularly for updates. The update provides the current number being served and anticipated time until they are front of line.
After reaching the front of the line, the user can exchange the number and device ID for a secure session token. This is included with their downstream requests to authenticate users securely.
If a user discovers the backend endpoint and tries to send requests, they are redirected into the waiting room. The API requests are denied access until they have a valid token. This prevents the backend from needing to scale to accommodate all users at a single time.
Integrating the AWS Virtual Waiting Room into your application
Integration steps depend on the integration pattern for your application. You can decide if all users are routed through the waiting room or only during periods of excessive traffic. You can also choose to protect only the web host serving the backend webpages or one or more APIs powering backend commerce services.
There are four common patterns supported for integrating the waiting room into your application:
- Upstream redirection of all traffic from the main target site to flow through AWS Virtual Waiting Room. This option sends all user traffic through the waiting room with the initial capacity of users permitted to the protected system. The traffic passes through transparently, then it buffers the remaining users. It admits new users as capacity becomes available. The target system is only accessible by users who pass through the waiting room.
- Downstream redirection to the virtual waiting room from the target site. This option sends all traffic to the target site. The target site conditionally redirects requests that need to enter the waiting room. No DNS or upstream modifications are needed. The target site must be able to handle the initial user requests and redirection responses.
- Direct target site API integration for buffering users from an existing website without any redirection. Your web or mobile application integrates the virtual waiting room at the API-level. This does not need any redirection to a different waiting room endpoint or site. This can offer a seamless user experience but may require more development for the integration.
- OpenID Connect (OIDC) adapter. This option offers no-code native integration of the waiting room with OpenID Connect-enabled system components, such as the AWS Application Load Balancer (ALB). Users are redirected by the load balancer or similar component to the waiting room. They are buffered until issued a signed, time-limited JSON Web Token (JWT). Once the user’s JWT token is issued, the load balancer then forwards user requests to the target backend systems.
Overview of the AWS Virtual Waiting Room solution
The AWS Virtual Waiting Room solution implementation includes three main components:
- Core APIs. The main resources deployed include two Amazon API Gateway deployments, a VPC, several AWS Lambda functions, an Amazon DynamoDB table, and an Amazon ElastiCache cluster. This API provides the basic mechanisms for tracking clients entering the waiting room. It requests status of the line progression and an authentication token to enter the target protected site.
- Waiting room front-end website. The waiting room static site is shown to users awaiting their turn. This site dynamically updates the position being served and their place in line on a configurable interval. You customize this site’s HTML, CSS, and JavaScript to match your frontend styling and theme.
- Lambda authorizer for protected target system. The Lambda authorizer wraps and protects the downstream protected target system’s APIs. This ensures that all user invocations have a validated time-limited token issued by the waiting room core API. It helps to prevent users from bypassing the waiting room.
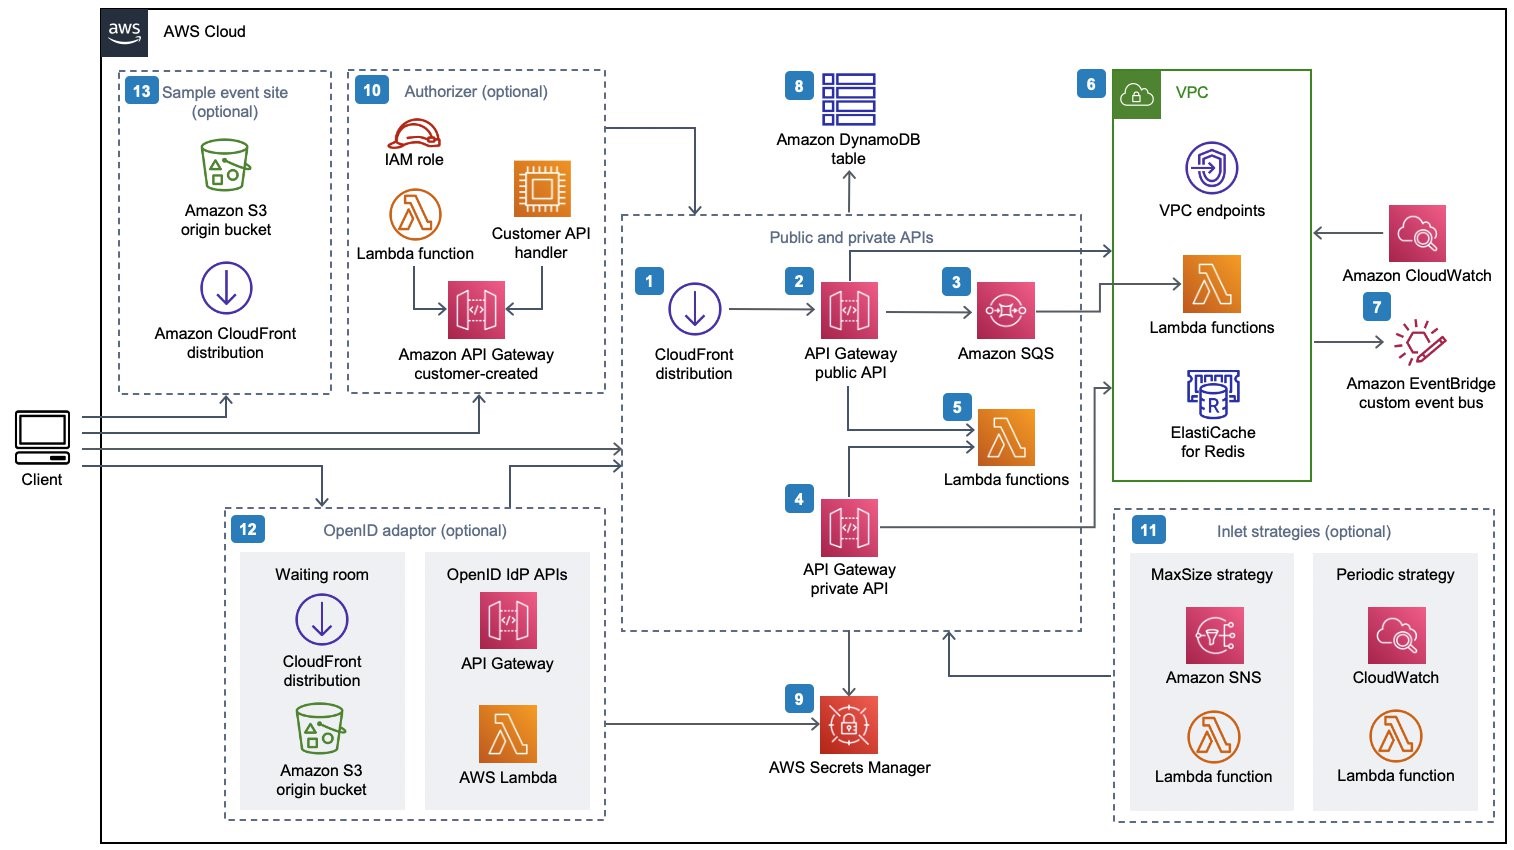
The Virtual Waiting Room CloudFormation template deploys the following infrastructure:
- An Amazon CloudFront distribution to deliver public API calls for the client.
- Amazon API Gateway public API resources to process queue requests from the virtual waiting room, track the queue position, and support validation of tokens that allow access to the target website.
- An Amazon Simple Queue Service (Amazon SQS) queue to regulate traffic to the AWS Lambda function that processes the queue messages. Instead of invoking the Lambda function for each request, the SQS queue batches the incoming bursts of requests.
- API Gateway private API resources to support administrative functions.
- Lambda functions to validate and process public and private API requests, and return the appropriate responses.
- Amazon Virtual Private Cloud (VPC) to host the Lambda functions that interact directly with the Amazon ElastiCache for Redis cluster. VPC endpoints allow Lambda functions in the VPC to communicate with services within the solution.
- An Amazon CloudWatch rule to invoke a Lambda function that works with a custom Amazon EventBridge bus to periodically broadcast status updates.
- An Amazon DynamoDB table to store token data.
- AWS Secrets Manager to store keys for token operations and other sensitive data.
- (Optional) Authorizer component consisting of an AWS Identity and Access Management (IAM) role and a Lambda function to validate signatures for your API calls. The only requirement for the authorizer to protect your API is to use API Gateway.
- (Optional) Amazon Simple Notification Service (Amazon SNS), CloudWatch, and Lambda functions to support two inlet strategies.
- (Optional) OpenID adaptor component with API Gateway and Lambda functions to allow an OpenID provider to authenticate users to your website. CloudFront distribution with an Amazon Simple Storage Service (Amazon S3) bucket for the waiting room page for this component.
- (Optional) A CloudFront distribution with Amazon S3 origin bucket for the optional sample waiting room web application.
Deploying the AWS Virtual Waiting Room
To get started with the AWS Virtual Waiting Room, deploy the Getting Started stack. This deploys the Core APIs stack, the Authorizers stack, and a sample application CloudFormation stack:
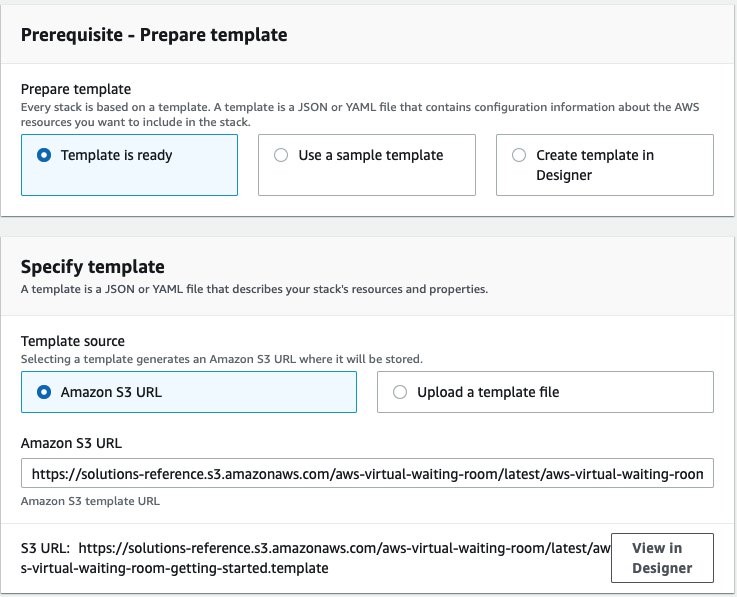
- Launch the Getting Started CloudFormation stack. The template launches in the US East (N. Virginia) Region by default. To launch the solution in a different AWS Region, use the Region selector in the console navigation bar.
- On the Create stack page, verify that the correct template URL is in the Amazon S3 URL text box and choose Next.
- On the Specify stack details page, assign a name to your solution stack, and accept all default parameter values. For information about naming character limitations, refer to IAM and STS Limits in the AWS Identity and Access Management User Guide. Choose Next.

- On the Configure stack options page, choose Next.
- On the Review page, review and confirm the settings. Check the box acknowledging that the template creates AWS Identity and Access Management (IAM) resources.
- Choose Create stack to deploy the stack.
- You can view the status of the stack in the AWS CloudFormation Console in the Status column. You should receive a CREATE_COMPLETE status in approximately 30 minutes.
- Once successfully deployed, browse to the Outputs tab.
- Copy the ControlPanelURL and WaitingRoomURL to a scratch pad file for later use.
Configuring the AWS Virtual Waiting Room
After deploying the three stacks, test the waiting room using the sample application:
- Navigate to the IAM console. Create a new IAM user or select an existing IAM user in the same account where you deployed the waiting room stack.
- Grant the selected IAM user programmatic access. Download the key file or copy the access key ID and secret access key values to your scratch pad for later use.
- Add the IAM user to the ProtectedAPIGroup IAM user group created by the getting started template:

- Open the control panel in a new tab or browser window using the ControlPanelURL output you saved earlier.
- In the control panel, expand the Configuration section.
- Enter the access key ID and secret access key that you retrieved in Generate AWS keys to call the IAM secured APIs. The endpoints and event ID are filled in from the URL parameters.

- Choose Use. The button activates after you have supplied the credentials.
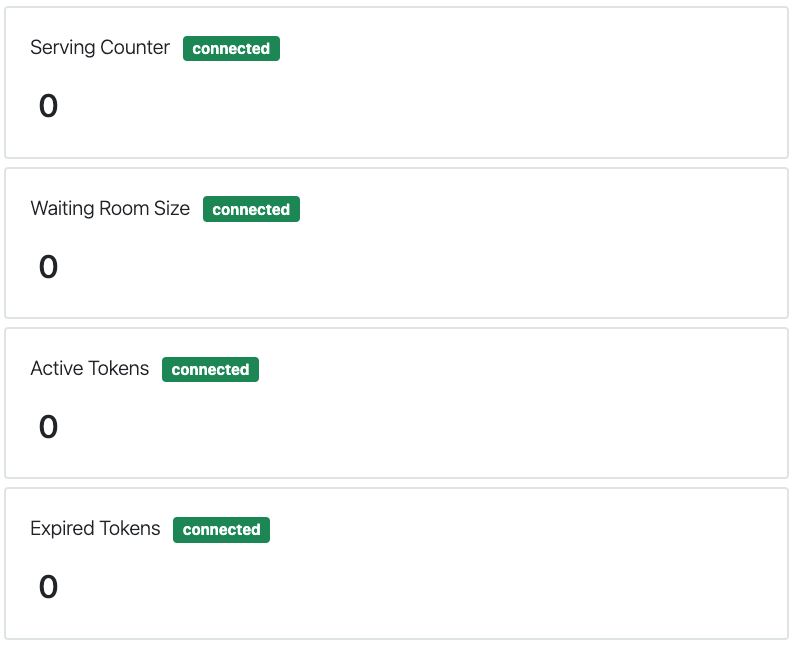
- You now see the status “Connected” shown following the various metrics reported:
Test the sample waiting room
- Browse to the sample waiting room in a new browser tab. Use the WaitingRoomURL you captured previously from the CloudFormation stack output values.
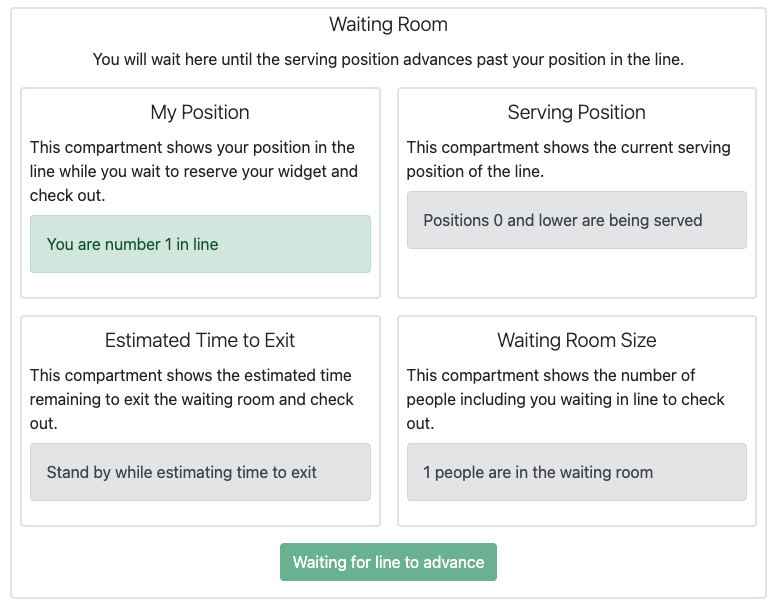
- Select Reserve to enter the waiting room. If you are unable to proceed with your transaction, your assigned number is not yet reached.
- Navigate back to the browser tab with the control panel.
- Under Increment Serving Counter, select Change. This manually increments the serving counter and allows 100 users to move on from the waiting room to the target site.

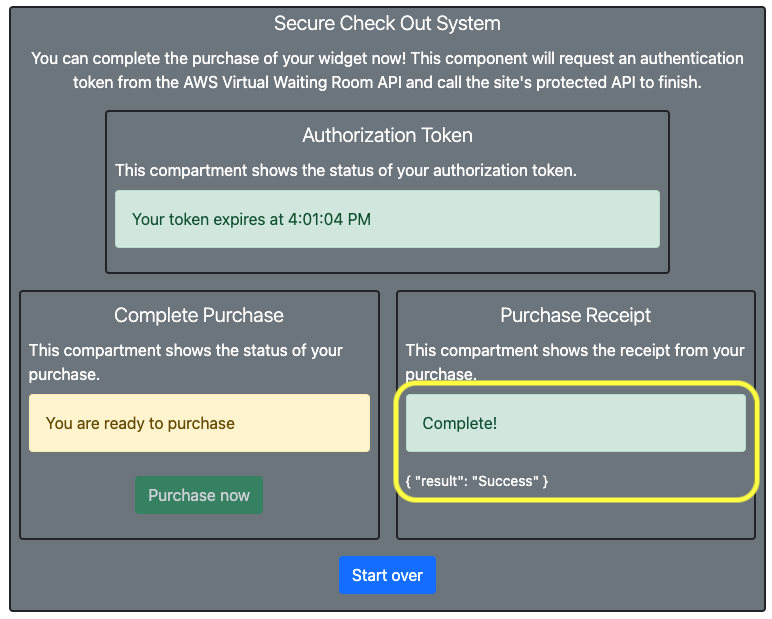
- Navigate back to the waiting room and choose Check out now! You are redirected to the target site since your serving number is eligible to proceed beyond the waiting room.

- Select Purchase now to finish your transaction at the target site. This page represents the protected system beyond the waiting room. Replace this with the actual system users you are protecting.

- After the simulated purchase is complete, you can see that the transaction is successful. This transaction is authorized using the time-limited authorization token, which came from the waiting room previously. If a user bypasses the waiting room, they would not be successful in completing a transaction.
Customizing the AWS Virtual Waiting Room for your application
The sample browser client demonstrates an entire user flow frontend with the AWS Virtual Waiting Room flow for an ecommerce purchase. You can use this code as a starting point for your waiting room or reference the API communication code for integrating the waiting room into your existing website.
This sample code is built with Vue.js and Bootstrap to render the user interface. It uses the Axios and Axios-Retry packages to make API calls to the virtual waiting room stack. The sample code uses the Axios-Retry package to show how to handle throttling conditions and exponential backoff in high-traffic situations.
The control panel client is used to make requests to the private waiting room API that requires IAM-based authorization. The control panel client demonstrates how to construct and sign requests to the private API. It can be used in production or customized further. All of the sample source code room source is available in GitHub including the sample user client and control panel client.
Conclusion
The AWS Virtual Waiting Room solution is available today at no additional cost, provided as open source under the Apache 2 license. It supports customized integration with any front-end application via a variety of integration techniques. You can also customize how and when the waiting room allows users to progress into the protected target system using a variety of strategies.
To learn more about the AWS Virtual Waiting Room solution, visit the solution implementation and implementation guide.
For more serverless learning resources, visit Serverless Land.