AWS Public Sector Blog
Analyze terabyte-scale geospatial datasets with Dask and Jupyter on AWS
The volume of Earth observation (EO) data captured each day is growing rapidly. Terabytes of data are collected each day, quickly leading to petabyte-scale datasets. Scalable and cost-effective cloud data services like Amazon Simple Storage Service (Amazon S3) can host these types of datasets, and many are hosted through the Registry of Open Data on AWS. By bringing these datasets to the cloud, users can use the compute and analytics resources of the cloud to reliably scale with growing needs.
The Pangeo open source community provides guidance, code, and example use cases focused on analyzing large geospatial datasets, with an emphasis on cloud computing. While Pangeo is not a fully prescriptive technical solution, the community advocates a combination of Kubernetes for container orchestration, Dask for distributed compute, and Jupyter notebooks to provide a user interface for performing analyses.
In this post, we show you how to set up this Kubernetes + Dask + Jupyter Pangeo solution step-by-step on Amazon Web Services (AWS) to automatically scale your cloud compute resources and parallelize your workload across multiple Dask worker nodes. After you deploy the solution, you log in to a Jupyter environment and run an example notebook that performs sample analyses on the Coupled Model Intercomparison Project 6 (CMIP6) dataset from the Registry of Open Data on AWS.
Solution overview
The two main components to run are Dask and a Jupyter notebook. The Pangeo community most frequently deploys their solution on top of Kubernetes, so for this post we run Dask and JupyterHub on top of Amazon Elastic Kubernetes Service (Amazon EKS), a managed Kubernetes Service. We create the Amazon EKS cluster using eksctl, a simple command line utility for creating and managing Kubernetes clusters on Amazon EKS. We deploy Dask and JupyterHub on the Amazon EKS cluster using a Helm chart called DaskHub, which resulted from collaboration between the Dask and Pangeo open source communities. Finally, we run example calculations such as computing mean and standard deviation of air temperature across CMIP6 data from the Registry of Open Data on AWS, speeding up the calculations by taking advantage of a scalable pool of Dask workers running on Amazon Elastic Compute Cloud (Amazon EC2) spot instances to save on cost. Dask makes it possible to perform calculations such as mean and standard deviation for CMIP6 air temperature on datasets that would otherwise not fit in local memory by breaking the calculations up into tasks and defining a task graph, while the on-demand scalability of the cloud makes it possible to create enough Dask workers to distribute the tasks to in parallel to complete the task graph in a reasonable amount of time.
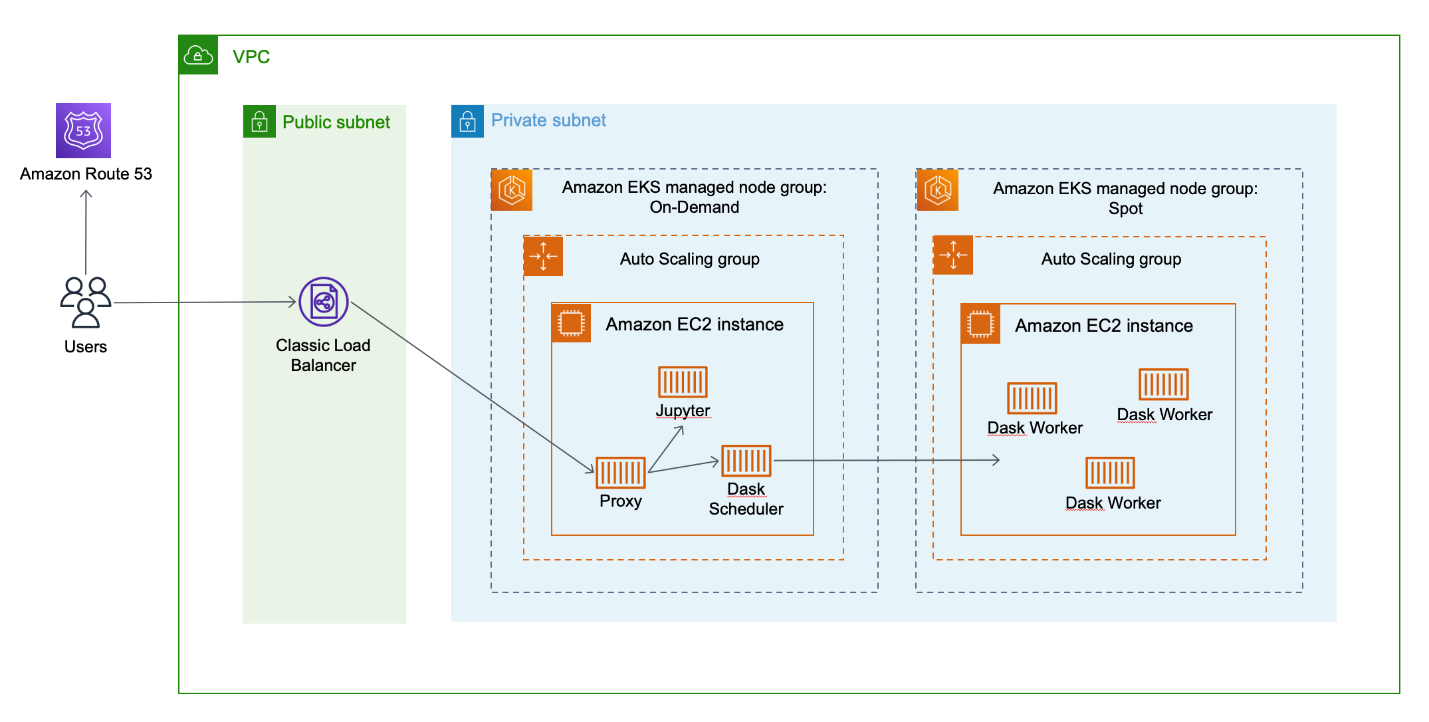 Figure 1. The solution architecture diagram shows an Amazon VPC with a public subnet and a private subnet. Amazon Route 53 routes Jupyter notebook users to a load balancer in the public subnet, which in turn routes traffic to an Amazon EKS cluster in the private subnet. Jupyter notebook users can instantiate Dask clusters, which create Dask worker nodes in a dedicated Amazon EC2 spot pricing managed node group.
Walkthrough
In this walkthrough, we show you step by step how you can build a Kubernetes cluster on Amazon EKS that runs Dask and JupyterHub so that you can perform analyses on geospatial datasets from the Registry of Open Data on AWS.
Here is an overview of the steps to follow:
- Create an AWS Key Management Service (AWS KMS) Customer Managed Key (CMK) to encrypt secrets in your Kubernetes cluster
- Use eksctl to create an Amazon EKS cluster
- Install a Cluster Autoscaler in the Amazon EKS cluster
- Register a domain using Amazon Route 53 and obtain a public certificate using AWS Certificate Manager to enable https access
- Use Helm to install the Daskhub Helm Chart
- Use a Jupyter notebook to perform an analysis of CMIP6 data from the Registry of Open Data on AWS
For this walkthrough, you need the following:
- An AWS account
- AWS Identity and Access Management (IAM) permissions to follow all of the steps in this guide, which include working with Amazon EKS IAM roles and service linked roles, AWS CloudFormation, and virtual private clouds (VPCs).
- Install the AWS CLI (for this walkthrough, we used version 2.2.21)
- Configure the AWS CLI (the credentials that you configure are stored and used by eksctl)
- Install kubectl (for this walkthrough, we used version 1.21.2)
- Install eksctl (for this walkthrough, we used version 0.57.0)
- Install Helm (for this walkthrough, we used using version 3.6.3)
Create an Amazon KMS key
Use envelope encryption for Kubernetes secrets stored in Amazon EKS. To do this, either use an existing Amazon Key Management Service (Amazon KMS) symmetric Customer Managed Key (CMK) in the next section or create a new one by editing the <your-desired-region> parameter and running the following command:
aws kms create-key --description "KMS symmetric key for use with EKS cluster" --region <your-desired-region>
Take note of the Arn and KeyId values that are returned once your key is created as you need them for the next steps. Once the Amazon KMS key is created, enable automatic key rotation as a security best practice using the KeyId value returned from the previous command:
aws kms enable-key-rotation --key-id <KeyId>
Create an Amazon EKS Cluster using eksctl
Begin by creating an Amazon EKS cluster using the eksctl command line utility, which provides a simple way to both create and manage your cluster over time. eksctl accepts configuration files that define how your Amazon EKS cluster is created, including networking, compute, and security. You can explore these possibilities for your own cluster, but in the interest of providing an opinionated walkthrough, start by downloading this eksctl configuration file, which we have created for this walkthrough.
Before you create your cluster, first edit the cluster.yaml file and replace <insert-your-kms-key-arn-here> with the Amazon KMS key Arn value that you noted from the previous section.
Before you create your cluster, you can also edit the cluster.yaml file and update the region value. We suggest leaving it as us-west-2 for this walkthrough because that is the location of the CMIP6 dataset used in the analysis. If you do change the region, also specify two Availability Zones (which is the minimum required to create an Amazon EKS cluster with eksctl) within that region in the top-level availabilityZone parameter. In the availabilityZone settings for each managed node group, set only one Availability Zone, and make it the same Availability Zone for both managed node groups. Only deploy to a single Availability Zone for this walkthrough for two reasons. First , JupyterHub stores user state in Amazon Elastic Block Store (Amazon EBS). Amazon EBS volumes are created in a single Availability Zone. If you allow Amazon EKS nodes to be created in different Availability Zones, then JupyterHub users do not have access to their files when logging back in if their session is created in a new Availability Zone. Amazon Elastic File System (Amazon EFS) can be used to provide file storage across Availability Zones, but that is outside the scope of this walkthrough. Second, there is high network I/O between distributed Dask workers, so placing them all in a single Availability Zone reduces latency and also reduces inter-Availability Zone traffic costs.
With the cluster.yaml file in your working directory, run the following command to create your Amazon EKS cluster:
eksctl create cluster -f cluster.yaml
While you wait for your cluster to be deployed, behind the scenes, eksctl is creating a set of AWS CloudFormation stacks. The eksctl-pangeo-cluster stack contains the EKS cluster itself along with all of the foundational pieces your Amazon EKS cluster needs, including an Amazon Virtual Private Cloud (Amazon VPC), subnets, and other networking and security resources. If you are planning to use your new cluster in a production environment, we recommend reviewing the security groups and network access control lists that are created and modifying them to be more restrictive.
Once those foundational resources are created, eksctl creates additional stacks, one for each Amazon EKS managed node group. For this walkthrough, you create two Amazon EKS managed node groups, one named dask-workers that makes use of Amazon EC2 Spot Instances to save on cost, and one named main for everything else that uses Amazon EC2 On-Demand Instances. The dask-workers managed node group has a Kubernetes taint that prevents pods from being scheduled onto it, but a corresponding Kubernetes toleration on the dask worker pods allows them to be scheduled on the tainted node group. All other pods are scheduled onto the main node group.
After 15-25 minutes, your eksctl command should return successfully and you have a working Amazon EKS cluster.
In the remainder of the walkthrough you may find it useful to view a continually updated view of all of the pods and nodes running in your Amazon EKS cluster, which you can get by running the following command:
kubectl get pods -o wide -w
Install the Cluster Autoscaler
To run your large geospatial analytics quickly, you want the ability to run on many concurrent Dask worker nodes, but you also don’t want to pay for these nodes when they are not in use. To support automatic scaling for the two Amazon EKS managed node groups, the next step is to install the Cluster Autoscaler onto your Amazon EKS cluster based on these instructions. The Prerequisites and Create an IAM policy and role sections are already taken care of by the cluster.yaml eksctl configuration file, so you can skip to the Deploy the Cluster Autoscaler section or simply run the following commands:
kubectl apply -f https://raw.githubusercontent.com/kubernetes/autoscaler/master/cluster-autoscaler/cloudprovider/aws/examples/cluster-autoscaler-autodiscover.yaml
If you don’t already know your AWS Account ID you can obtain it by running the following command:
aws sts get-caller-identity --output text | cut -f 1
Replace <AWS_ACCOUNT_ID> with the value of your AWS Account ID before running the following command:
kubectl annotate serviceaccount cluster-autoscaler -n kube-system eks.amazonaws.com/role-arn=arn:aws:iam::<AWS_ACCOUNT_ID>:role/eksctl-cluster-autoscaler-role
kubectl patch deployment cluster-autoscaler -n kube-system -p '{"spec":{"template":{"metadata":{"annotations":{"cluster-autoscaler.kubernetes.io/safe-to-evict": "false"}}}}}'
kubectl -n kube-system edit deployment.apps/cluster-autoscaler
The above command enters you into an interactive vi session. Begin editing by first pressing the “i” key. Edit the file by replacing <YOUR CLUSTER NAME> (including <>) with the name of your Amazon EKS cluster (in this walkthrough, the name is pangeo) in the –node-group-auto-discovery field, and add the following options:
so that the relevant section looks like this:
When you are done editing, press the following keys to save and exit the vi session: “Escape”, “:”, “w”, “q”, “Enter”.
Navigate to this page and keep going through the history to find the latest version of the Cluster Autoscaler that matches the version of Kubernetes that you are running. For this walkthrough, the eksctl configuration file is set to use version 1.21, and the latest compatible version of the Cluster Autoscaler at the time of writing was 1.21.1. Run the following command, replacing the Cluster Autoscaler version with a newer version if appropriate:
kubectl set image deployment cluster-autoscaler -n kube-system cluster-autoscaler=k8s.gcr.io/autoscaling/cluster-autoscaler:v1.21.1
Install the Amazon EBS CSI driver and update the default storage class
The Amazon EBS Container Storage Interface (CSI) driver allows Amazon EKS to manage the lifecycle of Amazon EBS volumes for persistent volumes. In this case, the Amazon EBS CSI driver provides a mechanism to set default Amazon EBS encryption for all volumes created in the cluster. To install the Amazon EBS CSI driver, run these command, but first replace <account-id> with your AWS account ID value that you found in the previous section, and replace 602401143452.dkr.ecr.us-west-2.amazonaws.com if you are deploying in a region other than us-west-2 by finding your region’s container image address:
helm repo add aws-ebs-csi-driver https://kubernetes-sigs.github.io/aws-ebs-csi-driver

 helm repo update

 helm upgrade -install aws-ebs-csi-driver aws-ebs-csi-driver/aws-ebs-csi-driver \

 --namespace kube-system \

 --set image.repository=602401143452.dkr.ecr.us-west-2.amazonaws.com/eks/aws-ebs-csi-driver \

 --set controller.serviceAccount.create=true \

 --set controller.serviceAccount.name=ebs-csi-controller-sa \

 --set controller.serviceAccount.annotations."eks\.amazonaws\.com/role-arn"="arn:aws:iam::<account-id>:role/ebs-csi-driver-role"
The Amazon EBS CSI driver is now installed. The next step is to overwrite the default Kubernetes storage class so that it uses the Amazon EBS CSI driver and enables encryption for all Amazon EBS volumes by default. Download the storageclass.yaml configuration file and run the following command:
kubectl replace -f storageclass.yaml --force
Register a domain and create a public certificate to enable HTTPS
To access your JupyterHub and Dask web pages securely via https, you need a registered domain and a public certificate. For this walkthrough you first register a new domain using Amazon Route 53.
- From the AWS Management Console, navigate to the Amazon Route 53 service and choose the Domain registration option.
- On the next page, find an available domain name, add it to your cart, and continue.
- On the next page, fill in your contact details and continue.
- On the final page, verify your email and complete your order.
Once your domain is registered, the next step is to request a public certificate from AWS Certificate Manager.
- From the AWS Management Console, navigate to the AWS Certificate Manager page and choose the Provision certificates.
- On the next page, select the Request a public certificate.
- On the following page, add your domain name.
- In the next pages, select DNS validation, and optionally add tags before confirming your request.
- On the following validation step, expand your domain and select the Create record in Route 53 button to create a CNAME record to your DNS configuration. Select Continue and take note of the ARN value of your newly created certificate as you need it in a future step.
The remainder of the setup for HTTPS comes later in the walkthrough.
Install DaskHub using Helm
The DaskHub Helm chart came out of coordination between the Pangeo and Dask communities, and combines the JupyterHub and Dask Gateway helm charts. Once installed into your Amazon EKS cluster, the DaskHub Helm chart provides everything you need to access Jupyter notebooks and run large-scale analyses using Dask.
For this walkthrough, a Helm configuration file called daskhub.yaml is provided with settings that override the default DaskHub settings. You need to edit daskhub.yaml before deploying DaskHub to your Amazon EKS cluster:
JupyterHub and Dask Gateway both require secret tokens. Run the following command on your local machine and copy the output. Paste the output to replace the <token-1> value in daskhub.yaml.
openssl rand -hex 32
Run the same openssl command again and copy the output. Paste the second output value to replace both instances of <token-2> in daskhub.yaml.
To avoid using any default passwords for your deployment, replace the value of <jupyterhub-password> with a password of your choosing. JupyterHub provides multiple authentication and authorization options for you to explore, but for this walkthrough, the goal is to keep things simple, so a single user called admin is configured along with a shared secret password.
To enable https, the public certificate you created previously is associated with the load balancer for DaskHub’s proxy service. In daskhub.yaml, for the parameter service.beta.kubernetes.io/aws-load-balancer-ssl-cert, replace <acm-certificate-arn> with the ARN of your certificate that you noted previously.
For this walkthrough, we’re using the latest stable pangeo-notebook Docker image, and making sure that Dask and Jupyter are using the same images so that there are no issues with mismatched libraries between the Jupyter notebook and Dask workers. You may want to review the available Pangeo Docker images to decide which image would work best for you and edit it in daskhub.yaml before proceeding.
The next step is to add the DaskHub Helm chart by running the following commands:
helm repo add dask https://helm.dask.org/
helm repo update
With daskhub.yaml in your local directory, run the following command to install DaskHub onto your EKS cluster:
helm upgrade --install daskhub dask/daskhub --values=daskhub.yaml
Once this command completes, run the following command to see a list of Kubernetes services running on your EKS cluster:
kubectl get svc
The DaskHub deployment created a Kubernetes Service called proxy-public with a ServiceType of LoadBalancer, which in turn created an Amazon EC2 Classic Load Balancer to provide you with a public address (the EXTERNAL-IP value) to access your Jupyter notebook environment. Instead of using the load balancer’s URL directly, follow these steps to create a record in Amazon Route 53 to point your registered domain to this load balancer:
- From the AWS management console, navigate to Route 53 and find your domain’s Hosted Zone.
- From your domain’s Hosted Zone page, select Create record.
- From the Quick create record page, leave the default values in place and toggle on Alias in the Route traffic to dropdown, select Alias to Application and Classic Load Balancer, select your region, and select your newly created load balancer. Select the Create records button to create your new record.
After a few minutes to allow for DNS propagation, you are able to navigate to https://<your-domain> and be directed to your JupyterHub landing page securely using https. Enter the username and password that you configured in daskhub.yaml.
Run a Jupyter notebook to perform a large-scale geospatial analysis on Dask
To demonstrate a large-scale geospatial analysis, download and run an example Jupyter notebook that uses the CMIP6 data from the Registry of Open Data on AWS. From your JupyterHub environment, open a terminal and run the following command to download the repository that contains the example notebook:
git clone https://github.com/awslabs/amazon-asdi.git
Within this repository, open examples/eks/cmip6_zarr.ipynb. Run each cell in the notebook sequentially to follow along with the analysis.
The notebook is configured to create a Dask cluster with 24 Dask workers, each with one CPU core and 3.5GB of memory. Your Amazon EKS managed node group for dask workers does not have sufficient capacity to schedule all of the Dask worker nodes, so the Cluster Autoscaler automatically scales up the number of Amazon EC2 instances until your Dask cluster has all 24 cores and 84GB of memory. You can adjust these numbers to run your analyses faster with a larger number of Dask workers.
For interesting visualizations showing how Dask breaks up the computations into tasks and parallelizes their execution across worker nodes, click the Dashboard URL after you create your cluster, as seen in the following:

Figure 2. A Jupyter notebook user creates a Dask cluster programmatically using Python. The Dask cluster scales out and creates Dask worker nodes in response to user demand. The Jupyter notebook user submits a calculation which is split up and distributed across all of the available Dask worker nodes.
Be sure to run the final cell in the notebook when you are finished, which shuts down your Dask cluster, allowing your managed node group to scale back in to save on cost.
Cost of operation
The cost of running this solution varies, primarily based on the number and size of the Dask clusters that are created and how long they run. Use the AWS Pricing Calculator to create a cost estimate based on your deployment needs.
Cleaning up
To avoid incurring future charges, you must delete the resources you created. First uninstall the DaskHub helm chart, which also terminates the load balancer:
helm delete daskhub
Once this command completes, delete your Amazon EKS cluster and all associated AWS resources by running this command:
eksctl delete cluster --name pangeo
Conclusion
In this post you created an Amazon EKS cluster, installed DaskHub, and performed a large-scale geospatial analysis against the CMIP6 dataset in the Registry of Open Data on AWS. We covered the foundational components of a Kubernetes-based Pangeo deployment on AWS, but there is more to learn and apply.
- If you want to deploy across multiple Availability Zones or provide users with scalable home directories for their data, consider configuring Amazon Elastic File System (EFS).
- If you want to add additional services to your Kubernetes cluster without having to create multiple load balancers, consider setting up an AWS Load Balancer Controller.
- If you want to set up multiple users in your cluster, you can configure more advanced authentication/authorization schemes in JupyerHub.
We hope this helped get you started with Pangeo on AWS for scenarios in which you would like to build out the infrastructure and have full control over your environment. If you would prefer to have a managed solution, consider Saturn Cloud which is available on the AWS Marketplace, coiled.io, or 2i2c if you are in the education/research space. You may also want to consider QHub for deploying a similar stack to AWS if you are looking for a highly opinionated deployment option.
Learn more about the Registry of Open Data on AWS.
Subscribe to the AWS Public Sector Blog newsletter to get the latest in AWS tools, solutions, and innovations from the public sector delivered to your inbox, or contact us.
The AWS Public Sector Blog needs your help. Please take a few minutes to share insights regarding your experience with the AWS Public Sector Blog in this survey, and we’ll use feedback from the survey to create more content aligned with the preferences of our readers.