AWS Big Data Blog
How to use streamlined permissions for Amazon S3 Tables and Iceberg materialized views
Apache Iceberg has emerged as the open table format for data lakes. It handles petabyte-scale datasets, lets teams evolve schemas and partitions in place, and supports time travel and incremental processing for data lake management at scale. Amazon S3 Tables provide a fully managed Apache Iceberg table experience in Amazon S3, optimized for analytics workloads, and integrate with the AWS Glue Data Catalog so AWS analytics services such as Amazon Redshift, Amazon EMR, Amazon Athena, Amazon SageMaker, and AWS Glue query your data. Together, they form the foundation of a modern data lake architecture on AWS.
S3 Tables integrate with the AWS Glue Data Catalog using AWS Identity and Access Management (IAM) – based authorization. If you manage analytics workloads across these services, you can now define permissions across storage, catalog, and compute in a single IAM policy. This gives teams already using IAM a straightforward path to govern access to S3 Tables resources without changing their existing permission model. For fine-grained access controls, you can opt in to AWS Lake Formation at any time through the AWS Management Console, AWS Command Line Interface (AWS CLI), API, or AWS CloudFormation.
Iceberg materialized views created in the Glue Data Catalog extend this foundation by letting you store pre-computed query results as Iceberg data on Amazon S3. When a query repeats aggregations or joins across large datasets, the engine reads directly from the materialized view’s S3 location rather than reprocessing the base tables. A materialized view can reside in S3 Tables or in an S3 general purpose bucket, independent of where its base tables live, which lets you place pre-computed results wherever fits your access patterns and cost model best.
In this post, we walk through how to set up and manage S3 Tables in the AWS Glue Data Catalog, create and query Iceberg materialized views, and configure access controls that work across your analytics stack with IAM-based authorization.
Solution overview
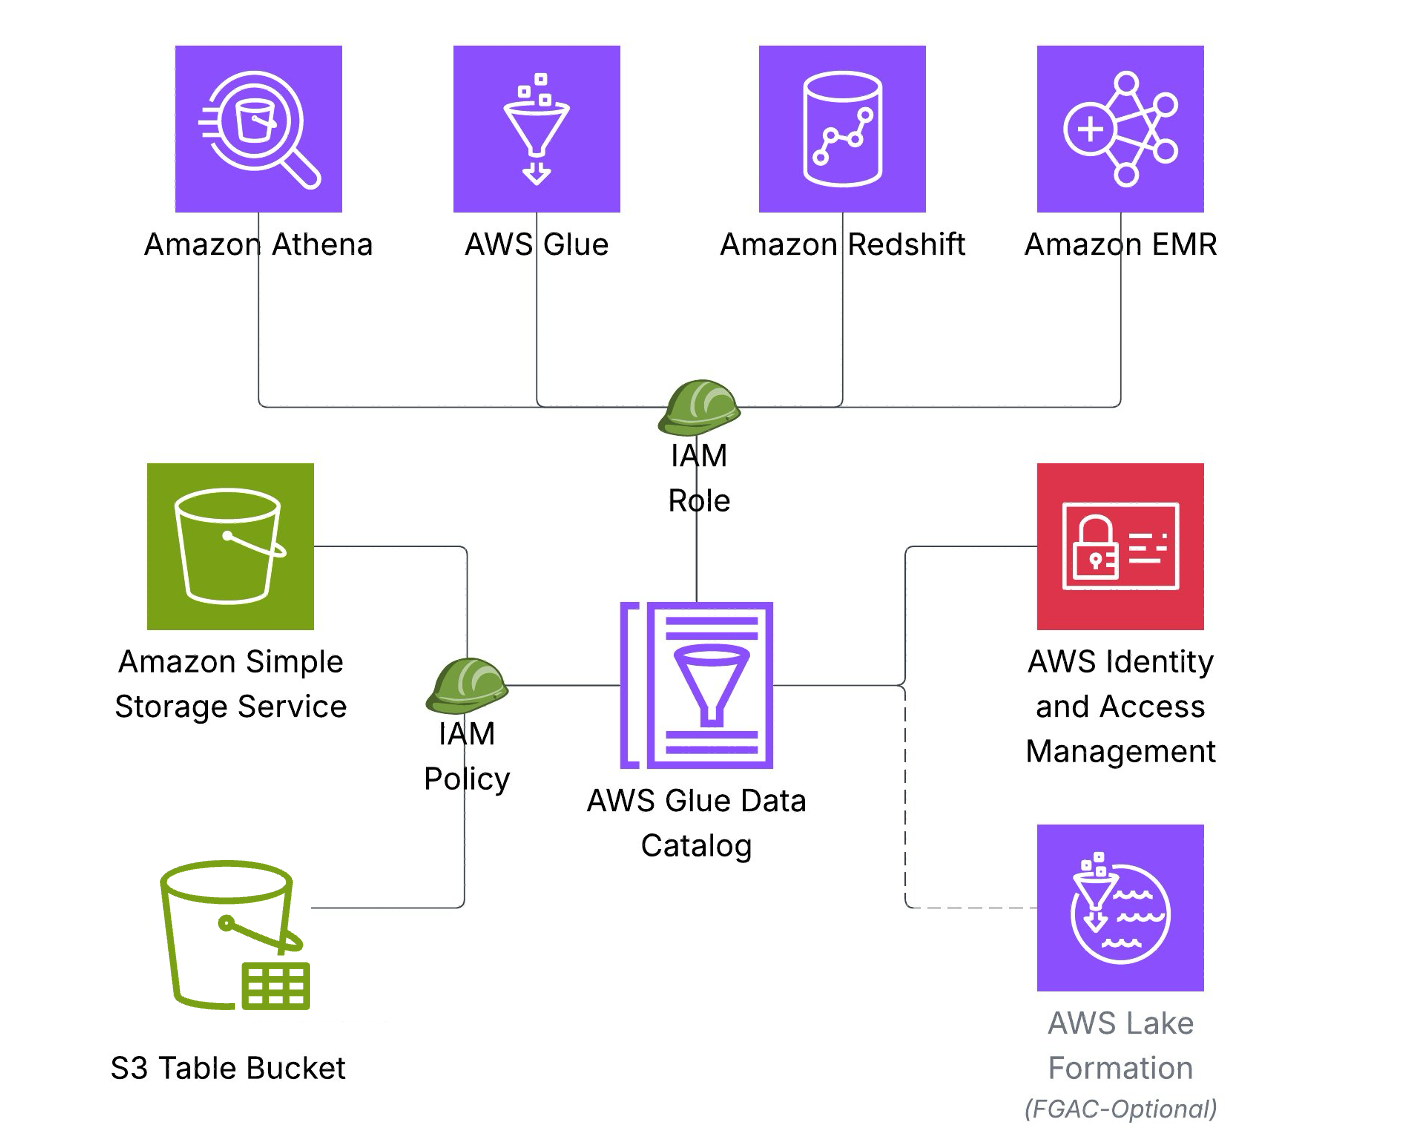
The above architecture illustrates how S3 Tables integrate with AWS Glue Data Catalog using IAM-based authorization, so you can define the necessary permissions across storage, catalog, and query engines in a single IAM policy. This permission model accelerates onboarding for new teams and workloads.
Key architecture components include:
Storage Layer: Data stored as Iceberg tables in Amazon S3 Tables
Catalog Layer: AWS Glue Data Catalog serves as the single metadata repository.
Compute Layer – Amazon Athena, AWS Glue, Amazon Redshift, and Amazon EMR connect to a single data Catalog to access Iceberg tables.
Security: AWS IAM authorizes access to resources in storage, catalog, and compute layers.
Prerequisites:
To follow along with this post, you must have an AWS account and an IAM role or user with appropriate permissions and familiarity to the following services:
- IAM
- AWS Glue Data Catalog
- Amazon S3
- Amazon Athena
- Amazon Redshift
- Amazon EMR
For the minimum permissions required for the role/user for metadata and data access, refer to required IAM permissions documentation.
Solution walkthrough
In this walkthrough, you will integrate S3 Tables with the AWS Glue Data Catalog, create Iceberg materialized views, and query data using multiple analytics engines. You will also learn to use materialized views when you have complex aggregations queried frequently but underlying data changes. You can follow these steps to implement the solution. It will take about 45–60 minutes to complete this walkthrough.
Setup S3 Tables and integrate with Glue Data Catalog
Navigate to Amazon S3 console:
- On the left menu, select Table buckets.
- Choose the Create table bucket button.
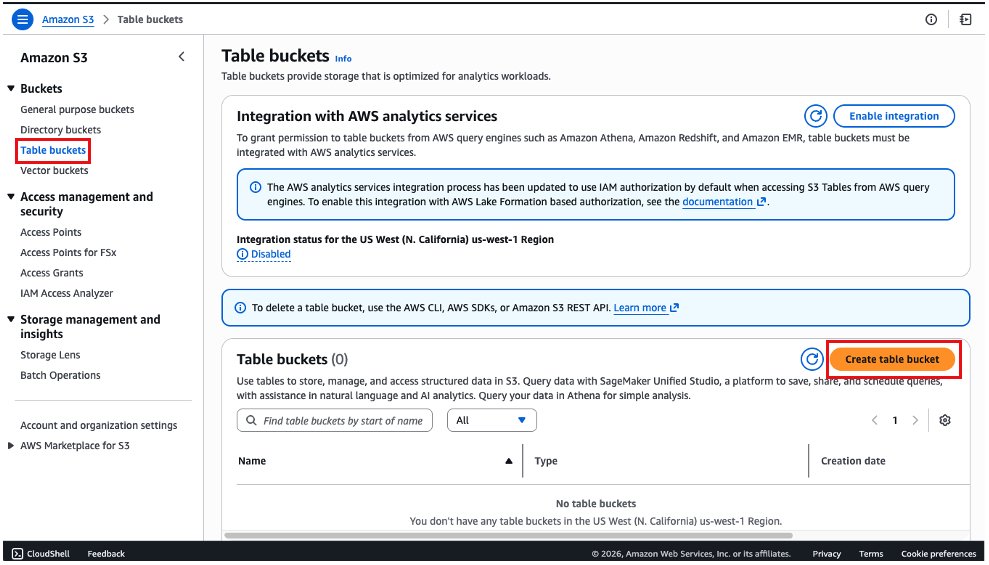
- In the next screen, we will fill the name of the bucket as salesbucket. Please ensure the Enable Integration configuration is checked. This step integrates S3 Tables with AWS Glue Data Catalog.
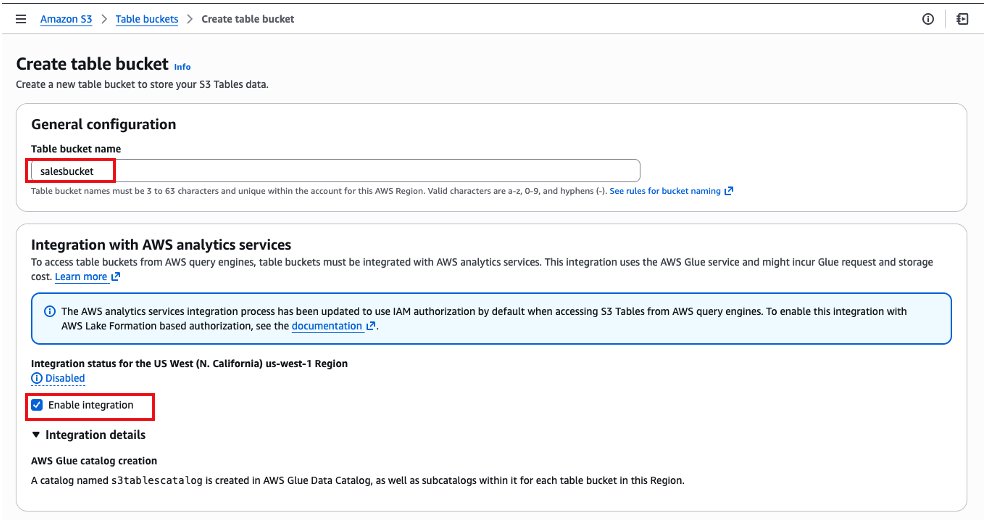
- Keep the other options as default and choose Create table bucket.
- After it is created, you will be redirected back to the list of table buckets. Choose the table bucket salesbucket.
- Select the Create table with Athena button.
- Create a namespace in S3 Tables which is equivalent to a database in AWS Glue Data Catalog. Enter namespace (database) name as “sales” and click Create namespace.
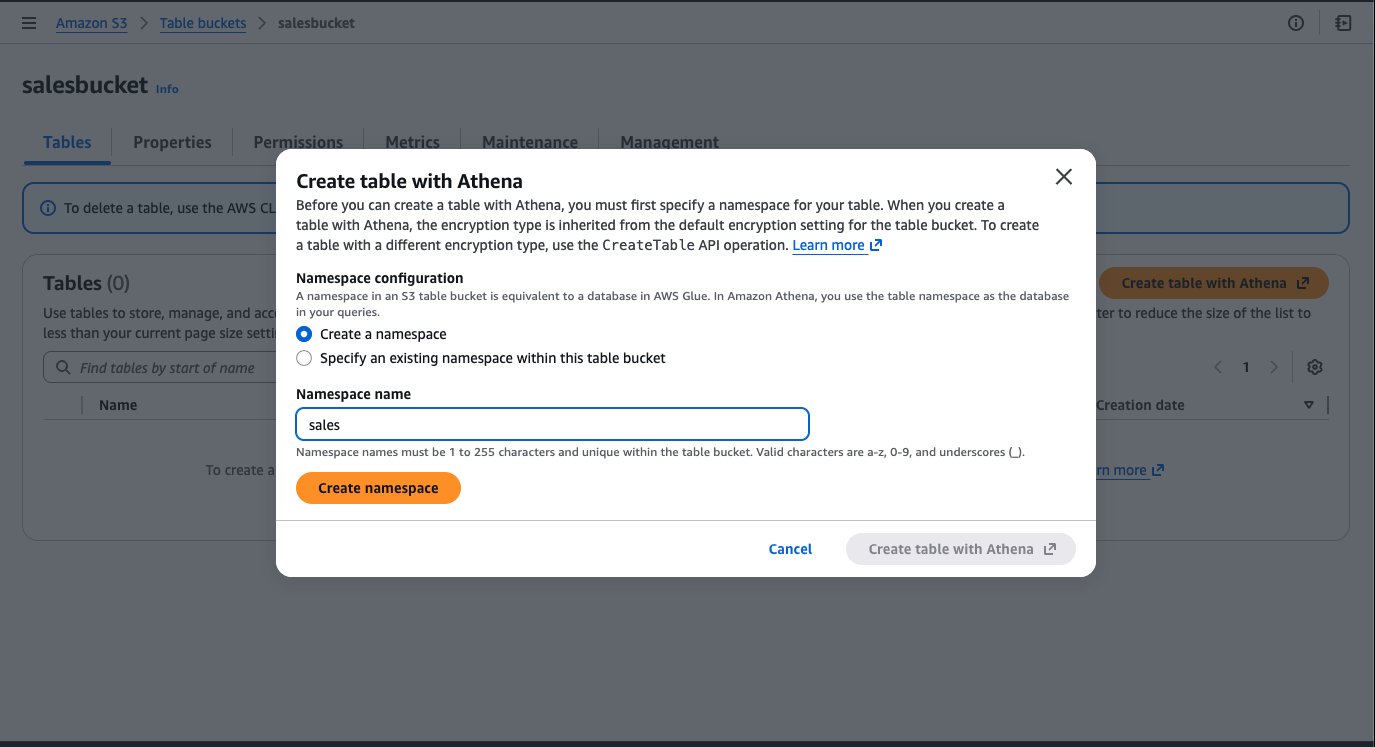
- Choose Create table with Athena, and a new tab will be open with the Amazon Athena console.
- When the Amazon Athena console opens, you will see an example of a query to create a table and examples to insert rows in that table. You could use this query block by uncommenting the code and executing each statement individually by highlighting it. At the end, you will have data in the table.
Query S3 Tables and create materialized view using Amazon EMR:
To run the instruction on Amazon EMR, complete the following steps to configure the cluster:
- Create an IAM role for the Amazon EMR instance profile following the Amazon EMR Management Guide. Add the following as policies and trust relationship for working on materialized views.
Replace ACCOUNT_ID with your AWS account ID, Instance_profile_role to the Amazon EMR instance profile role, and REGION with your AWS Region.
Add the following to the trust policy in addition to existing:
- Launch an Amazon EMR cluster 7.12.0 or higher with instance profile role created in the previous step and with Iceberg enabled. For more information, refer to Use an Iceberg cluster with Spark.
- Connect to the primary node of your Amazon EMR cluster by using SSH, and run the following command to start a Spark application with the required configurations:
Replace bucket_name with your bucket name.
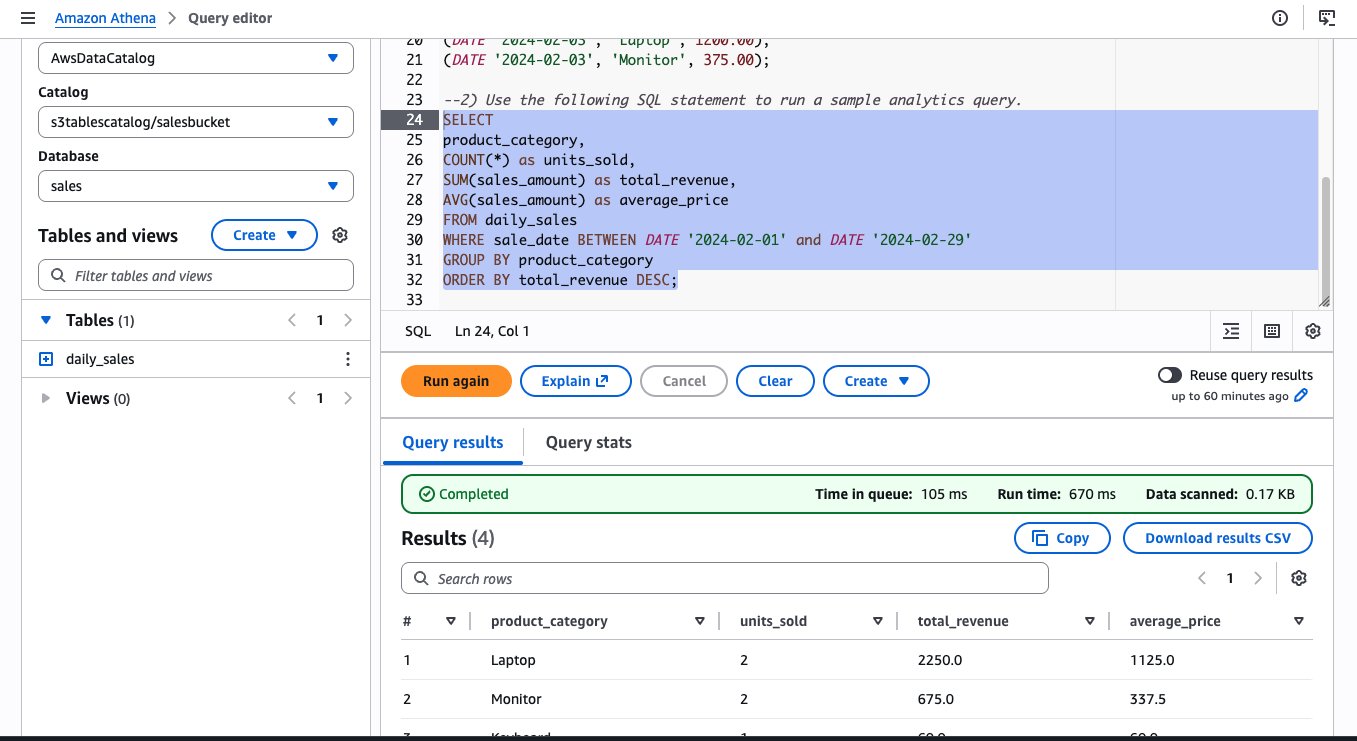
- Run the following queries to query the daily_sales table.
- Create Materialized view.
A newly created materialized view is populated with the initial query results but does not update automatically as base table data changes. To keep it current, specify a REFRESH EVERY clause when creating the view. This accepts a time interval and unit, so you can define how often the materialized view is recomputed from the base tables.
- Add refresh interval.
- Alternatively, you can refresh them manually.
For manual full refresh, you can use the following command:
For manual incremental refresh, you can use the following command:
For more details, refer to Refreshing materialized views.
- Query the MV.
After the Iceberg materialized views are created, you can access them using IAM principals that have required IAM permissions to Glue Data Catalog resource and its underlying storage.
Iceberg materialized views are flexible in how they combine base tables and access control modes. Base tables can reside in S3 general-purpose buckets (with IAM or Lake Formation access control), in S3 Tables (through the s3tablescatalog catalog), or a combination of these—all within a single materialized view definition. The materialized view itself can use either IAM or AWS Lake Formation access control, independently of its base tables.
For more details, refer to How materialized views work with AWS Glue.
Query using Athena:
Additionally, you can query the same materialized view from Athena SQL. The following image shows the same query run on Athena and the resulting output.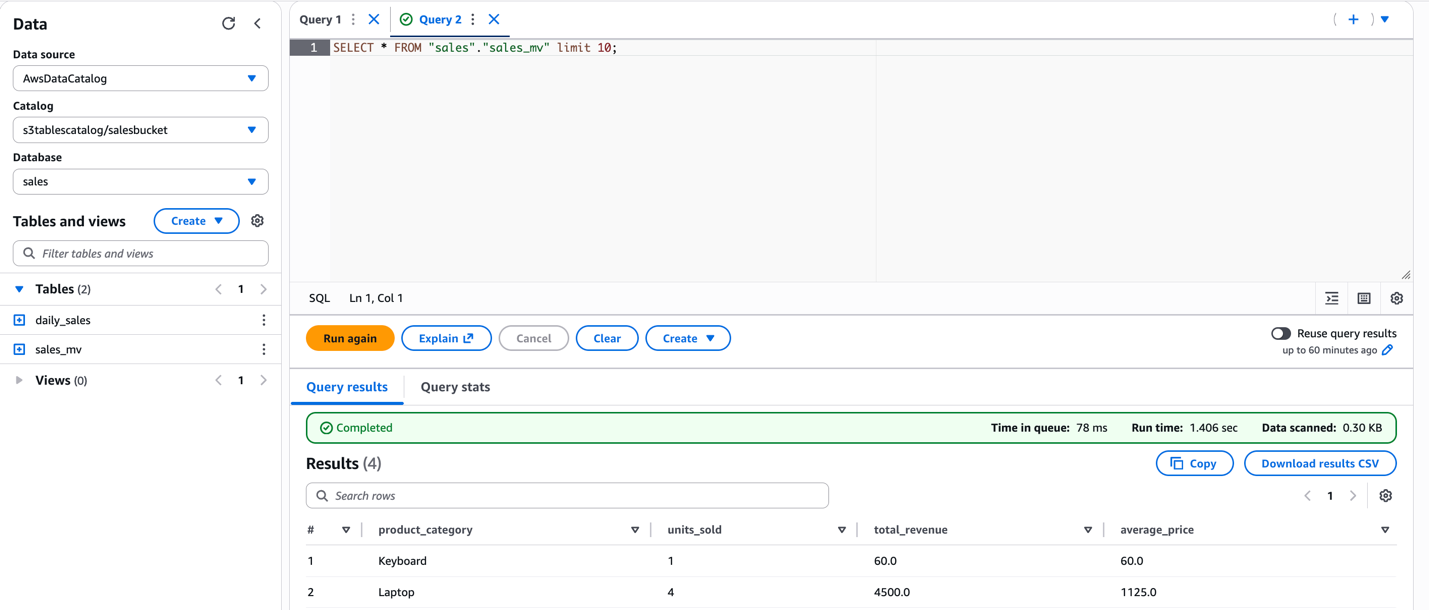
Query using Amazon Redshift:
To query the S3 Tables in AWS Glue Data Catalog using Amazon Redshift, you must create a database in the default catalog in Glue Data Catalog that points to the S3 Tables catalog.
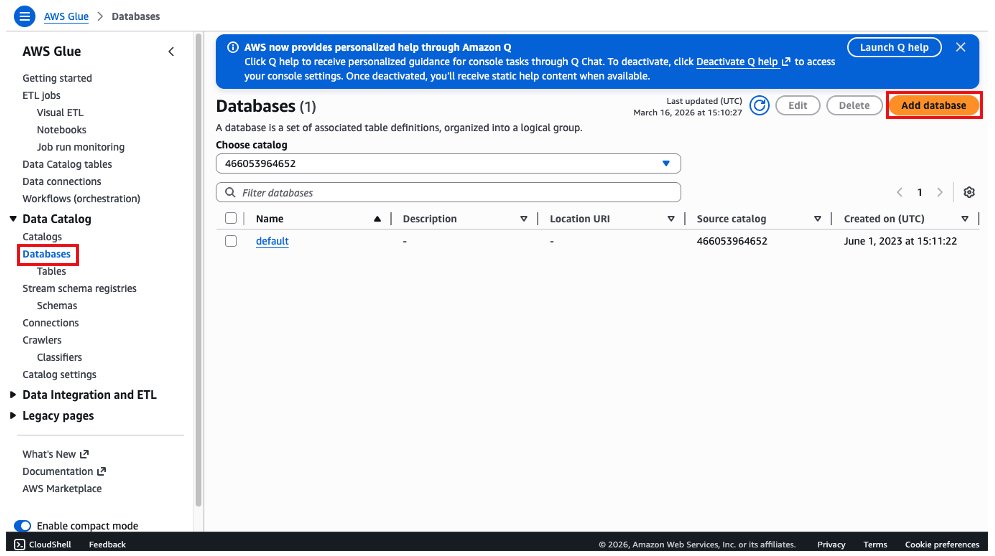
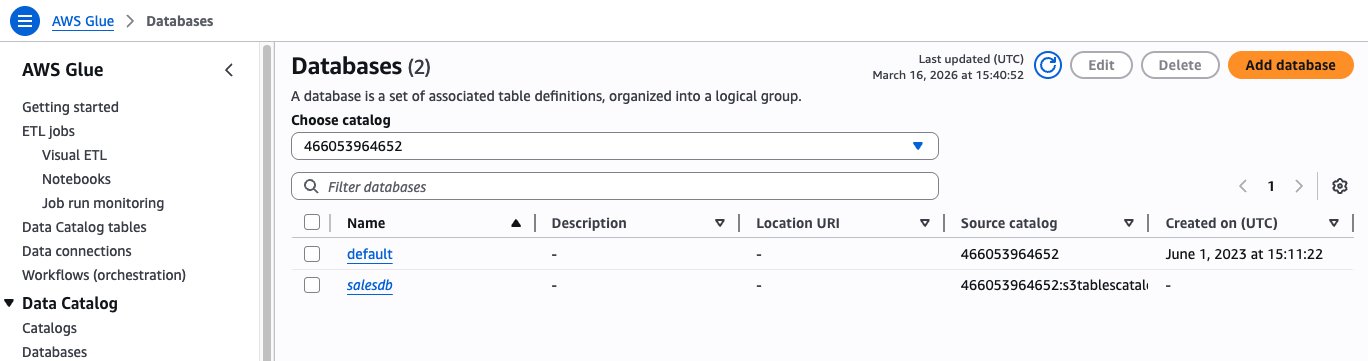
- On the AWS Glue console, choose Databases, and then choose Add Database.
- Choose the Glue Database resource link option, add a name for the database, choose salesbucket on the target catalog and sales as the target database. Then select Create database.
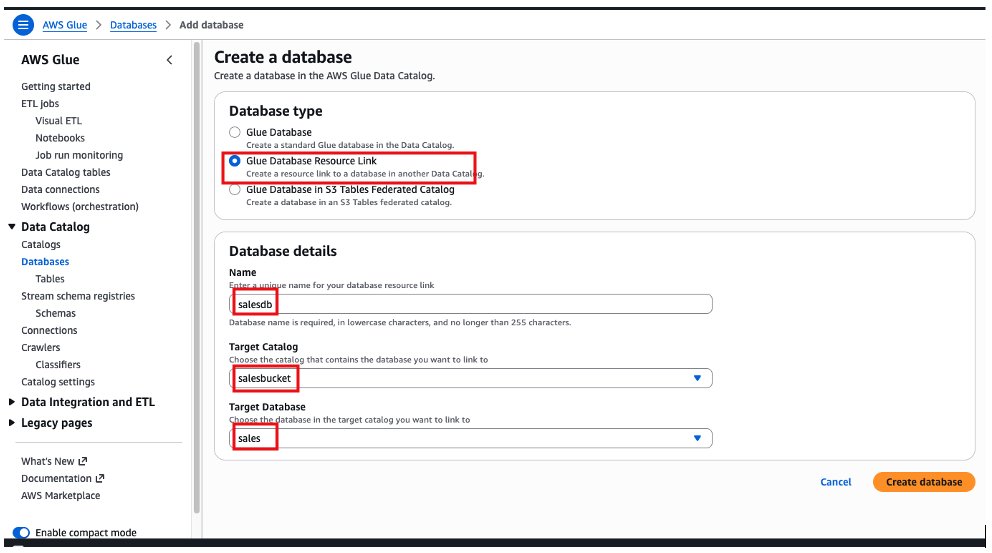
After creating the database, we will see the “salesdb” resource link under Databases on AWS Glue Data Catalog.
Create IAM role with the following policy for the Amazon Redshift schema creation. Replace the AWS Region and account ID for your account.
Create an Amazon Redshift provisioned cluster or Amazon Redshift Serverless, attaching the IAM role created in previous step.
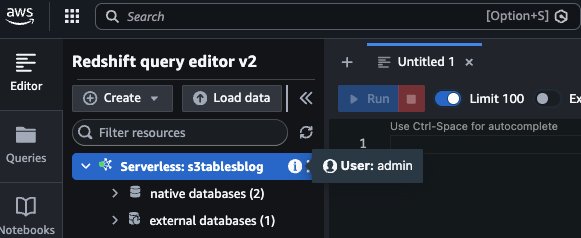
To access the AWS Glue Catalog and the resource link, you can now log in to Amazon Redshift as a local user. We use the admin user and Amazon Redshift Query Editor v2.
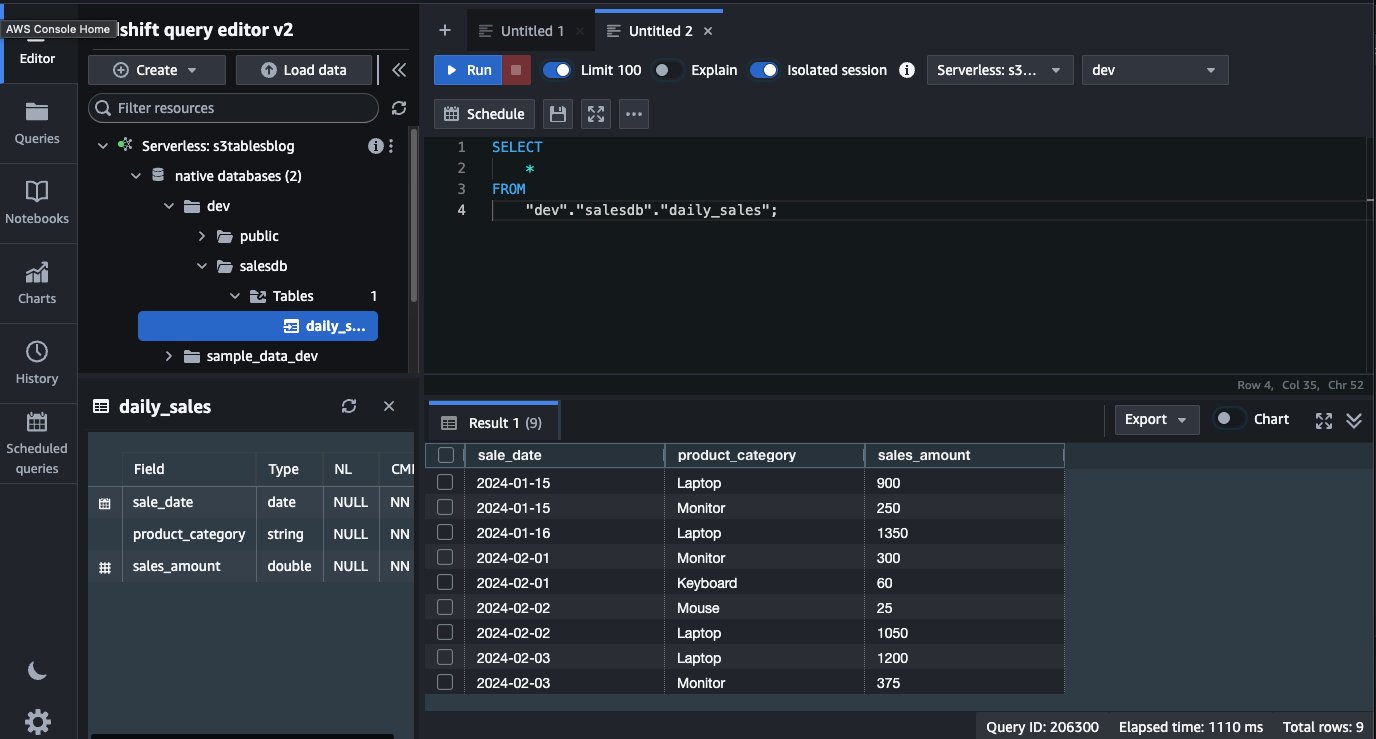
To create the external schema, you must run the following command: Replace ACCOUNT_ID with your AWS Account ID, IAM_ROLE to IAM role created for schema access, and REGION with your AWS Region.
After you have created the external schema, it will show up on the left side, under the dev database. The table that we created, daily_sales, is available and we can query directly from Amazon Redshift using a local user.
Cleanup:
After completing the walkthrough, follow these steps to remove the resources and avoid ongoing charges. These cleanup steps will permanently delete the data, including the daily_sales table and sales_mv materialized view. Make sure that you have backed up the data that you need to retain before proceeding.
To avoid incurring future charges, clean up the resources that you created during this walkthrough:
- Remove the Glue Data Catalog resources
- Delete the table bucket
- Terminate and Delete the Amazon Redshift cluster
- Terminate and Delete the Amazon EMR cluster
- Delete the IAM roles/policies created
Conclusion
Amazon S3 Tables now integrate with AWS Glue Data Catalog through IAM-based authorization via a single IAM policy. By consolidating permissions for storage, catalog, and query engines into one IAM policy, you can streamline authorization with AWS analytics services like Amazon Athena, Amazon EMR, and AWS Glue. You can use this streamlined IAM authorization model to build your data lake faster while maintaining enterprise-grade security. For organizations with additionally granular data access requirements, AWS Lake Formation remains available to layer fine-grained access controls on top of this foundation. This is configurable through the AWS Management Console, CLI, API, or CloudFormation. This integration allows AWS analytics users to use IAM and scale their analytics capabilities with reduced operational complexity.
To learn more about to S3 Tables and integration with Glue Data catalog, visit: Amazon S3 Tables integration with AWS analytics services overview and Integrating with Amazon S3 Tables.