AWS Big Data Blog
Implement a data mesh pattern in Amazon SageMaker Catalog without changing applications
When creating a project in Amazon SageMaker Unified Studio, users select a project profile to define resources and tools to be provisioned in the project. These are used by Amazon SageMaker Catalog to implement a data mesh pattern. Some users don’t want to take advantage of resources provisioned along with the project for various reasons. For instance, they may want to avoid making changes to their existing applications and data products.
This post shows you how to implement a data mesh pattern by using Amazon SageMaker Catalog while keeping your current data repositories and consumer applications unchanged.
Solution overview
In this post, you will simulate a scenario based on data producer and data consumer that exists before Amazon SageMaker Catalog adoption. For this purpose, you will use a sample dataset to simulate existing data and simulate an existing application using an AWS Lambda function. You can apply the same solution to your real-life data and workloads.
The following diagram illustrates the solution architecture’s key configurations. In this architecture, the Amazon Simple Storage Service (Amazon S3) bucket and the AWS Glue Data Catalog in the producer account simulate the existing data repository. The Lambda function in the consumer account simulates the existing consumer application.
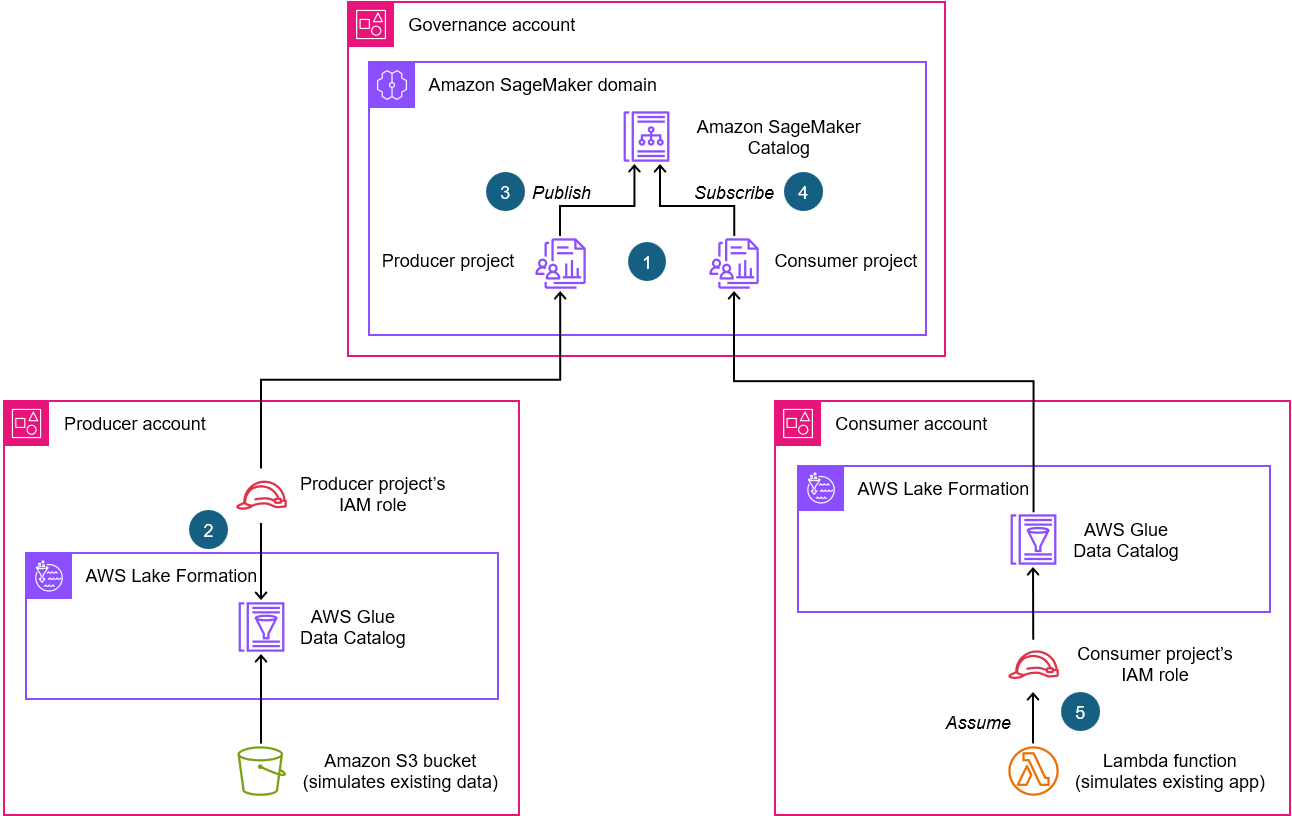
Here is a description of the key configurations highlighted in the architecture:
- As part of an Amazon SageMaker domain, create a producer project (associated to a producer account) and a consumer project (associated to a consumer account). Among other resources, a project AWS Identity and Access Management (IAM) role is created for each project in the associated account.
- In the producer account, use AWS Lake Formation to grant producer project’s IAM role permissions to access the existing data asset.
- Publish the data asset in the Amazon SageMaker Catalog from the producer project.
- Subscribe the data asset from the consumer project.
- In the consumer account, configure your Lambda function to assume consumer project’s IAM role to access the subscribed data asset.
The solution architecture is based on the following Amazon Web Services (AWS) services and features:
- Amazon SageMaker Catalog offers you a way to discover, govern, and collaborate on data and AI securely.
- Amazon SageMaker Unified Studio provides a single data and AI development environment to discover and build with your data. Amazon SageMaker Unified Studio projects provide collaborative boundaries for users to accomplish data and AI tasks.
- The lakehouse architecture of Amazon SageMaker is fully compatible with Apache Iceberg. It unifies data across Amazon S3 data lakes, Amazon Redshift data warehouses, and third-party and federated data sources.
- AWS Lake Formation, which you can use centrally to govern, secure, and share data for analytics and machine learning.
- AWS Glue Data Catalog is a persistent metadata store for your data assets. It contains table definitions, job definitions, schemas, and other control information to help you manage your AWS Glue environment.
- Amazon S3 is an object storage service that offers industry-leading scalability, data availability, security, and performance.
Setting up resources
In this section, you will prepare the resources and configurations you need for this solution.
Three AWS accounts
To follow this solution, you need three AWS accounts, and it’s better if they’re part of the same organization in AWS Organizations:
- Producer account – Hosts the data asset to be published
- Consumer account – Hosts the application that consumes the data published from the producer account
- Governance account – Where the Amazon SageMaker Unified Studio domain is configured
Each account must have an Amazon Virtual Private Cloud (Amazon VPC) with at least two private subnets in two different Availability Zones. For instruction, refer to Create a VPC plus other VPC resources. Make sure to create both VPCs in the same Region you plan to apply this solution.
A governance account is used for the sake of convenience, but it’s not strictly needed because Amazon SageMaker can be configured and managed in producer or consumer accounts.If you don’t have access to three accounts, you can still use this post to understand the key configurations required to implement a data mesh pattern with Amazon SageMaker Catalog while keeping your current data repositories and consumer applications unchanged.
Create a data repository in the producer account
First, create a sample dataset by following these instructions:
- Open a text editor.
- Paste the following text in a new file:
- Save the file as
trees.csv. This is your sample data file.
After you create the sample dataset, create an S3 bucket and an AWS Glue database in the producer account, which will act as the data repository.
Create the S3 bucket and upload the trees.csv file in the producer account:
- Access the S3 console in the producer account.
- Create an S3 bucket. For instructions, refer to Creating a general purpose bucket.
- Upload to the S3 bucket the
trees.csvsample data file that you created. For instructions, refer to Uploading objects.
Create the AWS Glue database and table in the producer account:
- Access the Glue console in the producer account.
- In the navigation pane, under Data Catalog, choose Databases.
- Choose Add database.
- For Name, enter
collections. - For Description, enter
This database contains collections of statistics for natural resources. - Choose Create database.
- In the navigation pane, under Data Catalog, choose Tables.
- Choose Add table.
- In the table creation guided procedure, enter the following input for Step 1: Set table properties:
- For Name, enter
trees. - For Database, select
collections. - For Description, enter
This table captures ratings data related to the characteristics of various tree species. - For Table format, select Standard AWS Glue table (default).
- For Select the type of source, select S3.
- For Data location is specified in, select my account.
- For Include path, enter
s3://<bucket-name>/<prefix>/where<bucket-name>is the name of the S3 bucket you created earlier in this procedure and<prefix>is the optional prefix for thetrees.csvfile you uploaded. - For Data format, select CSV.
- For Delimeter, select Comma (,).
- For Name, enter
- Choose Next.
- For Step 2: Choose or define schema, enter the following:
- For Schema, select Define or upload a schema.
- Choose Edit schema as JSON and enter the following schema in the pop-up:
- Choose Save.
- Choose Next.
- Choose Create.
Create a Lambda function in the consumer account
Create the Lambda function in the consumer account. This will simulate a data consumer application.First, in the consumer account create the IAM policy and the IAM role to be assigned to the Lambda function:
- Access the IAM console in the consumer account.
- Create an IAM policy and name it
smus_consumer_athena_executionby using the following policy. Make sure to replace placeholders<AWS_Region>and<AWS_account_ID_number>with your Region and consumer account ID number. You will replace the<workgroup_id>placeholder later. For IAM policy creation instructions, refer to Create IAM policies (console). - Create an IAM role for AWS Lambda service and name it
smus_consumer_lambda. Assign to it the AWS managed permissionAWSLambdaBasicExecutionRoleand the permission namedsmus_consumer_athena_executionthat you just created. For instructions, refer to Create a role to delegate permissions to an AWS service.
After the IAM role for the Lambda function is in place, you can create the Lambda function in the consumer account:
- Access the Lambda console in the consumer account.
- In the navigation pane, choose Functions.
- Choose Create function and enter the following information:
- For Function name, enter
consumer_function. - For Runtime, select Python 3.14.
- Expand Change default execution role section.
- For Execution role, select Use an existing role.
- For Existing role, select
smus_consumer_lambda.
- For Function name, enter
- Choose Create function.
- Under the Code tab, in the Code source, replace the existing code with the following:
- Choose Deploy.
The code provided for the Lambda function includes some placeholders that you will replace later, after you have the required information. Don’t test the Lambda function at this time because it will fail because of the presence of the placeholders.
Create a user with administrative access
Amazon SageMaker Unified Studio supports two distinct domain types: AWS IAM Identity Center based domains and IAM based domains. At the time of writing this post, only IAM Identity Center based domains support multi-accounts association, therefore in this post you work with this type of domain that requires IAM Identity Center.
In the governance account, you enable IAM Identity Center and create an administrative user to create and manage the Amazon SageMaker Unified Studio domain. Create a user with administrative access:
- Enable IAM Identity Center in the governance account. For instructions, refer to Enable IAM Identity Center.
- In IAM Identity Center in the governance account, grant administrative access to a user. For a tutorial about using the IAM Identity Center directory as your identity source, refer to Configure user access with the default IAM Identity Center directory.
Sign in as the user with administrative access:
- To sign in with your IAM Identity Center user, use the sign-in URL that was sent to your email address when you created the IAM Identity Center user. For help signing in using an IAM Identity Center user, refer to Sign in to your AWS access portal.
Create a SageMaker Unified Studio domain
To create the Amazon SageMaker Unified Studio domain in the governance account refer to Create a Amazon SageMaker Unified Studio domain – quick setup.
After your domain is created, you can navigate to the Amazon SageMaker Unified Studio portal (a browser-based web application) where you can use your data and configured tools for analytics and AI. Save the Amazon SageMaker Unified Studio portal URL because you will use this URL later.
Solution steps
Now that you have the prerequisites in place, you can complete the following ten high-level steps to implement the solution.
Associate the producer and consumer accounts to the Amazon SageMaker Unified Studio domain
Start by associating the producer and consumer accounts to the newly created Amazon SageMaker Unified Studio domain. When you associate your producer and consumer accounts to the domain, make sure to select IAM users and roles can access APIs and IAM users can log in to Amazon SageMaker Unified Studio in the AWS RAM share managed permission section. For step-by-step instructions, refer to Associated accounts in Amazon SageMaker Unified Studio. If your AWS accounts are part of the same organization, your association requests are automatically accepted. However, if your AWS accounts aren’t part of the same organization, request association with the other AWS accounts in the governance account and then accept the association request in both the producer and consumer accounts.
Create two project profiles
Now, create two project profiles, one for the producer project and one for the consumer project.
In Amazon SageMaker Unified Studio, a project profile defines an uber template for projects in your Amazon SageMaker domain. A project profile is a collection of blueprints that provides reusable AWS CloudFormation templates used to create project resources.
A project profile is associated to a specific AWS account. This means, when a project is created the blueprints listed in the project profile are deployed in the associated AWS account. To use a project profile, you must enable its blueprints in the AWS account associated to the project profile.
Create the producer project profile
You’re going to create the producer project profile that is associated to the producer account. This project profile will be used to create the producer project. This profile includes by default the Tooling blueprint that creates resources for the project, including IAM user roles and security groups.
Before creating the project profile, you will enable the Tooling blueprint in the producer account using the following procedure:
- Access the SageMaker console in the producer account.
- In the navigation pane, choose Associated domains.
- Select the domain you created while setting up.
- On the Blueprints tab, choose Enable in the Tooling blueprint section as shown in the following image:
- For Virtual private cloud (VPC) select your account VPC.
- For Subnets, select at least two subnets in different Availability Zones.
- Choose Enable blueprint.

Proceed to creating the project profile in the governance account:
- Access the SageMaker console in the governance account.
- In the navigation pane, choose Domains.
- Select the domain you created as part of prerequisites.
- Under the Project profiles tab, choose Create and enter the following information:
- For Project profile name, enter
producer-project-profile. - For Project profile creation options, select Custom create.
- DO NOT SELECT A BLUEPRINT for Blueprints because the
Toolingblueprint is included by default in any project profile. - For Account, select Provide an account ID.
- For Account ID, enter the producer account ID.
- For Region, select Provide region name and then select the Region in which you’re working.
- For Authorization, select Allow all users and groups.
- For Project profile readiness, select Enable project profile on creation.
- For Project profile name, enter
- Choose Create project profile.
Create a consumer project profile
You also create a consumer project profile and associate it to the consumer account. This profile will be used to create the consumer project. The consumer project profile includes the LakeHouseDatabase blueprint, which is needed to create a lakehouse environment with an AWS Glue database for data management and an Amazon Athena workgroup for querying. The Tooling blueprint is included by default in the project profile.
Before creating the project profile, enable the Tooling and LakeHouseDatabase blueprints in the consumer account:
- Access the SageMaker console in the consumer account.
- In the navigation pane, choose Associated domains.
- Select the domain you created as part of prerequisites.
- On the Blueprints tab, choose Enable in the Tooling blueprint section.
- For Virtual private cloud (VPC) select your account VPC.
- For Subnets, select at least two subnets in different Availability Zones.
- Choose Enable blueprint.
- In the navigation pane, choose Associated domains.
- Select the domain you created as part of prerequisites.
- Under the Blueprints tab, select the
LakeHouseDatabaseblueprint. - Choose Enable.
- Choose Enable blueprint.
After blueprints are enabled in the consumer account, you can proceed creating the project profile:
- Access the SageMaker console in the governance account.
- In the navigation pane, choose Domains.
- Select the domain you created as part of prerequisites.
- Under Project profiles tab choose Create and enter the following information:
- For Project profile name, enter
consumer-project-profile. - For Project profile creation options, select Custom create.
- For Blueprints, select
LakeHouseDatabase. - For Account, select Provide an account ID.
- For Account ID, enter the consumer account ID.
- For Region, select Provide region name and then select the Region you are working.
- For Authorization, select Allow all users and groups.
- For Project profile readiness, select Enable project profile on creation.
- For Project profile name, enter
- Choose Create project profile.
Create SageMaker Unified Studio producer and consumer projects
In Amazon SageMaker Unified Studio, a project is a boundary within a domain where you can collaborate with other users to work on a business use case. In projects, you can create and share data and resources.To create producer and consumer projects in Amazon SageMaker Unified Studio use the following instructions:
- Access the Amazon SageMaker Unified Studio portal.
- Choose the Select a project dropdown list.
- Choose Create project and enter the following information:
- For Project name, enter
Producer. - For Project profile, select
producer-project-profile.
- For Project name, enter
- Choose Continue.
- Choose Continue.
- Choose Create project.
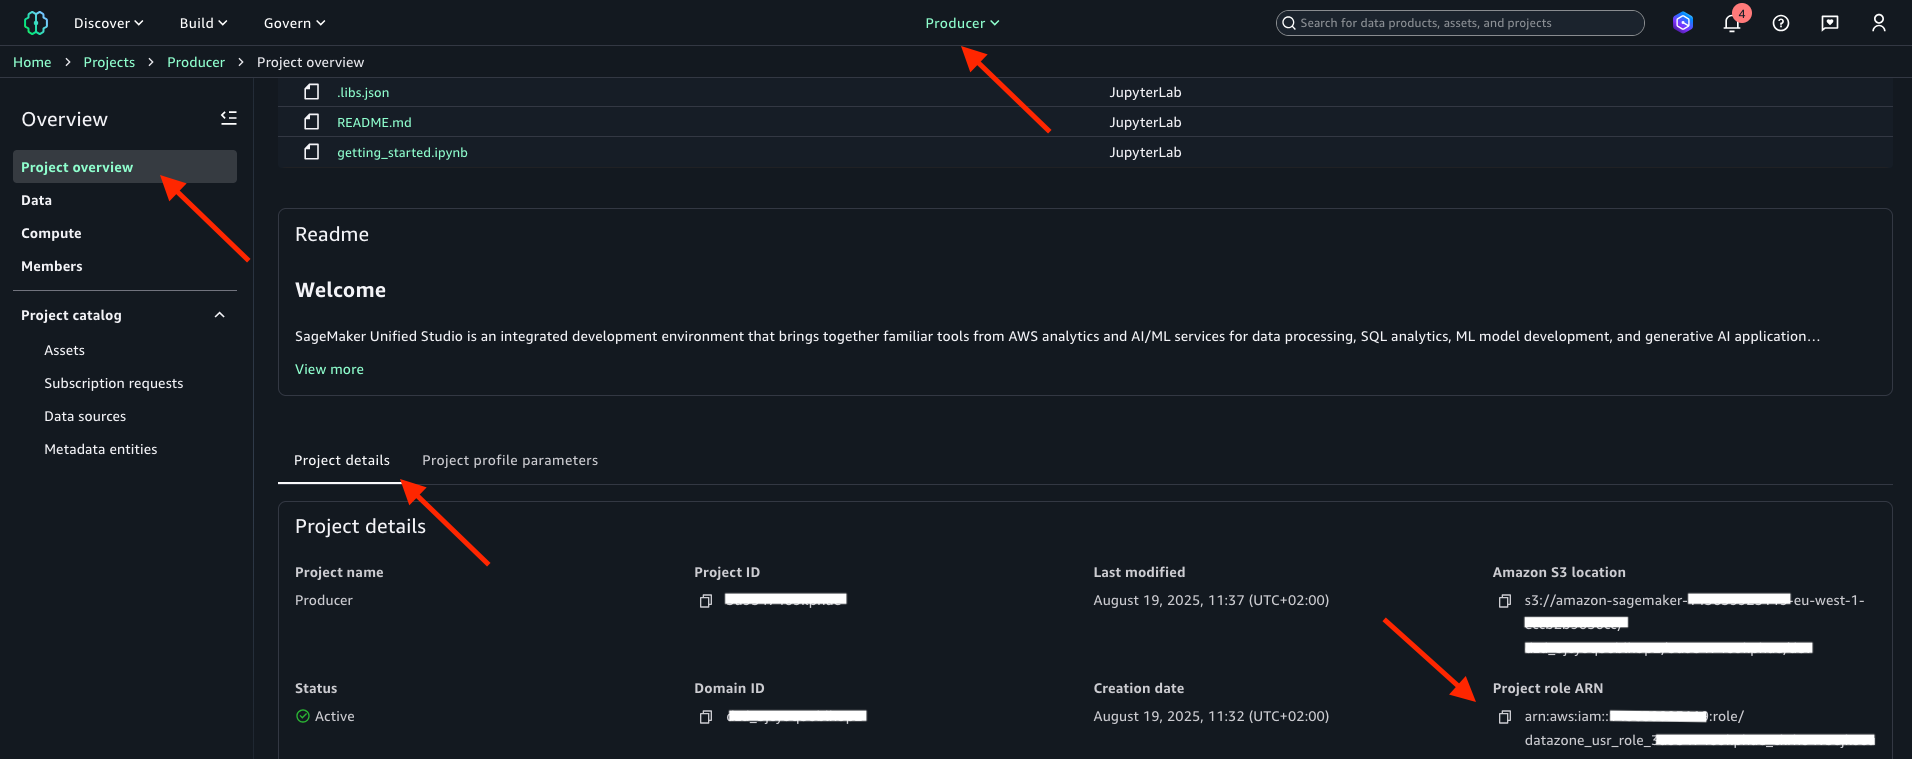
After you’ve created the Producer project, note in a text file the Project role ARN that is displayed in the Project overview. The following image is shown for reference. The project role name is the string that follows arn:aws:iam::<account_ID>:role/ in the project role Amazon Resource Name (ARN). You will use both project role name and ARN later.
Repeat the preceding procedure to create the Consumer project. Be sure to enter Consumer for Project name and then select consumer-project-profile for Project profile. After it’s created, note the Project role ARN in a text file. The project role name is the string that follows arn:aws:iam::<account_ID>:role/ in the project role ARN. You will use both project role name and ARN later.
Bring your own data from the producer account
Bring your own data to the Amazon SageMaker Unified Studio Producer project. AWS provides several options to achieve this onboarding. The first option is automated onboarding in Amazon SageMaker lakehouse, in which you ingest the Amazon SageMaker lakehouse metadata of datasets into Amazon SageMaker Catalog. With this option, you can onboard your Amazon SageMaker lakehouse data as part of creating a new Amazon SageMaker Unified Studio domain or for an existing domain.
For more information about automated onboarding of Amazon SageMaker lakehouse data, refer to Onboarding data in Amazon SageMaker Unified Studio. As other options, you can bring in existing resources to your Amazon SageMaker Unified Studio project by using the Data and Compute pages in your project, or by using scripts provided in GitHub. For more information about using the Data and Compute pages or about using scripts, refer to Bringing existing resources into Amazon SageMaker Unified Studio. In this post, you will use Amazon SageMaker lakehouse capabilities to import your trees AWS Glue table into the Producer project.
Register the Amazon S3 location for the table
To use Lake Formation permissions for fine-grained access control to the trees table, you need to register in Lake Formation the Amazon S3 location of the trees table. To do that, complete the following actions:
- Access the Lake Formation console in the producer account.
- In the navigation pane under Administration, choose Data lake locations.
- Choose Register location and enter the following information:
- For S3 URI, enter
s3://<bucket-name>/<prefix>/where<bucket-name>is the name of the S3 bucket you created in the prerequisites and<prefix>is the optional prefix for thetrees.csvfile you uploaded as part of the prerequisite. - For IAM role, select
AWSServiceRoleForLakeFormationDataAccess. - For Permission mode, select Lake Formation.
- For S3 URI, enter
- Choose Register location.
Grant Producer project role permissions on the database
Grant database access to the IAM role that is associated with your Producer project. This role is called the project role, and it was created in IAM upon project creation.
To access the AWS Glue Data Catalog collections database from the Producer project in the Amazon SageMaker Unified Studio, complete the following actions:
- Access the Lake Formation console in the producer account.
- In the navigation pane under Data Catalog, choose Databases.
- Choose the
collectionsdatabase. - From the Actions menu, choose Grant and enter the following information:
- For IAM users and roles, select your
Producerproject’s role name. This is the string starting withdatazone_usr_role_that is part of theProducerproject role ARN that you noted in step 3 “Create SageMaker Unified Studio producer and consumer projects”. - For Database permissions, select Describe.
- For IAM users and roles, select your
- Choose Grant.
Grant Producer project role permissions on the table
Grant trees table access to the IAM role that is associated with your Producer project. To grant these permissions use the following instructions:
- Access the Lake Formation console in the producer account.
- In the navigation pane under Data Catalog, choose Tables and MVs.
- Select the
treestable. - From the Actions menu, choose Grant and enter the following information:
- For IAM users and roles, select your
Producerproject’s role. This is the string starting withdatazone_usr_role_that is part of theProducerproject role ARN that you noted in step 3 “Create SageMaker Unified Studio producer and consumer projects”. - For Table permissions, select Select and Describe.
- For Grantable permissions, select Select and Describe.
- For IAM users and roles, select your
- Choose Grant.
Revoke any existing permissions of IAMAllowedPrincipals
You must revoke the IAMAllowedPrincipals group permissions on both the database and table to enforce Lake Formation permission for access. For more information, refer to Revoking permission using the Lake Formation console.
- Access the Lake Formation console in the producer account.
- In the navigation pane under Permission, choose Data permissions.
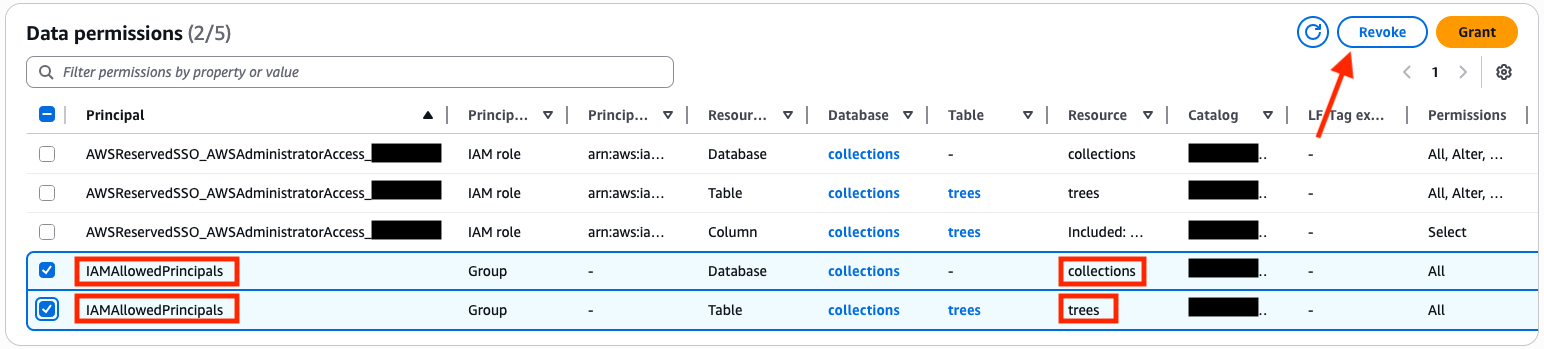
- Select the entries where Principal is set to
IAMAllowedPrincipalsand Resource is set tocollectionsortreesas in the following image: - Choose Revoke.
- Enter
revoke. - Choose Revoke again.
Verify that data is available in the Producer project
Verify that your collections database and trees table are accessible in the Producer project:
- Access the Amazon SageMaker Unified Studio portal.
- Choose the Select a project drop-down menu and choose the
Producerproject. - In the navigation pane under Overview, choose Data.
- Choose Lakehouse.
- Choose AwsDataCatalog.
- Choose
collections. - Choose tables.
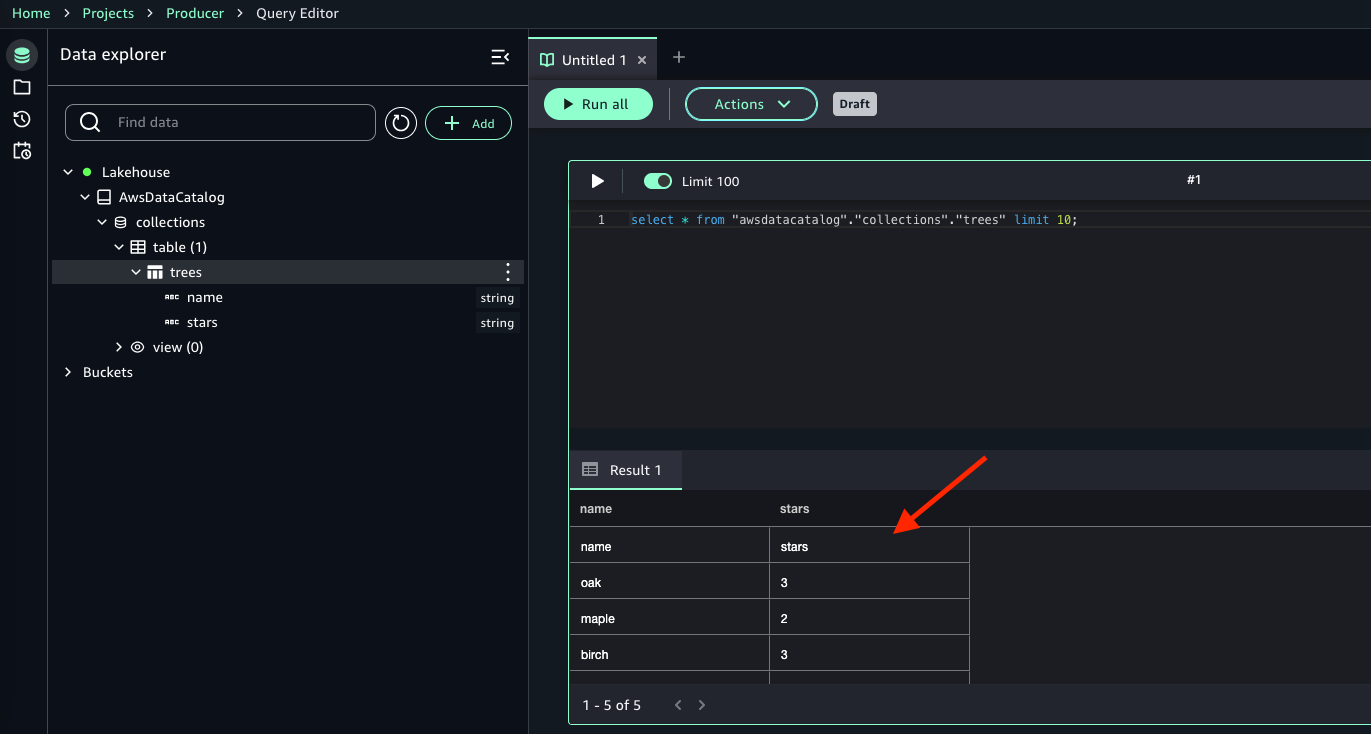
- Choose the three-dot action menu next to your
treestable and choose Preview data, as shown in the following image.
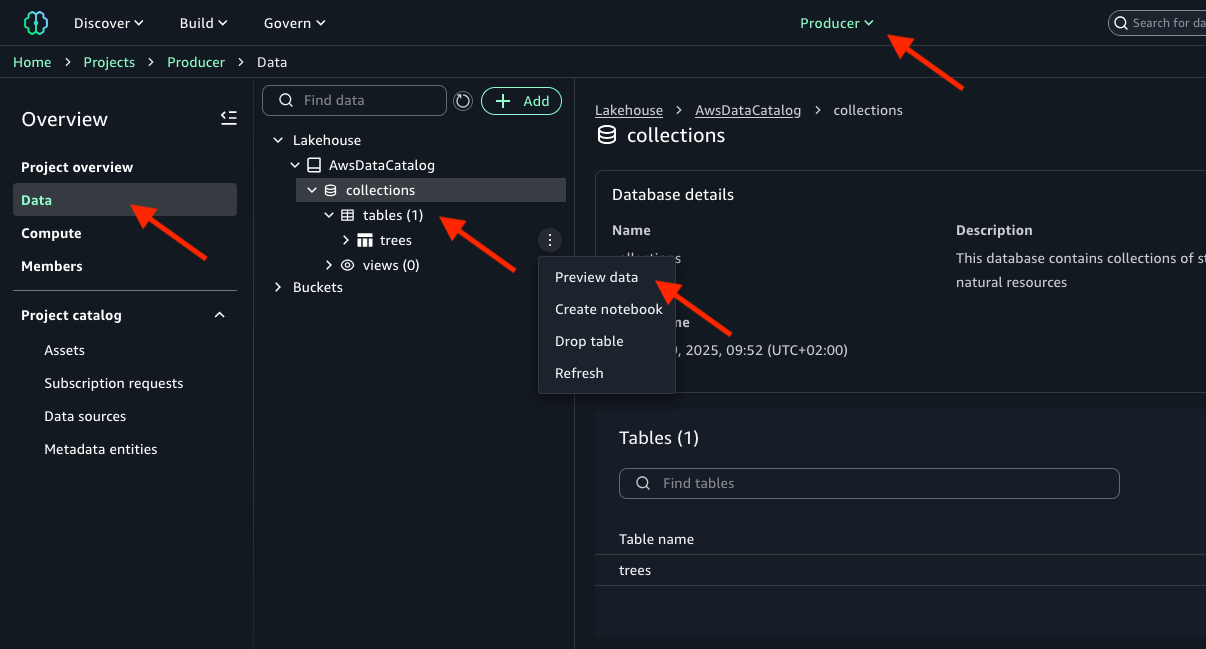
- You’ll find data from the
treestable as shown in the following image.
Create Amazon SageMaker Catalog asset
Even if it’s accessible in the project, to work with the trees table in Amazon SageMaker Catalog, you need to register the data source and create an Amazon SageMaker Catalog asset:
- Access the Amazon SageMaker Unified Studio portal.
- Choose the Select a project dropdown list and choose the
Producerproject. - On the project page, under Project catalog in the navigation pane, choose Data sources.
- Choose Create Data Source and make the following selections:
- For Name, enter
collections. - For Data source type, select AWS Glue (Lakehouse).
- For Database name, select
collections. - Choose Next.
- Choose Next.
- Choose Next.
- Choose Create.
- For Name, enter
- After the data source is created, you will be in the
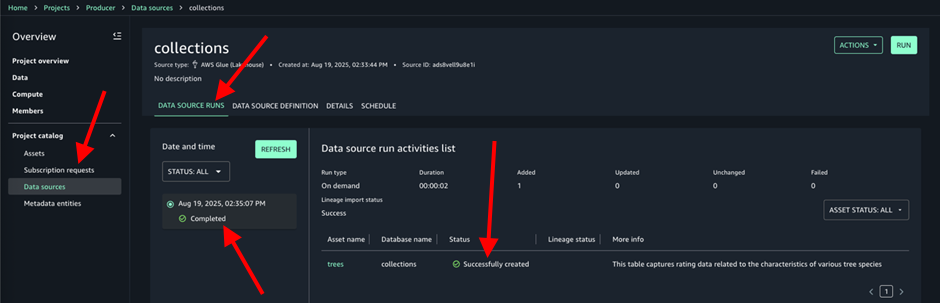
collectionsdata source page, choose Run. This will import metadata and create the Amazon SageMaker Catalog asset. - In the
collectionsdata source, on the Data source runs tab, you’ll find your run marked as Completed and thetreesasset Successfully created, as shown in the following image:
Publish the data asset in the Amazon SageMaker Catalog
Publishing a data asset manually is a one-time operation that you need to perform to allow others to access the data asset through the catalog:
- Access the Amazon SageMaker Unified Studio portal.
- Choose the Select a project dropdown list and choose the
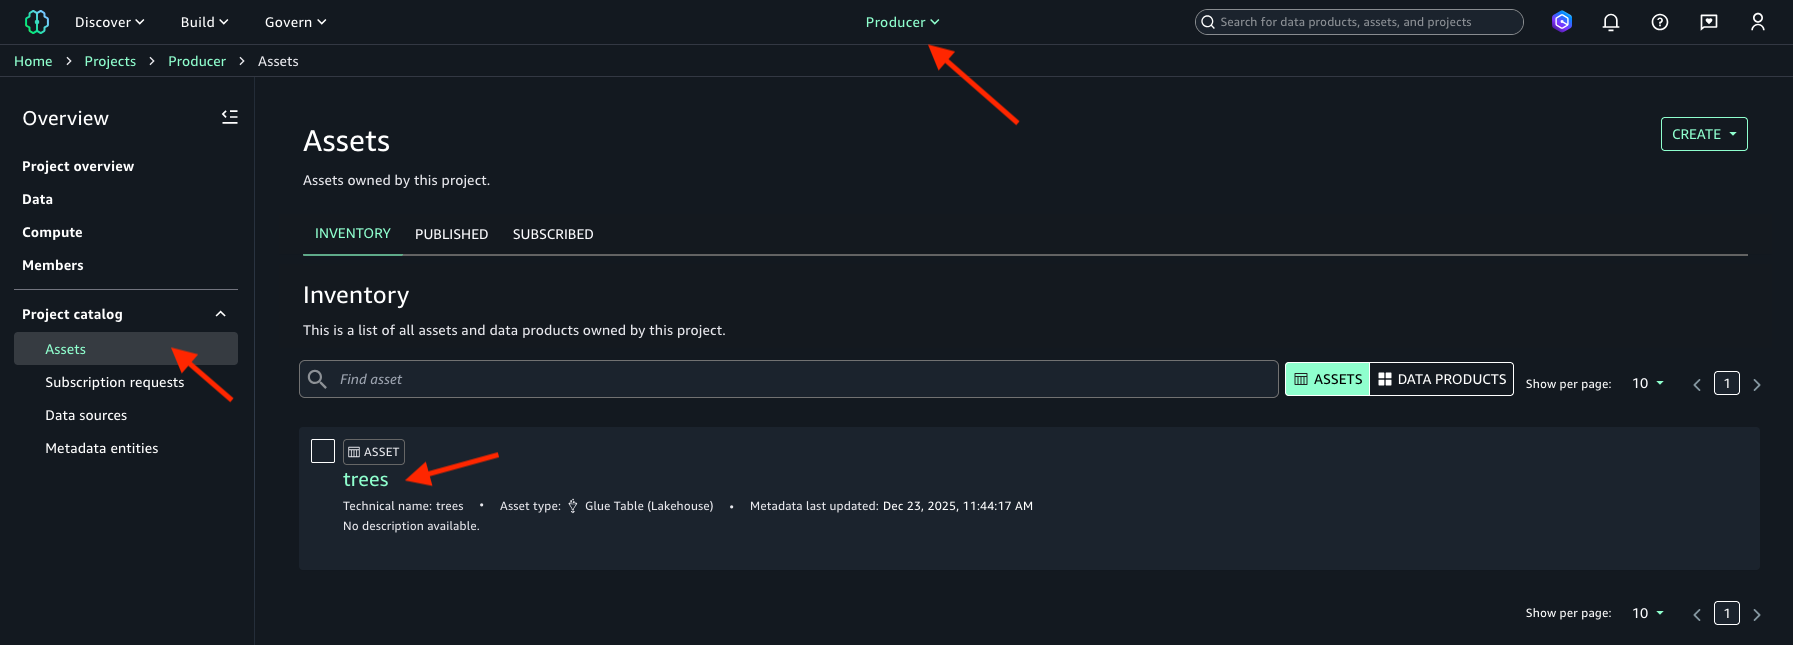
Producerproject. - On the project page under Project catalog, choose Assets.
- Select your
treesdata asset that is available on the Inventory tab. The following image is shown for reference.
- (Optional) If automated metadata generation is enabled when the data source is created, metadata for assets (such as the asset business name) is available to review and accept or reject. You can either choose Accept All or Reject All in the Automated Metadata Generation banner.
- Choose Publish Asset. The following image is shown for reference.
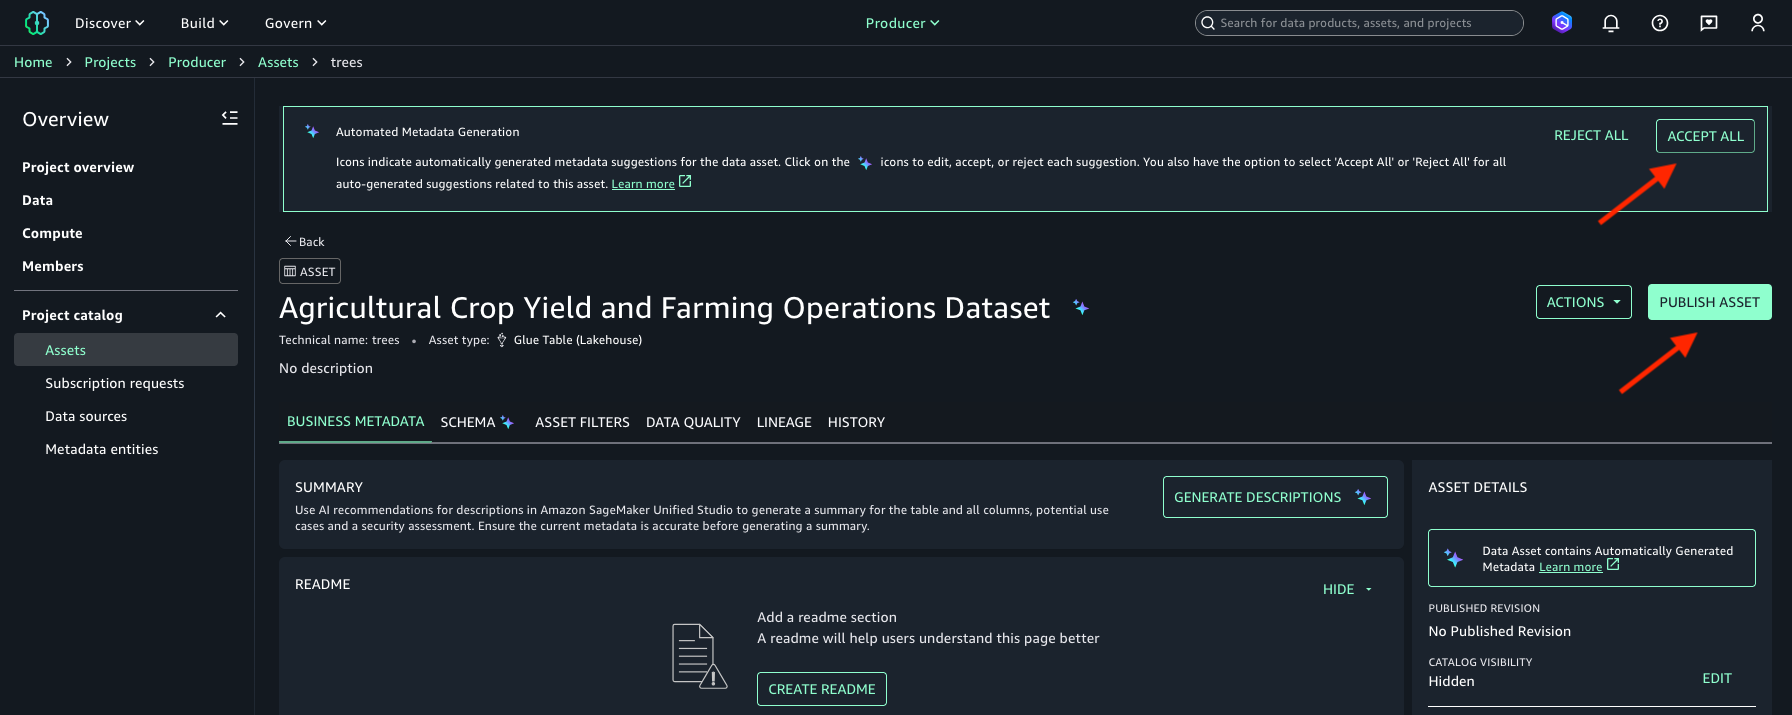
- Choose Publish Asset.
Subscribe to the data asset in the Amazon SageMaker Catalog
To consume data assets in the Consumer project, subscribe to the data asset by creating a subscription request:
- Access the Amazon SageMaker Unified Studio portal.
- Choose the Select a project dropdown list and choose
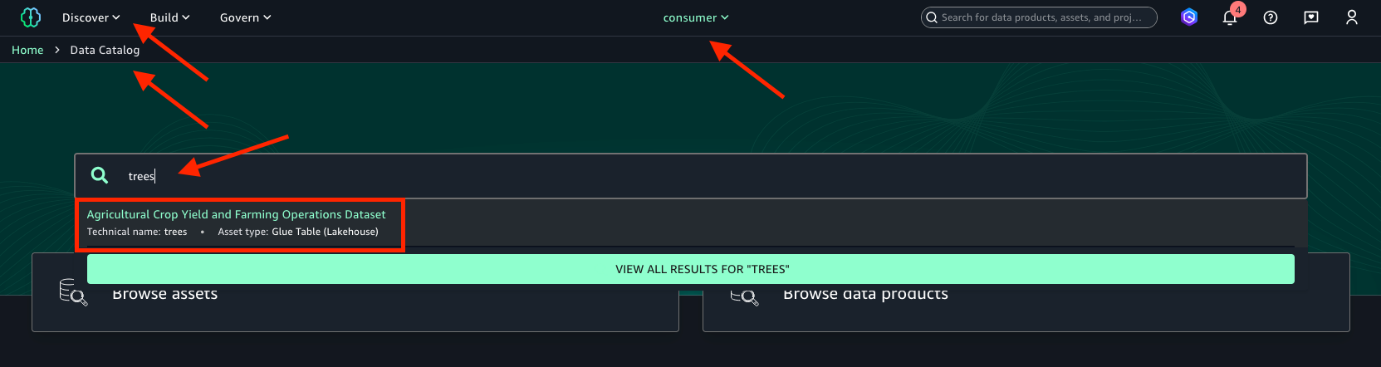
Consumerproject. - On the Discover menu, choose Catalog.
- Enter
treesin the search box and then select the data asset returned from the search. If in step 7 “Publish the data asset in the Amazon SageMaker Catalog” you chose Accept All in the Automated Metadata Generation banner, your data asset will have a different business name generated by the automated metadata recommendations feature. The data asset technical name istrees. For reference, refer to the following image.
- Choose Subscribe.
- For Comment, enter a justification such as
This data asset is needed for model training purposes. - Choose Subscribe again.
By default, asset subscription requests require manual approval by a data owner. However, if the requester in the Consumer project is also a member of the Producer project, the subscription request is automatically approved. For information about approving subscription requests, refer to Approve or reject a subscription request in Amazon SageMaker Unified Studio.
Configure your Lambda IAM role to access the subscribed data access
To enable your Lambda function access to the subscribed data asset, you need to allow the Lambda function to assume the Consumer project role. To do this, edit the Consumer project’s IAM role trust relationship:
- Navigate to the IAM console in the consumer account.
- In the navigation pane under Access management, choose Roles.
- Select the
Consumerproject’s IAM role. This is the string starting withdatazone_usr_role_that is part of theConsumerproject role ARN that you noted in step 3 “Create SageMaker Unified Studio producer and consumer projects”. - Under the Trust relationships tab, choose Edit trust policy.
- For backup reasons, make a copy of the existing trust policy in a text file.
- In the Edit trust policy window, add the following statement to the existing trust policy without removing or overwriting other existing statements in the trust policy. Be sure to replace the placeholder
<account_id>with your consumer AWS account ID.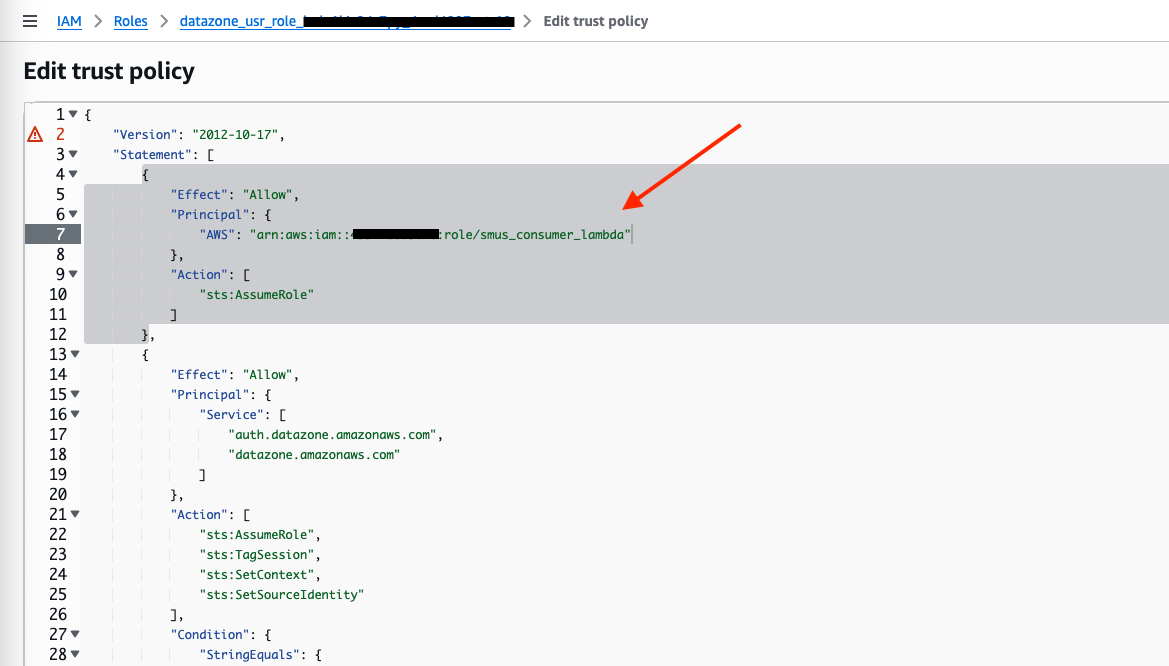
- Choose Update policy.
Test the Lambda function’s access to the subscribed data asset
Before you can test your Lambda function, you need to replace placeholders in the function code and in the IAM policy. There are three placeholders to be replaced: <role_arn>, <database_name> and <workgroup_id>. For <role_arn>, you already have the actual value, which is the Consumer project’s role ARN that you noted in step 3 “Create SageMaker Unified Studio producer and consumer projects”. The next sections provide instructions to retrieve values for the other placeholders.
Retrieve the AWS Glue Data Catalog database name
You need to find the name of the AWS Glue Data Catalog database that was created along with the Consumer project. You will then use this value to replace the <database_name> placeholder in the consumer_function Lambda function code. To retrieve the AWS Glue Data Catalog database name, follow these instructions:
- Access the Amazon SageMaker Unified Studio portal.
- Choose the Select a project dropdown list and choose
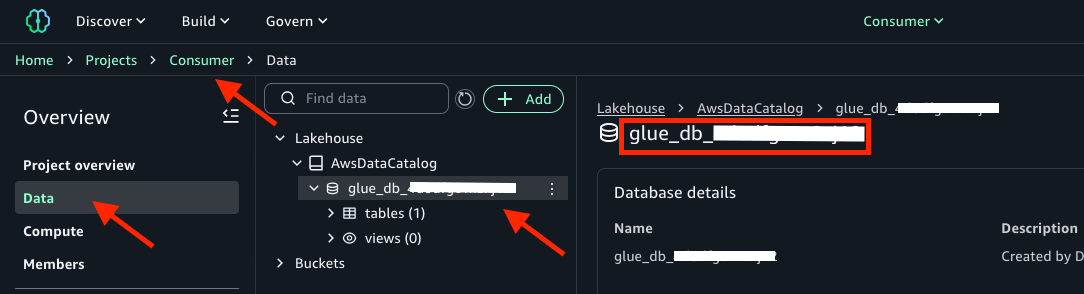
Consumerproject. - On the project page, under Overview, choose Data.
- Choose Lakehouse.
- Choose AwsDataCatalog.
- Copy the name of the database. It should be an alphanumerical string starting with
glue_db, as in the following image:
Retrieve the Athena workgroup ID
You need to find the ID of the Athena workgroup that was created along with the Consumer project. You will then use this value to replace the <workgroup_id> placeholder in the consumer_function Lambda function code and in the smus_consumer_athena_execution IAM policy. Use the following instructions to retrieve the Athena workgroup ID:
- Access the Amazon SageMaker Unified Studio portal.
- Choose the Select a project dropdown list and choose
Consumerproject. - On the project page, under Overview, choose Compute.
- Under the SQL analytics tab, select project.athena, as in the following image:
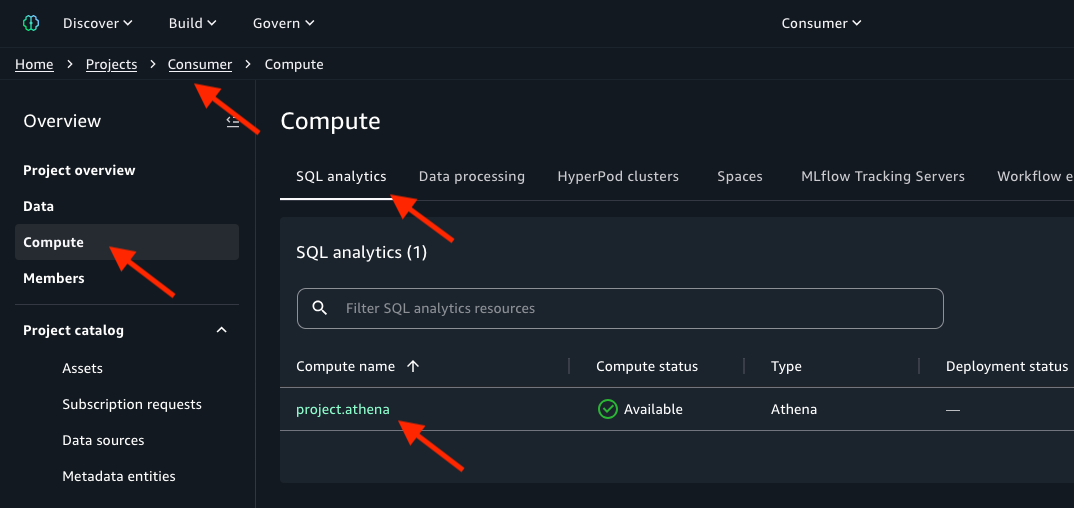
- Copy the Workgroup ARN and save to a text file. The Athena workgroup ID is the string that follows
arn:aws:athena:<region>:<account_ID>:workgroup/in the Workgroup ARN.
Replace placeholder in the smus_consumer_athena_execution IAM policy
To replace the <workgroup_id> placeholder in the smus_consumer_athena_execution IAM policy, use the following procedure:
- Access the IAM console in the consumer account.
- In the navigation pane, choose Policies.
- In the search field enter
smus_consumer_athena_execution. - Select the
smus_consumer_athena_executionpolicy. - Choose Edit.
- Replace
<workgroup_id>with the value you noted earlier. - Choose Next.
- Choose Save changes.
Replace placeholders in the Lambda function code and test it
In this section, you will replace the <role_arn>, <database_name> and <workgroup_id> placeholders in the consumer_function Lambda function code, and then you can test the function ability to access data of the trees table.
- Access the Lambda console in the consumer account.
- In the navigation pane, choose Functions.
- Select
consumer_function. - Under the Code tab, replace
<role_arn>,<database_name>and<workgroup_id>placeholders with the respective values you noted earlier. - Choose Deploy.
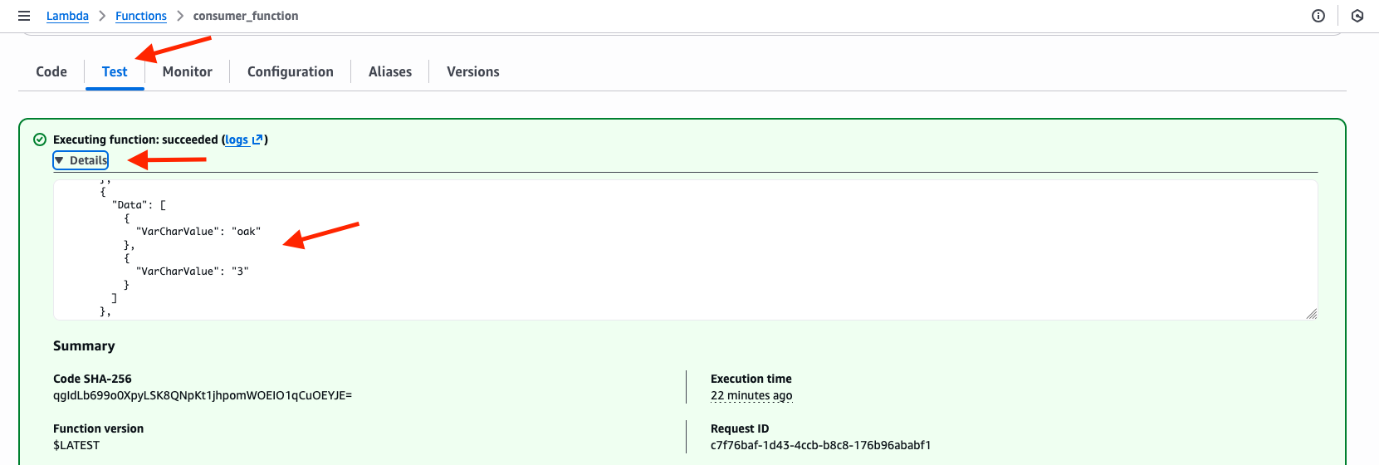
- Under the Test tab, for Event name, enter
mytest. - Choose Test.
- Choose Details in the green banner titled Executing function that appears after the execution is completed.
- The execution log reports the
treestable content, as shown in the following image:
If your Lambda function execution fails due to timeout, change the function timeout setting as follows:
- Access the Lambda console in the consumer account.
- In the navigation pane, choose Functions.
- Select
consumer_function. - Under the Configuration tab, choose Edit.
- For Timeout, enter 15 sec or a greater value.
- Choose Save.
After increasing the timeout, test the function again.
Clean up
If you no longer need the resources you created as you followed this post, delete them to prevent incurring additional charges. Start by deleting your Amazon SageMaker Unified Studio domain in the governance account. For more information, refer to Delete domains.
To remove the AWS Glue collections database from the producer account, follow these steps:
- Access the Glue console in the producer account.
- In the navigation pane under Data Catalog, choose Databases.
- Select the
collectionsdatabase. - Choose Delete.
- Choose Delete.
To remove the S3 bucket from the producer account, empty the bucket and then you can delete the bucket. For information about emptying the bucket, refer to Emptying a general purpose bucket. For information about deleting the bucket, refer to Deleting a general purpose bucket.
To remove the Lambda function from the consumer account, follow these steps:
- Access the Lambda console in the consumer account.
- In the navigation pane, choose Functions.
- Select the
consumer_functionLambda function. - Choose the Actions menu and then choose Delete function.
- Enter
confirm. - Choose Delete.
To complete the cleanup, delete the IAM role named smus_consumer_lambda, then delete the IAM policy named smus_consumer_athena_execution in the consumer account. For information about removing a IAM role, refer to Delete roles or instance profiles. For information about removing an IAM policy, refer to Delete IAM policies.
Conclusion
In this post, we covered adopting Amazon SageMaker Catalog for data governance without rearchitecting your existing applications and data repositories. We walked through how to onboard existing data in Amazon SageMaker Unified Studio, then publish it in a catalog, and then subscribe and consume the data from resources deployed outside the context of an Amazon SageMaker Unified Studio project. This solution can help you accelerate your implementation of a data mesh pattern with Amazon SageMaker Catalog to publish, find, and access data securely in your organization.
For more information, refer to What is Amazon SageMaker? and work through the Amazon SageMaker Workshop to try the unified experience for data, analytics, and AI.