AWS Big Data Blog
Modernize Apache Spark workflows using Spark Connect on Amazon EMR on Amazon EC2
Apache Spark Connect, introduced in Spark 3.4, enhances the Spark ecosystem by offering a client-server architecture that separates the Spark runtime from the client application. Spark Connect enables more flexible and efficient interactions with Spark clusters, particularly in scenarios where direct access to cluster resources is limited or impractical.
A key use case for Spark Connect on Amazon EMR is to be able to connect directly from your local development environments to Amazon EMR clusters. By using this decoupled approach, you can write and test Spark code on your laptop while using Amazon EMR clusters for execution. This capability reduces development time and simplifies data processing with Spark on Amazon EMR.
In this post, we demonstrate how to implement Apache Spark Connect on Amazon EMR on Amazon Elastic Compute Cloud (Amazon EC2) to build decoupled data processing applications. We show how to set up and configure Spark Connect securely, so you can develop and test Spark applications locally while executing them on remote Amazon EMR clusters.
Solution architecture
The architecture centers on an Amazon EMR cluster with two node types. The primary node hosts both the Spark Connect API endpoint and Spark Core components, serving as the gateway for client connections. The core node provides additional compute capacity for distributed processing. Although this solution demonstrates the architecture with two nodes for simplicity, it scales to support multiple core and task nodes based on workload requirements.
In Apache Spark Connect version 4.x, TLS/SSL network encryption is not inherently supported. We show you how to implement secure communications by deploying an Amazon EMR cluster with Spark Connect on Amazon EC2 using an Application Load Balancer (ALB) with TLS termination as the secure interface. This approach enables encrypted data transmission between Spark Connect clients and Amazon Virtual Private Cloud (Amazon VPC) resources.
The operational flow is as follows:
- Bootstrap script – During Amazon EMR initialization, the primary node fetches and executes the
start-spark-connect.shfile from Amazon Simple Storage Service (Amazon S3). This script starts the Spark Connect server. - Server availability – When the bootstrap process is complete, the Spark Server enters a waiting state, ready to accept incoming connections. The Spark Connect API endpoint becomes available on the configured port (typically 15002), listening for gRPC connection from remote clients.
- Client interaction – Spark Connect clients can establish secure connections to an Application Load Balancer. These clients translate DataFrame operations into unresolved logical query plans, encode these plans using protocol buffers, and send them to the Spark Connect API using gRPC.
- Encryption in transit – The Application Load Balancer receives incoming gRPC or HTTPS traffic, performs TLS termination (decrypting the traffic), and forwards the requests to the primary node. The certificate is stored in AWS Certificate Manager (ACM).
- Request processing – The Spark Connect API receives the unresolved logical plans, translates them into Spark’s built-in logical plan operators, passes them to Spark Core for optimization and execution, and streams results back to the client as Apache Arrow-encoded row batches.
- (Optional) Operational access – Administrators can securely connect to both primary and core nodes through Session Manager, a capability of AWS Systems Manager, enabling troubleshooting and maintenance without exposing SSH ports or managing key pairs.
The following diagram depicts the architecture of this post’s demonstration for submitting Spark unresolved logical plans to EMR clusters using Spark Connect.
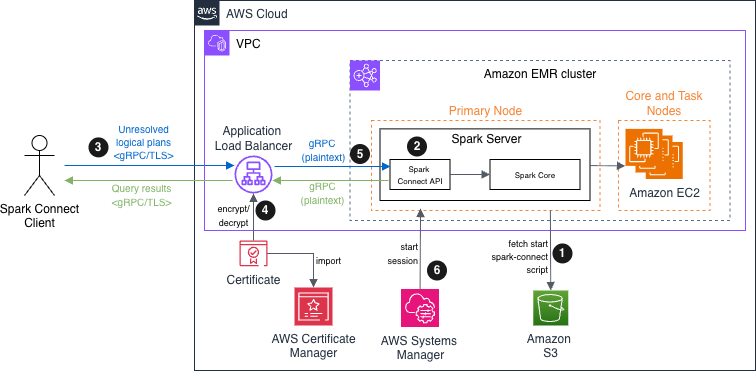
Apache Spark Connect on Amazon EMR solution architecture diagram
Prerequisites
To proceed with this post, ensure you have the following:
- An AWS account that provides access to AWS services.
- AWS Command Line Interface (AWS CLI) installed with the targeted Region set. Refer to Getting started with the AWS CLI for more information.
- Permissions to create AWS Identity and Access Management (IAM) roles, policies, security groups, and Amazon EMR Cluster.
- An Amazon VPC connection set up with its subnets and route tables.
Implementation steps
In this recipe, through AWS CLI commands, you will:
- Prepare the bootstrap script, a bash script starting Spark Connect on Amazon EMR.
- Set up the permissions for Amazon EMR to provision resources and perform service-level actions with other AWS services.
- Create the Amazon EMR cluster with these associated roles and permissions and eventually attach the prepared script as a bootstrap action.
- Deploy the Application Load Balancer and certificate with ACM secure data in transit over the internet.
- Modify the primary node’s security group to allow Spark Connect clients to connect.
- Connect with a test application connecting the client to Spark Connect server.
Prepare the bootstrap script
To prepare the bootstrap script, follow these steps:
- Create an Amazon S3 bucket to host the bootstrap bash script:
- Open your preferred text editor, add the following commands in a new file with a name such
start-spark-connect.sh. If the script runs on the primary node, it starts Spark Connect server. If it runs on a task or core node, it does nothing: - Upload the script into the bucket created in step 1:
Set up the permissions
Before creating the cluster, you must create the service role, and instance profile. A service role is an IAM role that Amazon EMR assumes to provision resources and perform service-level actions with other AWS services. An EC2 instance profile for Amazon EMR assigns a role to every EC2 instance in a cluster. The instance profile must specify a role that can access the resources for your bootstrap action.
- Create the IAM role:
- Attach the necessary managed policies to the service role to allow Amazon EMR to manage the underlying services Amazon EC2 and Amazon S3 on your behalf and optionally grant an instance to interact with Systems Manager:
- Create an Amazon EMR instance role to grant permissions to EC2 instances to interact with Amazon S3 or other AWS services:
- To allow the primary instance to read from Amazon S3, attach the
AmazonS3ReadOnlyAccesspolicy to the Amazon EMR instance role. For production environments, this access policy should be reviewed and replaced with a custom policy following the principle of least privilege, granting only the specific permissions needed for your use case: - Attaching AmazonSSMManagedInstanceCore policy enables the instances to use core Systems Manager features, such as Session Manager, and Amazon CloudWatch:
- To pass the
EMR_EC2_SparkClusterInstanceProfileIAM role information to the EC2 instances when they start, create the Amazon EMR EC2 instance profile: - Attach the role
EMR_EC2_SparkClusterNodesRolecreated in step 3 to the newly instance profile:
Create the Amazon EMR cluster
To create the Amazon EMR cluster, follow these steps:
- Set the environment variables, where your EMR cluster and load-balancer must be deployed:
- Create the EMR cluster with the latest Amazon EMR release. Replace the placeholder value with your actual S3 bucket name where the bootstrap action script is stored:
To modify primary node’s security group to allow Systems Manager to start a session.
- Get the primary node’s security group identifier. Record the identifier because you’ll need it for subsequent configuration steps in which
primary-node-security-group-idis mentioned: - Find the EC2 instance connect prefix list ID for your Region. You can use the
EC2_INSTANCE_CONNECTfilter with the describe-managed-prefix-lists command. Using a managed prefix list provides a dynamic security configuration to authorize Systems Manager EC2 instances to connect the primary and core nodes by SSH: - Modify the primary node security group inbound rules to allow SSH access (port 22) to the EMR cluster’s primary node from resources that are part of the specified Instance Connect service contained in the prefix list:
Optionally, you can repeat the preceding steps 1–3 for the core (and tasks) cluster’s nodes to allow Amazon EC2 Instance Connect to access the EC2 instance through SSH.
Deploy the Application Load Balancer and certificate
To deploy the Application Load Balancer and certificate, follow these steps:
- Create a load balancer’s security group:
- Add rule to accept TCP traffic from a trusted IP on port 443. We recommend that you use the local development machine’s IP address. You can check your current public IP address here: https://checkip.amazonaws.com:
- Create a new target group with gRPC protocol, which targets the Spark Connect server instance and the port the server is listening to:
- Create the Application Load Balancer:
- Get the load balancer DNS name:
- Retrieve the Amazon EMR primary node ID:
- (Optional) To encrypt and decrypt the traffic, the load balancer needs a certificate. You can skip this step if you already have a trusted certificate in ACM. Otherwise, create a self-signed certificate:
- Upload to ACM:
- Create the load balancer listener:
- After the listener has been provisioned, register the primary node to the target group:
Modify the primary node’s security group to allow Spark Connect clients to connect
To connect to Spark Connect, amend only the primary security group. Add an inbound rule to the primary’s node security group to accept Spark Connect TCP connection on port 15002 from your chosen trusted IP address:
Connect with a test application
This example demonstrates that a client running a newer Spark version (4.0.1) can successfully connect to an older Spark version on the Amazon EMR cluster (3.5.5), showcasing Spark Connect’s version compatibility feature. This version combination is for demonstration only. Running older versions might pose security risks in production environments.
To test the client-to-server connection, we provide the following test Python application. We recommend that you create and activate a Python virtual environment (venv) before installing the packages. This helps isolate the dependencies for this specific project and prevents conflicts with other Python projects. To install packages, run the following command:
In your integrated development environment (IDE), copy and paste the following code, replace the placeholder, and invoke it. The code creates a Spark DataFrame containing two rows and it shows its data:
The following shows the application output:
Clean up
When you no longer need the cluster, release the following resources to stop incurring charges:
- Delete the Application Load Balancer listener, target group, and the load balancer.
- Delete the ACM certificate.
- Delete the load balancer and Amazon EMR node security groups.
- Terminate the EMR cluster.
- Empty the Amazon S3 bucket and delete it.
- Remove
AmazonEMR-ServiceRole-SparkConnectDemoandEMR_EC2_SparkClusterNodesRoleroles andEMR_EC2_SparkClusterInstanceProfileinstance profile.
Considerations
Security considerations with Spark Connect:
- Private subnet deployment – Keep EMR clusters in private subnets with no direct internet access, using NAT gateways for outbound connectivity only.
- Access logging and monitoring – Enable VPC Flow Logs, AWS CloudTrail, and bastion host access logs for audit trails and security monitoring.
- Security group restrictions – Configure security groups to allow Spark Connect port (15002) access only from bastion host or specific IP ranges.
Conclusion
In this post, we showed how you can adopt modern development workflows and debug Spark applications from local IDEs or notebooks, so you can step through code execution. With Spark Connect’s client-server architecture, the Spark cluster can run on a different version than the client applications, so operations teams can perform infrastructure upgrades and patches independently.
As the cluster operators gain experience, they can customize the bootstrap actions and add steps to process data. Consider exploring Amazon Managed Workflows for Apache Airflow (MWAA) for orchestrating your data pipeline.