IBM & Red Hat on AWS
Installing Red Hat OpenShift on AWS in a restricted network using AWS Secure Token Service
Customers in regulated industries often need to avoid using external software registries and long-term credentials to comply with regulatory requirements. When deploying Red Hat OpenShift Container Platform (OCP) on Amazon Web Services (AWS), these same customers can use restricted Amazon Virtual Private Cloud (Amazon VPC) networks and the AWS Secure Token Service (AWS STS).
AWS STS grants limited, short-term access to AWS resources, enhancing security and compliance by automatically expiring credentials after a set period. Installing OpenShift in a restricted or air-gapped network helps customers control software package installation and container image deployment.
To install OpenShift clusters on restricted Amazon VPC networks, customers must create an internal mirror of the OpenShift installation release content. OpenShift needs communication with AWS APIs and Red Hat to manage resources during provisioning.
For added security, customers can use AWS Network Firewall to control outbound traffic. Integration with AWS STS allows OpenShift components and operators to assume individual AWS IAM roles only when needed, regularly cycling credentials.
These strategies give customers greater control and enhanced security over their OpenShift clusters and software registries, ensuring compliance with security requirements and standards.
In this Blog post we will explore:
- The underlying networking used to create air-gapped environments
- Creating private repositories for OpenShift provisioning and day two operations using a private Amazon Elastic Container Registry (Amazon ECR)
- Provisioning OpenShift with AWS STS
Architecture Overview
The scenario we’re implementing creates a private OpenShift cluster on AWS in a restricted network. AWS provides different connectivity options between VPCs and on-premises environments, and different deployment models for AWS Network Firewall to secure East-West (Inter-VPC) and North-South (On Premises/Internet) traffic.
Our deployment uses three different Amazon VPCs – an Egress VPC, a Management VPC and an OpenShift VPC. AWS Transit Gateway (TGW) will act as a network hub and simplify the connectivity between our VPCs and the internet. Each of our VPCs have subnets used for the TGW attachments and workloads. The Egress VPC provides access to the internet and traffic inspection through AWS Network Firewall endpoints and public subnets.
We’re using a centralized deployment of AWS Network Firewall, with stateful rule groups to allow communication between our VPCs and the internet, as well as from the OpenShift VPC and AWS service endpoints. Our Management and OpenShift VPCs are also using Gateway endpoints for Amazon S3. Figure 1 below, shows the architecture of our network and firewall.
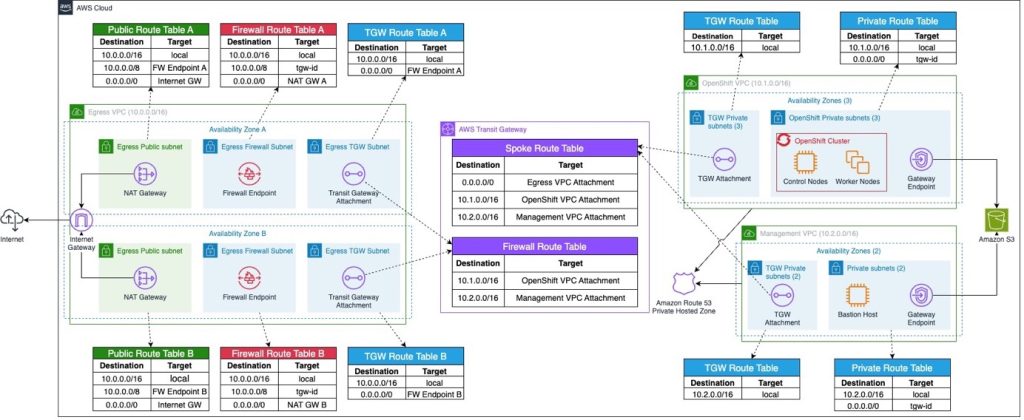
Figure 1. Network architecture to deploy OpenShift in a restricted Amazon VPC.
Our OpenShift cluster is deployed across three Availability Zones (AZ), with three Master nodes and three Worker nodes. This combines the resilience model of OpenShift with that of AWS, protecting against possible failures at various layers, as seen in figure 2 below.
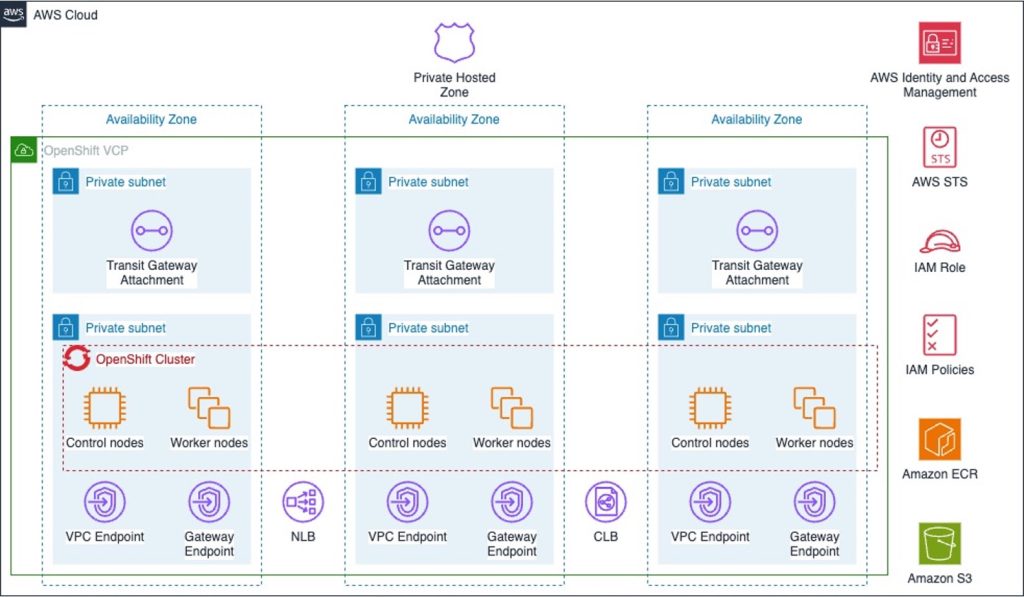
Figure 2. Highly-available OpenShift cluster on a restricted Amazon VPC network.
Controlling North-South traffic with AWS Network Firewall
Review the Red Hat documentation to setup your firewall with granular control rules. You must grant access to certain AWS service endpoints, allowing OpenShift to access the services that it requires to function. The list below shows the domains we’ve granted access to with our AWS Network Firewall configuration (figure 3):
- .amazon.com
- .amazonaws.com
- .cloudfront.net
- redhat.io
- redhat.com
- .quay.io
- redhat.com
- redhat.com
- .api.openshift.com
- .openshiftapps
- access.redhat.com
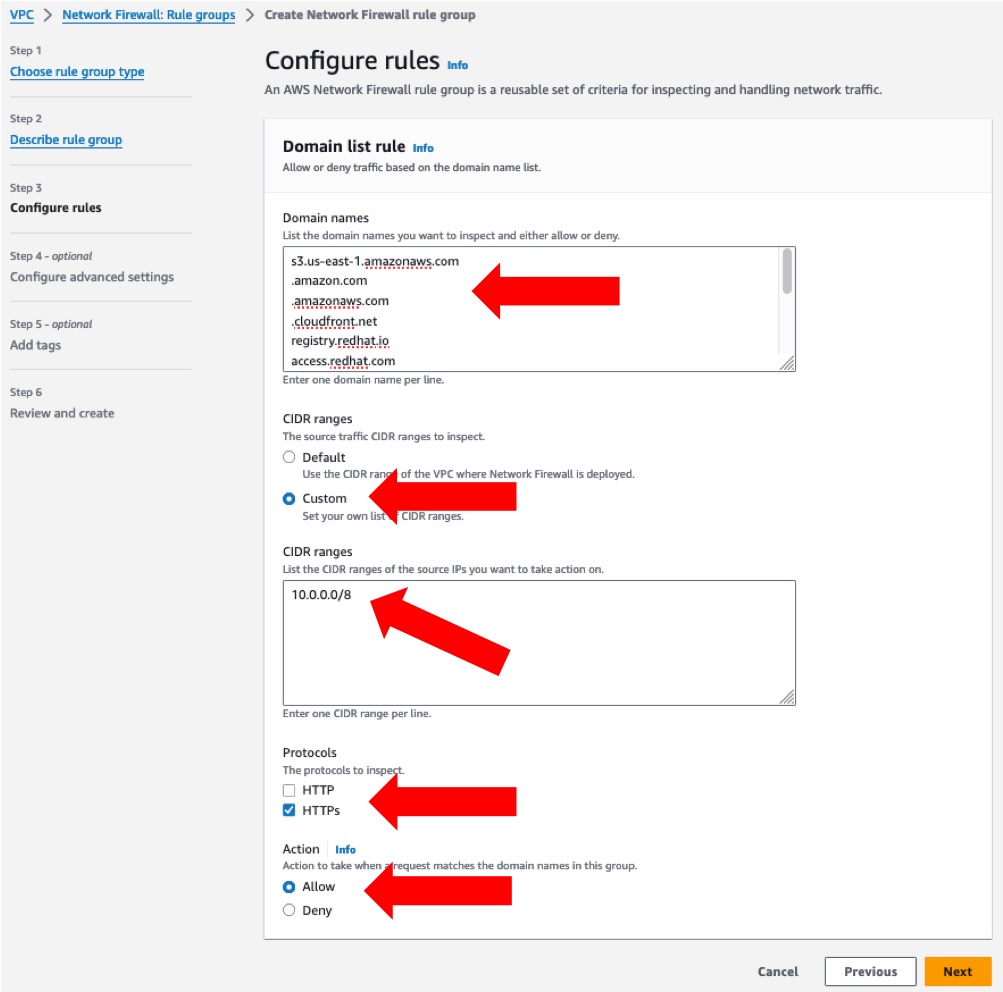
Figure 3. AWS Network Firewall Stateful domain list rule, allowing access to AWS service.
If you need to implement a more restricted network setup, create additional VPC endpoints to communicate with AWS services privately from your Amazon VPCs . Review the list of AWS services that integrate with AWS PrivateLink, as not all AWS service endpoints are available as private endpoints. For those, you will need to configure AWS Network Firewall rules.
The following AWS blog post discusses how to connect your Amazon VPCs using AWS Transit Gateway. AWS CloudFormation template examples demonstrating how to setup AWS Network Firewall are available through the AWS Samples GitHub repository.
Now that we have an understanding of the underlying restricted networking requirements, let’s start building.
Cost
You’re responsible for the cost of the AWS services used when deploying OpenShift in your AWS account. For cost estimates, see the pricing pages for each AWS service you use.
Prerequisites
This part of the blog post assumes familiarity with Amazon Elastic Compute Cloud (Amazon EC2), Amazon Elastic Block Store (EBS), Amazon VPC, Amazon Route 53, IAM, Amazon Simple Storage Service(Amazon S3), AWS STS, AWS Command Line Interface (AWS cli), Amazon Elastic Container Registry (ECR), AWS Network Firewall, AWS Transit Gateway and OpenShift.
Tip for the day:
Increase the Amazon ECR Rate of PutImage requests quota to 50 or higher to avoid PutImage rate exceed errors. This can be done from the Service Quotas console, or by submitting a support request through AWS support.
Please review the pre-requisites to install OpenShift on AWS and follow the security best practices in AWS IAM before deploying OpenShift in your environment.
You’ll need access to an AWS account with permissions to create the resources described in the installation steps section, an IAM role with the permissions described in the OpenShift documentation, and the Cloud Credential Operator utility documentation.
Additionally, you’ll need access to a Red Hat account to download your OpenShift pull secret from Red Hat OpenShift Cluster Manager.
The following software packages will need to be installed in your bastion host:
- AWS Command Line Interface (aws cli)
- OpenShift command-line interface (oc)
- Kubernetes command-line tool (kubectl)
- OpenShift Installer (openshift-install) for your target architecture (x86_64 or ARM).
- The Linux utilities (docker, jq)
Installation steps
We’re deploying OpenShift version 4.15 in the us-east-1 AWS region, but the same steps can be used with other OpenShift versions or AWS regions.
Download your OpenShift installation pull secret
1. Use your valid Red Hat credentials to log in and download your installation pull secret from the Red Hat OpenShift Cluster Manager (figure 4).
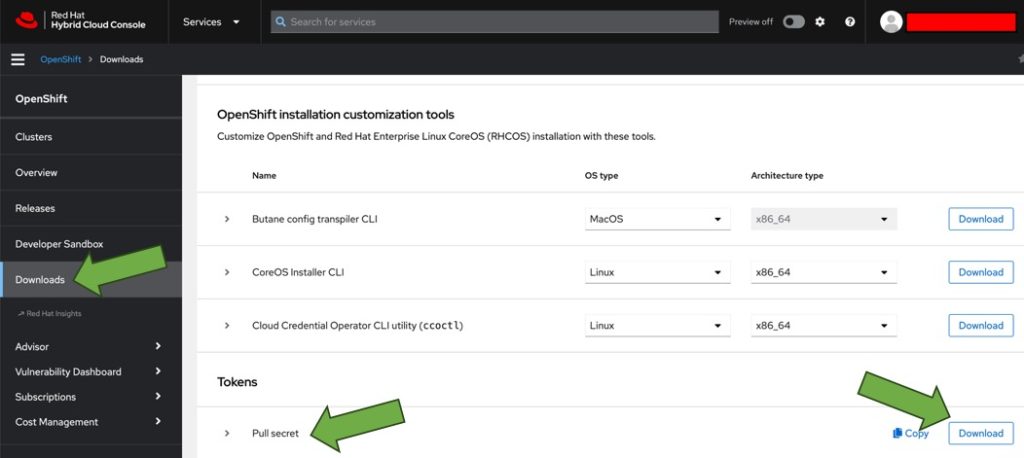
Figure 4. Download the OpenShift pull secret file.
IAM setup
2. Create an IAM policy named OpenShift-Restricted-Installer-Policy with the permissions described in the Red Hat documentation.
3. Next, create an IAM role:
- Select AWS service in the Trusted entity type
- Select EC2 In the Use case panel and click Next.
- Search and select the policies OpenShift-Restricted-Installer-Policy, AmazonSSMManagedInstanceCore, in the Permissions policies and click Next.
- Name the role OpenShift-Restricted-Installer-Role, and click Create role.
Amazon VPC setup
4. Create the Amazon VPCs listed below, as described in the Architecture Overview section of this blog:
- Egress-VPC
- Management-VPC
- OpenShift-VPC
Table 1 below, shows the configuration we’ve implemented for our Amazon VPCs:
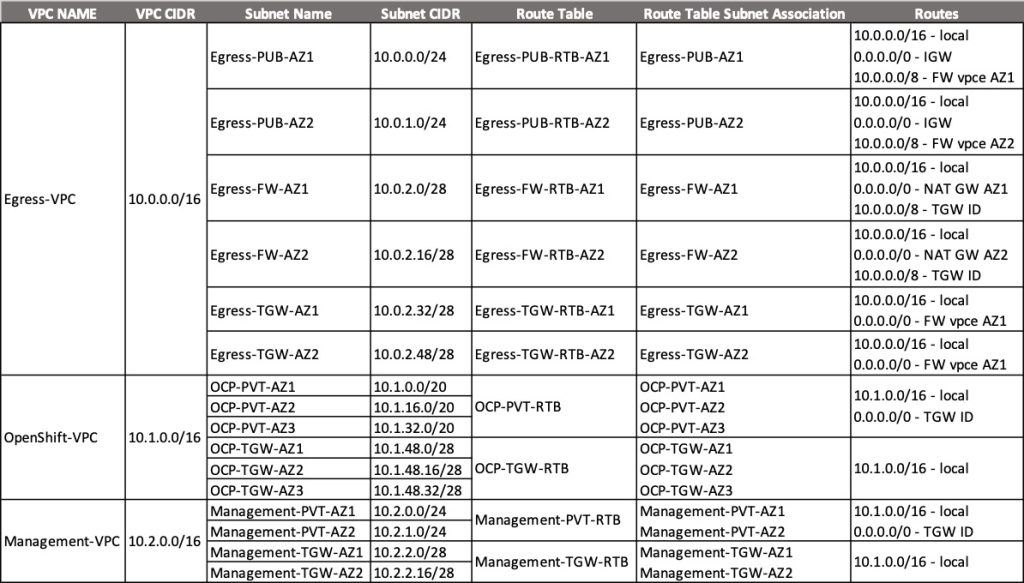
Table 1. Amazon VPCs configurations.
5. Create Gateway endpoints for Amazon S3 in the OpenShift and Management and then associate the endpoints with all the route tables created in your VPCs.
6. Create an AWS Transit Gateway to allow communication between the Amazon VPCs. Create the transit gateway attachments for the Egress and OpenShift VPCs, making sure Application mode support is enabled.
Table 2 below, shows the configuration we’ve implemented for our AWS Transit Gateway:

Table 2. Amazon Transit Gateway configurations.
7. Create a security group on the Management VPC, with and Inbound rule allowing incoming connections on port 443 (HTTPS), from that VPC’s CIDR block, example: 10.2.0.0/16.
8. Create the following VPC endpoints for AWS System Manager on the Management VPC, and assign the security group created on the previous step.
- ssm.us-east-1.amazonaws.com
- ssmmessages.us-east-1.amazonaws.com
- ec2messages.us-east-1.amazonaws.com
Consider enabling VPC Flow Logs as they can provide valuable network traffic insights and help with security analysis, troubleshooting, and optimizing network access rules.
Bastion Host setup
We’re using an Amazon EC2 instance with Amazon Linux 2023 as our bastion host.
9. Launch a new EC2 instance from the Amazon EC2 console:
- Under the Application and OS Images (Amazon Machine Image) box, choose Quick Start, and select Amazon Linux.
- From Amazon Machine Image (AMI), select Amazon Linux 2023 AMI for 64-bit (x86)
- From Instance type box, set the type to large.
- AWS Systems Manager Agent will be used to access our EC2 instances. So, we’re not creating a Key pair. You can choose to create one if required for your environment.
- Under the Network settings, set the Network to your Management VPC and select a subnet for your new instance. Don’t use the subnets used for the AWS Transit Gateway attachment.
- Create a new Security Group, or choose an existing one, with inbound SSH from the OpenShift VPC.
- Configure your storage size to 30 GB.
- Expand the Advanced details box and set the IAM instance profile value to the role OpenShift-Installer-Role, created on step 3.
- Click Launch instance in the Summary
10. Once your EC2 instance is in the Running state, connect to it using Session Manager and install the OpenShift CLI and installer utilities. Figure 5 shows the expected result:
$ sudo yum update -y $ sudo yum -y install jq docker
$ sudo usermod -a -G docker ec2-user
$ sudo wget -c https://mirror.openshift.com/pub/openshift-v4/x86_64/clients/ocp/4.15.10/openshift-client-linux.tar.gz -O - | sudo tar -xz -C /usr/local/bin/
$ sudo chmod +x /usr/local/bin/oc
$ sudo wget https://mirror.openshift.com/pub/openshift-v4/x86_64/clients/ocp/4.15.10/openshift-install-linux.tar.gz -O - | sudo tar -xz -C /usr/local/bin/
$ sudo chmod +x /usr/local/bin/openshift-install
$ oc version
$ openshift-install version
Figure 5. OpenShift utilities installed on the bastion host.
11. Upload the OpenShift pull-secret file, downloaded on step 1, to your bastion host and convert it to JSON (figure 6):
$ cat pull-secret | jq . > pull-secret.json
$ rm pull-secret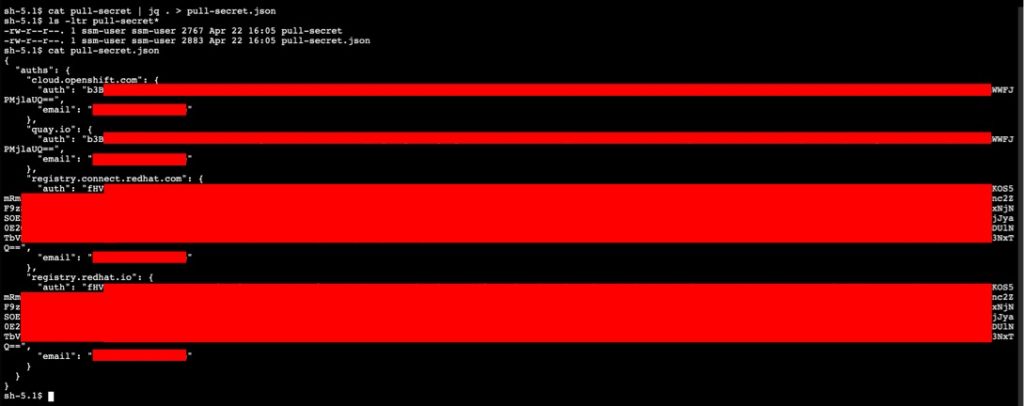
Figure 6. Convert the OpenShift pull-secret file to JSON in the bastion host.
12. Configure the aws cli in your bastion host:
$ aws configure
AWS Access Key ID [None]:
AWS Secret Access Key [None]:
Default region name [None]: us-east-1
Default output format [None]: json
13. Configure the shell environment on your bastion host:
$ export ACCOUNT_ID=$(aws sts get-caller-identity --output text | awk  '{print $1}')
$ TOKEN=$(curl --request PUT "http://169.254.169.254/latest/api/token" --header "X-aws-ec2-metadata-token-ttl-seconds: 3600")
$ export AWS_REGION=$(curl -s http://169.254.169.254/latest/meta-data/placement/region --header "X-aws-ec2-metadata-token: $TOKEN")
$ export OPENSHIFT_VPC_ID=$(aws ec2 describe-vpcs --filters "Name=tag:Name,Values=openshift*" --query "Vpcs[0].VpcId" --output text)
$ export MANAGEMENT_VPC_ID=$(aws ec2 describe-vpcs --filters "Name=tag:Name,Values=management*" --query "Vpcs[0].VpcId" --output text)
Amazon Route 53 setup
OpenShift requires a DNS service to deploy a cluster. In the steps below, we will create an Amazon Route 53 private hosted zone.
14. Run the commands below to create a private hosted zone:
$ export PVT_ZONE=myrestricetedocp.local
$ aws route53 create-hosted-zone --name ${PVT_ZONE} \
    --vpc VPCRegion=${AWS_REGION},VPCId=${OPENSHIFT_VPC_ID} \
    --caller-reference $(date "+%Y-%m-%d-%H:%M:%S") \
    --hosted-zone-config Comment="Restricted OpenShift Hosted Zone",PrivateZone=true
$ export PVT_ZONE_ID=$(aws route53 list-hosted-zones \
    --query "HostedZones[?Name == '${PVT_ZONE}.' ].Id" \
    --output text | cut -d '/' -f3)
$ aws route53 associate-vpc-with-hosted-zone \
    --hosted-zone-id $PVT_ZONE_ID \
    --vpc VPCRegion=$AWS_REGION,VPCId=$MANAGEMENT_VPC_ID
Amazon ECR setup
15. Create an Amazon ECR repository:
$ export REPOSITORY_NAME=openshiftregistry
$ aws ecr create-repository \
  --repository-name ${REPOSITORY_NAME} \
  --region ${AWS_REGION}
Mirror OpenShift container images to Amazon ECR
16. Retrieve your Amazon ECR authorization token:
$ ECR_TOKEN=$(aws ecr get-authorization-token --output text \
    --query 'authorizationData[].authorizationToken')
$ echo $ECR_TOKEN
17. Update the pull-secret.json file with the ECR_TOKEN value from the previous step. The file needs to have a new entry, as shown in figure 7 below:
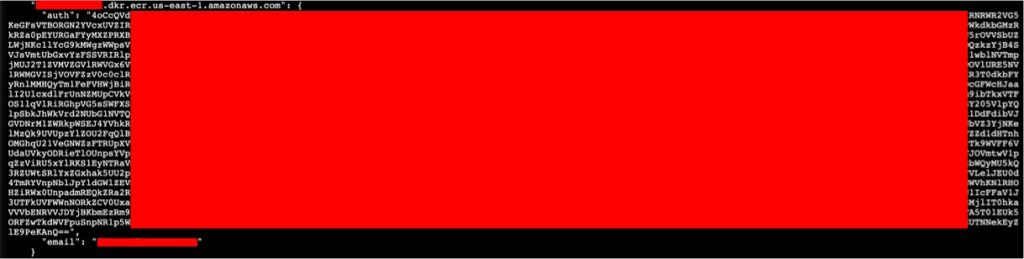
Figure 7. Updated pull-secret.json file with Amazon ECR repository information.
18. Set the following environment variables:
$ export CLUSTER_NAME="restricted-cl01"
$ export OCP_RELEASE="4.15.10"
$ export LOCAL_REGISTRY="${ACCOUNT_ID}.dkr.ecr.${AWS_REGION}.amazonaws.com"
$ export LOCAL_REPOSITORY="openshiftregistry"
$ export PRODUCT_REPO="openshift-release-dev"
$ export LOCAL_SECRET_JSON="/home/ec2-user/pull-secret.json"
$ export RELEASE_NAME="ocp-release"
$ export ARCHITECTURE="x86_64"
19. Mirror the OpenShift images and upload them to Amazon ECR:
$ oc adm release mirror -a ${LOCAL_SECRET_JSON} \
   --from=quay.io/${PRODUCT_REPO}/${RELEASE_NAME}:${OCP_RELEASE}-${ARCHITECTURE} \
   --to=${LOCAL_REGISTRY}/${LOCAL_REPOSITORY} \
   --to-release-image=${LOCAL_REGISTRY}/${LOCAL_REPOSITORY}:${OCP_RELEASE}-${ARCHITECTURE}
20. Copy the command output section as shown in figure 8 below. You will use these values later to create your OpenShift installation file in step 24.
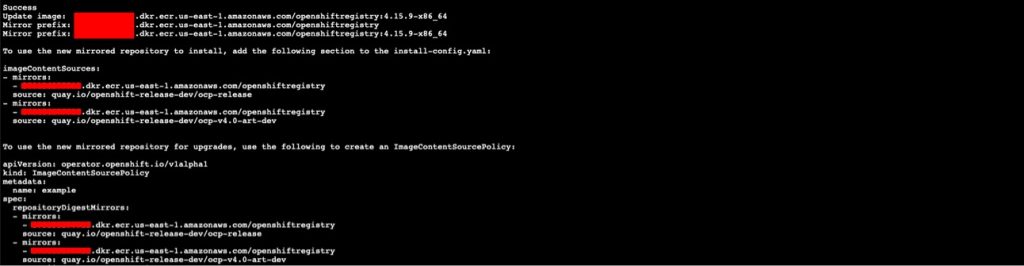
Figure 8. New mirrored image repository information.
Create the OpenShift cluster
21. Generate a SSH key pair to use for authentication onto your cluster nodes:
$ ssh-keygen -t ed25519 -N '' -f /home/ec2-user/.ssh/id_restricted_ocp
$ eval "$(ssh-agent -s)"
$ ssh-add /home/ec2-user/.ssh/id_restricted_ocp
22. Create a json string from your pull-secret file. You will use this value in step 24:
$ PULLSECRET=$(jq -c --arg account_id "$ACCOUNT_ID" --arg aws_region "$AWS_REGION" '{"auths": { "\($account_id).dkr.ecr.\($aws_region).amazonaws.com": .auths["\($account_id).dkr.ecr.\($aws_region).amazonaws.com"] }}' pull-secret.json)
$ echo $PULLSECRET
23. Create the install-config.yaml file for your cluster installation.
$ mkdir restricted-install
$ vim restricted-install/install-config.yaml
24. Add the necessary information to the install-config.yaml, such as:
- SSH key created on step 21.
- Select the AWS region where you are deploying the cluster. In our case us-east-1.
- The Amazon Route 53 domain created on step 14.
- Your Red Hat pull secret copied from step 22.
- Your compute and controlPlane
- Inform the OpenShift VPC CIDR in the machineNetwork
- Specify your OpenShift VPC subnet IDs to create the cluster nodes.
- Set the value of publish to Internal to create a private cluster.
- Add the imageContentSources information from step 20.
- Your installation file should look like the example below:
apiVersion: v1
baseDomain: myrestricetedocp.local
credentialsMode: Manual
controlPlane:
  architecture: amd64
  hyperthreading: Enabled
  name: master
  platform:
    aws:
      zones:
      - us-east-1a
      - us-east-1b
      - us-east-1c
      rootVolume:
        iops: 3000
        size: 350
        type: gp3
      metadataService:
        authentication: Optional
      type: m6i.xlarge
  replicas: 3
compute:
- architecture: amd64
  hyperthreading: Enabled
  name: worker
  platform:
    aws:
      zones:
      - us-east-1a
      - us-east-1b
      - us-east-1c
      rootVolume:
        iops: 3000
        size: 300
        type: gp3
      metadataService:
        authentication: Optional
      type: m6i.xlarge
  replicas: 3
metadata:
  name: restricted-cl01
networking:
  clusterNetwork:
  - cidr: 10.128.0.0/14
    hostPrefix: 23
  machineNetwork:
  - cidr: 10.1.0.0/16
  networkType: OVNKubernetes
  serviceNetwork:
  - 172.30.0.0/16
platform:
  aws:
    region: us-east-1
    subnets:
    - <<subnet-id-us-east-1a>>
    - <<subnet-id-us-east-1b>>
    - <<subnet-id-us-east-1c>>
    hostedZone: <<ROUTE_53_HOSTED_ZONE_ID>>
publish: Internal
pullSecret: '{"auths":{"123456789012.dkr.ecr.us-east-1.amazonaws.com":{"auth":"QVdTOmV5E56RTROelkyT0RZMmZRPT0…","email":"<<YOUR_EMAIL_ADDRESS>>"}}}'
sshKey: |
  ssh-ed25519 AAAAC3NzaC1lZDI1NTE5AAAAIGBr+LPglhKEkI8mrTGuT65UR/aR/073efmVTrh9qZb5 ec2-user@ip-10-2-0-66.ec2.internal
imageContentSources:
- mirrors:
  - 123456789012.dkr.ecr.us-east-1.amazonaws.com/openshiftregistry
  source: quay.io/openshift-release-dev/ocp-release
- mirrors:
  - 123456789012.dkr.ecr.us-east-1.amazonaws.com/openshiftregistry
  source: quay.io/openshift-release-dev/ocp-v4.0-art-dev
More details about the OpenShift installation file and parameters can be found in the Sample customized install-config.yaml file for AWS documentation. Refer to the Red Hat documentation to define the value of kmsKeyARN with an AWS Key Management Service (AWS KMS) key to encrypt your Amazon EBS instance volumes.
25. Obtain the OpenShift release image and update its value by replacing io with your Amazon ECR repository:
$ RELEASE_IMAGE=$(openshift-install version | awk '/release image/ {print $3}' | sed "s/quay\.io\/openshift-release-dev\/ocp-release/${ACCOUNT_ID}\.dkr\.ecr\.${AWS_REGION}\.amazonaws\.com\/openshiftregistry/")
$ aws ecr get-login-password --region ${AWS_REGION} | docker login --username AWS --password-stdin ${ACCOUNT_ID}.dkr.ecr.${AWS_REGION}.amazonaws.com
$ CCO_IMAGE=$(oc adm release info --image-for='cloud-credential-operator' $RELEASE_IMAGE | sed "s/quay\.io\/openshift-release-dev\/ocp-v4\.0-art-dev/${ACCOUNT_ID}\.dkr\.ecr\.${AWS_REGION}\.amazonaws\.com\/openshiftregistry/")
26. Extract the ccoctl binary from the CCO container image.
$ oc image extract $CCO_IMAGE --file="/usr/bin/ccoctl" \
    -a /home/ec2-user/pull-secret.json
$ sudo mv ccoctl /usr/local/bin/
$ sudo chmod +x /usr/local/bin/ccoctl
27. Extract the list of Credentials Request objects from the OCP release image:
$ mkdir credreqs
$ oc adm release extract --cloud=aws \
    --credentials-requests $RELEASE_IMAGE --to=./credreqs
28. Run the ccoctl command below to generate:
- Public and private ServiceAccount signing keys.
- An IAM Identity Provider and an Amazon S3 bucket, with public read-only access, for the OIDC configuration.
- IAM Roles for each AWS CredentialsRequest file extracted above.
- Files needed by the OpenShift installer, in the output folder.
$ ccoctl aws create-all --create-private-s3-bucket \
   --name "${CLUSTER_NAME}-creds-${AWS_REGION}" \
   --region ${AWS_REGION} --credentials-requests-dir ./credreqs \
   --output-dir _output
29. Create the OpenShift installation manifest files:
$ openshift-install create manifests --dir ./restricted-install30. Copy the manifests and private key generated by cccoctl in the step above, to the OpenShift installation folder:
$ cp ./_output/manifests/* ./restricted-install/manifests/
$ cp -a ./_output/tls ./restricted-install
31. Trigger the cluster creation. At the end of the cluster creation process, it’ll prompt for the OpenShift cluster console and its admin credential.
$ cd ~/restricted-install
$ openshift-install create cluster --log-level=debug
32. View the installation progress from the installation log:
$ tail -f .openshift_install.log33. View the installation image pull source, version, and status. Example outputs can be seen in figure 9:
$ export KUBECONFIG=auth/kubeconfig
$ oc get node
$ oc get clusterversion
$ oc get clusteroperators.config.openshift.io
34. The installer will run for approximately 30 minutes. The OpenShift cluster URL and the kubeadmin credentials will be displayed at end of the installation process (figure 9).

Figure 9. OpenShift cluster URL and credentials.
35. Run the command below to log in to the OpenShift cluster console using the kubeadmin user. Figure 10 shows the expected output:
$ oc login https://api.restricted-cl01.myrestrictedocp.local:6443 --username kubeadmin --password <<KUBEADMIN_PASSWORD>>
$ oc get pods -n openshift-console
Figure 10. Accessing the OpenShift cluster with the kubeadmin credentials.
Congratulations! You successfully completed the installation of OpenShift on AWS in a restricted network.
Post installation considerations
Handling the OperatorHub in a Restricted VPC
In a restricted Amazon VPC, the Operator Lifecycle Manager (OLM) cannot access Red Hat-provided OperatorHub sources. Disable the default Operator catalogs and mirror the necessary OperatorHub content locally, pushing it to a mirror registry. This setup allows your cluster to discover and install Operators without needing direct internet access.
36. Disable the sources for the Operator catalogs:
$ oc patch OperatorHub cluster --type json \
    -p '[{"op": "add", "path": "/spec/disableAllDefaultSources", "value": true}]'
Follow the Red Hat documentation to mirror the Operator catalog for your setup on AWS.
Updating Clusters in a Restricted VPC
Cluster updates in a restricted Amazon VPC require a mirror registry accessible to your Amazon VPCs. Configure the OpenShift Update Service (OSUS) locally to provide recommended updates, mirroring the connected cluster experience. Ensure your mirror registry has the necessary images and resources to support updates. For a more hands-on approach, consider using the OpenShift CLI for updates, keeping in mind the prerequisites for each method.
Additional security controls
If your OpenShift cluster workloads will be exposed to the internet, consider using the AWS Load Balancer Operator and AWS Web Application Firewall (AWS WAF) to protect against common web exploits. Use AWS Certificate Manager to simplify SSL/TLS certificate provisioning and management.
Integrate AWS Secrets Manager with the Secrets Store CSI Driver Operator in your OpenShift cluster. This allows you to manage, retrieve, and rotate database credentials, application credentials, API keys, and other secrets, enhancing your security posture.
Regularly scan your container images for vulnerabilities using tools like Amazon Inspector or third-party solutions.
Utilize AWS Security Hub to aggregate security alerts and automate security checks across multiple AWS accounts, providing a comprehensive view of your security posture.
Implement AWS GuardDuty for threat detection to monitor for malicious activity and unauthorized behavior, adding another layer of security to your environment.
Cleanup
1. Log in to the bastion host and run the command below from the installer directory to destroy the cluster and delete the AWS resources created by ccoctl:
$ cd /home/ec2-user/restricted-install
$ openshift-install destroy cluster
$ ccoctl aws delete --name="${CLUSTER_NAME}-creds-${AWS_REGION}" --region ${AWS_REGION}
2. Follow the Amazon EC2 documentation to terminate your bastion host.
3. Follow the documentation below to delete your AWS Transit Gateway resources:
4. Delete the Amazon Route 53 Private Hosted Zone.
5. Use the links below to delete your AWS Network Firewall resources:
6. Delete your Amazon VPC resources following the documentation below:
- Interface endpoints
- NAT gateways
- Amazon VPCs (OpenShift, Management and Egress)
Summary
In this blog post, you have learned how to install a Red Hat OpenShift Container Platform cluster in a restricted Amazon VPC network to comply with regulatory requirements and organizational controls.
This setup can help you meet your security requirements by implementing granular security controls for your network topology, restrict access to a private local Amazon ECR registry, and use temporary, short term access to resources in your AWS account with AWS STS.
Visit the Red Hat OpenShift offers on the AWS Marketplace:
Further content:
- Red Hat Solutions on AWS
- Red Hat OpenShift Service on AWS (ROSA) YouTube playlist
- OpenShift Virtualization on Red Hat OpenShift Service on AWS (ROSA)
- Fine-grained IAM roles for Red Hat OpenShift Service on AWS (ROSA) workloads with STS
- Benefits of OpenShift with STS
- Red Hat OpenShift Service on AWS: private clusters with AWS PrivateLink