Artificial Intelligence
Accelerate campaign workflow with insights from Adobe Marketing Agent for Amazon Quick
Amazon Quick and Adobe Marketing Agent help marketing teams access campaign insights within governed conversations in seconds. Marketers can ask questions about campaign performance, audiences, journeys, campaign conflicts, and content performance in natural language. Amazon Quick provides the chat experience and action orchestration. Adobe provides marketing-domain analysis to the approved data sources behind those questions.
This post shows how to enable Adobe Marketing Agent for Amazon Quick using a Model Context Protocol (MCP). We walk you through how to configure the integration, authenticate using your Adobe credentials, and get the latest insights in Amazon Quick. The sample workflow returns audience rankings, loyalty segment summaries, journey usage, and conflict recommendations.
Overview: Adobe Marketing Agent for Amazon Quick
Amazon Quick integrations connect external applications and services to AI-powered analysis and automation. With MCP integrations, Amazon Quick connects to remote MCP servers, discovers exposed tools, and registers selected tools as actions. An assistant can call those actions during a conversation. In this solution, the Adobe Marketing Agent exposes marketing tools. The tools cover audience ranking, loyalty analysis, journey lookup, conflict analysis, and content performance summaries.
The following architecture shows the end-to-end request flow. A marketer asks a campaign planning question in Amazon Quick. The chat agent selects an approved action from the Adobe Marketing Agent integration. The MCP server validates the request and queries authorized Adobe marketing data. Amazon Quick renders the response as an answer, table, chart, or recommendation. Apply governance controls across the flow, including least privilege, tenant isolation, audit logging, schema versioning, and human review for launch decisions.
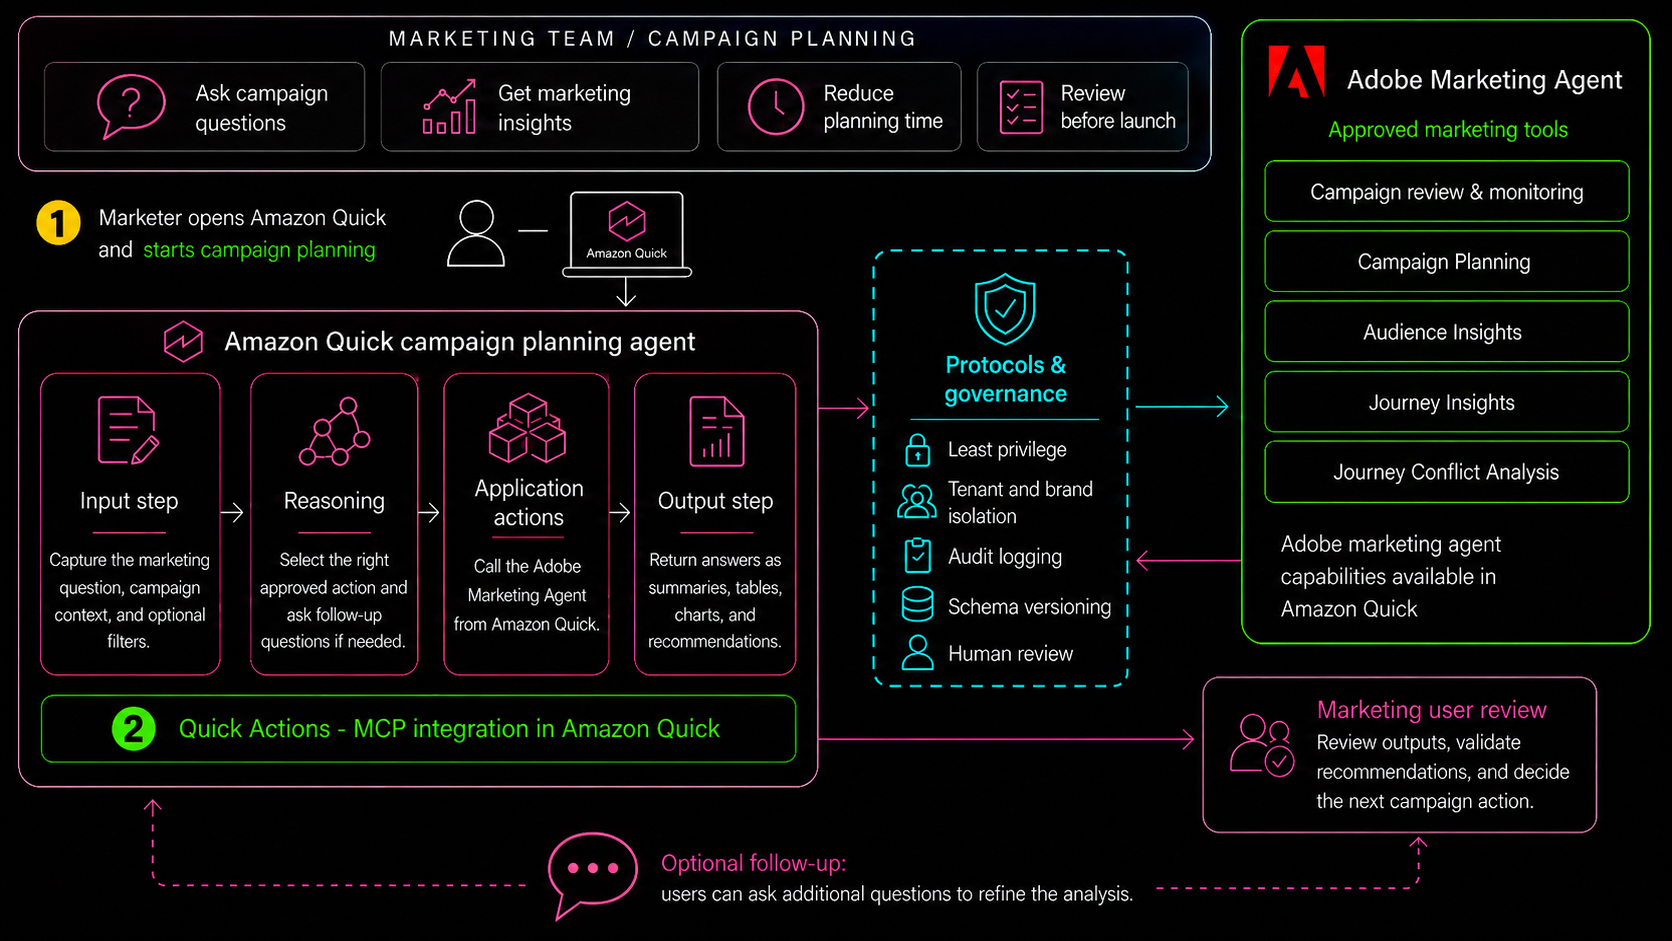
Figure 1. Architecture for connecting Adobe Marketing Agent to Amazon Quick using MCP.
The workflow has four parts:
- An Amazon Quick administrator creates the Adobe Marketing Agent integration using the branded connector tile or the generic MCP setup path.
- Amazon Quick discovers the MCP tools and registers selected tools as actions.
- A custom chat agent uses those actions to answer marketing questions in natural language.
- Marketing users review the output before using it in campaign planning or launch decisions.
The Adobe Marketing Agent actions provide following capabilities:
- Campaign review & monitoring enables marketers to visualize campaign metrics that inform campaign review and monitoring workflows.
- Campaign Planning enables marketing teams to access insights about campaign such as reach and past campaign performance to inform future campaign decisions.
- Audience Insights enables marketers to gather audience insights such as profile size, frequently changing audiences, overlap between audiences and identify attributes to grow campaign reach.
- Journey Insights enables marketers to access existing journey insights to monitor for business outcomes and inform strategies for corrective action that drive towards intended results.
- Journey Conflict Analysis enables marketers to quickly surface existing journey conflicts that need to be addressed before go-live and avoid conflicting customer experiences and optimize towards campaign outcomes.
Prerequisites
Before you configure the Adobe Marketing Agent integration, you must complete the following prerequisites.
- Verify that you have access to Amazon Quick, your Adobe organization, your identity provider, and an Adobe-provided Adobe Marketing Agent MCP endpoint with required authentication details. For Adobe-side entitlement and agent access requirements, refer to Adobe Experience Platform Agent Orchestrator.
- Amazon Quick Enterprise subscription and permissions to create, review, share, and manage integrations and chat agents.
- Licensed one or more of the Adobe CX Enterprise products, including Adobe Real-Time CDP, Adobe Customer Journey Analytics, or Adobe Journey Optimizer.
- Licensed and provisioned Adobe Experience Platform Agent Orchestrator. Adobe provides MCP endpoints and tools.
- A governance plan for the Adobe Marketing Agent Model Context Protocol (MCP) integration. Your plan should cover the following:
- User or service authentication.
- Custom chat agent sharing permissions.
- Adobe Experience Platform access control for Adobe tenant, brand, and sandbox boundaries.
- MCP tool-invocation audit logs and monitoring.
- Human review for launch-impacting recommendations.
- Retention rules for MCP request metadata and generated artifacts such as tables, charts, and recommendations.
The estimated setup time is 45–60 minutes after the MCP endpoint, credentials, and pilot users are ready. Costs depend on your Amazon Quick subscription, Adobe licensing, and the infrastructure that hosts the MCP server.
Implementation: Connect the Adobe Marketing Agent to Amazon Quick
In this section, you connect Adobe Marketing Agent to Amazon Quick, create a focused chat agent, and validate the workflow with read-only prompts. The screenshots use sample marketing data and show the user experience after the integration is available in Amazon Quick.
Step 1: Connect the Adobe Marketing Agent integration
You can find Adobe Marketing Agent as a branded connector tile in the Amazon Quick Integrations console.
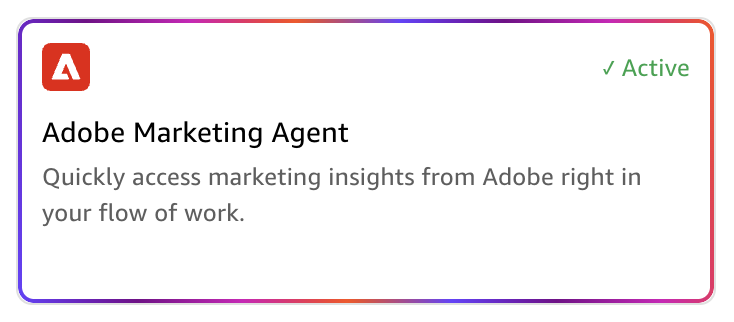
Figure 2. Adobe Marketing Agent tile in the Amazon Quick Integrations console.
To create the integration
- Open the Amazon Quick console and choose Connectors.
- Choose Create for your team.
- Choose Adobe Marketing Agent.
- On the Adobe Marketing Agent connection details page, enter a descriptive name, such as Adobe Marketing Agent. Optionally, add a description for the marketing workflow.
- For Connection type, select Public network. For Auth configuration, select Default OAuth app. With the branded connector, Amazon Quick shows that no additional credentials are needed.
- Choose Next.
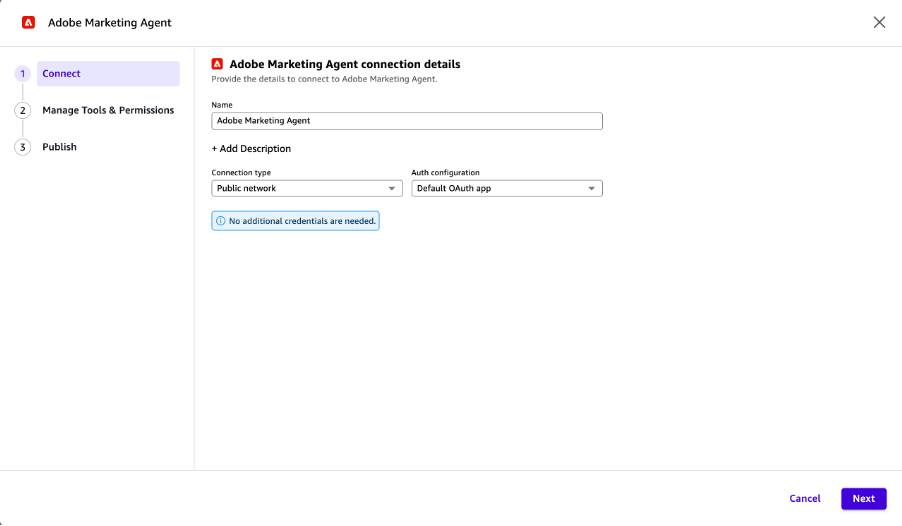
Figure 3. Adobe Marketing Agent connection details in Amazon Quick.
To manage tools and permissions
- On the Manage Tools & Permissions page, review the access level defaults.
- For the first pilot, choose Always ask so each action requires explicit user approval before it runs.
- Expand Write Operations and Read Operations, and review the actions exposed by the Adobe Marketing Agent connector.
- Keep write operations set to Always ask for the pilot. Use read operations for the validation prompts in later steps.
- Choose Next.
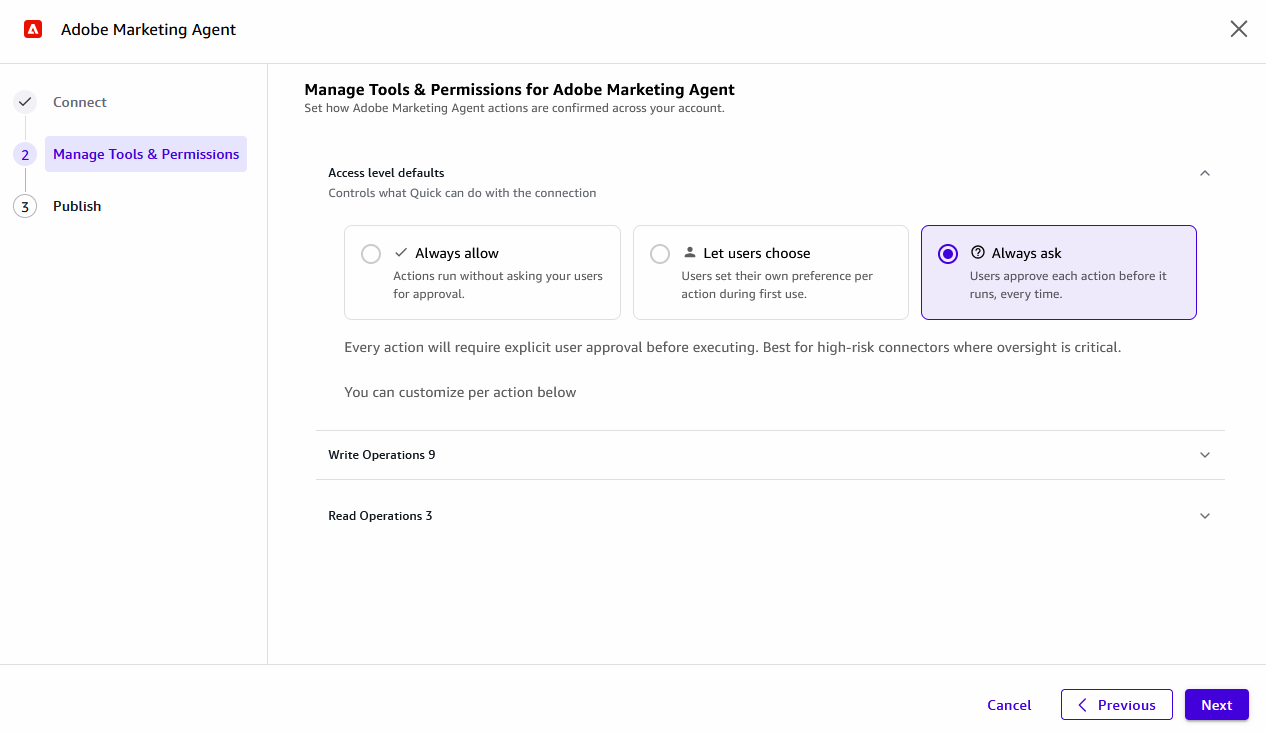
Figure 4. Tool approval settings for Adobe Marketing Agent actions.
To publish and authorize the connection
- On the Publish connection page, choose who can access the connection.
- Keep Everyone in your organization turned off unless the connector is approved for organization-wide use.
- Under Specific groups, enter the team or group that should use the connection, and choose Add.
- Choose Publish. The Adobe authorization window opens after you publish the connection.
- In the Adobe authorization window, review the requested access. In this example, the request includes access to basic profile information, email address, Adobe organization data, and Adobe Experience Platform data. For Adobe-side user permissions and sandbox access, refer to Access control overview.
- Choose Allow Access to complete authorization.
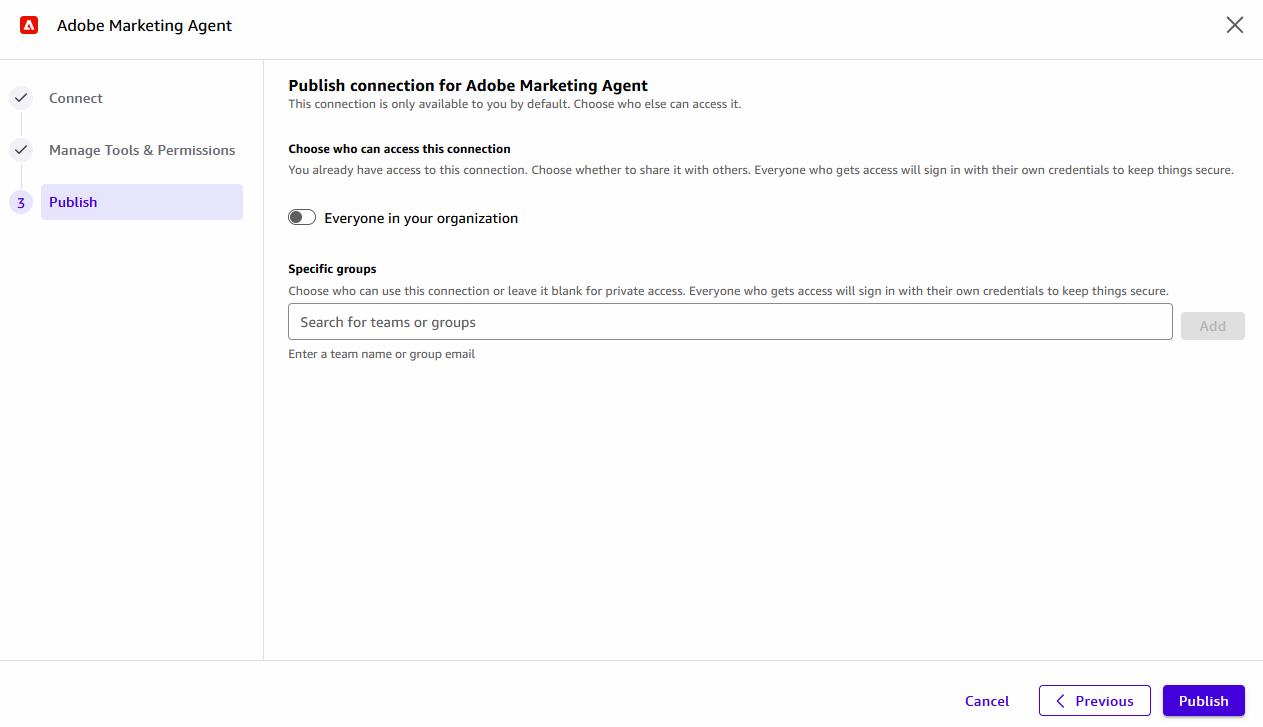
Figure 5. Publish settings for sharing the Adobe Marketing Agent connection.
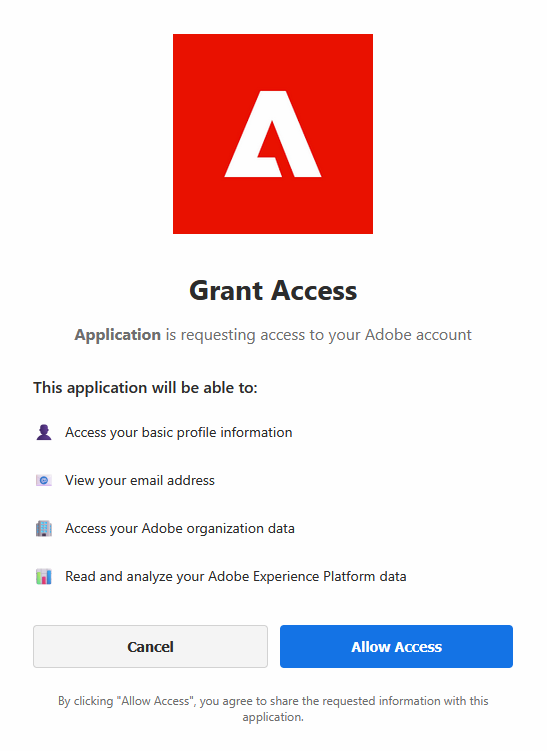
Figure 6. Adobe authorization request for the Adobe Marketing Agent connection.
After authorization completes, the Adobe Marketing Agent connection is published and ready to use in a custom chat agent. In the next step, you create the campaign planning chat agent and link it to the Adobe Marketing Agent actions.
Step 2: Create the campaign planning chat agent
Create a focused chat agent instead of a general-purpose marketing assistant. A narrow campaign planning agent is easier to test, explain, and govern.
- Navigate to Chat agents and choose Create chat agent.
- Add the agent name Adobe Marketing Agent and a short description for the pilot workflow.
- In the actions section, choose Link existing integration and select the Adobe Marketing Agent actions created in Step 1.
- Add the agent instructions shown in the following example. You can add to or modify the instructions based on your specific analysis needs.
- Preview the agent, test each approved prompt, and launch it only after the answers match your acceptance criteria.
Step 3: Open the chat agent and run the following query
Open the chat agent from Amazon Quick. Figure 7 shows the Adobe Marketing Agent selected in the chat experience. Use it to verify authentication, tool discovery, data retrieval, artifact rendering, and the natural language response without changing campaign state.
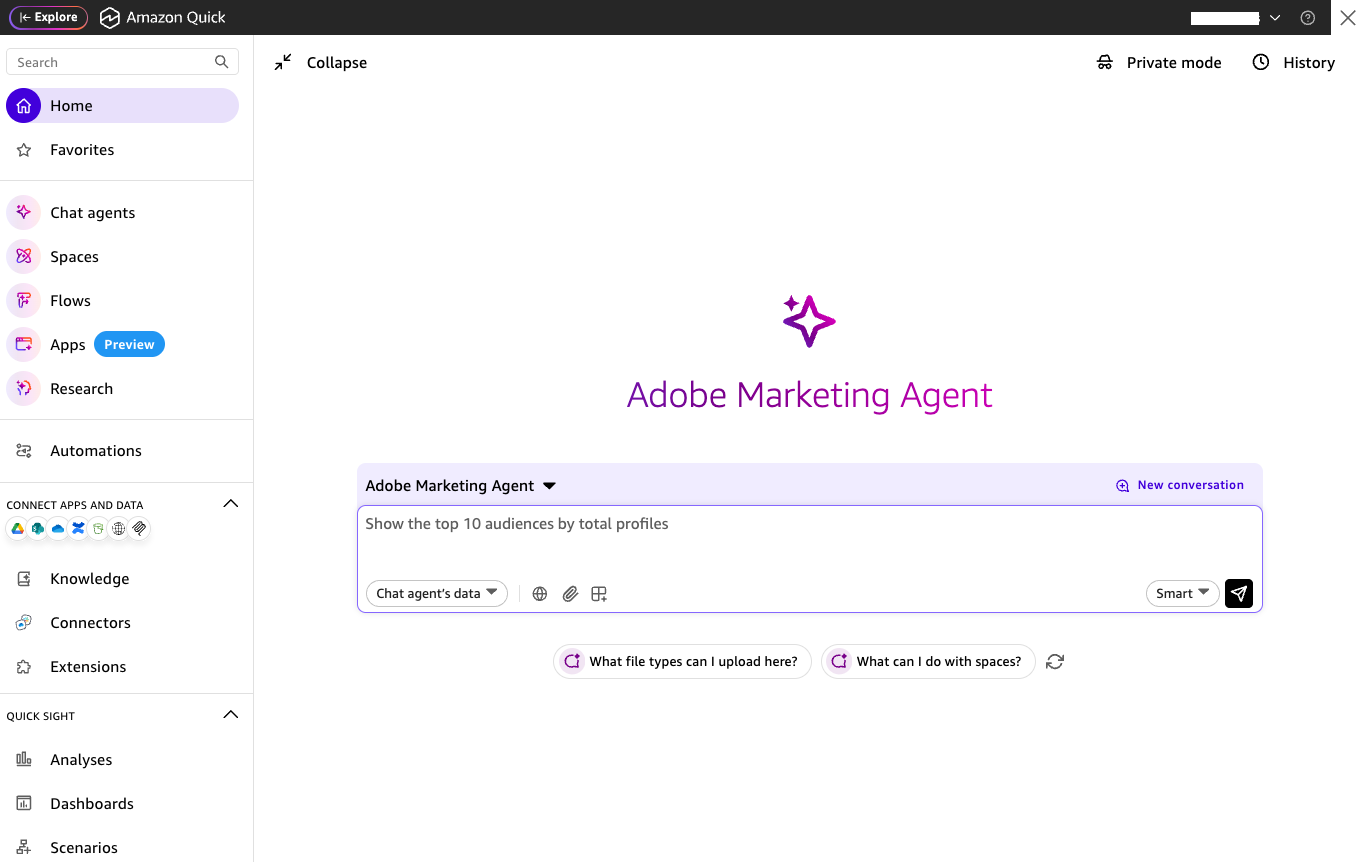
Figure 7. Amazon Quick chat experience with Adobe Marketing Agent selected.
Send the following prompt to the chat agent:
Step 4: Validate audience ranking output
When you enter the prompt for top audiences by total profiles, Amazon Quick invokes the Adobe Marketing Agent audience-ranking action through MCP. Figure 8 shows the response with a bar chart, a smaller chart in the chat panel, and key insights for the marketer.
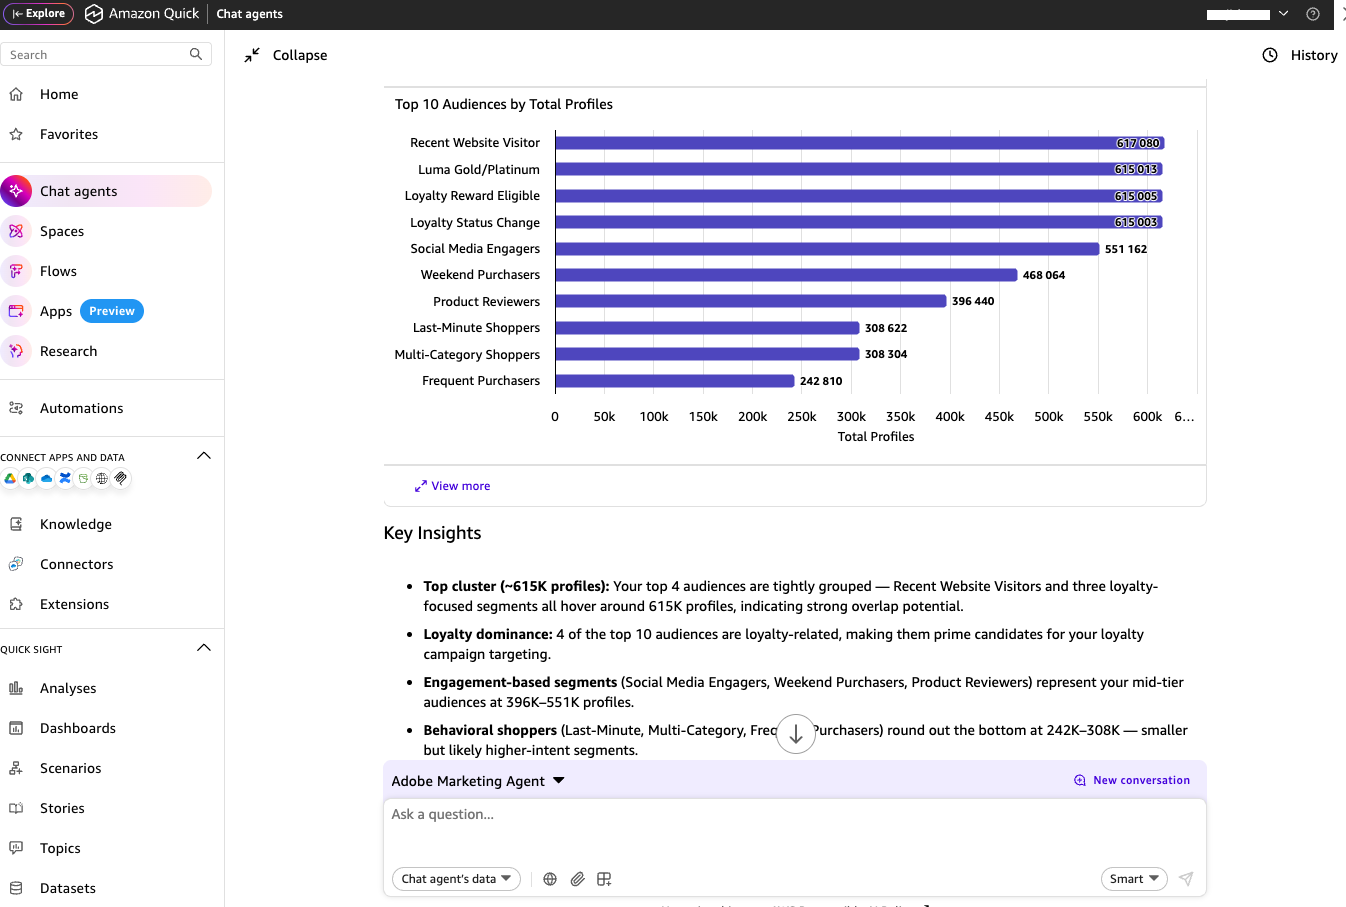
Figure 8. Top audiences by total profiles and generated key insights.
Step 5: Analyze loyalty audience segments
After the top-audience view works, validate a follow-up prompt that narrows the analysis to loyalty audiences. The agent should reuse conversation context where appropriate. It should call the loyalty-segment action and explain overlap assumptions when summed audience counts can overstate unique reach.
Send a prompt like the following:
The following figure shows the loyalty audience distribution and segment-level observations returned in Amazon Quick.
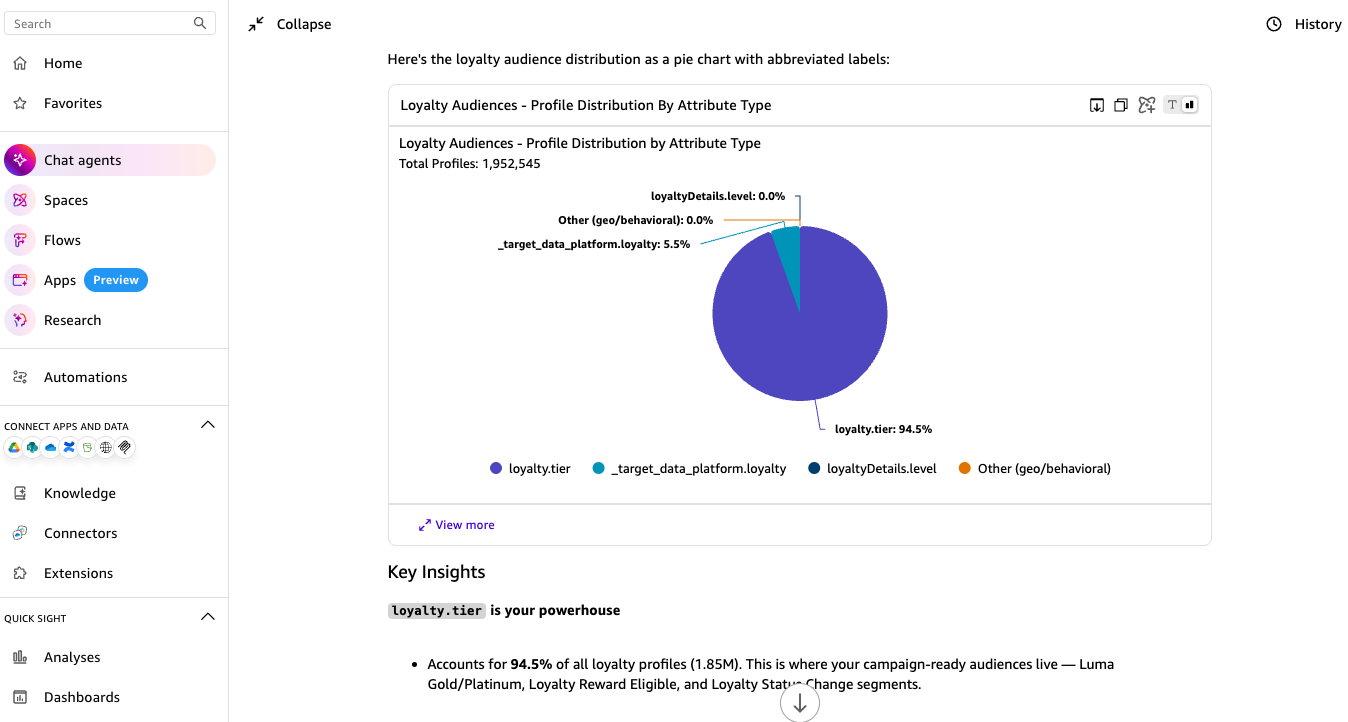
Figure 9. Loyalty audience distribution and segment insights.
Step 6: Analyze journeys that use loyalty audiences
Next, ask which journeys use loyalty audiences. This validates that the Adobe Marketing Agent can connect audience analysis with journey analysis. The response should return a table for marketing operations teams to review before launch.
Send a prompt like the following:
The following figure shows journeys that reference loyalty audiences. It includes the audience used, the loyalty attribute, and generated patterns. The output helps campaign teams identify repeated audience usage and potential campaign interactions before a new campaign goes live.
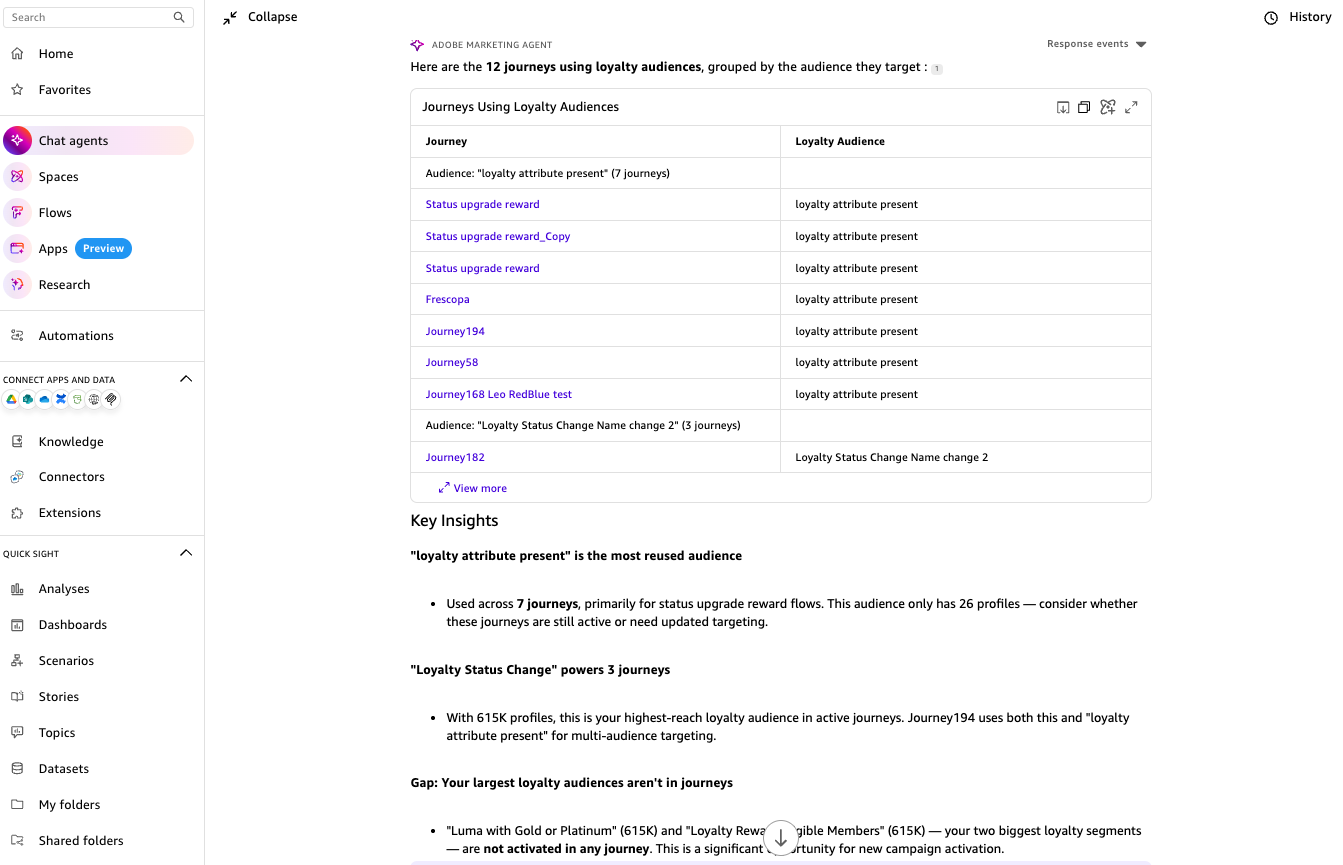
Figure 10. Journeys with loyalty audiences and generated pattern analysis.
Step 7: Review conflicts before launch
The final validation prompt asks the agent to summarize conflicts and recommendations for human review. Keep this action advisory for the first release. The agent can shorten the review cycle. Your organization’s approval process should control campaign launch decisions.
Send a prompt like the following:
The following figure shows a conflict summary with risk level, audience overlap, key observations, and coordination recommendations. In this sample, the output identifies a medium-risk conflict with 2.3 percent audience overlap. Reviewers should verify that the risk language, metric definitions, and recommendations match your marketing governance standards.
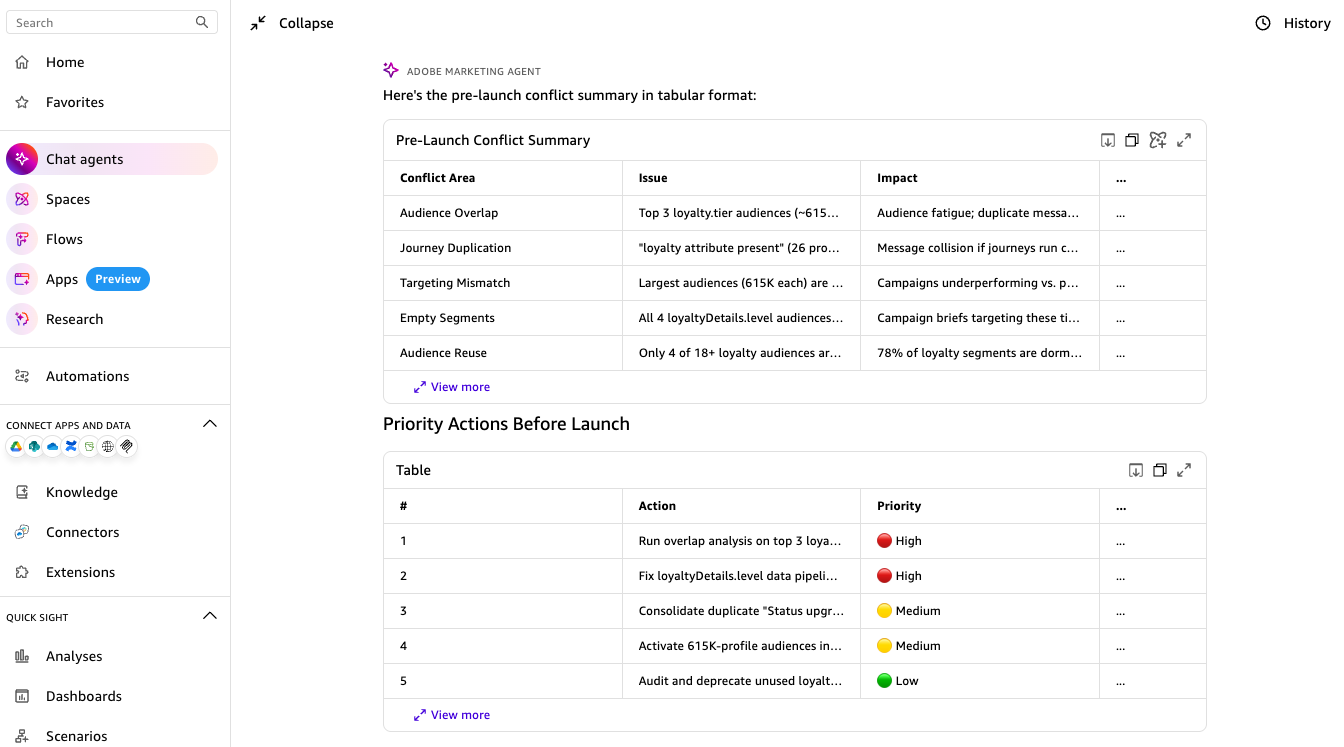
Figure 11. Conflict summary and recommended coordination strategy.
Step 8: Launch, share, and support the workflow
After the validation prompts meet your acceptance criteria, launch the chat agent and share it with approved pilot users or groups. Launching makes the agent available in the chat agent library, and sharing controls which users can use it. For instructions, see Custom chat agents.
Security and governance considerations
Before you launch or share the chat agent, review the controls that protect Adobe data access, tool use, and campaign launch decisions. During the initial connection setup, use the Manage Tools & Permissions page to review the discovered Read Operations and Write Operations. For the pilot, turn on only the read actions needed for validation. Keep write actions turned off where possible, or set them to Always ask until your approval and rollback processes are tested. For more details, see Step 1 earlier in this post.
If Adobe provides a private Adobe Marketing Agent MCP server endpoint for your organization, Amazon Quick supports virtual private cloud (VPC) connectivity for MCP connections. During MCP setup, select the configured VPC connection, and confirm that the MCP server is reachable from your VPC. If the MCP server uses OAuth, the OAuth endpoints must still be reachable over the public internet.
Use Adobe permissions and sandbox access to enforce user, tenant, brand, region, and business-unit boundaries. Configure access in Adobe so the MCP server returns only the fields needed for the marketing task. For more information, refer to Access control overview and Sandboxes overview.
Require human approval for recommendations that affect campaign launch, targeting, audience suppression, personalization, or customer messaging. To capture chat conversations, user feedback, agent or research usage, and index storage usage, configure Monitoring Amazon Quick usage using CloudWatch Logs. You can deliver these logs to Amazon CloudWatch Logs, Amazon Simple Storage Service (Amazon S3), or Amazon Data Firehose. Retain logs according to your organization’s policy, and don’t log raw profile identifiers, customer identifiers, email addresses, phone numbers, IP addresses, access tokens, secrets, or restricted Adobe metadata.
Clean up resources
If you created a pilot integration, remove or disable it when testing ends. This removes operational noise and prevents access to tools that are no longer under review.
- In Amazon Quick, disable or remove the Adobe Marketing Agent actions from the pilot chat agent.
- Unshare the pilot chat agent and integration from pilot users and groups.
- Delete the MCP integration if you no longer need the Adobe Marketing Agent endpoint registered in Amazon Quick.
- Revoke OAuth clients, service credentials, bearer tokens, or test credentials created for the pilot.
- Remove pilot users from Adobe-side roles, brands, tenants, or business units that were created only for testing.
- Retain logs only for the period required by your organization’s security and compliance policy.
Conclusion
In this post, you configured a governed Adobe Marketing Agent integration for Amazon Quick using MCP. Amazon Quick provides the conversational workspace and action orchestration. Adobe Marketing Agent provides marketing-domain analysis for audiences, journeys, campaign conflicts, and content effectiveness. MCP provides the integration layer that lets Amazon Quick discover Adobe tools and call them as actions.
We recommend that you start with a narrow read-only workflow such as audience discovery or journey conflict review. Validate access control, data quality, response usefulness, and human-review steps before you add broader tools or write actions. For more information about MCP setup, refer to Model Context Protocol (MCP) integration in the Amazon Quick User Guide. For more details about the Adobe and AWS collaboration, refer to Accelerate customer experiences powered by Adobe and AWS agentic AI collaboration.
References and further reading
- Amazon Quick User Guide: Model Context Protocol (MCP) integration
- Amazon Quick User Guide: Work with integrations in Amazon Quick
- Amazon Quick User Guide: Custom chat agents
- AWS Partner Network Blog: Accelerate customer experiences powered by Adobe and AWS agentic AI collaboration