Artificial Intelligence
Add secure Web Search to Claude Desktop with Amazon Bedrock AgentCore
Claude Desktop on Amazon Bedrock provides powerful AI assistance, but without integrated web search, responses are limited to the model’s training knowledge cutoff. When you need current information, such as recent documentation updates, live pricing, or weather updates, the model can’t retrieve it on its own.
Amazon Bedrock AgentCore is a platform to build, connect, and optimize agents at scale, with any framework or model. With AgentCore Gateway, a capability of Amazon Bedrock AgentCore, you can close this knowledge cutoff gap by connecting Claude Desktop to Web Search. Web Search is a fully managed, Model Context Protocol (MCP)-compatible web search capability backed by an Amazon web index that spans tens of billions of documents. All query traffic stays within AWS infrastructure, with no external API keys to manage and no queries leaving your boundary.
With Claude Desktop, you can use managed MCP servers to connect to an AgentCore Gateway with the Web Search target enabled. In this post, we walk through the steps to set up this integration and use JSON Web Token (JWT)-based inbound authentication to secure the communication.
Architecture
Many enterprises running on AWS use AWS IAM Identity Center for single sign-on (SSO) access to their AWS accounts. In this walkthrough, we use AWS IAM Identity Center as the authentication source for the AgentCore Gateway. With this setup, Claude Desktop on Amazon Bedrock can invoke Web Search through a trusted, enterprise-managed identity flow. This approach aligns with existing organizational identity governance. No separate credentials or third-party identity providers are required.
To bridge AWS IAM Identity Center with the AgentCore Gateway JWT-based authentication, we use Amazon Cognito as a federation layer with the OAuth 2.0 authorization code grant flow. IAM Identity Center handles user authentication through Security Assertion Markup Language (SAML). Amazon Cognito issues JWTs, and the AgentCore Gateway validates them on each request. The entire authentication chain stays within AWS.
The following sequence diagram illustrates this authentication flow.
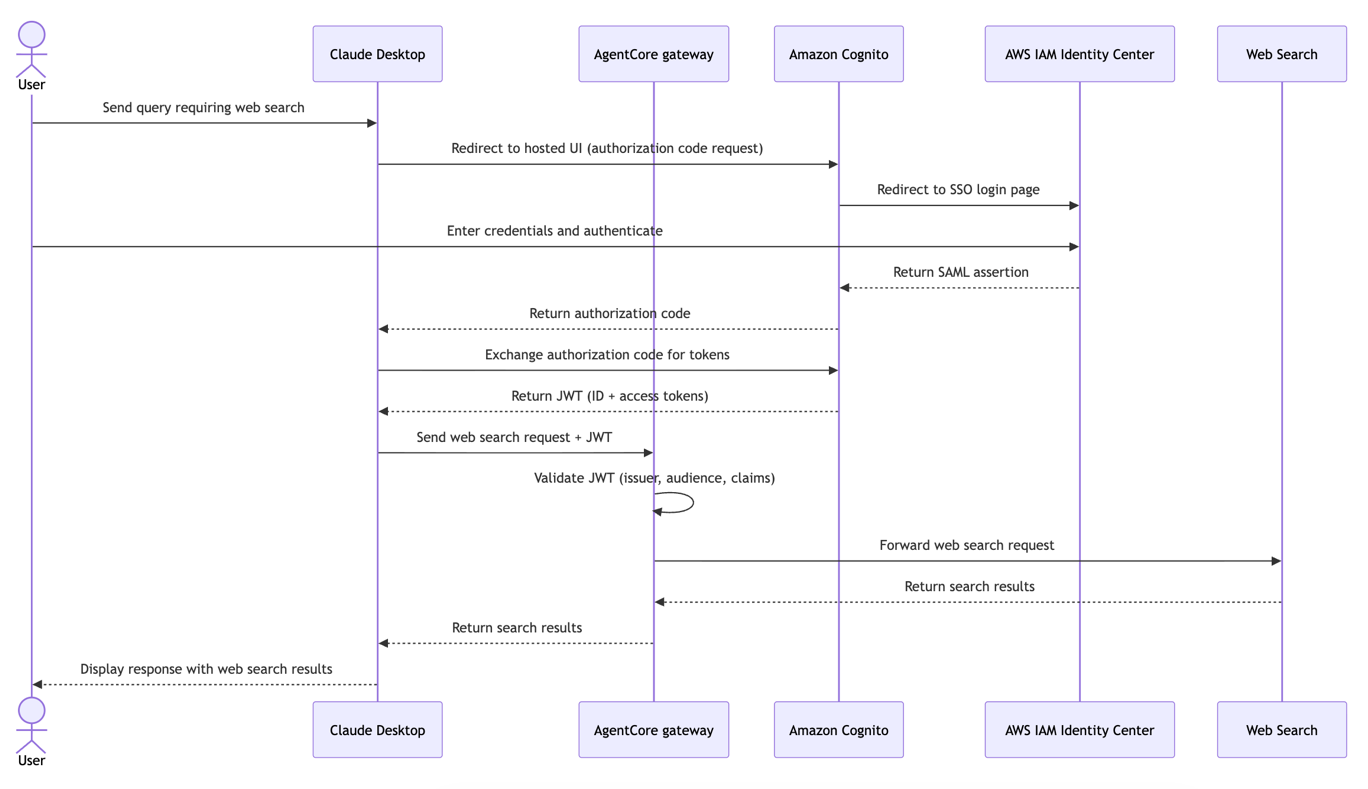
Figure 1: User authentication and authorization sequence diagram
Prerequisites
To follow along with the steps in this post, you need the following:
- An AWS account with permissions to create AWS Identity and Access Management (IAM) roles and Amazon Bedrock AgentCore resources.
- Admin access to your management account in AWS Organizations (for AWS IAM Identity Center configuration).
- AWS IAM Identity Center preconfigured for SSO access to AWS accounts.
- Claude Desktop set up with Amazon Bedrock as the inference provider.
- The AWS Command Line Interface (AWS CLI) v2 installed and configured.
- Python 3.10 or later.
- The Boto3 SDK updated to the latest version.
Web Search on Amazon Bedrock AgentCore is currently available in the US East (N. Virginia) AWS Region (us-east-1), Europe (Ireland) Region (eu-west-1), and Asia Pacific (Tokyo) Region (ap-northeast-1). Verify that your gateway is created in one of these Regions.
Configuration
The configuration involves setting up the authentication chain (AWS IAM Identity Center to Amazon Cognito to JWT) and then wiring the AgentCore Gateway into Claude Desktop. We walk through each step in the following section.
Step 1: Create an Amazon Cognito user pool
In your target AWS account, create an Amazon Cognito user pool that will serve as the OpenID Connect (OIDC) token issuer for the AgentCore Gateway.
Save these values for later steps:
- User Pool ID:
$USER_POOL_ID. - Domain:
<your-unique-prefix>.auth.<region>.amazoncognito.com. - Audience:
urn:amazon:cognito:sp:<user-pool-id>. - ACS URL:
https://<your-unique-prefix>.auth.<region>.amazoncognito.com/saml2/idpresponse.
Step 2: Configure IAM Identity Center SAML application
In your AWS Organizations management account, create a SAML application that federates with Cognito:
- Open IAM Identity Center console.
- Choose Applications, Add application, I have an application I want to set up, SAML 2.0, and then Next.
- Fill in the following details:
- Display name: AgentCore Web Search.
- Select Manually type your metadata value.
- ACS URL:
https://<your-unique-prefix>.auth.<region>.amazoncognito.com/saml2/idpresponse. - Audience:
urn:amazon:cognito:sp:<user-pool-id>.
- ACS URL:
- Download the SAML metadata XML file and choose Submit.
- After the application is created, edit the attribute mappings and insert the following values:
- Subject, ${user:subject}, Format: Persistent.
- Email, ${user:email}, Format: Basic.
- Assign the users or groups that would have access to Web Search.
Step 3: Wire SAML IdP into Cognito
Back in the target account, register IAM Identity Center as a SAML identity provider in your Cognito user pool:
Step 4: Create Cognito app client for Amazon Bedrock AgentCore
Create an app client with a client secret. Claude Desktop uses this client to initiate the OAuth flow, which authenticates the user through IAM Identity Center and obtains a JWT for the AgentCore Gateway:
Note the Client ID and Client Secret from the output. These are your application client ID and secret.
Step 5: Configure AgentCore Gateway with Web Search tool
In this step, we create a new AgentCore Gateway with Inbound Auth Type as JSON Web Tokens (JWT). For this configuration, we use the Cognito user pool ID and application client ID that were created in the prior steps.
Run the following Python script to create the gateway with the required configurations, replacing all placeholders with actual values from your environment.
You now have an AgentCore Gateway with Web Search tool, with JWT-based inbound authorization.
Step 6: Configure Claude Desktop
Use the steps in the Claude Desktop configuration documentation to access the configuration window for Claude Desktop with Amazon Bedrock. After you open it, choose Connectors and Extensions, then choose Add server, and then choose Blank.
The following screenshot shows the configuration window with these options.
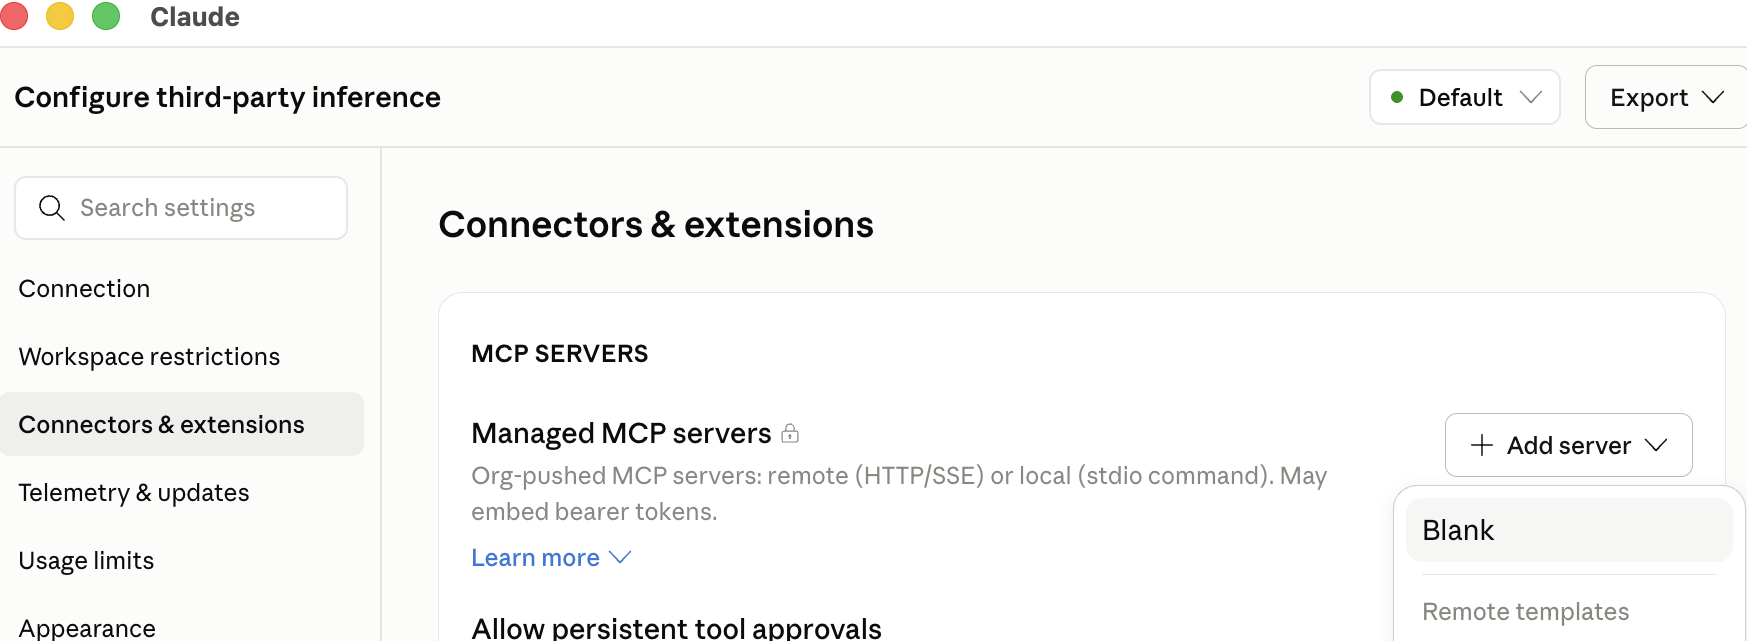
Figure 2: Claude Desktop connector configuration window
Enter the following details:
- Name: websearchtool.
- Transport: Streamable HTTP.
- URL: Enter the gateway resource URL for the AgentCore Gateway created in Step 5.
- OAuth: Bring your own client.
- Client ID: Enter the client ID for the app client created in Step 4.
- Client Secret: Enter the client secret for the app client created in Step 4.
- Authorization Server: Enter
["https://<your-unique-prefix>.auth.<region>.amazoncognito.com/oauth2/authorize"]. - Scope: openid.
- Callback host:
localhost. - Callback port: 53280.
When you’re done, choose sign in and test. This should open a browser for you to authenticate, redirecting you to your AWS IAM Identity Center SSO login. Enter your credentials to authenticate. If successful, you should see a message such as, “Authorization complete. You can close this tab and return to Claude.”
Back in Claude Desktop, you should see a successful MCP registration message like in the following image.
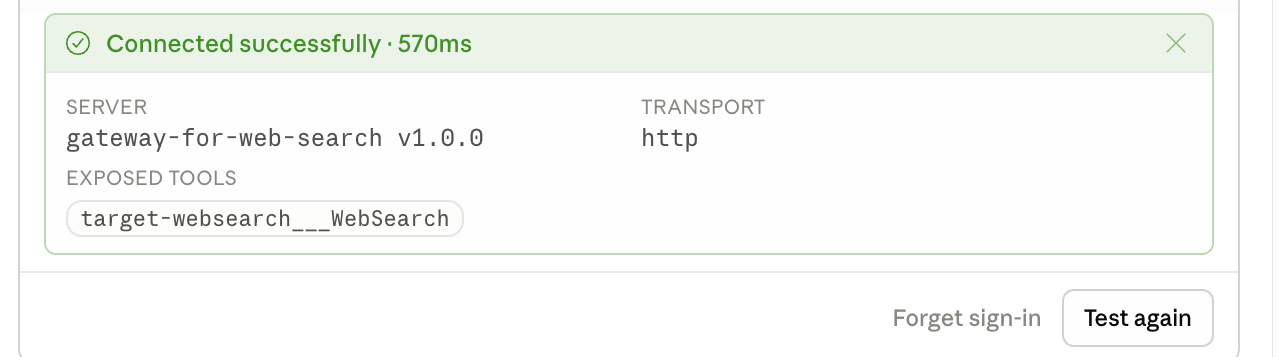
Figure 3: Successful MCP server registration in Claude Desktop
Claude Desktop will now discover the WebSearchTool through the MCP tools/list call. It invokes the tool automatically whenever the model needs current information from the web.
Testing and validation
In your preferred interface (for example, Chat or Cowork), send a query that requires Claude Desktop to retrieve the latest results. You should see a tool execution approval box, indicating that Claude has successfully discovered the Web Search tool. On approval, you should see the web search results included in the response.
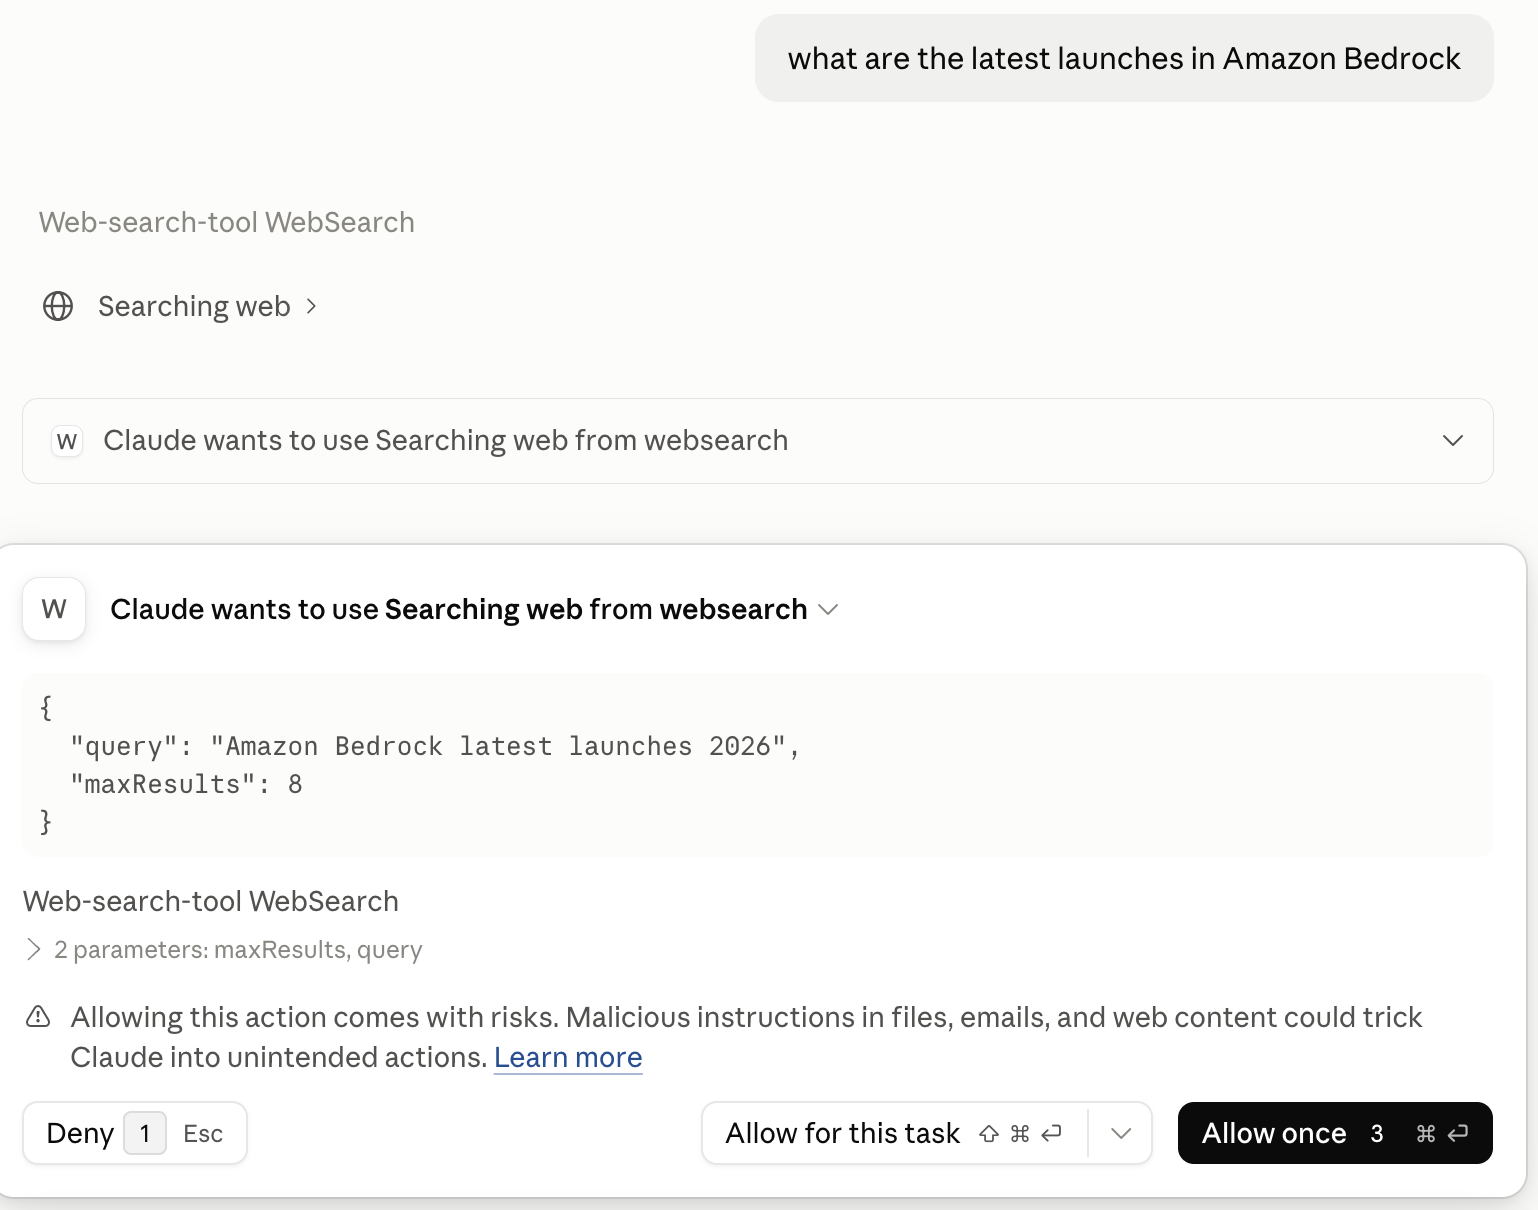
Figure 4: Web Search tool execution approval dialog
The dialog shows the query Claude wants to run and offers three options: Deny, Allow for this task, or Allow once. On approval, Web Search results are included in the response.
Clean up
If you created resources while following along, perform the following steps to delete them:
Finally, in the IAM Identity Center console in the management account, delete the SAML application you created in Step 2.
Conclusion
In this post, we walked through integrating Web Search on AgentCore with Claude Desktop. While this walkthrough uses AWS IAM Identity Center as the identity provider, the same pattern works with any SAML or OIDC-compatible identity provider. You can substitute your existing IdP by configuring it as a federation source in Amazon Cognito. This approach closes the web search gap without introducing third-party dependencies, and all queries stay within your AWS boundary.
To get started, follow the steps above to set up the integration in your own environment. For advanced gateway configurations, see the AgentCore Gateway Developer Guide. To learn more about Web Search, see the Web Search documentation.