Artificial Intelligence
Integrating AWS API MCP Server with Amazon Quick using Amazon Bedrock AgentCore Runtime
As your AWS infrastructure scales, operational workflows naturally grow more complex. SREs and DevOps Engineers spend significant time context-switching between the AWS Management Console, CLI documentation, and multiple service dashboards. They manually translate business questions into the correct API syntax, chain calls across services, and rebuild the same integration patterns for each new use case.This friction compounds over time. Incident investigations require cross-referencing Amazon CloudWatch Logs, Amazon Elastic Compute Cloud (Amazon EC2) instance states, and AWS Identity and Access Management (IAM) policies across separate interfaces. Capacity planning means manually querying multiple services and assembling results. Security audits demand consistent, repeatable API call sequences that are time-consuming to script from scratch.
This post shows you how to use Amazon Bedrock AgentCore Runtime with Model Context Protocol (MCP) support to connect Amazon Quick with AWS services through the AWS API MCP Server, creating a conversational AI assistant that translates natural language into AWS Command Line Interface (AWS CLI) commands, without the need to switch between tools during critical moments.
Solution overview
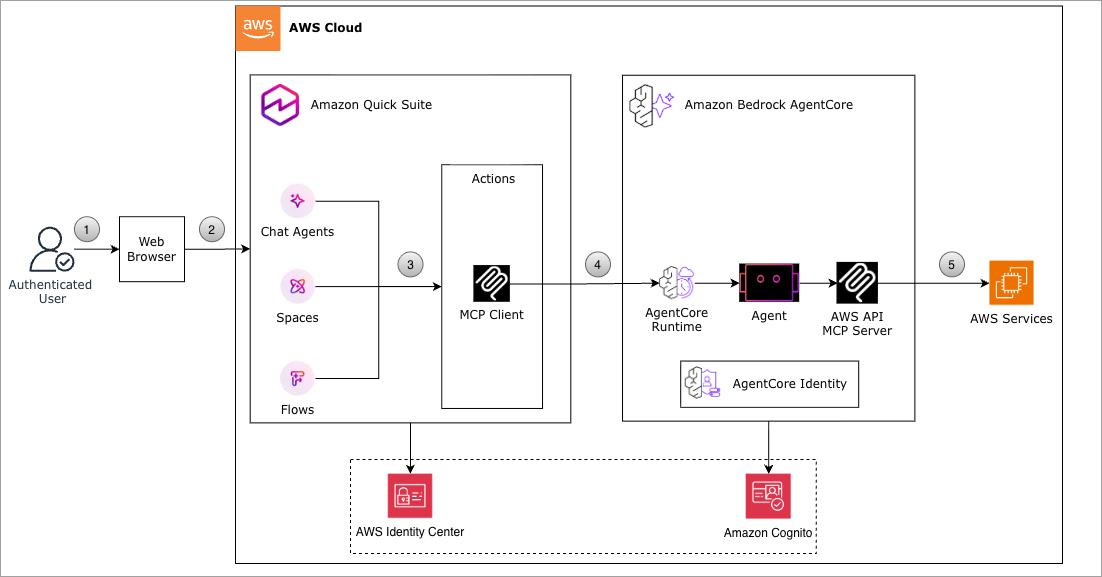
With Amazon Bedrock AgentCore Runtime and MCP support, natural language queries translate directly to AWS API calls. You can ask, “Show me all running EC2 instances in us-east-1,” and get immediate, accurate results without switching between tools or memorizing API syntax. Your requests run securely within your existing IAM permissions, with full Amazon CloudWatch audit trails for compliance. Rather than rebuilding connection logic for each workflow, you can standardize how AI agents interact with AWS services through a single, reusable integration. The following diagram shows how Amazon Bedrock AgentCore Runtime connects Amazon Quick to AWS services through the AWS API MCP Server.
How it works for daily operations:
- You ask a question in natural language: “Show running EC2 instances in us-east-1”.
- The Amazon Quick custom agent interprets your intent.
- Amazon Cognito authenticates the request: Quick obtains a JWT token from your Amazon Cognito user pool using OAuth 2.0 client credentials flow with the Client ID and Client Secret you configured.
- The agent connects to AWS API MCP Server: The authenticated request reaches Amazon Bedrock AgentCore Runtime, which validates the JWT token against your Cognito identity provider configuration.
- AgentCore Runtime authorizes and routes the request: After validating your Cognito token, AgentCore Runtime securely invokes the AWS API MCP Server running in the containerized environment.
- The MCP server translates your request: Your natural language query is converted into the appropriate AWS CLI command.
- AWS services execute the command: Using the IAM execution role you configured, the command runs with least-privilege permissions against AWS services.
- Results are returned in a readable format: No CLI syntax required. You get structured, readable results directly in your Quick interface.
Prerequisites
You must have the following prerequisites to follow along with this post.
Account and access requirements:
- AWS account with administrative access
- Amazon Quick Enterprise subscription (Professional tier minimum)
- Access to AWS Marketplace – AWS API MCP Server
- IAM permissions to create:
- Amazon Cognito user pools
- IAM roles and policies
- Amazon Bedrock AgentCore Runtime agents
- Amazon CloudWatch Log groups
Required software and tools:
- AWS CLI installed and configured (required for the URL encoding step in the walkthrough)
Required knowledge and expertise:
- Basic understanding of IAM roles and policies (already listed)
- Familiarity with OAuth 2.0 authentication flows
- Understanding of JWT (JSON Web Token) concepts
Additional information:
- Estimated completion time: 30–45 minutes
- Estimated monthly cost: For a single Enterprise user running approximately 500 queries per month, the estimated cost is approximately $292/month, primarily driven by the Amazon Quick Enterprise subscription ($40/user/month) and infrastructure fee ($250/account/month).
Set up the solution
Manual deployment
To implement the solution, complete the following steps:
- Set up an Amazon Cognito user pool – For authentication.
- Create IAM roles – For authorization.
- Create an Amazon Bedrock AgentCore Runtime agent.
- Configure Integrations in Amazon Quick for AWS API MCP Server.
- Create a custom chat agent in Amazon Quick.
Visual layouts in some screenshots in this post might look different than those on your AWS Management Console.
Set up Amazon Cognito user pool
Amazon Cognito provides authentication and authorization for your application. In this solution, you configure a Cognito user pool to generate JWT tokens that authenticate requests to the Amazon Bedrock AgentCore Runtime. With JWT authentication using Amazon Cognito, you configure the authorizer during the CreateAgentRuntime operation, specifying your identity provider (IdP)-specific discovery URL and allowed clients. Your existing agent code requires no modification. You add the authorizer configuration to your runtime deployment. When a calling entity or user invokes your agent, they pass their IdP-specific access token as a bearer token in the Authorization header. AgentCore Runtime uses AgentCore Identity to automatically validate this token against your configured authorizer and rejects unauthorized requests.
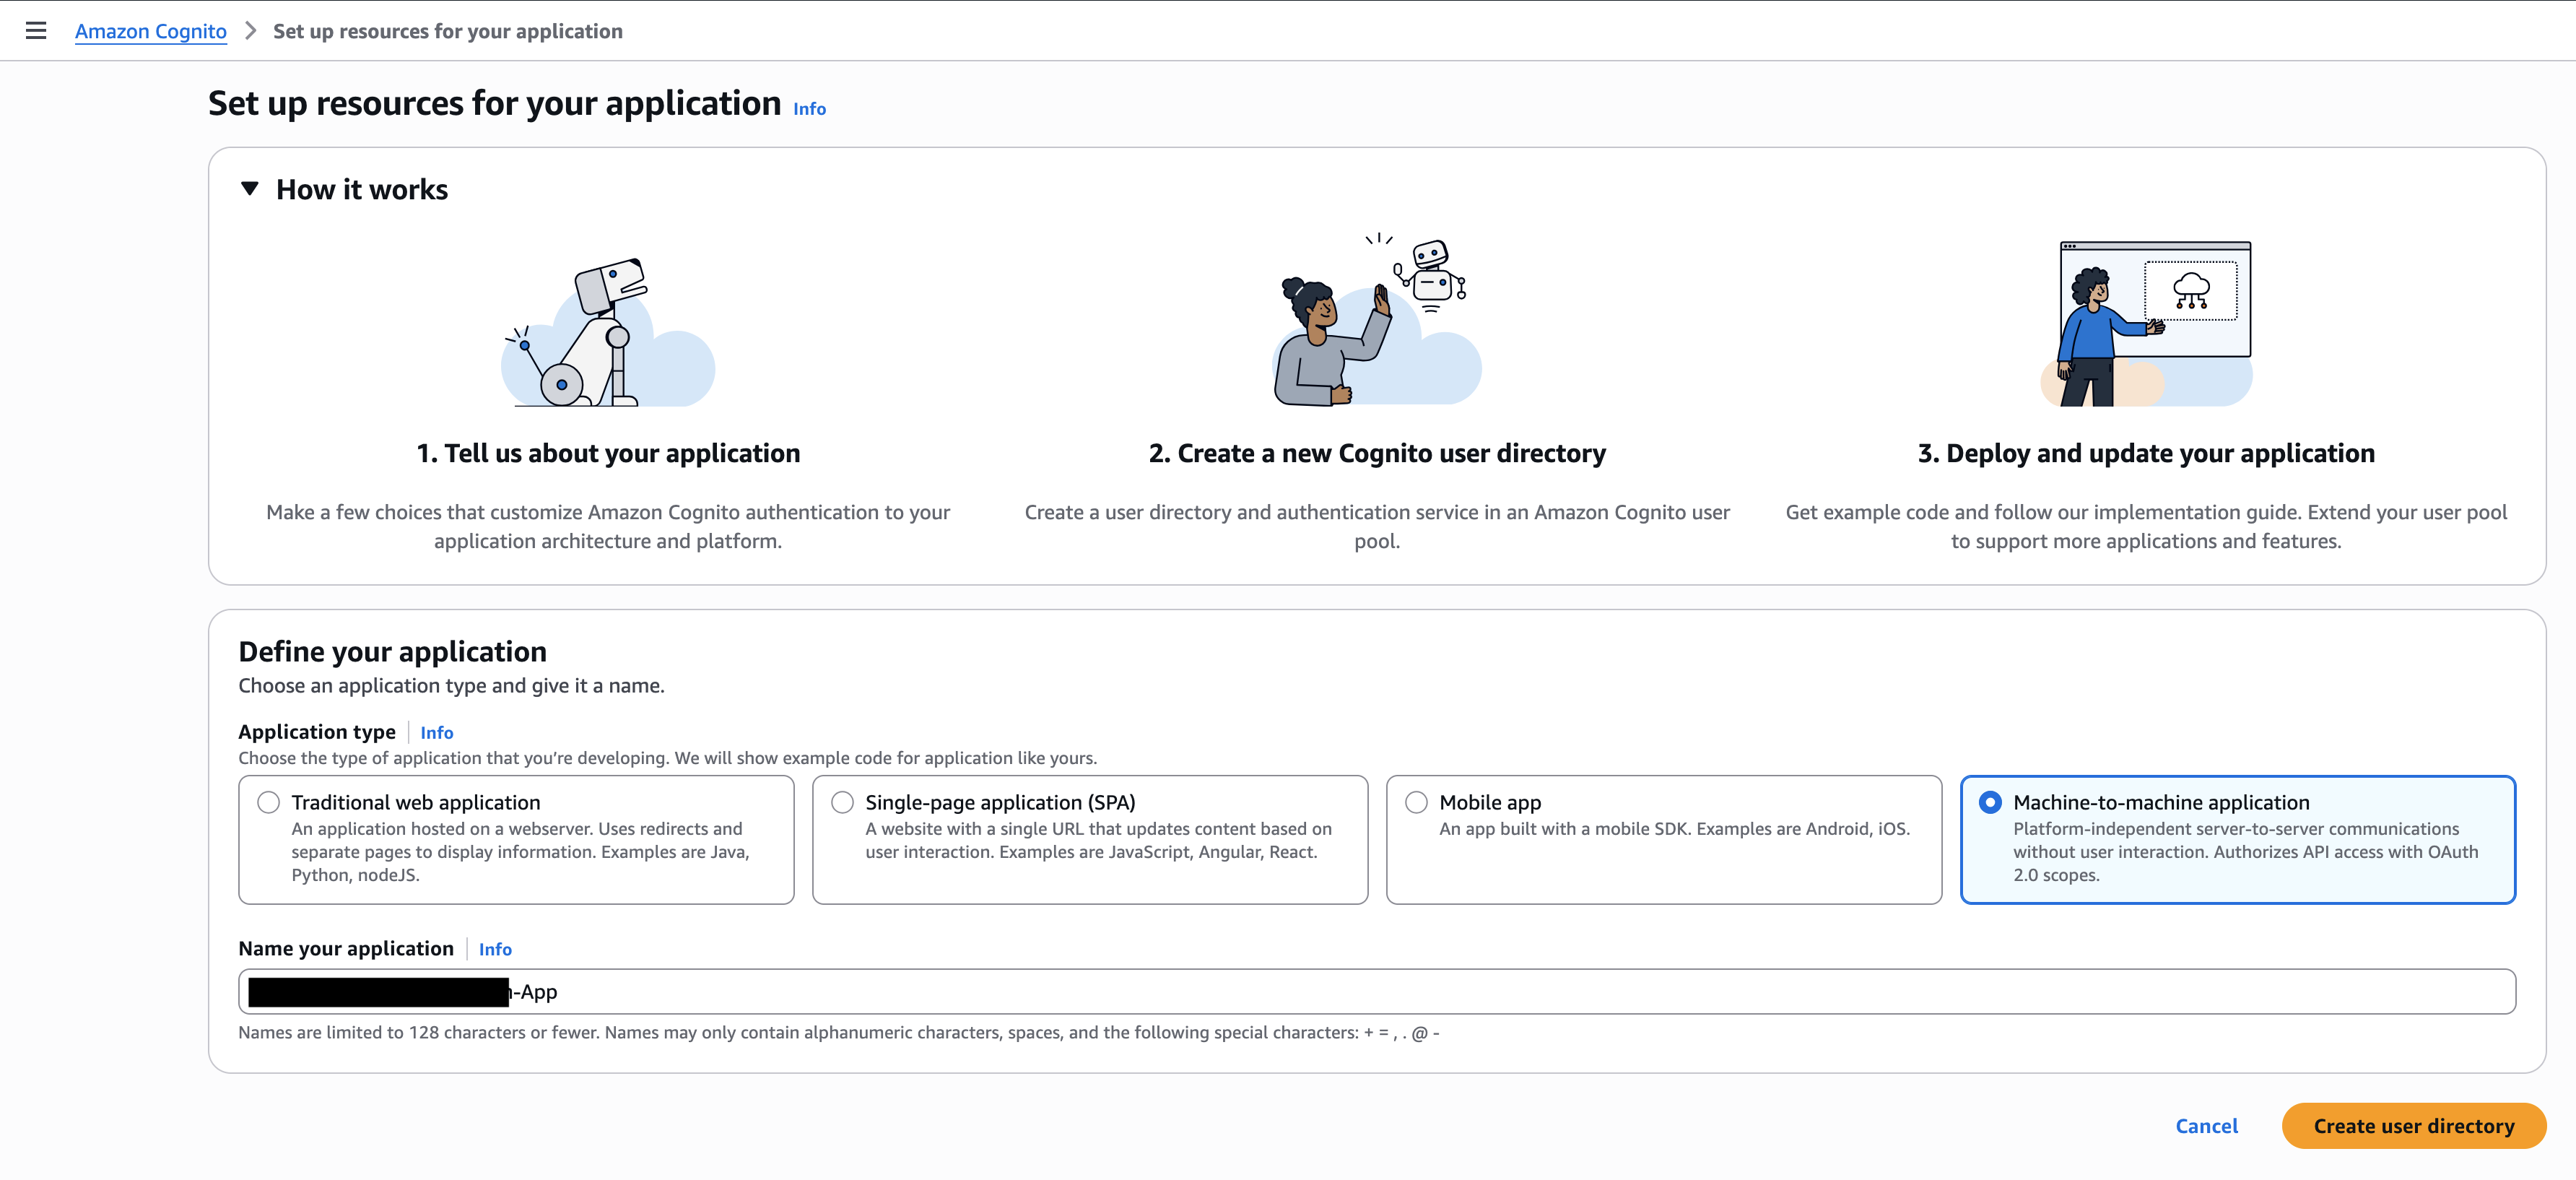
Create Amazon Cognito user pool for JWT authentication with unique application name and application type as Machine-to-machine application as shown in the following screenshot. Provide a name for the application and then choose create user directory.
When you create a Cognito user pool with a machine-to-machine application, Amazon Cognito automatically creates a resource server for your application. The resource server defines custom OAuth 2.0 scopes that specify the permissions your application can request

From the newly created user pool menu, navigate to Branding and choose Domain. Select the Resource server created and choose edit. Add write scope to the custom scope and update the descriptions for both read and write.
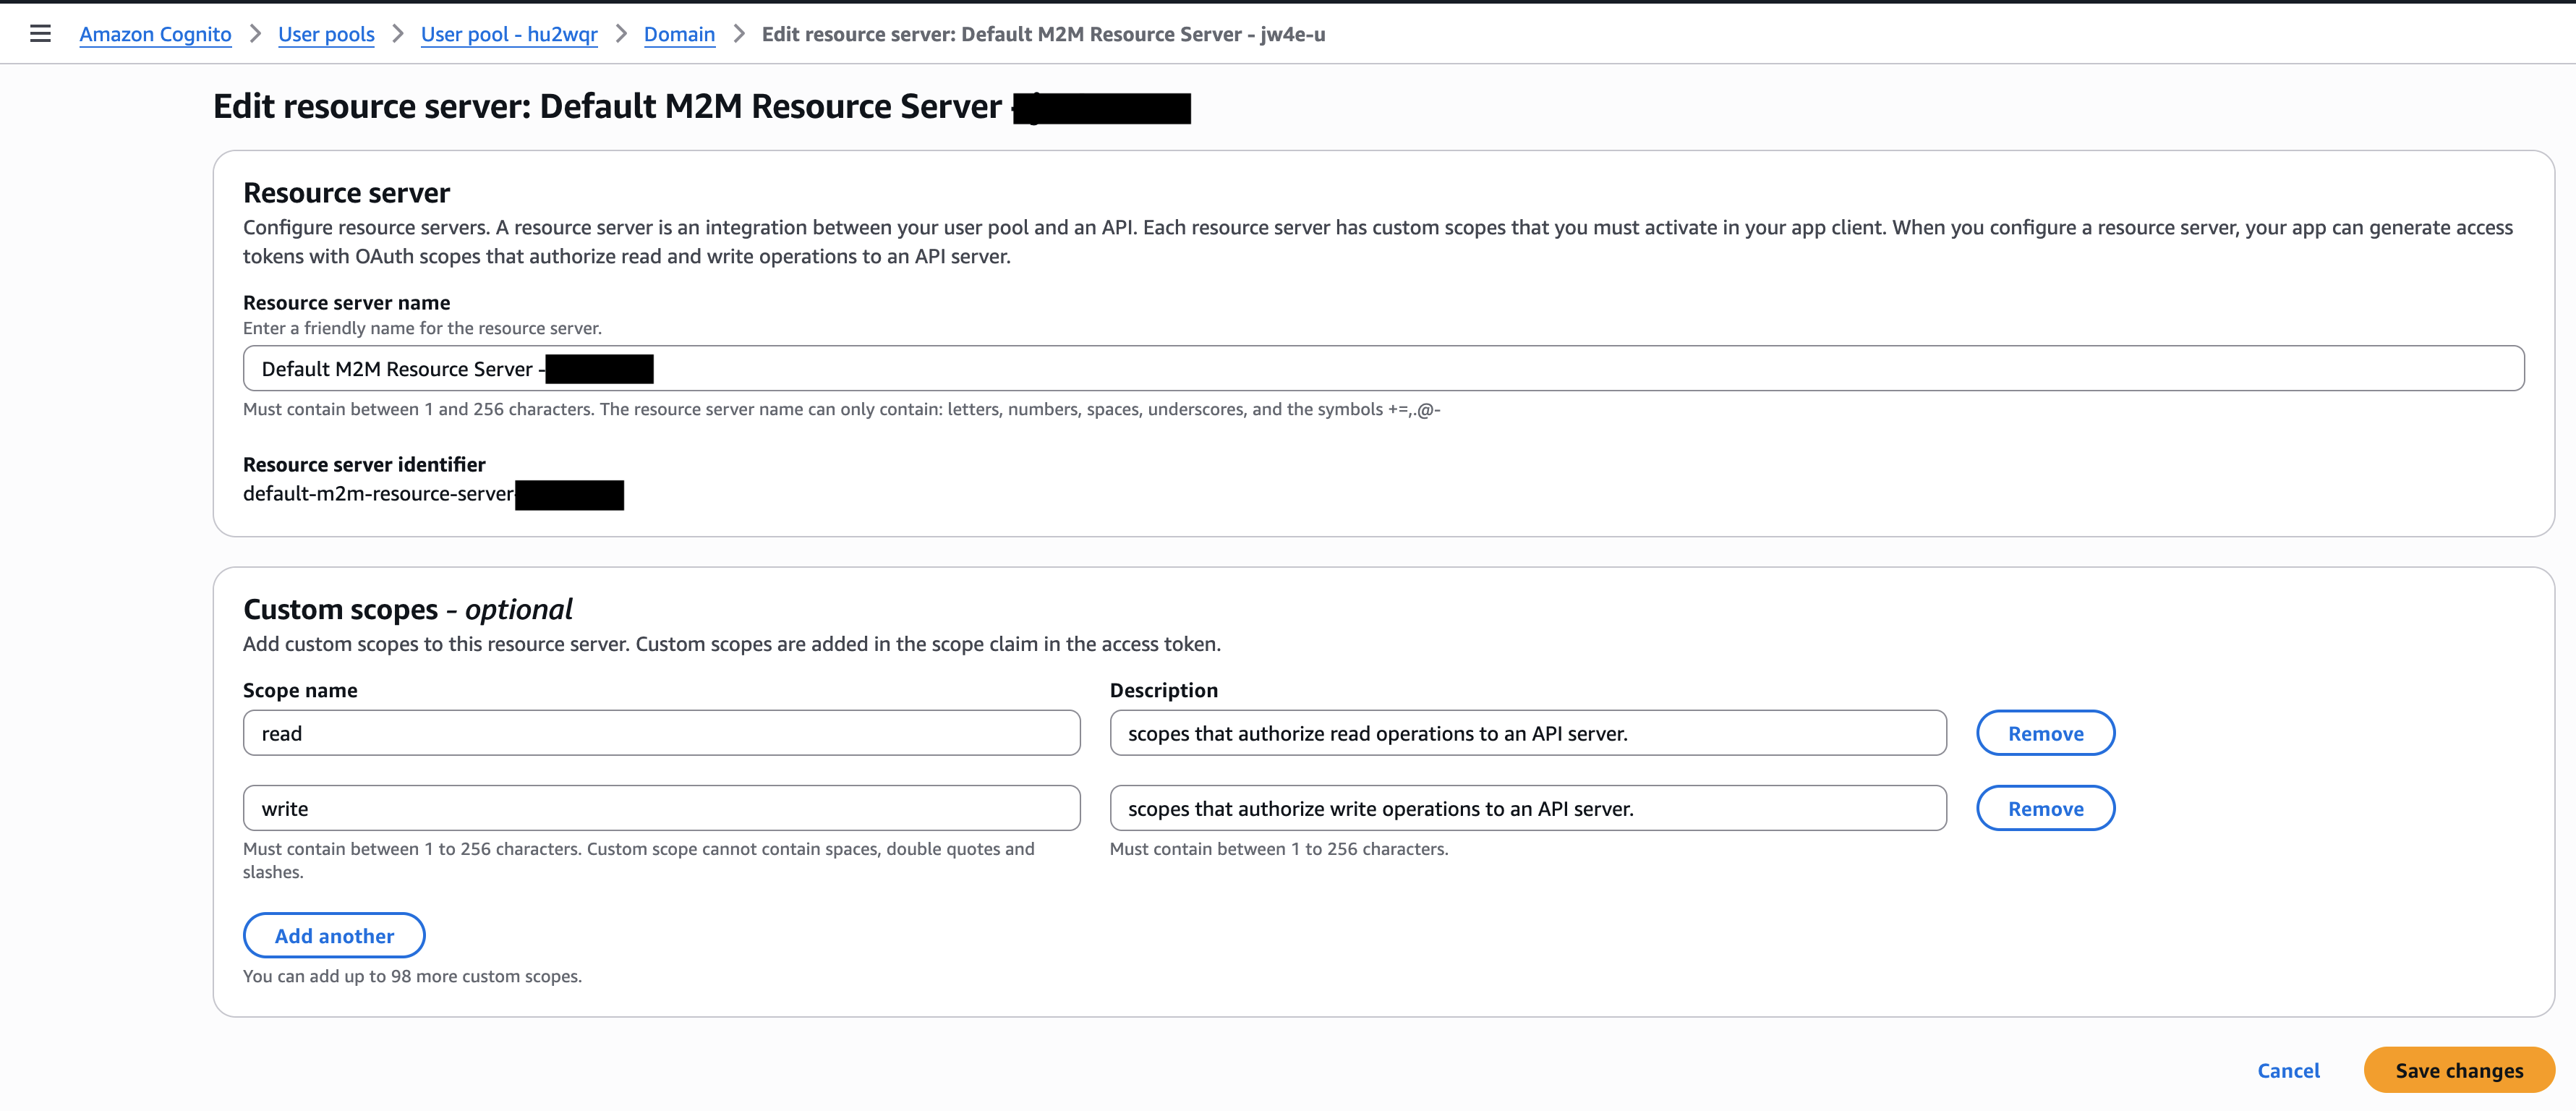
The read and write scopes control access to the AWS API MCP Server:
- Read scope – Allows the application to query AWS resources (for example, listing EC2 instances or describing Amazon Simple Storage Service (Amazon S3) buckets).
- Write scope – Allows the application to modify AWS resources (for example, creating resources or updating configurations).
These scopes map to the IAM permissions that the MCP server uses when executing AWS CLI commands on behalf of authenticated requests.
Create IAM roles
To run agents or tools in Amazon Bedrock AgentCore Runtime, you need an IAM execution role. For information about creating an IAM role, see IAM role creation.
Create the required trust policy and execution role for Amazon Bedrock AgentCore Runtime. See IAM Permissions for AgentCore Runtime for more details. Replace YOUR_ACCOUNR_ID below with your AWS account ID.
The following code is for the AgentCore Runtime trust policy:
The following code is for the AgentCore Runtime execution role:
The following IAM policy grants your execution role the permissions required to pull the AWS API MCP Server container image and write runtime logs. The container image is hosted in an AWS-managed public Amazon Elastic Container Registry (Amazon ECR) repository. You don’t need to build or maintain the image yourself.
To find the latest container URI, visit : AWS Marketplace – AWS API MCP Server.
Attach specific permissions to the role that define what actions it can perform on your behalf. This example uses a scoped-down read-only policy granting s3:ListBucket and s3:GetObject across all buckets. This is intentionally broad for discovery and exploration purposes only.
Note: Using a wildcard resource (arn:aws:s3:::*) grants access to every S3 bucket in your account. This is acceptable for initial setup and testing but violates the principle of least privilege in production. Before deploying to production, replace the wildcard with specific bucket ARNs:
Example Role:
Create Amazon Bedrock AgentCore Runtime agent
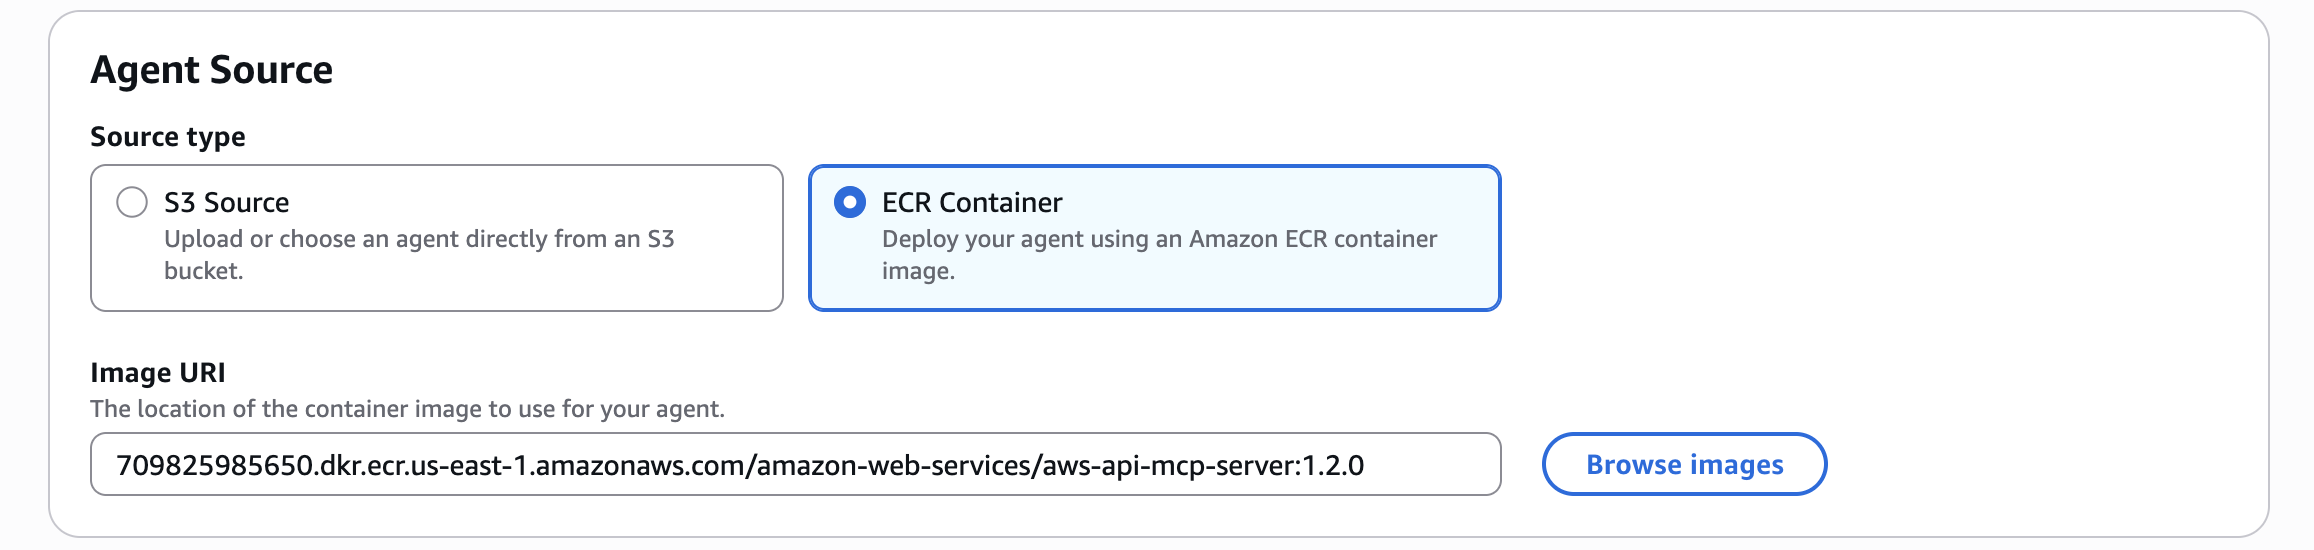
From Amazon AgentCore, choose runtime from the menu, then choose host/agent tool. Provide a unique name for your runtime agent. For Agent Source, select the ECR container option and enter the image URI from AWS Marketplace.
On the same page, under permissions, select the existing role created in the previous step.

In the inbound auth section on the same page, select the MCP protocol and JWT token for inbound auth type. For JWT schema configuration, use the existing identity provider configuration (the Cognito identity pool created in the first step).
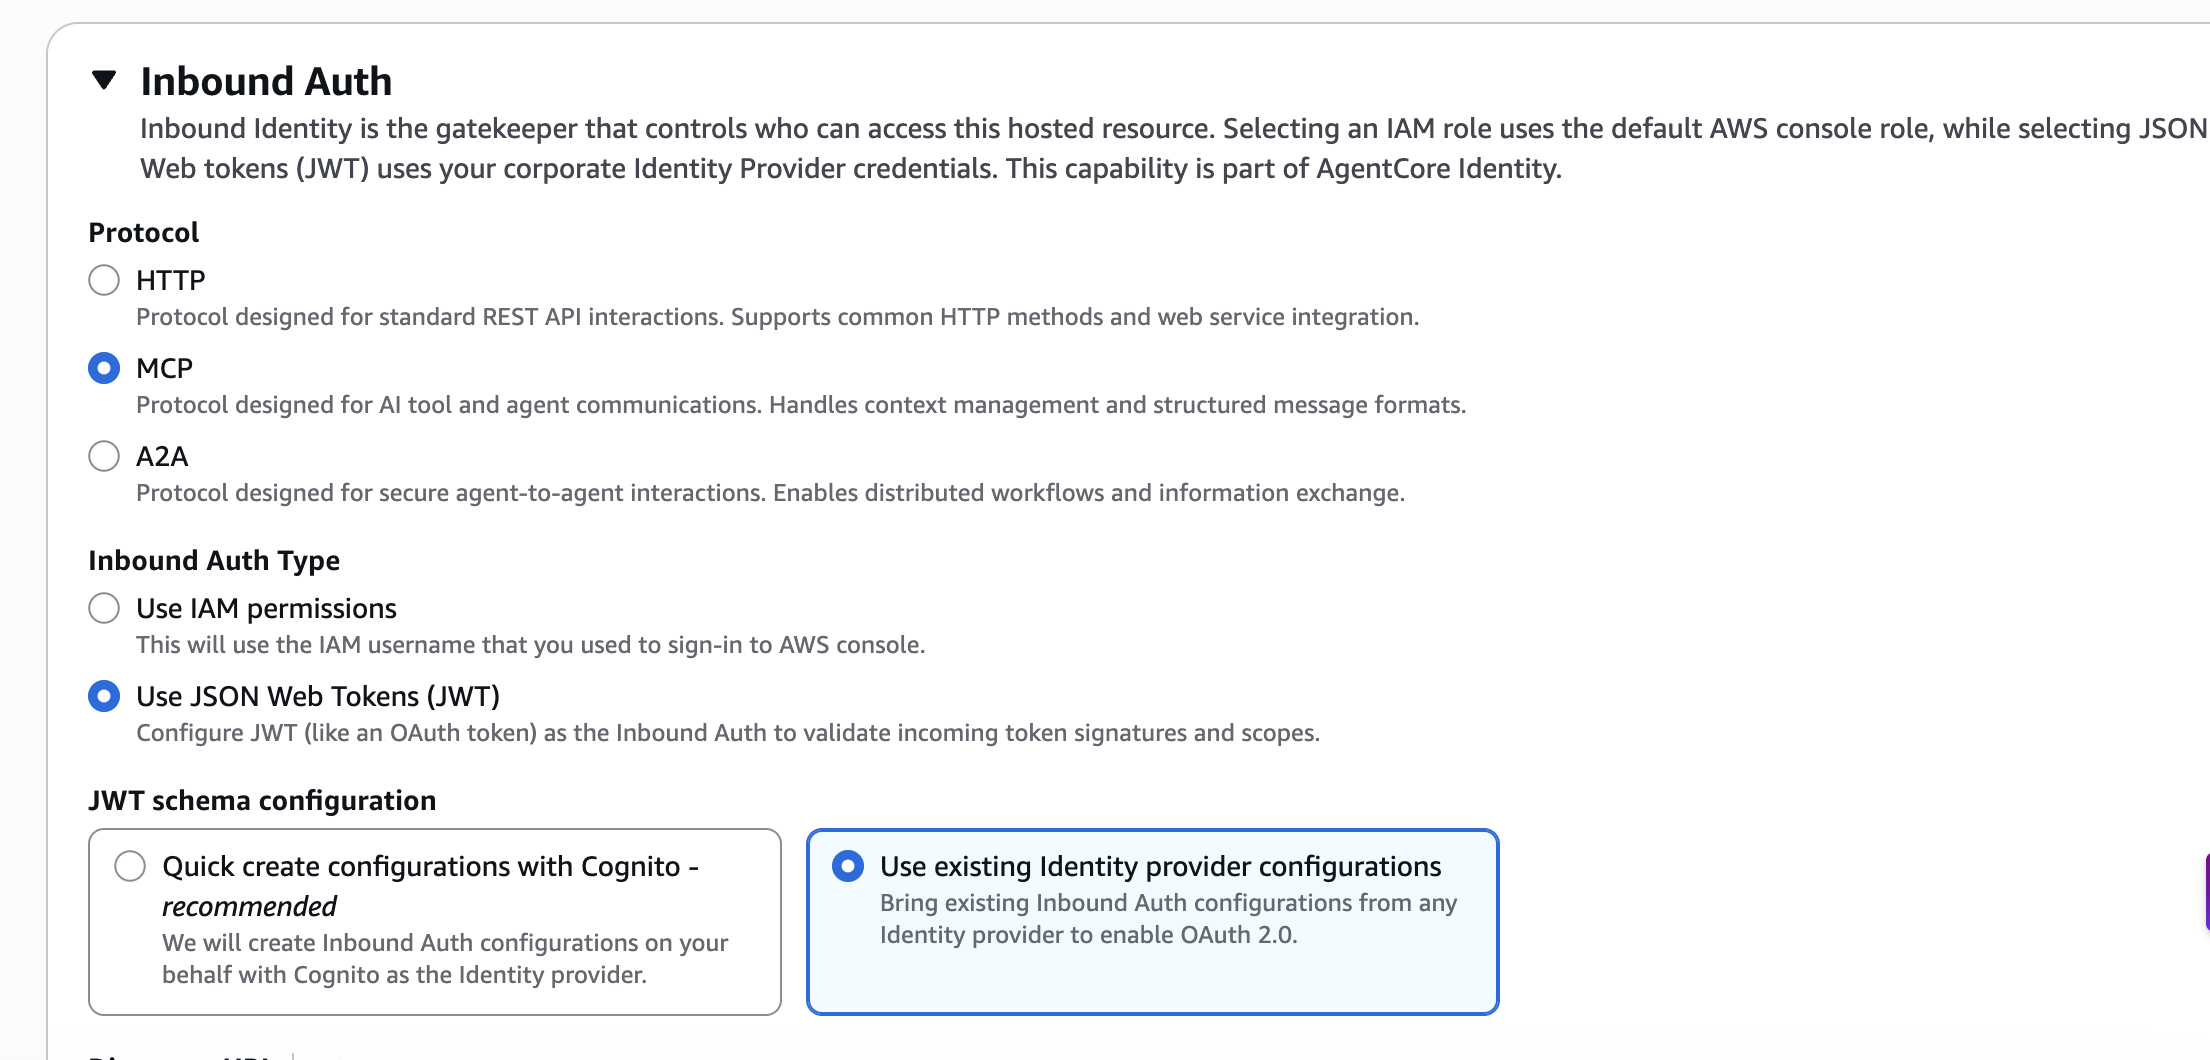
Obtain the discovery URL from your Cognito user pool information. Look for the Token signing key URL, which follows this format:https://cognito-idp.$REGION.amazonaws.com/$POOL_ID/.well-known/jwks.json
Replace jwks.json with openid-configuration. Your final URL should look similar to this example:
https://cognito-idp.us-east-1.amazonaws.com/us-east-1_ev5CwXjma/.well-known/openid-configuration
Add allowed clients to your configuration. Navigate to the App Client section in your Cognito user pool by choosing App Client in the left panel. Copy the client ID from the App client information and add it to the allowed clients section.
Configure advanced settings for your AgentCore Runtime deployment. Under Advanced configurations, keep the default network mode set to Public for this walkthrough. This allows the runtime to be reachable over the internet during initial setup and testing.
For production deployments, choose the VPC option to restrict network access to private, controlled environments. This is the recommended approach for workloads handling sensitive data or requiring network isolation. Next, add your environment variables as shown in the following section, then choose Create agent.
AUTH_TYPE: “no-auth”AWS_API_MCP_HOST: “0.0.0.0”AWS_API_MCP_PORT: “8000”AWS_API_MCP_STATELESS_HTTP: “true”AWS_API_MCP_TRANSPORT: “streamable-http”AWS_API_MCP_ALLOWED_HOSTS= “*”AWS_API_MCP_ALLOWED_ORIGINS= “*”
Understanding AWS API authentication on AgentCore
| Variable | Description |
AWS_API_MCP_TRANSPORT |
Sets the transport protocol to streamable HTTP for MCP communications. |
AWS_API_MCP_STATELESS_HTTP |
Enables stateless HTTP mode, required for streamable-http transport. |
AWS_API_MCP_PORT |
Port on which the MCP server listens for incoming requests. |
AWS_API_MCP_HOST |
Binds the server to available network interfaces within the container. |
AWS_API_MCP_ALLOWED_ORIGINS |
Allows requests from any origin. Acceptable within the AgentCore Runtime controlled execution environment. |
AWS_API_MCP_ALLOWED_HOSTS |
Allows requests from any host. Scoped to the container network boundary enforced by AgentCore Runtime. |
AUTH_TYPE |
Disables MCP server-level authentication. Authentication is handled by AgentCore Runtime using JWT token validation. For information, see the following security note. |
The AUTH_TYPE is set to no-auth because the MCP server itself doesn’t perform authentication. This is intentional and safe when deploying through Amazon Bedrock AgentCore Runtime. AgentCore Runtime acts as the security boundary. Before a request reaches your MCP server container, AgentCore Runtime enforces JWT token validation. It verifies cryptographic signatures using public keys from AgentCore Identity, validates token claims (issuer, audience, expiration), and rejects requests that don’t present a valid OAuth 2.0 bearer token. In other words: the MCP server trusts that AgentCore Runtime has already authenticated the caller. This is the same pattern used by internal microservices behind an API Gateway. The service itself doesn’t re-authenticate because the gateway already did.
Note: Don’t use AUTH_TYPE: no-auth if you’re running this MCP server outside of AgentCore Runtime (for example, directly on an EC2 instance or as a standalone container). In that scenario, the server would be exposed without an authentication layer.
The wildcard values for AWS_API_MCP_ALLOWED_HOSTS and AWS_API_MCP_ALLOWED_ORIGINS (*) are intentionally broad for this tutorial. In production, replace these with the specific hostnames and origins your workload requires to enforce least-privilege network access.
Create custom chat agent in Amazon Quick
Now that you have the AWS API MCP server running in Amazon Bedrock AgentCore Runtime, let’s create a custom chat agent in Amazon Quick that can be used to execute AWS CLI commands through natural language interactions.
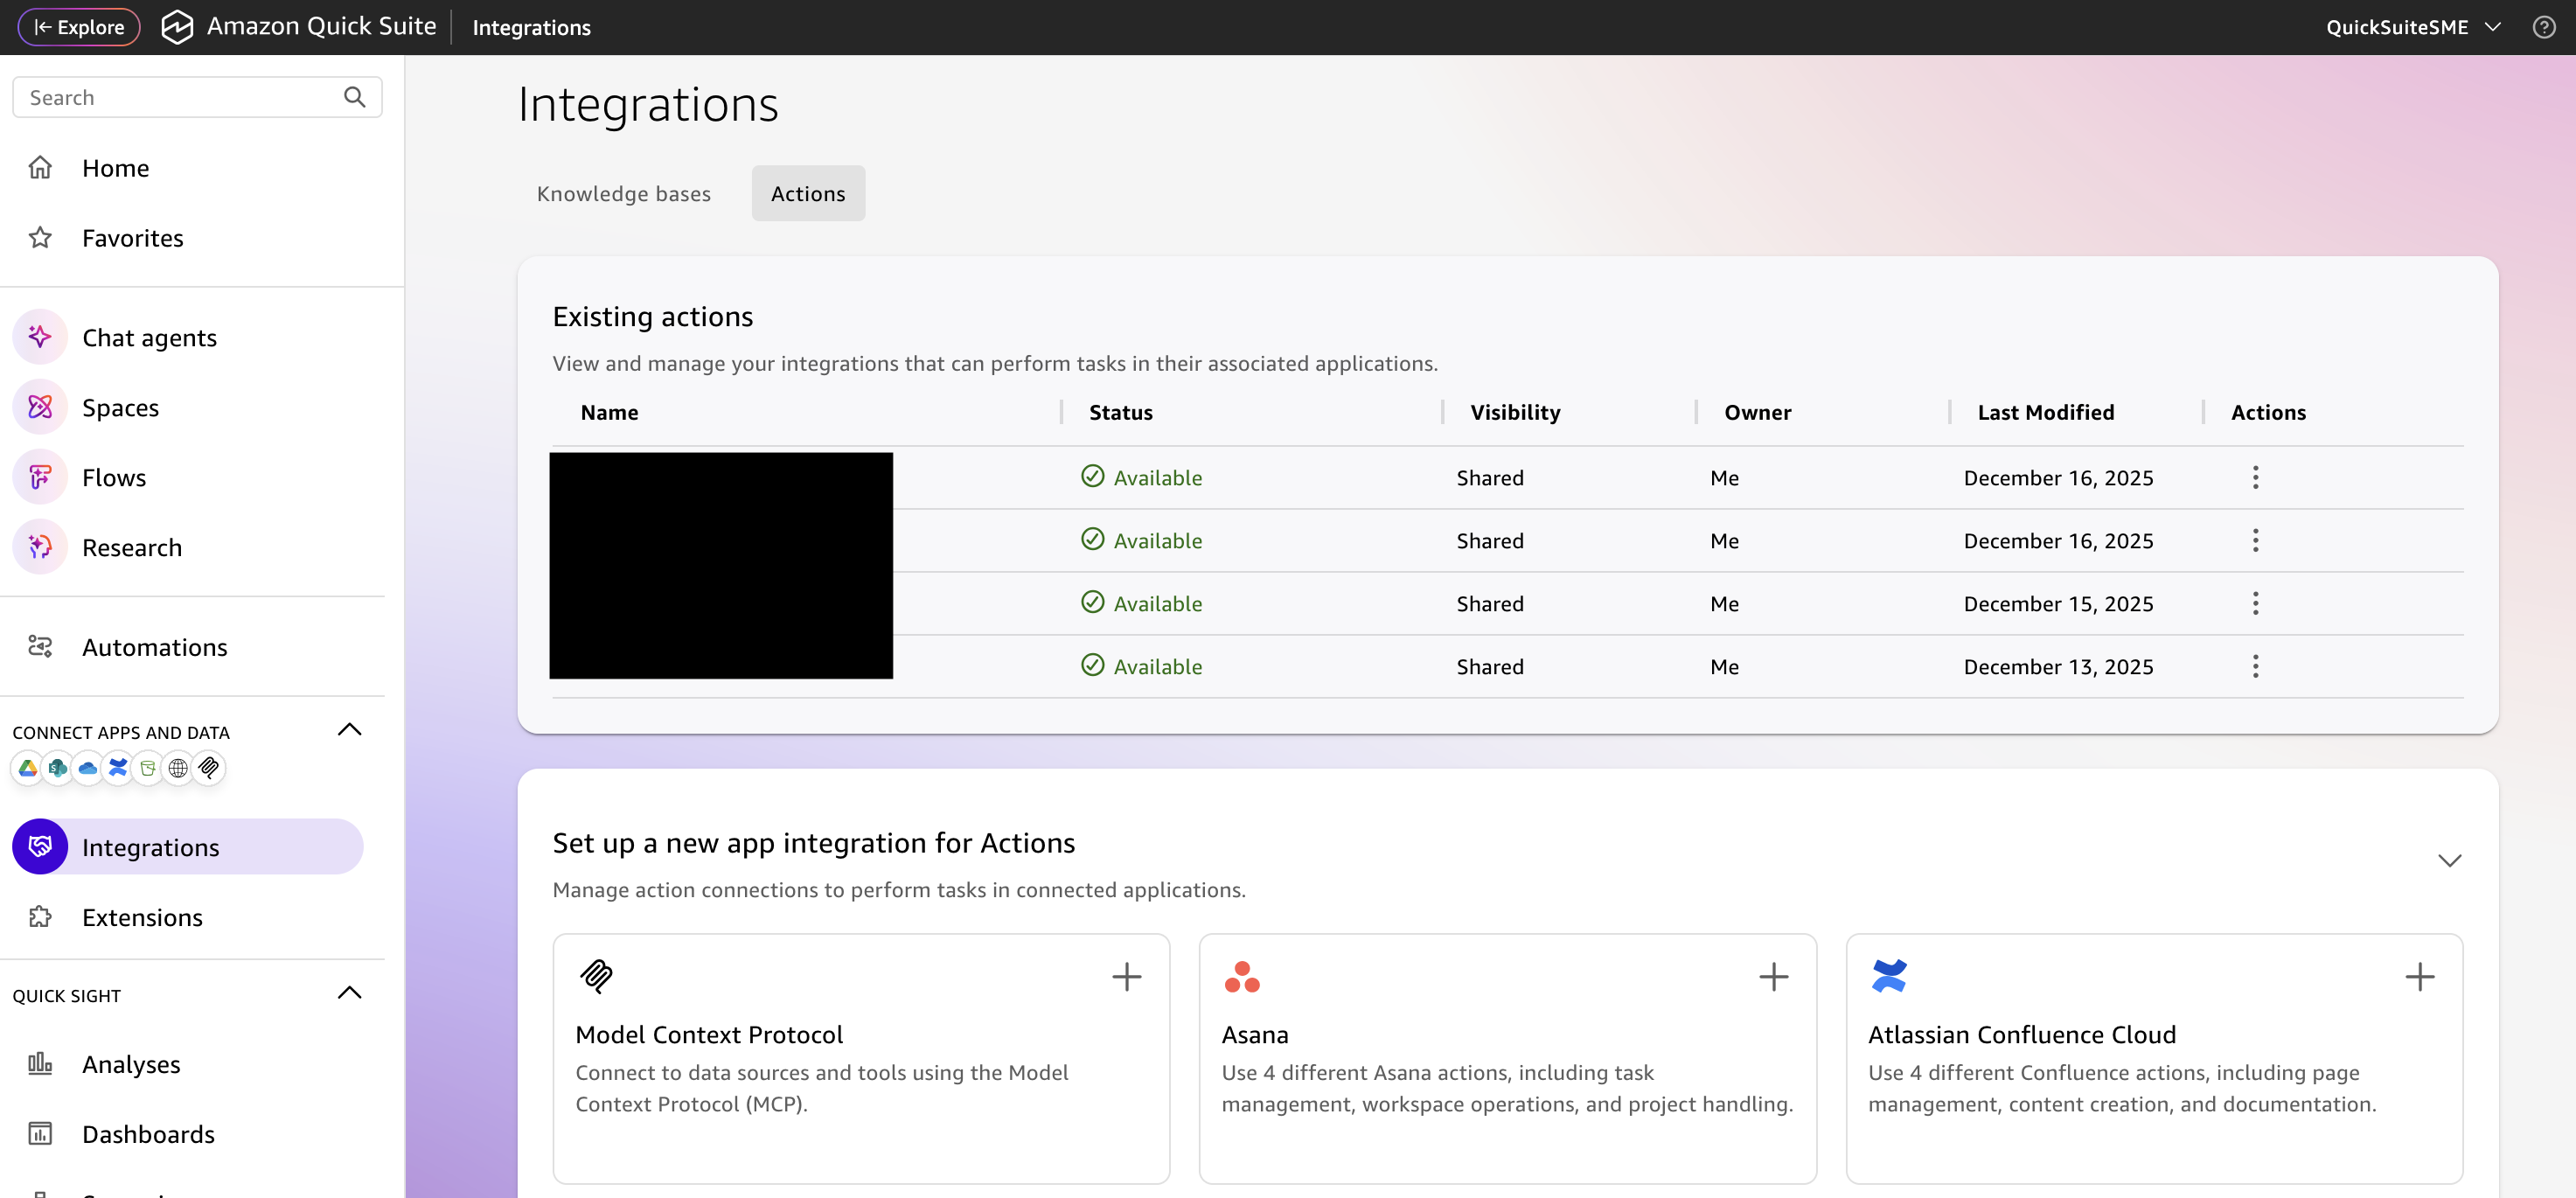
Navigate to the Amazon Quick console, access integration settings. In the left navigation panel, choose Integrations, then select Actions. Add the MCP protocol integration to connect Amazon Quick with your MCP server hosted on Amazon Bedrock AgentCore Runtime.
To configure the integration details, enter integration metadata. Provide a descriptive Name for your integration and then add a clear Description explaining the integration’s purpose.
For endpoint configuration, retrieve your Amazon Bedrock AgentCore Runtime ARN. Navigate to your agent’s Tools Details section. Copy the Runtime ARN from the Runtime section.
Example ARN format:
arn:aws:bedrock-agentcore:us-east-1:123456789123:runtime/demoagent-LmNop08QoR
The end point URL should be in the following format, replace Region with your AWS Region and follow steps to create url encoded arn.
To create a URL-encoded ARN, run the following command in your terminal:
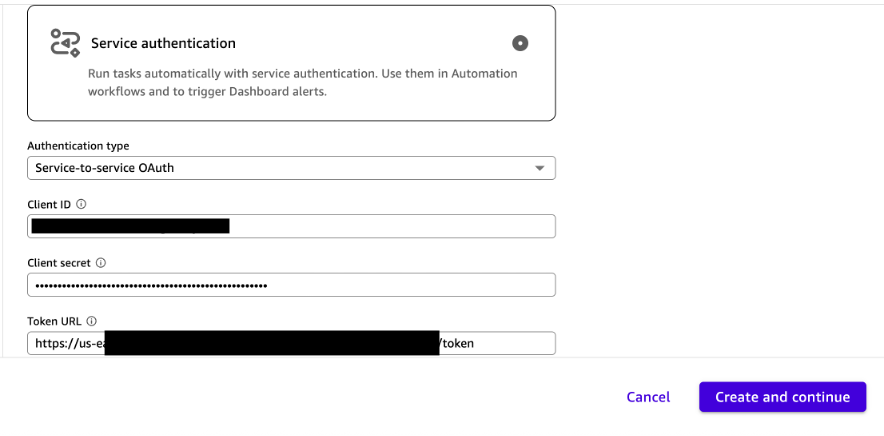
echo "YOUR_ARN" | sed 's/:/%3A/g; s/\//%2F/g'[System.Uri]::EscapeDataString("YOUR_ARN")Note: The bash command requires Linux, macOS, or Windows with WSL (Windows Subsystem for Linux) installed. The Windows PowerShell cmdlet works natively on Windows systems without additional dependencies.Finally keep the enable auto-publishing option enabled.To establish secure communication between Amazon Quick and the MCP server, configure service authentication using your Amazon Cognito user pool credentials.
Note: Amazon Cognito is a fully managed AWS identity service that handles authentication and authorization for your applications. App client secrets are stored encrypted at rest and in transit. Your credentials aren’t transmitted in plaintext. Cognito also supports on-demand client secret rotation, so you can maintain up to two active secrets per app client for zero-downtime rotation.
When prompted in the authentication settings page, select Service Authentication as your authentication method.
To find your Client ID and Client Secret:
- Open the Amazon Cognito console.
- Choose User Pools, then select your user pool.
- In the left navigation pane, choose App clients (under Applications).
- Select your app client. The App client ID is displayed directly on this page.
- Choose Show client secret to reveal the App client secret.
Note: Treat your Client Secret like a password. Store it securely using AWS Secrets Manager for production deployments. Don’t embed it in client-side code or version control.
For the Token URL, construct it using your user pool’s domain:
- In the left navigation pane of your user pool, scroll down to Branding section.
- Choose Domain. Your Cognito domain is displayed here in the format:
https://your-domain.auth.region.amazoncognito.com - Append
/oauth2/token to this domain to form your complete token endpoint:https://your-domain.auth.region.amazoncognito.com/oauth2/token
After you’ve entered the Client ID, Client Secret, and Token URL, choose Create and Continue.
Note: Within Amazon Quick, your credentials are encrypted using AWS Key Management Service (AWS KMS). By default, Quick uses a service-managed AWS KMS key to encrypt data source credentials and OAuth tokens. For organizations with stricter compliance requirements, account administrators can configure customer managed keys to maintain full control over encryption key lifecycle, including the ability to revoke access instantly and maintain an auditable log of credential access.
Next, set the sharing preferences for this action. Choose whether to share this action with other team members and configure appropriate access permissions. Choose Done and verify that the action appears in the Actions section.
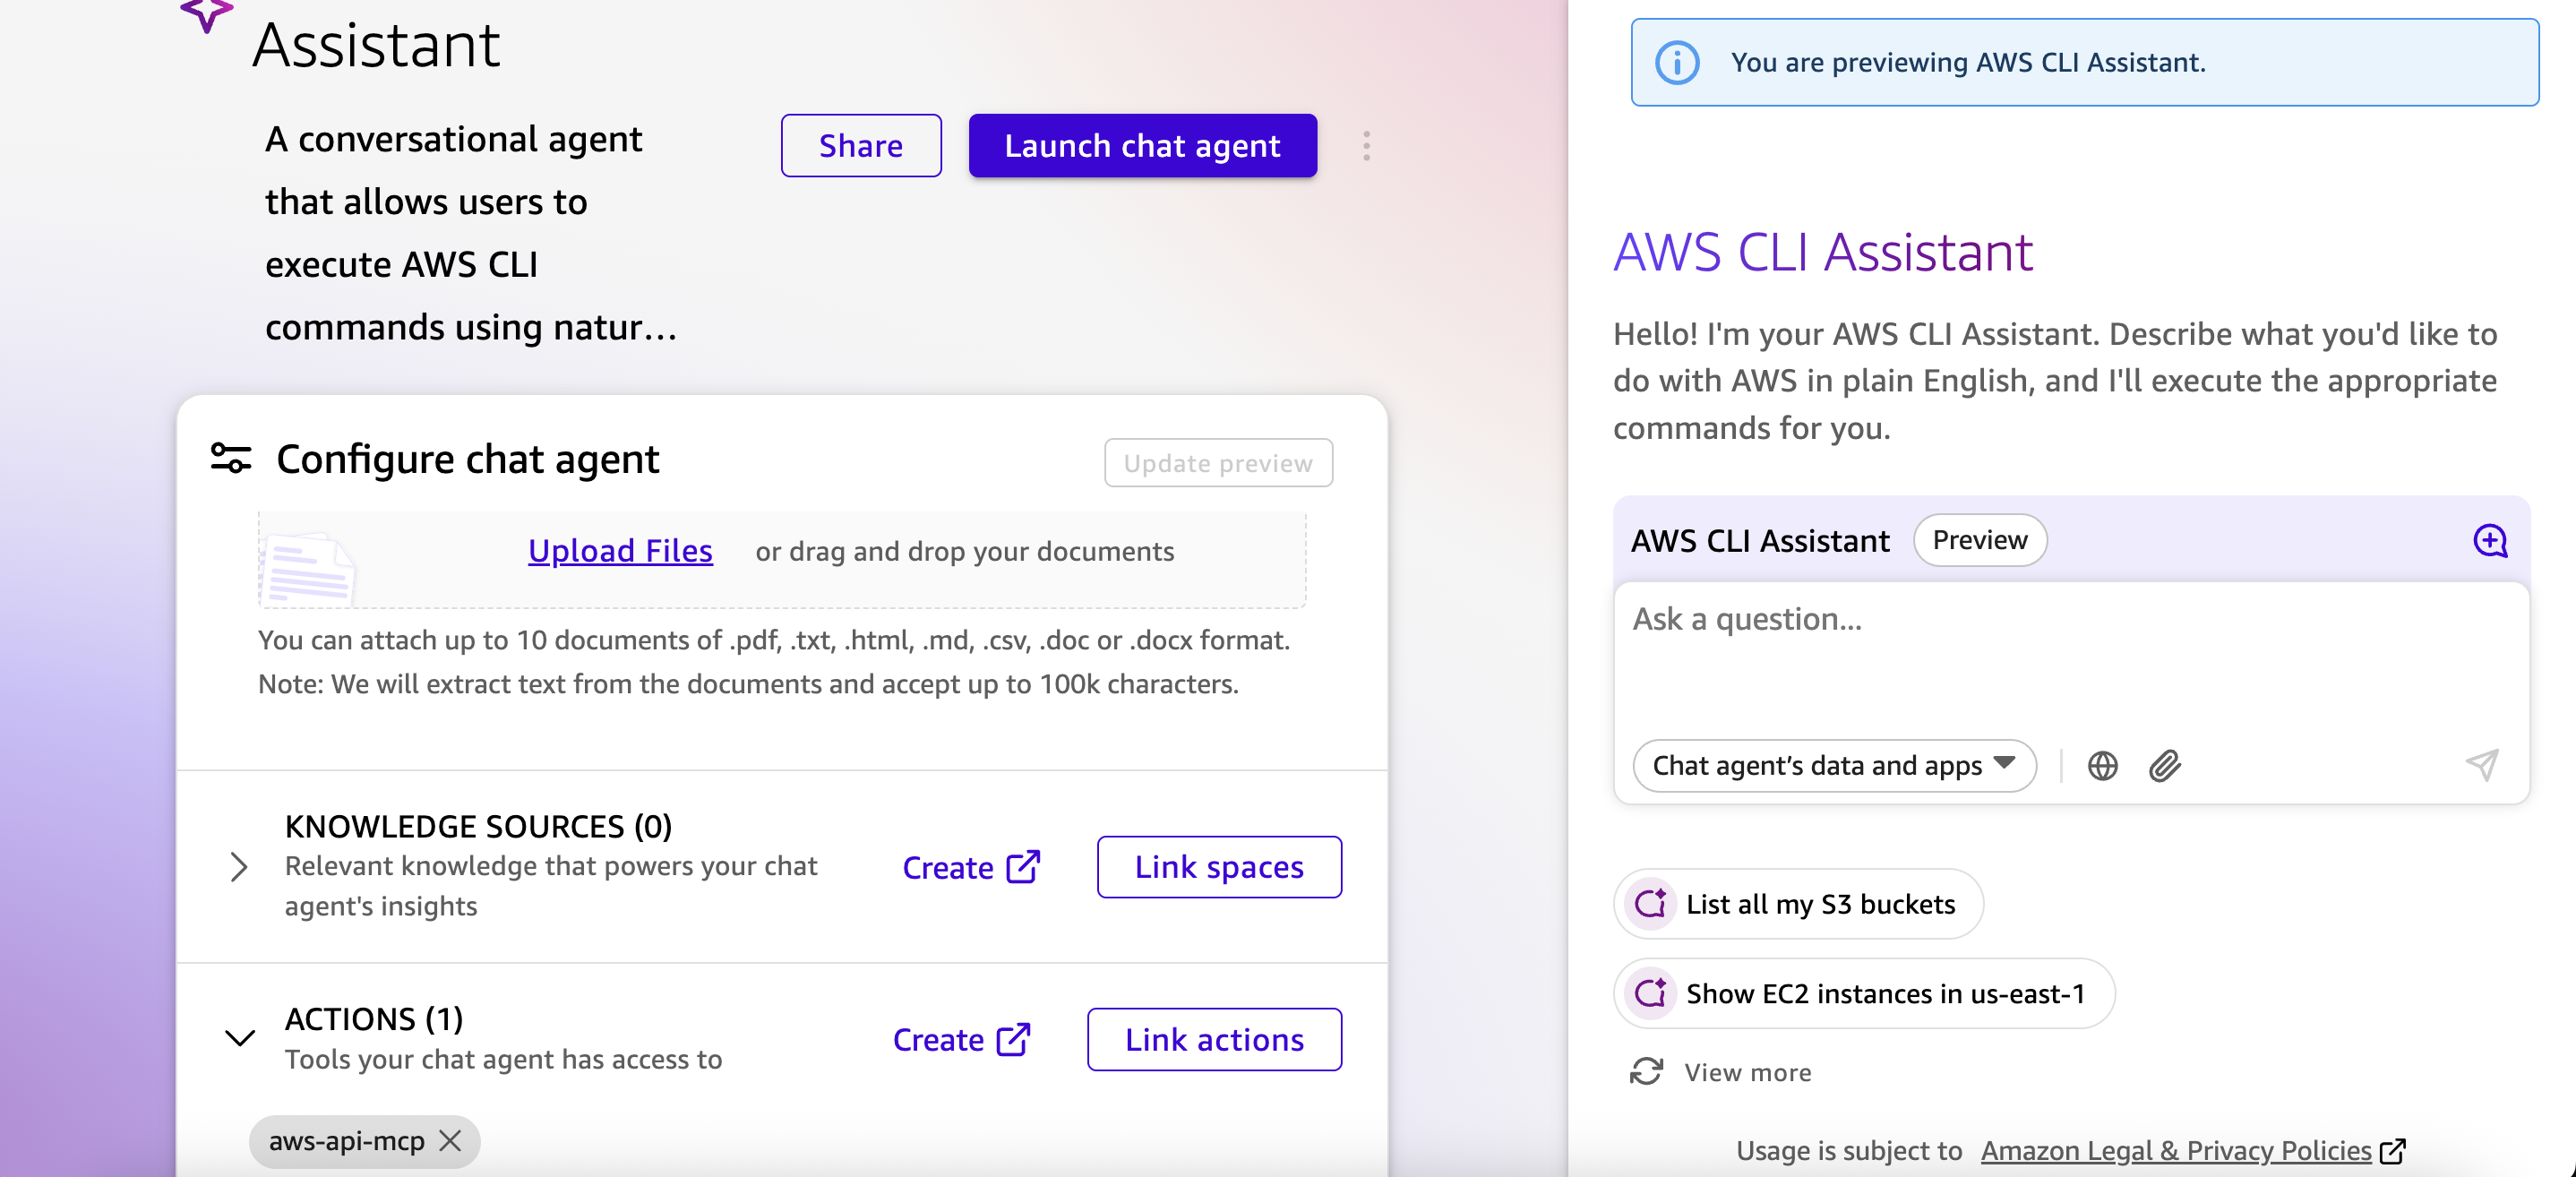
Now let’s build a conversational agent that translates natural language into AWS CLI commands. Navigate to agent creation in Amazon Quick console, in the left panel, choose Custom Agents, then choose Create Chat Agent.
Configure the agent with a descriptive prompt:
Prompt: Create a conversational agent that allows users to execute AWS CLI commands using natural language. Translates user requests into appropriate AWS API calls through the aws-api-mcp connector.
Amazon Quick automatically detects and selects the MCP connector based on your prompt. Verify that the correct integration is associated with your agent. Choose Launch Agent to make it available for testing.
Automated deployment
For automated deployment, follow the instructions in GitHub to deploy the AWS API MCP server in Amazon Bedrock Runtime.Additionally, to deploy Cognito user pool and app client, follow the AWS documentation instructions under the Appendix section in Set up Cognito user pool for authentication.
Finally, for setting up the integration between Amazon Quick and AWS API MCP server, follow the steps mentioned in the section Create Custom Chat Agent in Amazon Quick.
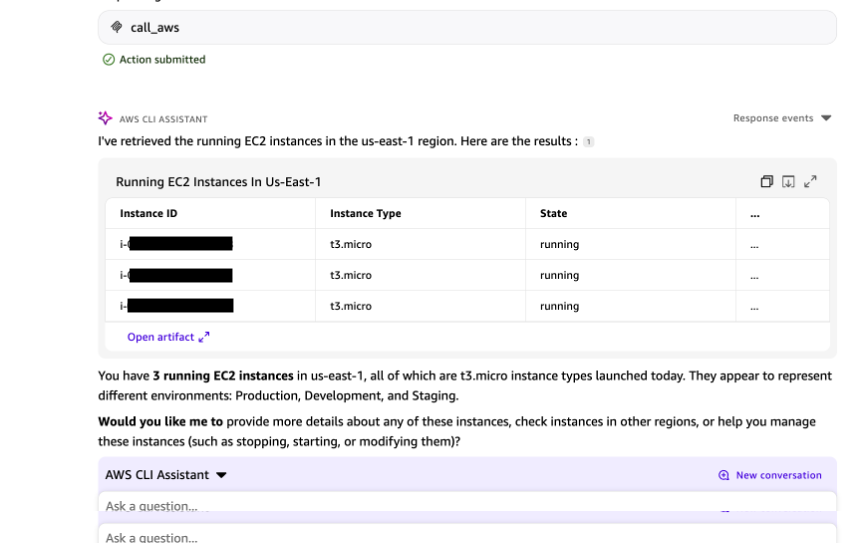
Test the solution
To validate your custom chat agent functionality, access the chat interface for your newly created custom chat agent and test natural language commands:
Prompt: Show running EC2 instances in the us-east-1 region.
Clean up
To avoid incurring ongoing charges, clean up the resources that you created as part of this solution.
- Delete the Amazon Quick resources. Remove the Amazon Quick features that you enabled, including your custom chat agent, Spaces, and Flows.
- Remove the MCP integration. Delete the Amazon Quick MCP action that you created.
- Clean up Amazon Bedrock resources. Delete the Amazon Bedrock AgentCore agent and its associated IAM execution role.
- Delete the Amazon Cognito user pool. Finally, remove the Amazon Cognito user pool that you created for authentication.
Conclusion
In this post, you learned how to connect Amazon Quick with AWS services using Amazon Bedrock AgentCore Runtime and the AWS API MCP Server. When you standardize how AI agents interact with your infrastructure through MCP, you can avoid the need to rebuild custom integration patterns for each new use case.
From here, you can extend this pattern to automate common operational queries. You can also build domain-specific agents for security, cost optimization, or capacity planning, and integrate with incident management workflows using Amazon Quick Flows and Amazon Quick Automate. The result is a more consistent, secure, and efficient way to manage AWS infrastructure at scale.