Artificial Intelligence
Create and manage Amazon EMR Clusters from SageMaker Studio to run interactive Spark and ML workloads – Part 1
February 2024: This blog post was reviewed and updated to include an updated AWS CloudFormation stack to comply with a recent Python3.7 lambda deprecation policy.
Amazon SageMaker Studio is the first fully integrated development environment (IDE) for machine learning (ML). It provides a single, web-based visual interface where you can perform all ML development steps, including preparing data and building, training, and deploying models.
Analyzing, transforming, and preparing large amounts of data is a foundational step of any data science and ML workflow. Data scientists and data engineers use Apache Spark, Hive, and Presto running on Amazon EMR for fast data preparation. Studio comes with built-in integration with Amazon EMR, enabling you to do petabyte-scale interactive data preparation and machine learning right within the Studio notebook. We dive deeper into this integration in this post in the following four sections:
- Authentication – We start with explaining how you can connect Studio securely to an EMR cluster configured with various authentication methods.
- Create clusters – Next, we demonstrate how DevOps administrators can use the AWS Service Catalog to define parameterized templates that data workers can use to create EMR clusters directly from the Studio interface.
- Connect to clusters – We then demonstrate how you can use a Studio notebook to visually discover, authenticate with, and connect to an existing EMR cluster.
- Example workflow – Finally, we use an example of predicting the sentiment of a movie review to demonstrate how you can run an end-to-end ML workflow, including preparing data, monitoring Spark jobs, and training and deploying an ML model to get predictions—all from the same Studio notebook.
We provide AWS CloudFormation templates to make it easy for you to deploy resources such as networking, EMR clusters, and Studio domains with a few simple clicks so that you can follow along with the examples in your own AWS account. As a follow-up, Part 2 of this post provides a deep dive into cross-account setups. These multi-account setups are common amongst customers and are a best practice for many enterprise account setups, as mentioned in our AWS Well-Architected Framework.
Solution overview
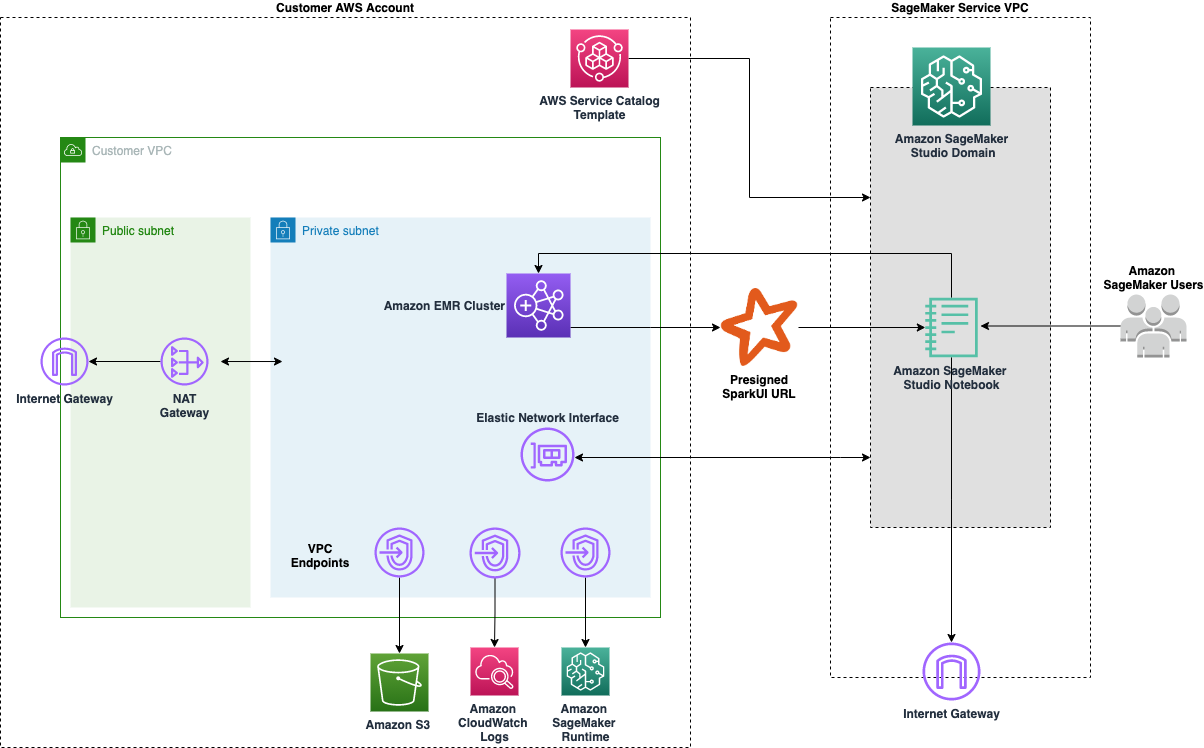
Studio runs on an environment managed by AWS. In this solution, the network access for the new Studio domain is configured as VPC only. For more details on different connectivity methods, see Securing Amazon SageMaker Studio connectivity using a private VPC. The elastic network interface created in the private subnet connects to required AWS services through VPC endpoints. That connected VPC is where we spin up our EMR clusters for this demo. For more information about the prerequisites, see Prepare Data at Scale with Studio Notebooks.
The following diagram represents the different components used in this solution.
The following diagram shows the complete user journey. A DevOps persona creates the AWS Service Catalog product within a portfolio that is accessible to the Studio execution AWS Identity and Access Management (IAM) roles. Data scientists using Studio with those roles can create, discover, and connect to EMR clusters from Studio to run Spark, Hive, and Presto workloads. You can also easily monitor your Spark jobs with a single click.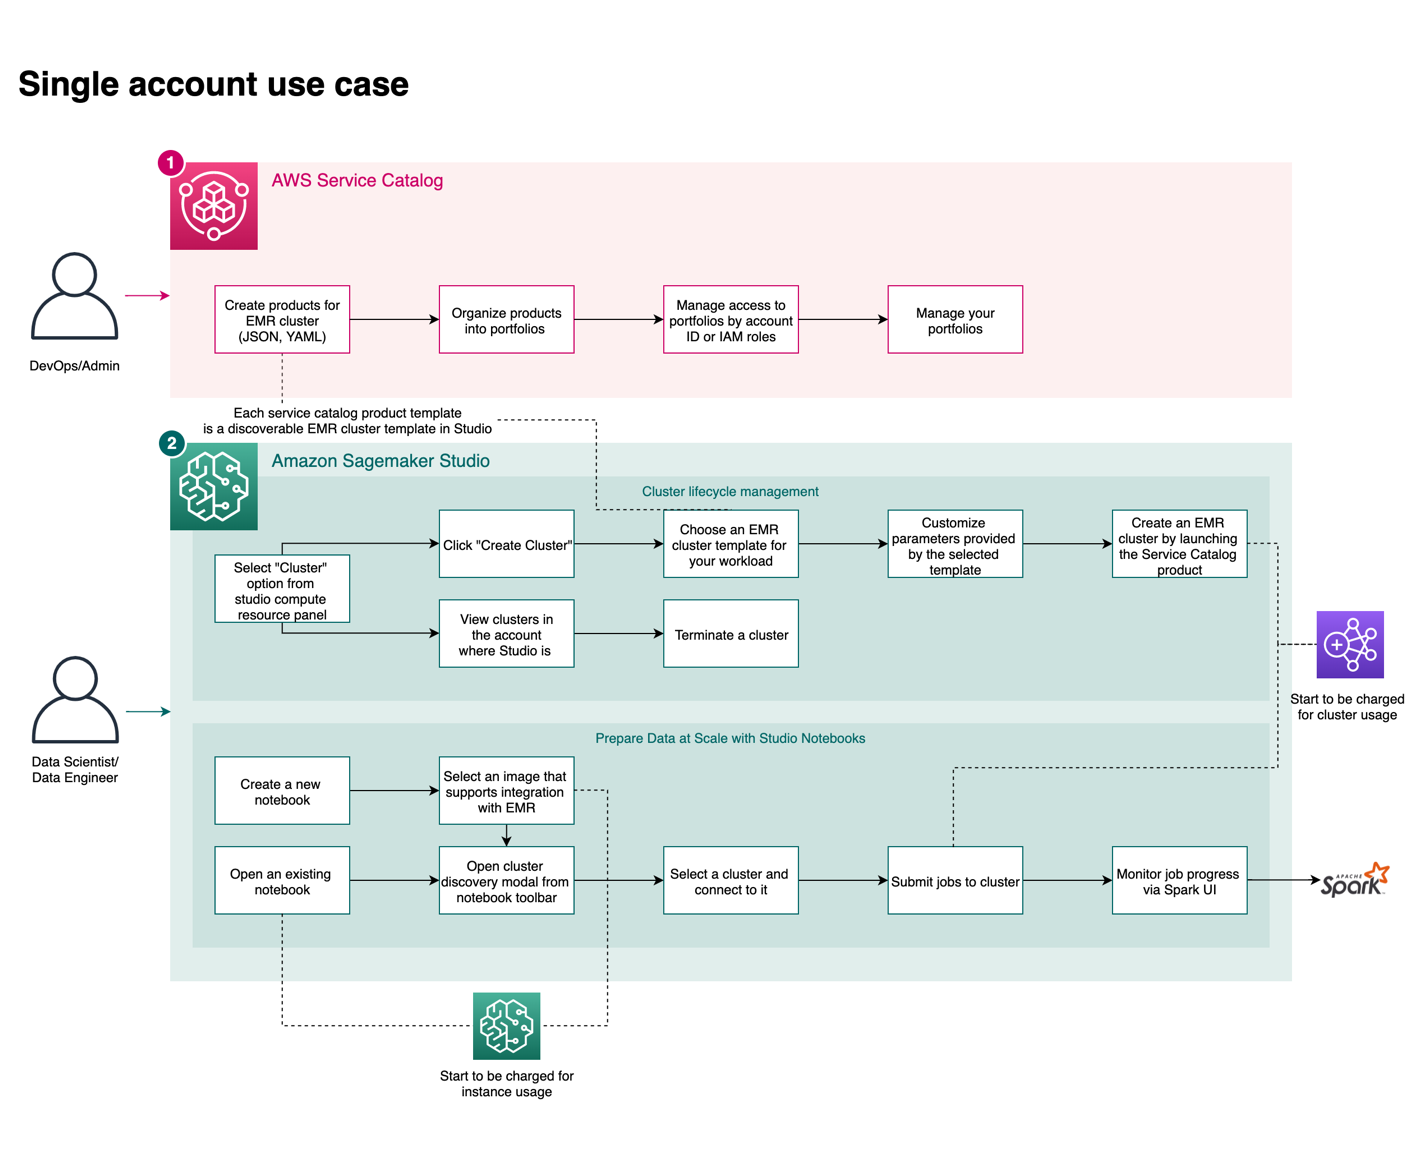
Authentication
Studio can connect to and run Spark, Hive, and Presto code on a remote EMR cluster through Livy, an open-source REST server. Livy supports three authentication options: Kerberos, LDAP, and No-Auth. The CloudFormation template used in this post uses No-Auth authentication mode. To understand how to set up Livy with Kerberos and LDAP, refer to the sample CloudFormation templates on GitHub.
Create EMR clusters from Studio
In this section, we demonstrate how an administrator can create a template that end users can launch with configurable parameters.
Create an EMR cluster from Studio: Administrator workflow
Administrators can use the AWS Service Catalog to define CloudFormation templates that allow users to create Amazon EMR clusters and make them available to selected users and IAM roles. You can parameterize the CloudFormation template so that end-users can modify relevant aspects of the cluster to match their workloads. For example, a data scientist or data engineer may want to specify the number of core nodes on the cluster, and the creator of the template can specify AllowedValues to set guardrails.
The following template parameters give some examples of commonly used parameters:
Administrators can choose to only expose certain relevant configuration parameters for users to customize while fully controlling the organizational, security, and networking guardrails in the AWS Service Catalog templates. Administrators can use the full set of AWS CloudFormation properties for Amazon EMR when creating templates that can be deployed though Studio. This means that you can enable Spot, auto scaling, auto-termination, and other popular configurations through the AWS Service Catalog product.
For the product to be visible within the Studio interface, we need to set the following tags on the Service Catalog product:
Lastly, the CloudFormation template in the Service Catalog product must have the following mandatory stack parameters:
Both values for these parameters are automatically injected when the stack is launched, so you don’t need to fill them in. They’re part of the template because Amazon SageMaker projects are utilized as part of the integration between AWS Service Catalog and Studio.
Create an EMR cluster from Studio: User workflow
After the AWS Service Catalog product has been created and made available to the user, users can create EMR clusters from Studio with the following steps:
- Launch a Studio notebook.
- Under SageMaker resources, choose Clusters on the drop-down menu.
- Choose Create cluster.
- From the available templates, choose the provisioned template SageMaker Studio Domain No Auth EMR.
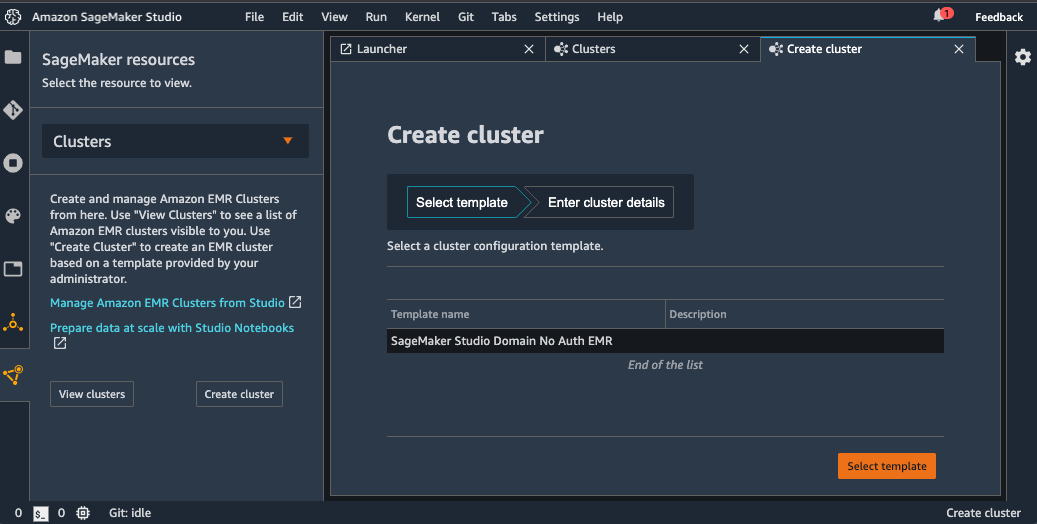
- Enter your desired configurable parameters and choose Create cluster.

You can now monitor the deployment on the Clusters management tab. As part of the template, our cluster instantiates Hive tables with some data that we can use as part of our example.

Connect to an EMR cluster from Studio
After your cluster has entered the Running/Waiting status, you can connect to the cluster from the notebook.
Choose Cluster at the top of the notebook. Select a cluster to connect to and choose Connect. For simplicity, the template that we deploy uses a No-Auth authentication mechanism, but this works seamlessly with Kerberos, LDAP, and HTTP authentication as well. Depending on the authentication method required by Livy on the chosen EMR cluster, the appropriate code is injected into a new cell and is run to connect to the cluster. You can use this code to establish a connection to the EMR cluster if you’re using this notebook at a later time.
You can also change the EMR cluster that the Studio notebook is connected to. Simply browse to find the cluster you want to switch to and connect to it. The Studio notebook can only be connected to one EMR cluster at a time.

For Studio users to browse the available clusters, we need to attach an IAM policy that permits Amazon EMR discoverability. For more information, refer to Discover Amazon EMR Clusters from Studio.
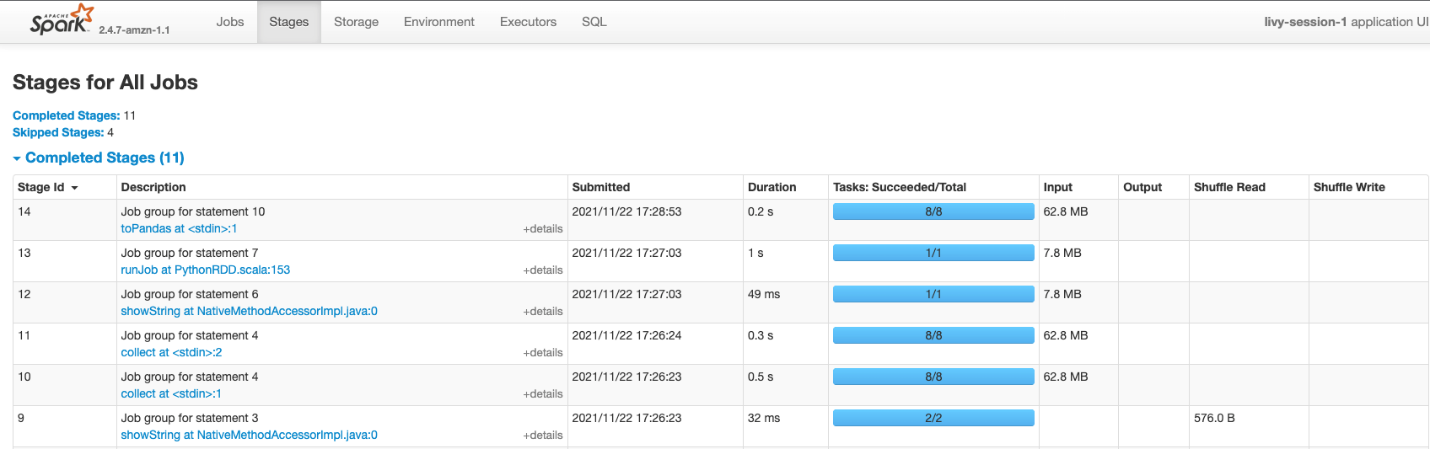
Monitor and debug with the Spark UI
After a connection is made, you can see a hyperlink for the Spark UI, which you can use to debug and monitor your Spark jobs. This presigned URL is generated at the time of connection to your cluster and has a time to live of 5 minutes. For more information, see Prepare Data at Scale with Studio Notebooks.
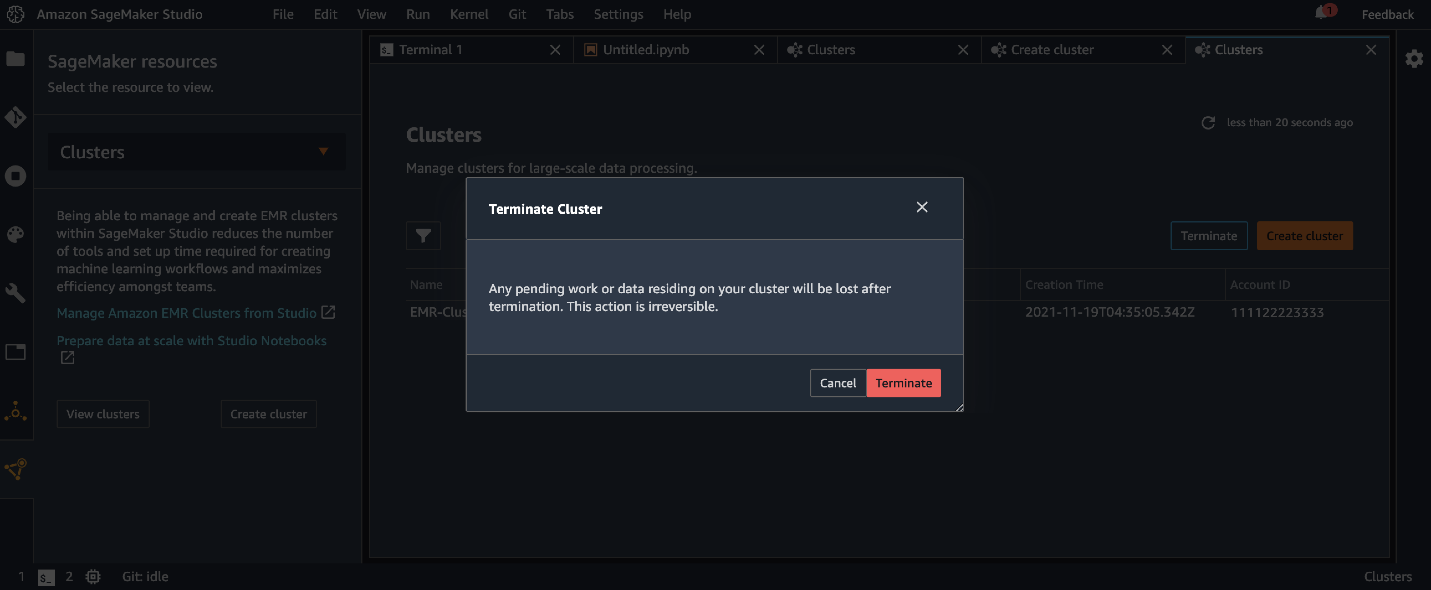
Delete an EMR cluster from Studio
After you’re finished with your data analysis on the EMR clusters, you can use the Studio interface to delete the cluster. Because this operation runs DELETE STACK under the hood, you may only delete clusters that were launched using provisioned AWS Service Catalog templates—you can’t delete existing clusters that were created outside of Studio.
Example workflow
In this section, we supply AWS CloudFormation templates and example notebooks to get started in a demonstration SageMaker domain.
Deploy resources with AWS CloudFormation
We provide CloudFormation templates to make it easy for you to deploy resources such as networking, EMR clusters, and Studio with a few simple clicks so that you can follow along with the examples in your own AWS account.
You will be charged for Studio and Amazon EMR resources used when you launch the following stacks. For more information, see Amazon SageMaker Pricing and Amazon EMR pricing. Follow the instructions in the cleanup sections at the end of this post to make sure that you don’t continue to be charged for these resources.
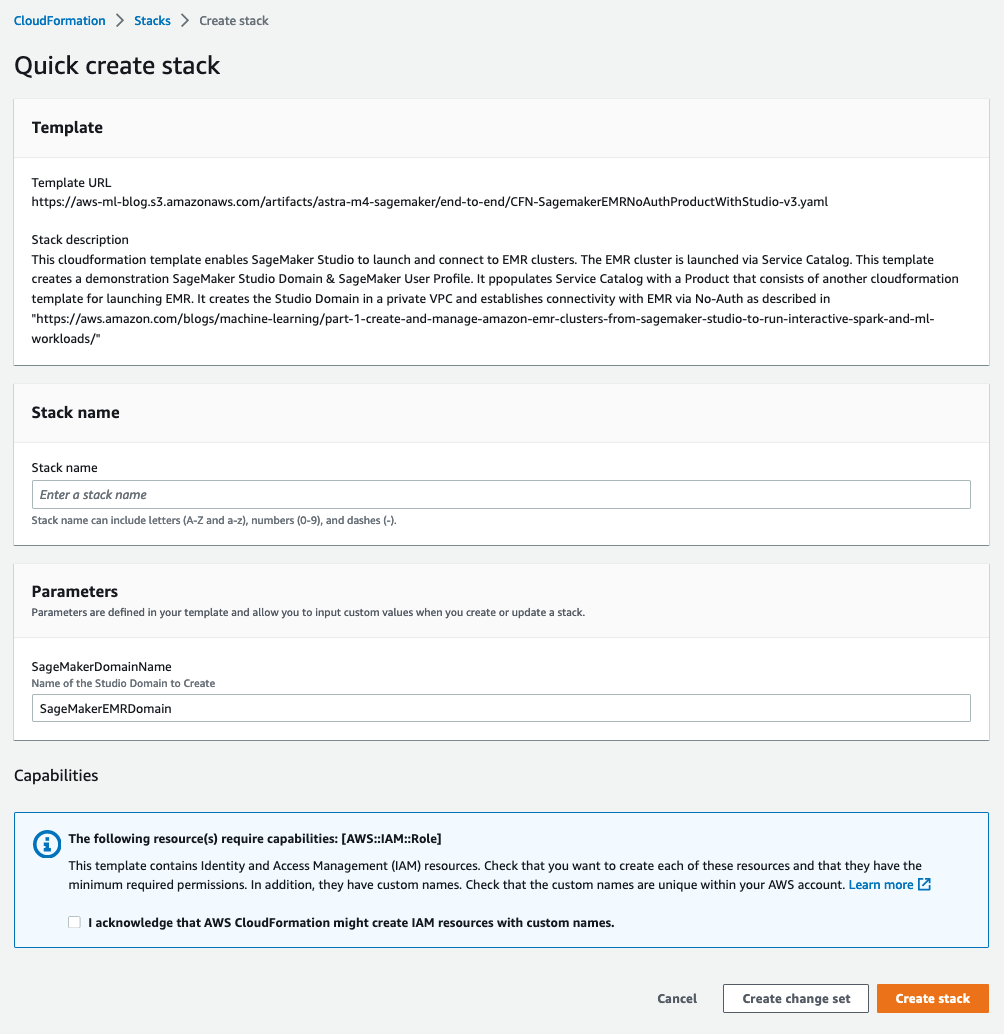
CloudFormation stack for end-to-end demo
The following stack provides an end-to-end CloudFormation template that stands up a private VPC, a SageMaker domain attached to that VPC, and a SageMaker user with visibility to the pre-created AWS Service Catalog product.
To launch the end-to-end stack, choose the stack for your desired Region.
| ap-northeast-1 | |
| ap-northeast-2 | |
| ap-south-1 | |
| ap-southeast-1 | |
| ap-southeast-2 | |
| ca-central-1 | |
| eu-central-1 | |
| eu-north-1 | |
| eu-west-1 | |
| eu-west-2 | |
| eu-west-3 | |
| sa-east-1 | |
| us-east-1 | |
| us-east-2 | |
| us-west-1 | |
| us-west-2 |
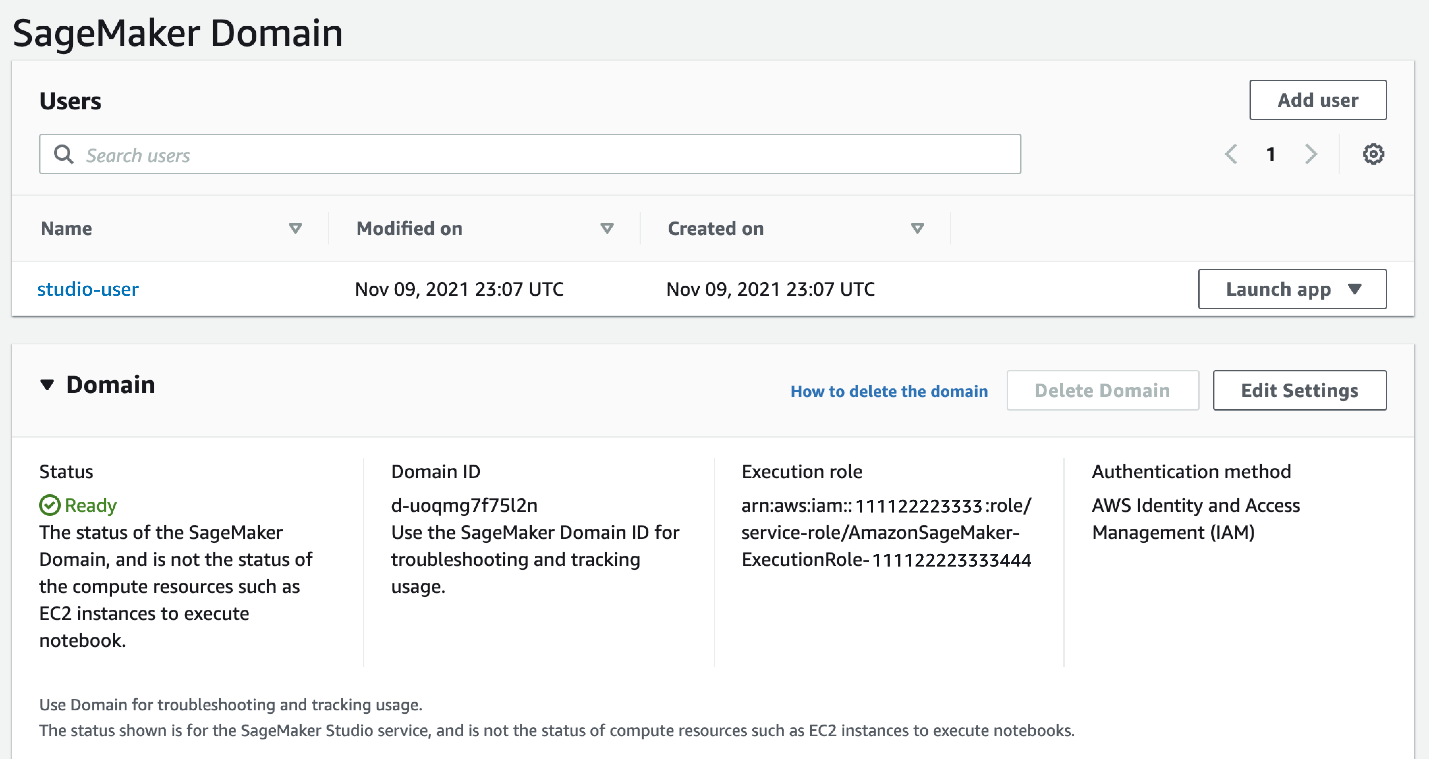
After we launch the stack, we can see that our Studio domain has been created, and studio-user is attached to an execution role that was created with visibility to our Service Catalog product.
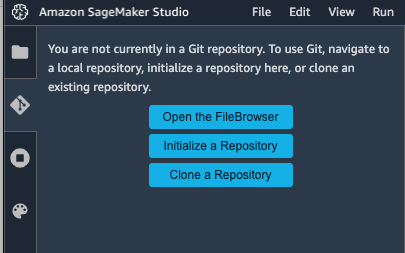
Clone the GitHub repo
The GitHub repository has several code samples and templates. We therefore start with cloning the repo.
Start the notebook and kernel
On Studio, choose the File menu, then choose New and Notebook and select the SparkMagic Image and PySpark kernel. As of this writing, only a subset of kernels support connecting to an existing EMR cluster. For the full list of supported kernels, and information on building your own Studio images with connectivity capabilities, refer to Prepare Data at Scale with Studio Notebooks. For this post, we use the SparkMagic kernel from the PySpark image and run the blog_example_code/smstudio-pyspark-hive-sentiment-analysis.ipynb notebook from the repository.
Explore Studio features
You’re now ready to explore all the features described in this post on your own Studio setup. You can use Studio to create, visually discover, authenticate with, and connect to an EMR cluster. The file blog_example_code/smstudio-pyspark-hive-sentiment-analysis.ipynb provides a walkthrough of how you can query a Hive table on Amazon EMR using SparkSQL. The file also demonstrates the code you can use to locally preprocess and feature engineer the retrieved data, train an ML model, deploy it, and get predictions—all from the Studio notebook.
Clean up the end-to-end stack
If you deployed the end-to-end stack, complete the following steps to clean up the resources deployed for this solution:
- Delete your EMR cluster, as shown in the previous section.
- On the Studio console, choose your user name (
studio-user). - Delete all the apps listed under Apps by choosing Delete app.
- Wait until the status shows as
Completed.
Next, you delete your Amazon Elastic File System (Amazon EFS) volume associated with domain provisioned.
- On the Amazon EFS console, delete the file system that SageMaker created.
You can confirm it’s the correct volume by choosing the file system ID and confirming the tag is ManagedByAmazonSageMakerResource.
Finally, you delete the CloudFormation template.
- On the AWS CloudFormation console, choose Stacks.
- Select the stack you deployed for this solution.
- Choose Delete.
Conclusion
In this post, we demonstrated a unified notebook-centric experience to create and manage EMR clusters, run analytics on those clusters, and train and deploy SageMaker models, all from the Studio interface. We also showed a one-click interface for debugging and monitoring Amazon EMR jobs through the Spark UI.
We encourage you to try out this new functionality in Studio yourself, and check out Part 2 of this post, which dives deep how data workers can discover, connect, create, and stop clusters in a multi-account setup.
About the authors
 Sumedha Swamy is a Principal Product Manager at Amazon Web Services. He leads SageMaker Studio team to build it into the IDE of choice for interactive data science and data engineering workflows. He has spent the past 15 years building customer-obsessed consumer and enterprise products using Machine Learning. In his free time, he likes photographing the amazing geology of the American Southwest.
 Prateek Mehrotra is a Senior SDE working for SageMaker Studio at Amazon Web Services. He is focused on building interactive ML solutions which simplify usability by abstracting away complexity. In his spare time, Prateek enjoys spending time with his family and likes to explore the world with them.
 Sriharsha M S is an AI/ML specialist solutions architect in the Strategic Specialist team at Amazon Web Services. He works with strategic AWS customers who are taking advantage of AI/ML to solve complex business problems. He provides technical guidance and design advice to implement AI/ML applications at scale. His expertise spans application architecture, big data, analytics, and machine learning.
 Sean Morgan is a Senior ML Solutions Architect at AWS. He has experience in the semiconductor and academic research fields, and uses his experience to help customers reach their goals on AWS. In his free time Sean is an activate open source contributor/maintainer and is the special interest group lead for TensorFlow Addons.
 Ruchir Tewari is a Senior Solutions Architect specializing in security and is a member of the ML TFC. For several years he has helped customers build secure architectures for a variety of hybrid, big data and AI/ML applications. He enjoys spending time with family, music and hikes in nature.
 Luna Wang is a UX designer at AWS who has a background in computer science and interaction design. She is passionate about building customer-obsessed products and solving complex technical and business problems by using design methods. She is now working with a cross-functional team to build a set of new capabilities for interactive ML in SageMaker Studio.
Audit History
Last reviewed and updated in February 2024 by Pranav Murthy | Sr. Machine Learning Solutions Architect
Last reviewed and updated in January 2023 by Sean Morgan | Sr. Machine Learning Solutions Architect