Artificial Intelligence
Scale Robot Reinforcement Learning with NVIDIA Isaac Lab on Amazon SageMaker AI
Physical AI is moving from research into production. Robots are increasingly trained in high-fidelity simulation before being deployed to factories, warehouses, and logistics centers, because training in the real world is slow, expensive, and often unsafe, while GPU-accelerated simulation can compress months of learning into hours.
This shifts the challenge to compute. Reinforcement learning (RL) for complex behaviors like humanoid locomotion on rough terrain is compute-intensive, with single-node training runs stretching from hours to days. Robotics teams need to iterate quickly during research and also run production-grade, long-horizon training jobs without the operational burden of maintaining compute clusters.
In this post, we show how to train robot policies for the Unitree H1 humanoid with NVIDIA Isaac Lab on Amazon SageMaker AI across two compute options: Amazon SageMaker HyperPod and Amazon SageMaker Training Jobs. The full code of this solution is available in the accompanying GitHub repository.

Image credit: NVIDIA
1. Why Amazon SageMaker AI for Physical AI training
Amazon SageMaker AI removes the undifferentiated heavy lifting of managing compute infrastructure for machine learning (ML) training. The service provisions instances, configures drivers and networking, monitors node health, and tears down resources when jobs finish, so engineering effort stays on developing the robot policy rather than on the infrastructure underneath it. This is especially relevant for robot policy RL, which is infrastructure heavy: runs are long, GPU intensive, and often distributed across multiple nodes. Development typically involves two phases: short iterative experiments to tune reward functions, observation spaces, and model architectures, and longer production runs that train a tuned configuration to convergence. SageMaker AI provides two compute options that fit these phases.
Cluster resiliency and control with SageMaker HyperPod
SageMaker HyperPod is a purpose-built, managed infrastructure for distributed training and inference of large-scale foundation models. Resiliency is at the core of SageMaker HyperPod. Hardware failures become an issue at scale, and each failure in a multi-node RL run means lost training progress plus time to detect the fault, replace the node, and restart from the last checkpoint. SageMaker HyperPod runs a health-monitoring agent on each node that performs basic and deep health checks. When a fault is detected, it automatically reboots or replaces the faulty instance. With auto-resume functionality, the training job restarts from the last checkpoint after the replacement node is ready, with no manual intervention.
Orchestrated with Amazon Elastic Kubernetes Service (Amazon EKS) or Slurm, HyperPod provides direct access to cluster nodes and a stable environment that persists across runs. The HyperPod observability add-on publishes hundreds of cluster, node, and job metrics to Amazon Managed Service for Prometheus and visualizes them in pre-built Amazon Managed Grafana dashboards. Teams get GPU utilization, memory pressure, network throughput, and task-level performance without setting up a metrics pipeline. HyperPod task governance, built on Kueue, lets administrators carve the cluster into namespace-scoped queues with compute quotas, priorities, and preemption. Allocations can be defined per instance, per whole GPU, or per GPU partition with NVIDIA Multi-Instance GPU (MIG). Fine-grained quotas cover accelerators, vCPU, and memory.
Ephemeral compute with SageMaker Training Jobs
SageMaker Training Jobs are a fully managed, on-demand way to run containerized training workloads without maintaining any long-lived compute. Each job provisions GPU instances, pulls the container from Amazon Elastic Container Registry (Amazon ECR), runs the training script, uploads artifacts to Amazon Simple Storage Service (Amazon S3), and terminates the instances when the job finishes. There is no idle compute cost between runs. This model fits the iteration phase of policy development, where reward functions, observation spaces, and network architectures change frequently between short runs. It is also a good fit for hyperparameter tuning sweeps, where many short runs run in parallel and then release their compute.
2. NVIDIA Isaac Lab and the training task
NVIDIA Isaac Lab is an open-source robot learning framework built on NVIDIA Isaac Sim. It uses GPU-parallel simulation to run thousands of robot instances simultaneously on one or multiple GPUs, turning what would be months of real-world experience into hours of simulated training. Isaac Lab provides structured APIs to define tasks, observation and action spaces, reward functions, and training loops for both reinforcement learning and imitation learning.
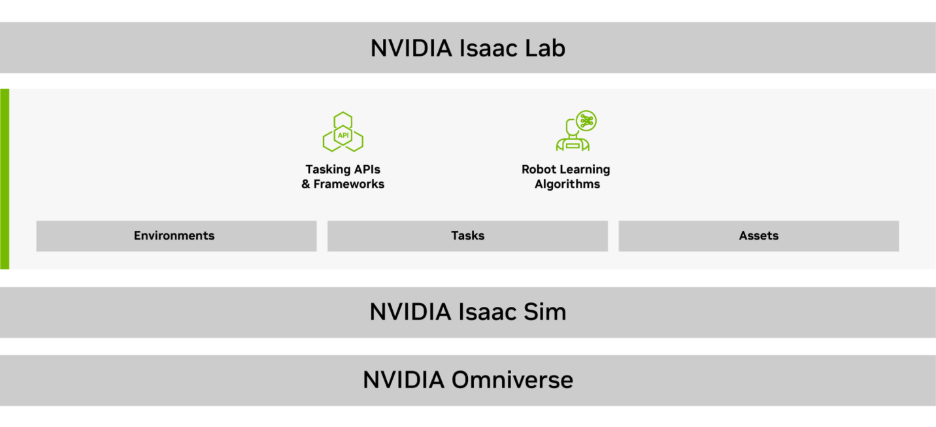
Image credit: NVIDIA
The sample training task in this post is Isaac-Velocity-Rough-H1-v0, where a Unitree H1 humanoid robot learns to track velocity commands while walking across rough terrain. The robot must coordinate its 19 joints to maintain balance over procedurally generated uneven surfaces. Training uses Proximal Policy Optimization (PPO) through skrl, one of several RL frameworks supported by Isaac Lab. Scaling to multiple nodes multiplies the number of parallel environments, producing more diverse experience per policy update and accelerating convergence. You can extend the scripts and configuration provided in this solution to other robot learning tasks.
3. Solution overview
The solution in the accompanying GitHub repository consists of two main parts: (1) a single Docker image that runs the training code on both SageMaker HyperPod and SageMaker Training Jobs, and (2) a generator script that renders the Kubernetes manifests and the SageMaker launch script from a shared configuration file. The two service options differ only in how the image is launched: as a Kubernetes PyTorchJob on SageMaker HyperPod, or through a CreateTrainingJob API call for a SageMaker Training Job.
The H1 locomotion task used here is the same as in the NVIDIA Isaac Lab on AWS workshop, which runs the workload on Amazon Elastic Compute Cloud (Amazon EC2) and AWS Batch. Moving to SageMaker AI keeps the training code unchanged and adds managed clusters, integrated fault recovery, and serverless training job execution.
Training image
The training container image is built from nvcr.io/nvidia/isaac-sim:5.1.0. The provided Dockerfile clones Isaac Lab v2.3.2, installs it into Isaac Sim’s bundled Python environment, and copies in the entrypoint script that parses the SageMaker Training Jobs resource config to launch torchrun. The full Dockerfile is in docker/Dockerfile. Both service options use the same image.
Experiment tracking
Training metrics are streamed to Amazon SageMaker managed MLflow for persistent, searchable experiment tracking across both backends when a tracking server is configured. MLflow is opt-in: leave the tracking URI empty to disable it entirely. Section 4.5 covers the configuration.
Configuration and the generator script
The generator script is configured through environment-specific variables defined in config.yaml. The generate.py script reads the configuration and renders the templates in templates/ into ready-to-apply files under generated/.
Running the generator is a single command:
The specific files used by each backend are covered in the Section 4 and Section 5 walkthroughs for SageMaker HyperPod and SageMaker Training Jobs respectively.
Training topology across backends
In the provided solution, both paths end with the same torchrun invocation of Isaac Lab’s skrl trainer on the same image. The primary difference is how each environment provides the topology to the container. On SageMaker HyperPod, the Kubeflow Training Operator injects MASTER_ADDR, MASTER_PORT, RANK, and WORLD_SIZE into each pod. These describe the pod-level topology (WORLD_SIZE is the pod count, RANK is the per-pod index). The entrypoint forwards them to torchrun, which spawns one process per GPU within each pod. The per-pod launchers rendezvous through MASTER_ADDR:MASTER_PORT to form the global process group. On SageMaker Training Jobs, SageMaker writes the host list to /opt/ml/input/config/resourceconfig.json, and the container’s entrypoint parses it at startup.
GPU instance compatibility
Isaac Sim is built on NVIDIA Omniverse and uses the Omniverse RTX Renderer, which requires GPUs with hardware RT Cores. The G family of AWS GPU instances is suitable for Isaac Lab workloads. The P family is not, because it uses data center GPUs without RT Cores. See the Isaac Sim 5.1 requirements page for the full list of supported and unsupported hardware.
| Instance family | GPU type and generation | RT Cores / Isaac Sim compatibility |
ml.g5 |
NVIDIA A10G (Ampere) | Yes |
ml.g6 |
NVIDIA L4 (Ada Lovelace) | Yes |
ml.g6e |
NVIDIA L40S (Ada Lovelace) | Yes |
ml.g7e |
NVIDIA RTX PRO 6000 (Blackwell) | Yes |
ml.p4d, ml.p4de, ml.p5, ml.p5e, ml.p5en, ml.p6-b200, ml.p6-b300, ml.p6e-gb200 |
NVIDIA A100 (Ampere), H100 / H200 (Hopper), B200 / B300 / GB200 (Blackwell) | No |
The examples in this post use ml.g6.12xlarge throughout. You can change the instance type in config.yaml. The ml.g6, ml.g6e, and ml.g7e families support Elastic Fabric Adapter (EFA) at the 8xlarge size and above, which gives NCCL a kernel-bypass, RDMA-capable transport for multi-node collectives. Enabling EFA on HyperPod requires the AWS EFA device plugin and requesting vpc.amazonaws.com/efa resources in the pod spec. On SageMaker Training Jobs, you must configure EFA in the container image and in the virtual private cloud (VPC) configuration. EFA is automatically configured through the solution for both SageMaker HyperPod and SageMaker Training Jobs backends. The SageMaker Training Job setup is in the documentation.
Setup: Clone the repository and build the image
Two setup steps are shared across both walkthroughs: cloning the accompanying repository and building the training image.
Clone the solution’s repository:
The repository contains the Dockerfile, the configuration template, the generator, and the entrypoint scripts used by both backends.
Build the image from the repository root and push it to Amazon ECR.
- Define the environment variables according to your setup:
- Check whether the corresponding ECR repository exists, and create it if not:
- Authenticate with Amazon ECR:
- Build and tag the Docker image:
- Push the Docker image to Amazon ECR:
If you want to use Training Jobs instead, jump to Section 5.
4. Walkthrough: training on SageMaker HyperPod with Amazon EKS
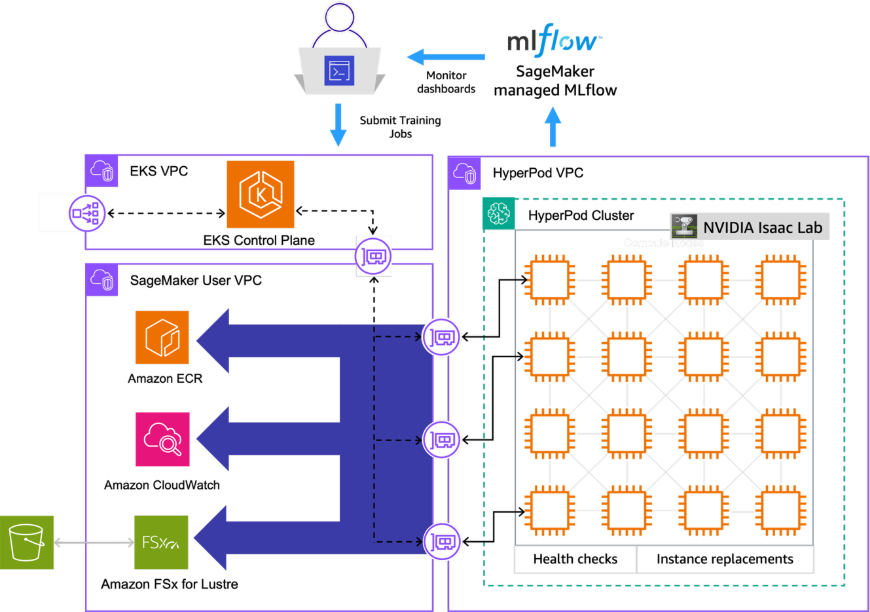
For this walkthrough, we use an existing SageMaker HyperPod cluster orchestrated by Amazon EKS, with a GPU instance group of two ml.g6.12xlarge nodes (4× NVIDIA L4 each, 8 GPUs total). The goal is a distributed training job for the H1 locomotion task, with live metrics in SageMaker managed MLflow and the resulting checkpoints written to FSx for Lustre.
4.1 Prerequisites
The solution requires the following prerequisites to be in place:
- Sufficient service quota for the cluster and the chosen GPU instance type in the target region. HyperPod clusters consume the corresponding
ml.g6.*(or other GPU family) quota for SageMaker HyperPod. Request an increase through AWS Service Quotas before creating or scaling the cluster. - A SageMaker HyperPod cluster orchestrated by Amazon EKS with a GPU instance group of two
ml.g6.12xlargenodes. See Creating a SageMaker HyperPod cluster with Amazon EKS orchestration. kubectlconfigured against the cluster, and the Kubeflow Training Operator installed in it so thatPyTorchJobcustom resources are recognized.- The FSx for Lustre CSI Driver installed, and an Amazon FSx for Lustre file system in the same VPC and subnet as the HyperPod nodes. This file system stores the logs and checkpoints written by the training job.
4.2 Configure and generate manifests
- Copy the example configuration:
- Fill in your environment values and AWS account ID, Region, and cluster details:
Important configuration fields include the following:
aws,ecr— these are used to form the container image URI (<account>.dkr.ecr.<region>.amazonaws.com/<repo>:<tag>) referenced by every pod and training job. You can set an explicit URI throughhyperpod_eks.imageas an override.training.task— the Isaac Lab task identifier. You can select a different locomotion or manipulation task by changing this value.training.max_iterations— the number of PPO iterations. A value of 1000 is sufficient for a smoke test. Production runs for H1 on rough terrain typically require an order of magnitude more.hyperpod_eks.fsx— the file system ID, DNS name, and mount name of the FSx for Lustre file system. These values are available from the FSx console or theaws fsx describe-file-systemscommand.jobs.training_job.fsx_log_dir— the directory on FSx where training logs and checkpoints are written.
Generate the manifests by executing the script:
The following Kubernetes manifests are generated and used in the next parts of the walkthrough:
| Generated file | What it is | When to apply |
storage.yaml |
PersistentVolume and PersistentVolumeClaim that bind to your FSx for Lustre file system, exposing it to pods at /fsx. |
Once per cluster. |
training-job.yaml |
Kubeflow PyTorchJob with a Master replica and num_nodes - 1 Worker replicas. Runs on one node when num_nodes: 1 and across multiple nodes otherwise. |
Per training run. |
viz-eks-webrtc-pod.yaml |
Pod that runs Isaac Sim in headless streaming mode alongside a browser-based WebRTC client, for visualizing trained policies. | Optional. Covered in Section 6. |
The remaining file, launch-sm-training.py, is covered in the SageMaker Training Jobs walkthrough (Section 5).
4.3 Deploy shared storage
FSx for Lustre is the storage layer for this walkthrough. It provides parallel, high-throughput writes that handle checkpoints from multiple pods without bottlenecking the training loop, and it lets the training job and the visualization pod use the same volume.
The file generated/storage.yaml contains a PersistentVolume and PersistentVolumeClaim that point at your FSx file system. Apply it to your cluster:
4.4 Launch the training
The file generated/training-job.yaml is a Kubeflow PyTorchJob with a Master replica and num_nodes - 1 Worker replicas. With the default jobs.training_job.num_nodes: 2 in config.yaml, it runs across two ml.g6.12xlarge nodes (8 GPUs total). Setting num_nodes: 1 produces a single-node job with no Worker replicas.
When the job starts, the Kubeflow Training Operator injects the standard PyTorch distributed environment variables (MASTER_ADDR, MASTER_PORT, RANK, WORLD_SIZE) into each pod. The container launch script passes them to torchrun, which handles rendezvous and process group setup:
Apply the manifest:
Observe the job status:
Early logs show each pod printing its rank, the master address, and the output of nvidia-smi. After the workers connect to the master, Isaac Lab loads the scene (which takes a minute or two the first time on each node while asset caches warm up), spawns parallel environments across all available GPUs, and begins logging reward and value loss metrics every few seconds. The entrypoint prints the Kubeflow-injected pod-level topology before handing off to torchrun.
The training manifest also checks FSx for an existing best_agent.pt at startup. If one is found from a previous run, it passes --checkpoint to train.py so training resumes from that point rather than starting from scratch. A pod restart or node replacement triggered by HyperPod’s health monitoring automatically continues from the last checkpoint.
=== Master Node Info ===
Hostname: isaaclab-h1-master-0
MASTER_ADDR: isaaclab-h1-master-0
WORLD_SIZE: 2
RANK: 0
GPU 0: NVIDIA L4 (UUID: GPU-dd5102c3-be08-...)
GPU 1: NVIDIA L4 (UUID: GPU-3c0d70fe-519f-...)
GPU 2: NVIDIA L4 (UUID: GPU-42485aa5-6a2a-...)
GPU 3: NVIDIA L4 (UUID: GPU-18f62bef-4155-...)
=== Starting Master (2 nodes, 8 GPUs total, 1000 iterations) ===
...
[INFO][AppLauncher]: Using device: cuda:0
[INFO]: Scene manager: <class InteractiveScene>
Number of environments: 4096
Environment spacing : 2.5
[INFO]: Time taken for scene creation: 16.30 seconds
10%|▉ | 118/24000 [00:09<01:02, 17.21it/s]
...
Here WORLD_SIZE: 2 is the pod count, not the global process count. torchrun spawns 8 processes in total (4 per pod across 2 pods) after it starts, and inside those processes WORLD_SIZE becomes 8.
4.5 Track experiments with SageMaker managed MLflow
Training metrics, run parameters (task, iterations, seed), and the final checkpoint directory are forwarded to Amazon SageMaker managed MLflow for a persistent, searchable experiment store. System metrics such as GPU utilization and CPU/memory usage are sampled by MLflow’s own background thread.
Enabling MLflow is opt-in. When MLFLOW_TRACKING_URI is empty (the default), the training script skips every MLflow call. Set the tracking URI and experiment name in config.yaml:
Regenerate the manifests and relaunch the training job. The training pod logs print the run URL a few seconds after startup:
INFO mlflow.tracking.fluent: Experiment with name 'isaaclab-h1' does not exist. Creating a new experiment.
INFO mlflow.system_metrics.system_metrics_monitor: Started monitoring system metrics.
...
View run 2026-04-27_18-59-29_ppo_torch at:
https://mlflow.sagemaker.us-east-2.app.aws/#/experiments/1/runs/<RUN-ID>
View experiment at:
https://mlflow.sagemaker.us-east-2.app.aws/#/experiments/1
When the run completes, MLflow shuts down the system-metrics thread and the Training time: line from skrl appears:
Training time: 91.9 seconds
INFO mlflow.system_metrics.system_metrics_monitor: Stopping system metrics monitoring...
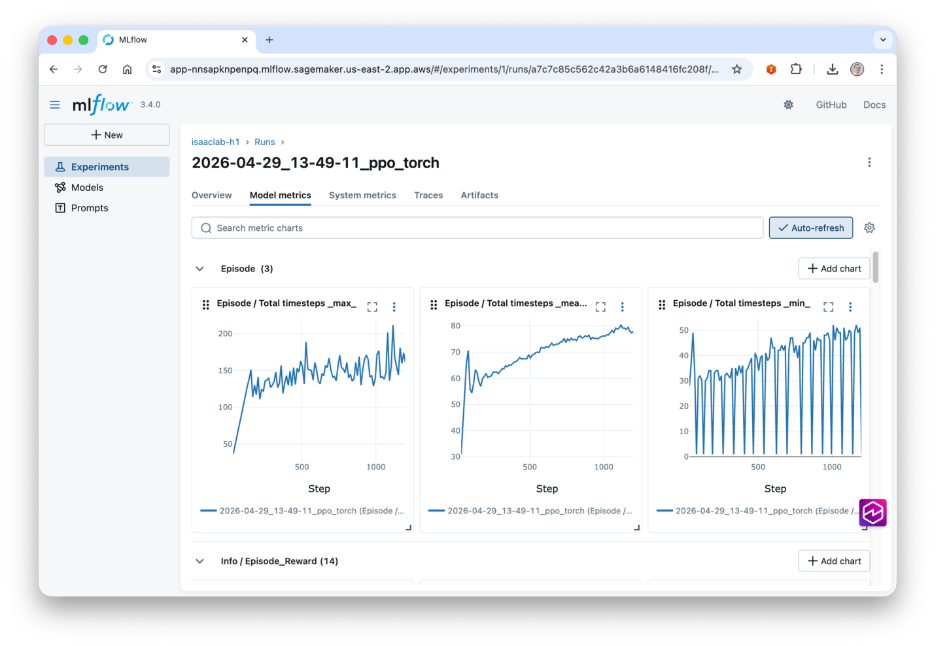
INFO mlflow.system_metrics.system_metrics_monitor: Successfully terminated system metrics monitoring!Open the URL, or navigate to the MLflow UI from SageMaker Studio, to see reward curves and value loss update live alongside GPU utilization.
Two authorization models exist for SageMaker managed MLflow:
- MLflow tracking server (
arn:aws:sagemaker:<region>:<account>:mlflow-tracking-server/<name>): IAM actions under thesagemaker-mlflowservice prefix govern access. Give the training rolesagemaker-mlflow:*on the tracking server resource. - Studio MLflow App (
arn:aws:sagemaker:<region>:<account>:mlflow-app/<id>): the app is tied to a Studio user profile and authorizes callers through that Studio execution role. Training jobs run under a different role, so they must assume the Studio execution role before each MLflow call. Setassume_role_arnto the Studio role ARN. The generator passes it through asSAGEMAKER_MLFLOW_ASSUME_ROLE_ARN, and the sagemaker-mlflow plugin handles thests:AssumeRolecall on each request. Update the Studio execution role’s trust policy so the training role can assume it, and attachsts:AssumeRoleto the training role.
5. Walkthrough: training on SageMaker Training Jobs
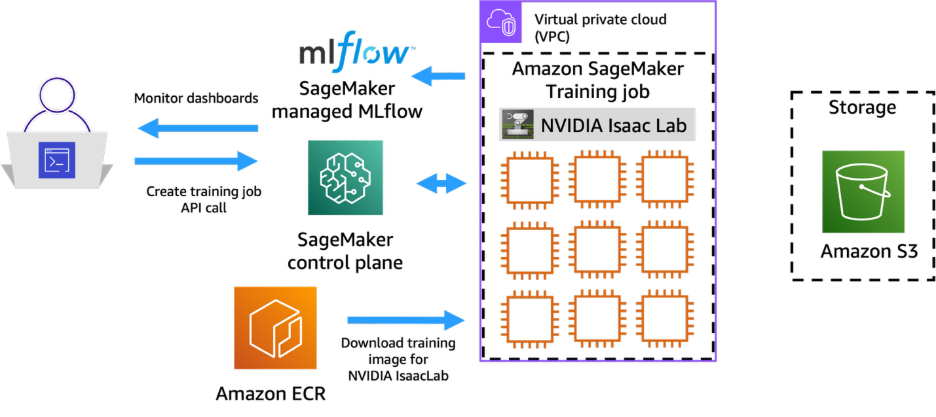
SageMaker Training Jobs run the same image through a different lifecycle. Each job provisions the requested GPU instances, pulls the image from Amazon ECR, runs the entrypoint, uploads all files that the training script copied into /opt/ml/model/ to the S3 output path, and terminates the instances.
5.1 Prerequisites
- Sufficient service quota for the cluster and the chosen GPU instance type in the target Region. SageMaker Training Jobs consume the corresponding
ml.g6.*(or other GPU family) quota for SageMaker Training Jobs. Request an increase through AWS Service Quotas before creating or scaling the cluster. - An IAM role that SageMaker can assume for the training job, with permissions to pull from your Amazon ECR repository, read the entrypoint from your S3 bucket, and write artifacts back to Amazon S3. See the SageMaker execution role documentation.
- An S3 bucket for the entrypoint script (input) and the training artifacts (output).
- The same Amazon ECR image pushed in Section 3. No rebuild is needed.
boto3installed locally (pip install boto3).
5.2 Configure
The Training Jobs section of config.yaml captures the execution role, the instance type and count, and the output location. The scripts S3 URI and output S3 path auto-derive from the top-level s3.bucket value when left empty.
Important configuration fields include the following:
role_arn— the IAM role SageMaker assumes for the job. The role must haveecr:BatchGetImage,s3:GetObjecton the scripts path, ands3:PutObjecton the output path.instance_count— the number of instances the job uses. When you set this to more than one, SageMaker launches a multi-node job and populatesresourceconfig.jsonon each instance with the host list. The container entrypoint reads this file to derive its rank and the master address, so the same training script is reused without modification.
5.3 Upload the entrypoint
SageMaker pulls the entrypoint script from Amazon S3 into each training instance at job start time. Upload it once. Every subsequent job reads from the same location until a new version is uploaded. Replace the bucket name with your chosen Amazon S3 bucket:
5.4 Generate and launch
Running python generate.py produces a launch-sm-training.py script in generated/ with the image URI, IAM role, S3 paths, and instance configuration pre-populated from config.yaml. The script exposes a small CLI for values you can override between runs:
The launcher calls CreateTrainingJob with a timestamp-suffixed job name, the Amazon ECR image, and the S3 entrypoint location. It also passes through the Isaac Sim environment variables the container requires (ACCEPT_EULA, NVIDIA_VISIBLE_DEVICES=all, MAX_ITERATIONS, among others). On success, it prints the job name and a describe-training-job command to monitor progress.
5.5 Monitor
The SecondaryStatus field progresses through Pending → Downloading → Training → Uploading → Completed:
Training logs are streamed to Amazon CloudWatch Logs under the /aws/sagemaker/TrainingJobs log group, with one log stream per instance. The SageMaker console links directly from the job page to the stream if you prefer a UI. A successful rank 0 stream starts with the entrypoint’s self-test:
=== SageMaker Training Job ===
Hostname: ip-10-0-195-224.us-east-2.compute.internal
GPU 0: NVIDIA L4 (UUID: GPU-66e3a452-...)
GPU 1: NVIDIA L4 (UUID: GPU-a075bb9c-...)
GPU 2: NVIDIA L4 (UUID: GPU-2ba15062-...)
GPU 3: NVIDIA L4 (UUID: GPU-e25c05a4-...)
=== Resource Config ===
{"current_host":"algo-1","hosts":["algo-1","algo-2"],"network_interface_name":"eth0"}
=== Training Configuration ===
CURRENT_HOST=algo-1
MASTER_HOST=algo-1
NNODES=2
NODE_RANK=0
NPROC=4
MAX_ITERATIONS=1000
=== Starting Isaac Lab H1 Training ===
When the job finishes, SageMaker packages whatever the entrypoint copied into /opt/ml/model/ as a model.tar.gz and uploads it to the output S3 path. For H1, the archive contains the skrl logs/ directory with the training checkpoints and best_agent.pt.
When you set sagemaker_training.checkpoint_s3_path in config.yaml, the launcher includes a CheckpointConfig that tells SageMaker to continuously sync /opt/ml/checkpoints to Amazon S3 during training. The entrypoint symlinks skrl’s log directory to that path, so every checkpoint skrl writes is backed up to Amazon S3 in near-real time. If the job fails or is interrupted, relaunching it with the same checkpoint_prefix restores the latest checkpoint and resumes training automatically.
The same MLflow integration described in Section 4.5 applies to Training Jobs. When you set mlflow.tracking_uri, the generated launch-sm-training.py forwards the MLflow environment variables to the training container as part of the CreateTrainingJob request, and the training code writes metrics to the same experiment. For Studio MLflow Apps, the training job’s execution role must be listed in the Studio execution role’s trust policy and carry sts:AssumeRole in its own permissions.
6. Visualizing trained policies
The repository provides a visualization pod for SageMaker HyperPod that streams the Isaac Sim GUI directly into a browser through WebRTC, using the same FSx volume as the training jobs so any checkpoint produced on HyperPod can be replayed.
WebRTC streaming on the HyperPod cluster
Isaac Sim includes built-in headless WebRTC streaming. The viz pod bundles two containers sharing the pod network:
isaacsim— the training image, launched with the skrlplay.pyscript in live-stream mode. It loads the most recentbest_agent.ptfrom the FSx log directory, runs the task with 25 parallel environments, and streams the viewport over WebRTC (signaling on TCP 49100, media on UDP 47998).web-viewer— a stocknode:22-slimthat scaffolds NVIDIA’s WebRTC client from@nvidia/create-ov-web-rtc-app, points it at the Isaac Sim container on127.0.0.1, and serves it on TCP 8210.
The viz pod runs on a GPU node in the same cluster and mounts the FSx volume used by the training jobs, so checkpoints produced by a HyperPod run are directly available for replay. The manifest is rendered by generate.py into generated/viz-eks-webrtc-pod.yaml alongside the training manifests:
Connectivity needs one extra step: kubectl port-forward only supports TCP, but WebRTC media requires UDP. krelay is a kubectl plugin that adds UDP forwarding. Install it with the following command:
Start the port forwarding by running the following commands:
The browser connects to the web viewer sidecar, which negotiates a WebRTC session with the Isaac Sim container and displays the live viewport. To replay a different checkpoint, edit the isaacsim container args in the viz pod manifest (or delete the pod and regenerate after updating training.task in config.yaml).
For team-accessible deployments, replace the local relay with an AWS Network Load Balancer that exposes both the TCP and UDP ports, and set Isaac Sim’s publicIp flag to the NLB’s public address.
The provided viz pod is skrl-specific. If you change framework in config.yaml, update the checkpoint path and play script accordingly.
Alternative: Amazon EC2 with NICE DCV
If a full Linux desktop is preferable to a browser-based viewer (for example, to run Isaac Sim alongside terminals and a file browser), the NVIDIA Isaac Lab on AWS workshop walks through setting up a standalone Amazon EC2 GPU instance with NICE DCV and running the same Isaac Lab image interactively over low-latency remote desktop streaming. The checkpoints produced by the SageMaker jobs in this post can be replayed on that instance by mounting the FSx file system or downloading from the S3 bucket.
7. Cost considerations and clean up
The two compute options have different cost shapes. SageMaker HyperPod is a persistent cluster: instances are billed while they are part of the cluster. FSx for Lustre bills hourly per provisioned capacity, and the visualization pod from Section 6 holds a GPU node for as long as it is running. SageMaker Training Jobs bill only for the runtime of each job. See the SageMaker AI and FSx for Lustre pricing pages for current rates.
7.1 Clean up
SageMaker HyperPod
Scale the GPU instance group to zero between sessions to pause instance costs while keeping the cluster configured, or delete the cluster entirely. See Manage a SageMaker HyperPod cluster.
Deleting the FSx file system permanently removes all training checkpoints and logs stored on it. Download any checkpoints you want to keep before proceeding.
SageMaker Training Jobs
Training Jobs terminate automatically when the job completes or fails. No compute cleanup is required.
The following commands permanently delete training artifacts and checkpoints. Download any files you want to keep before running them.
Amazon ECR
8. Conclusion
As Physical AI workloads move into production, teams need to scale policy training without the operational overhead of managing compute infrastructure. In this post, we showed how SageMaker HyperPod and SageMaker Training Jobs let robotics teams run distributed Isaac Lab training on managed GPU infrastructure, using a single container image and a shared configuration across both compute models.
SageMaker HyperPod offers persistent GPU clusters with resilient, long-running training. SageMaker Training Jobs offer ephemeral, on-demand runs suited to experiments and hyperparameter sweeps. Both run the same container image and the same torchrun invocation of the skrl trainer, so switching between them is only a configuration change.
To get started, explore the accompanying repository to launch your first H1 training run, and extend the pattern to other Isaac Lab tasks (humanoid manipulation, quadrupeds, dexterous hands). To learn more, see the Amazon SageMaker HyperPod documentation and the Amazon SageMaker Training Jobs documentation.