Artificial Intelligence
Train, optimize, and deploy models on edge devices using Amazon SageMaker and Qualcomm AI Hub
This post is co-written by Rodrigo Amaral, Ashwin Murthy and Meghan Stronach from Qualcomm.
In this post, we introduce an innovative solution for end-to-end model customization and deployment at the edge using Amazon SageMaker and Qualcomm AI Hub. This seamless cloud-to-edge AI development experience will enable developers to create optimized, highly performant, and custom managed machine learning solutions where you can bring you own model (BYOM) and bring your own data (BYOD) to meet varied business requirements across industries. From real-time analytics and predictive maintenance to personalized customer experiences and autonomous systems, this approach caters to diverse needs.
We demonstrate this solution by walking you through a comprehensive step-by-step guide on how to fine-tune YOLOv8, a real-time object detection model, on Amazon Web Services (AWS) using a custom dataset. The process uses a single ml.g5.2xlarge instance (providing one NVIDIA A10G Tensor Core GPU) with SageMaker for fine-tuning. After fine-tuning, we show you how to optimize the model with Qualcomm AI Hub so that it’s ready for deployment across edge devices powered by Snapdragon and Qualcomm platforms.
Business challenge
Today, many developers use AI and machine learning (ML) models to tackle a variety of business cases, from smart identification and natural language processing (NLP) to AI assistants. While open source models offer a good starting point, they often don’t meet the specific needs of the applications being developed. This is where model customization becomes essential, allowing developers to tailor models to their unique requirements and ensure optimal performance for specific use cases.
In addition, on-device AI deployment is a game-changer for developers crafting use cases that demand immediacy, privacy, and reliability. By processing data locally, edge AI minimizes latency, ensures sensitive information stays on-device, and guarantees functionality even in poor connectivity. Developers are therefore looking for an end-to-end solution where they can not only customize the model but also optimize the model to target on-device deployment. This enables them to offer responsive, secure, and robust AI applications, delivering exceptional user experiences.
How can Amazon SageMaker and Qualcomm AI Hub help?
BYOM and BYOD offer exciting opportunities for you to customize the model of your choice, use your own dataset, and deploy it on your target edge device. Through this solution, we propose using SageMaker for model fine-tuning and Qualcomm AI Hub for edge deployments, creating a comprehensive end-to-end model deployment pipeline. This opens new possibilities for model customization and deployment, enabling developers to tailor their AI solutions to specific use cases and datasets.
SageMaker is an excellent choice for model training, because it reduces the time and cost to train and tune ML models at scale without the need to manage infrastructure. You can take advantage of the highest-performing ML compute infrastructure currently available, and SageMaker can scale infrastructure from one to thousands of GPUs. Because you pay only for what you use, you can manage your training costs more effectively. SageMaker distributed training libraries can automatically split large models and training datasets across AWS GPU instances, or you can use third-party libraries, such as DeepSpeed, Horovod, Fully Sharded Data Parallel (FSDP), or Megatron. You can train foundation models (FMs) for weeks and months without disruption by automatically monitoring and repairing training clusters.
After the model is trained, you can use Qualcomm AI Hub to optimize, validate, and deploy these customized models on hosted devices with Snapdragon and Qualcomm Technologies within minutes. Qualcomm AI Hub is a developer-centric platform designed to streamline on-device AI development and deployment. AI Hub offers automatic conversion and optimization of PyTorch or ONNX models for efficient on-device deployment using TensorFlow Lite, ONNX Runtime, or Qualcomm AI Engine Direct SDK. It also has an existing library of over 100 pre-optimized models for Qualcomm and Snapdragon platforms.
Qualcomm AI Hub has served more than 800 companies and continues to expand its offerings in terms of models available, platforms supported, and more.
Using SageMaker and Qualcomm AI Hub together can create new opportunities for rapid iteration on model customization, providing access to powerful development tools and enabling a smooth workflow from cloud training to on-device deployment.
Solution architecture
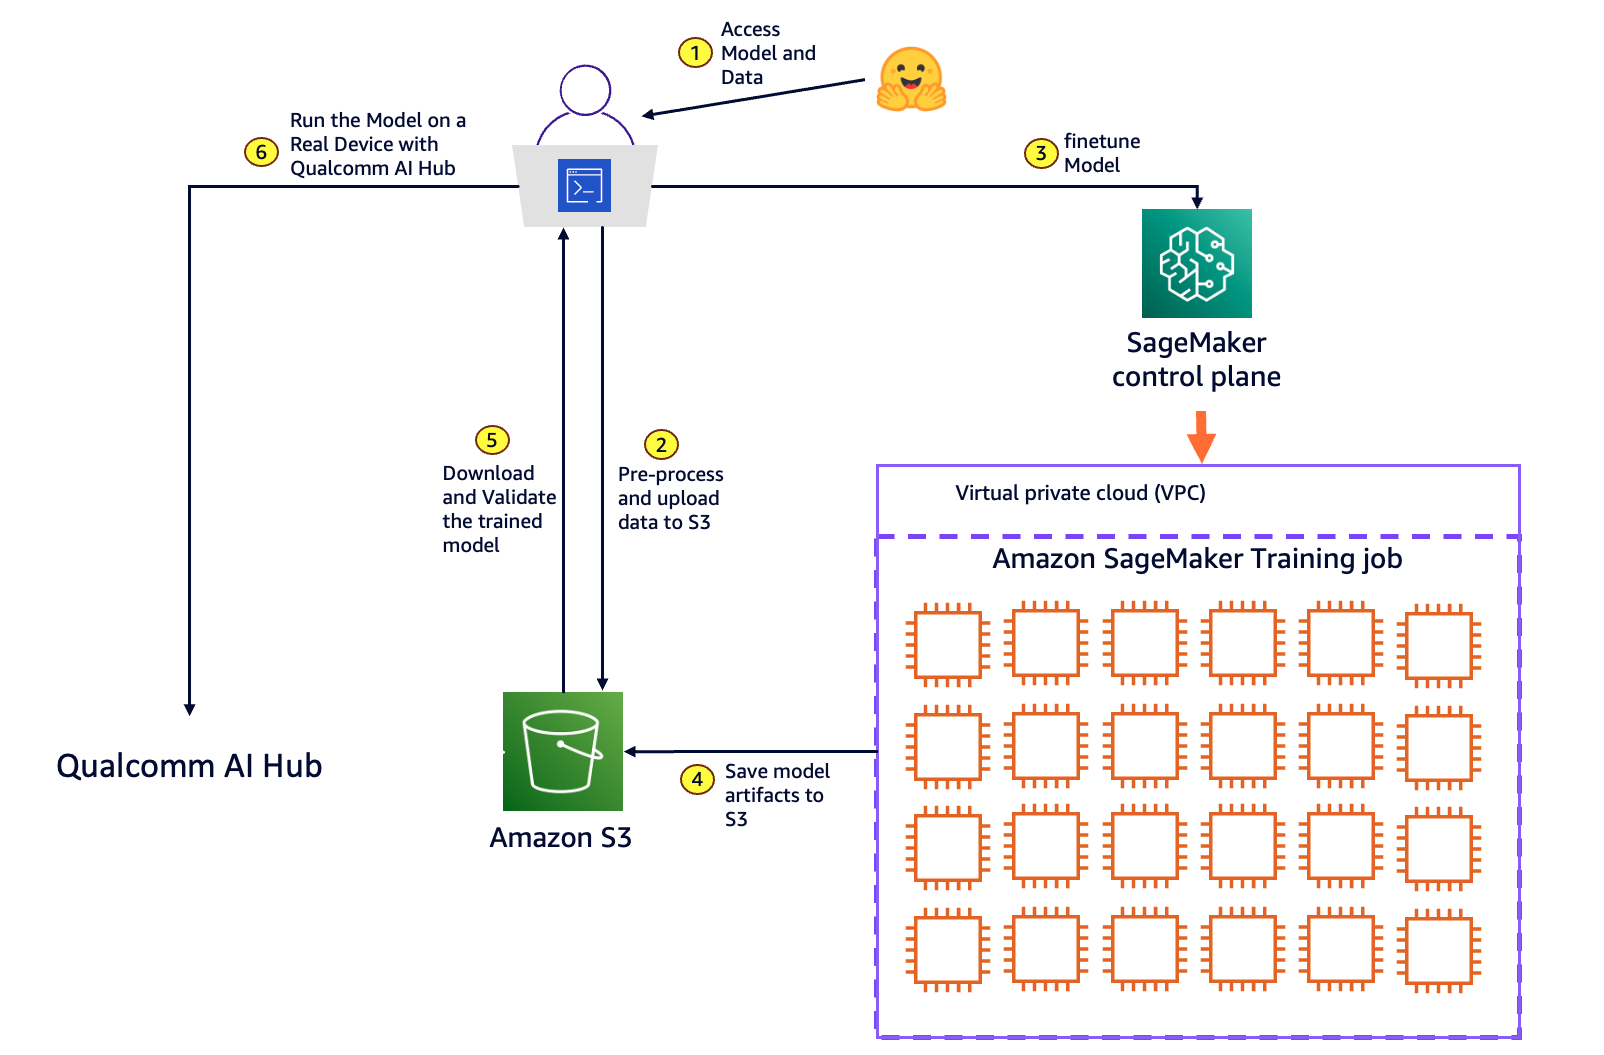
The following diagram illustrates the solution architecture. Developers working in their local environment initiate the following steps:
- Select an open source model and a dataset for model customization from the Hugging Face repository.
- Pre-process the data into the format required by your model for training, then upload the processed data to Amazon Simple Storage Service (Amazon S3). Amazon S3 provides a highly scalable, durable, and secure object storage solution for your machine learning use case.
- Call the SageMaker control plane API using the SageMaker Python SDK for model training. In response, SageMaker provisions a resilient distributed training cluster with the requested number and type of compute instances to run the model training. SageMaker also handles orchestration and monitors the infrastructure for any faults.
- After the training is complete, SageMaker spins down the cluster, and you’re billed for the net training time in seconds. The final model artifact is saved to an S3 bucket.
- Pull the fine-tuned model artifact from Amazon S3 to the local development environment and validate the model accuracy.
- Use Qualcomm AI Hub to compile and profile the model, running it on cloud-hosted devices to deliver performance metrics ahead of downloading for deployment across edge devices.
Use case walk through
Imagine a leading electronics manufacturer aiming to enhance its quality control process for printed circuit boards (PCBs) by implementing an automated visual inspection system. Initially, using an open source vision model, the manufacturer collects and annotates a large dataset of PCB images, including both defective and non-defective samples.
This dataset, similar to the keremberke/pcb-defect-segmentation dataset from HuggingFace, contains annotations for common defect classes such as dry joints, incorrect installations, PCB damage, and short circuits. With SageMaker, the manufacturer trains a custom YOLOv8 model (You Only Look Once), developed by Ultralytics, to recognize these specific PCB defects. The model is then optimized for deployment at the edge using Qualcomm AI Hub, providing efficient performance on chosen platforms such as industrial cameras or handheld devices used in the production line.
This customized model significantly improves the quality control process by accurately detecting PCB defects in real-time. It reduces the need for manual inspections and minimizes the risk of defective PCBs progressing through the manufacturing process. This leads to improved product quality, increased efficiency, and substantial cost savings.
Let’s walk through this scenario with an implementation example.
Prerequisites
For this walkthrough, you should have the following:
- Jupyter Notebook – The example has been tested in Visual Studio Code with Jupyter Notebook using the Python 3.11.7 environment.
- An AWS account.
- Create an AWS Identity and Access Management (IAM) user with the
AmazonSageMakerFullAccesspolicy to enable you to run SageMaker APIs. Set up your security credentials for CLI. - Install AWS Command Line Interface (AWS CLI) and use
aws configureto set up your IAM credentials securely. - Create a role with the name
sagemakerroleto be assumed by SageMaker. Add managed policies AmazonS3FullAccess to give SageMaker access to your S3 buckets. - Make sure your account has the SageMaker Training resource type limit for ml.g5.2xlarge increased to 1 using the Service Quotas console.
- Follow the get started instructions to install the necessary Qualcomm AI Hub library and set up your unique API token for Qualcomm AI Hub.
- Use the following command to clone the GitHub repository with the assets for this use case. This repository consists of a notebook that references training assets.
The sm-qai-hub-examples/yolo directory contains all the training scripts that you might need to deploy this sample.
Next, you will run the sagemaker_qai_hub_finetuning.ipynb notebook to fine-tune the YOLOv8 model on SageMaker and deploy it on the edge using AI Hub. See the notebook for more details on each step. In the following sections, we walk you through the key components of fine-tuning the model.
Step 1: Access the model and data
- Begin by installing the necessary packages in your Python environment. At the top of the notebook, include the following code snippet, which uses Python’s pip package manager to install the required packages in your local runtime environment.
- Import the necessary libraries for the project. Specifically, import the
Datasetclass from the Hugging Face datasets library and theYOLOclass from theultralyticslibrary. These libraries are crucial for your work, because they provide the tools you need to access and manipulate the dataset and work with the YOLO object detection model.
Step 2: Pre-process and upload data to S3
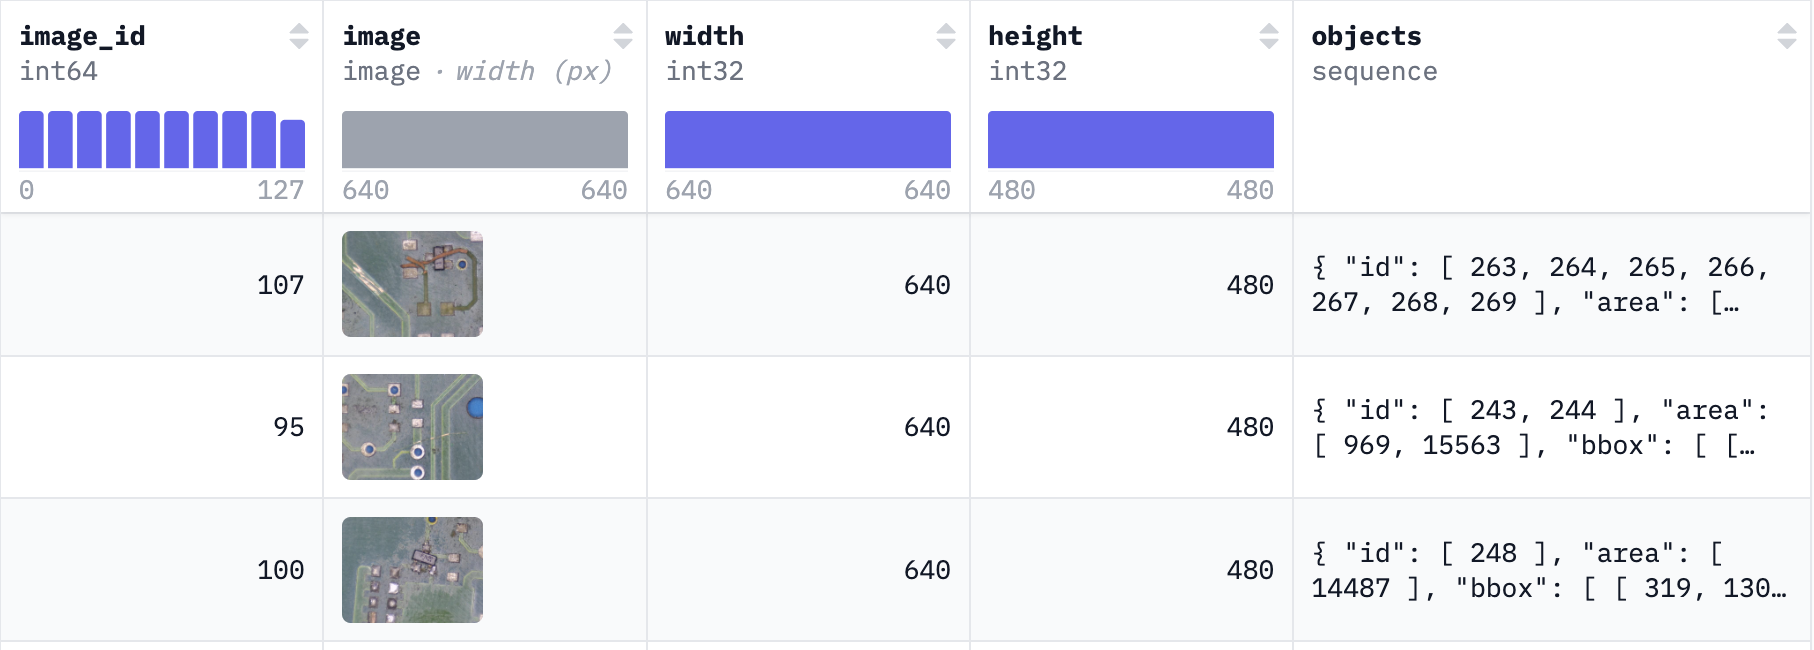
To fine-tune your YOLOv8 model for detecting PCB defects, you will use the keremberke/pcb-defect-segmentation dataset from Hugging Face. This dataset includes 189 images of chip defects (train: 128 images, validation: 25 images and test: 36 images). These defects are annotated in COCO format.
YOLOv8 doesn’t recognize these classes out of the box, so you will map YOLOv8’s logits to identify these classes during model fine-tuning, as shown in the following image.
- Begin by downloading the dataset from Hugging Face to the local disk and converting it to the required YOLO dataset structure using the utility function
CreateYoloHFDataset. This structure ensures that the YOLO API correctly loads and processes the images and labels during the training phase. - Upload the dataset to Amazon S3. This step is crucial because the dataset stored in S3 will serve as the input data channel for the SageMaker training job. SageMaker will efficiently manage the process of distributing this data across the training cluster, allowing each node to access the necessary information for model training.
Alternatively, you can use your own custom dataset (non-Hugging Face) to fine-tune the YOLOv8 model, as long as the dataset complies with the YOLOv8 dataset format.
Step 3: Fine-tune your YOLOv8 model
3.1: Review the training script
You’re now prepared to fine-tune the model using the model.train method from the Ultralytics YOLO library.
We’ve prepared a script called train_yolov8.py that will perform the following tasks. Let’s quickly review the key points in this script before you launch the training job.
- The training script will do the following: Load a YOLOv8 model from the Ultralytics library
- Use the train method to run fine-tuning that considers the model data, adjusts its parameters, and optimizes its ability to accurately predict object classes and locations in images.
After the model is trained, the script runs inference to test the model output and save the model artifacts to a local Amazon S3 mapped folder
3.2: Launch the training
You’re now ready to launch the training. You will use the SageMaker PyTorch training estimator to initiate training. The estimator simplifies the training process by automating several of the key tasks in this example:
- The SageMaker estimator spins up a training cluster of one 2xlarge instance. SageMaker handles the setup and management of these compute instances, which reduces the total cost of ownership.
- The estimator also uses one of the pre-built containers managed by SageMaker—PyTorch, which includes an optimized compiled version of the PyTorch framework along with its required dependencies and GPU-specific libraries for accelerated computations.
The estimator.fit() method initiates the training process with the specified input data channels. Following is the code used to launch the training job along with the necessary parameters.
You can track a SageMaker training job by monitoring its status using the AWS Management Console, AWS CLI, or AWS SDKs. To determine when the job is completed, check for the Completed status or set up Amazon CloudWatch alarms to notify you when the job transitions to the Completed state.
Step 4 & 5: Save, download and validate the trained model
The training process generates model artifacts that will be saved to the S3 bucket specified in output_path location. This example uses the download_tar_and_untar utility to download the model to a local drive.
- Run inference on this model and visually validate how close ground truth and model predictions bounding boxes align on test images. The following code shows how to generate an image mosaic using a custom utility function—
draw_bounding_boxes—that overlays an image with ground truth and model classification along with a confidence value for class prediction.
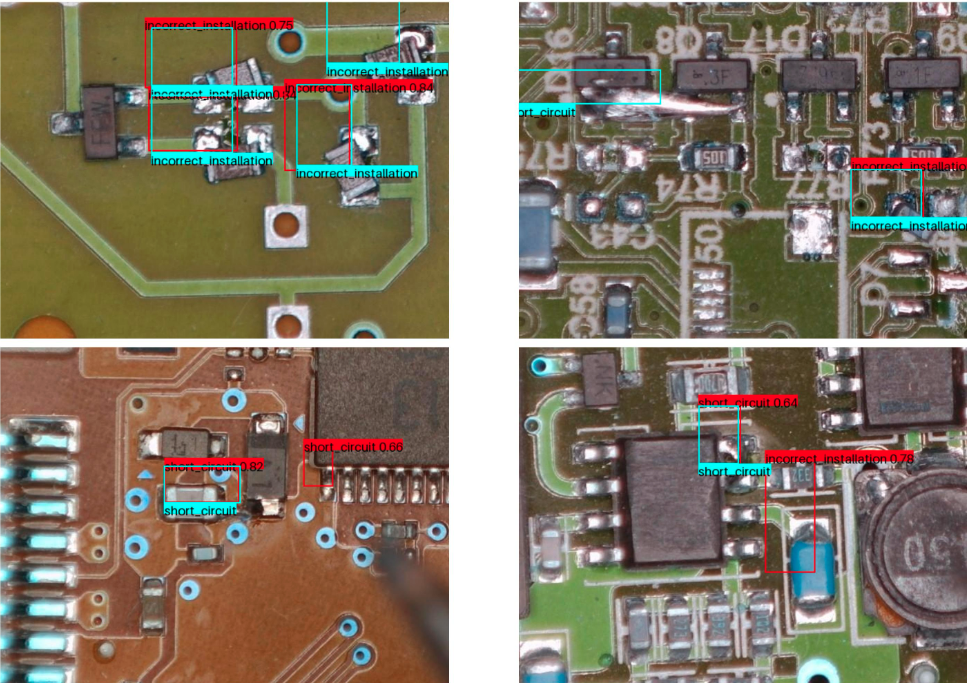
From the preceding image mosaic, you can observe two distinct sets of bounding boxes: the cyan boxes indicate human annotations of defects on the PCB image, while the red boxes represent the model’s predictions of defects. Along with the predicted class, you can also see the confidence value for each prediction, which reflects the quality of the YOLOv8 model’s output.
After fine-tuning, YOLOv8 begins to accurately predict the PCB defect classes present in the custom dataset, even though it hadn’t encountered these classes during model pretraining. Additionally, the predicted bounding boxes are closely aligned with the ground truth, with confidence scores of greater than or equal to 0.5 in most cases. You can further improve the model’s performance without the need for hyperparameter guesswork by using a SageMaker hyperparameter tuning job.
Step 6: Run the model on a real device with Qualcomm AI Hub
Now that you’re validated the fine-tuned model on PyTorch, you want to run the model on a real device.
Qualcomm AI Hub enables you to do the following:
- Compile and optimize the PyTorch model into a format that can be run on a device
- Run the compiled model on a device with a Snapdragon processor hosted in AWS device farm
- Verify on-device model accuracy
- Measure on-device model latency
To run the model:
- Compile the model.
The first step is converting the PyTorch model into a format that can run on the device.
This example uses a Windows laptop powered by the Snapdragon X Elite processor. This device uses the ONNX model format, which you will configure during compilation.
As you get started, you can see a list of all the devices supported on Qualcomm AI Hub, by running qai-hub list-devices.
See Compiling Models to learn more about compilation on Qualcomm AI Hub.
- Inference the model on a real device
Run the compiled model on a real cloud-hosted device with Snapdragon using the same model input you verified locally with PyTorch.
See Running Inference to learn more about on-device inference on Qualcomm AI Hub.
- Profile the model on a real device.
Profiling measures the latency of the model when run on a device. It reports the minimum value over 100 invocations of the model to best isolate model inference time from other processes on the device.
See Profiling Models to learn more about profiling on Qualcomm AI Hub.
- Deploy the compiled model to your device
Run the command below to download the compiled model.
The compiled model can be used in conjunction with the AI Hub sample application hosted here. This application uses the model to run object detection on a Windows laptop powered by Snapdragon that you have locally.
Conclusion
Model customization with your own data through Amazon SageMaker—with over 250 models available on SageMaker JumpStart—is an addition to the existing features of Qualcomm AI Hub, which include BYOM and access to a growing library of over 100 pre-optimized models. Together, these features create a rich environment for developers aiming to build and deploy customized on-device AI models across Snapdragon and Qualcomm platforms.
The collaboration between Amazon SageMaker and Qualcomm AI Hub will help enhance the user experience and streamline machine learning workflows, enabling more efficient model development and deployment across any application at the edge. With this effort, Qualcomm Technologies and AWS are empowering their users to create more personalized, context-aware, and privacy-focused AI experiences.
To learn more, visit Qualcomm AI Hub and Amazon SageMaker. For queries and updates, join the Qualcomm AI Hub community on Slack.
Snapdragon and Qualcomm branded products are products of Qualcomm Technologies, Inc. or its subsidiaries
About the authors
 Rodrigo Amaral currently serves as the Lead for Qualcomm AI Hub Marketing at Qualcomm Technologies, Inc. In this role, he spearheads go-to-market strategies, product marketing, developer activities, with a focus on AI and ML with a focus on edge devices. He brings almost a decade of experience in AI, complemented by a strong background in business. Rodrigo holds a BA in Business and a Master’s degree in International Management.
 Ashwin Murthy is a Machine Learning Engineer working on Qualcomm AI Hub. He works on adding new models to the public AI Hub Models collection, with a special focus on quantized models. He previously worked on machine learning at Meta and Groq.
 Meghan Stronach is a PM on Qualcomm AI Hub. She works to support our external community and customers, delivering new features across Qualcomm AI Hub and enabling adoption of ML on device. Born and raised in the Toronto area, she graduated from the University of Waterloo in Management Engineering and has spent her time at companies of various sizes.
 Kanwaljit Khurmi is a Principal Generative AI/ML Solutions Architect at Amazon Web Services. He works with AWS customers to provide guidance and technical assistance, helping them improve the value of their solutions when using AWS. Kanwaljit specializes in helping customers with containerized and machine learning applications.
 Pranav Murthy is an AI/ML Specialist Solutions Architect at AWS. He focuses on helping customers build, train, deploy and migrate machine learning (ML) workloads to SageMaker. He previously worked in the semiconductor industry developing large computer vision (CV) and natural language processing (NLP) models to improve semiconductor processes using state of the art ML techniques. In his free time, he enjoys playing chess and traveling. You can find Pranav on LinkedIn.
 Karan Jain is a Senior Machine Learning Specialist at AWS, where he leads the worldwide Go-To-Market strategy for Amazon SageMaker Inference. He helps customers accelerate their generative AI and ML journey on AWS by providing guidance on deployment, cost-optimization, and GTM strategy. He has led product, marketing, and business development efforts across industries for over 10 years, and is passionate about mapping complex service features to customer solutions.