AWS Messaging Blog
Getting your SMS short code production-ready with AWS End User Messaging
Getting your Short Message Service (SMS) short code production-ready requires you to configure the Amazon Web Services (AWS) infrastructure that controls how your messages are sent, monitored, and protected. You have provisioned your short code, and it is active on carrier networks. In this post, we walk through that setup using AWS End User Messaging SMS, covering 12 configuration steps from compliance through phased traffic migration. Total estimated time is 2 to 4 hours of configuration plus 1 to 3 business days for limit increase approvals.mess
The guide to SMS short codes with AWS End User Messaging covers the application and registration process up through provisioning. This post picks up from that point and provides an operational readiness walkthrough that takes you from “Active” status to confidently sending your first production message, including a final validation step to confirm readiness.
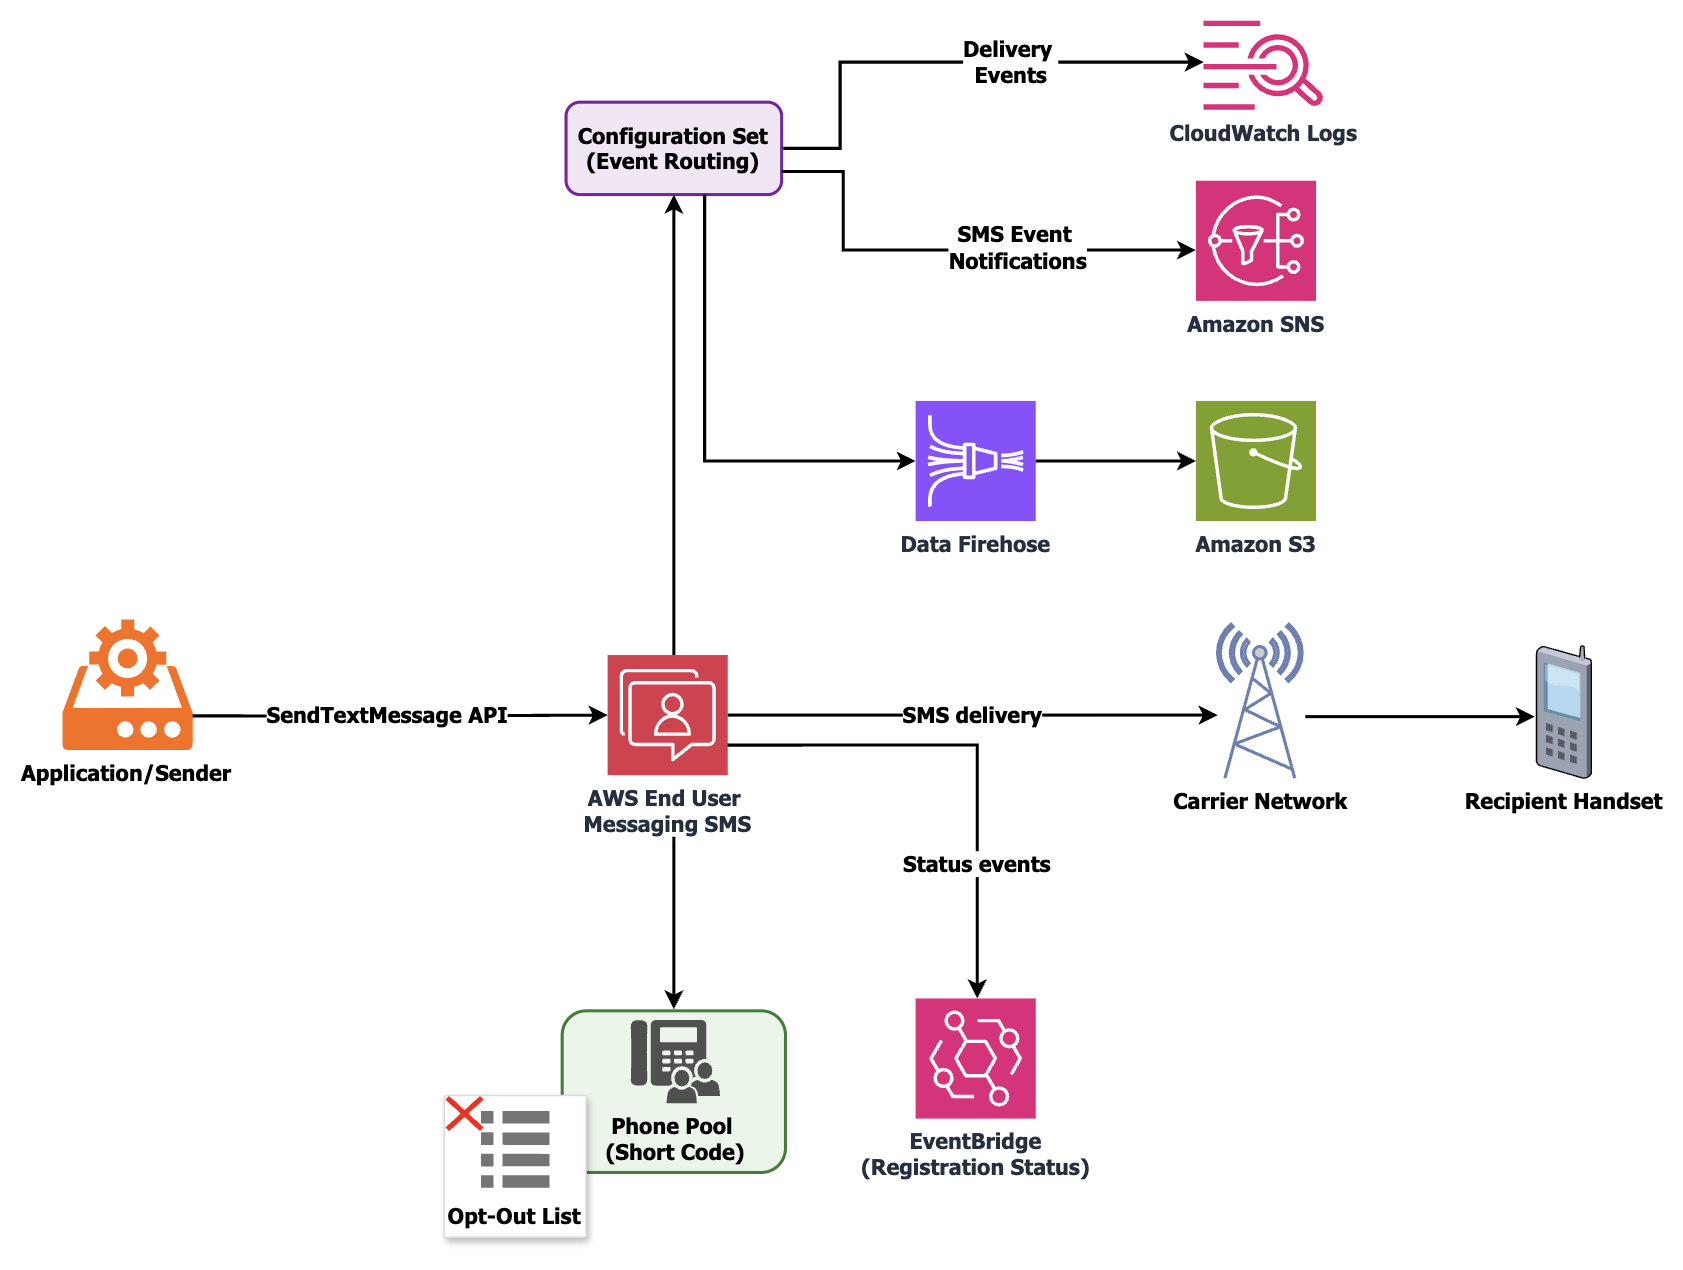
The following diagram shows the end-to-end message flow and event routing architecture covered in this walkthrough.
Prerequisites
You need the following to follow along with this walkthrough:
- An AWS account with access to the AWS End User Messaging SMS console.
- A short code with Active status in the AWS Management Console (carrier provisioning finished).
- Permissions to create AWS Identity and Access Management (IAM) roles, Amazon CloudWatch Log Groups, and Amazon Simple Notification Service (Amazon SNS) topics.
- AWS Command Line Interface (AWS CLI) v2 or an AWS SDK installed and configured.
- Your approved registration documentation, including the service name, keyword responses, and message templates submitted to carriers.
Step 1: Verify your short code is active and delivering
Navigate to the AWS End User Messaging SMS console, choose Phone numbers, and locate your provisioned short code. Confirm that the status shows Active, then send a test message to a phone number you control using the SendTextMessage API or the console test feature. Verify delivery on your handset.
Carrier-side activation can take up to 24 to 48 hours to fully propagate across all networks after provisioning finishes. If the console shows Active but your test message does not arrive, submit a support case so the team can verify propagation status with the carrier.
You can also verify using the AWS CLI:
Step 2: Configure keywords and verify message compliance
US carriers require every short code to respond to HELP and STOP keywords. You defined these during your registration, and this step confirms they are configured correctly in your account.
In the SMS console, choose Phone numbers, select your short code, and choose the Keywords tab. Verify that STOP returns the opt-out response you submitted during registration, and that HELP returns your support contact response (which must include a phone number or email). Add any custom keywords your use case requires, such as YES for double opt-in confirmation flows. You can manage keywords programmatically using the PutKeyword API.
To add or update a keyword programmatically:
To verify your current keyword configuration:
Beyond keyword configuration, carrier compliance does not end at registration approval. The content you send in production must stay aligned with what carriers reviewed and approved. Here is what to keep consistent.
Use the exact brand or program name from your approved registration across all keyword responses, confirmation messages, and outbound templates. If carriers approved your registration under “Acme Health Alerts,” every message your short code sends should reference that name. Mixing variations creates inconsistencies that auditors flag during reviews. For example, do not use the company name in one message and the product name in another.
Your HELP, STOP, and confirmation responses must match the templates submitted during registration. Do not add or remove opt-out language, change frequency disclosures, or alter customer care contact details post-approval without updating the registration through a support case. If your organization operates multiple domains, use the domain documented in the registration. For example, you might have one domain for the application and another for marketing. Carrier reviewers cross-reference message content, opt-in screenshots, and privacy policy URLs with what was submitted.
Humans conduct carrier reviews, and message content that is concise and limited to the essentials is reviewed consistently. All messages must remain under 160 characters.
Step 3: Create a configuration set with event destinations
A configuration set controls where your SMS delivery events are streamed and which event types are captured. Without one, you are limited to the basic events that AWS End User Messaging SMS sends to Amazon EventBridge by default. These default events omit recipient details and full carrier response context.
Create a configuration set with a descriptive name such as prod-otp-shortcode or marketing-sc-us. Then create at least one event destination. The three main options are Amazon CloudWatch Logs (for operational monitoring and alarming), Amazon SNS (for real-time event fanout to downstream systems), and Amazon Data Firehose (for durable archival and analytics).
Amazon Data Firehose typically delivers to an Amazon Simple Storage Service (Amazon S3) bucket, where you can query delivery history using Amazon Athena for compliance audits or delivery pattern analysis.
Important: When sending messages with SendTextMessage, always specify your ConfigurationSetName parameter so events route to the appropriate destination.
Required event types
| Event type | Description |
TEXT_DELIVERED |
Message successfully delivered to recipient handset. |
TEXT_FAILED |
Message delivery failed. |
TEXT_QUEUED |
Message accepted and queued for delivery. |
TEXT_CARRIER_UNREACHABLE |
Carrier network unreachable. |
TEXT_TTL_EXPIRED |
Message expired before delivery. |
For a detailed walkthrough of configuration sets including multi-tenant architectures, see How to send SMS using configuration sets with AWS End User Messaging.
Step 4: Create a phone pool and associate your short code
A pool is a logical container that groups origination identities and controls routing behavior. Creating one gives you deterministic control over which number sends your messages and how opt-outs are enforced.
Configuration parameters
| Parameter | Recommended value | Rationale |
| Pool name | us-otp-pool |
Descriptive, environment-prefixed. |
SharedRoutesEnabled |
False |
Prevents fallback to shared routes; only your short code is used. |
| Opt-out list | Associate one | Manages opt-out state per use case. |
IsoCountryCode |
US |
Restricts to destination country your short code serves. |
If you operate multiple use cases on separate short codes, create a dedicated pool for each. For example, use one short code for one-time password (OTP) traffic and another for transactional notifications. This isolation means a recipient opting out of marketing messages does not lose access to authentication codes.
Step 5: Request your throughput increase
Short codes start at a default of 100 messages per second (MPS). If your production volume will exceed this, request an increase before your launch date rather than after traffic is flowing.
Create a case in the AWS Support Center, choose Service limit increase, then choose End User Messaging SMS. Provide your short code phone number, requested MPS, use case description, and expected peak volume. Allow 1 to 3 business days for processing.
To estimate your required MPS:
Short codes support scaling to thousands of MPS, so start with a value that covers your expected peak and request further increases as traffic grows.
Step 6: Request a spending limit increase
AWS accounts have a default monthly SMS spending limit. To keep delivery uninterrupted at your expected volume, request an increase that accommodates your projected monthly spend before you begin sending.
Create a support case under Service limit increase > End User Messaging SMS > Account Spend Threshold. Provide your estimated monthly spend, use case description, and website URL.
For details, see Requesting increases to your monthly SMS spending quota.
Step 7: Restrict destination countries
If your short code serves a single country (US-only, for example), restrict sending to that country. This protects your account from artificially inflated traffic (SMS pumping). In pumping attacks, messages are routed to international premium-rate numbers, generating significant charges.
In the SMS console, navigate to Account settings, then choose Countries and keep only the countries you intend to send to. The pool-level IsoCountryCode restriction from Step 4 provides an additional enforcement layer at the sending path. Combining account-level country restrictions with pool-level country codes gives you two independent controls that both must be satisfied before a message is sent internationally.
For a detailed walkthrough on SMS fraud prevention controls, see Defending against SMS pumping: new AWS features to help combat artificially inflated traffic.
Step 8: Set up monitoring and alarms
With event destinations configured in Step 3, build proactive alerting that surfaces delivery trends before they affect your end users.
Recommended alarms
| Alarm | Metric / Source | Threshold |
| Delivery success rate | CloudWatch SMS metrics | Alert when below 95%. |
| Spend threshold | CloudWatch billing metric | Alert at 80% of monthly limit. |
| Delivery failures | Amazon EventBridge rule on TEXT_FAILED |
Route to Amazon SNS topic or AWS Lambda. |
| Carrier unreachable | Amazon EventBridge rule on TEXT_CARRIER_UNREACHABLE |
Route to Amazon SNS topic or AWS Lambda. |
Build a CloudWatch dashboard showing messages sent per minute, success versus failure breakdown, and spend accumulation over time.
You can also configure Amazon EventBridge to notify you of registration status changes. AWS End User Messaging SMS publishes events for statuses including REQUIRES_UPDATES, REVIEWING, and PROVISIONING, which is useful if a carrier requests changes during a proactive audit after your short code is already active.
For metric details, see Monitoring SMS activity with Amazon CloudWatch.
Step 9: Track OTP verification success (if applicable)
If your short code delivers OTP or two-factor authentication (2FA) codes, track end-to-end verification success in addition to carrier delivery receipts. A “delivered” status at the carrier level does not confirm the end user received and entered the code.
Tracking verification rates gives you insight into latency patterns when codes expire before arrival, geographic delivery trends, and opportunities to improve conversion. Some use cases involve asynchronous processing where several minutes of computation occur before the SMS is sent. For these, measure the full round-trip from the triggering action to message delivery. This separates application-side latency from carrier-side delivery latency.
For implementation guidance, see Track OTP success with AWS End User Messaging SMS feedback.
Step 10: Set up cost visibility
SMS costs include AWS charges plus per-message carrier surcharges. Setting up cost visibility from day one lets you track spend trends, catch anomalies early, and optimize over time.
Start by activating AWS Cost Explorer and creating a cost allocation tag for your SMS workload. Then configure an AWS Budget with threshold alerts. For example, you might notify at 80% of projected monthly spend. This gives you advance warning of unexpected cost increases, whether from traffic spikes, retry loops, or blocked-country leakage.
Step 11: Plan your traffic migration
A phased rollout validates delivery performance at each stage before you increase volume.
Start with a canary phase (Day 1 to 3) where you route 5 to 10% of traffic to the short code and monitor delivery rates, latency, and event logs. Move to a ramp phase (Day 3 to 7) at 50%, validating throughput and carrier-level delivery across your recipient base. Finish the full migration (Day 7+) at 100%. Decommission your previous origination identity only after confirming stability for at least 48 hours.
Step 12: Validate production readiness and send
Before declaring your short code production-ready, run through the following validation checks:
- Confirm your CloudWatch dashboard shows events flowing for
TEXT_DELIVEREDandTEXT_FAILED(from Step 3). - Send a test message that triggers your
STOPkeyword. Verify the correct opt-out response is returned and the phone number appears in your opt-out list. - Send a test message that triggers your
HELPkeyword. Verify the response matches your approved registration. - Check your MPS quota in the support case response (from Step 5). Confirm it matches or exceeds your calculated peak.
- Review your country restrictions (from Step 7). Attempt to send a message to a blocked country and confirm it is rejected.
- Verify your CloudWatch alarm fires by temporarily lowering the threshold, or by checking that the alarm state is not
INSUFFICIENT_DATA.
After all six checks pass, you are ready to begin your phased migration (Step 11) and scale to full production traffic. At this point, your short code is configured, monitored, compliant, and protected.
Automate with a validation script
You can use an AI coding assistant such as Kiro to generate a validation script tailored to your environment. Try a prompt like: “Write a boto3 script that validates my SMS short code is production-ready by checking Active status, HELP/STOP keywords, configuration set existence, and pool association using the pinpoint-sms-voice-v2 client.”
Refine the prompt with specifics from the following reference implementation, such as exact API names, filter parameters, and output format, to match your requirements.
The following script is an example of what that output looks like:
Cleaning up
If you created test resources while following this walkthrough, you can delete them through the AWS End User Messaging SMS console or with the API to avoid confusion with your production configuration. This includes a test configuration set, test pool, or test event destinations used for validation. Do not delete your production configuration set, pool, or keyword settings.
If you requested a test-level MPS increase or spending limit for validation, update these to your production values through a new support case before going live.
Quick reference checklist
| Step | Action | Key API / Service |
| 1 | Verify short code is Active and test delivery | SendTextMessage |
| 2 | Configure keywords and verify message compliance | PutKeyword |
| 3 | Create configuration set with event destinations | CreateConfigurationSet |
| 4 | Create pool and associate short code | CreatePool, AssociateOriginationIdentity |
| 5 | Request MPS increase for expected throughput | AWS Support |
| 6 | Request spending limit increase | AWS Support |
| 7 | Restrict destination countries | Console / UpdateAccount |
| 8 | Set up CloudWatch alarms and dashboards | Amazon CloudWatch |
| 9 | Track OTP verification success (if applicable) | SMS Feedback events |
| 10 | Set up cost visibility | AWS Cost Explorer, AWS Budgets |
| 11 | Plan phased traffic migration | Application-level routing |
| 12 | Validate production readiness and send | All of the preceding |
Conclusion
In this post, we walked through how to configure a newly provisioned SMS short code for production use with AWS End User Messaging SMS. The 12 steps cover keyword verification, message compliance, event monitoring, throughput planning, country restrictions, cost visibility, phased traffic migration, and a final production validation.
You can adapt the sequence to your specific use case and volume profile. For the full registration and application process, see A guide to SMS short codes with AWS End User Messaging. To start configuring, navigate to the AWS End User Messaging SMS console. For the full API reference, see the AWS End User Messaging SMS documentation.
Related posts
- A guide to SMS short codes with AWS End User Messaging
- How to send SMS using configuration sets with AWS End User Messaging
- Defending against SMS pumping: new AWS features to help combat artificially inflated traffic