AWS Security Blog
Enable external pipeline deployments to AWS Cloud by using IAM Roles Anywhere
June 10, 2024: In February 2024, the workload identity federation feature for Azure DevOps became generally available. This feature is a native way to manage authentication between Azure DevOps and your AWS accounts.
October 3, 2023: We updated this post to include the requirement for AWS Toolkit for Azure DevOps in the walkthrough.
Continuous integration and continuous delivery (CI/CD) services help customers automate deployments of infrastructure as code and software within the cloud. Common native Amazon Web Services (AWS) CI/CD services include AWS CodePipeline, AWS CodeBuild, and AWS CodeDeploy. You can also use third-party CI/CD services hosted outside the AWS Cloud, such as Jenkins, GitLab, and Azure DevOps, to deploy code within the AWS Cloud through temporary security credentials use.
Security credentials allow identities (for example, IAM role or IAM user) to verify who they are and the permissions they have to interact with another resource. The AWS Identity and Access Management (IAM) service authentication and authorization process requires identities to present valid security credentials to interact with another AWS resource.
According to AWS security best practices, where possible, we recommend relying on temporary credentials instead of creating long-term credentials such as access keys. Temporary security credentials, also referred to as short-term credentials, can help limit the impact of inadvertently exposed credentials because they have a limited lifespan and don’t require periodic rotation or revocation. After temporary security credentials expire, AWS will no longer approve authentication and authorization requests made with these credentials.
In this blog post, we’ll walk you through the steps on how to obtain AWS temporary credentials for your external CI/CD pipelines by using IAM Roles Anywhere and an on-premises hosted server running Azure DevOps Services.
Deploy securely on AWS using IAM Roles Anywhere
When you run code on AWS compute services, such as AWS Lambda, AWS provides temporary credentials to your workloads. In hybrid information technology environments, when you want to authenticate with AWS services from outside of the cloud, your external services need AWS credentials.
IAM Roles Anywhere provides a secure way for your workloads — such as servers, containers, and applications running outside of AWS — to request and obtain temporary AWS credentials by using private certificates. You can use IAM Roles Anywhere to enable your applications that run outside of AWS to obtain temporary AWS credentials, helping you eliminate the need to manage long-term credentials or complex temporary credential solutions for workloads running outside of AWS.
To use IAM Roles Anywhere, your workloads require an X.509 certificate, issued by your private certificate authority (CA), to request temporary security credentials from the AWS Cloud.
IAM Roles Anywhere can work with your existing client or server certificates that you issue to your workloads today. In this blog post, our objective is to show how you can use X.509 certificates issued by your public key infrastructure (PKI) solution to gain access to AWS resources by using IAM Roles Anywhere. Here we don’t cover PKI solutions options, and we assume that you have your own PKI solution for certificate generation. In this post, we demonstrate the IAM Roles Anywhere setup with a self-signed certificate for the purpose of the demo running in a test environment.
External CI/CD pipeline deployments in AWS
CI/CD services are typically composed of a control plane and user interface. They are used to automate the configuration, orchestration, and deployment of infrastructure code or software. The code build steps are handled by a build agent that can be hosted on a virtual machine or container running on-premises or in the cloud. Build agents are responsible for completing the jobs defined by a CI/CD pipeline.
For this use case, you have an on-premises CI/CD pipeline that uses AWS CloudFormation to deploy resources within a target AWS account. The CloudFormation template, the pipeline definition, and other files are hosted in a Git repository. The on-premises build agent requires permissions to deploy code through AWS CloudFormation within an AWS account. To make calls to AWS APIs, the build agent needs to obtain AWS credentials from an IAM role. The solution architecture is shown in Figure 1.
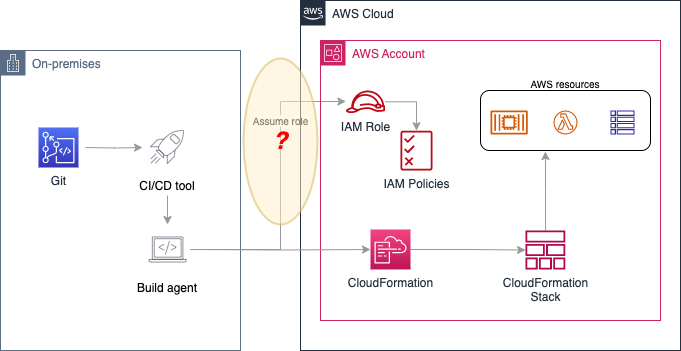
Figure 1: Using external CI/CD tool with AWS
To make this deployment securely, the main objective is to use short-term credentials and avoid the need to generate and store long-term credentials for your pipelines. This post walks through how to use IAM Roles Anywhere and certificate-based authentication with Azure DevOps build agents. The walkthrough will use Azure DevOps Services with Microsoft-hosted agents. This approach can be used with a self-hosted agent or Azure DevOps Server.
IAM Roles Anywhere and certificate-based authentication
IAM Roles Anywhere uses a private certificate authority (CA) for the temporary security credential issuance process. Your private CA is registered with IAM Roles Anywhere through a service-to-service trust. Once the trust is established, you create an IAM role with an IAM policy that can be assumed by your services running outside of AWS. The external service uses a private CA issued X.509 certificate to request temporary AWS credentials from IAM Roles Anywhere and then assumes the IAM role with permission to finish the authentication process, as shown in Figure 2.
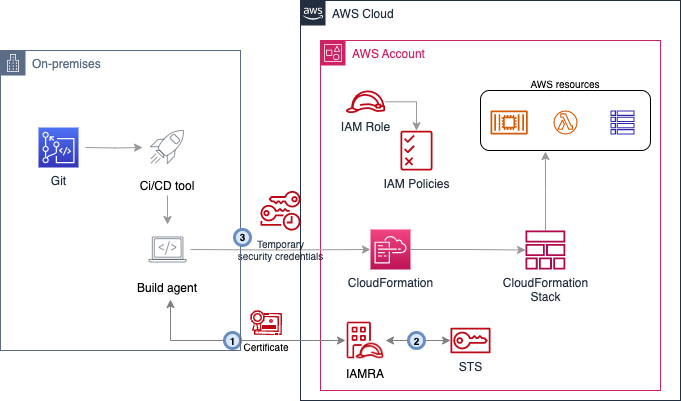
Figure 2: Certificate-based authentication for external CI/CD tool using IAM Roles Anywhere
The workflow in Figure 2 is as follows:
- The external service uses its certificate to sign and issue a request to IAM Roles Anywhere.
- IAM Roles Anywhere validates the incoming signature and checks that the certificate was issued by a certificate authority configured as a trust anchor in the account.
- Temporary credentials are returned to the external service, which can then be used for other authenticated calls to the AWS APIs.
Walkthrough
In this walkthrough, you accomplish the following steps:
- Deploy IAM roles in your workload accounts.
- Create a root certificate to simulate your certificate authority. Then request and sign a leaf certificate to distribute to your build agent.
- Configure an IAM Roles Anywhere trust anchor in your workload accounts.
- Configure your pipelines to use certificate-based authentication with a working example using Azure DevOps pipelines.
Preparation
You can find the sample code for this post in our GitHub repository. We recommend that you locally clone a copy of this repository. This repository includes the following files:
- DynamoDB_Table.template: This template creates an Amazon DynamoDB table.
- iamra-trust-policy.json: This trust policy allows the IAM Roles Anywhere service to assume the role and defines the permissions to be granted.
- parameters.json: This passes parameters when launching the CloudFormation template.
- pipeline-iamra.yml: The definition of the pipeline that deploys the CloudFormation template using IAM Roles Anywhere authentication.
- pipeline-iamra-multi.yml: The definition of the pipeline that deploys the CloudFormation template using IAM Roles Anywhere authentication in multi-account environment.
The first step is creating an IAM role in your AWS accounts with the necessary permissions to deploy your resources. For this, you create a role using the AWSCloudFormationFullAccess and AmazonDynamoDBFullAccess managed policies.
When you define the permissions for your actual applications and workloads, make sure to adjust the permissions to meet your specific needs based on the principle of least privilege.
Run the following command to create the CICDRole in the Dev and Prod AWS accounts.
As part of the role creation, you need to apply the trust policy provided in iamra-trust-policy.json. This trust policy allows the IAM Roles Anywhere service to assume the role with the condition that the Subject Common Name (CN) of the certificate is cicdagent.example.com. In a later step you will update this trust policy with the Amazon Resource Name (ARN) of your trust anchor to further restrict how the role can be assumed.
Issue and sign a self-signed certificate
Use OpenSSL to generate and sign the certificate. Run the following commands to generate a root and leaf certificate.
Note: The following procedure has been tested with OpenSSL 1.1.1 and OpenSSL 3.0.8.
The following files are needed in further steps: ca.crt, certificate.crt, private.key.
Configure the IAM Roles Anywhere trust anchor and profile in your workload accounts
In this step, you configure the IAM Roles Anywhere trust anchor, the profile, and the role with the associated IAM policy to define the permissions to be granted to your build agents. Make sure to set the permissions specified in the policy to the least privileged access.
To configure the IAM Role Anywhere trust anchor
- Open the IAM console and go to Roles Anywhere.
- Choose Create a trust anchor.
- Choose External certificate bundle and paste the content of your CA public certificate in the certificate bundle box (the content of the ca.crt file from the previous step). The configuration looks as follows:
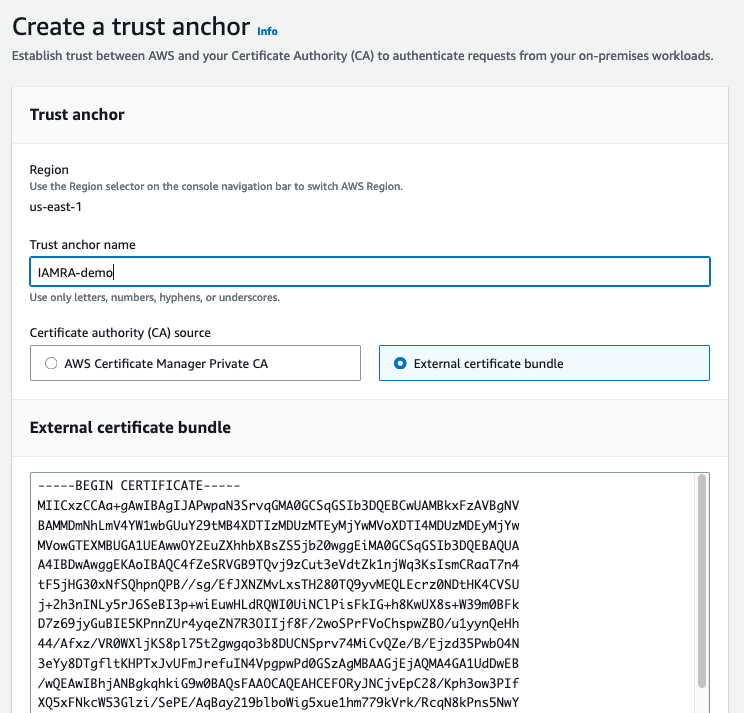
Figure 3: IAM Roles Anywhere trust anchor
To follow security best practices by applying least privilege access, add a condition statement in the IAM role’s trust policy to match the created trust anchor to make sure that only certificates that you want to assume a role through IAM Roles Anywhere can do so.
To update the trust policy of the created CICDRole
- Open the IAM console, select Roles, then search for CICDRole.
- Open CICDRole to update its configuration, and then select Trust relationships.
- Replace the existing policy with the following updated policy that includes an additional condition to match on the trust anchor. Replace the ARN ID in the policy with the ARN of the trust anchor created in your account.
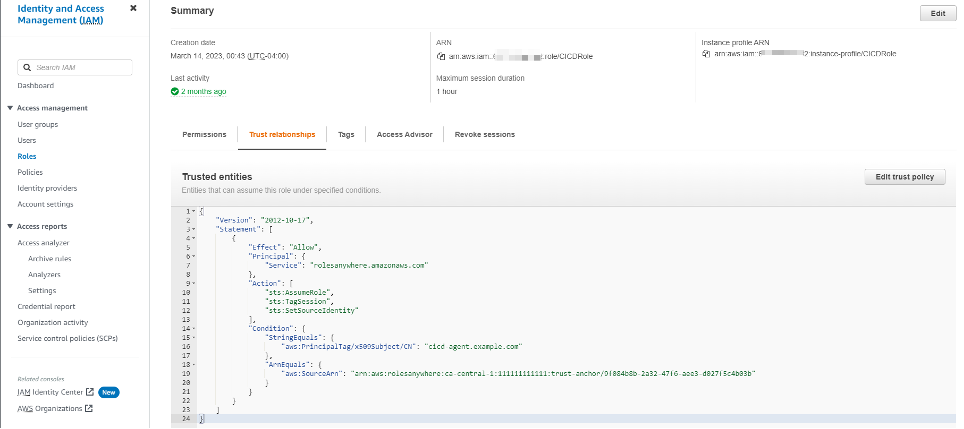
Figure 4: IAM Roles Anywhere updated trust policy
To create an IAM Role Anywhere profile and link the profile to CICDRole
- Open the IAM console and go to Roles Anywhere.
- Choose Create a profile.
- In the Profile section, enter a name.
- In the Roles section, select CICDRole.
- Keep the other options set to default.
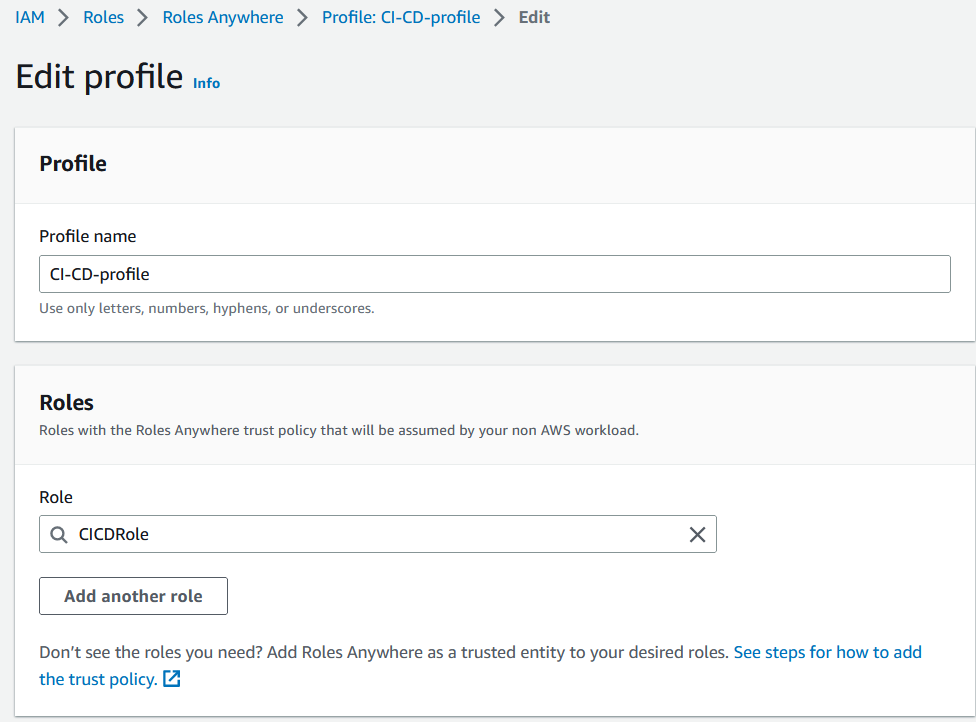
Figure 5: IAM Roles Anywhere profile
Configure the Azure DevOps pipeline to use certificate-based authentication
Now that you’ve completed the necessary setup in AWS, you move to the configuration of your pipeline in Azure DevOps. You need to have access to an Azure DevOps organization with the AWS Toolkit for Azure DevOps installed and have access to Microsoft-hosted agents to complete these steps.
Have the following values ready. They’re needed for the Azure DevOps Pipeline configuration. You need this set of information for every AWS account you want to deploy to.
- Trust anchor ARN – Resource identifier for the trust anchor created when you configured IAM Roles Anywhere.
- Profile ARN – The identifier of the IAM Roles Anywhere profile you created.
- Role ARN – The ARN of the role to assume. This role needs to be configured in the profile.
- Certificate – The certificate tied to the profile (in other words, the issued certificate: file certificate.crt).
- Private key – The private key of the certificate (private.key).
Azure DevOps configuration steps
The following steps walk you through configuring Azure DevOps.
- Create a new project in Azure DevOps.
- Add the following files from the sample repository that you previously cloned to the Git Azure repo that was created as part of the project. (The simplest way to do this is to add a new remote to your local Git repository and push the files.)
- DynamoDB_Table.template – The sample CloudFormation template you will deploy
- parameters.json – This passes parameters when launching the CloudFormation template
- pipeline-iamra.yml – The definition of the pipeline that deploys the CloudFormation template using IAM RA authentication
- Create a new pipeline:
- Select Azure Repos Git as your source.
- Select your current repository.
- Choose Existing Azure Pipelines YAML file.
- For the path, enter pipeline-iamra.yml.
- Select Save (don’t run the pipeline yet).
- In Azure DevOps, choose Pipelines, and then choose Library.
- Create a new variable group called aws-dev that will store the configuration values to deploy to your AWS Dev environment.
- Add variables corresponding to the values of the trust anchor profile and role to use for authentication.

Figure 6: Azure DevOps configuration steps: Adding IAM Roles Anywhere variables
- Save the group.
- Update the permissions to allow your pipeline to use the variable group.

Figure 7: Azure DevOps configuration steps: Pipeline permissions
- In the Library, choose the Secure files tab to upload the certificate and private key files that you generated previously.

Figure 8: Azure DevOps configuration steps: Upload certificate and private key
- For each file, update the Pipeline permissions to provide access to the pipeline created previously.

Figure 9: Azure DevOps configuration steps: Pipeline permissions for each file
- Run the pipeline and validate successful completion. In your AWS account, you should see a stack named my-stack-name that deployed a DynamoDB table.

Figure 10: Verify CloudFormation stack deployment in your account
Explanation of the pipeline-iamra.yml
Here are the different steps of the pipeline:
- The first step downloads and installs the credential helper tool that allows you to obtain temporary credentials from IAM Roles Anywhere.
- The second step uses the DownloadSecureFile built-in task to retrieve the certificate and private key that you stored in the Azure DevOps secure storage.
The credential helper is configured to obtain temporary credentials by providing the certificate and private key as well as the role to assume and an IAM AWS Roles Anywhere profile to use. Every time the AWS CLI or AWS SDK needs to authenticate to AWS, they use this credential helper to obtain temporary credentials.
- The next step is for troubleshooting purposes. The AWS CLI is used to confirm the current assumed identity in your target AWS account.
- The final step uses the CloudFormationCreateOrUpdateStack task from the AWS Toolkit for Azure DevOps to deploy the Cloud Formation stack. Usually, the awsCredentials parameter is used to point the task to the Service Connection with the AWS access keys and secrets. If you omit this parameter, the task looks instead for the credentials in the standard credential provider chain.
Multi-account deployments
In this example, the pipeline deploys to a single AWS account. You can quickly extend it to support deployment to multiple accounts by following these steps:
- Repeat the Configure IAM Roles Anywhere Trust Anchor for each account.
- In Azure DevOps, create a variable group with the configuration specific to the additional account.
- In the pipeline definition, add a stage that uses this variable group.
The pipeline-iamra-multi.yml file in the sample repository contains such an example.
Cleanup
To clean up the AWS resources created in this article, follow these steps:
- Delete the deployed CloudFormation stack in your workload accounts.
- Remove the IAM trust anchor and profile from the workload accounts.
- Delete the CICDRole IAM role.
Alternative options available to obtain temporary credentials in AWS for CI/CD pipelines
In addition to the IAM Roles Anywhere option presented in this blog, there are two other options to issue temporary security credentials for the external build agent:
- Option 1 – Re-host the build agent on an Amazon Elastic Compute Cloud (Amazon EC2) instance in the AWS account and assign an IAM role. (See IAM roles for Amazon EC2). This option resolves the issue of using long-term IAM access keys to deploy self-hosted build agents on an AWS compute service (such as Amazon EC2, AWS Fargate, or Amazon Elastic Kubernetes Service (Amazon EKS)) instead of using fully-managed or on-premises agents, but it would still require using multiple agents for pipelines that need different permissions.
- Option 2 – Some DevOps tools support the use of OpenID Connect (OIDC). OIDC is an authentication layer based on open standards that makes it simpler for a client and an identity provider to exchange information. CI/CD tools such as GitHub, GitLab, and Bitbucket provide support for OIDC, which helps you to integrate with AWS for secure deployments and resources access without having to store credentials as long-lived secrets. However, not all CI/CD pipeline tools supports OIDC.
Conclusion
In this post, we showed you how to combine IAM Roles Anywhere and an existing public key infrastructure (PKI) to authenticate external build agents to AWS by using short-lived certificates to obtain AWS temporary credentials. We presented the use of Azure Pipelines for the demonstration, but you can adapt the same steps to other CI/CD tools running on premises or in other cloud platforms. For simplicity, the certificate was manually configured in Azure DevOps to be provided to the agents. We encourage you to automate the distribution of short-lived certificates based on an integration with your PKI.
For demonstration purposes, we included the steps of generating a root certificate and manually signing the leaf certificate. For production workloads, you should have access to a private certificate authority to generate certificates for use by your external build agent. If you do not have an existing private certificate authority, consider using AWS Private Certificate Authority.
If you have feedback about this post, submit comments in the Comments section below. If you have questions about this post, start a new thread on the AWS Security, Identity, & Compliance re:Post or contact AWS Support.
Want more AWS Security news? Follow us on Twitter.