AWS Partner Network (APN) Blog
How to Connect Your LoRaWAN Devices to AWS IoT Core Using Actility ThingPark
By Gaurav Gupta, Sr. Partner Solutions Architect – IoT at AWS
By Pedro Mendoza, Sr. EMEA IoT Specialist SA at AWS
By Olivier Hersent, CEO and CTO at Actility
 |
 |
The demand to connect low power wide area (LPWA) Internet of Things (IoT) devices to the cloud is ever growing. According to a 2019 IHS connectivity report, LoRa/LoRaWAN connections will account for 730 million connected devices by 2024.
AWS IoT Core offers a managed cloud service to support trillions of messages from billions of devices, and route messages easily and securely to devices and other AWS services.
This post provides an overview of how to add LoRaWAN devices to your IoT network using Actility ThingPark Enterprise. We’ll show you how to use a combination of an AWS Marketplace solution and AWS CloudFormation template to manage LoRaWAN devices from inside your AWS IoT Core account.
Actility is an AWS Select Technology Partner whose mission is to simplify LoRaWAN deployment and integrate with cloud applications.
Background on LoRaWAN
Private LPWA deployments, made possible through the use of unlicensed spectrum, are a perfect use case for LoRaWAN as the networks can be easily deployed and managed from cloud infrastructure.
Standardized by LoRa Alliance, LoRaWAN defines the low-level commands supported by all compliant devices. LoRaWAN technology provides robust indoor and outdoor coverage for IoT applications.
Unlike other unlicensed radio frequency (RF) technologies such as mesh networks, LoRaWAN can reliably connect mobile assets and the workers themselves.
LoRaWAN RF gateways often incorporate cellular, WiFi, or Ethernet capabilities for reliable low-touch data backhaul. LoRaWAN is also deployed by leading mobile operators across regions to complement cellular IoT technologies and serve all segments of IoT connectivity.
Why Actility ThingPark?
Actility published ThingPark Enterprise LoRa Network Server (LNS) as a software-as-a-solution (SaaS) solution on AWS Marketplace to address the complex challenge of setting up LoRaWAN networks and make it easy for customers to find and purchase their solution.
ThingPark Enterprise is a LoRaWAN IoT connectivity management platform that helps customers build network infrastructure by managing LoRaWAN gateways, add new LoRaWAN devices, monitor network operations, and control the flow of data to application servers.
The focus of this post is the integration of registered devices with AWS IoT Core once you have configured devices and gateways on the Actility ThingPark platform. With this integration, you can develop the bi-directional connector between devices in the Actility ThingPark account to the corresponding AWS IoT Core account.
This connection uses Actility’s dataflow management service (ThingPark X) that is bundled in the Enterprise edition and adapts to AWS IoT Core interfaces and drivers for LoRaWAN devices. The drivers convert the binary payload to properties and data types easily manageable on AWS IoT Core. AWS users can also build commands that get converted to binary payload as required by the target device.
Next, we’ll outline the AWS IoT Core integration using an AWS CloudFormation template. Once the AWS connector is set up with the CloudFormation stack, MQTT over TLS v1.2 connection is the transport protocol used between ThingPark X and AWS IoT Core.
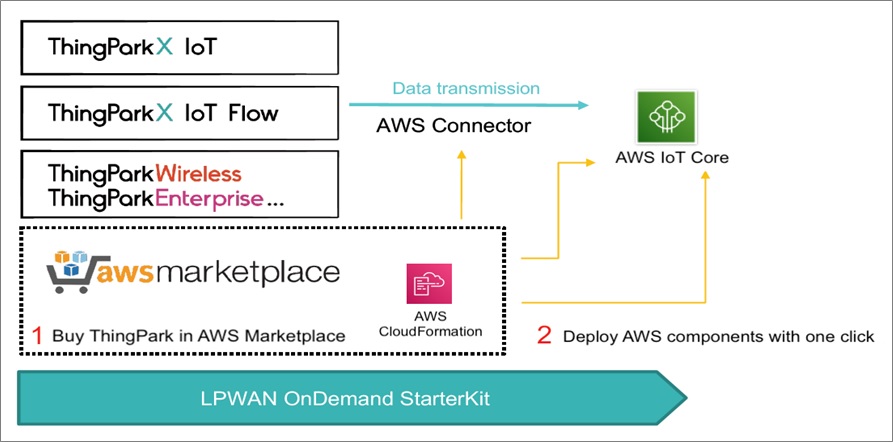
Figure 1 – Integration of Actility ThingPark with AWS IoT Core.
Walkthrough
To get started, go to the AWS Marketplace listing for Actility:
- Subscribe to redirect to Actility ThingPark console (the exact URL may depend on your country, so use the link provided in your account confirmation email).
- To experiment with procedures in this post, you can use ThingPark Enterprise free discovery tiers, or use a production-grade subscription.

Figure 2 – Steps involved to establish the AWS IoT connector.
To implement this architecture, a CloudFormation template is provided and performs the following steps:
- Creates Action Lambda and policy in AWS IoT Core.
- Action Lambda creates X.509 certificate, attaches the policy, and fetches the IoT endpoint.
- Action Lambda then returns X.509 certificate to ThingPark X IoT Flow to establish the connector.
- ThingPark X IoT Flow sets up the MQTT connection using the X.509 certificate and IoT endpoint. The creation of a connection via AWS CloudFormation establishes a bi-directional messaging transport link between ThingPark X IoT Flow and your AWS IoT Core account. Events and commands from multiple LoRaWAN devices are multiplexed over this messaging transport link.
Next, after ordering a “discovery” or “production” instance on AWS Marketplace, you’ll receive a welcome email with a link to set up your password on the ThingPark SaaS platform. You can now access your ThingPark Enterprise console.
Choose a password for your administrator account to the new ThingPark Enterprise SaaS instance. After login, you are redirected to the main ThingPark Enterprise dashboard; learn more about setting up the LoRaWAN network.
In this example, you see an Abeeway Micro Tracker device. From the console, it’s possible to manually set up your AWS connection using Applications Create.
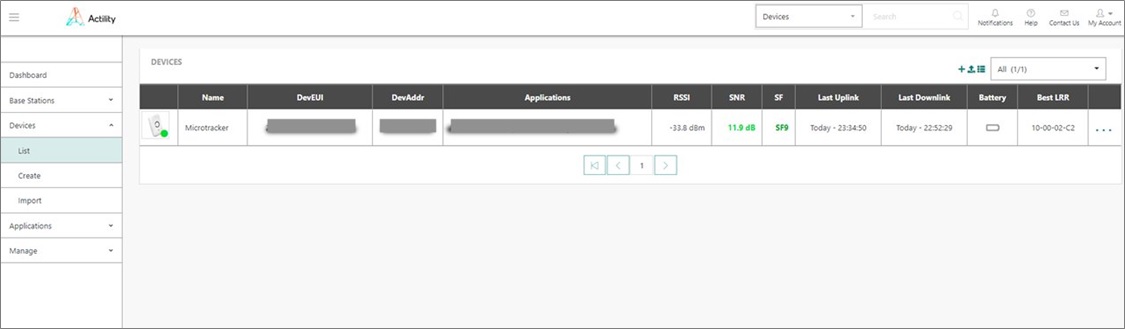
Figure 3 – Actility ThingPark Enterprise dashboard – List devices.
Alternatively, you can leverage the CloudFormation template, which may be downloaded and launched from the AWS connector setup page in ThingPark Enterprise console.
Now, select your Region of choice to create a new CloudFormation stack.
Fill the CloudFormation template parameters with the information you received in your ThingPark welcome email:
- ClientID: The email you used to subscribe to ThingPark Enterprise.
- ClientSecret: The password you defined to activate your account.
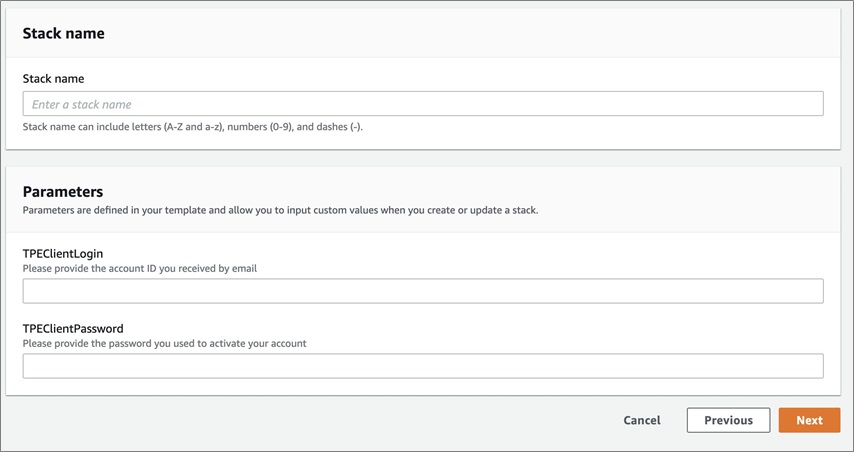
Figure 4 – AWS CloudFormation console with Actility ThingPark Enterprise stack.
Click Next until you reach the final step in the CloudFormation stack creation. Select the “I acknowledge” box to acknowledge that resources for the integration may be created in your AWS account.
Select Create to initiate the creation of the stack. It returns a cross-account Role ARN and AWS IoT Core certificate from the customer AWS account to the ThingPark Enterprise. The IoT policy for the certificate is also created and attached.
Testing Integration
The connector publishes uplink messages to AWS IoT Core on MQTT topics and subscribes to MQTT topics for downlink messages. The following sections describe how to test uplink and downlink message flows.
Uplink Messages
Before developing applications on AWS IoT Core, you want to test whether the connector is publishing data. Check first if your device is sending data as seen from the LoRaWAN network server.
To do this, go to your ThingPark Enterprise console, and select Device List <your device>. The monitoring page for the device includes a widget showing the last 10 LoRaWAN packets.
If the device has a supported driver, you’ll be able to visualize the decoded payload details. If you need the full details or to troubleshoot your network, you can also open the dedicated “wireless logger” console.

Figure 5 – Actility ThingPark Enterprise dashboard – Device uplink activity.
After checking at the LoRaWAN level, you can now check the live data on AWS IoT Core by subscribing to an MQTT topic.
- Log in to the AWS Management Console.
- In Services under Internet of Things, go to AWS IoT Core.
- In the menu on the left, go to Test.
- For Subscription topic, enter the uplink topic:
aws/things/+/uplink - Click Subscribe to topic.
- Uplink messages are shown as they arrive:
Downlink Messages
Before developing applications on AWS IoT, you want to test whether you can send downlink data to your devices. You can use AWS IoT Core Test view to publish downlink messages to ThingPark X IoT Flow:
- Log in to the AWS console.
- In Services under Internet of Things, go to AWS IoT Core.
- In the menu on the left, go to Test.
- Under Publish, enter the downlink topic:
aws/things/<devEUI>/downlink - Enter the downlink payload according to the downlink message format:
- Click Publish to topic.
The downlink is scheduled for transmission by the LoRaWAN network server as soon as the device is ready to receive downlink messages. You will receive a transmission report in the uplink topic.
Here’s an example of a successful transmission report. Messages may be rejected for various causes, so please refer to ThingPark Enterprise reference guide for delivery failure cause codes.
ThingPark Enterprise is not a message queue; although it can buffer several messages, it’s recommended to send downlinks one at a time by waiting for successful DevEUI_downlink_Sent indication before scheduling the next downlink.
Finally, when the packet is effectively sent over LoRaWAN air interface, it will appear on ThingPark Enterprise wireless logger console. Downlink packets are marked with a red arrow as in the following screenshot, illustrating a downlink command to the Abeeway tracker.
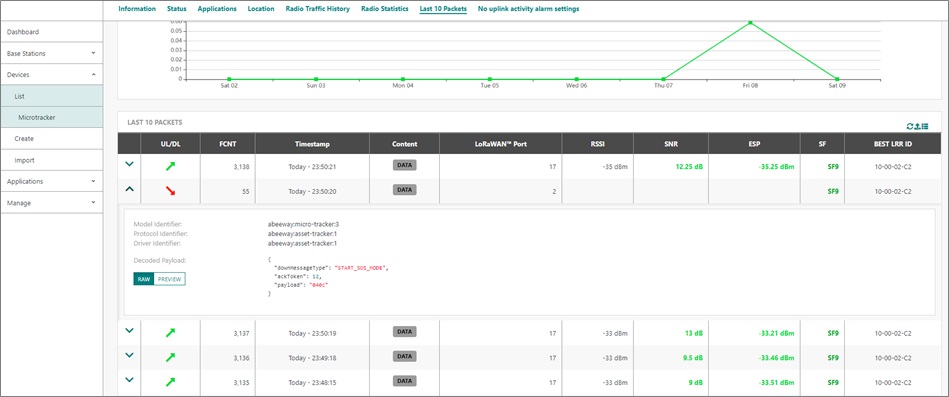
Figure 6 – Actility ThingPark Enterprise dashboard – Device downlink activity triggered from AWS IoT Core.
Uplink Data Storage
Since the data is now received in AWS IoT Core via the AWS IoT connector, you create an AWS IoT Rule to store the data in an Amazon DynamoDB table.
- Log in to the AWS console.
- Go to AWS IoT Core by selecting Internet of Things under Services.
- In the menu on the left, go to Act.
- Click Create rule.
- Enter a name for the rule, such as
actility_datastore - Add a Description. For example: send uplink data from ThingPark X IoT Flow to DynamoDB.
- To send the entire uplink message from ThingPark X IoT Flow to Amazon DynamoDB, enter the following in the Rule query statement:
SELECT DevEUI_uplink.* FROM 'aws/things/+/uplink'
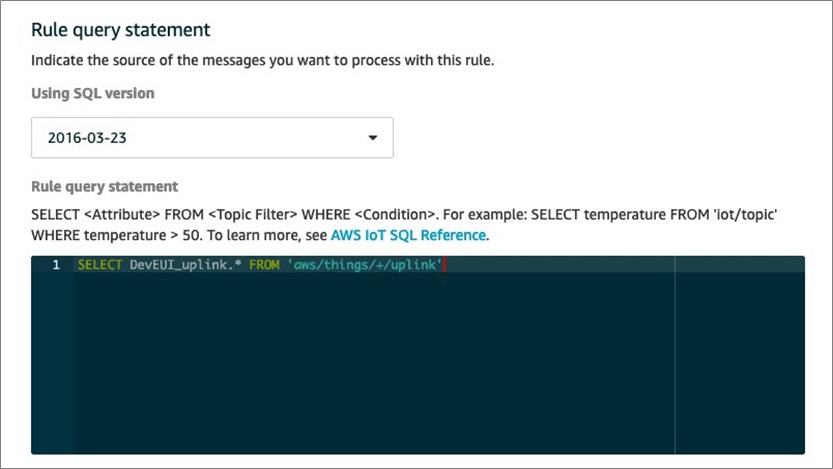
Figure 7 – AWS IoT Core – Create rule.
- Next, add an action, and select “Split messages into multiple columns of a database table (DynamoDBv2)”.
- Under Table name, click Create a new resource and a new browser tab opens:
- Click Create table.
- Enter any Table name. For example:
my-thingpark-data - As Partition key, enter
DevEUI - Optionally, check Add sort key and enter
Timeto sort by time. You can then click Create and leave this tab open.

Figure 8 – Amazon DynamoDB console – Create table.
- Go back to the AWS IoT tab, and click refresh next to Table name.
- Select your newly created table.
- Click Create new role and enter
aws-iot-dynamodb, or update an existing role to grant access from AWS IoT Core to the DynamoDB table. - Click Add action, and then Create rule.
- Go back to the DynamoDB table tab, and go to Items.
- Wait for few minutes to see the stored data. A typical LoRaWAN device sends data once every few minutes.

Figure 9 – Amazon DynamoDB console – Table entry showing device payload.
- Finally, click on one of the listed DevEUI to view the uplink upload in the DynamoDB view.
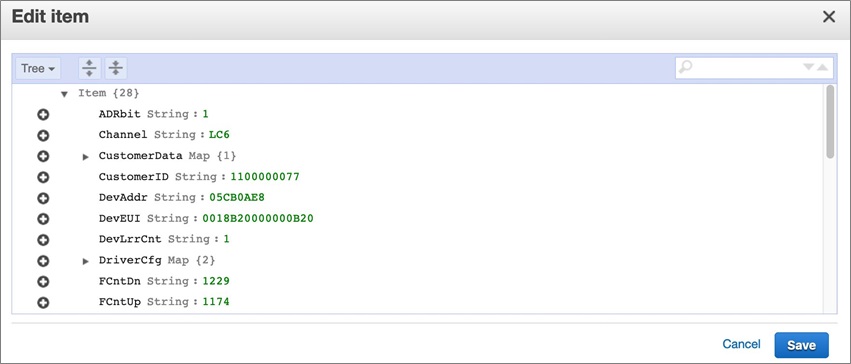
Figure 10 – Amazon DynamoDB console – Table entry showing detailed device fields.
Using this example flow, you can now create other AWS IoT Rules that route the data to other AWS services. You could perform archiving in Amazon Simple Storage Service (Amazon S3), analytics using AWS IoT Analytics, machine learning using Amazon SageMaker, monitoring via Amazon CloudWatch, and other functions.
You can also chain multiple rules, using the output topic of a rule as the input topic for the next. To learn more about this option, visit the AWS IoT Core page.
Customer Reference
Watch this video to see how Charlie Isaacs, VP and CTO for Customer Connection at Salesforce, uses ThingPark with the AWS IoT connector to integrate with Salesforce Lightning Flow directly through REST API from AWS Lambda.
Through this integration, LoRaWAN devices connected via Actility ThingPark can trigger alarms in Salesforce, for instance, if the battery level is low and log the data in Salesforce for further analysis.
Conclusion
In this post, we covered how to use an AWS CloudFormation template to build the Actility ThingPark X connector to AWS IoT as the first step to connect LoRaWAN-enabled endpoints to AWS IoT Core, and to make use of other cloud services available on AWS.
Actility will continue to iterate this functionality to develop new features and build end-to-end AWS solutions. Please refer to the ThingPark Enterprise and AWS IoT connector documentation for details on additional features.
.

.
Actility – AWS Partner Spotlight
Actility is an AWS Select Technology Partner whose mission is to simplify LoRaWAN deployment and integrate with cloud applications.
Contact Actility | Partner Overview | AWS Marketplace
*Already worked with Actility? Rate the Partner
*To review an AWS Partner, you must be a customer that has worked with them directly on a project.