Containers
Beyond metrics: Extracting actionable insights from Amazon EKS with Amazon Q Business
Amazon Elastic Kubernetes Service (Amazon EKS) has emerged as a leading platform for container orchestration, enabling the deployment, scaling, and management of containerized applications. However, it can be very complex to monitor and understand the behavior of enterprise applications, and derive valuable insights from the extensive data produced by an application stack on Amazon EKS. Fortunately, the integration of Amazon EKS with Amazon Q Business provides a robust solution for uncovering actionable insights from your applications.
Amazon Q Business is a generative AI–powered assistant that can answer questions, provide summaries, generate content, and securely complete tasks based on data and information in your enterprise systems. Customers can use this fully managed service to query and analyze data from multiple sources, such as the control plane, data plane, request rates, and application logs. Furthermore, it offers organizations thorough insight into their applications and Kubernetes environments.
In this post, we demonstrate a solution that uses Amazon Data Firehose to aggregate logs from the Amazon EKS control plane and data plane, and send them to Amazon Simple Storage Service (Amazon S3). Finally, we use Amazon Q Business and its Amazon S3 connector to synchronize the logs, index the log data in Amazon S3, and enable a chat experience powered by the generative AI capabilities of Amazon Q Business.
Solution overview
The following architecture diagram shows the workflow that occurs when deploying the Terraform code that we use in this solution. The following steps detail how the EKS cluster is deployed with the retail sample application.
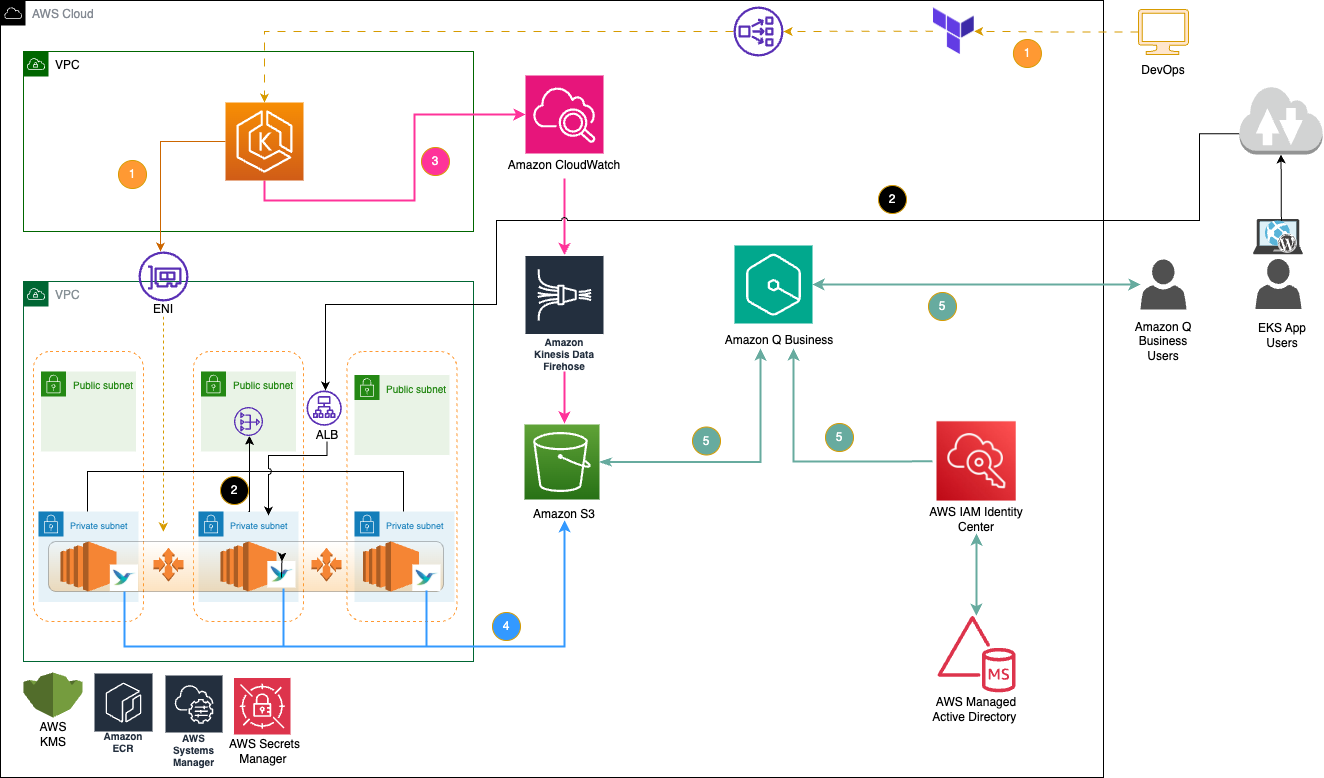
Figure 1: Solution architecture diagram
- The user deploys the complete infrastructure stack including Amazon Virtual Private Cloud (Amazon VPC), AWS Identity Access Management (IAM) roles, EKS cluster, and Amazon Q Business using a single Terraform execution.
- Application traffic flows through the Application Load Balancer (ALB) to the deployed sample retail application running on the EKS cluster.
- Amazon EKS Control Plane logs stored in Amazon CloudWatch get streamed to Amazon S3 through Amazon Data Firehose.
- Fluent Bit DaemonSet collects and forwards all pod and container logs directly to Amazon S3 from across the EKS cluster.
- Amazon S3 serves as the unified storage layer for all logs, which Amazon Q Business indexes and analyzes through its native connector. Therefore, users can efficiently query, extract insights, and troubleshoot issues through an intuitive AI-powered interface.
Prerequisites
The following prerequisite are necessary to complete this solution:
- An Amazon Web Services (AWS) account
- Command line tools: AWS Command Line Interface (AWS CLI), aws iam-authenticator, kubectl, and Terraform on your workstation
- AWS IAM Identity Center
Walkthrough
The following steps walk you through the solution.
Creating Terraform backend remote state resources
To set up your workspace, open your terminal.
- Clone the Terraform code in your current working directory.
- Change your current working directory to Amazon-Q-business by running the following command.
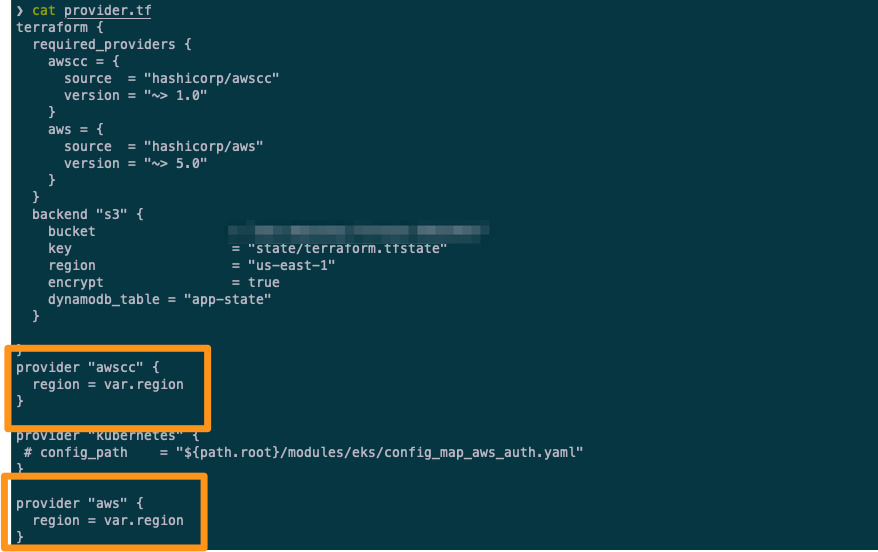
Figure 2: Terraform providers
This directory has a file that is named provider.tf that contains information about the providers that you use in this solution with Terraform. As shown in the preceding figure, we use the aws provider and the awscc provider, which is powered by the AWS Cloud Control API, to create Amazon Q Business and its dependencies in this post.
All variables and their default values are stored in a separate vars.tf file, so that you can make changes as needed. For Terraform state management, use Amazon S3 and Amazon DynamoDB. To set up the initial workspace and Terraform backend, open a terminal, navigate to your base directory, and run the following:
This creates a DynamoDB table and an S3 bucket for storing and locking Terraform state files. Note the S3 bucket name for the next step.
Create blog architecture resources using Terraform
With the initial setup complete, you can create your current blog environment as shown in Figure 1. First, update the bucket name in provider.tf with the backend bucket from the Creating Terraform backend resources section, and run the following:
Deployment in the us-east-1 AWS Region takes approximately 30 minutes. After deployment, you should observe the resource IDs as shown in the following figure.
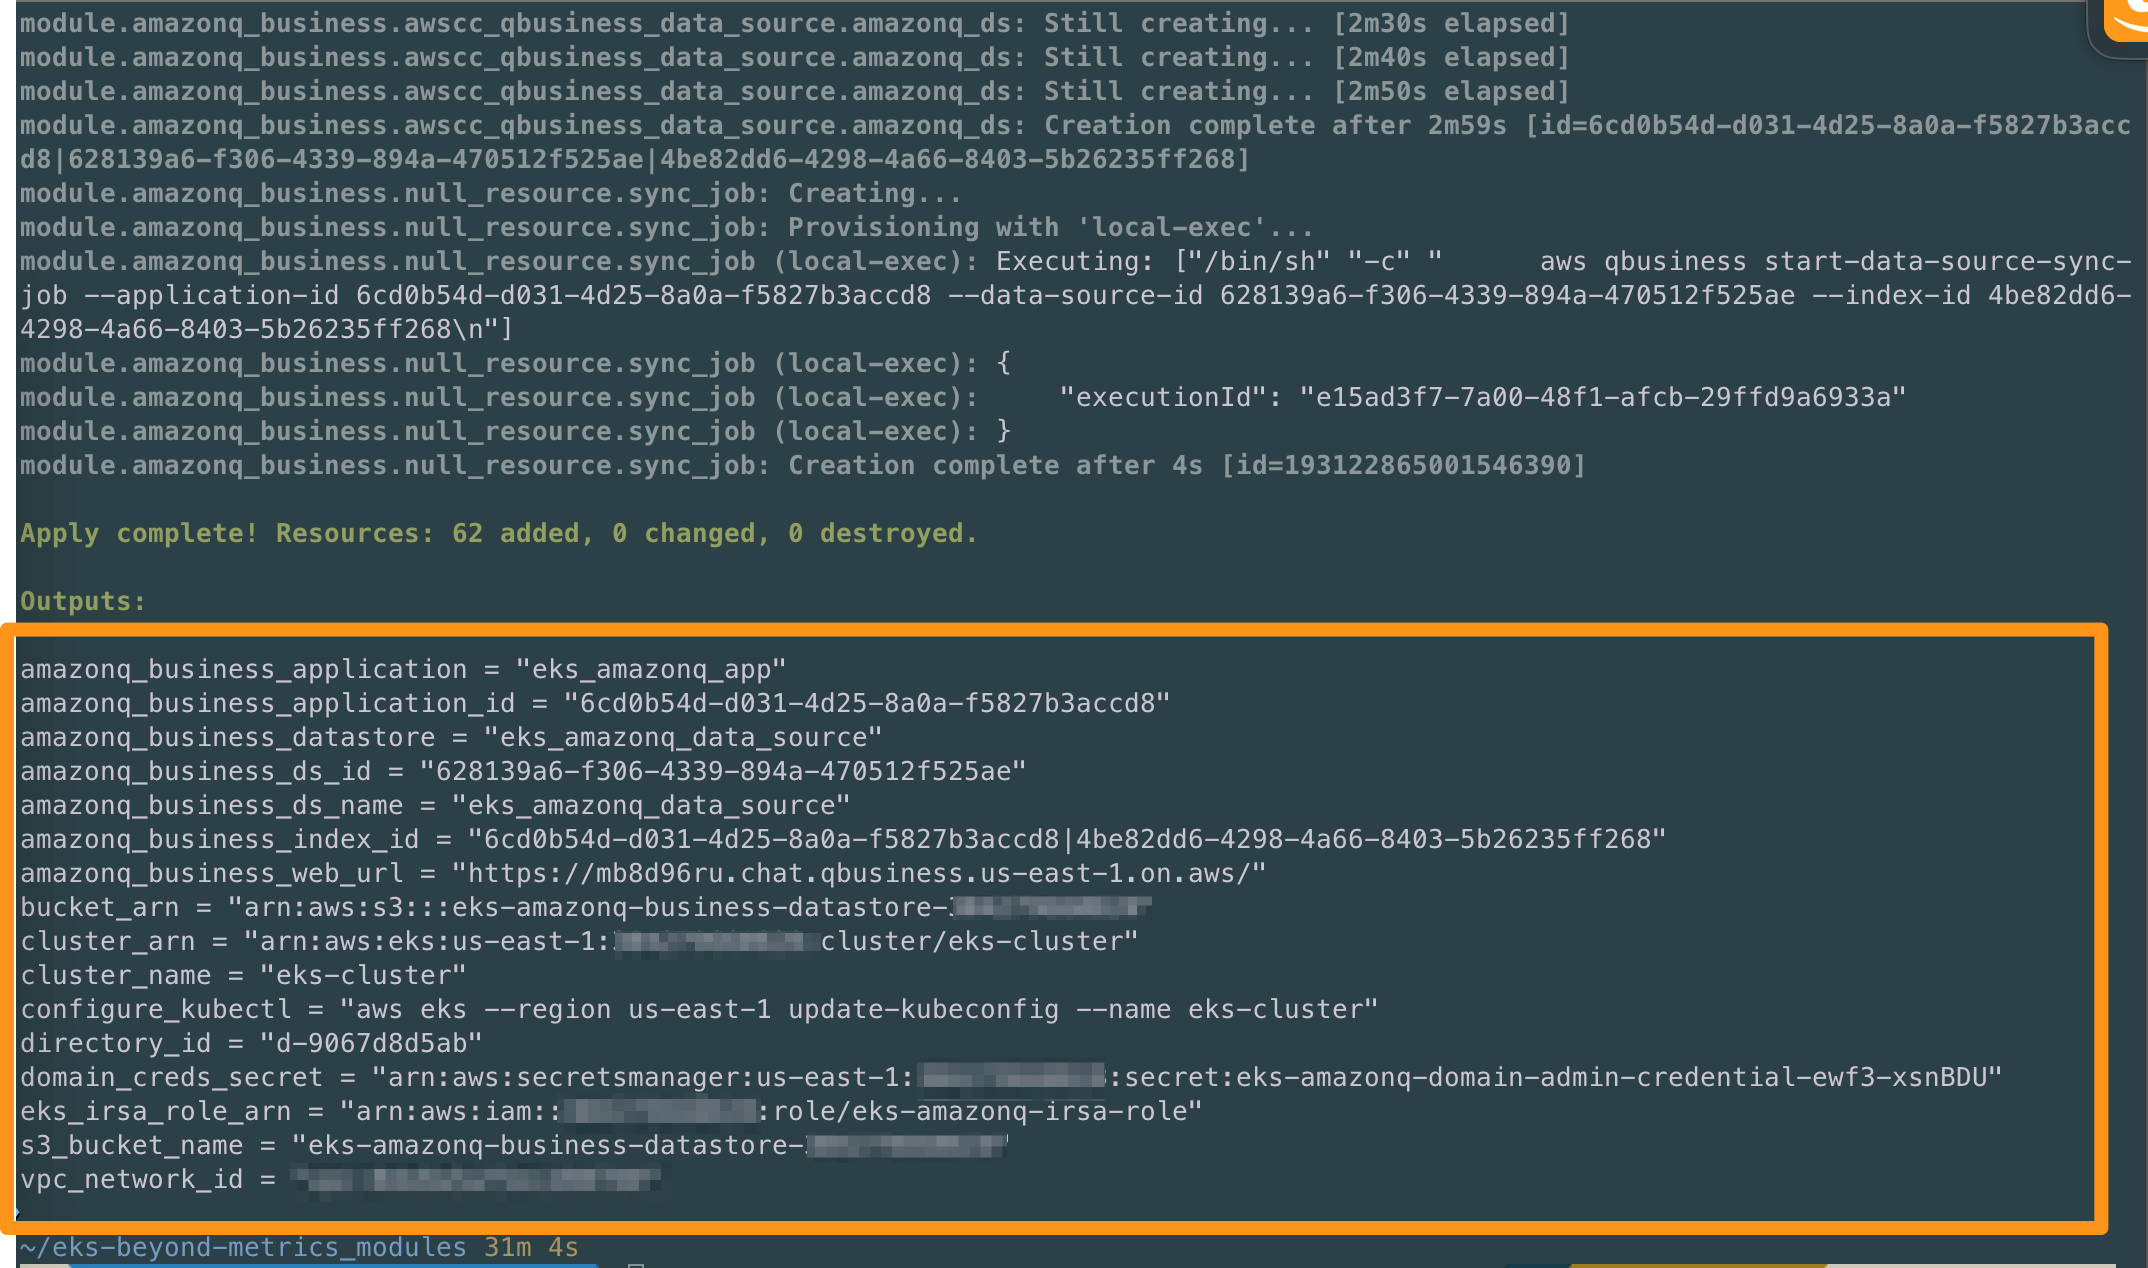
Figure 3: Terraform output
Deploy sample application and Fluent Bit to export container logs to Amazon S3
In this step you deploy the retail store sample application on top of the EKS cluster, which you created in the last step. To deploy the application, run the following command in your terminal from the repo base directory:
Deploy AWS for Fluent Bit to export container logs to Amazon S3
After deploying the application, you deploy AWS for Fluent Bit as a DaemonSet in the default namespace. This forwards pod logs to an S3 bucket. Use Helm to deploy aws-for-fluent-bit, customizing the configuration with the s3-fluentbit-values.yaml file located in the Terraform repo base directory.
Replace the IRSA serviceAccount, role-arn, bucket name, and region with values from your environment created in the preceding figure. You can also get these resource details by running make output in your terminal.
After updating the s3-fluentbit-values.yaml, run the following command to install Fluent Bit:
Verify that Fluent Bit is running with the following command:
The control plane and data plane logs being queried through Amazon Q Business are stored in an S3 bucket named eks-amazonq-business-datastore-<AWS Account Id> under different folders: eks-cluster/ and pod-logs/. After the logging is enabled, you should observe the logs appearing in the configured S3 bucket as shown in the following figure.
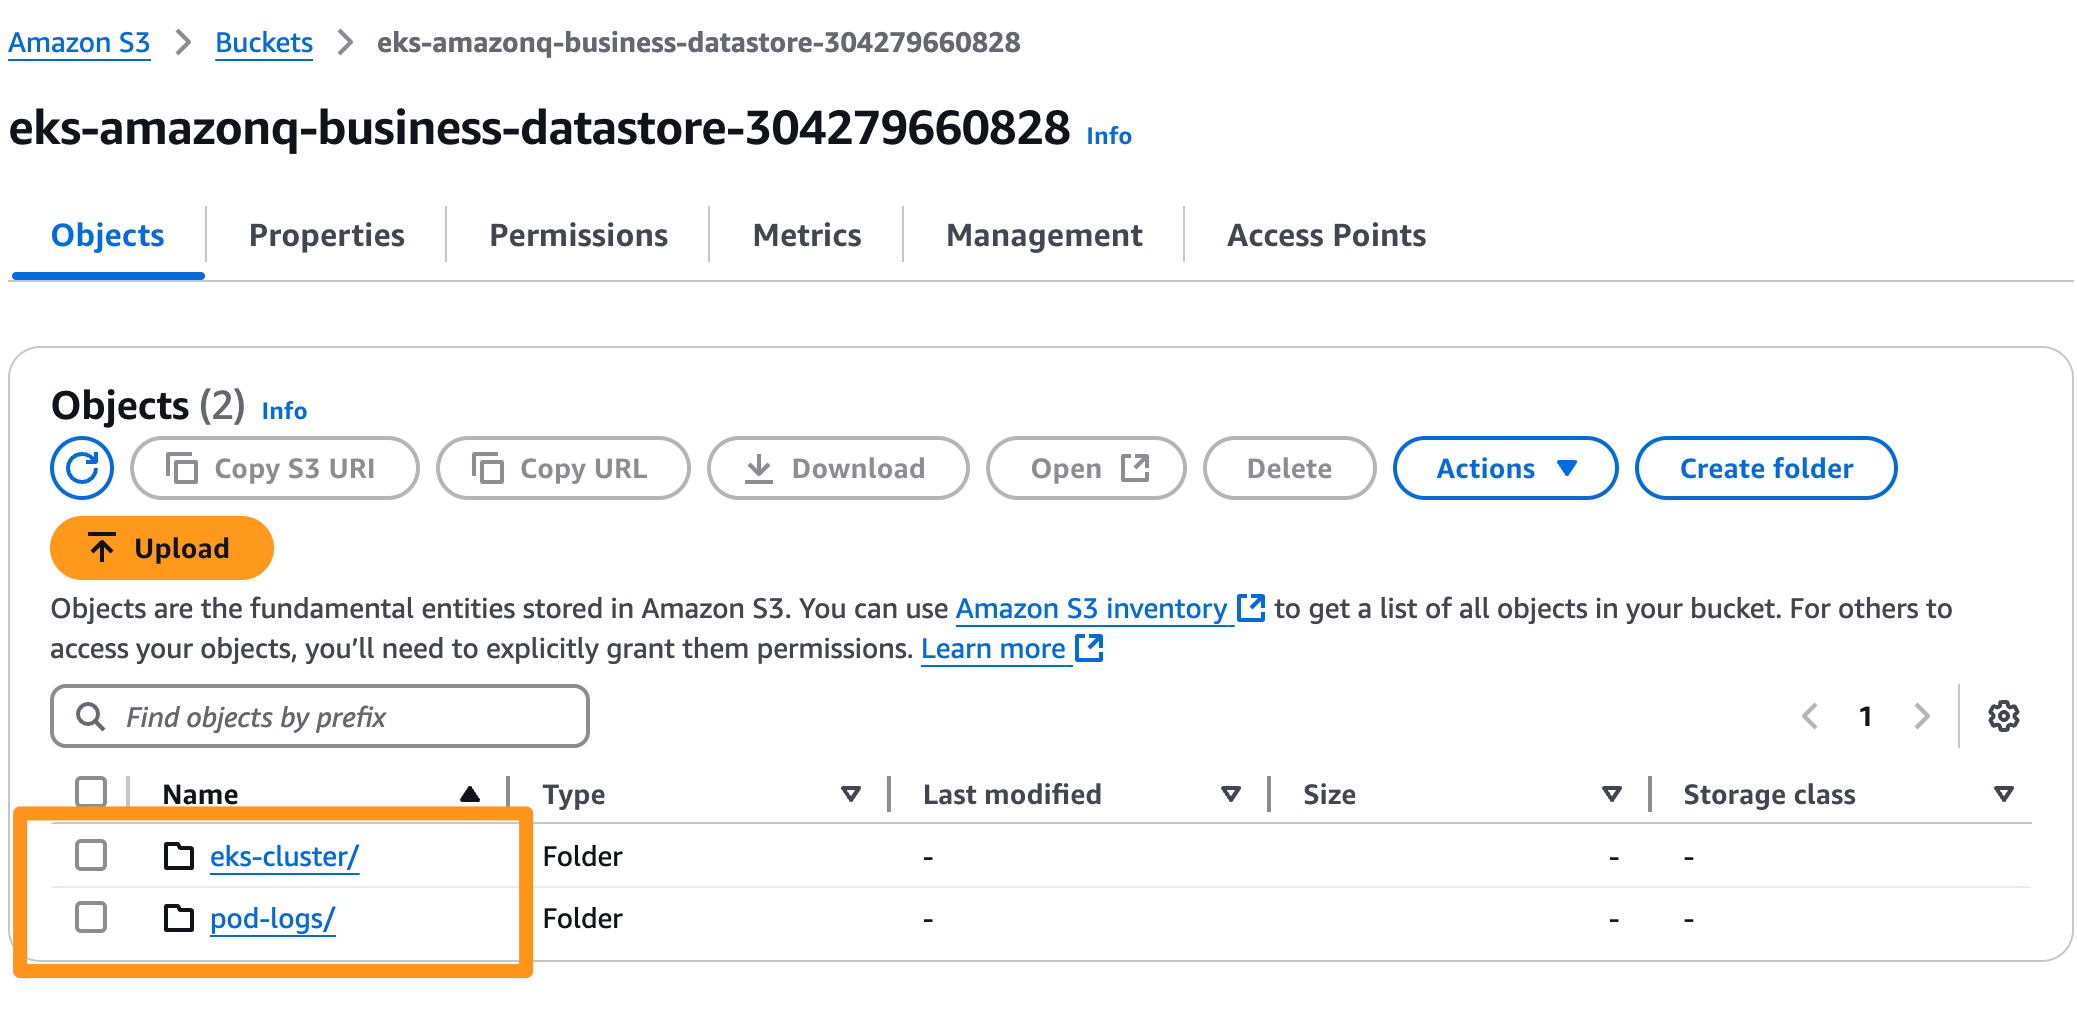
Figure 4: Logs in the S3 bucket
Create users and groups in AD and sync with IAM Identity Center
In this section, you create users in the AWS Directory Service for Microsoft Active Directory (AWS Managed Microsoft AD), the centralized identity source for Amazon Q Business for this post. In the next step, you integrate the Microsoft AD with IAM Identity Center. You have the option to create users using either the make command or the AWS Management Console. However, this post focuses on the make method.
In this step you must provide the user’s first name and last name, otherwise the user creation fails. Accounts are initially disabled, as shown in the following image. Therefore, you must reset the password so that any users to work with Amazon Q Business
For password reset, open AWS Directory Service Console to view your Directory Service page and observe all user details with status.
- Choose the user, choose Actions, then choose Reset Password and enable account.
- Input a strong password and save to reset the user’s password in AD.
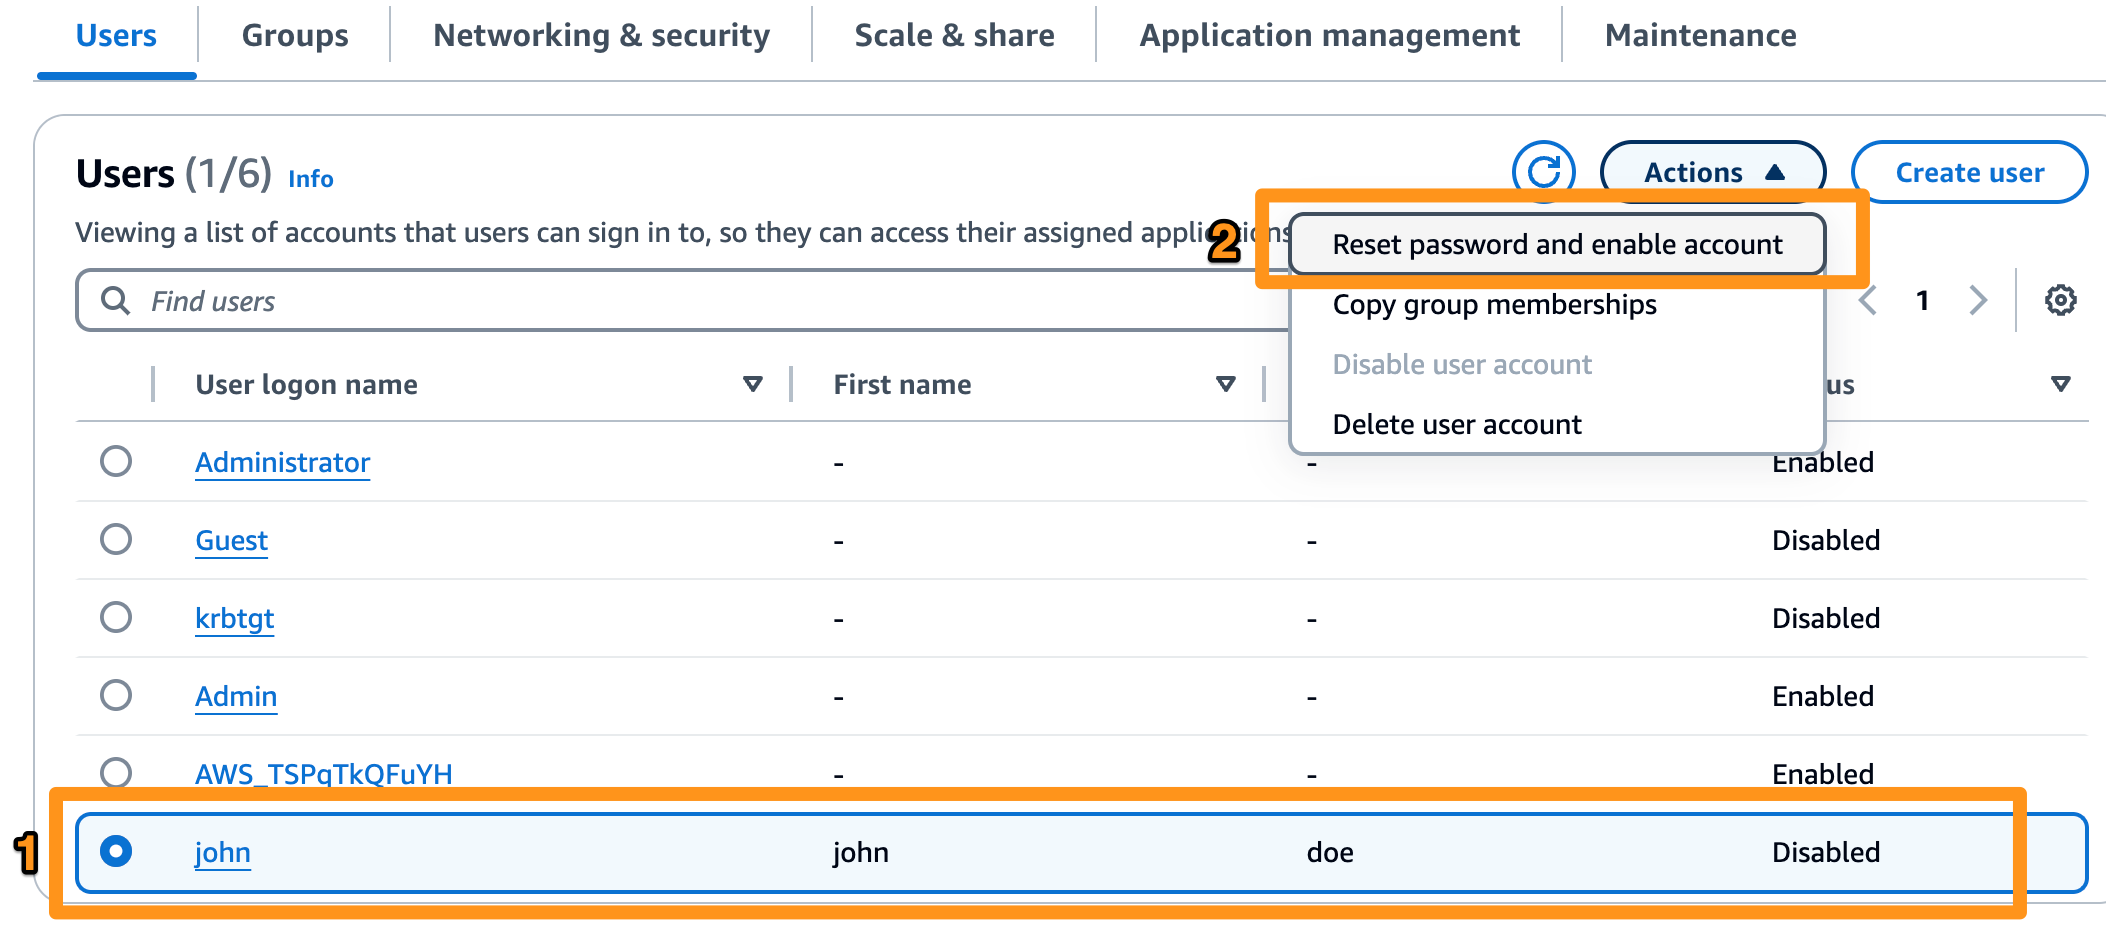
Figure 5: User creation in AD
Link your Identity source with IAM Identity Center by following these steps:
- Open the IAM Identity Center console.
- Choose Settings.
- On the Settings page, choose the Identity source tab, and choose Actions > Change identity source.
- Under Choose identity source, choose Active Directory, and choose Next.
- Under Connect active directory choose a directory in AWS Managed Microsoft AD from the list, and choose Next.
- Under Confirm change, review the information, when ready type ACCEPT, and choose Change identity source.
When you change the AD in IAM Identity Center it asks you to sync users. Choose Start guided setup at the top right in green color.
- Choose Start guided setup after changing the AD in IAM Identity Center.
- Configure attribute mappings: Keep the default attribute mappings, and choose Next.
- Configure sync scope: Search for and add the user that you created, and save the configuration.
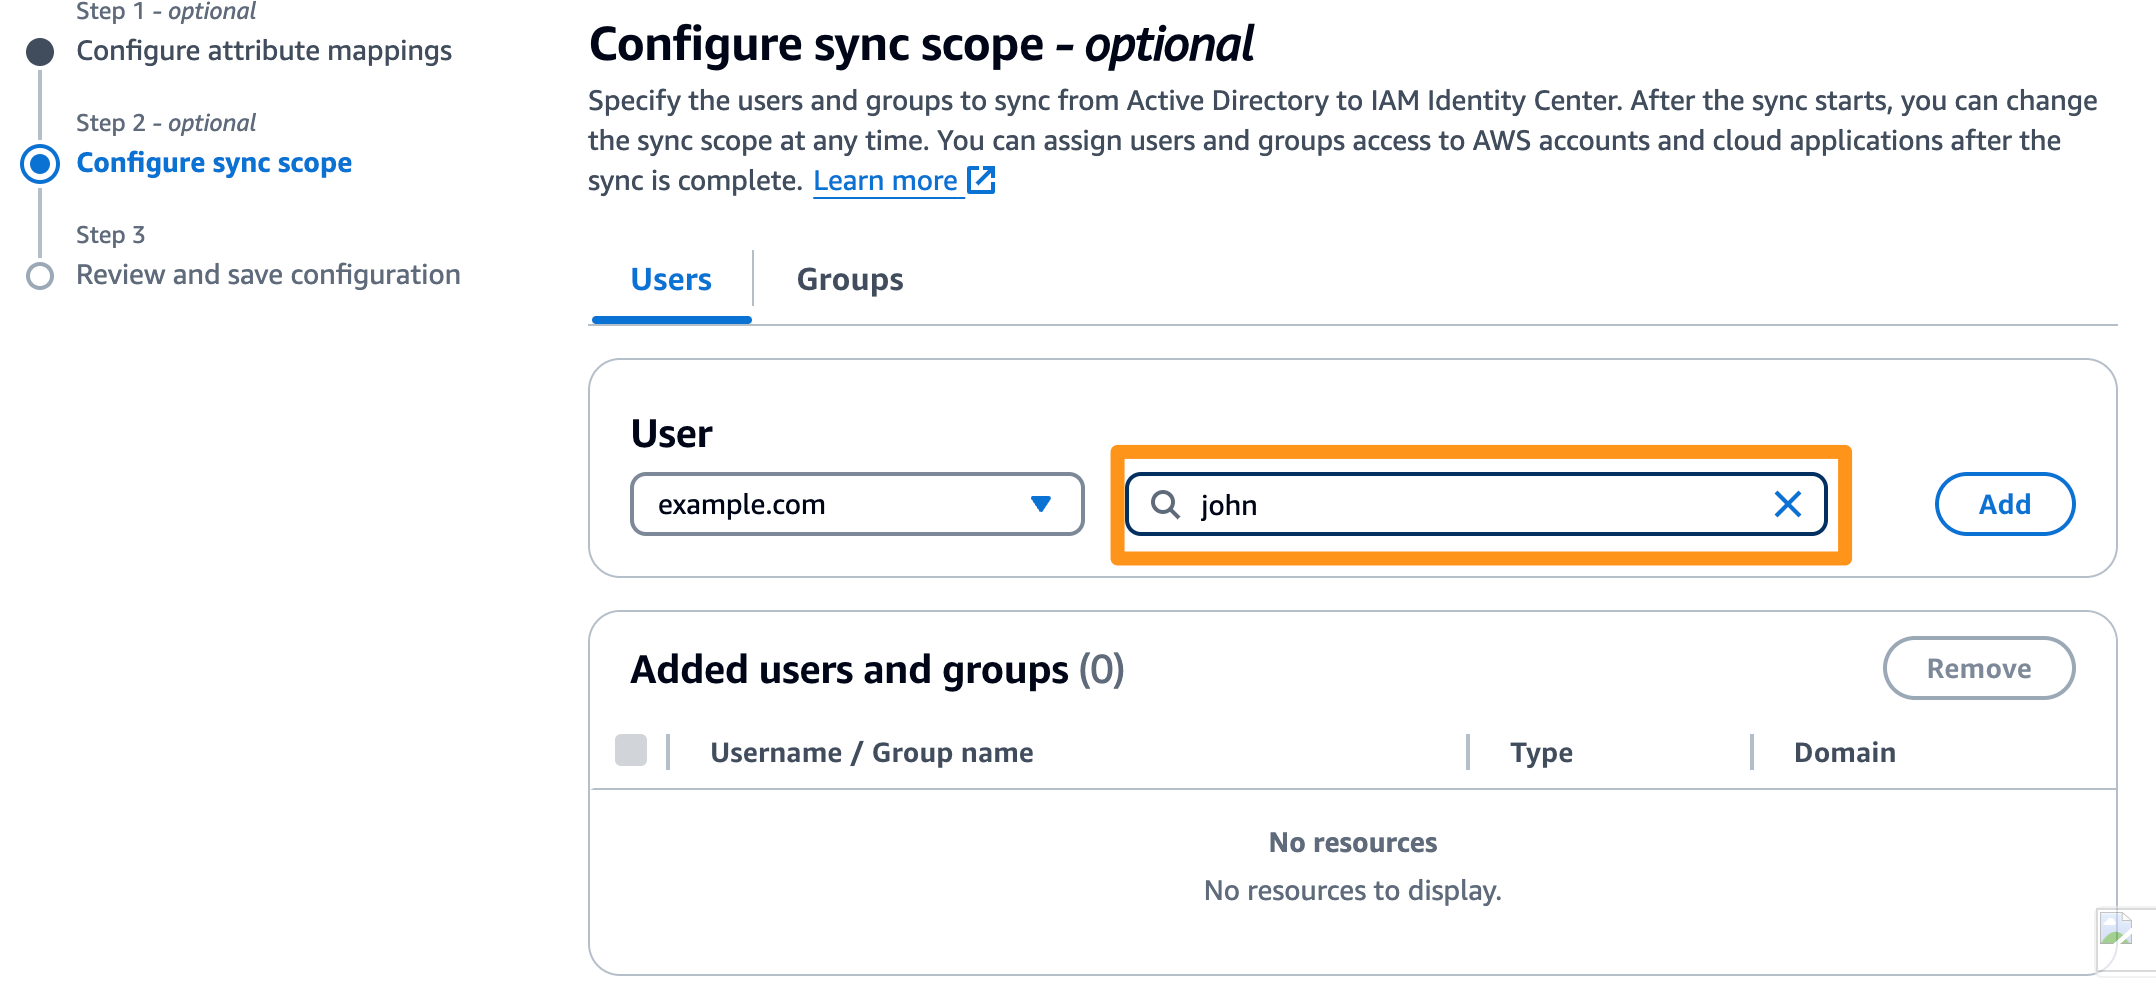
Figure 6: Configuring user sync scope
Allow the synchronization process to complete, which typically takes a few minutes.
Your environment may already have a Microsoft AD integrated with IAM Identity Center. Run this only when there is no Microsoft AD and you’re working in a new clean account.
Add users and groups in the Amazon Q Business application
In this section, you set up users and groups to showcase how access can be managed in Amazon Q Business.
- Open the Amazon Q Business console.
- Choose Get Started and choose the eks_amazonq_app Amazon Q Business application that you created during the deployment of the blog architecture resources.
- On your application home page, choose Manage user access. On the Manage access and subscriptions page, add groups and users by assigning existing users and groups. Search for “johndoe” and “janedoe” and assign them, as shown in the following figure.
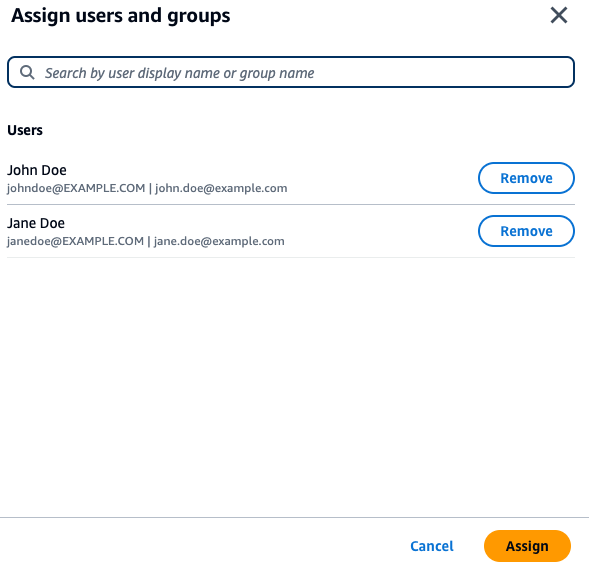
Figure 7: Assign users to Amazon Q Business
Amazon Q Business supports the Pro and Lite Plan. In this blog choose pro for both users in the access and subscription page.
Sync Amazon S3 data source
Crawl and update the Amazon Q Business index with the latest Amazon EKS control plane, data plane, and application logs in the S3 bucket. Remember to update your index when your data source content changes. When you first sync your data source with Amazon Q, all content is synced by default. You can run sync on-demand or on schedule. For more details, go to the Sync run schedule. To initiate the sync, run the following make command in your terminal from the repo base directory.
The sync can take anywhere from minutes to hours. Wait for it to complete.

Figure 8: Sync Amazon Q Business data source
Simulation and queries with Amazon Q
With the setup configured, you’re ready to simulate and query logs based on the scenarios outlined in this section. Along with the sample application and Fluent Bit, you’ve deployed resources that generate load, causing UI pods to crash and sync logs with Amazon Q Business. After the data sync, run the make command from the base directory to find the Amazon Q Business web URL.
Copy the web experience URL, open it in your browser, and log in as the user (jane@EXAMPLE.COM) that you created.
Simulation 1: You granted the user system:anonymous access to view ClusterRole, so that anonymous users can view all cluster objects. This is an unexpected configuration that needs review. You also synced Amazon Q data source to index updated logs.
After successful login, query the logs and see if Amazon Q can find this by asking:
You should observe output similar to the following:
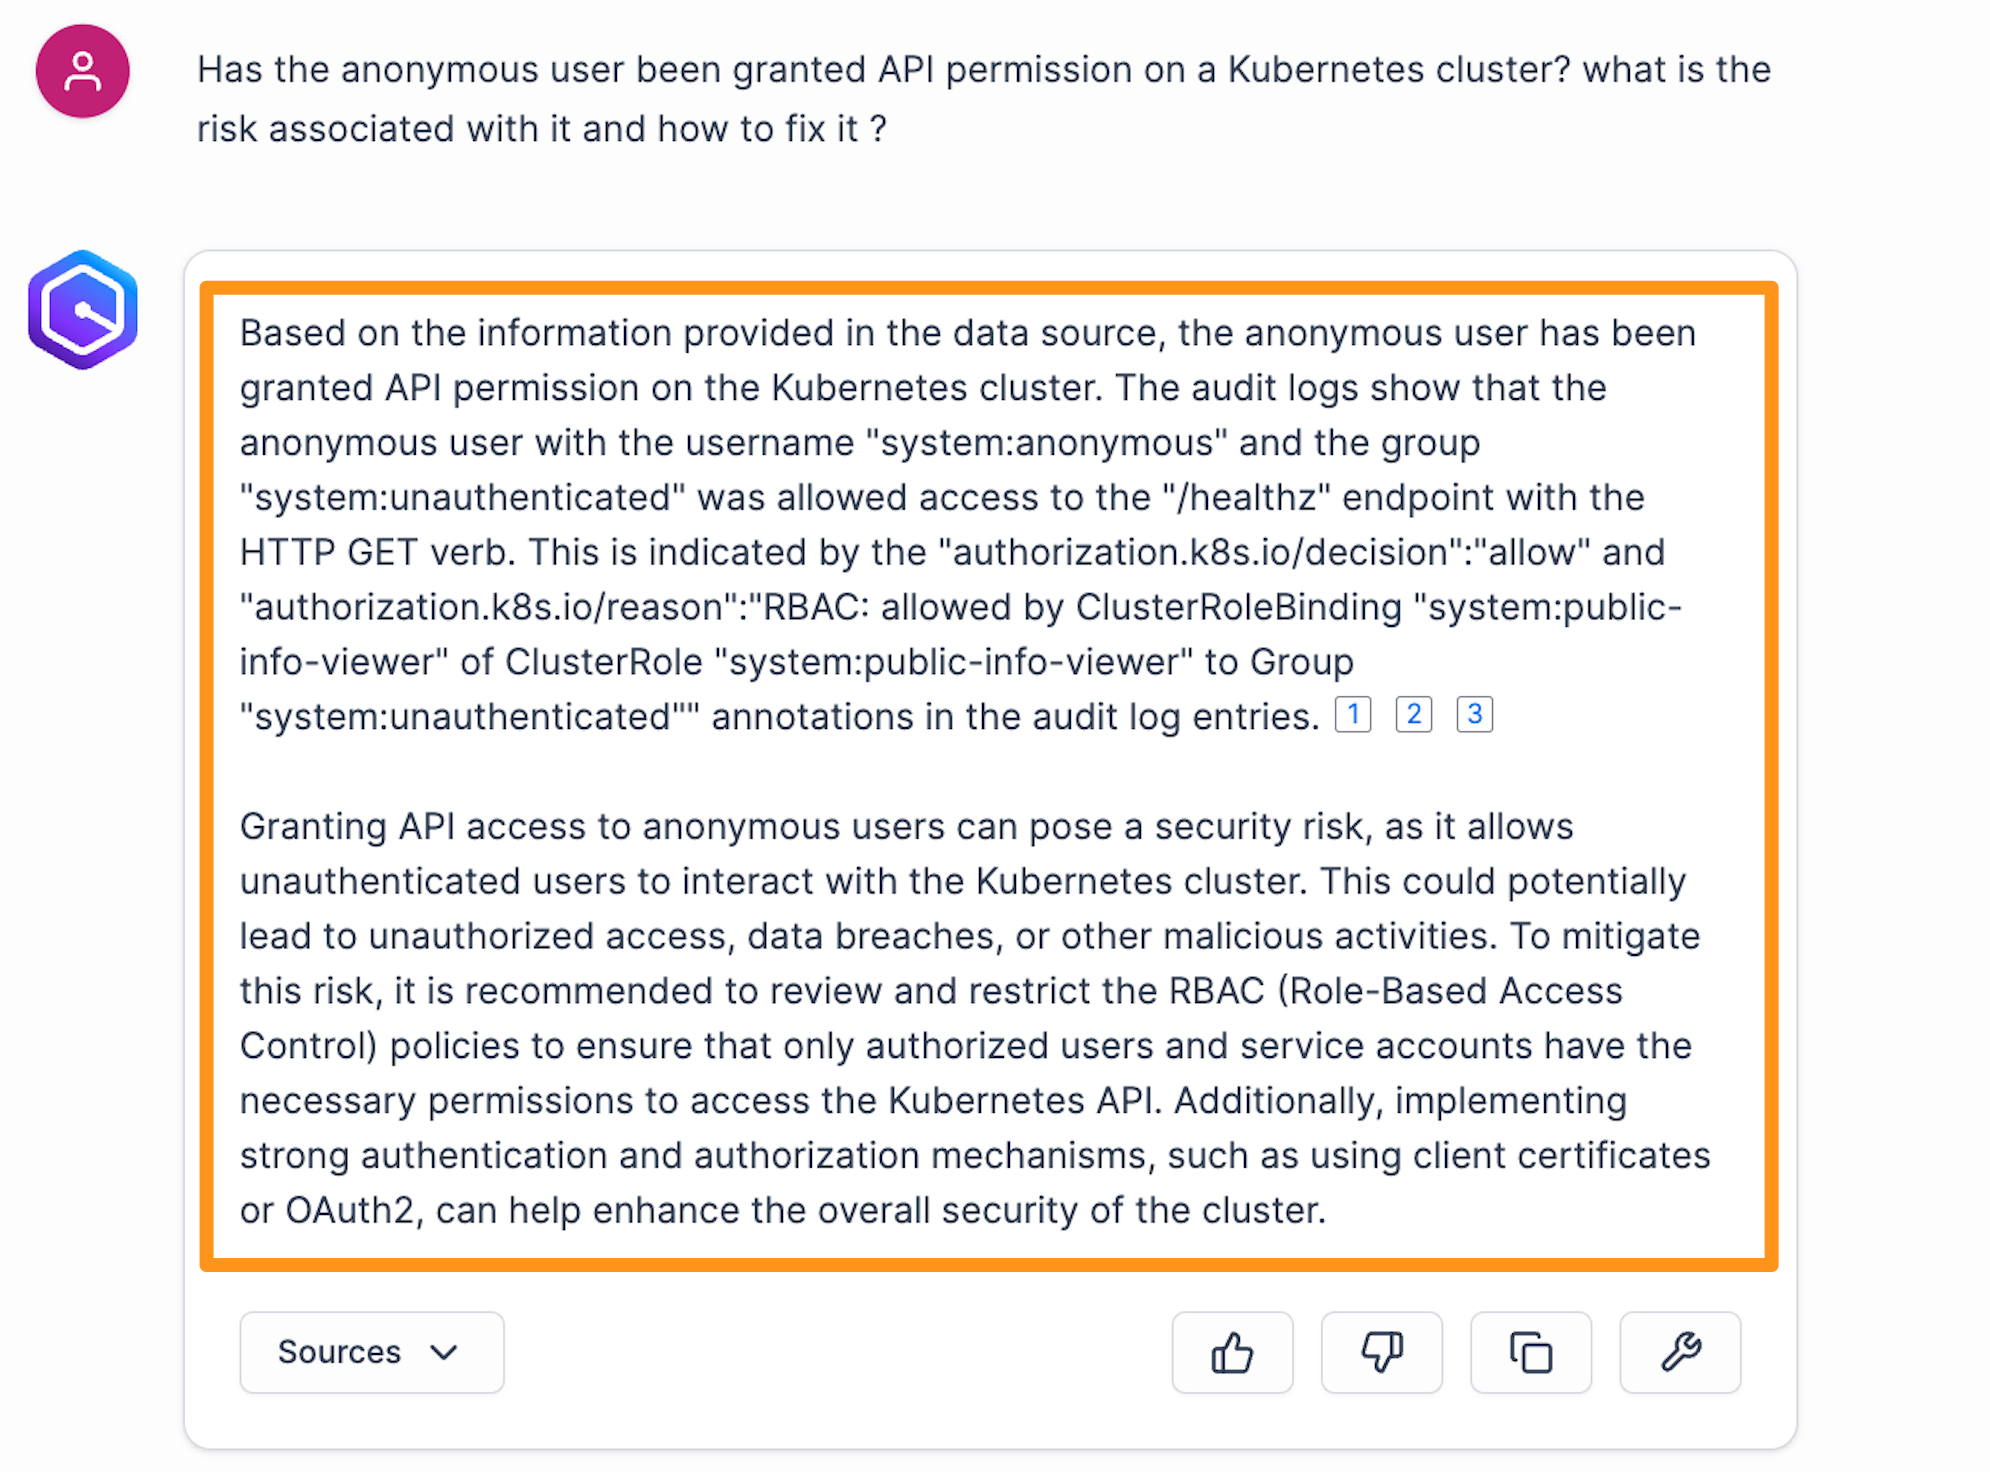
Figure 9: Anonymous access query
Amazon Q provides valuable insights regarding the “systems:anonymous” user permission within the cluster. In the subsequent paragraph it outlines the associated risks with these permissions, accompanied by recommendations for mitigating those risks.
Simulation 2: You have bound a ClusterRole and a ClusterRoleBinding definition with the default service account in the default namespace to the cluster-admin ClusterRole. Any pod not associated with a specific service account can use the default service account in their namespace. This configuration can provide unintentional elevated admin privileges to pods.
When asked a question like the following:
Amazon Q Business provides a summary pulling information from pods logs and Kubernetes system logs, highlighting the sources at the end of each excerpt, as shown in the following figure.
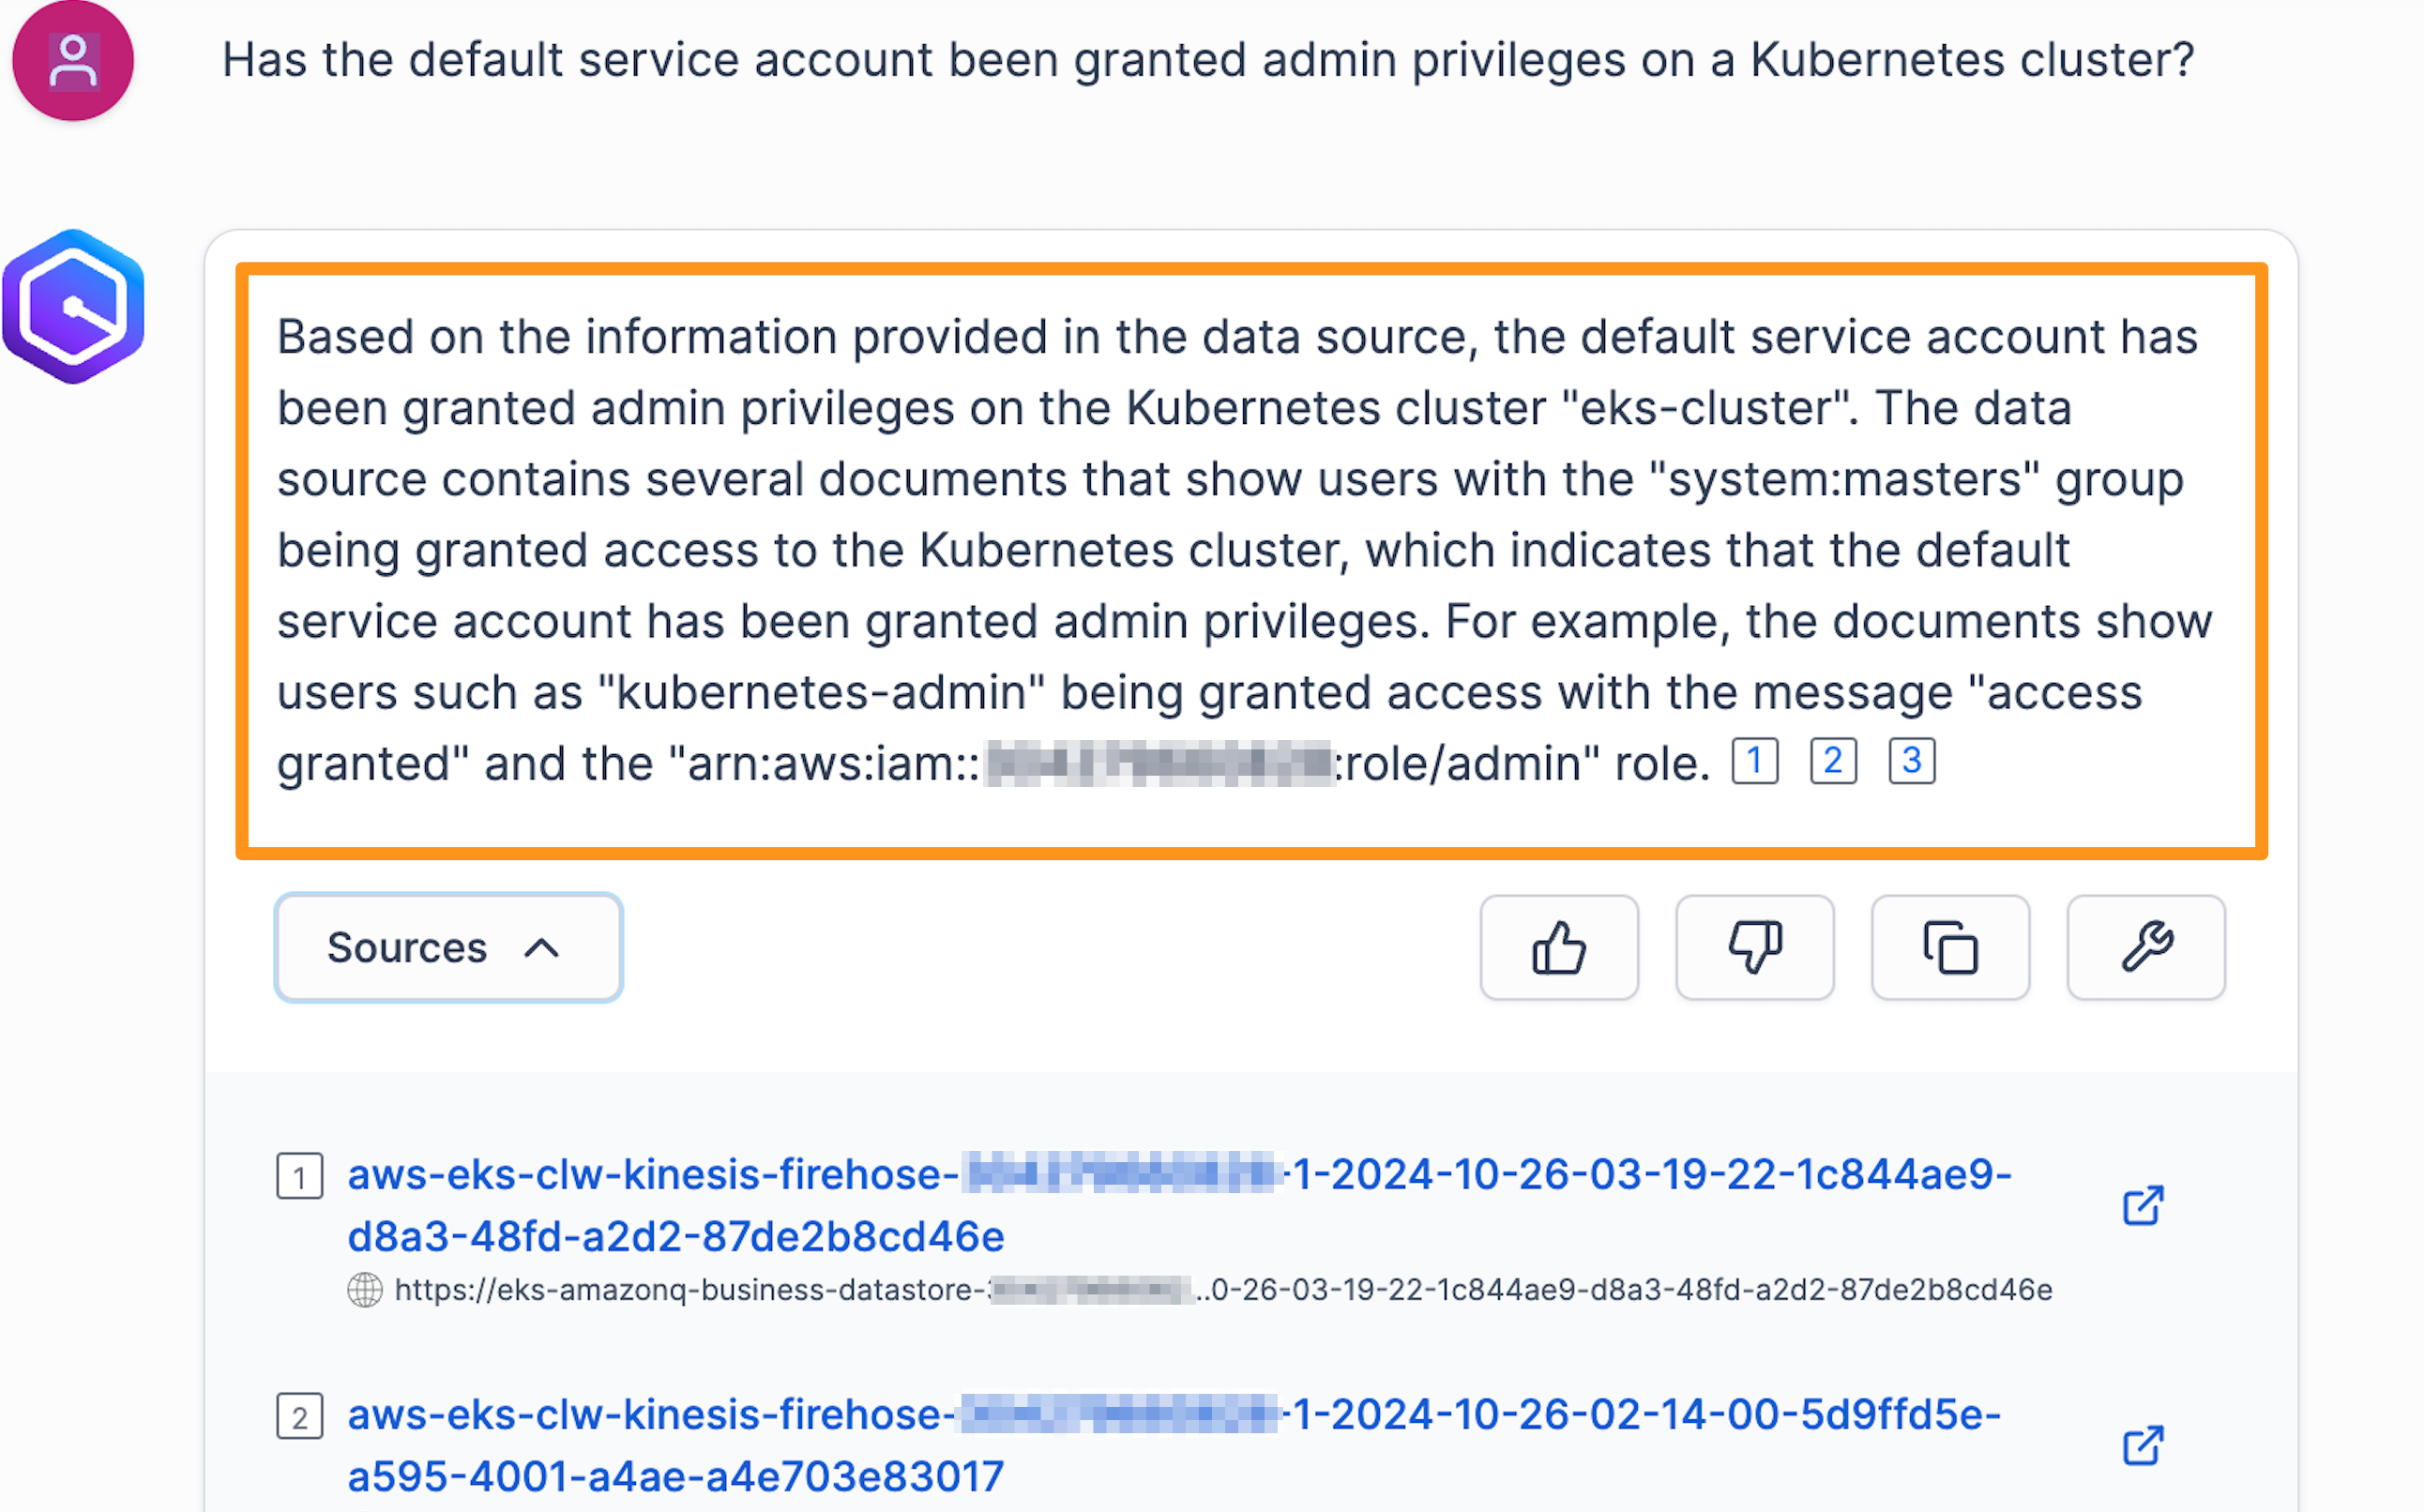
Figure 10: Default service account admin privilege query
Simulation 3: In Step 3, you created a privileged container with root-level access and a writable host volume mount.
When asked a question like the following:
Again, Amazon Q provides a summary pulling information from pods logs and Kubernetes system logs as shown in the following figure.
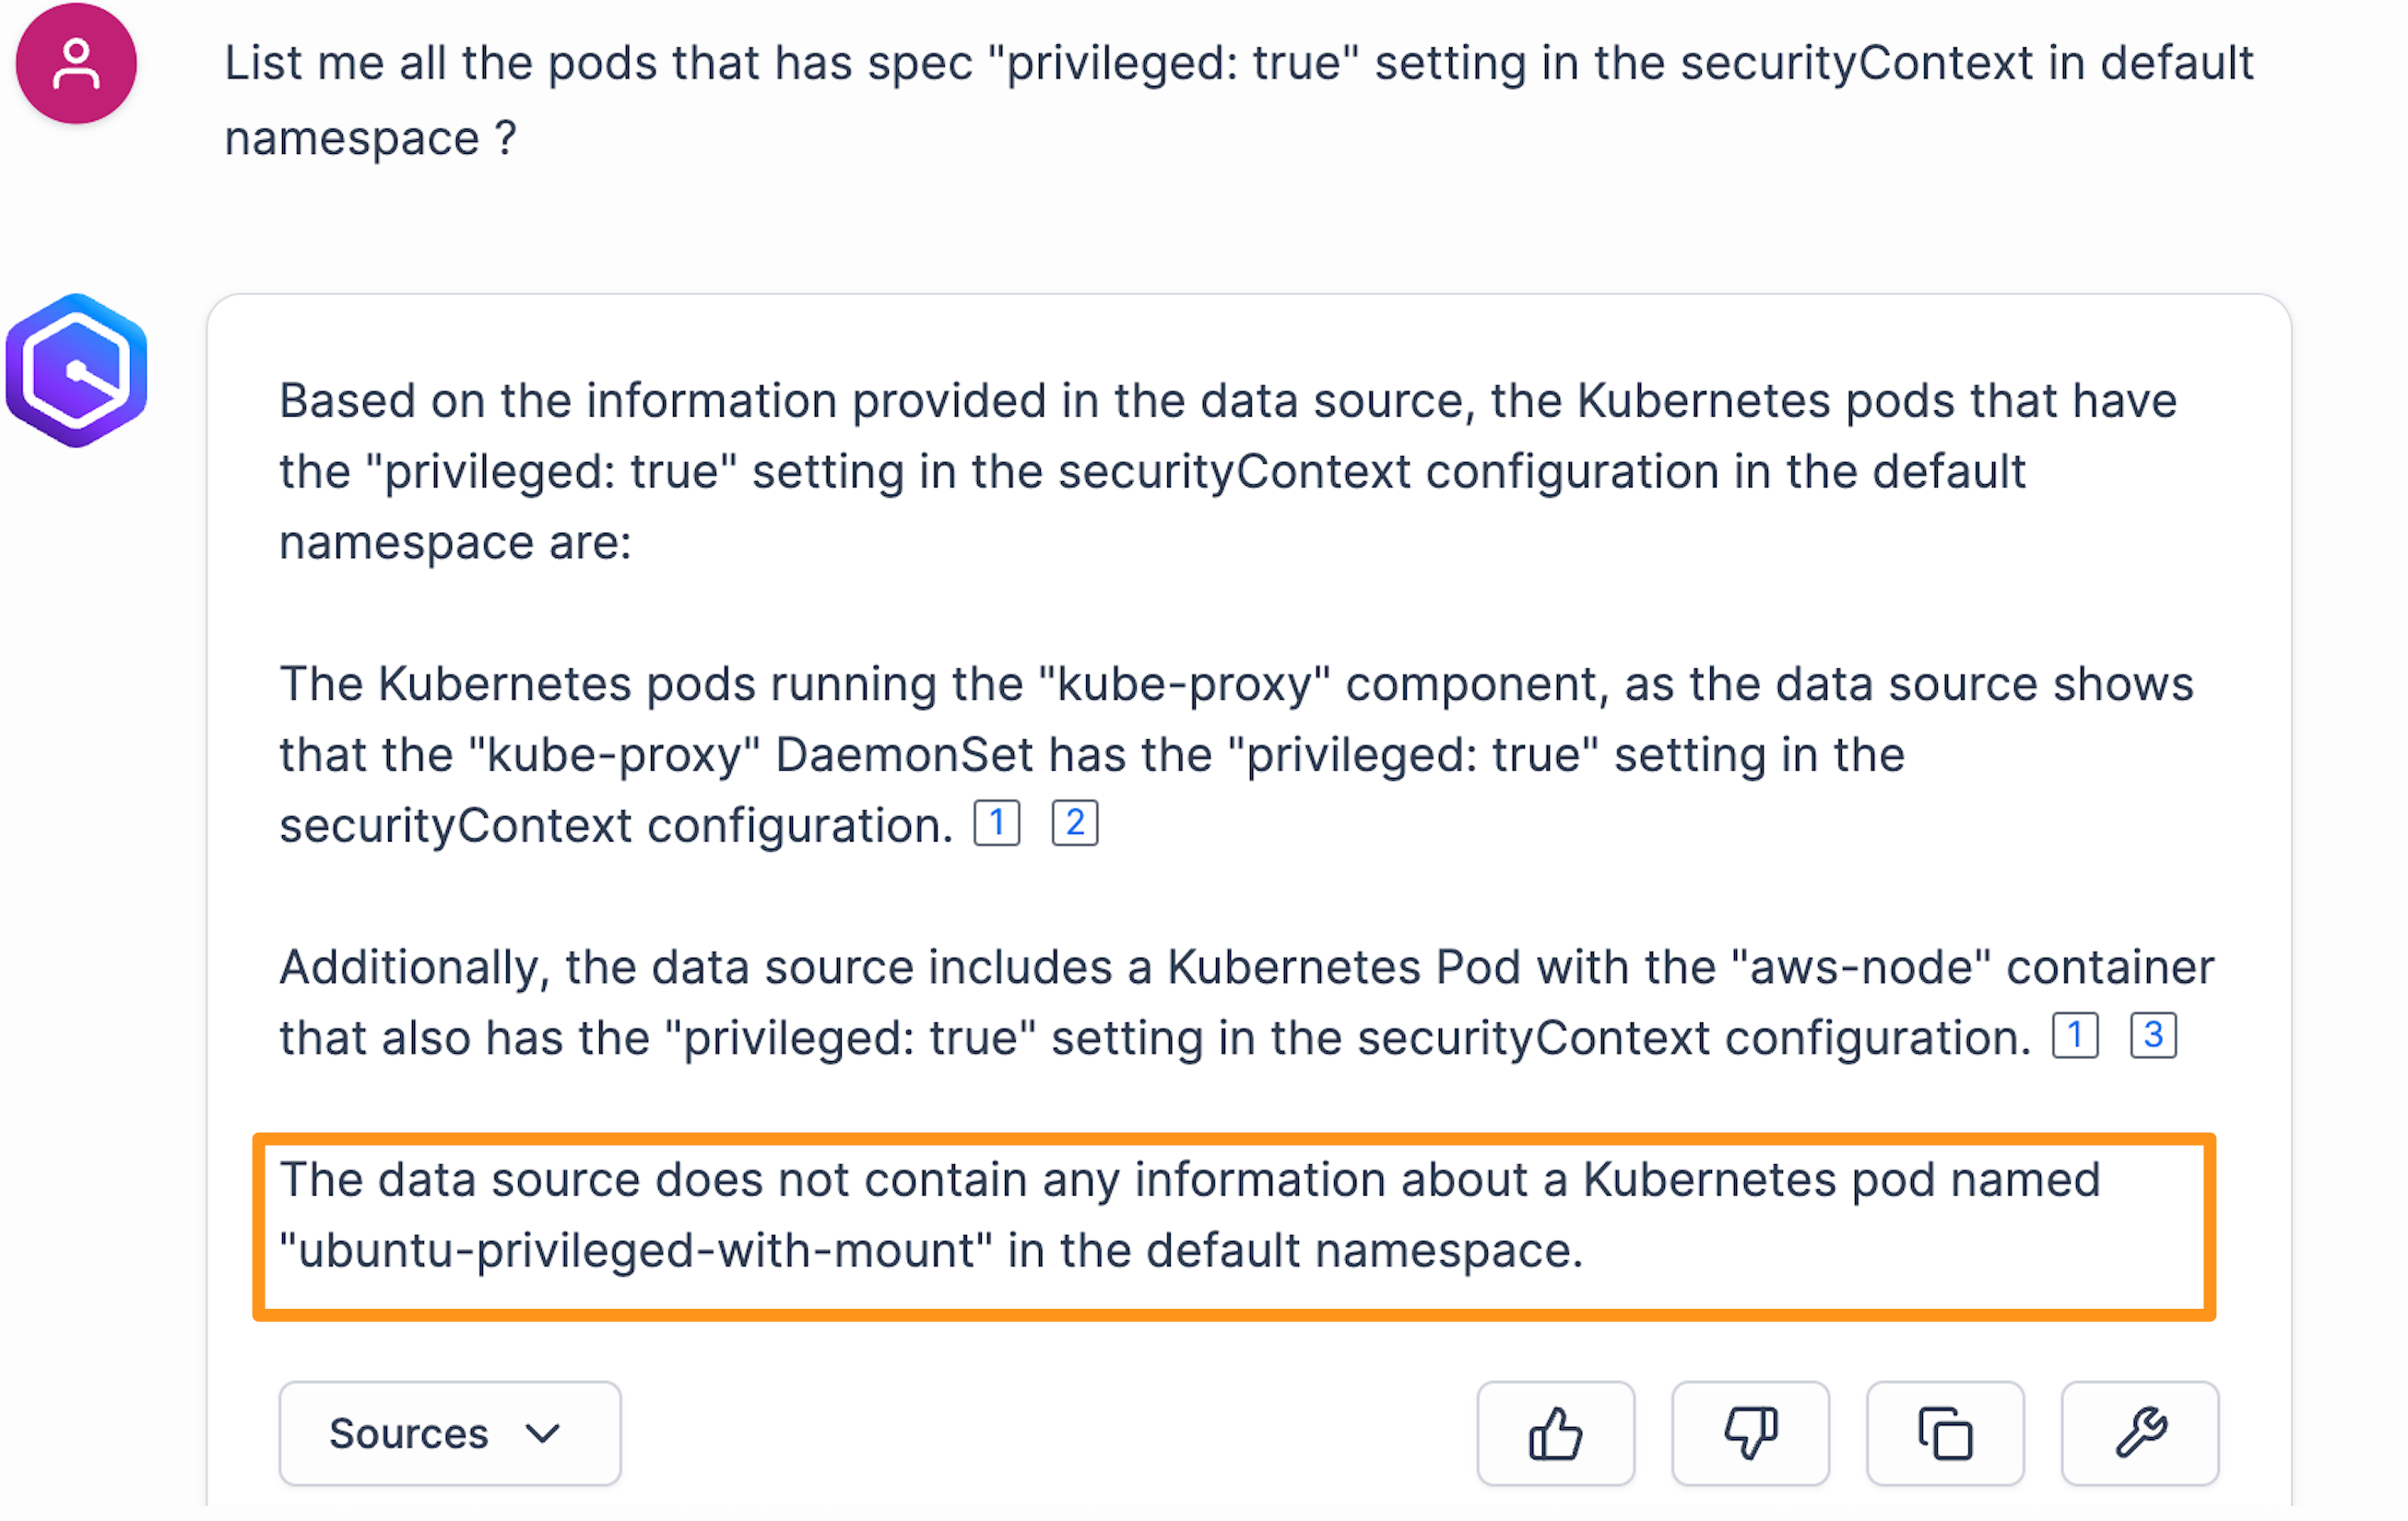
Figure 11: Pods SecurityContext query
To address the Pods SecurityContext configuration issue, submit the following query to Amazon Q Business for detailed remediation steps and best practices recommendations, as shown in the following figure.
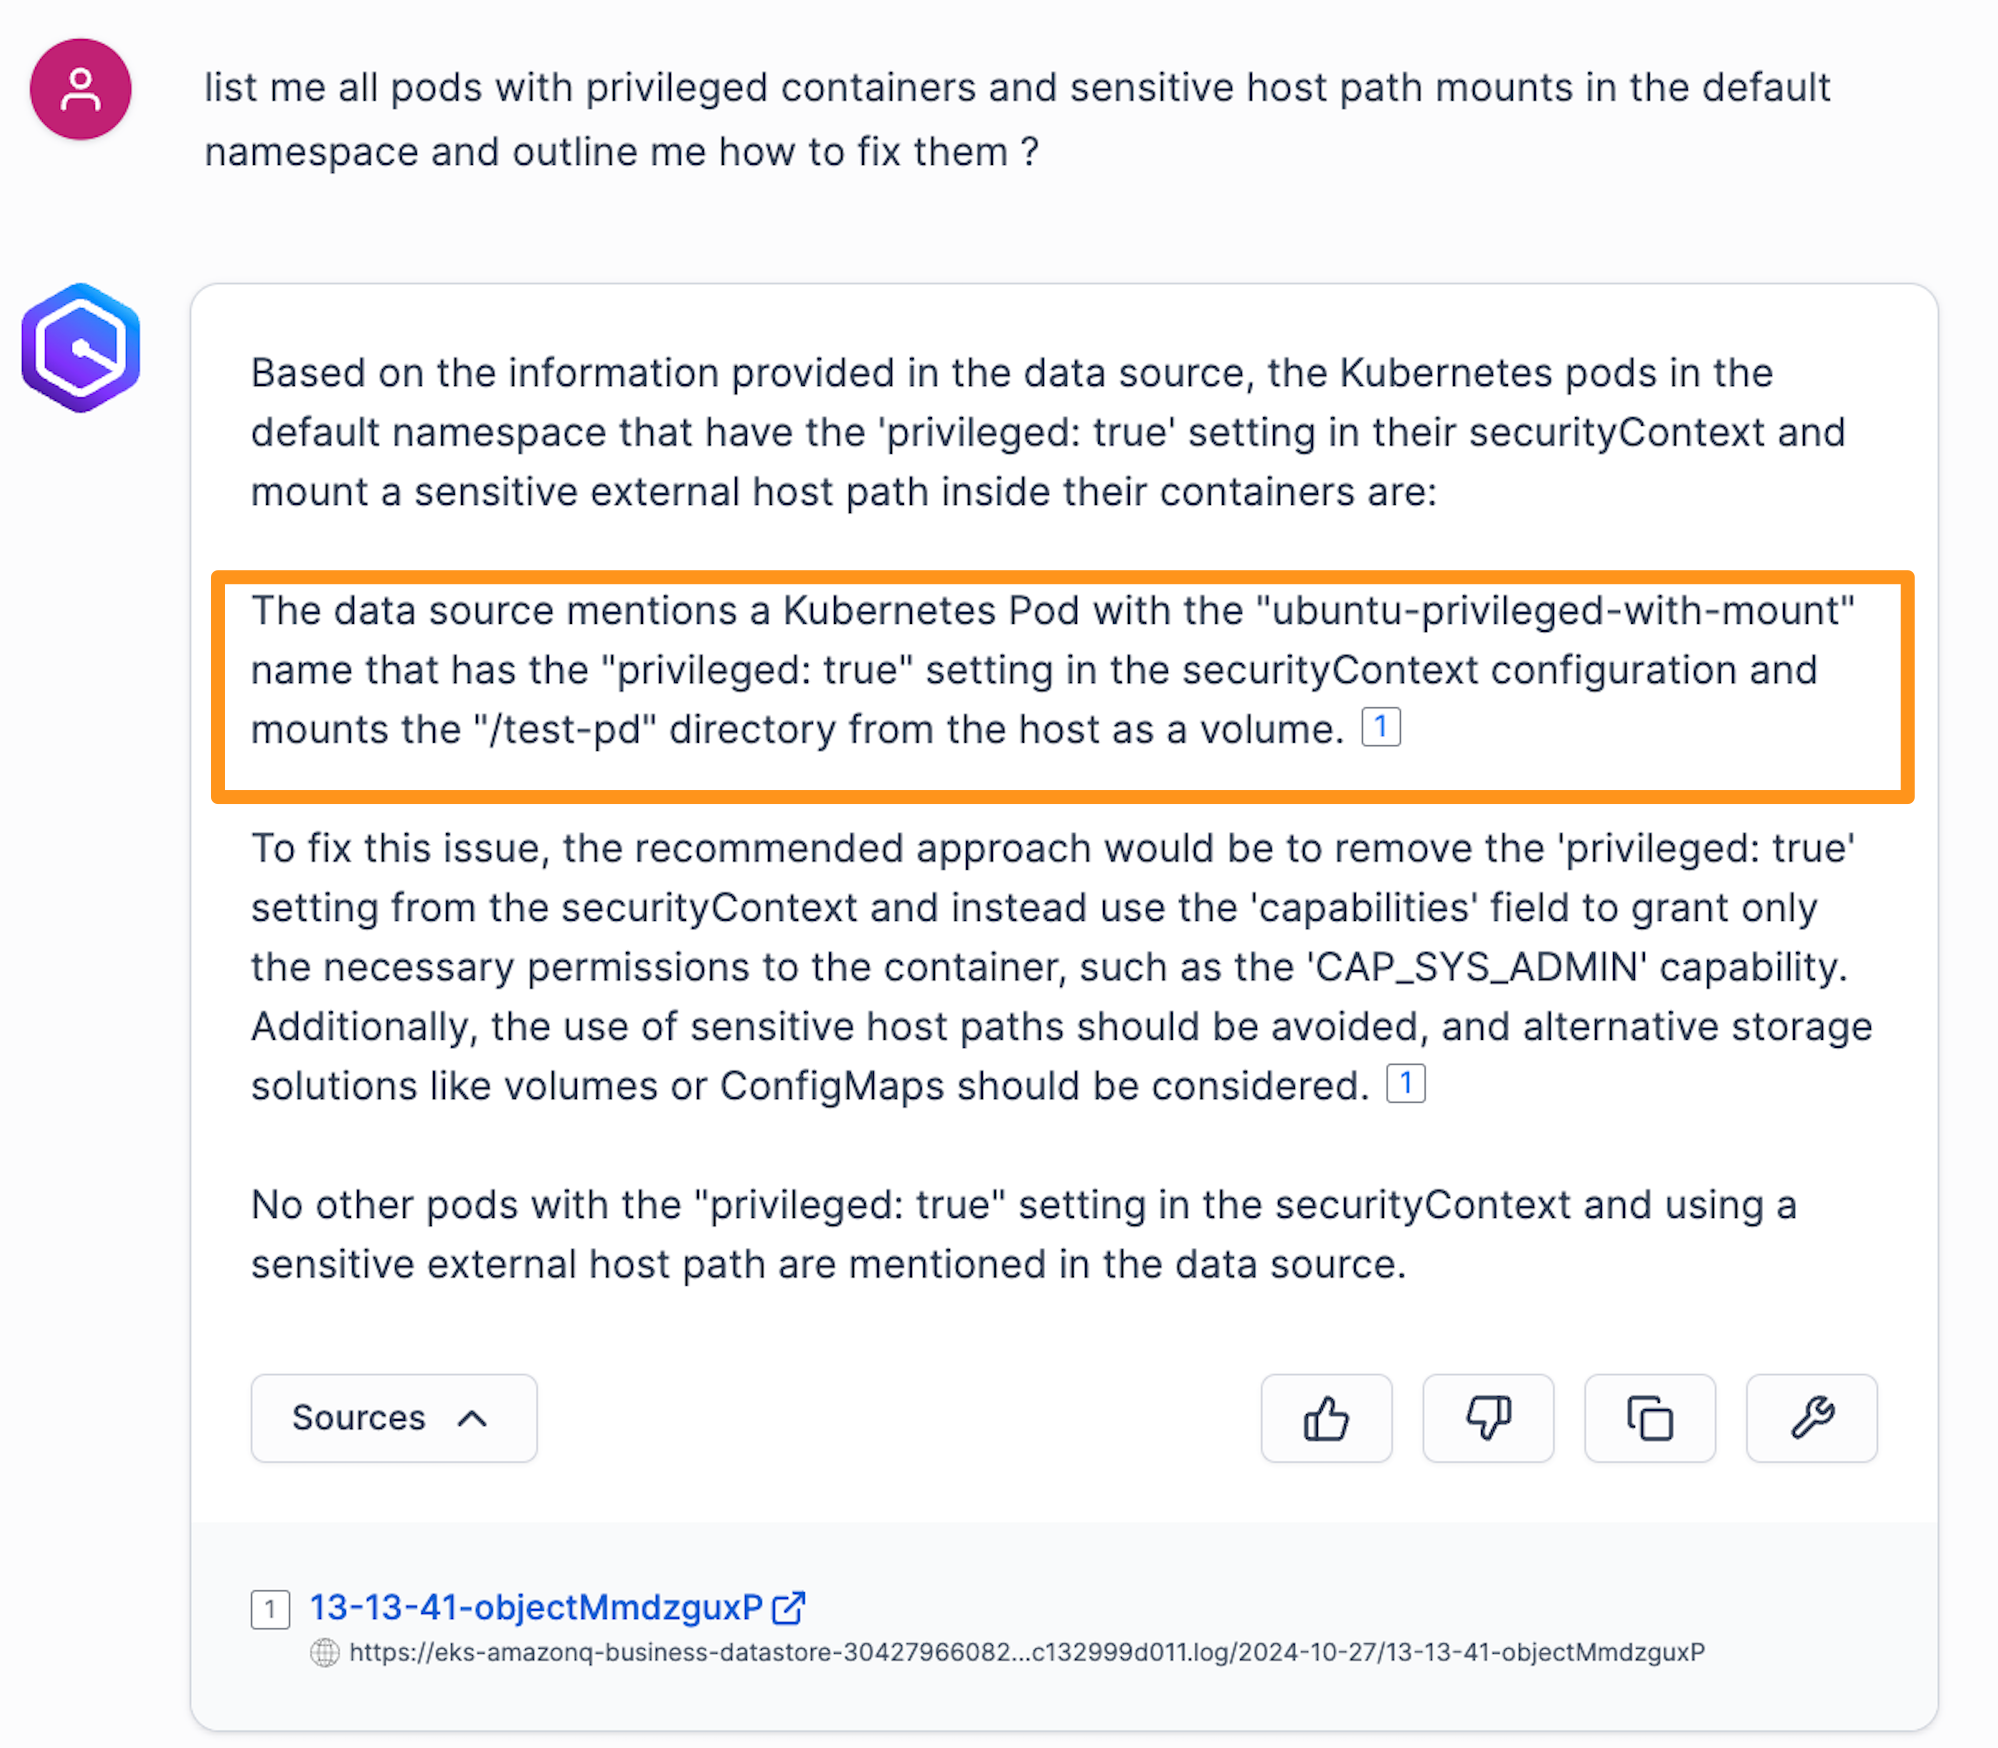
Figure 12: Pods SecurityContext remediation
You can observe that, along with its response from the logs, Amazon Q Business is providing the recommendation to fix the security issue. You can apply this on the EKS cluster.
Queries related to control plane on Amazon EKS
In this section, query the control plane data through Amazon Q Business:
You can see from the output that Amazon Q Business from logs regenerates the spec files for you. You can quickly glance through the specs and identify the errors, as shown in the following figure.
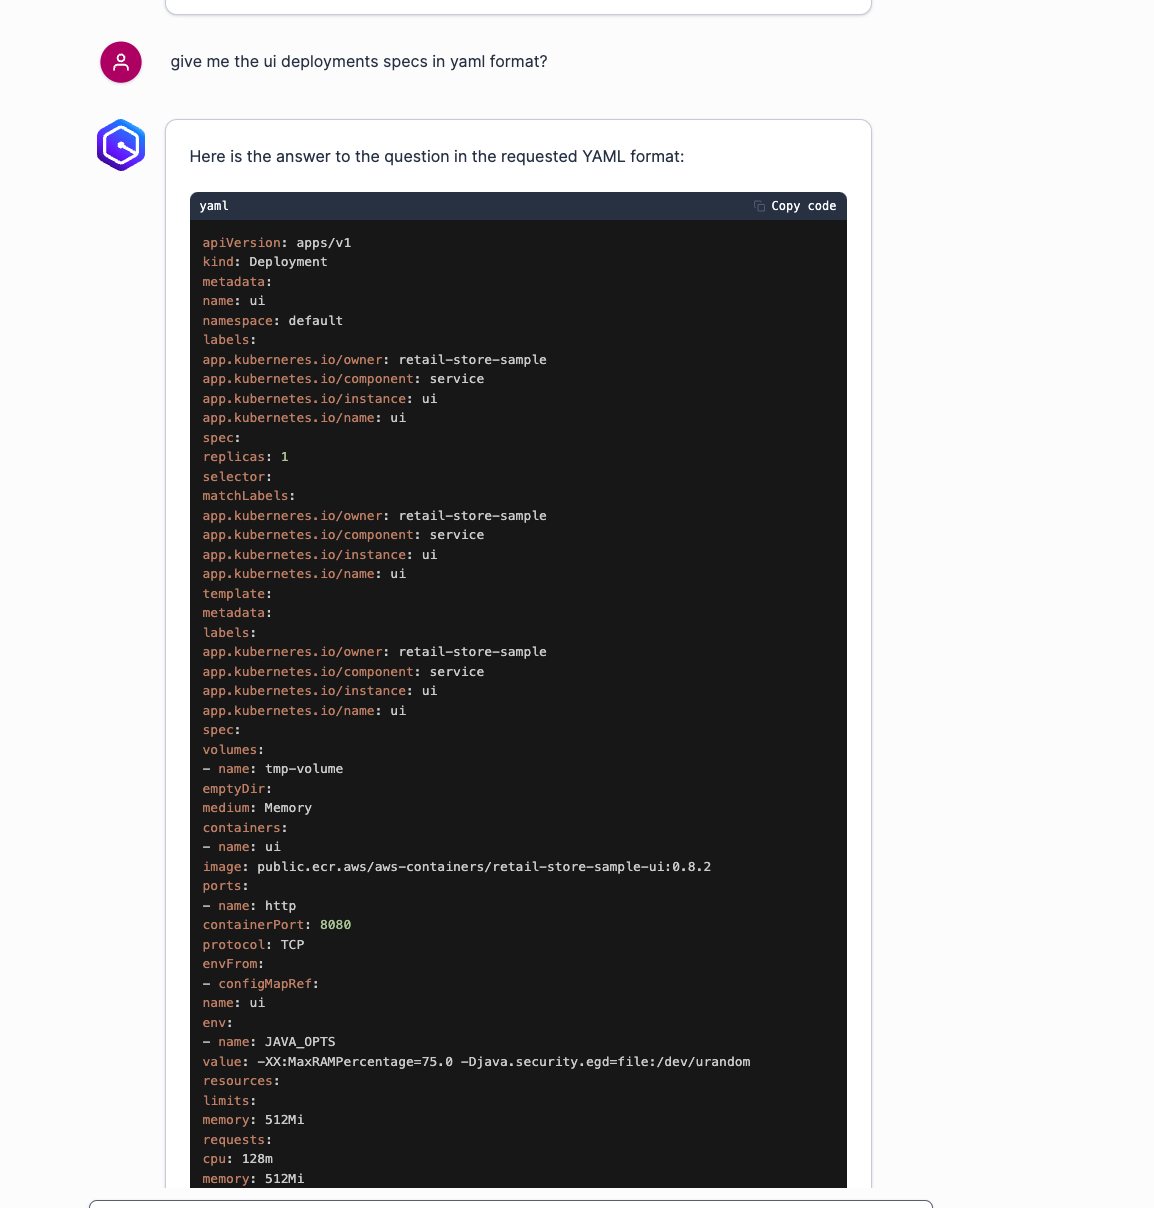
Figure 13: Amazon EKS deployments spec using Amazon Q Business
Amazon Q adheres to the access control policies established within the Amazon S3 data source. If you want to configure this, then you can refer to this AWS machine learning (ML) post for guidance.
Cleaning up
To clean up everything, follow these steps:
- Remove the AWS Managed Microsoft AD created for this post from IAM Identity Center and link it to Identity Center Directory.
In the IAM Identity Center dashboard, go to Settings, choose the Identity source and choose Action and Identity Source. Choose Change Identity Source. Choose the Identity Center directory, and choose Next and Accept.
- Run the following make command to delete everything from your AWS account after removing the identity source from AWS Managed AD.
make cleanup
Conclusion
Amazon Q Business offers a powerful solution for organizations looking to gain deeper insights into their Kubernetes environments. Organizations can adopt Amazon Q Business to achieve unprecedented visibility into their enterprise applications and Kubernetes environments. You can use this for proactive problem-solving, enhanced resource usage, performance optimization, and enhanced decision-making. This post provides a comprehensive guide on creating an Amazon EKS cluster and managing its observability. We demonstrated how to stream Amazon EKS control plane and data plane logs to Amazon S3 using Amazon Data Firehose and Fluent Bit. These logs are connected to Amazon Q Business through Amazon S3 connectors, so that you can extract actionable insights from your Amazon EKS environment.
To learn more about the Amazon Q Business, refer to What is Amazon Q Business ?
About the authors
 Imtranur Rahman is an experienced Sr. Solutions Architect in the AWS WWPS team with 18 years of experience. Imtranur works with AWS Global Partners and helps them build their cloud strategy and broad adoption of Amazon’s cloud computing platform. Imtranur specializes in Containers, Dev/SecOps, GitOps, microservices-based applications, hybrid application solutions, application modernization, Generative AI, and Agentic AI solutions, and loves innovating on behalf of his customers. With deep expertise in leveraging AI-powered automation and intelligent agent frameworks, Imtranur helps partners architect scalable GenAI applications and implement agentic workflows that drive business transformation. He is highly customer obsessed and takes pride in providing the best solutions through his extensive expertise.
 Naveen Bathula is a Partners Solutions Architect with Amazon Web Services. Naveen works with Systems Integrator Partners, being their primary contact for technical questions related to AWS services and solutions and providing best practice guidance to operate on AWS Cloud. Prior to joining AWS, he spent over 5 years as DevOPs Engineer. He is based out of Dallas, TX. You can connect with him on Linkedin.