AWS Partner Network (APN) Blog
How to Automate Centralized Logging and Integrate with Datadog
 |
 |
 |
By Wally Lu, Sr. Consultant, Infra Architect at AWS
By Ian Scofield, Partner Solutions Architect at AWS
Having to debug a system with logs scattered in different places can make troubleshooting extremely difficult. This is one of the reasons why we recommend customers deliver their AWS CloudTrail logs to a centralized Amazon Simple Storage Service (Amazon S3) bucket.
Although aggregating these logs is a big step forward, it still requires something to parse the logs and alert based on anomalies or high-risk API calls.
This is where customers can integrate with solutions such as Datadog, which allows you to configure monitors and send critical change notifications to your team, such as adding security group rules or terminating Amazon Elastic Compute Cloud (Amazon EC2) instances.
Datadog is an AWS Partner Network (APN) Advanced Technology Partner with the AWS DevOps Competency and Amazon Aurora MySQL Service Delivery designation.
Datadog’s solution helps you monitor and analyze your logs, and one of the most useful features is their AWS CloudTrail log integration and analysis, which gives you real-time visibility of your API calls from the Datadog monitor.
Customers often create new accounts for new projects or lines of business, but it can be time consuming to build all the guardrails one by one. You may also want to integrate with existing tools such as Datadog, so it will be nice to build centralized logging with a standard workflow and automatically integrate with existing tools when you create a new account.
Goals for this Post
In this post, we’ll set up a workflow that creates new Amazon Web Services (AWS) accounts with a bootstrapping process that configures a centralized logging solution. The logs will then be made available to Datadog for alerting and reporting.
At the end of the post, you will have the following outcomes:
- An automation AWS Identity and Access Management (IAM) role in a shared security AWS account, which is able to deploy resources in the new member account.
- AWS CloudTrail logs delivered to the shared security Amazon S3 bucket, being monitored by Datadog for critical AWS changes.
- Datadog integration with other AWS services in the new member account.
You can integrate this solution with your existing automation and service catalog tools, and build a workflow to deploy centralized logging into your new and existing member accounts automatically.
Some of the processes and code we use in this post are covered in our colleague David Schonbrun’s post on the AWS Security Blog. David wrote about using AWS Organizations to automate an end-to-end account creation process. We encourage you to read it, as it will provide some additional context to the workflow we’ll be creating.
How the Deployment Process Works
The diagram below is the new account creation process, which uses an automation role in the shared security account to create a new account and integrate with Datadog. There are four phases:
- Create a new account
- Update the shared security account
- Deploy the stack in the new AWS account
- Deliver the logs to the shared S3 bucket and Datadog
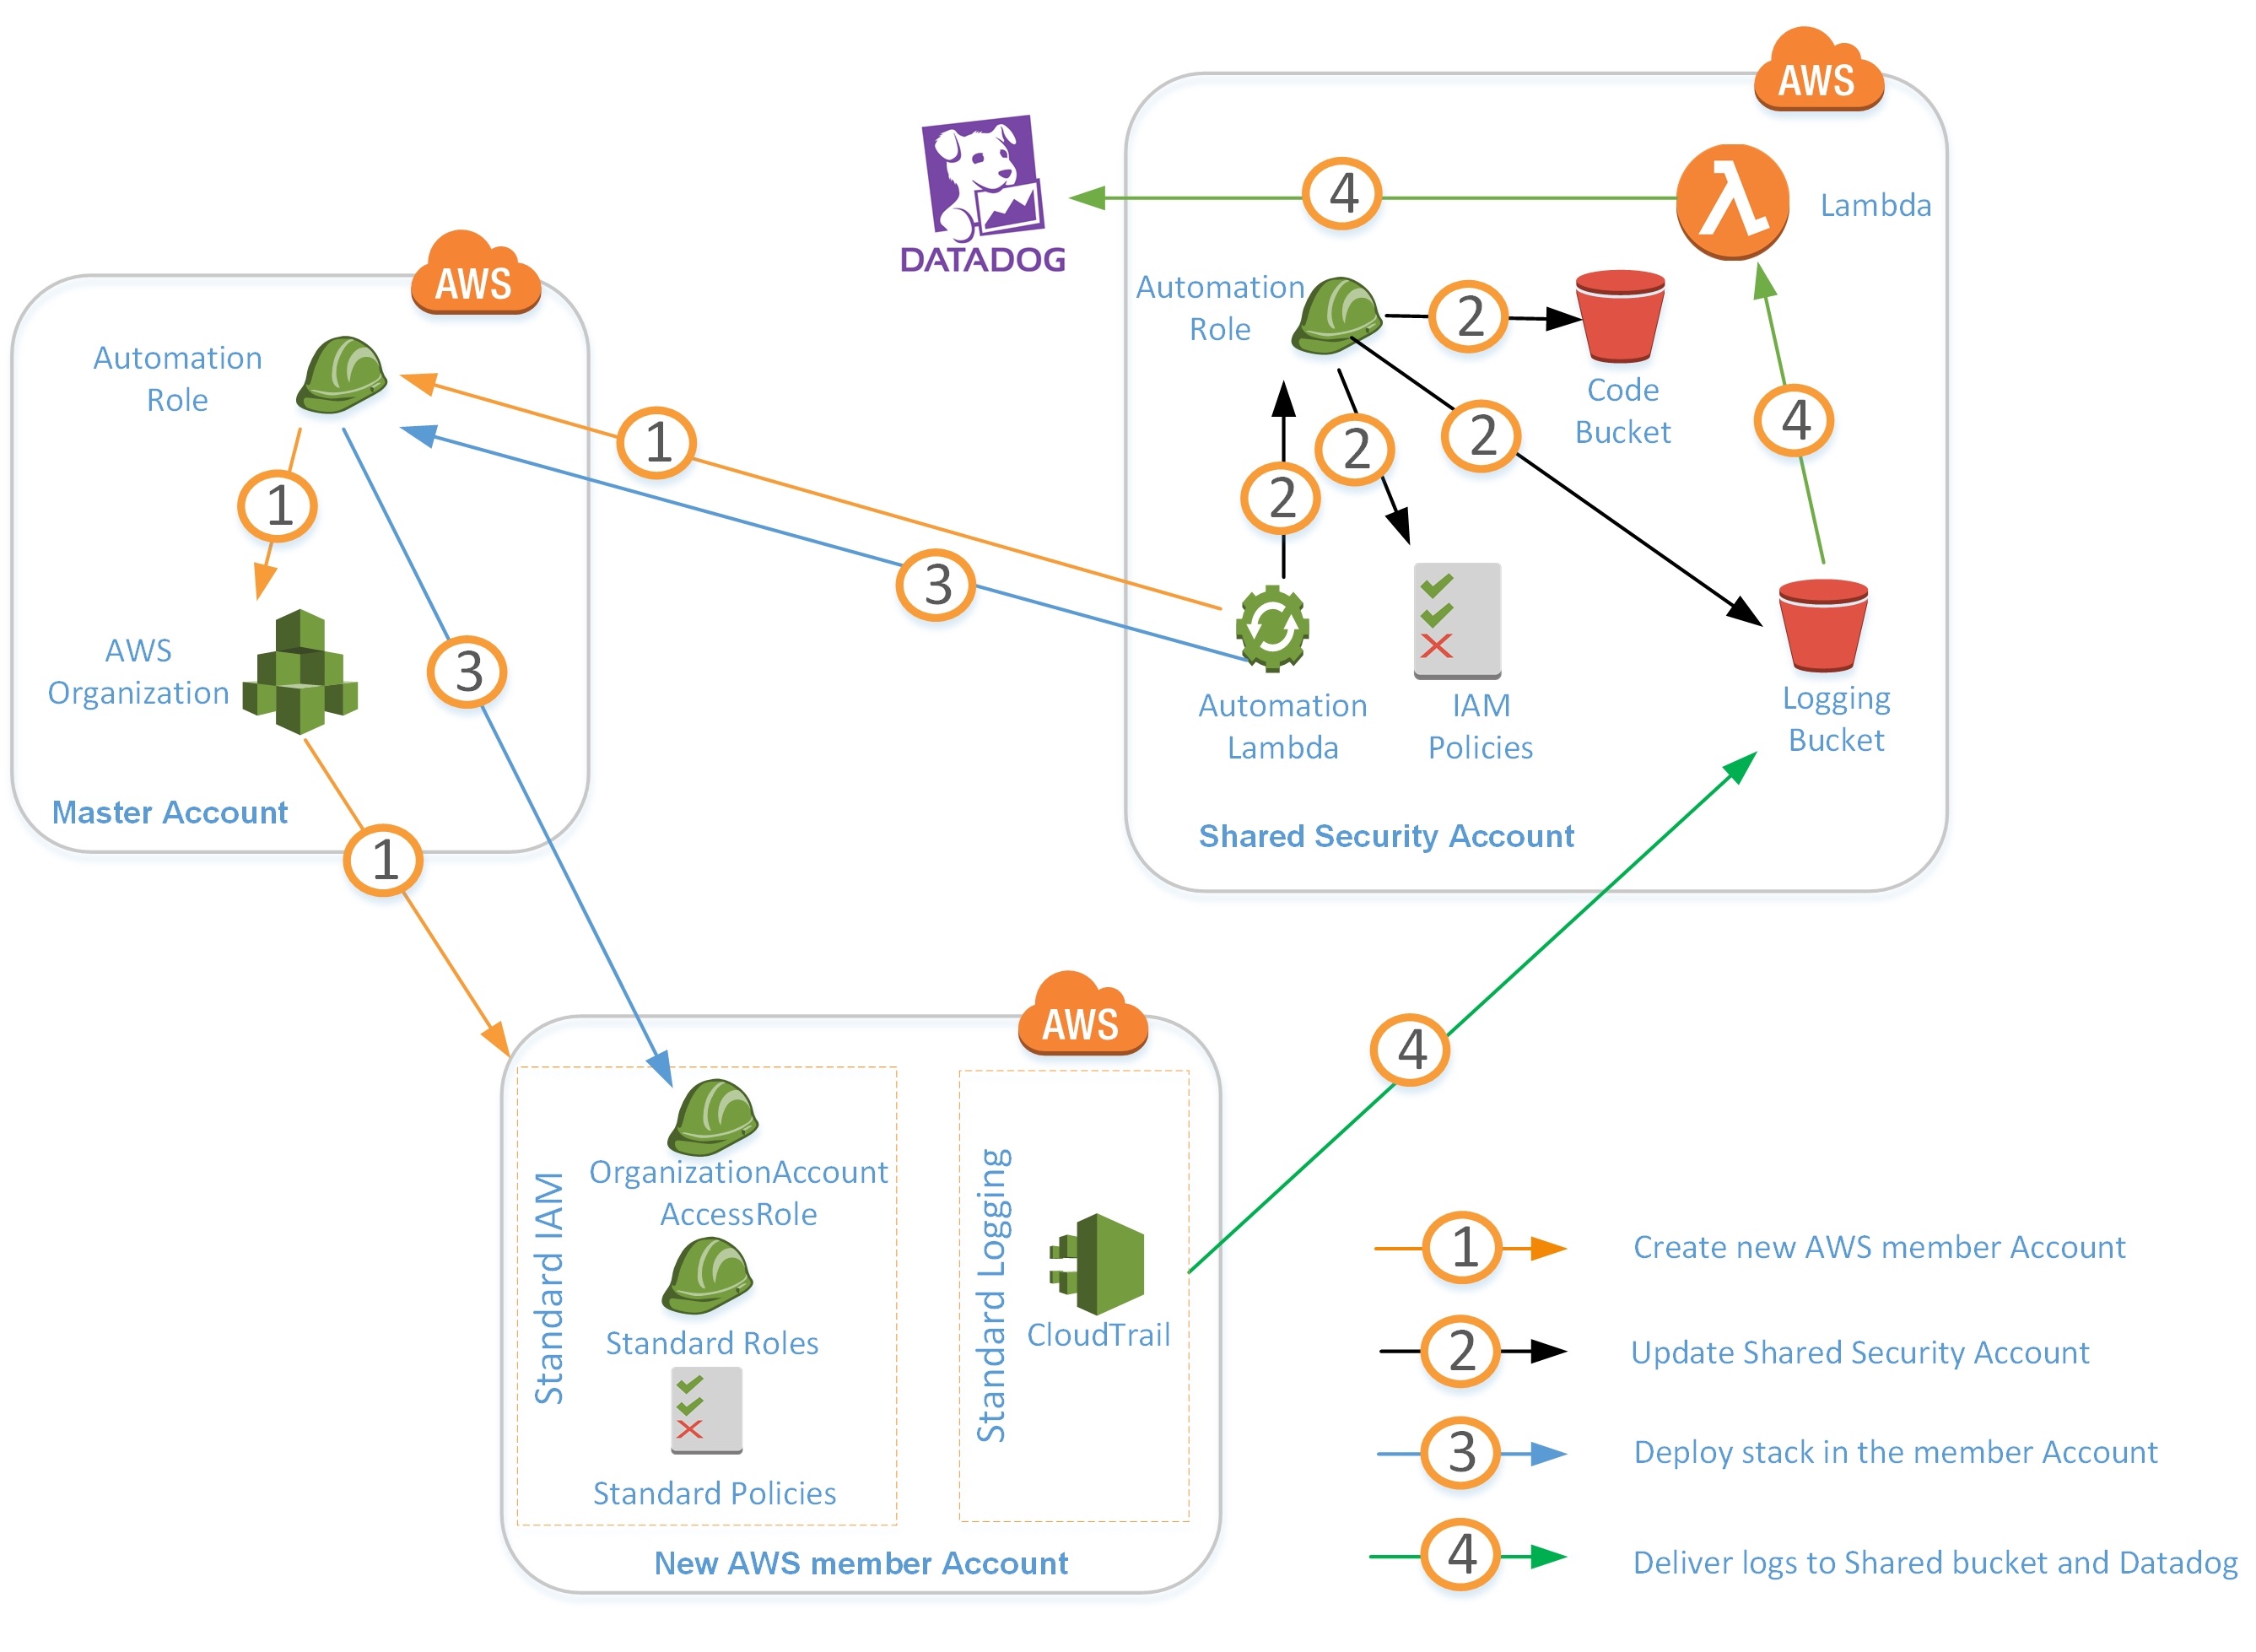
Before we dig into the specifics, let’s walk through the process at a high level to understand the various pieces and the overall flow.
Create a New AWS Account
The automation Lambda function in the shared security account assumes an automation IAM role in the master account using a cross account role. This role invokes the AWS Organizations API using the assumed credentials and calls create_account to create a new AWS member account.
This sample code shows how the create_account function works:
Update Shared Security Account
The automation Lambda function assumes an automation role in the shared security account. This Lambda function invokes the Amazon S3 API put_bucket_policy to update the shared logging bucket, and the Datadog Lambda code bucket with the new AWS account ID, which enables the new AWS account to deliver logs to the logging bucket and get Datadog Lambda code from the code bucket.
This Lambda function also invokes the IAM API put_role_policy to update inline policies for the automation role. This will grant sts:AssumeRole permissions to the automation role so the automation role has permission to deploy resources to the new account.
The sample code below shows how the update_policy function updates the bucket policy. The code first gets the existing bucket policy from S3, then adds the additional Amazon Resource Names (ARNs) to the existing policy statement and updates the existing policy document on the bucket.
The automation Lambda function assumes an automation role in the master account, which then assumes the OrganizationAccountAccessRole role in the new AWS account. Using these assumed credentials, it deploys a stack in the new account, which includes the following resources:
- An automation IAM role with a trust policy allowing the shared security account to assume the role.
- A monitoring IAM role with a trust policy allowing the Datadog account to assume the role. In the AWS CloudFormation template, the trust policy grants access to AWS Account ID ‘464622532012’. This is the Datadog AWS account and is the same for all Datadog customers. You do not need to change this.
- A CloudTrail trail with logs being delivered to the S3 bucket in the shared security account.
- Datadog Lambda function and associated IAM execution role.
Deliver Logs to the Shared S3 Bucket and Datadog
When logs are generated in the new account, they will be delivered to the Amazon S3 bucket in the shared security account. Amazon S3 event notifications will then trigger the Datadog Lambda function, which delivers logs to Datadog. If a Datadog monitor is configured for the API call, a notification will be sent to the subscriber.
Prerequisites
Before getting started, ensure you have the following:
- Two AWS accounts which will act as the shared security and master accounts
- AWS Organizations must be enabled in the master account
- Download the Python script and AWS CloudFormation templates from the Github repository:
- SharedSecurity.yml – The AWS CloudFormation template to deploy in the shared security account
- Master.yml – The CloudFormation template to deploy in the master account
- Member.yml – The CloudFormation template to deploy in the new account
- logging_automation.py – The Python script to create a new account and deploy the CloudFormation template
- A Datadog account—if you don’t have one already, please create a new Datadog account here
Initial Setup
First, update the Datadog Lambda function. Log in to your Datadog account and select Integrations > APIs to get your API key.

Next, download the Datadog lambda_function.py from the Datadog Github repository. This Lambda function ships Elastic Load Balancer, Amazon S3, AWS CloudTrail, Amazon Virtual Private Cloud (Amazon VPC), Amazon CloudFront, and Amazon CloudWatch logs to Datadog.
Please don’t add your plain text API key into code, we’ll do this later as an encrypted environment variable. Using KMS to encrypt your API key for the Lambda function is recommended, so we’re automatically encrypting them with KMS and storing as an environment variable on your behalf for the shared security account and all member accounts.
Now you can create a file lambda_function.zip, and add lambda_function.py into lambda_function.zip. Create an S3 bucket called datadog-<your AWS account ID> in the shared security account for the Lambda function code. For example, if your AWS account ID is “111122223333” your code bucket should be “datadog-111122223333”. Then, upload the zip file you created in the previous step to the S3 bucket.
Next, create a logging_automation.zip, add logging_automation.py and Member.yml into logging_automation.zip, upload to the same Datadog S3 bucket in the previous step.
Deploy the SharedSecurity.yml CloudFormation template in the shared security account, and then deploy the Master.yml CloudFormation template in the master account.
Configure Datadog
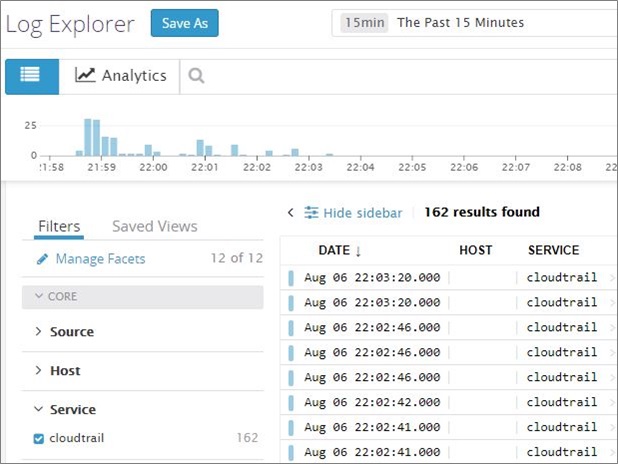
Datadog monitor is a feature that helps you check your logs and sends you notifications if the alert conditions are met. To get started, log in to your Datadog account and select Logs on the menu to enable the log management feature.

After that, make sure you can see AWS logs in the Log Explorer.
You can create a monitor for any of the Amazon CloudTrail API calls. In this example, we’ll create a monitor to alert on the S3 CreateBucket and DeleteBucket actions. To do this, select Monitor > New Monitor on the menu.

Now, select Logs as monitor type.

Set the search query to “@eventName:(DeleteBucket OR CreateBucket)” and alert condition to “above or equal to” 1 during the last 30 minutes.

Input the text of your notification message and set the notification email address. Don’t forget to put in your monitor name. In the screenshot below, “S3 Change” is the monitor name.

Create a New AWS Account and Integrate with Datadog
First, log in to the shared security account and switch to Lambda. Test the Lambda function to create a new AWS account, and click on your LoggingLambda function.

Create a test event and click the Create button.

For example, if account email is xxxx@amazon.com, master account ID is 111122223333, security account ID is 222233334444, CloudTrail bucket is test-cloudtrail001, and datadogcode bucket is datadog-222233334444, then the JSON file should be the same as the one below.
Please note that this test will create a new AWS account, so the account_email must be unique. Otherwise, you’ll get an error saying account already exists.
Now, click the Test button on the top right.

The test event may take a few minutes because it will create a new AWS account and deploy all the resources in the member account.
You should see the message “Resources deployed for account <Account ID> ( <Account Email>)”. For example, Resources deployed for account 111122223333 (xxxx@amazon.com).

Configure Centralized Logging for Existing Member Account
If you want to configure centralized logging for your existing member account, you can do this using the same Lambda function. Please note the existing member account must be in the same AWS Organization as the master account.
You have to pass your existing account ID to the parameter existing_accountid when you configure the test event.
You will see the same output as the new account.
Verification
To verify CloudTrail logs, you must log in to the shared security account with a user that has IAM permissions to manage S3 buckets. Make sure there is a folder with the new AWS account ID in the CloudTrail bucket.

Next, log in to Datadog and select Logs. You should see logs from the new account after about 5-10 minutes. You should also receive a Datadog monitor email in 5-10 minutes indicating a test S3 bucket was created as part of the Member.yml CloudFormation template.

Configure Additional AWS Services
We now have CloudTrail logs delivered to a shared S3 bucket and accessible to Datadog. However, there are other AWS services in the member account. If you want to integrate Datadog with other AWS services, you can easily do that because we have deployed the Datadog Lambda function and monitoring role in the member account.
First, log in to Datadog and select Integrations > Integrations. Click Integrations on the top of the page and select Amazon Web Services.

Now, click the Configuration tab and enter your account ID and role. You should see the message “Account credentials are valid.”

Finally, click the Install Integration button to complete the process. You should now have metrics for other AWS services in your newly created AWS account. With integration, you are able to pull metrics for all supported AWS services.

Conclusion
In this post, we used a Lambda function in a shared security account to automate centralized logging across various AWS accounts. This Lambda function created a new AWS account, updated the Amazon S3 bucket policy and IAM group policies, and deployed an AWS CloudFormation stack to the new AWS account.
We also created a Datadog monitor, viewed the logs in the Datadog log explorer, and set up an integration with the new AWS account.
.
Datadog – APN Partner Spotlight
Datadog is an APN Advanced Technology Partner with the AWS DevOps Competency. They bring together data from servers, databases, tools, and services to present a unified view of your entire stack. Datadog is a SaaS-based data analytics platform that enables Dev and Ops teams to work collaboratively.
Contact Datadog | Solution Demo | Customer Success | Spec Sheet | Free Trial | Buy on Marketplace
*Already worked with Datadog? Rate this Partner
*To review an APN Partner, you must be an AWS customer that has worked with them directly on a project.