AWS Partner Network (APN) Blog
Power Your AWS Application with Customer Bank Data and Payments Using Yapily APIs
By Rafael Magalhaes, Sr. Software Engineer – Yapily
By Alex Tarasov, Sr. Solutions Architect, Startups – AWS
 |
| Yapily |
 |
Open banking is revolutionizing financial services and companies like Yapily are at the forefront of this new wave of innovation. These organizations work in the background to power some of the latest technical solutions, giving customers direct access to their end user bank account data or allowing them to make simple, cost-effective payments.
In this post, we will demonstrate how to build and deploy a basic application on Amazon Web Services (AWS) in a few simple steps using the Yapily Bank Connector. We’ll demonstrate how an end user would select their bank from a list, securely connect to that bank and give consent to either:
- Share data, along with the additional API calls needed to pull real-time accounts, balances and categorized transactions.
- Make a payment—this is a direct account-to-account payment and can be adapted to include domestic, international, recurring, or bulk payments, depending on the features supported by each bank.
All of these services fall under fully regulated activity, and Yapily can help navigate the obligations and legal requirements needed to deploy the application as a live, customer facing solution.
Yapily is an AWS Partner open banking infrastructure provider, enabling companies to seamlessly access financial data and initiate payments. Connecting to thousands of banks, Yapily uses a secure open API to power industry leaders in financial services.
What We’ll Build
The diagram below illustrates how we rapidly built a demo app on AWS using the AWS Amplify framework, via a connection to the Yapily API gateway. In this post, we also include details on how to set up a free trial for Yapily via AWS Marketplace.
AWS Amplify helps users to quickly build a serverless web app with a Vue frontend. Using built-in integrations for user authentication using Amazon Cognito, securely storing application credentials with AWS Secrets Manager, setting up backend API endpoints with Amazon API Gateway, and storing the application data in Amazon DynamoDB.
Functionally, the app allows an end user to sign up using Amazon Cognito, select their bank from a list, log in to the bank, and give their consent for a third party to either:
- Pull their latest transactions; a consent can be re-used to maintain access.
- Make an account to account payment; a consent is used once to initiate the payment.
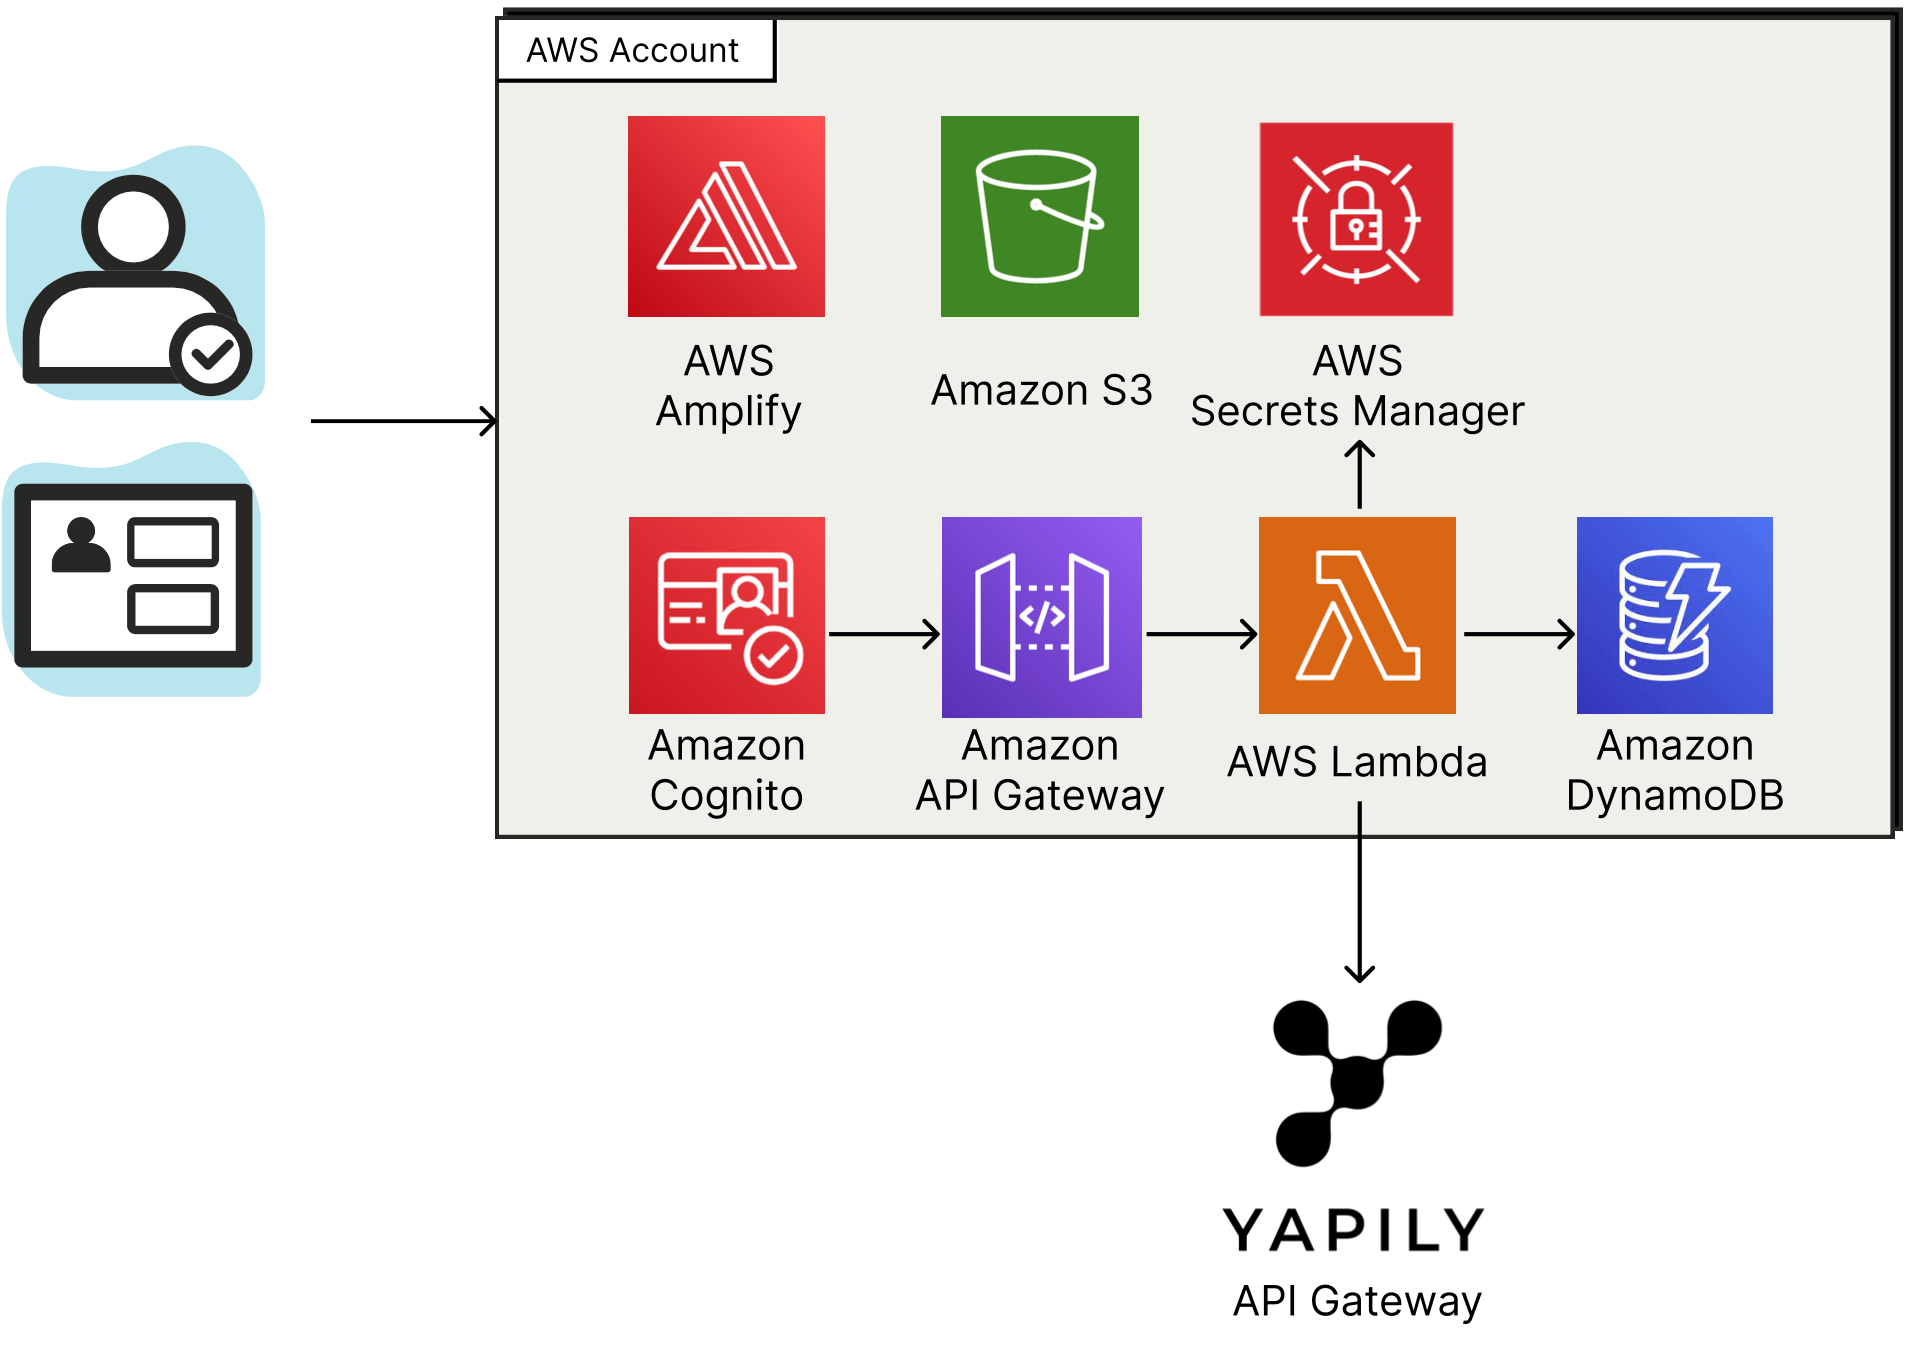
Figure 1 – Demo application architecture.
AWS Amplify generates the code for signing up and authenticating users who are then stored in an Amazon Cognito user pool. It also helps create a REST API invoked by the React frontend and implemented by an AWS Lambda function behind Amazon API Gateway. The backend Lambda function sets up the Yapily connection, allowing the end user to interact with their selected bank.
AWS Amplify also helps store the Yapily API key securely in AWS Secrets Manager so it never needs to appear in the code or in a file. User consent tokens (described in the next section) are stored in the Amazon DynamoDB database.
This is a scalable and secure architecture which does not require users to manage any server instances.
Prerequisites
Before building the app, you will need to get your API keys from Yapily. The sign-up process has been automated, but if you wish to dive into the details then Yapily has made it easy to manually register and create an account. See the Yapily documentation for details.
Install AWS Amplify
You will also need to install AWS Amplify, and if you haven’t already done so then create a default AWS configuration profile by running the AWS configure command as described in the AWS documentation.
Signing Up to Yapily
We have automated the process of creating an account on the Yapily gateway. By subscribing to Yapily on AWS Marketplace, Yapily will automatically generate an application instance on its gateway and assign a series of sandboxes and mock backs to drive the integration via the Yapily dashboard. You can then log in to retrieve the corresponding ClientID and Secret.
This sign-up process creates an associated “Production” application that will be ready to support live bank connections when you are. The switch to live accounts is straightforward but requires some know your customer (KYC) checks before enabling live access to any of the over 1,900 banks across 16 countries in the UK and Europe. More details on coverage are available on the Yapily website.
Building the App
Open the terminal window on your machine and clone the repository from the link below:
Step 1: Initialize a New AWS Amplify Project
The following command will set up a new AWS Amplify project:
Step 2: Add Authentication
Now, let’s add the user login/sign-up page to our application. We’ll be using email address to log in.
Step 3: Add the API
Next, let’s add a REST API to our application that we’ll use to communicate with the backend. We’ll be using Amazon API Gateway with AWS Lambda integration. Please make sure you name your API “awsblogapi,” otherwise the demo will not work properly.
amplify add api
Follow these steps after for API creation:
Please make sure you’re using “yapilyaws” as a table name, otherwise the demo will not work properly.
At this point, AWS Amplify has generated the stub for Lambda to be used with Amazon API Gateway integration located in amplify/backend/function/yapilyaws/src/app.js
We now have to replace that stub file with our version from the repository by running this command from your terminal:
cp functions/app.js amplify/backend/function/yapilyaws/src/app.js
We also have to replace the generated package.json file in the same folder to include the relevant dependencies for the Lambda function:
cp functions/package.json amplify/backend/function/yapilyaws/src/package.json
Step 4: Update Cloud Resources
Until now, the AWS Amplify resources have only been provisioned locally—let’s push the changes to your AWS account:
amplify push
Step 5: Add Storage
Next, let’s create an Amazon DynamoDB table to store the necessary data for our demo:
Step 6: Update Lambda Function to Add Permissions for Database
Let’s adjust the AWS Lambda function permissions to give it the access to the table:
Step 7: Add Hosting to Deploy the Site
Make sure you have Vue CLI and necessary JavaScript modules installed by running the following commands from the project root folder:
AWS Amplify can automatically package and deploy your frontend code, uploading your code to Amazon Simple Storage Service (Amazon S3) and setting up Amazon CloudFront distribution for fast access:
Step 8: Publish the Site
Let’s do another sync of the latest changes to your AWS account:
amplify publish
Testing the App
Once you have successfully published the AWS Amplify project, you should get the demo URL similar to https://dev.XXXXX.amplifyapp.com/ in the console output.
Open that URL in the browser, create a new account, and then sign in.
You can use any of the preconfigured sandboxes to test the application. Here are some example screens from our version for reference:
- Select the functionality you wish to use (pull data or make a payment).
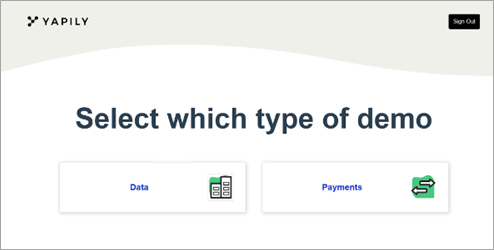
Figure 2 – Home page.
- Select your bank screen.
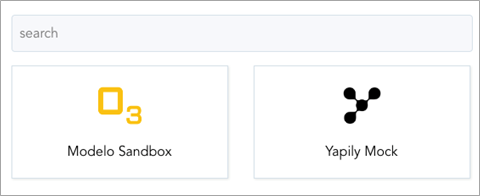
Figure 3 – Select an institution.
- Leverage QR code images.

Figure 4 – Authenticate with Yapily API.
Going Live
Now that you’ve seen how easy it is to build an application powered by the latest financial service technology, try registering on the Yapily page (sandbox connections are free). You can immediately tap into Yapily’s extensive knowledge and experience of helping new solutions and innovators bring their ideas to life.
Conclusion
By following the steps detailed in this post, you will be able to build and deploy a demo application in a few simple steps using the Yapily Bank Connector and AWS Amplify. Users can select their bank from a list, securely connect to that bank, and give consent to either share data or make a payment.
.

.
Yapily – AWS Partner Spotlight
Yapily is an AWS Partner that helps businesses and fintechs connect securely to their end-user bank accounts.