Artificial Intelligence
Building a trash sorter with AWS DeepLens
| April 2023 Update: Starting January 31, 2024, you will no longer be able to access AWS DeepLens through the AWS management console, manage DeepLens devices, or access any projects you have created. To learn more, refer to these frequently asked questions about AWS DeepLens end of life. |
In this blog post, we show you how to build a prototype trash sorter using AWS DeepLens, the AWS deep learning-enabled video camera designed for developers to learn machine learning in a fun, hands-on way. This prototype trash sorter project teaches you how to train image classification models with custom data.
Image classification is a powerful machine learning technique where a machine learning model learns how to distinguish between many different objects inside images by observing many examples. You can apply techniques learned in this blog post to solve problems that require sorting objects into different bins based on imagery (such as sorting fruits by size or grade) or detecting the existence of an object in an image (such as recognizing the type of object at self-checkout).
This tutorial was inspired by the smart recycle arm project created for the AWS Public Sector Builders Fair. For more information, see Demonstration: Automatic Recycling on YouTube.
Solution overview
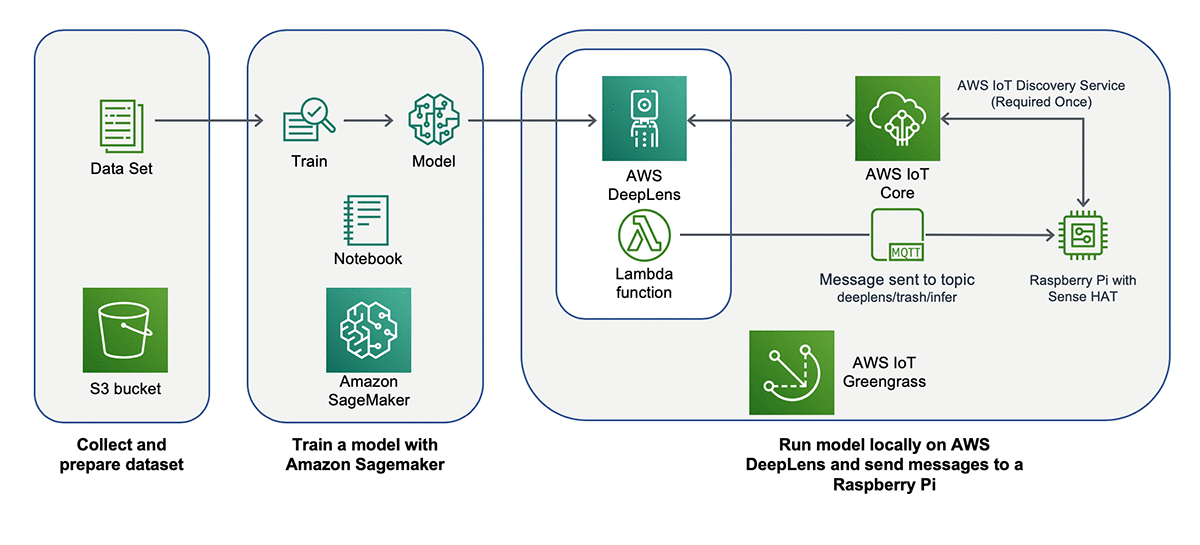
This walkthrough includes the following steps:
- Collecting and preparing your dataset to feed into an ML algorithm
- Training a model with Amazon SageMaker, a fully managed service that provides the ability to build, train, and deploy ML models quickly
- Running the model locally on AWS DeepLens to predict types of trash without sending any data to the cloud
- Optionally, after AWS DeepLens makes its prediction, you can set up AWS DeepLens to send a message to a Raspberry Pi via AWS IoT Greengrass to show you which bin to throw the item in.
The following diagram illustrates the solution architecture.
Prerequisites
To complete this walkthrough, you must have the following prerequisites:
- An AWS account
- An AWS DeepLens device. Available on Amazon.com (US), Amazon.ca (Canada), Amazon.co.jp (Japan), Amazon.de (Germany), Amazon.fr (France), Amazon.es (Spain), Amazon.it (Italy).
- Raspberry Pi with Sense HAT (optional)
Collecting and preparing your dataset
This tutorial uses an ML algorithm called an image classification model. These models learn to distinguish between different objects by observing many examples over many iterations. This tutorial uses a technique called transfer learning to dramatically reduce the time and data required to train an image classification model. For more information about transfer learning with Amazon SageMaker built-in algorithms, see How Image Classification Works. With transfer learning, you only need a few hundred images of each type of trash. As you add more training samples and vary the viewing angle and lighting for each type of trash, the model takes longer to train but improves its accuracy during inference, when you ask the model to classify trash items it has never seen before.
Before going out and collecting images yourself, consider using one of the many sources for images that are publicly available. You want images that have clear labels (often done by humans) of what’s inside the image. Here are some sources you could use:
- AWS Open Data – Contains a variety of datasets sourced from trusted entities that share and open their datasets for general use.
- AWS Data Exchange – Contains datasets that are both free and available for a fee or subscription charge. These are very well curated and labeled, therefore involve a charge in most cases.
- GitHub – Offers several public repos with image datasets. Make sure you comply with the terms and conditions and cite the original authors.
- Kaggle – Contains a wide variety of public data sets used for ML competitions. These datasets often come starter code.
- Non-profit and government organizations – Contains datasets for public use. Be sure to check the terms of use for each.
- Amazon SageMaker Ground Truth – Creates labeled datasets from your images. You can choose between automated labeling (recommended for common objects), human labelers or AWS Marketplace offerings for more specific labeling use cases. For more information, see Build Highly Accurate Training Datasets with Amazon SageMaker Ground Truth.
A good practice for collecting images is to use pictures at different angles and lighting conditions to make the model more robust. The following image is an example of the type of image the model classifies into landfill, recycling, or compost.

When you have your images for each type of trash, separate the images into folders.
After you have the images you want to train your ML model on, upload them to Amazon S3. First, create an S3 bucket. For AWS DeepLens projects, the S3 bucket names must start with the prefix deeplens-.
This tutorial provides a dataset of images labeled under the categories of recycling, landfill, and compost. You will download this dataset in the next step when you train a model with Amazon SageMaker.
Training a model with Amazon SageMaker
This tutorial uses Amazon SageMaker Jupyter notebooks as the development environment to train your models. Jupyter notebook is an open-source web application that allows you to create and share documents that contain live code, equations, visualizations, and narrative text. A full Jupyter notebook has been prepared for you to follow along.
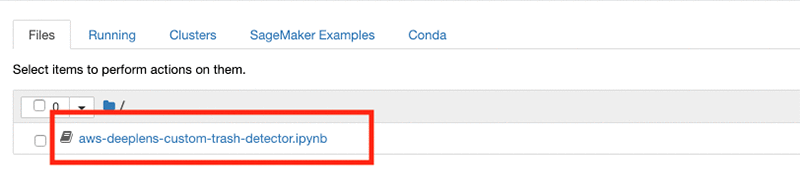
First, download the example notebook: aws-deeplens-custom-trash-detector.ipynb
Then to create a custom image classification model, you need to use a graphics processing unit (GPU) enabled training job instance. GPUs are excellent at parallelizing the computations required to train a neural network. This tutorial uses a single ml.p2.xlarge instance. In order to access a GPU-enabled training job instance, you must submit a request for a service limit increase to the AWS Support Center. You can follow the instructions here to increase your limit.
After you have received your limit increase, follow the instructions below to create an Amazon SageMaker notebook instance:
- Open the Amazon SageMaker console at https://console.aws.amazon.com/sagemaker/.
- Choose Notebook instances, then choose Create notebook instance.
- On the Create notebook instance page, provide the following information (if a field is not mentioned, leave the default values):
- For Notebook instance name, type a name for your notebook instance.
- For Instance type, choose ml.t2.medium. This is the least expensive instance type that notebook instances support, and it suffices for this tutorial.
- For IAM role, choose Create a new role. Make sure this IAM role has access to the S3 bucket you created earlier (prefix
deeplens-). See below.

- Choose Create notebook instance.
Your notebook instance can take up to a minute to configure.
When the status on the notebook instances page changes to InService, choose Open Jupyter to launch your newly created Jupyter notebook instance.
Upload the aws-deeplens-custom-trash-detector.ipynb file you downloaded earlier.

Open the notebook and follow it through to the end. If you are asked about setting the kernel, select conda_mxnet_p36.
Jupyter notebooks contain a mix of text and code cells. To run a piece of code, choose the cell and press Shift+Enter. While the cell is running, an asterisk appears next to the cell. When the cell is complete, an output number and new output cell appear below the original cell.
After you follow the notebook through to the end, you have a trained model to distinguish between different types of trash.
Running the model locally on AWS DeepLens
An AWS DeepLens project consists of two pieces: a model and an inference function. Inference is when you apply the model to a new image that the model has not seen before and get predictions. The model consists of the algorithm and the parameters learned through the training process. You can use models trained with Amazon SageMaker or external models trained on your own machine. For this tutorial, you will use the Amazon SageMaker model you just trained.
Import your model into AWS DeepLens
In your AWS DeepLens console, go to Models and click on Import model.
Select Amazon SageMaker trained model. Then selection your most recent job ID and model name. Then select MXNet as your model framework.

Then click Import model.
Create the inference function
The inference function optimizes the model to run on AWS DeepLens and feeds each camera frame into the model to get predictions. For the inference function, you use AWS Lambda to create a function that you deploy to AWS DeepLens. The Lambda function runs inference (locally on the AWS DeepLens device) over each frame that comes out of the camera.
This tutorial provides an example inference Lambda function.
First we need to create an AWS Lambda function to be deployed to AWS DeepLens.
- Download the deeplens-trash-lambda.zip onto your computer.
- Go to AWS Lambda in your AWS Management Console and click Create Function.
- Then select Author from Scratch and make sure the follow options are selected:
- Runtime: Python 2.7
- Choose or create an execution role: Use an existing role
- Existing role: service-role/AWSDeepLensLambdaRole
- Once the function is created, scroll down on the function’s detail page and choose Upload zip in Code entry type.
- Upload the deeplens-trash-lambda.zip you downloaded earlier.
- Choose Save to save the code you entered.
- From the Actions dropdown menu list, choose Publish new version. Publishing the function makes it available in the AWS DeepLens console so that you can add it to your custom project.
- Enter a version number and click publish!
Understanding the Lambda function
This section walks you through some important parts of the Lambda function.
First, there are two files you should pay attention to: labels.txt and lambda_function.py.
labels.txt contains the list of the human-readable labels for us to map the output of the neural network (integers) to.
lambda_function.py contains code for the function being called to generate predictions on every camera frame and send back results.
Here are the important parts of lambda_function.py.
First, you load and optimize the model. Compared to cloud virtual machines with a GPU, AWS DeepLens has less computing power. AWS DeepLens uses the Intel OpenVino model optimizer to optimize the model trained in Amazon SageMaker to run on its hardware. The following code optimizes our model to run locally:
Then you run the model frame-per-frame over the images from the camera. See the following code:
Finally, you send the text prediction results back to the cloud. Viewing the text results in the cloud is a convenient way to make sure the model is working correctly. Each AWS DeepLens device has a dedicated iot_topic automatically created to receive the inference results. Alternatively you can overlay the results on the video stream or send these results to another device, such as a Raspberry Pi. See the following code:
Create a custom AWS DeepLens project
In your AWS DeepLens console’s Projects page, click on Create Project.
Choose the Blank Project option.
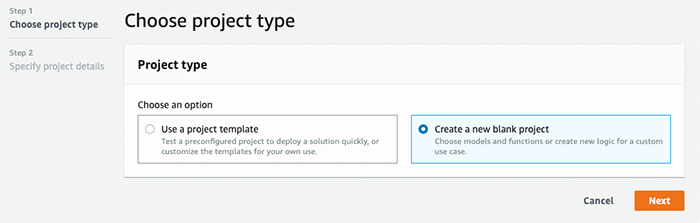
Name your project yourname-trash-sorter.
Then click Add model and select the model you just created.
Then click Add function and search for the AWS Lambda function you created earlier by name.
Then click Create project.
Import your model into AWS DeepLens
In your AWS DeepLens console’s Projects page, select the project you want to deploy and then select Deploy to device.

On the Target device screen, choose your device from the list, and click Review.
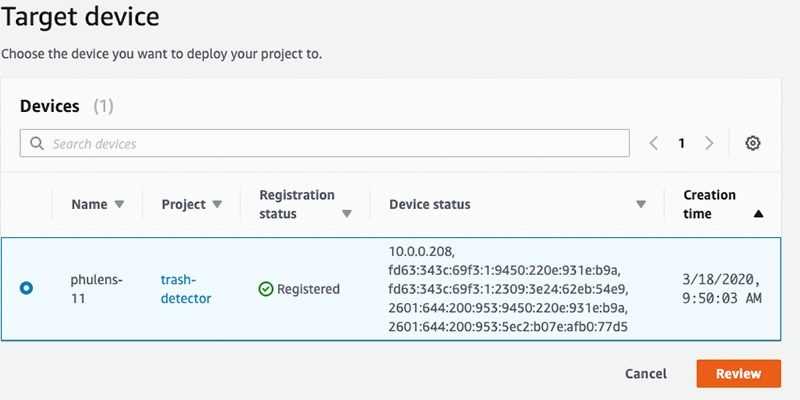
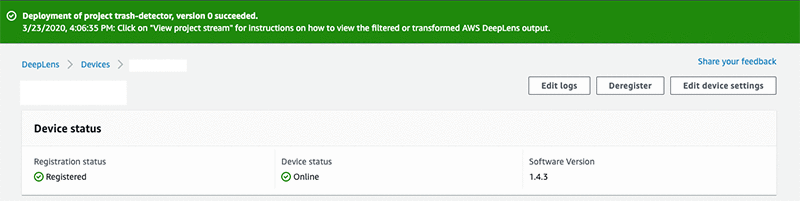
Then click Deploy. The deployment can take up to 10 minutes to complete, depending on the speed of the network your AWS DeepLens is connected to. Once the deployment is complete, you should see a green banner like the one below.
Congratulations, your model is now running locally on AWS DeepLens!
To see the text output, scroll down on the device details page to the Project output section. Follow the instructions in the section to copy the topic and go to the AWS IoT console to subscribe to the topic.

You should see results coming through like the screenshot below.

For step-by-step instructions on how to view the video stream or text output, see here.
Taking action with AWS IoT
This section discusses optional steps to send results from the AWS DeepLens to an IoT device such as the Raspberry Pi. The Raspberry Pi can then use these results to take action such as moving an arm or displaying a message telling you which bin to throw the trash item in. This blog post discusses these steps at a high-level, for step-by-step guidance refer to the instructions here.
Updating an AWS DeepLens Lambda function
For the Raspberry Pi to know what action to take, AWS DeepLens needs to send a message with the output from the model inference. You need to add new lines of code to the existing AWS DeepLens Lambda function, which sends the message to a new MQTT topic. Make sure to save and publish the new version of the Lambda function before you deploy the updated project so the AWS DeepLens can use the updated capability. See here for step-by-step instructions.
Adding a device to a Greengrass group
AWS IoT Greengrass lets connected devices operate even with intermittent connectivity to the cloud. The devices can collect and process data when online or offline. To allow direct secure communication between devices, you must add the Raspberry Pi to the existing Greengrass group. For instructions, see Create AWS IoT Devices in an AWS IoT Greengrass Group. Make sure to choose the existing group that starts with deeplens. See here for step-by-step instructions.
After you add the Raspberry Pi to the Greengrass group, you need to create a subscription so the MQTT topic from the Lambda function goes to the appropriate destinations. For this use case, you want the Lambda function to send the message to the Raspberry Pi using an MQTT topic of deeplens/trash/infer. Make sure you deploy the Greengrass group to the AWS DeepLens after adding the subscription. See here for step-by-step instructions.
By default, AWS DeepLens blocks traffic on port 8883, which is required for local AWS IoT Greengrass communication. To allow this communication, first SSH to the AWS DeepLens device by opening a terminal on your computer and enter ssh aws_cam@<YOUR_DEEPLENS_IP>. You might need to enable SSH by following instructions here. Then open the firewall port by entering sudo ufw allow 8883. See here for step-by-step instructions.
Each time you update the Lambda function, you need to update the Greengrass group with the device you have created and the subscription. You do not have to recreate a new device in AWS IoT; that definition remains. You only need to add an existing device to the Greengrass group, recreate the subscription, and deploy the group.
Configuring the Raspberry Pi
After you configure AWS DeepLens to send the inference of the model to the MQTT topic, you need to prepare the Raspberry Pi to listen for messages on the MQTT topic. Because the Raspberry Pi uses Python to interact with AWS IoT, you need to make sure it has the AWS IoT Device SDK for Python. For more information, see Install the AWS IoT Device SDK for Python.
The Python script receives the message and takes action. You can download an example script from here. Alternatively, you can write your own script by using basicDiscovery.py as a template from the AWS IoT Device SDK. The script uses the certificates downloaded during the creation of a new AWS IoT Greengrass device. For more information, see Test Communications.
Conclusion
Through this tutorial, you learned how to train an image classification model and deploy it to AWS DeepLens to sort trash. Next try to repeat the tutorial with your own data.
For a more detailed walkthrough of this tutorial and other tutorials, samples, and project ideas with AWS DeepLens, see www.awsdeeplens.recipes.
About the Authors
 Todd Reagan is a Solutions Architect at Amazon Web Services based in Dallas, TX with a passion for Machine Learning and IoT. When not working, he likes spending time outdoors with his family, finding the next landscape to photograph, and playing golf.
 Varun Rao Bhamidimarri is an Enterprise Solutions Architect at Amazon Web Services based in Dallas Tx. His focus is helping customers with adoption of cloud-enabled analytics solutions to meet their business requirements.
 Juan Pablo Bustos is a Solutions Architect for Global Accounts at Amazon Web services based in Dallas, TX. Outside of work, he loves spending time writing and playing music as well as trying random restaurants with his family.
 Raj Kadiyala is an AI/ML Tech Business Development Manager in AWS WWPS Partner Organization. Raj has over 12 years of experience in Machine Learning and likes to spend his free time exploring machine learning for practical every day solutions and staying active in the great outdoors of Colorado.
 Phu Nguyen is a Product Manager for AWS DeepLens. He builds products that give developers of any skill level an easy, hands-on introduction to machine learning.
 Lakshay Sharma is a Software Development Engineer at Amazon Prime Video who enjoys building and applying Computer Vision and Machine Learning solutions to problems. He is particularly interested in exploring self-supervised, weakly supervised, and few-shot learning techniques.
 Jeff Keyes is a Principal Engineer with Amazon FreeTime. Currently, he spends most of his time on analytics and software architecture, but, when time permits, he loves to dabble in machine learning and optimization.