AWS for M&E Blog
Live video production using vMix on Amazon EC2
Live video is a popular and effective mechanism for businesses to stay in contact with their customers and stakeholders. As business constraints continue to evolve and content producers are challenged to produce live content outside the studio, including from their own home, live video production solutions from AWS can help businesses across industries adapt quickly.
This blog demonstrates how to configure your own cloud-based live production and streaming platform using vMix on Amazon Elastic Compute Cloud (Amazon EC2) and AWS Elemental Media Services.
Requirements
To follow along, you’ll need the following components:
- An AWS account
- A g4dn.2xlarge EC2 instance with Microsoft Windows Server 2019 Base AMI installed
- NVIDIA GRID drivers
- Microsoft Windows RDP client
- Teradici GPU Graphics Agent (License required)
- Teradici PCoIP client installed on your local machine.
- Microsoft .NET Framework version 3.5
- vMix Live Production and Streaming Software (License required, 60 day free trial)
- Newtek NDI Tools (if you wish to use NDI as a video transport protocol)
- VLC Media Player
Cost disclaimer
The AWS resources needed to build this solution are not covered by the Free Tier and will incur additional cost while running. You are responsible for the cost of the AWS services used while running this solution. Remember to clean up your resources once finished to avoid long-running charges.
Provision and configure GPU-optimized EC2 instance
There are different options for provisioning and configuring an instance for live video production:
- Instead of doing a manual build, you can visit the AWS Marketplace and subscribe to a Teradici-provided, pre-built AMI, which already has the NVIDIA GRID driver and Teradici CAS software installed, configured, and licensed as part of the overall usage cost.
- You can set up a virtual graphics workstation in Amazon WorkSpaces using a Windows Graphics or GraphicsPro workstation, which comes with NVIDIA drivers installed but requires manual configuration of Teradici.
- You can provision a GPU-optimized EC2 instance with the Microsoft Windows Server 2019 Base AMI installed, which also requires manual configuration.
If you purchase the Teradici Cloud Access Software for Windows AMI from the AWS Marketplace, you can skip this initial configuration section. Otherwise, this blog post focuses on manually building a live production studio from the base AMI using a g4 GPU-optimized EC2 instance.
The g4 instance is a versatile graphics workstation for live video applications. It can support concurrent hardware video encodes and decodes (using advanced compression codecs such as H.265 at up to 12-bit depth) suitable for bringing live video streams in and out of the instance. It has 2,560 CUDA cores which make it capable of concurrently compositing multiple live, graphical video and animation elements in real time at resolutions up to and above Ultra-High Definition (UHD). The g4 instance also supports NVIDIA GRID features to power a low-latency, high quality, PCoIP protocol for command and control whilst freeing up the CPU to handle audio and operational functions of live production.
First, we will provision a g4 instance to be used as the core infrastructure for this solution.
1. In the AWS Management Console, choose EC2 and provision a g4dn.2xlarge (or better) EC2 instance with the Microsoft Windows Server 2019 Base AMI.
2. When configuring the security group for this instance, make sure to allow traffic from your IP address to the instance so you can access it using Teradici and an RDP client. For this tutorial, you can allow All traffic with the source locked down to your IP address.
3. Once the instance is provisioned with 2/2 status checks complete, connect to the instance using an RDP client of your choice. This is so you can install the right drivers and software needed for this tutorial in an easier fashion. You can find the connection information by choosing your EC2 instance and selecting Connect to find the DNS name, username, and password.
4. Once you are connected to the instance, install the NVIDIA GRID driver.
5. To do this, install the AWS Command Line Interface (AWS CLI).
6. Configure AWS CLI credentials in PowerShell AWS configure.
aws configure
7. Download the NVIDIA GRID driver from Amazon S3. Choose PowerShell, then Run as Administrator, and paste following into PowerShell to be run:
$Bucket = "ec2-windows-nvidia-drivers"$KeyPrefix = "latest"$LocalPath = "C:\Users\Administrator\Desktop\NVIDIA"$Objects = Get-S3Object -BucketName $Bucket -KeyPrefix $KeyPrefix -Region us-east-1 foreach ($Object in $Objects) {$LocalFileName = $Object.Key if ($LocalFileName -ne '' -and $Object.Size -ne 0) {$LocalFilePath = Join-Path $LocalPath $LocalFileName Copy-S3Object -BucketName $Bucket -Key $Object.Key -LocalFile $LocalFilePath -Region us-east-1}
8. This will download the NVIDIA GRID installer. Run the command for the installer, which you should find at the following path:
C:\Users\Administrator\Desktop\NVIDIA\391.57_grid_win10_server2016_64bit_international.exe
9. Reboot the machine via the command prompt:
cmd shutdown /r
10. To download vMix, the .NET Framework 3.5 must be enabled on the instance. Enable this in Server Manager by selecting Manage and then Add Roles and Features. Choose Select installation type, then Role-based or feature-based installation. On the Select features page, choose .Net Framework 3.5 Features for installation.
11. Install vMix.
12. Install NDI tools.
Use Teradici to access EC2 instance
Next, we will configure the instance to use the Teradici Graphics Agent for accessing our live production studio instead of an RDP client. The Teradici Graphics Agent is Cloud Access Software built on industry-leading PCoIP technology. It provides a smoother, low-latency desktop virtualization experience compared to RDP.
1. Using RDP to access the EC2 instance, download and install the Teradici Graphics Agent Host, which is used to securely deliver the host instance’s pixel output to PCoIP clients.
2. Download the Teradici PCoIP client on your local machine. This client enables secure connection to the remote EC2 instance.
3. Stop using the RDP client to access EC2, and instead use the Teradici client. Connect to the instance by providing the IP address or domain name, a connection name, and the username and password if prompted.

Troubleshooting tip: If you are unable to connect, check to see if you are using a VPN as it may prevent you from accessing the instance. If you are not using a VPN and you are still unable to connect, check the Security Group of the instance and make sure that you have allowed access from your IP address to the necessary ports.
Set up local camera sources, graphics, and music
Now, let’s explore vMix to learn what is possible. You can add many different types of inputs to vMix, such as images, graphic overlays, remote and local camera sources, music, and more. In this example, let’s add a sample graphic overlay. Select Add Input and add a Title/XAML to choose a title overlay to add. You can edit the headline and description as well. The following is a sample video of Big Buck Bunny [AH1] playing with a graphic overlay:

You can insert an MP3 or WAV file to add background music or audio clips by selecting Add Input and choosing Audio to select an audio file.
You can also add a local camera source by choosing Camera and selecting your local camera source.
If you are coordinating a live broadcast, you can allow casters or producers to call into vMix using the Video Call input. If you need to access the remote desktop screens of those participating in the broadcast, such as an esports event where you need access to live gameplay and observer feeds from players, you can use vMix Desktop Capture to live-stream what is happening on their desktop.
Tip: For the best performance when using vMix with Teradici, change the Display Method to smooth in the vMix settings, under the Performance tab.

Set up remote camera sources
So you know how to add local sources and inputs; now you can set up a remote camera source to send an NDI video stream to vMix. This is accomplished using the NewTek NDI Tools you previously installed on the vMix EC2 instance.
Network Device Interface (NDI) is a networking protocol stack for the transport of live video. VizRT, the creator of NDI, grants a royalty-free license for software implementations. VizRT publishes an SDK for Windows, Linux and MacOS, and NDI has been integrated into vMix.
NDI employs low latency i-frame only video compression at bitrates typically between 100 Mbps (1080i50) and 250 Mbps (UHDp60). Video frames are multiplexed together with multichannel, uncompressed audio and metadata messages, such as camera tallies and PTZF telemetry. Version 4.0 and above of NDI incorporates multi-TCP to facilitate reliable transport throughout the AWS network.
NDI supports automatic stream discovery between video applications using mDNS. If you wish to automatically discover streams between NDI-enabled g4 instances inside your VPC, consider attaching a transit gateway to your VPC with multicast enabled. mDNS uses the IPv4 address 224.0.0.251 on UDP port 5353.
Alternatively, you can manually discover video streams between instances using the NDI Access Manager, which is included with the NewTek NDI Tools software suite. Manual stream discovery occurs directly between a sending and receiving device over TCP port 5960.
The streaming of audio/video payload packets between devices commences on TCP ports 5961 and 5962. Subsequent ports are assigned incrementally if additional streams are established.
NDI is used in this tutorial to help deliver broadcast-quality video in a high-quality, low-latency manner. This blog post will show how to manually discover NDI video streams using NewTek NDI tools:
1. To set up a remote camera source, provision another EC2 instance. Because you are only playing a sample video, you can choose a t2.micro instance that is covered under the AWS Free Tier to avoid incurring additional costs.
2. Choose the Windows 2019 Server Base AMI again.
3. Provision this remote source EC2 instance in the same VPC as the vMix instance.
4. Allow the two EC2 instances to communicate with each other. You can do this by putting them in the same security group and self-referencing the security group.
a. Add a self-referencing inbound rule for ALL Traffic. This allows any traffic coming from resources within the security group to communicate with each other.
5. Access the remote instance. You can use an RDP client.
6. Install NDI Tools and VLC Media Viewer to simulate video from your remote source.
7. Configure VLC to send video and audio to the NewTek NDI VLC Plugin. Open VLC Media Player, go to Tools → Preferences. For audio, change the output to NDI audio output. For video, change the output to NDI video output.


8. Save your changes and restart VLC Media Viewer.
9. Download a video and open it in VLC Media Viewer. When it plays, only the playback progress bar and a black screen should render. This is because the video is playing on the network as an NDI stream. If you open NDI Video Monitor, you will find playback of the NDI sources running on your network.
10. On both EC2 instances, be sure to disable Windows Defender Firewall as this may block communication between the two instances.
11. Now it is time to add it to a source in vMix.
12. Switch back to Teradici to access your vMix instance. In your Windows programs, search for NDI Access Manager. On the Remote Sources tab, add the IP address of the instance with remote video.

This process allows you to manually discover NDI streams between instances. On vMix, select Add Input and choose NDI / Desktop Capture and it should automatically detect an NDI source on the same network.

Add the remote NDI source as an input. Now your remote NDI source is playing in vMix.
Troubleshooting: If you are unable to pick up the NDI source and it seems there is a communication issue with the instances – for example you can’t ping the instances successfully – check that Windows Defender Firewall is disabled. If that doesn’t work, double check the security groups to make sure the instances are in the same security group. Also, check that the security group self-references itself to allow communication between the two instances.
Set up the web distribution component with AWS Elemental Media Services
To distribute this live stream to your own website, you can use a combination of AWS Elemental Media Services, including AWS Elemental MediaLive and AWS Elemental MediaPackage. When used alongside Amazon CloudFront for content delivery, you can build a highly available, resilient, and scalable architecture to deliver your live stream to viewers worldwide.
AWS Elemental MediaLive is a broadcast-grade live video processing service. MediaLive ingests redundant live input feeds and transcodes them into two adaptive bitrate (ABR) HTTP Live Streaming (HLS) output streams in real time. AWS Elemental MediaPackage ingests the input feeds from MediaLive and packages the live stream into various formats: HLS, Dynamic Adaptive Streaming over HTTP (DASH), Microsoft Smooth Streaming (MSS), and Common Media Application Format (CMAF).
Amazon CloudFront is the content delivery network (CDN) service used to deliver the stream to viewers around the word with low latency and high transfer speeds.
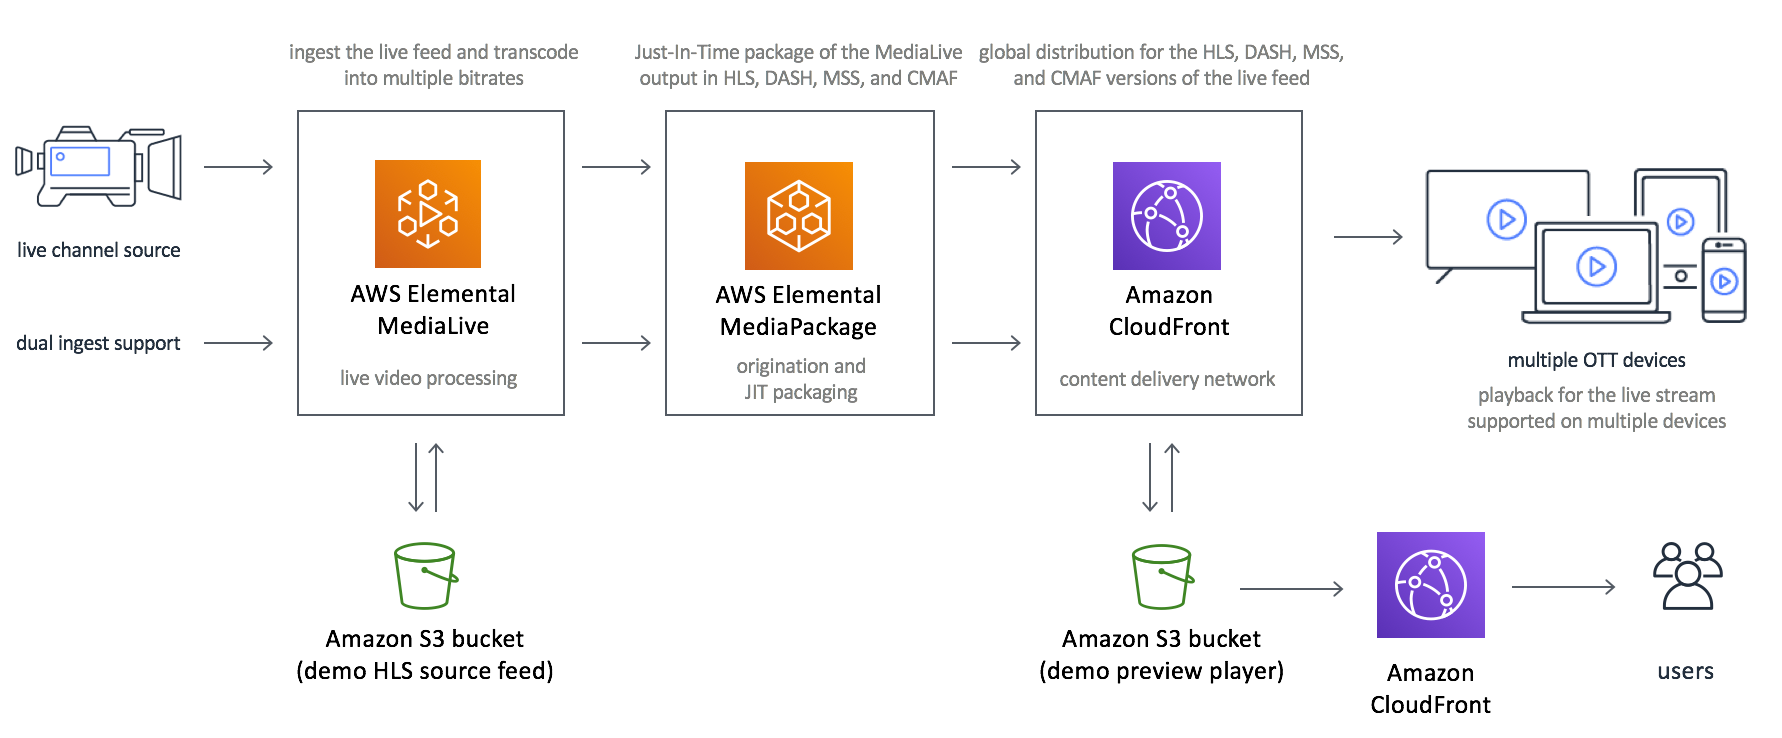
To stand up this web distribution, use the AWS Solution “Live Streaming on AWS”. The solution is a CloudFormation template that will spin up the architecture shown above.
1. Deploy the CloudFormation template by opening the Live Streaming on AWS Solution in a new tab, and choosing Launch solution in the AWS Console.
2. Specify an Input CIDR Block range for the MediaLive Security Group. Put the IP address of the vMix EC2 instance that is sending the live stream to MediaLive.
a. Follow the deployment guide to better understand this architecture and the CloudFormation parameters in more detail while deploying this solution.
3. It should take about 15 minutes to deploy the CloudFormation template. Wait until the CloudFormation template says CREATE_COMPLETE.
A small change needs to be made to this architecture: By default, the AWS Solution plays a sample VOD asset. You need to configure your own RTMP input for MediaLive so you can output streams from vMix.
1. In the AWS Management Console, go to AWS Elemental MediaLive.
2. On the left-hand navigation pane, select Inputs and choose Create Input.
3. Give your input a name. For input type, select RTMP (push).

4. Leave Network mode as Public, and use the existing security group that was created when you launched the CloudFormation template.
5. Under Input destinations, you can specify two input streams for high availability and redundancy. vmix1/a is used to represent the first RTMP input while vmix2/b is used to represent the second.

6. Create the new input.
7. On the left-hand navigation pane of MediaLive, select Channels. You need to add the input you just created to the MediaLive channel the AWS Solution created for you.
8. Select the existing MediaLive channel to view details and select The channel needs to be in a stopped state before modification.
9. Once stopped, select Channel Actions > Edit channel from the dropdown menu
10. On the left side, next to Input Attachments, select Add to add your newly created input to the MediaLive channel
11. Choose your input and select Confirm. Take note of the input destinations as you will need them to configure the vMix output stream.
a. The input destinations should look like:
rtmp://<YOUR-IP-ADDRESS>/vmix1/a
rtmp://<YOUR-IP-ADDRESS>/vmix2/b
b. MediaLive is available in two different modes: standard channel and single-pipeline channel. Single-pipeline channel creates one pipeline for you, while standard channel creates two independent pipelines for high availability depending on your requirements. The Live Streaming on AWS solution creates a standard channel and requires a standard input that has two redundant input destinations. Single-pipeline channels work with either standard or single-pipeline inputs.

c. Select Update channel and then start the MediaLive channel again.
The distribution component is deployed using Amazon CloudFront. You can find the CloudFront URL by navigating to the AWS CloudFormation outputs section for the live streaming stack previously launched. You should see 8 outputs including one that is titled DemoConsole, which is a CloudFront URL. This is the web distribution where you will be able to view your live stream. 
Output vMix live stream to your web distribution
Now, configure vMix to live stream to your web distribution.
1. Using the Teradici client, access the EC2 instance with vMix running .
Troubleshooting tip: If you are having issues accessing your EC2 instance, make sure you are not using a VPN. Also, verify that your IP address on your local machine has not changed. If it has changed, update the security group to allow access from your new IP address.
2. At the bottom of vMix, there is a gear icon next to stream that represents Stream Settings. Open Stream Settings to specify an RTMP output destination.

3. Choose Custom RTMP Server as the destination. Add your RTMP input destination for the URL and specify your stream key, which is “a” for the first pipeline and “b” for the second pipeline. This is one of the input destinations you specified when adding a new input for AWS Elemental MediaLive. It should look like this:
rtmp://<YOUR-IP-ADDRESS>/vmix1/a
4. Save and close. Click Stream to start streaming. Click the Preview button next to HSL and you should see your live stream output from vMix on your CloudFront web distribution! You can also set up vMix to stream to platforms like Twitch.tv, Facebook Live, and YouTube TV to broadcast to multiple places simultaneously.

AWS Elemental MediaLive ingests your input feed from vMix and transcodes the live streaming content into an adaptive bitrate HTTP Live Streaming (HLS) stream as output. It is then sent to a CloudFront distribution to be delivered with low latency to millions of viewers around the world.
In this blog post, we only set up one input feed but AWS Elemental MediaLive supports up to two input feeds for redundancy and high availability. It is best practice to implement two redundant input feeds in a production setting.
Conclusion
Congratulations! You have configured your own fully remote, virtualized live video production environment on AWS and successfully broadcasted to your own web distribution.