构建一个基本的 Web 应用程序
教程


模块 5:添加交互到 Web 应用程序
在此模块中,您将修改静态网站,以调用您的 API 并显示自定义文本。
概览
在此模块中,我们将更新我们在模块 1 中创建的静态网站,以调用我们在模块 3 中创建的 REST API。这将增加根据您的输入内容显示文本的能力。
您将学到的内容
在本模块中,您将:
- 从 HTML 页面调用 API Gateway API
- 将 Web 应用程序的新版本上传到 Amplify 控制台
重要概念
部署网站:使网站对用户可用。
环境:可以在其中执行应用程序或网站的阶段,例如“生产”、“开发”或“暂存”。
调用 API:向 API 发送事件以触发特定行为。
实施
-
使用 Amplify 控制台更新 Web 应用程序
- 打开您在模块 1 中创建的 index.html 文件。
- 使用以下代码替换现有代码:
<!DOCTYPE html> <html> <head> <meta charset="UTF-8"> <title>Hello World</title> <!-- Add some CSS to change client UI --> <style> body { background-color: #232F3E; } label, button { color: #FF9900; font-family: Arial, Helvetica, sans-serif; font-size: 20px; margin-left: 40px; } input { color: #232F3E; font-family: Arial, Helvetica, sans-serif; font-size: 20px; margin-left: 20px; } </style> <script> // define the callAPI function that takes a first name and last name as parameters var callAPI = (firstName,lastName)=>{ // instantiate a headers object var myHeaders = new Headers(); // add content type header to object myHeaders.append("Content-Type", "application/json"); // using built in JSON utility package turn object to string and store in a variable var raw = JSON.stringify({"firstName":firstName,"lastName":lastName}); // create a JSON object with parameters for API call and store in a variable var requestOptions = { method: 'POST', headers: myHeaders, body: raw, redirect: 'follow' }; // make API call with parameters and use promises to get response fetch("YOUR-API-INVOKE-URL", requestOptions) .then(response => response.text()) .then(result => alert(JSON.parse(result).body)) .catch(error => console.log('error', error)); } </script> </head> <body> <form> <label>First Name :</label> <input type="text" id="fName"> <label>Last Name :</label> <input type="text" id="lName"> <!-- set button onClick method to call function we defined passing input values as parameters --> <button type="button" onclick="callAPI(document.getElementById('fName').value,document.getElementById('lName').value)">Call API</button> </form> </body> </html>3.确保您在第 41 行中添加了您的 API 调用 URL(从模块 3 中)。注意:如果您没有 API 的 URL,则可以通过依次选择 API 和阶段,从 API Gateway 控制台中获取它。
4.保存文件。
5.仅 ZIP(压缩)HTML 文件。
6.打开 Amplify 控制台。
7.选择在模块 1 中创建的 Web 应用程序。
8.单击白色的选择文件按钮。
9.选择您在步骤 5 中创建的 ZIP 文件。
10.上传文件时,部署过程将自动开始。当您看到绿色的条后,您的部署将完成。
- 打开您在模块 1 中创建的 index.html 文件。
-
测试更新后的 Web 应用程序
- 选择域下面的 URL。
- 您上传的 Web 应用程序应加载到您的浏览器中。
- 填写姓名(或者您喜欢的任何内容),然后选择调用 API 按钮。
- 您应看到一条以 Hello from Lambda 开头,后接您填写的文本的消息。
恭喜! 您现在已经有一个通过 Amplify 控制台部署的运行 Web 应用程序,它可以通过 API Gateway 调用 Lambda 函数。
应用程序架构
现在所有模块均已完成,下面是您构建内容的架构:
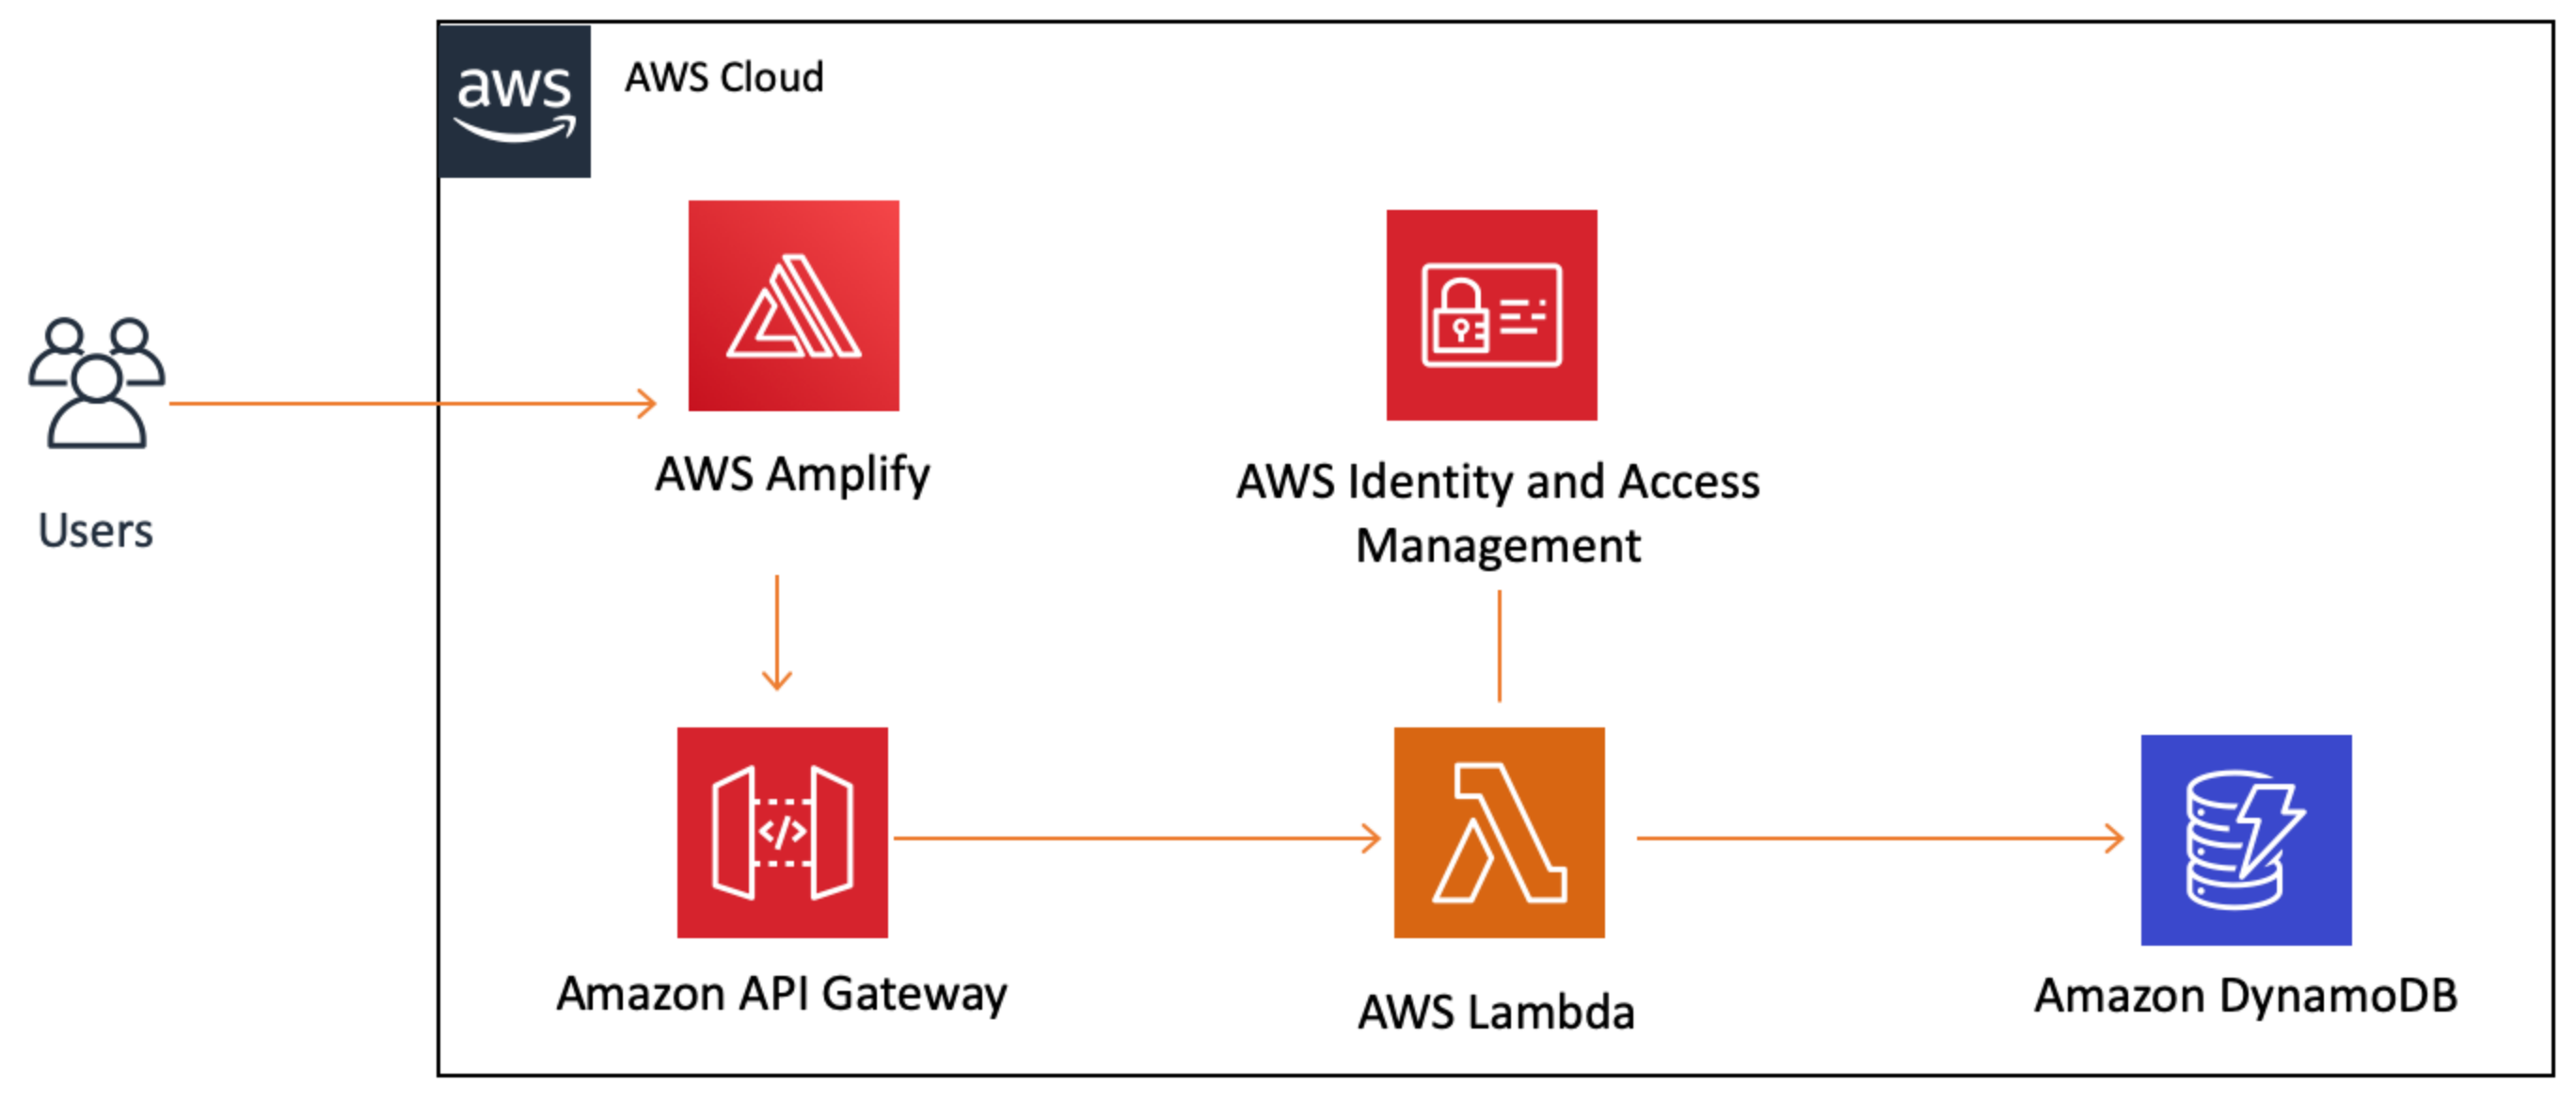
我们设置的所有 AWS 服务都可以相互安全地通信。当用户选择 Web 应用程序上的按钮时,它将对我们的 API 进行调用,从而触发 Lambda 函数。Lambda 函数将写入数据库中,并通过 API Gateway 返回一条消息到客户端。IAM 管理所有权限。