构建一个基本的 Web 应用程序
教程


模块 4:创建数据表
在本模块中,您将创建 Amazon DynamoDB 表并启用您的 Lambda 函数以将数据存储在其中
概览
在本模块中,我们将使用 Amazon DynamoDB 创建表来持久存储数据。DynamoDB 是一个键值数据库服务,因此我们不需要为我们的数据创建 Schema。它在任意规模下都能提供一致的超高性能,并且使用它时不需要管理服务器。
此外,我们还将使用 AWS Identity and Access Management(IAM)服务为我们的服务安全地授予互相交互所需的权限。具体来说,我们将允许我们在模块 2 中创建的 Lambda 函数使用 IAM policy 写入我们新创建的 DynamoDB 表中。为实现此目的,我们将使用 Lambda 函数中的 AWS SDK(Python、JavaScript 或 Java)。
您将学到的内容
- 使用 AWS 管理控制台创建一个 DynamoDB 表
- 使用 IAM 创建角色并管理权限
- 使用 AWS 开发工具包(Python、JavaScript 或 Java)写入 DynamoDB 表
重要概念
永久存储数据:存储数据,以便我们以后可以独立于程序执行来访问数据。
非关系数据库:非关系数据库不使用行和列组成的表格 Schema。它们使用针对存储数据类型的特定要求优化的存储模型。
键值数据库:一种非关系数据库,它将数据存储为键值对集合,其中键作为唯一标识符。
主键:标识 DynamoDB 表中每一段数据的值。该值还将用于对表格进行分区,以使其可扩展。
Schema:数据的组织形式,用作数据库构建方式的蓝图。
AWS SDK:AWS SDK(软件开发工具包)提供一组工具、库、文档、示例代码、过程和指导,从而使开发人员能够在特定平台上创建软件应用程序。
IAM policy:定义实体(例如,服务、用户、组)可以访问哪些 AWS 资源的文档。
实施
-
创建 DynamoDB 表
- 登录 Amazon DynamoDB 控制台。
- 请确保创建表的区域与在上一模块中创建 Web 应用程序的区域相同。您可以在页面最顶部您的账户名称旁看到此信息。
- 选择橙色的创建表按钮。
- 在表名下,输入 HelloWorldDatabase。
- 在分区键字段中,输入 ID。 分区键是表主键的一部分。
- 保留其余默认值不变,然后选择橙色的创建表按钮。
- 在表列表中,选择表名 HelloWorldDatabase。
- 在常规信息部分,通过选择向下箭头来显示其他信息。

9.复制 Amazon 资源名称(ARN)。 稍后将在本模块中使用该名称。
-
创建 IAM policy 并将其添加到 Lambda 函数
- 现在我们已创建表,下面来编辑 Lambda 函数以便能够在其中写入数据。在新建浏览器窗口中,打开 AWS Lambda 控制台。
- 选择我们在模块 2 中创建的函数(如果您使用我们的示例,它将被命名为 HelloWorldFunction)。如果没有看到该函数,请查看右上角姓名旁的“区域”下拉列表,确保您所在的区域与创建该函数的区域相同。
- 我们将添加权限到函数中,以便它可以使用 DynamoDB 服务,我们将使用 AWS Identity and Access Management(IAM)执行此操作。
- 选择配置选项卡,然后从右侧菜单中选择权限。
- 在执行角色”框的角色名称下,选择链接。新的浏览器选项卡将打开。
- 在权限策略框中,打开添加权限下拉列表并选择创建内联策略。
- 选择 JSON 选项卡。
- 将以下策略复制到文本区域中,注意替换第 15 行中资源字段中的表 ARN:
{ "Version": "2012-10-17", "Statement": [ { "Sid": "VisualEditor0", "Effect": "Allow", "Action": [ "dynamodb:PutItem", "dynamodb:DeleteItem", "dynamodb:GetItem", "dynamodb:Scan", "dynamodb:Query", "dynamodb:UpdateItem" ], "Resource": "YOUR-TABLE-ARN" } ] }9.此策略将允许我们的 Lambda 函数读取、编辑或删除项目,但限制它只能在我们创建的表中执行这些操作。
10.选择蓝色的查看策略按钮。
11.在名称旁,输入 HelloWorldDynamoPolicy。
12.选择蓝色的创建策略按钮。
13.您现在可以关闭此浏览器选项卡并返回您的 Lambda 函数选项卡。
-
修改 Lambda 函数以写入 DynamoDB 表
-
Python
-
JavaScript
-
Java
-
Python
-
- 选择代码选项卡,然后从代码编辑器左侧的导航窗格中选择您的函数。
- 使用以下代码替换函数的代码:
# import the json utility package since we will be working with a JSON object import json # import the AWS SDK (for Python the package name is boto3) import boto3 # import time import time # import two packages to help us with dates and date formatting # create a DynamoDB object using the AWS SDK dynamodb = boto3.resource('dynamodb') # use the DynamoDB object to select our table table = dynamodb.Table('HelloWorldDatabase') # define the handler function that the Lambda service will use as an entry point def lambda_handler(event, context): # Get the current GMT time gmt_time = time.gmtime() # store the current time in a human readable format in a variable # Format the GMT time string now = time.strftime('%a, %d %b %Y %H:%M:%S +0000', gmt_time) # extract values from the event object we got from the Lambda service and store in a variable name = event['firstName'] +' '+ event['lastName'] # write name and time to the DynamoDB table using the object we instantiated and save response in a variable response = table.put_item( Item={ 'ID': name, 'LatestGreetingTime':now }) # return a properly formatted JSON object return { 'statusCode': 200, 'body': json.dumps('Hello from Lambda, ' + name) }3. 选择代码编辑器顶部的部署按钮
- 选择代码选项卡,然后从代码编辑器左侧的导航窗格中选择您的函数。
-
JavaScript
-
- 选择代码选项卡,然后从代码编辑器左侧的导航窗格中选择您的函数。
- 使用以下代码替换函数的代码:
// Include the AWS SDK module const AWS = require('aws-sdk'); // Instantiate a DynamoDB document client with the SDK let dynamodb = new AWS.DynamoDB.DocumentClient(); // Use built-in module to get current date & time let date = new Date(); // Store date and time in human-readable format in a variable let now = date.toISOString(); // Define handler function, the entry point to our code for the Lambda service // We receive the object that triggers the function as a parameter exports.handler = async (event) => { // Extract values from event and format as strings let name = JSON.stringify(`Hello from Lambda, ${event.firstName} ${event.lastName}`); // Create JSON object with parameters for DynamoDB and store in a variable let params = { TableName:'HelloWorldDatabase', Item: { 'ID': name, 'LatestGreetingTime': now } }; // Using await, make sure object writes to DynamoDB table before continuing execution await dynamodb.put(params).promise(); // Create a JSON object with our response and store it in a constant const response = { statusCode: 200, body: name }; // Return the response constant return response; };3. 选择代码编辑器顶部的部署按钮。
- 选择代码选项卡,然后从代码编辑器左侧的导航窗格中选择您的函数。
-
Java
-
- 选择 Configuration(配置)选项卡。
- 转至函数代码并上传以下 JAR 文件。(在本教程中,我们将跳过部署包的创建。)
- 将句柄更新为 com.example.app.SavePersonHandler::handleRequest。
-
-
测试更改
- 选择橙色的测试按钮。
- 您应该会看到绿色背景的执行结果:成功消息。
- 在新浏览器选项卡中,打开 DynamoDB 控制台。
- 在左侧导航窗格中,选择表 > 浏览项目。
- 选择我们本模块中之前创建的 HelloWorldDatabase。
- 选择右侧的项目选项卡。
- 与您的测试事件匹配的项目将显示在已返回项目下方。 如果您一直在使用我们的示例,那么项目 ID 将是 Hello from Lambda、Ada Lovelace 或 Ada Lovelace。
- 您的 Lambda 函数每次执行时,都将更新 DynamoDB 表。如果使用相同的名称,只能更改时间戳。
应用程序架构
完成模块 4 后,我们来看看当前的架构:
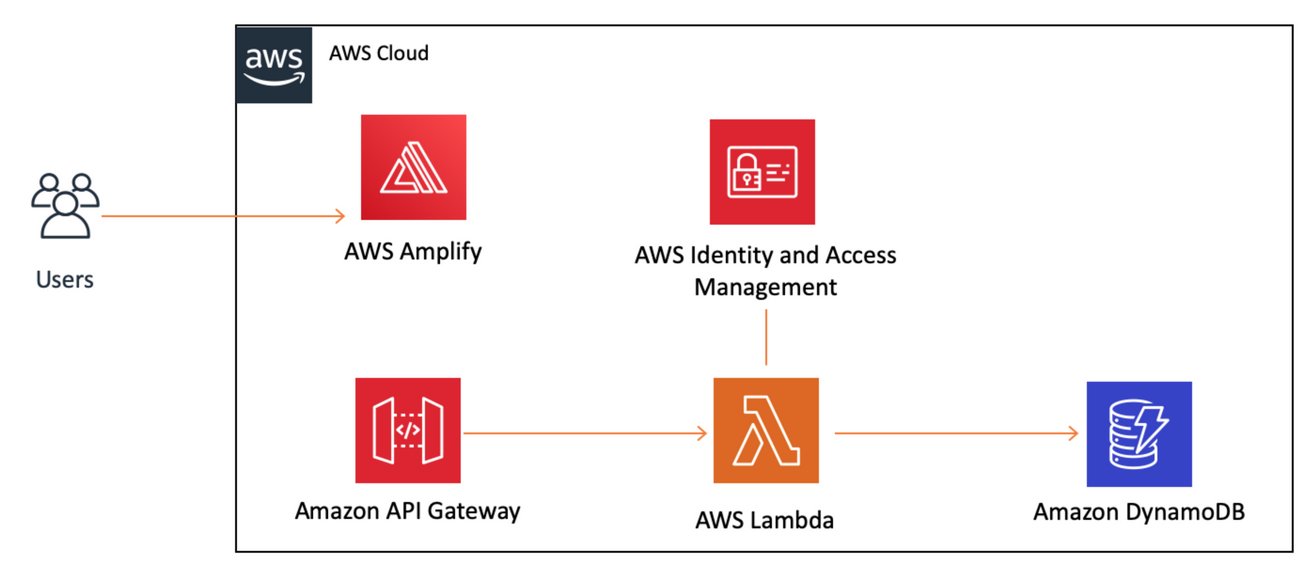
我们在本模块中添加了两项服务:DynamoDB(用户存储)和 IAM(用于安全地管理权限)。这两项服务都与我们的 Lambda 函数连接,因此可以写入到我们的数据库。最后一步是将代码添加到客户端中,以调用 API Gateway。