使用 AWS Copilot、Amazon ECS、Docker 和 AWS Fargate 将单体应用程序分解为多个微服务
概述
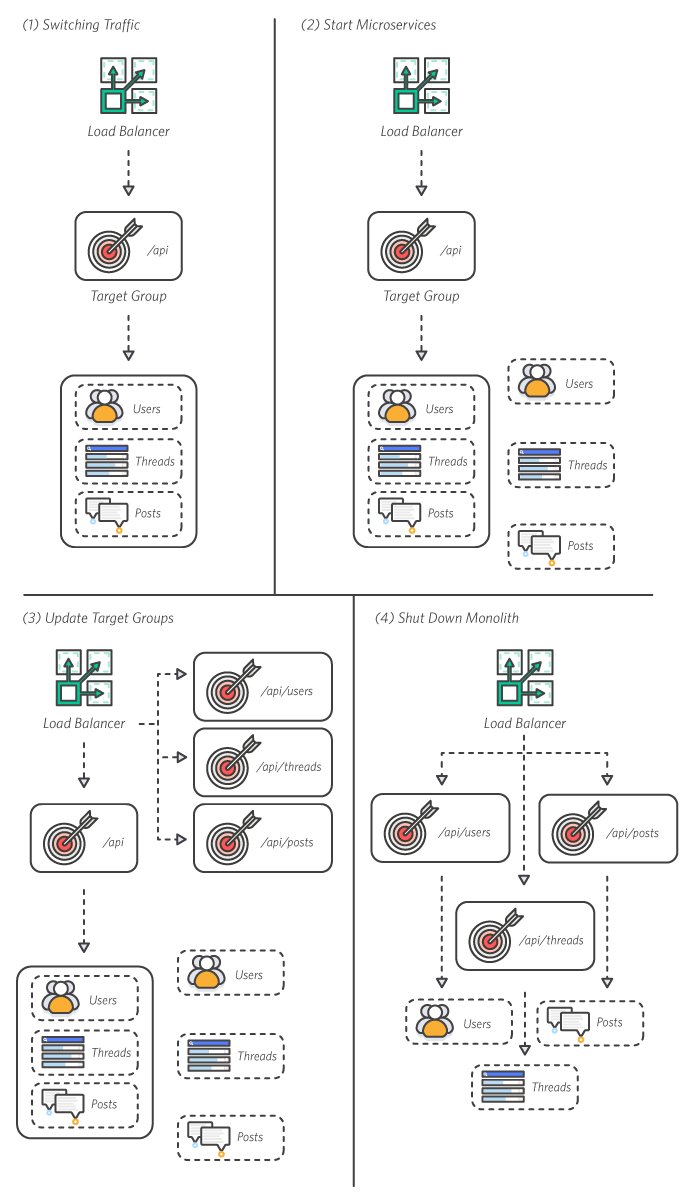
部署微服务并安全地将应用程序流量从单体服务切换到微服务。
1.切换流量 – 这是初始配置。Node.js 单体应用程序在 Amazon ECS 的容器中运行。
2.启动微服务 – 使用 AWS Copilot 构建并推送到 Amazon ECR 的三个容器镜像,您将在现有的 Amazon ECS 集群上启动三个微服务。
3.关闭单体服务 – 删除单体服务会将流量路由到正在运行的微服务。
操作步骤
请按照以下分步指南部署微服务。
bash
copilot svc deploy --name posts
Only found one environment, defaulting to: api
Building your container image: docker build -t 837028011264.dkr.ecr.us-east-1.amazonaws.com/api/posts --platform linux/x86_64 /Users/sparaaws/github/spara/amazon-ecs-nodejs-microservices/3-microservices/services/posts -f /Users/sparaaws/github/spara/amazon-ecs-nodejs-microservices/3-microservices/services/posts/Dockerfile
[+] Building 1.6s (10/10) FINISHED
 => [internal] load build definition from Dockerfile                                                                                      0.1s
 => => transferring dockerfile: 36B                                                                                                       0.0s
 => [internal] load .dockerignore                                                                                                         0.0s
 => => transferring context: 2B                                                                                                           0.0s
 => [internal] load metadata for docker.io/mhart/alpine-node:7.10.1                                                                       1.0s
 => [auth] mhart/alpine-node:pull token for registry-1.docker.io                                                                          0.0s
 => [internal] load build context                                                                                                         0.0s
 => => transferring context: 147B                                                                                                         0.0s
 => [1/4] FROM docker.io/mhart/alpine-node:7.10.1@sha256:d334920c966d440676ce9d1e6162ab544349e4a4359c517300391c877bcffb8c                 0.0s
 => => resolve docker.io/mhart/alpine-node:7.10.1@sha256:d334920c966d440676ce9d1e6162ab544349e4a4359c517300391c877bcffb8c                 0.0s
 => CACHED [2/4] WORKDIR /srv                                                                                                             0.0s
 => CACHED [3/4] ADD . .                                                                                                                  0.0s
 => CACHED [4/4] RUN npm install                                                                                                          0.0s
 => exporting to image                                                                                                                    0.1s
 => => exporting layers                                                                                                                   0.0s
 => => writing image sha256:b97d6e203a072a0ed3885414d5cc1f35baa9bbd46f74f122c4a3154a36e5e6a4                                              0.0s
 => => naming to 837028011264.dkr.ecr.us-east-1.amazonaws.com/api/posts                                                                   0.0s

Use 'docker scan' to run Snyk tests against images to find vulnerabilities and learn how to fix them
Login Succeeded

Logging in with your password grants your terminal complete access to your account.
For better security, log in with a limited-privilege personal access token. Learn more at https://docs.docker.com/go/access-tokens/
Using default tag: latest
The push refers to repository [837028011264.dkr.ecr.us-east-1.amazonaws.com/api/posts]
8b3af4325a20: Pushed
9b446d573a92: Pushed
5f70bf18a086: Pushed
3e893534526a: Pushed
040fd7841192: Pushed
latest: digest: sha256:82749ddab70e1657feaa97134150e6d39abe32b3710538b37398996dc546e442 size: 1365
✔ Proposing infrastructure changes for stack api-api-posts
- Creating the infrastructure for stack api-api-posts                         [create complete]  [216.9s]
  - Service discovery for your services to communicate within the VPC         [create complete]  [3.6s]
  - Update your environment's shared resources                                [create complete]  [38.0s]
  - An IAM role to update your environment stack                              [create complete]  [19.5s]
  - An IAM Role for the Fargate agent to make AWS API calls on your behalf    [create complete]  [19.5s]
  - A HTTP listener rule for forwarding HTTP traffic                          [create complete]  [2.5s]
  - A custom resource assigning priority for HTTP listener rules              [create complete]  [3.8s]
  - A CloudWatch log group to hold your service logs                          [create complete]  [3.6s]
  - An IAM Role to describe load balancer rules for assigning a priority      [create complete]  [19.5s]
  - An ECS service to run and maintain your tasks in the environment cluster  [create complete]  [111.3s]
    Deployments
               Revision  Rollout      Desired  Running  Failed  Pending
      PRIMARY  2         [completed]  1        1        0       0
  - A target group to connect the load balancer to your service               [create complete]  [12.5s]
  - An ECS task definition to group your containers and run them on ECS       [create complete]  [0.0s]
  - An IAM role to control permissions for the containers in your tasks       [create complete]  [37.0s]
✔ Deployed service posts.
Recommended follow-up action:
  - You can access your service at http://api-a-Publi-7HVMVCJEP59-1269931118.us-east-1.elb.amazonaws.com/api/posts over the internet.
Deploy the threads and users microservices.
步骤 1:部署微服务
对于每个微服务,输入 copilot svc deploy --name <微服务名称>。与 monolith 服务类似,AWS Copilot 会为微服务构建容器,将其推送到存储库,并将其部署在运行于 Fargate 上的 Amazon ECS 集群中。
部署 threads 和 users 微服务。
bash
$ copilot svc deploy --name threads

$ copilot svc deploy --name users您可以使用之前的请求来验证微服务是否已正确部署并正常运行。
bash
{"id":2,"title":"Party at the candy kingdom tomorrow","createdBy":3}您可以使用之前的请求来验证微服务是否已正确部署并正常运行。
bash
[{"thread":1,"text":"Has anyone checked on the lich recently?","user":4},{"thread":1,"text":"I'll stop by and see how he's doing tomorrow!","user":2},{"thread":2,"text":"Come party with the candy people tomorrow!","user":3},{"thread":2,"text":"Mathematical!","user":2},{"thread":2,"text":"I'll bring my guitar","user":1},{"thread":3,"text":"I need a new guitar to play the most savory licks in Ooo","user":1}]
您可以使用之前的请求来验证微服务是否已正确部署并正常运行。
bash
[{"thread":1,"text":"Has anyone checked on the lich recently?","user":4},{"thread":1,"text":"I'll stop by and see how he's doing tomorrow!","user":2}]