使用 AWS Copilot、Amazon ECS、Docker 和 AWS Fargate 将单体应用程序分解为多个微服务


模块 2:容器化并部署单体应用程序
概述
通过容器,您可以轻松地将应用程序的代码、配置和依赖项打包成易于使用的构建模块,以实现环境一致性、运维效率、开发人员生产力和版本控制。无论部署环境如何,容器都能帮助确保应用程序快速、可靠且一致地部署。
为什么要使用容器?
启动包含新版本代码的容器无需大量部署开销。由于开发人员本地机器上容器中构建的代码可以通过简单地移动容器轻松转移到测试服务器,因此提高了运维效率。在构建时,此容器可以链接到运行应用程序堆栈所需的其他容器。
依赖项控制和管道改进
Docker 容器镜像是应用程序代码和依赖项在特定时间点的快照。这使工程组织能够为应用程序生命周期创建标准管道。例如:
- 开发人员在本地构建并运行容器。
- 持续集成服务器运行相同的容器,并对其执行集成测试,以确保其符合预期。
- 在预发布环境中部署相同的容器,可以在该环境中通过负载测试或手动 QA 检查容器运行时行为。
- 在生产环境中部署相同的容器。
由于能够在集成和部署管道的所有阶段中构建、测试、运输和运行完全相同的容器,可以更加轻松地交付高质量、高可靠性的应用程序。
密度和资源效率
通过允许多个异构进程在单个系统上运行,容器可以提高资源效率。容器所采用的隔离和分配技术可以提升资源效率。您可以限制容器使用主机的 CPU 和内存数量。通过了解容器需要哪些资源以及底层主机服务器可提供哪些资源,您可以合理调整小型主机上的计算资源,或增加在单个大型主机上运行的进程密度,从而提高可用性并优化资源消耗。
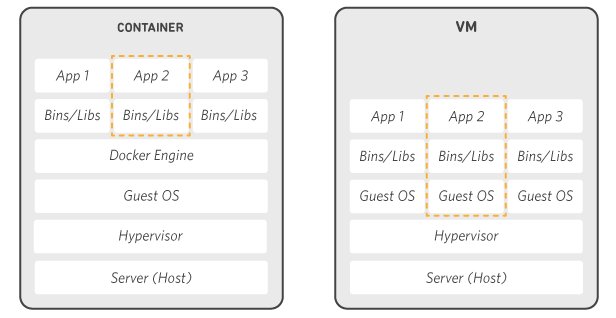
灵活性
Docker 容器的灵活性基于其可移植性、易部署性和小体积。与虚拟机需要安装和配置不同,将服务打包到容器中可以带来以下优势:服务可以在主机之间轻松迁移;容器相互隔离,不受其他相邻服务故障的影响;容器内的服务不会受到主机系统错误补丁或软件升级的干扰。
应用程序概览
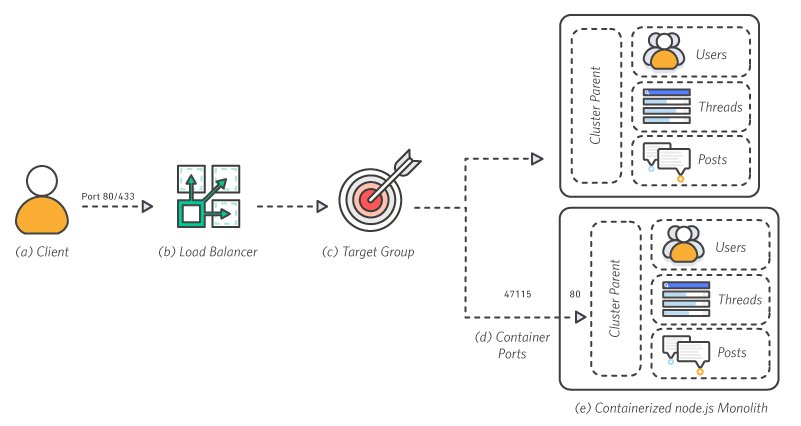
a. 客户端 – 客户端通过 80 端口向负载均衡器发出请求。
b. 负载均衡器 – 负载均衡器在所有可用端口上分发请求。
c. 目标组 – 在应用程序的目标组中注册实例。
d. 容器端口 – 每个容器运行一个应用程序进程,该进程将 Node.js 集群父进程绑定到其命名空间内的 80 端口。
e. 容器化的 Node.js 单体应用程序 - Node.js 集群父进程负责将流量分发给单体应用程序中的工作进程。这种架构已经容器化,但仍然是单体架构,因为每个容器都具有与其他容器相同的所有功能。
什么是 Amazon ECS?
Amazon ECS 是一种高度可扩展、高性能的容器管理服务,支持 Docker 容器,允许您在 Amazon EC2 实例的托管集群上轻松运行应用程序。只需通过简单的 API 调用,您可以启动和停止支持 Docker 的应用程序、查询集群的完整状态,并访问许多熟悉的功能,如安全组、弹性负载均衡、EBS 卷和 IAM 角色。
您可以根据资源需求和可用性要求,使用 Amazon ECS 调度容器在集群内的部署位置。此外,您还可以集成自有调度器或第三方调度器,以满足特定于业务或应用程序的需求。
使用 Amazon ECS 不会产生额外费用。您只需为存储和运行应用程序而创建的 AWS 资源(例如 EC2 实例或 EBS 卷)付费。
学习目标
在本模块中,您将使用 Amazon ECS 实例化 EC2 计算实例的托管集群,并将镜像部署为在集群上运行的容器。
操作步骤
请按照以下分布指南操作,使用 AWS Copilot 部署 Node.js 应用程序。
步骤 1:创建 AWS Copilot 应用程序
AWS Copilot Application 是服务和环境的集合,可以将其看作是对正在构建的内容的一种标识。在本例中,我们使用 Node.js 构建了一个单体应用程序形式的 API,并将其标识为一个 AWS Copilot Application。在此步骤中,您将创建一个新的空应用程序。在终端或命令提示符中,输入以下命令并将应用程序命名为 api。
$ cd ./amazon-ecs-nodejs-microservices/
$ copilot app initAWS Copilot 应用程序将创建一个空应用程序,包含用于管理 StackSets、ECR 存储库、KMS 密钥和 S3 存储桶的角色。此外,还将在存储库中创建一个本地目录,用于存储应用程序和服务的配置文件。
步骤 2:创建环境
$ copilot env init
Environment name: api

  Which credentials would you like to use to create api?  [Use arrows to move, type to filter, ? for more help]
    Enter temporary credentials
> [profile default]Environment name: api
Credential source: [profile default]
Would you like to use the default configuration for a new environment?
- A new VPC with 2 AZs, 2 public subnets and 2 private subnets
- A new ECS Cluster
- New IAM Roles to manage services and jobs in your environment
[Use arrows to move, type to filter]
> Yes, use default.
Yes, but I'd like configure the default resources (CIDR ranges, AZs).
No, I'd like to import existing resources (VPC, subnets).Environment name: api
Credential source: [profile default]
Default environment configuration? Yes, use default.
✔ Wrote the manifest for environment api at copilot/environments/api/manifest.yml
- Update regional resources with stack set "api-infrastructure" [succeeded] [0.0s]
- Update regional resources with stack set "api-infrastructure" [succeeded] [130.8s]
- Update resources in region "us-east-1" [create complete] [130.4s]
- ECR container image repository for "monolith" [create complete] [2.5s]
- KMS key to encrypt pipeline artifacts between stages [create complete] [124.5s]
- S3 Bucket to store local artifacts [create complete] [2.4s]
✔ Proposing infrastructure changes for the api-api environment.
- Creating the infrastructure for the api-api environment. [create complete] [56.0s]
- An IAM Role for AWS CloudFormation to manage resources [create complete] [22.4s]
- An IAM Role to describe resources in your environment [create complete] [25.0s]
✔ Provisioned bootstrap resources for environment api in region us-east-1 under application api.步骤 3:部署环境
$ copilot env deploy --name api

✔ Proposing infrastructure changes for the api-api environment.
- Creating the infrastructure for the api-api environment.                    [update complete]  [78.3s]
  - An ECS cluster to group your services                                     [create complete]  [7.5s]
  - A security group to allow your containers to talk to each other           [create complete]  [1.4s]
  - An Internet Gateway to connect to the public internet                     [create complete]  [16.0s]
  - Private subnet 1 for resources with no internet access                    [create complete]  [1.7s]
  - Private subnet 2 for resources with no internet access                    [create complete]  [1.7s]
  - A custom route table that directs network traffic for the public subnets  [create complete]  [10.9s]
  - Public subnet 1 for resources that can access the internet                [create complete]  [3.1s]
  - Public subnet 2 for resources that can access the internet                [create complete]  [6.0s]
  - A private DNS namespace for discovering services within the environment   [create complete]  [46.3s]
- A Virtual Private Cloud to control networking of your AWS resources [create complete] [11.6s]步骤 4:创建单体 AWS Copilot 服务
Copilot 服务将运行容器。面向互联网的服务可以是使用 AWS App Runner 的请求驱动的 Web 服务,也可以是预配了具有适当安全组的应用程序或网络负载均衡器并在 Amazon ECS 或 Fargate 上运行的负载均衡的 Web 服务。
其他服务类型包括后端服务,它允许 AWS 服务在应用程序内通信,但不与互联网通信。Worker 服务用于通过 Amazon Simple Queue Service (Amazon SQS) 进行异步的服务间消息传递。
本教程将使用基于负载均衡的 Web 服务实现面向互联网的单体服务。要创建单体服务,请输入 copilot svc init 并选择 Load Balanced Web Service(负载均衡的 Web 服务)。
$ copilot svc init

Note: It's best to run this command in the root of your Git repository.
Welcome to the Copilot CLI! We're going to walk you through some questions
to help you get set up with a containerized application on AWS. An application is a collection of
containerized services that operate together.


  Which workload type best represents your architecture?  [Use arrows to move, type to filter, ? for more help]
    Request-Driven Web Service  (App Runner)
  > Load Balanced Web Service   (Internet to ECS on Fargate)
    Backend Service             (ECS on Fargate)
    Worker Service              (Events to SQS to ECS on Fargate)
Scheduled Job (Scheduled event to State Machine to Fargate)将服务命名为 monolith。
Workload type: Load Balanced Web Service

What do you want to name this service? [? for help] monolith

Choose Enter custom path for your Dockerfile.

Workload type: Load Balanced Web Service
Service name: monolith

  Which Dockerfile would you like to use for monolith?  [Use arrows to move, type to filter, ? for more help]
> Enter custom path for your Dockerfile输入 2-containerized/services/api/Dockerfile 的路径
Service type: Load Balanced Web Service
Service name: monolith
Dockerfile: Enter custom path for your Dockerfile
Dockerfile: 2-containerized/services/api/Dockerfile

✔ Wrote the manifest for service monolith at copilot/monolith/manifest.yml切换目录到 ./amazon-ecs-nodejs-microservices/copilot/monolith,查看 manifest.yml 以了解服务的配置方式。请注意,参数 http 定义了应用程序的路径。Node.js 应用程序 server.js 将基本路由定义为 /。
The manifest for the "monolith" service.
Read the full specification for the "Load Balanced Web Service" type at:
 https://aws.github.io/copilot-cli/docs/manifest/lb-web-service/
Your service name will be used in naming your resources like log groups, ECS services, etc.
name: monolith
type: Load Balanced Web Service

Distribute traffic to your service.
http:
  # Requests to this path will be forwarded to your service.
  # To match all requests you can use the "/" path.
  path: '/'
  # You can specify a custom health check path. The default is "/".
# healthcheck: '/'步骤 5:部署单体 AWS Copilot 服务
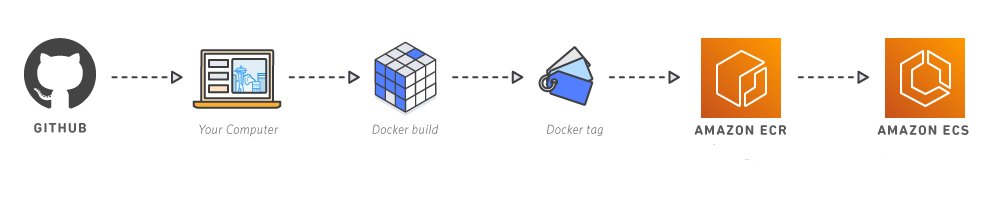
要部署单体服务,请在终端中输入 copilot svc deploy --name monolith。部署服务时,Docker 会在本地构建容器,并将其推送到您的 Elastic Container Registry。服务从注册表中拉取容器并将其部署到环境中。部署完成后,monolith 应用程序将处于运行状态。
$ copilot svc deploy --name monolith
Only found one service, defaulting to: monolith
Only found one environment, defaulting to: api
Building your container image: docker build -t 837028011264.dkr.ecr.us-east-1.amazonaws.com/api/monolith --platform linux/x86_64 /Users/sparaaws/github/spara/amazon-ecs-nodejs-microservices/2-containerized/services/api -f /Users/sparaaws/github/spara/amazon-ecs-nodejs-microservices/2-containerized/services/api/Dockerfile
[+] Building 43.3s (10/10) FINISHED
 => [internal] load build definition from Dockerfile                                                                                                                          0.0s
 => => transferring dockerfile: 36B                                                                                                                                           0.0s
 => [internal] load .dockerignore                                                                                                                                             0.0s
 => => transferring context: 2B                                                                                                                                               0.0s
 => [internal] load metadata for docker.io/mhart/alpine-node:7.10.1                                                                                                           5.6s
 => [auth] mhart/alpine-node:pull token for registry-1.docker.io                                                                                                              0.0s
 => [internal] load build context                                                                                                                                             0.0s
 => => transferring context: 392B                                                                                                                                             0.0s
 => [1/4] FROM docker.io/mhart/alpine-node:7.10.1@sha256:d334920c966d440676ce9d1e6162ab544349e4a4359c517300391c877bcffb8c                                                     0.0s
 => => resolve docker.io/mhart/alpine-node:7.10.1@sha256:d334920c966d440676ce9d1e6162ab544349e4a4359c517300391c877bcffb8c                                                     0.0s
 => CACHED [2/4] WORKDIR /srv                                                                                                                                                 0.0s
 => [3/4] ADD . .                                                                                                                                                             0.0s
 => [4/4] RUN npm install                                                                                                                                                    37.1s
 => exporting to image                                                                                                                                                        0.3s
 => => exporting layers                                                                                                                                                       0.2s
 => => writing image sha256:26ea1872922a12bd3a297c2dd003d1fc71de93e0e5895d2264acca4db3963fbb                                                                                  0.0s
 => => naming to 837028011264.dkr.ecr.us-east-1.amazonaws.com/api/monolith                                                                                                    0.0s

Use 'docker scan' to run Snyk tests against images to find vulnerabilities and learn how to fix them
Login Succeeded

Logging in with your password grants your terminal complete access to your account.
For better security, log in with a limited-privilege personal access token. Learn more at https://docs.docker.com/go/access-tokens/
Using default tag: latest
The push refers to repository [837028011264.dkr.ecr.us-east-1.amazonaws.com/api/monolith]
bc590299ddf7: Pushed
947736d9bac9: Pushed
5f70bf18a086: Pushed
3e893534526a: Pushed
040fd7841192: Pushed
latest: digest: sha256:721adc83096c12f21d61bb73d7ea6d296269cce607178676492aaa1f6cdad6bc size: 1365步骤 6:确认部署
部署完成后,AWS Copilot 会在输出中打印服务的 URL。
✔ Proposing infrastructure changes for stack api-api-monolith
- Creating the infrastructure for stack api-api-monolith                          [create complete]    [360.8s]
  - Service discovery for your services to communicate within the VPC             [create complete]    [0.0s]
  - Update your environment's shared resources                                    [update complete]    [149.9s]
    - A security group for your load balancer allowing HTTP traffic               [create complete]    [5.9s]
    - An Application Load Balancer to distribute public traffic to your services  [create complete]    [123.0s]
    - A load balancer listener to route HTTP traffic                              [create in progress]  [198.5s]
  - An IAM role to update your environment stack                                  [create complete]    [23.5s]
  - An IAM Role for the Fargate agent to make AWS API calls on your behalf        [create complete]    [19.9s]
  - A HTTP listener rule for forwarding HTTP traffic                              [create complete]    [3.5s]
  - A custom resource assigning priority for HTTP listener rules                  [create complete]    [5.1s]
  - A CloudWatch log group to hold your service logs                              [create complete]    [1.5s]
  - An IAM Role to describe load balancer rules for assigning a priority          [create complete]    [23.5s]
  - An ECS service to run and maintain your tasks in the environment cluster      [create complete]    [117.0s]
    Deployments
               Revision  Rollout      Desired  Running  Failed  Pending
      PRIMARY  1         [completed]  1        1        0       0
  - A target group to connect the load balancer to your service                   [create complete]    [15.0s]
  - An ECS task definition to group your containers and run them on ECS           [create complete]    [0.0s]
  - An IAM role to control permissions for the containers in your tasks           [create complete]    [23.5s]
✔ Deployed service monolith.
Recommended follow-up action:
- You can access your service at http://api-a-Publi-DU44D9VOSXLA-792918025.us-east-1.elb.amazonaws.com over the internet.您可以在浏览器中输入查询来测试应用程序的部署,例如:
http://<application-string>.us-east-1.elb.amazonaws.com/api/users/3
{"id":3,"username":"pb","name":"Bonnibel Bubblegum","bio":"Scientist, bearer of candy power, ruler of the candy kingdom"}{"id":2,"title":"Party at the candy kingdom tomorrow","createdBy":3}[{"thread":1,"text":"Has anyone checked on the lich recently?","user":4},{"thread":1,"text":"I'll stop by and see how he's doing tomorrow!","user":2},{"thread":2,"text":"Come party with the candy people tomorrow!","user":3},{"thread":2,"text":"Mathematical!","user":2},{"thread":2,"text":"I'll bring my guitar","user":1},{"thread":3,"text":"I need a new guitar to play the most savory licks in Ooo","user":1}][{"thread":1,"text":"Has anyone checked on the lich recently?","user":4},{"thread":1,"text":"I'll stop by and see how he's doing tomorrow!","user":2}]下一项:拆分单体应用程序