AWS Big Data Blog
Orchestrate Amazon Redshift-Based ETL workflows with AWS Step Functions and AWS Glue
April 2024: This post was reviewed for accuracy.
Amazon Redshift is a fully managed, petabyte-scale data warehouse service in the cloud that offers fast query performance using the same SQL-based tools and business intelligence applications that you use today. Many customers also like to use Amazon Redshift as an extract, transform, and load (ETL) engine to use existing SQL developer skillsets, to quickly migrate pre-existing SQL-based ETL scripts, and—because Amazon Redshift is fully ACID-compliant—as an efficient mechanism to merge change data from source data systems.
In this post, I show how to use AWS Step Functions and AWS Glue Python Shell to orchestrate tasks for those Amazon Redshift-based ETL workflows in a completely serverless fashion. AWS Glue Python Shell is a Python runtime environment for running small to medium-sized ETL tasks, such as submitting SQL queries and waiting for a response. Step Functions lets you coordinate multiple AWS services into workflows so you can easily run and monitor a series of ETL tasks. Both AWS Glue Python Shell and Step Functions are serverless, allowing you to automatically run and scale them in response to events you define, rather than requiring you to provision, scale, and manage servers.
While many traditional SQL-based workflows use internal database constructs like triggers and stored procedures, separating workflow orchestration, task, and compute engine components into standalone services allows you to develop, optimize, and even reuse each component independently. So, while this post uses Amazon Redshift as an example, my aim is to more generally show you how to orchestrate any SQL-based ETL.
Prerequisites
If you want to follow along with the examples in this post using your own AWS account, you need a Virtual Private Cloud (VPC) with at least two private subnets that have routes to an S3 VPC endpoint.
If you don’t have a VPC, or are unsure if yours meets these requirements, I provide an AWS CloudFormation template stack you can launch by selecting the following button. Provide a stack name on the first page and leave the default settings for everything else. Wait for the stack to display Create Complete (this should only take a few minutes) before moving on to the other sections.
![]()
Scenario
For the examples in this post, I use the Amazon Customer Reviews Dataset to build an ETL workflow that completes the following two tasks which represent a simple ETL process.
- Task 1: Move a copy of the dataset containing reviews from the year 2015 and later from S3 to an Amazon Redshift table.
- Task 2: Generate a set of output files to another Amazon S3 location which identifies the “most helpful” reviews by market and product category, allowing an analytics team to glean information about high quality reviews.
This dataset is publicly available via an Amazon Simple Storage Service (Amazon S3) bucket. Complete the following tasks to get set up.
Solution overview
The following diagram highlights the solution architecture from end to end:

The steps in this process are as follows:
- The state machine launches a series of runs of an AWS Glue Python Shell job (more on how and why I use a single job later in this post!) with parameters for retrieving database connection information from AWS Secrets Manager and an .sql file from S3.
- Each run of the AWS Glue Python Shell job uses the database connection information to connect to the Amazon Redshift cluster and submit the queries contained in the .sql file.
- For Task 1: The cluster utilizes Amazon Redshift Spectrum to read data from S3 and load it into an Amazon Redshift table. Amazon Redshift Spectrum is commonly used as an means for loading data to Amazon Redshift. (See Step 7 of Twelve Best Practices for Amazon Redshift Spectrum for more information.)
- For Task 2: The cluster executes an aggregation query and exports the results to another Amazon S3 location via UNLOAD.
- The state machine may send a notification to an Amazon Simple Notification Service (SNS) topic in the case of pipeline failure.
- Users can query the data from the cluster and/or retrieve report output files directly from S3.
I include an AWS CloudFormation template to jumpstart the ETL environment so that I can focus this post on the steps dedicated to building the task and orchestration components. The template launches the following resources:
- Amazon Redshift Cluster
- Secrets Manager secret for storing Amazon Redshift cluster information and credentials
- S3 Bucket preloaded with Python scripts and .sql files
- Identity and Access Management (IAM) Role for AWS Glue Python Shell jobs
See the following resources for how to complete these steps manually:
- Create a Redshift Cluster in a VPC
- Creating and Managing Secrets with AWS Secrets Manager
- Getting Started with Simple Storage Service (S3)
- Create IAM Roles
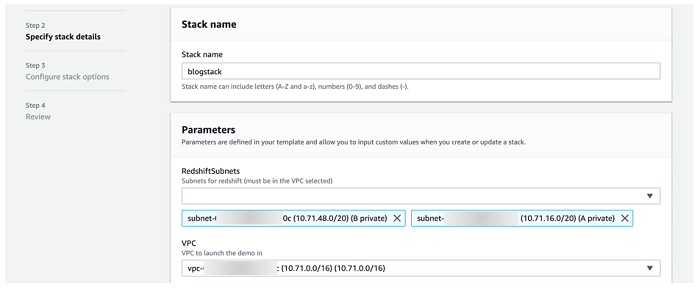
![]()
Be sure to select at least two private subnets and the corresponding VPC, as shown in the following screenshot. If you are using the VPC template from above, the VPC appears as 10.71.0.0/16 and the subnet names are A private and B private.
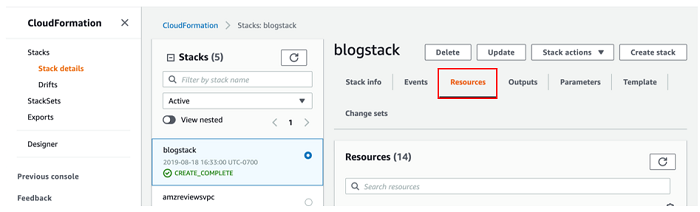
The stack should take 10-15 minutes to launch. Once it displays Create Complete, you can move on to the next section. Be sure to take note of the Resources tab in the AWS CloudFormation console, shown in the following screenshot, as I refer to these resources throughout the post.
Building with AWS Glue Python Shell
Begin by navigating to AWS Glue in the AWS Management Console.
Making a connection
Amazon Redshift cluster resides in a VPC, so you first need to create a connection using AWS Glue. Connections contain properties, including VPC networking information, needed to access your data stores. You eventually attach this connection to your Glue Python Shell Job so that it can reach your Amazon Redshift cluster.
Select Connections from the menu bar, and then select Add connection. Give your connection a name like blog_rs_connection, select Amazon Redshift as the Connection type, and then select Next, as shown in the following screenshot.

Under Cluster, enter the name of the cluster that the AWS CloudFormation template launched, i.e blogstack-redshiftcluster-####. Because the Python code I provide for this blog already handles credential retrieval, the rest of the values around database information you enter here are largely placeholders. The key information you are associating with the connection is networking-related.
Please note that you are not able to test the connection without the correct cluster information. If you are interested in doing so, note that Database name and Username are auto-populated after selecting the correct cluster, as shown in the following screenshot. Follow the instructions here to retrieve the password information from Secrets Manager to copy into the Password field.

ETL code review
Take a look at the two main Python scripts used in this example:
Pygresql_redshift_common.py is a set of functions that can retrieve cluster connection information and credentials from Secrets Manger, make a connection to the cluster, and submit queries respectively. By retrieving cluster information at runtime via a passed parameter, these functions allow the job to connect to any cluster to which it has access. You can package these functions into a library by following the instructions to create a python .egg file (already completed as a part of the AWS CloudFormation template launch). Note that AWS Glue Python Shell supports several python libraries natively.
The AWS Glue Python Shell job runs rs_query.py when called. It starts by parsing job arguments that are passed at invocation. It uses some of those arguments to retrieve a .sql file from S3, then connects and submits the statements within the file to the cluster using the functions from pygresql_redshift_common.py. So, in addition to connecting to any cluster using the Python library you just packaged, it can also retrieve and run any SQL statement. This means you can manage a single AWS Glue Python Shell job for all of your Amazon Redshift-based ETL by simply passing in parameters on where it should connect and what it should submit to complete each task in your pipeline.
Creating the Glue Python Shell Job
Next, put that code into action:
- Navigate to Jobs on the left menu of the AWS Glue console page and from there, select Add job.
- Give the job a name like blog_rs_query.
- For the IAM role, select the same GlueExecutionRole you previously noted from the Resources section of the AWS CloudFormation console.
- For Type, select Python shell, leave Python version as the default of Python 3, and for This job runs select An existing script that you provide.
- For S3 path where the script is stored, navigate to the script bucket created by the AWS CloudFormation template (look for ScriptBucket in the Resources), then select the python/py file.
- Expand the Security configuration, script libraries, and job parameters section to add the Python .egg file with the Amazon Redshift connection library to the Python library path. It is also located in the script bucket under python /redshift_module-0.1-py3.6.egg.
When all is said and done everything should look as it does in the following screenshot:

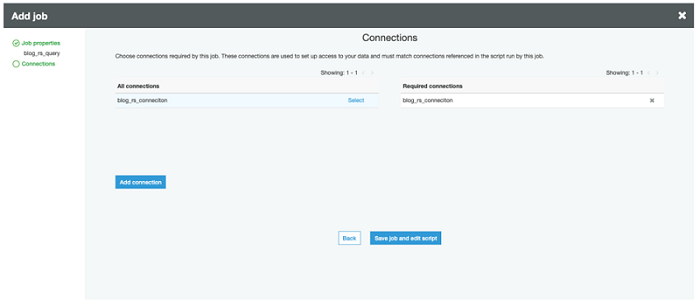
Choose Next. Add the connection you created by choosing Select to move it under Required connections. (Recall from the Making a connection section that this gives the job the ability to interact with your VPC.) Choose Save job and edit script to finish, as shown in the following screenshot.
Test driving the Python Shell job
After creating the job, you are taken to the AWS Glue Python Shell IDE. If everything went well, you should see the rs_query.py code. Right now, the Amazon Redshift cluster is sitting there empty, so use the Python code to run the following SQL statements and populate it with tables.
- Create an external database (amzreviews).
- Create an external table (reviews) from which Amazon Redshift Spectrum can read from the source data in S3 (the public reviews dataset). The table is partitioned by product_category because the source files are organized by category, but in general you should partition on frequently filtered columns (see #4).
- Add partitions to the external table.
- Create an internal table (reviews) local to the Amazon Redshift cluster. product_id works well as a DISTKEY because it has high cardinality, even distribution, and most likely (although not explicitly part of this blog’s scenario) a column that will be used to join with other tables. I choose review_date as a SORTKEY to efficiently filter out review data that is not part of my target query (after 2015). Learn more about how to best choose DISTKEY/SORTKEY as well as additional table design parameters for optimizing performance by reading the Designing Tables documentation.
Do this first job run manually so you can see where all of the elements I’ve discussed come into play. Select Run Job at the top of the IDE screen. Expand the Security configuration, script libraries, and job parameters section. This is where you add in the parameters as key-value pairs, as shown in the following screenshot.
| Key | Value |
| –db | reviews |
| –db_creds | reviewssecret |
| –bucket | <name of s3 script bucket> |
| –file | sql/reviewsschema.sql |

Select Run job to start it. The job should take a few seconds to complete. You can look for log outputs below the code in the IDE to watch job progress.
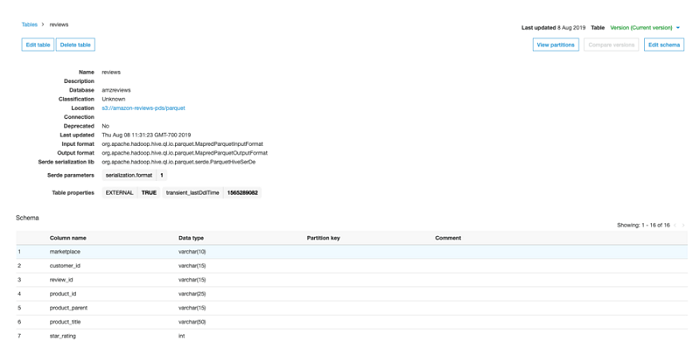
Once the job completes, navigate to Databases in the AWS Glue console and look for the amzreviews database and reviews table, as shown in the following screenshot. If they are there, then everything worked as planned! You can also connect to your Amazon Redshift cluster using the Redshift Query Editor or with your own SQL client tool and look for the local reviews table.
Step Functions Orchestration
Now that you’ve had a chance to run a job manually, it’s time to move onto something more programmatic that is orchestrated by Step Functions.
Launch Template
I provide a third AWS CloudFormation template for kickstarting this process as well. It creates a Step Functions state machine that calls two instances of the AWS Glue Python Shell job you just created to complete the two tasks I outlined at the beginning of this post.
![]()
For BucketName, paste the name of the script bucket created in the second AWS CloudFormation stack. For GlueJobName, type in the name of the job you just created. Leave the other information as default, as shown in the following screenshot. Launch the stack and wait for it to display Create Complete—this should take only a couple of minutes—before moving on to the next section.

Working with the Step Functions State Machine
State Machines are made up of a series of steps, allowing you to stitch together services into robust ETL workflows. You can monitor each step of execution as it happens, which means you can identify and fix problems in your ETL workflow quickly, and even automatically.
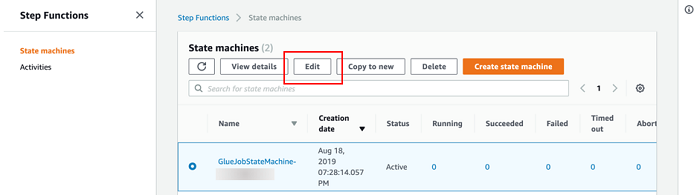
Take a look at the state machine you just launched to get a better idea. Navigate to Step Functions in the AWS Console and look for a state machine with a name like GlueJobStateMachine-######. Choose Edit to view the state machine configuration, as shown in the following screenshot.
It should look as it does in the following screenshot:

As you can see, state machines are created using JSON templates made up of task definitions and workflow logic. You can run parallel tasks, catch errors, and even pause workflows and wait for manual callback to continue. The example I provide contains two tasks for running the SQL statements that complete the goals I outlined at the beginning of the post:
- Load data from S3 using Redshift Spectrum
- Transform and writing data back to S3
Each task contains basic error handling which, if caught, routes the workflow to an error notification task. This example is a simple one to show you how to build a basic workflow, but you can refer to the Step Functions documentation for an example of more complex workflows to help build a robust ETL pipeline. Step Functions also supports reusing modular components with Nested Workflows.
SQL Review
The state machine will retrieve and run the following SQL statements:
As I mentioned previously, Amazon Redshift Spectrum is a great way to run ETL using an INSERT INTO statement. This example is a simple load of the data as it is in S3, but keep in mind you can add more complex SQL statements to transform your data prior to loading.
This statement groups reviews by product, ordered by number of helpful votes, and writes to Amazon S3 using UNLOAD.
State Machine execution
Now that everything is in order, start an execution. From the state machine main page select Start an Execution.

Leave the defaults as they are and select Start to begin execution. Once execution begins you are taken to a visual workflow interface where you can follow the execution progress, as shown in the following screenshot.

Each of the queries takes a few minutes to run. In the meantime, you can watch the Amazon Redshift query logs to track the query progress in real time. These can be found by navigating to Amazon Redshift in the AWS Console, selecting your Amazon Redshift cluster, and then selecting the Queries tab, as shown in the following screenshot.

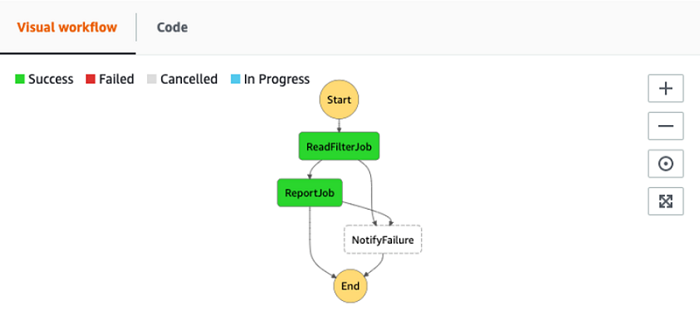
Once you see COMPLETED for both queries, navigate back to the state machine execution. You should see success for each of the states, as shown in the following screenshot.
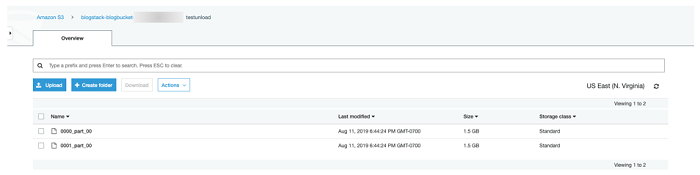
Next, navigate to the data bucket in the S3 AWS Console page (refer to the DataBucket in the CloudFormation Resources tab). If all went as planned, you should see a folder named testunload in the bucket with the unloaded data, as shown in the following screenshot.
Inject Failure into Step Functions State Machine
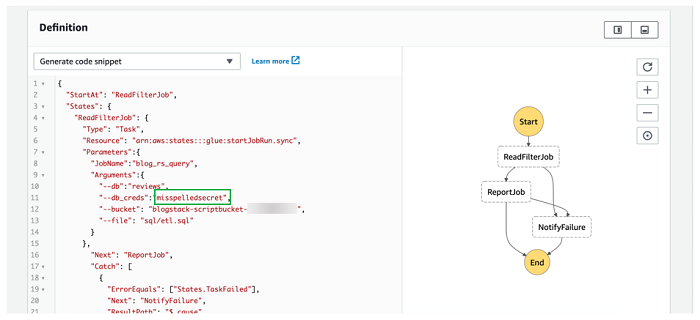
Next, test the error handling component of the state machine by intentionally causing an error. An easy way to do this is to edit the state machine and misspell the name of the Secrets Manager secret in the ReadFilterJob task, as shown in the following screenshot.
If you want the error output sent to you, optionally subscribe to the error notification SNS Topic. Start another state machine execution as you did previously. This time the workflow should take the path toward the NotifyFailure task, as shown in the following screenshot. If you subscribed to the SNS Topic associated with it, you should receive a message shortly thereafter.

The state machine logs will show the error in more detail, as shown in the following screenshot.

Conclusion
In this post I demonstrated how you can orchestrate Amazon Redshift-based ETL using serverless AWS Step Functions and AWS Glue Python Shells jobs. As I mentioned in the introduction, the concepts can also be more generally applied to other SQL-based ETL, so use them to start building your own SQL-based ETL pipelines today!
About the Author
 Ben Romano is a Data Lab solution architect at AWS. Ben helps our customers architect and build data and analytics prototypes in just four days in the AWS Data Lab.
Audit History
Last reviewed and updated in April 2024 by Anusha Challa | Sr. Redshift Solutions Architect