AWS Database Blog
Migrate Db2 z/OS to Amazon Aurora PostgreSQL using AWS DMS and gateway server
Organizations running critical workloads on IBM Db2 databases hosted on z/OS mainframes often look to modernize their data infrastructure by migrating to open source, cloud-based databases such as Amazon Aurora PostgreSQL-Compatible Edition. Migrating to Amazon Aurora can help reduce licensing costs, improve scalability, and align with modern DevOps practices. However, migrating from Db2 on z/OS, especially with periodic full-load refresh requirements, poses unique challenges because of architectural and format differences.
To address these challenges, AWS provides a flexible migration architecture using AWS Database Migration Service (AWS DMS) in combination with a Db2 gateway server deployed on Amazon Elastic Compute Cloud (Amazon EC2). Organizations can use this setup to copy data from their on-premises Db2 on z/OS environment and replicate it on a scheduled basis to Aurora PostgreSQL-Compatible on AWS.
In this post, we show you how to use AWS DMS and a Db2 gateway server to migrate and replicate data from an on-premises Db2 z/OS database to Aurora PostgreSQL. The architecture includes an EC2-based gateway server that serves as a bridge between the mainframe and AWS. AWS DMS handles both the full load and the periodic full-load refresh. We walk you through the setup steps, highlight important configuration options, and use a sample dataset to validate data consistency and periodic full-load refresh synchronization.
Solution overview
This solution supports secure, scalable modernization of Db2 on z/OS workloads by migrating to Aurora PostgreSQL, keeping data synchronized with periodic full-load refresh, and using AWS DMS with a Db2 Connect Server on EC2.
The implementation of this solution consists of the following steps using various AWS services and components:
- Set up an EC2 instance in a private subnet with secure connectivity to the on-premises Db2 z/OS system using a VPN or AWS Direct Connect. This EC2 instance acts as a Db2 gateway server.
- Install and configure IBM Db2 gateway server on the EC2 instance to establish connectivity with the Db2 z/OS database.
- Create an AWS DMS replication instance, source endpoint, and target endpoint, using the EC2 gateway server as a bridge to connect to the Db2 source and Aurora PostgreSQL as the target. For more information, see Choosing the right AWS DMS replication instance for your migration.
- Create an AWS DMS migration task to perform a full load followed by periodic full-load refresh from Db2 to Aurora PostgreSQL.
- Validate migration by running queries to compare row counts, schema objects, and other changes between source and target databases.
The following figure illustrates the data migration architecture with source on-premises Db2 on z/OS, Amazon EC2 based Db2 Connect Server, AWS DMS for data replication, and target Aurora PostgreSQL database cluster.
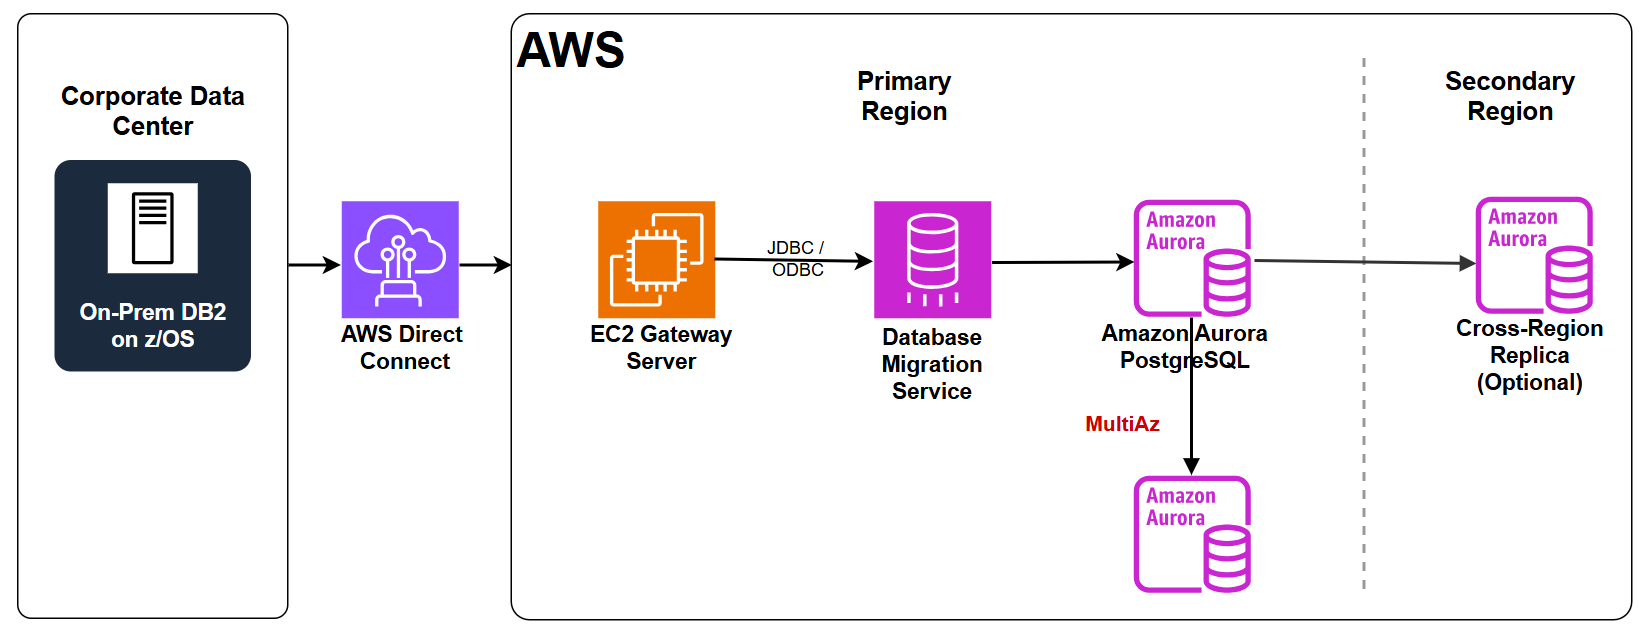
Figure 1: Data migration architecture from on-premises Db2 on z/OS to Amazon Aurora PostgreSQL using AWS DMS and an EC2 gateway server
Prerequisites
Before initiating the migration from Db2 on z/OS to Aurora PostgreSQL, make sure that the following AWS infrastructure and configurations are already in place with suggested versions:
- An active AWS account with all required permissions.
- Aurora PostgreSQL cluster (version 17.4).
- AWS DMS (version 3.6.1).
- EC2 instance with Amazon Linux 2023.
- IBM Db2 Connect Server install file (version 11.5.9, valid IBM Db2 ODBC connect license required).
- On-premises Db2 database on z/OS with necessary firewall rules configured.
- Secure and encrypted on-premises infrastructure to AWS connectivity either using AWS Direct Connect to an AWS VPN or similar method. Also, we are using AWS Key Management Service (AWS KMS) with AWS DMS, Aurora PostgreSQL database and Amazon Elastic Block Store (Amazon EBS) volumes for robust encryption at rest.
- Create an AWS Identity and Access Management (IAM) role for AWS Lambda to use later with this IAM policy:
EC2 instance
In this setup, the EC2 instance functions as a Db2 gateway server, acting as a secure gateway between the AWS environment and the on-premises Db2 database on z/OS system. This Amazon EC2 hosted gateway handles the protocol translation and communication with the mainframe. It hosts the IBM Db2 Connect client, which supports JDBC- or ODBC-based communication with the mainframe so that AWS DMS can pull data securely through this Amazon EC2 intermediary. This setup is essential because AWS DMS doesn’t inherently support direct connectivity to Db2 on z/OS.
Make sure you have an EC2 instance in place with Amazon Linux 2023 and that you have validated connectivity to it.
Install and configure IBM Db2 Connect Server
To access the EC2 instance, follow these steps:
- On the Amazon EC2 console, choose Connect.
- Choose Session Manager.
- Choose Connect.
To install and configure IBM Db2 Connect Server, follow these steps:
- Install required dependencies.
- Update base packages:
- Enable and start AWS Systems Manager Agent (SSM Agent):
- Mount a 6 GB
tmpfs: - Format and mount an Amazon EBS volume:
- Install required dependencies:
- Create
redhat-releaseand expand/tmp: - Download the Db2 installer file (Customer needs valid IBM Db2 ODBC connect license to download this file from the vendor) from Amazon Simple Storage Service (Amazon S3).
Customers must obtain the licensed Db2 Connect binary from IBM and stage it. AWS does not host or distribute the IBM binary.
- Extract the Db2 installer:
- Run the installer while bypassing the OS precheck.
- Run install:
- If you experience issues around the missing OpenSSL 1.1.1 dependency:
- Rerun Db2 install:
After successful installation, perform the following steps on that instance.
- Create Db2 Instance users and groups.
- Add the Db2 port to services:
- Create Db2 users and groups:
- Create the Db2 instance.
- Create the Db2 instance:
- Configure the Db2 instance for TCP/IP.
- Switch to the Db2 instance user:
- Enable TCP/IP:
- Set service port to 4472 (or your preferred port):
- Verify settings:
- Add service entry to
/etc/services: - Start the Db2 instance:
- Verify port listening:
- You should see a line like:
- Adjust firewall and security groups. In the AWS console, update your Amazon EC2 security group to allow inbound TCP 4472 from your AWS DMS replication instance.
- Catalog the backend Db2 database if acting as a gateway.
Example:
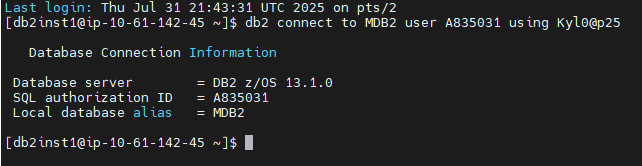
Figure 2: Successful Db2 connection to the MDB2 database from the gateway server
Troubleshooting gateway server installation
Use the following guidance if you run into similar issues with your gateway installation on EC2:
- If you get any library issues, verify your OS has all the needed compatibility libraries installed.
- If you see
/tmpsize errors during installation, overrideTMPDIR:
Create AWS DMS resources
In this section, we show you how to prepare the AWS DMS components, including the replication instance and source and target endpoints. Consider rightsizing the replication instance according to your data volume.
Prerequisites
Before you begin make sure the following is in place:
- VPC with on-premises connectivity using AWS Direct Connect or VPN.
- EC2 data connect gateway.
- Aurora PostgreSQL instance deployed and reachable.
- Security group rule to allow port 4472 (Db2) and 5432 (PostgreSQL).
- AWS Identity and Access Management (IAM) role for AWS DMS is configured.
- Database credentials stored in AWS Secrets Manager or readily available for manual entry.
To create an AWS DMS replication instance, follow these steps:
- On the AWS DMS console, choose Replication instances.
- Choose Create replication instance.
- Enter the following:
- Name:
cbc-db2-postgresql - Instance class: Choose based on your workload
- VPC: Select the same VPC where your EC2 gateway and Aurora PostgreSQL exist
- Multi-Availability Zone (AZ): Optional, recommended for production
- Storage: The minimum is 100 GB, but you can adjust based on your workload
- Name:
Leave the defaults for maintenance and logs unless your use case requires something different. Wait for the instance to become available.
The source endpoint connects to your on-premises Db2 server. To create a source endpoint, follow these steps:
- On the AWS DMS console, choose Endpoints.
- Choose Create endpoint.
- Enter the following:
- Endpoint type: Source
- Endpoint identifier:
db2-test-src-ep - Source engine:
ibm-db2on z/OS - Server name: Private IP or hostname of Db2 server
- Port: 4472
- Database name: MDB2 (your source Db2 database name)
- Username and password: Choose from Secrets Manager or enter them manually
- SSL mode: This is required and recommended for production
- (Optional) Extra connection attributes:
After the endpoint is created successfully, test the endpoint connection using the replication instance cbc-db2-postgresql.
The target endpoint connects to your Aurora PostgreSQL database. To create a target endpoint, follow these steps:
- On the AWS DMS console, choose Endpoints.
- Choose Create endpoint.
- Enter the following:
- Endpoint type: Target
- Endpoint identifier:
rates-target-ep - Target engine:
aurora-postgresql - Server name: Aurora writer endpoint (for example,
aurora-db.cluster-xxxxxxxx.us-east-2.rds.amazonaws.com) - Port: 5432
- Database name: Target database name (for example,
rates_db) - Username and password: Use Secrets Manager or enter them manually
- SSL mode: This is required and recommended for production
- (Optional) Extra connection attributes:
After the endpoint is created successfully, test the endpoint connection using the replication instance cbc-db2-postgresql.
Create an AWS DMS migration task
When migrating data from IBM Db2 to Aurora PostgreSQL, AWS DMS offers a scalable and secure approach. This guide details the step-by-step process to create a DMS migration task after setting up your replication instance and endpoints with appropriate large binary object (LOB) settings and optimized table mapping.
Keep in mind that Full LOB mode is slower than limited mode and strictly bounded by Db2 z/OS limits rather than supporting unlimited sizes. Make sure your environment is ready with these appropriate LOB settings and optimized table mapping (limitations when using Db2 on z/OS as a source for AWS DMS), then follow these steps:
- On the AWS DMS console, choose Create task.
- Define the task settings:
- Task identifier:
cca-rates-db2-postgresql-poc - Replication instance: Select cbc-db2-postgresql
- Source endpoint:
db2-test-src-ep - Target endpoint:
rates-target-ep - Migration type: Choose Migrate existing data
- Enable Start Task on Create
- Task identifier:
- To configure task settings, under Task settings, enter the following:
- Target table preparation mode: Truncate
- Include LOB columns in replication: Full LOB mode
- Enable Logging
- Control table settings: Use the defaults or configure to meet your requirements
- Table mapping rules: Provide your table mapping from source to target.
- Task tags: Optional. Add tags as needed.
Choose Create task. After it is created successfully, start the task.
Validate migration
After you complete the preparations and the AWS DMS migration task has run successfully, you can validate the data migration.
- Make sure you are connected to the right source server on-premises:
- Record the total number of rows from the source tables:
Run these SQL statements against your source database and expected row counts are shown next to each statement.
The following four images confirm the source database name and row counts for the preceding SQL statements.
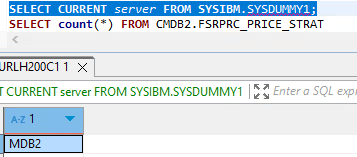
Figure 3: Source server confirmed as MDB2
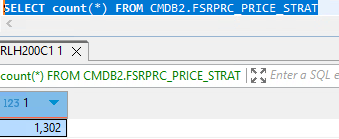
Figure 4: Source row count for CMDB2.FSRPRC_PRICE_STRAT is 1,302 rows
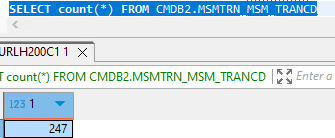
Figure 5: Source row count for CMDB2.MSMTRN_MSM_TRANCD is 247 rows
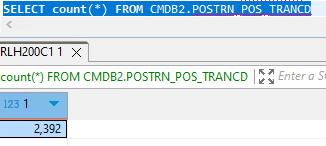
Figure 6: Source row count for CMDB2.POSTRN_POS_TRANCD is 2,392 rows
- Connect to your target Aurora PostgreSQL database from pgAdmin. Record the total number of rows from the matching target tables:
Run these SQL statements against your target database before starting the DMS full-load task and expected row counts are shown next to each statement.
The following image confirms that the target tables contain 0 rows before the full-load task runs.
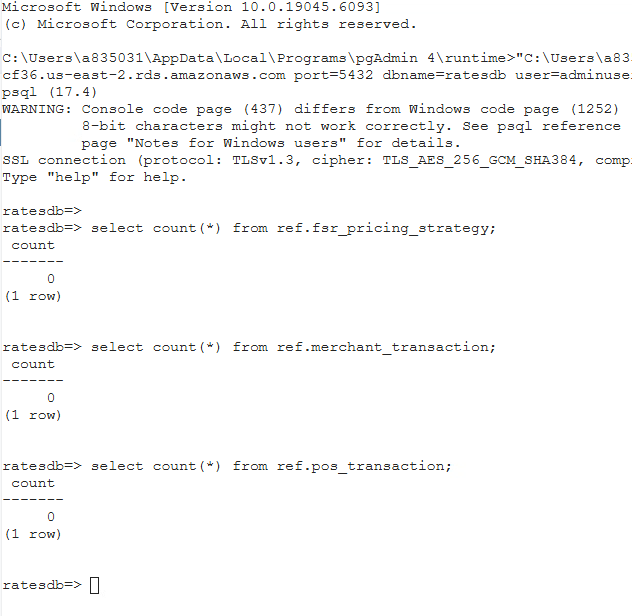
Figure 7: Target Amazon Aurora PostgreSQL row counts of 0 before the full-load task runs
To invoke the AWS DMS database migration task, follow these steps:
- On the AWS DMS console, choose Database migration tasks.
- Choose cca-rates-db2-postgresql-poc, as shown in the following screenshot.
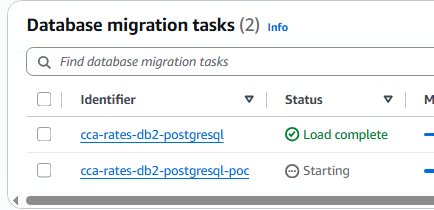
Figure 8: Database migration tasks in the AWS DMS console
- Under Actions, choose Restart/Resume.
To monitor the task, follow these steps:
- In the Database migration tasks section, select cca-rates-db2-postgresql-poc task.
- Go to monitor task status, then table statistics tab.
In the Table statistics section under Load state, confirm that each table has a status of Table completed and check for warnings or errors, as shown in the following screenshot.
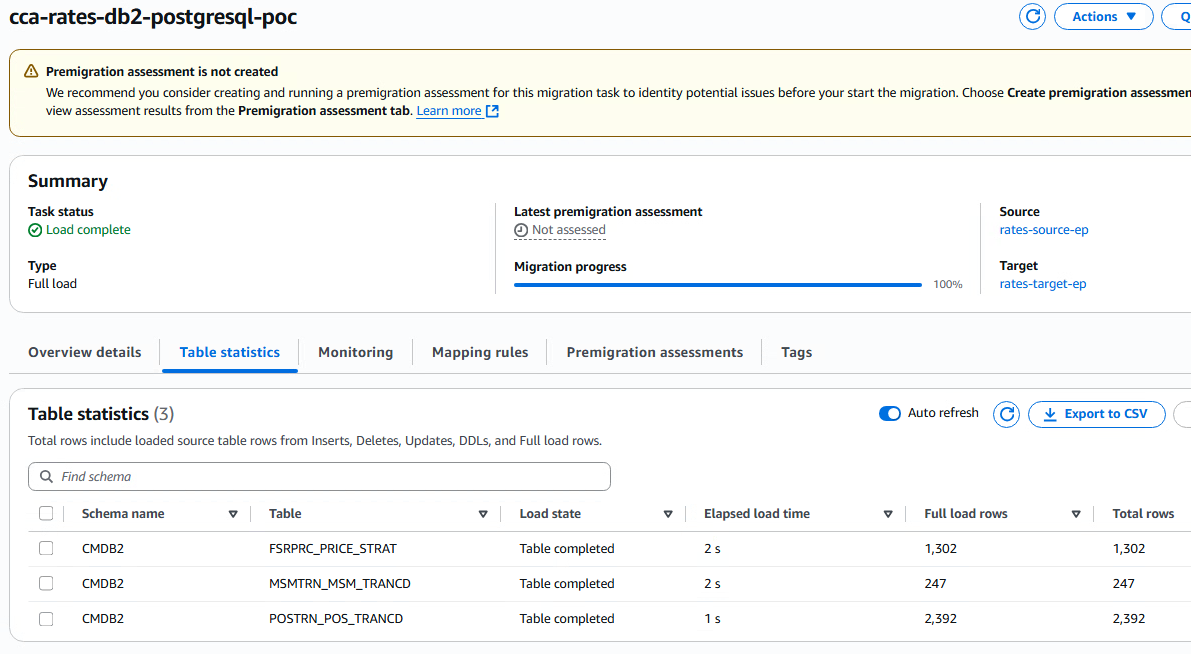
Figure 9: Table statistics showing all three tables completed with matching row counts
After the task is completed successfully, reconnect to your target Aurora PostgreSQL database from pgAdmin and enter the following SQL command:
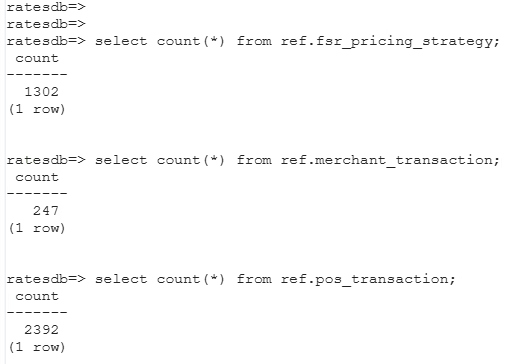
Figure 10: Target Amazon Aurora PostgreSQL row counts matching the source after the full-load task
Confirm that the target table row counts match those of the source database, AWS DMS migration task, and the target PostgreSQL database. This confirms the migration task is complete and all the associated rows migrated successfully.
Automate the AWS DMS task (optional)
Automating your AWS DMS migration task with AWS Lambda keeps your target Aurora PostgreSQL tables refreshed and in sync with the source system. Use that function to start this AWS DMS migration task at a scheduled time or repeat it according to your schedule. Follow these steps:
- On the Lambda console, choose Create function.
- Choose Author from scratch.
- Enter the following:
- Function name: StartDMSTask
- Runtime:
Python 3.13 - Architecture:
x86_64
- Under Permissions, change Execution Role to the role you created earlier and leave the other sections as the defaults.
- Choose Create function.
- After the function is created, select the name and on the Code tab, add the following Python code:
- On the Amazon EventBridge console, choose Rules.
- Choose Create rule.
- In the Rule detail section, enter the following:
- Rule-name:
dms-start-schedule - Description: Migration Test POC
- Event Bus Name: Default
- Type: Schedule standard
- Rule-name:
- In the Specify schedule details section, enter the following:
- Schedule name:
cca-rates-dms-db2-postgresql - Schedule description: POC migration task automation test
- Schedule group: Default
- Schedule name:
- In the Schedule pattern section, enter the following:
- Occurrence: Recurring schedule
- TimeZone: America/New York
- Schedule type: Cron based schedule
- Cron expression: 0 10 * * ? *
- Flexible time window: 5 minutes
- In the Select target section, choose AWS Lambda.
- On the list, select your StartDMSTask Lambda function that you created previously.
- Choose Next.
- (Optional) On the Setting page, enable Schedule enable then perform the following:
- Action after completion: None
- Retry policy: None
- Permissions: Create a new role for this schedule
- Review your settings and choose Create schedule.
- (Optional) You can configure an Amazon Simple Notification Service (Amazon SNS) notification to receive email notifications when the AWS DMS task starts and upon completion.
Troubleshooting
Use the following guidance if you come across some common issues for this migration:
- Data Connect Gateway and inability to connect to the source Db2 database (valid customer owned IBM Db2 ODBC connect license required)
Obtain your permanent activation license file using your valid license from the vendor
Make sure to install all pre-requisites including setting environment variables
- DMS task is interrupted.
check DMS task log file and resolve the outstanding issue if any and restart the task
- DMS endpoints issues.
check end point configuration and provide correct details for required fields
- Check these pre-requisites and limitations when using IBM Db2 for z/OS as a source for AWS DMS.
- For any issues on the EC2 Db2 Connect gateway instance, the customer owns issues related to the OS, driver, software configuration, and patching, which are outside of AWS DMS support. The EC2 gateway OS and Db2 Connect are customer owned, and you should confirm the supported OS versions with IBM.
Costs
There is a cost associated with using this solution because it uses various AWS services, for example, an Aurora PostgreSQL database, an S3 bucket, AWS DMS, and Lambda. Make sure to visit AWS Pricing for additional clarity before deploying this solution and make yourself familiar with AWS Pricing Calculator.
Clean up
If you decide that you no longer want to keep the solution and infrastructure components, follow these steps to remove the resources. On the AWS console, select and remove the resources in this order:
- Amazon EventBridge rules.
- Lambda function.
- AWS DMS migration task, source endpoint, target endpoint, and replication instance.
- EC2 instance.
- Aurora PostgreSQL cluster.
- All the associated IAM roles and policies.
Conclusion
In this post, we outlined a complete solution for migrating a Db2 database on z/OS to an Aurora PostgreSQL database using AWS DMS and an EC2 instance configured as a Db2 gateway server. The approach supports both initial full-load migrations and recurring refreshes of the target database using scheduled AWS DMS tasks triggered using Lambda.
To further enhance automation and repeatability, this solution can be extended using AWS CloudFormation or HashiCorp Terraform.
If you’re interested in a related mainframe modernization and migration approach that uses AWS DMS to migrate data from Db2 LUW to Aurora PostgreSQL-Compatible, refer to Using IBM Db2 for Linux, Unix, and Windows database (Db2 LUW) as a source for AWS DMS.
If you have questions or feedback, leave a comment in the comments section.