AWS for Games Blog
Development phase steps for successful launches on Amazon GameLift Servers
You’re developing a multiplayer game, but aren’t certain about how to efficiently host, scale, and monitor the game server fleet globally. You’re also thinking about how to place sessions efficiently around the world for the best player experience. Building the required infrastructure from scratch can be overwhelming.
We recommend Amazon GameLift Servers, a fully managed service for global game server hosting. It helps you reduce the operational work and stress of your multiplayer game launch, as the service takes care of orchestration, global session-placement, and game session lifecycle management.
In this blog series we’ll cover key considerations to prepare for a successful game launch. This first blog focuses on actions to take in pre-production, and the second part focuses on pre-launch preparations (2-3 months prior to launch). These recommendations are based on the experience of supporting hundreds of game studios from initial integration to game launch.
We are assuming you have:
- Familiarity with the basics of Amazon GameLift Servers
- Knowledge of game engines and game development
- Understanding of multiplayer networking concepts
We’ll go through four key areas of early planning for game launch:
- Test your game server and select instance type
- Set up game session lifecycle management
- Utilize queues and queue events for session placement
- Set up monitoring, logging, and alarms
Test your game server and select instance type
Your game server testing typically starts with testing the game server locally. Once you have a working local server, the next step is to deploy it to an Amazon GameLift Servers fleet and test the performance on the service.
Following are critical metrics to measure that will help you identify the correct instance type and size:
- Resources consumption (memory intensive compared with CPU intensive)
- The number of game server containers or processes you can run on each instance
- Performance of the game servers on an instance with maximum player load
This phase can be done with a small fleet, even just one instance in a single region. It’s recommended to create a separate development Amazon Web Services (AWS) account at this point for resource isolation. You can add other environments, such as test and production later. Fleets scale out very linearly, so putting a single instance under maximum player load with real-life testers or bot clients will give you a good indication on how your game server performs.
The recommended fleet type is a container fleet. Container fleets allow defining the vCPU and memory requirements for each game server. Amazon GameLift Servers automatically places as many sessions as it can on a selected instance type.
The built-in Amazon CloudWatch metrics help you identify game server memory and CPU constraints. You can adjust based on this testing usage data and select between C-family instances (when more CPU is needed), M-family instances (for a balance between memory and CPU), and R-family instances (when more memory is needed). Most games will use C-family or M-family instances, as physics simulation consume a lot of CPU resources.
The latest generation of instances, which are supported by Amazon GameLift Servers, provide the best price-performance. Utilizing ARM-based AWS Graviton instances can increase performance even further.
To select how many containers (on container fleets) or game server processes (on Amazon Elastic Compute Cloud (Amazon EC2) fleets) you can fit on the selected instance type, you need to test with an actual load and monitor the performance. This can be done either with a test group playing the game, or with headless bot clients of your game that connect to the servers and automatically play the game with a pre-defined script.
This test should be done with actual data traffic flowing between clients and the server, as just testing the simulation with local bots on the server doesn’t provide a comprehensive picture of the performance. Having your bot clients or actual testers across multiple regions is also useful to perceive a more realistic understanding of how geographic network traffic latency affects the performance.
Figure 1 shows bot clients for generating traffic to game sessions with performance monitored through Amazon CloudWatch metrics and logs. Container fleets will automatically push game server logs to Amazon CloudWatch, and on Amazon EC2 fleets you can use the CloudWatch Agent to push logs to CloudWatch.
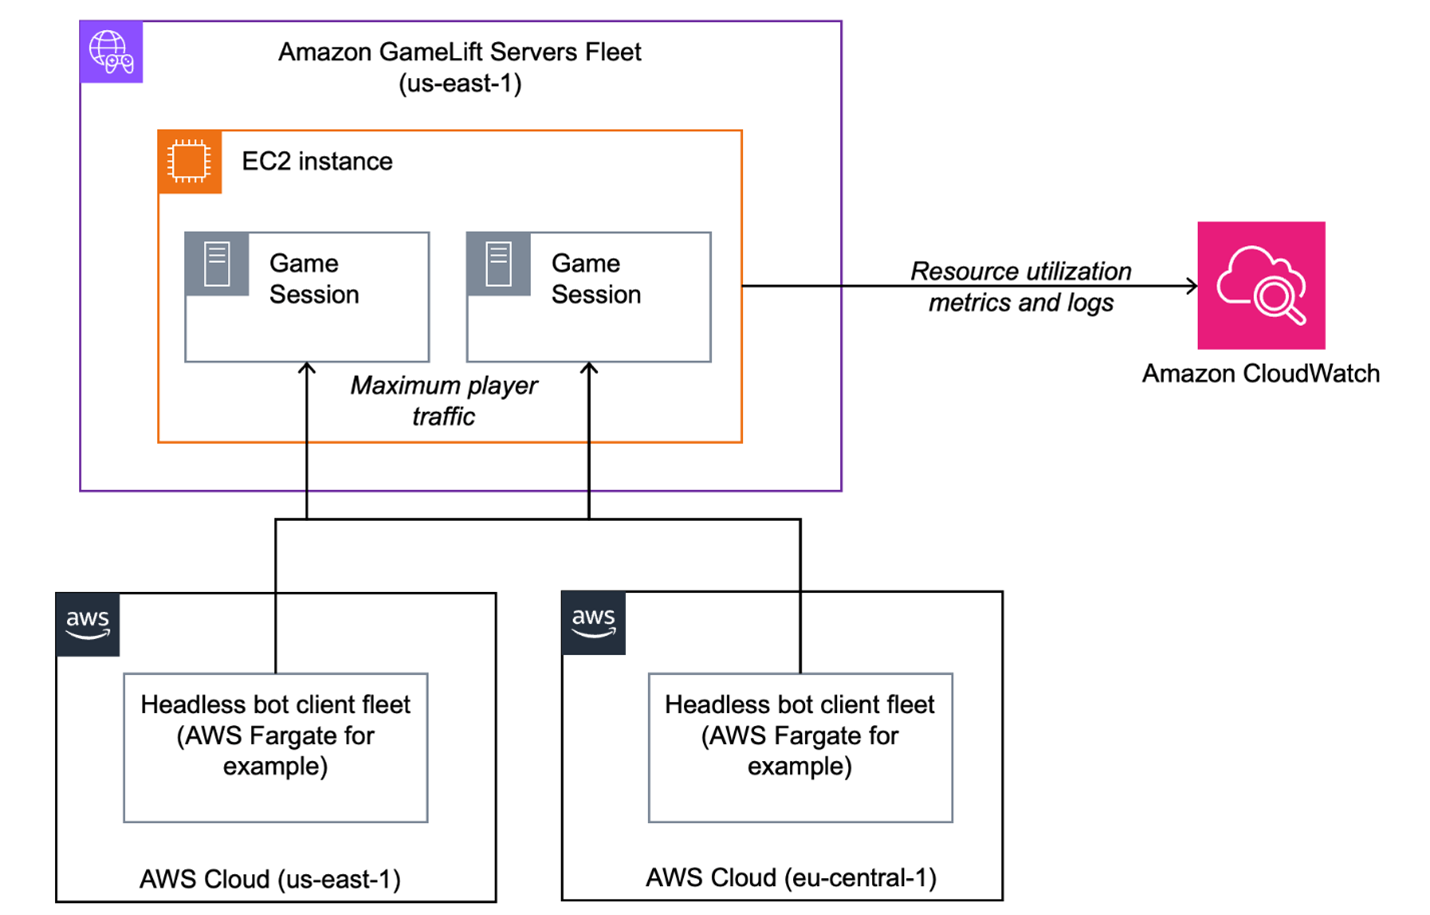
Figure 1: Testing the performance of your game server.
Set up game session lifecycle management
There are several key elements in the lifecycle of a game server process and making sure you have considered all is essential for keeping your fleet healthy. Now, let’s dive in and review the sequence of session management in a game server fleet.
On startup, a game server process establishes communication with Amazon GameLift Servers and reports its status as ready to host a game session.
The game server process calls the following server SDK operations in sequence:
- Initialize game server
- Announce server readiness
- Evaluate game server health
- Handle game session events
- Terminate the game session
-
Initialize game server
Servers start with the InitSDK call method. This function authenticates your server processes and prepares it for Amazon GameLift Servers orchestration.
Considerations:
-
- Make
InitSDKthe first call during your server process startup to promptly establish communication with Amazon GameLift Servers. - Log and handle SDK initialization errors to prevent silent failures and assist with fleet monitoring.
- Make
-
Announce server readiness
When resources and game logic are loaded, call ProcessReady to notify Amazon GameLift Servers that the process is ready to host game sessions. This call also reports the process’s connection information, which game clients use to connect to the game session. Amazon GameLift Servers updates the status of the game server process to ACTIVE and is available to host a new game session.
Considerations:
-
- Only invoke
ProcessReadyafter all initialization is complete and avoid making duplicate calls. - Supply all required callbacks, such as
OnStartGameSessionandOnHealthCheck, and implement proper error handling and retries. - Provide accurate log paths on EC2 fleets to confirm access to session logs from the Amazon GameLift Servers console or through APIs.
- Only invoke
-
Evaluate game server health
Once the server process is set to ACTIVE, Amazon GameLift Servers begins periodically calling the OnHealthCheck callback to request a health status from the game server processes. If the process reports unhealthy or doesn’t respond to health checks, the service changes the process’s active status and replaces it with a new process.
Considerations:
-
- Implement a robust
OnHealthCheckcallback with the server SDK, which properly validates your server is healthy before responding true.
- Implement a robust
-
Handle game session events
When a player requests to join a game, the game client sends the request to the backend service, which may call StartGameSessionPlacement or CreateGameSession to start a new session. The service searches the fleets for an available server process. Once found, it creates a game session and invokes the OnStartGameSession callback. The server then calls ActivateGameSession once it is ready, while Amazon GameLift updates the session from PENDING to ACTIVE and fulfills the placement.
Considerations:
-
- Make sure you only have players connect after you receive the
OnStartGameSessionAmazon GameLift Servers invokes this callback when it wants your server process to start hosting a new game session. This will reduce issues with any probing connections to the server prior to the actual game load. - Only call
ActivateGameSessionin theOnStartGameSessioncallback once you have properly set up the game map, any other configurations, and are fully ready to host the session. InvokingActivateGameSessionnotifies the Amazon GameLift service that the server has completed initialization to host a new game session and is now ready to receive incoming traffic to establish player connections. - When a process has been waiting for a session placement for up to several days, make sure in the health check that all systems still operate correctly. This applies when you set up a fleet in advance, but you only receive production traffic to it at a later point, as well as when player traffic changes based on time of day. Some locations might have times they don’t receive session placements.
- Make sure you only have players connect after you receive the
-
Terminate the Game Session
At the end of the game session, the server process notifies Amazon GameLift Servers of the game session status. The game server process initiates the shutdown by calling the server SDK operation ProcessEnding. As part of the game session termination, Amazon GameLift Servers changes the game session and server process status to TERMINATED.
Considerations:
-
- Implement a backup process termination mechanism when a game session is placed on the server (
OnStartGameSessionis called), but players never connect, or they are disconnected. You want to make sure the process ends correctly in these situations and is replaced with a fresh new game server. - Don’t reuse the server process for multiple sessions. After a session ends, call
ProcessEndingand exit. This will trigger the creation and registration of a new process immediately. - Call
ProcessEndingon the Amazon GameLift Servers SDK in all paths that the server could exit. This will make sure it is properly cleaned and immediately replaced with a new session.
- Implement a backup process termination mechanism when a game session is placed on the server (
Figure 2 shows the lifecycle of a game server process and key steps every game server implementation should consider.
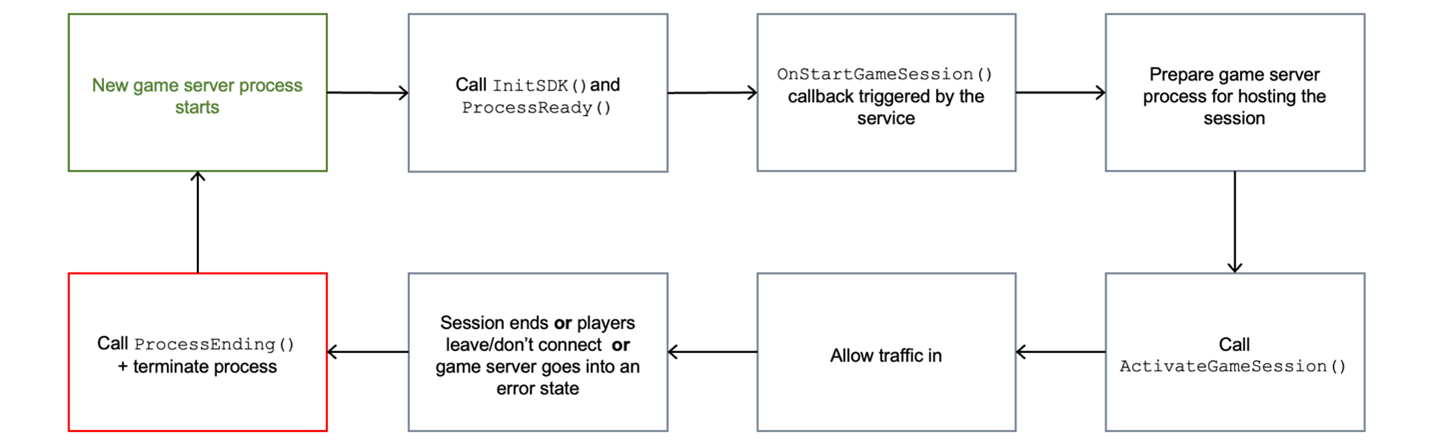
Figure 2: Game server lifecycle.
Utilize queues and queue events for session placement
Amazon GameLift Servers queues offer several benefits over creating sessions directly on a fleet.
A queue:
- Can fail over to a secondary fleet location if the first option isn’t available
- Can place sessions across multiple fleets
- Provide session placement events your backend can process
- Prioritize destinations based on latency and cost
When you use queues, the StartGameSessionPlacement call is the only APIs you need to use—the rest is managed through queue events.
Best practices when using queues:
- Set up a timeout for the queue, which defines when the placement is considered failed if no suitable capacity is found.
- If you’re providing player latencies to the queue, set up the player latency policies. Make sure that the limits you set here are realistic, so you’re not waiting for extended time to place on a latency value that in most matches is not available for some of the players in the game. Even without the player latency policies, whenever you provide latency data to the queue, the sessions are placed based on this information. The default behavior works on averages, where player latency policies make sure no player is above the max latency limit.
- Define the game session placement priority. For most needs, we recommend the default behavior of prioritizing latency and then cost across all registered fleets. However, in cases where you want to utilize an Amazon GameLift Anywhere fleet resource first, regardless of the latency quality, set the destination as the first priority.
Best practices for using queue events:
- Register an Amazon Simple Notification Service (Amazon SNS) Topic or use Amazon EventBridge to receive game session placement events notifications.
- You can have an AWS Lambda function registered to the events, and store event data to a database such as Amazon DynamoDB, or send updates directly over WebSockets to your players. Using events is extremely scalable, as opposed to using the Describe APIs.
Figure 3 shows the standard high-level architecture for leveraging Amazon GameLift Servers queues for placing game sessions and processing the events through subscribing to the Amazon SNS Topic.
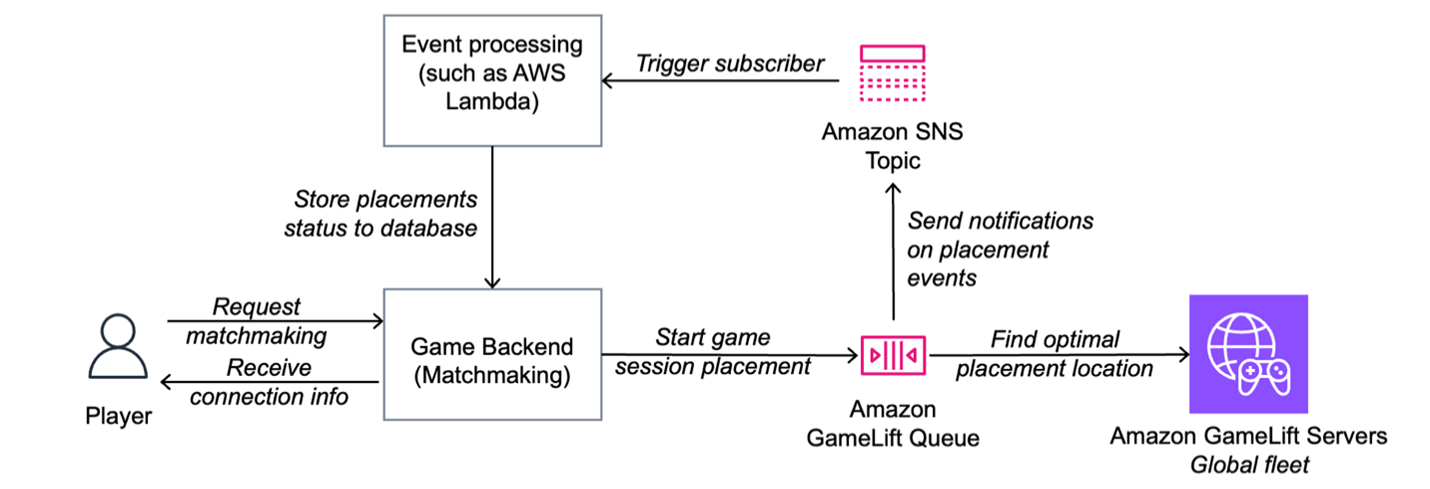
Figure 3: Standard architecture for utilizing Amazon GameLift Servers Queues.
In case you’re not using a latency policy and need to place sessions with an exact location preference, you can define a Priority Configuration Override in the StartGameSessionPlacement request. This is useful if your game design provides players the ability to select a specific location or from a list of priority locations. It’s also useful if your matchmaker provides a priority list instead of providing the latencies for each location separately.
If you’re using Amazon GameLift Servers FlexMatch as your matchmaker, it will natively integrate with the queue you define. You can then use the FlexMatch events instead of the queue events to track the session placement process.
Set up metrics, logging, and alarms
Observability is key to understanding what’s going on in your environment. Amazon GameLift Servers has several native features to help with this. We’ll cover three key aspects: logs, monitoring and alarms.
Logs
On container fleets you can configure the game server output to be sent to Amazon CloudWatch or Amazon Simple Storage Service (Amazon S3) without any additional tools or services. Make sure to write the game session ID to the output on the game server to search for the correct log files when debugging. On EC2 fleets, you can download the log files within 14 days after a game session terminates. If you want to also push logs to Amazon CloudWatch on EC2 fleets, the Amazon GameLift Servers integration in the AWS Game Backend Framework guidance helps you set up Amazon CloudWatch Agent to do that.
When generating log output from your game server process, it’s good to be able to define how verbose the logging is in your logging system. You can use more verbose logging in development and reduce the amount of data collected in production. A structured log output, such as a JSON format, can help utilize CloudWatch query features.
In addition, you can run a sidecar container, or in case of EC2 fleets a background agent on the instance, to send log output to any third-party log management tool.
Metrics
Amazon GameLift Servers provides extensive CloudWatch metrics. This includes information on the instances and game sessions in your fleet, placement times for queues, resource utilization metrics, and many others. These metrics are directly available in the Amazon GameLift Servers console, as well as in CloudWatch.
Some key metrics to monitor:
- Resource utilization:
CPUutilization,MemoryUtilization(for container fleets) andNetworkIn/NetworkOut. These metrics give an overview on how your game server processes are performing and how much resources they’re utilizing. - Session availability:
PercentAvailableGameSessions,AvailableGameSessions. These metrics will indicate the health of your fleet and your ability to place new sessions. - Potential issues:
UnhealthyInstancesReplacedandServerProcessAbnormalTerminations. These metrics indicate instances running out of resources to keep operating, and issues with the processes not exiting correctly. - Queue metrics:
AverageWaitTime,PlacementsFailed, andPlacementsTimedOut. These metrics will provide you an indication of the health of the queue: How quickly players are placed into matches and how often their placements fail.
As with logs, you can use sidecar containers, or agents on EC2 fleets to gather customer metrics about any other systems. This can include tools and services, such as an OpenTelemetry agent, to gather metrics on a Prometheus instance that you can visualize with Grafana.
Alarms
Alarms are a mechanism to inform your operations team that there is an issue with your game backend. You should create appropriate alarms for metrics that indicate possible issues. These include metrics such as PercentAvailableGameSessions (being low or zero), ServerProcessAbnormalTerminations, UnhealthyInstancesReplaced, PlacementsFailed and any others that are relevant for your needs. You can additionally extract metrics from CloudWatch Logs, and create alarms based on those extracted metrics. JSON format is recommended for quick extractions of metrics from logs.
Figure 4 shows an example of how metrics and logs in CloudWatch can be utilized to generate alarms and notify your on-call team regarding challenges. A similar approach can be used if you collect metrics with Prometheus and visualize them with Grafana.
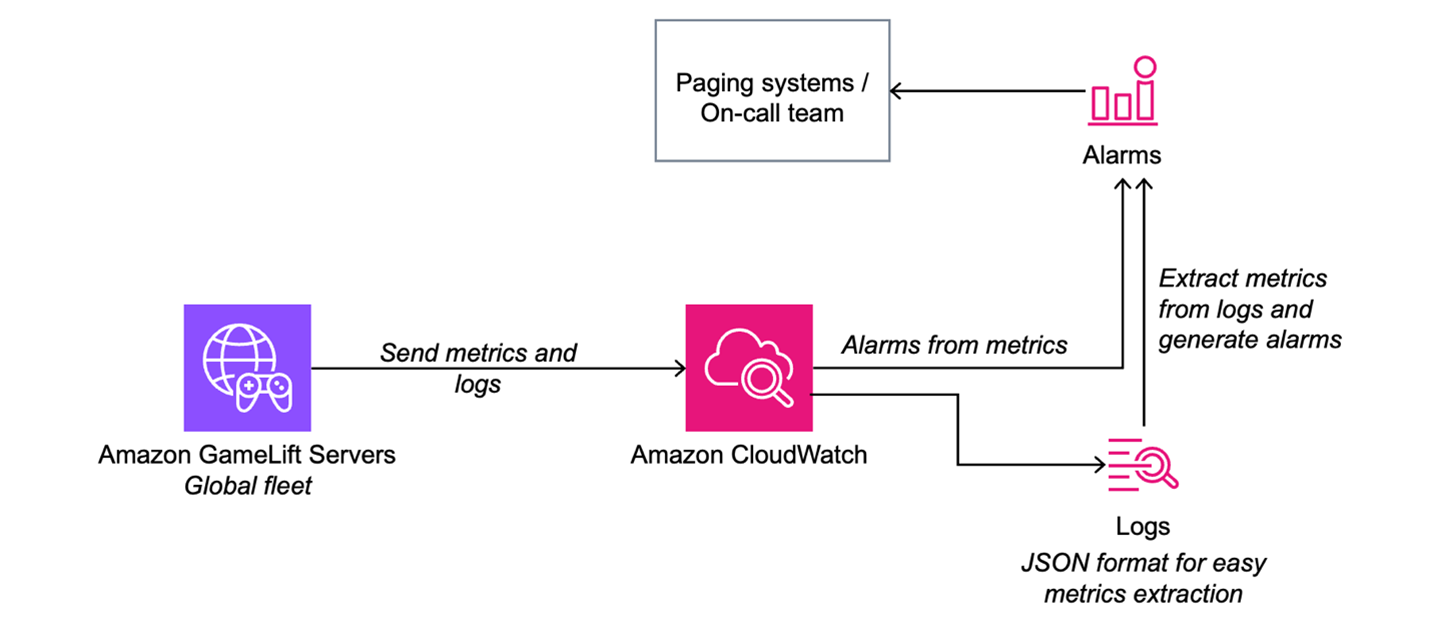
Figure 4: Alarming your on-call team based on logs and metrics.
Conclusion
We covered the baseline of becoming operationally ready for a successful game launch by using Amazon GameLift Servers for game server hosting. We discussed how selecting the correct instance type and server process, or container packing, can make sure you have a well-performing, cost-optimized configuration. We also considered how all architectures should utilize queues for well-controlled and event-based session placement. Finally, we discussed how setting up logs, monitoring, and alarms can help you identify issues and collect information about your game servers’ performance.
In the second blog in the series, Launch phase steps for successful launches on Amazon GameLift Servers, we’ll dive deeper into getting ready to launch your game.
Get started today with Amazon GameLift Servers for multiplayer game server hosting. Contact an AWS Representative to learn how we can help accelerate your business.