AWS HPC Blog
Resilient HPC and ML on AWS: Running Tightly Coupled Workloads on Spot Instances
This post was contributed by Santosh Kumar, Bhagyaraju Kasina, Dr. Sandeep Sovani and Dr. Max Starr
Researchers and engineering teams running High Performance Computing (HPC) jobs face a constant challenge: balancing computational costs against the need for powerful computing resources. Amazon EC2 Spot Instances present an attractive solution, offering up to 90% discount compared to On-Demand pricing. Spot capacity is spare Amazon EC2 capacity made available to customers at deep discount, with availability tending to be higher during off-peak hours and weekends in most AWS regions.
However, Spot Instances come with a trade-off: Amazon EC2 can reclaim them with just two minutes’ notice when it needs the capacity back. Jobs with fault-tolerant design and checkpointing can use this notice window for graceful state preservation, but traditionally, Spot has been limited to short-duration, loosely coupled workloads that handle interruptions easily. For many engineering and research teams running workloads with long execution and checkpoint times, adapting jobs to be Spot-compatible has been considered challenging.
For example, consider a Computational Fluid Dynamics (CFD) simulation modeling complex aerodynamics. These simulations can run for days across dozens of tightly-coupled nodes, where each node’s calculations depend on continuous communication with all other nodes in the computation. When running such workloads on Spot Instances, the interruption of a single node can cause the entire simulation to fail, potentially losing days of computational progress.
This challenge is common across other tightly-coupled HPC workloads that require sustained, reliable access to multiple compute nodes working in concert – including electromagnetic simulations analyzing radar interactions, molecular dynamics simulations, weather modeling spanning vast computational domains, and machine learning training workloads running on Amazon EC2 UltraClusters.
Solution Architecture
In this post, we present a solution that bridges the gap between the cost advantages of Spot Instances and the long-runtime availability requirements of tightly-coupled HPC workloads, demonstrating it using Simcenter STAR-CCM+ and GROMACS simulation workloads as primary examples. Beyond these examples, this approach can work with most applications that support checkpointing, such as computer-aided engineering (CAE) applications from major vendors like Ansys, Siemens, and Dassault Systems, as well as weather simulation, molecular dynamics simulations, and machine learning training jobs that run on Amazon EC2 UltraClusters.
AWS Parallel Computing Service (PCS) and AWS ParallelCluster provide the essential building blocks for HPC environments, handling cluster provisioning, compute scaling, scheduler integration, and storage integration with Amazon FSx for Lustre and Amazon EFS. They create a familiar environment for HPC users while providing the flexibility needed for Spot Instance management.
We use the Slurm job scheduler, a choice driven by its widespread adoption in the HPC community as well as it being the default scheduler for AWS PCS and AWS ParallelCluster. Specifically, Slurm’s job state signals – including NODE_FAIL, NODE DOWN, and POWERING_DOWN – combined with job exit codes, give the Smart Job Navigator the precise failure signals needed to detect Spot interruptions and trigger automatic resubmission. Slurm’s squeue and sbatch commands provide the programmatic interface for continuous job monitoring and queue transitions.
To simplify the user experience, jobs are submitted through sjn-submit, a lightweight wrapper around Slurm’s sbatch that registers jobs for smart queue management while preserving the familiar submission experience. Monitoring continues through the standard Slurm interface, supplemented by utilities for tracking job transition and performance metrics.
Administrators deploy the solution on the head node of their existing AWS PCS or AWS ParallelCluster environments and configure additional queues as needed. The solution consists of the following components:
- Smart Job Navigator Service (sjn-daemon.py): Core service that monitors jobs and manages queue transitions
- Smart Submit Script (sjn-submit.sh): Wrapper script for sbatch, handles job submission to Slurm queues and integrates seamlessly with the navigator
- Job History Checker (sjn-history.py): Utility to track and view job’s transition history
- Job Metrics Checker (sjn-metrics.py): Utility to track and view job’s performance metrics
As shown in the diagram below, the high-level job navigation flow works as follows:
- User submits job using sjn-submit command, which creates a tracking entry for sjn-daemon
- After job submission, sjn-daemon begins monitoring job status
- If job is pending beyond threshold time (default 240 seconds), queue selection strategy activates
- Job is submitted to the next highest priority queue
- Job runs with continuous monitoring of state and metrics
- If job failure detected (NODE_FAIL, FAILED, NodeDown) due to Spot Instance termination, the system checks retry count
- Job resubmits to same queue if retry count is under MAX_RETRY limit (set to 1 as default)
- Otherwise, intelligent queue selection finds optimal next queue based on Spot placement scores and submits the job to it.
- Process continues such smart re-submission every time a job failure is detected, until job completes successfully or the job fails due to reasons other than Spot interruption.
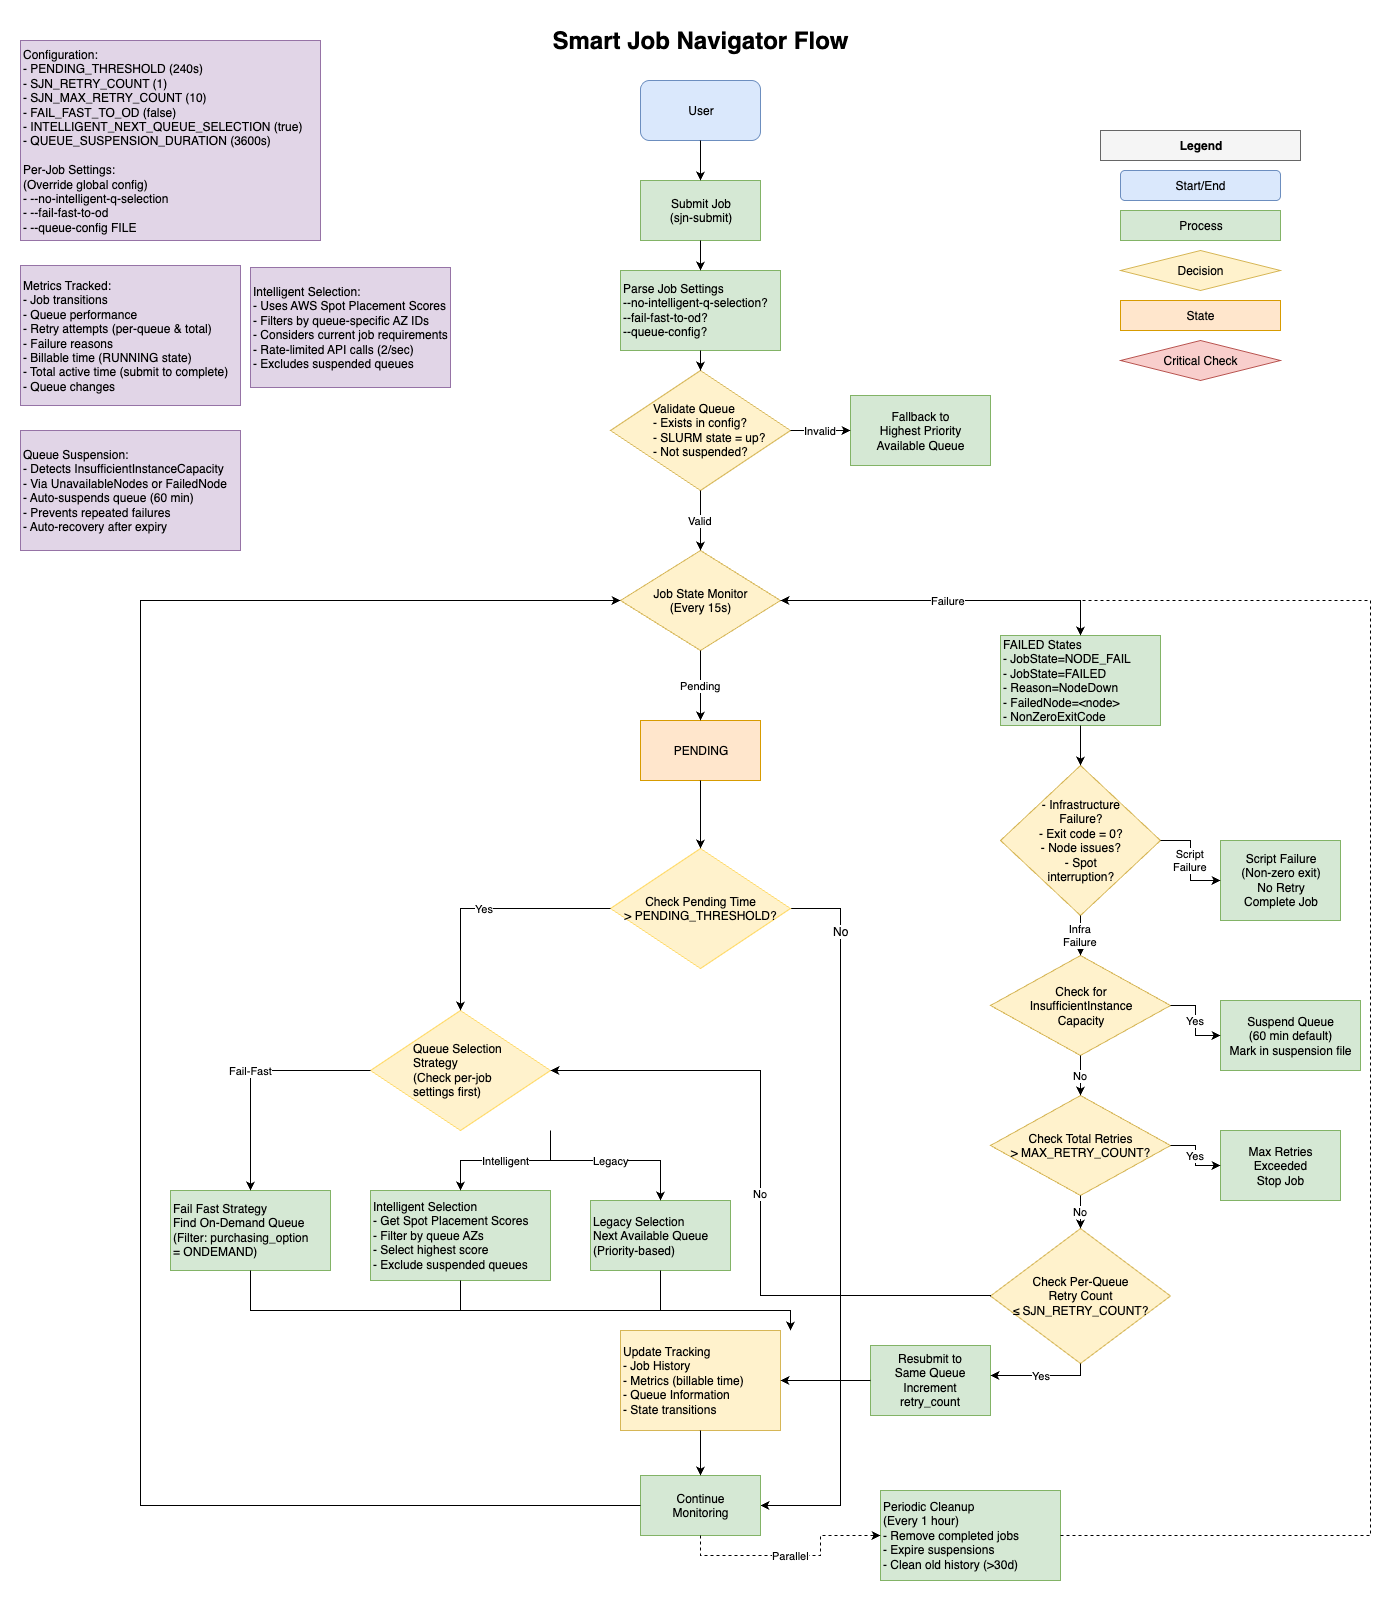
Figure 1 – Smart Job Navigator workflow showing how jobs are intelligently managed from submission through completion. The system monitors job states, handles Spot interruptions through configurable retry mechanisms, and implements three queue selection strategies (Fail Fast, Intelligent Selection using Spot Placement Scores, and Legacy Selection) while tracking comprehensive metrics including job transitions, queue performance, and failure reasons.
Key Highlights
- Intelligent Queue Selection: Uses Amazon EC2 Spot Placement Score API to dynamically select the best available Spot queues based on job capacity requirements and Availability Zone selection
- AZ-Aware Spot Scoring: Filters Spot placement scores by queue-specific Availability Zones for capacity assessment
- Automatic Spot Interruption Detection: Detects Spot interruptions through NODE_FAIL job status, non-zero exit codes combined with NODE DOWN/POWERING_DOWN states, enabling rapid recovery
- Maximum Retry Protection: Configurable maximum job retry limits (default: 10 total retries) prevent infinite retry loops while ensuring job completion
- Spot Capacity Handling: Automatically suspends queues experiencing Spot capacity issues and provides automatic recovery after suspension periods
- Comprehensive Job Tracking: Tracks total active time, billable running time, retry counts, and queue transitions for comprehensive job insights
- Per-Job Configuration Override: Allows individual jobs to override global settings using –no-intelligent-q-selection and –fail-fast-to-od flags
- Pending Job Management: Automatically moves jobs stuck in pending state (default: 240 seconds) to different queues
Prerequisites
- Check-pointing: Applications must be able to save their state and restart from checkpoints. The time required to save checkpoints should be significantly shorter than the run time between checkpoints to minimize overhead.
- Instance Type Diversity: Jobs should run satisfactorily on at least 3 different instance types (more is better) across all Availability Zones. Instance types should be homogeneous in terms of resources (CPU, memory, network) based on job nature and demands to ensure efficient resource utilization on compute nodes. This flexibility allows leveraging the deepest Spot pools and maximizes access to available capacity. Performance and accuracy should be validated on the chosen instance types.
- Python Environment: Python 3.9+ is required on the cluster head node for the management tools.
Implementation
The complete solution, including all configuration files and scripts, is available in the project repository in GitHub.
For this demonstration, we use AWS ParallelCluster via its CLI, a command-line utility installed locally via pip. For those new to AWS ParallelCluster, check the setup guidance available through the AWS HPC Workshop. Additionally, the AWS HPC Recipe Library provides one-click deployable templates to accelerate your setup process.
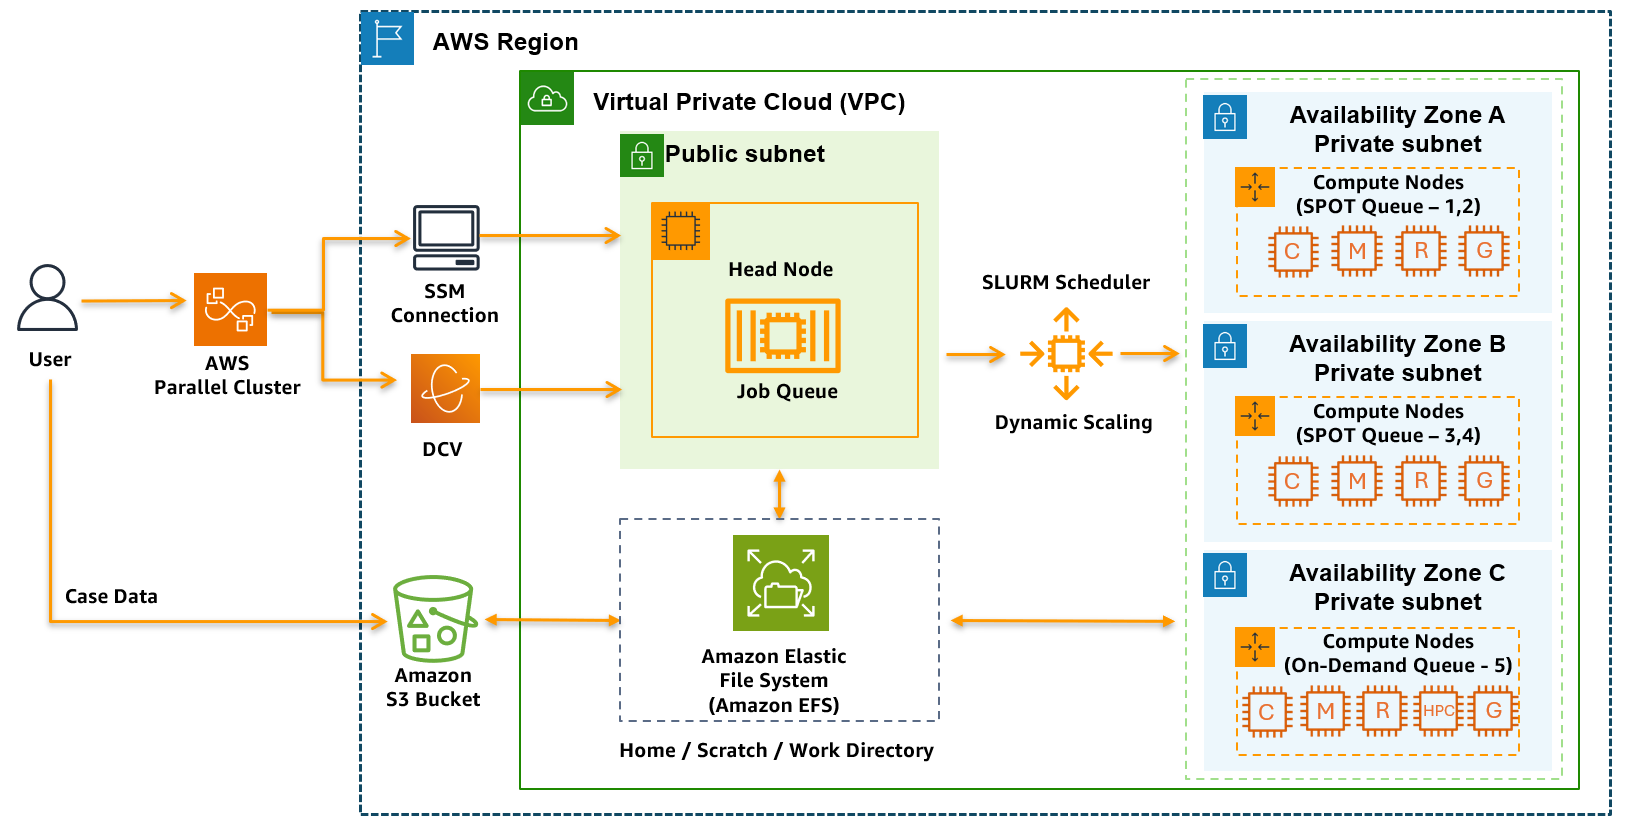
Figure 2 – Architecture diagram showing AWS ParallelCluster deployment with compute nodes distributed across multiple Availability Zones, utilizing Spot Instances in two queues and On-Demand Instances in a third queue. The setup includes a head node managing job scheduling through Slurm, with shared storage provided by Amazon EFS.
Note: For this demonstration we chose to use Amazon EFS. You can also use Amazon FSx for Lustre for workloads requiring higher throughput and lower latency during parallel file system operations.
Queue Configuration Best Practices
For optimal Spot Instance management, configure Slurm queues to span all Availability Zones in your AWS Region with multiple homogeneous instance types (minimum 3, more is better). This maximizes access to Spot capacity pools and improves resource utilization across compute nodes.
Example Queue Configuration:
# Spot queue with multiple instance types across all AZs
SlurmQueues:
  - Name: spot-queue-1
    CapacityType: SPOT
    AllocationStrategy: price-capacity-optimized
    ComputeResources:
      - Name: spot-cr-1
        Instances:
          - InstanceType: c7i.16xlarge
          - InstanceType: c7a.16xlarge
          - InstanceType: m7i.16xlarge
          - InstanceType: m7a.16xlarge
          - InstanceType: r7i.16xlarge
          - InstanceType: r7a.16xlarge
          MinCount: 0
          MaxCount: 20
      Networking:
        SubnetIds:
          - subnet-xxxxxxxxxxxxxxx1x # (us-east-1a)
          - subnet-xxxxxxxxxxxxxxx2x # (us-east-1b)
          - subnet-xxxxxxxxxxxxxxx3x # (us-east-1c)
          - subnet-xxxxxxxxxxxxxxx4x # (us-east-1d)
Multi-AZ vs Single-AZ Considerations
While multi-AZ deployment maximizes Spot availability, it may introduce higher inter-node latency and inter-AZ data transfer charges for tightly-coupled workloads. For latency-sensitive applications, create separate queues per availability zone with optimal instance diversification:
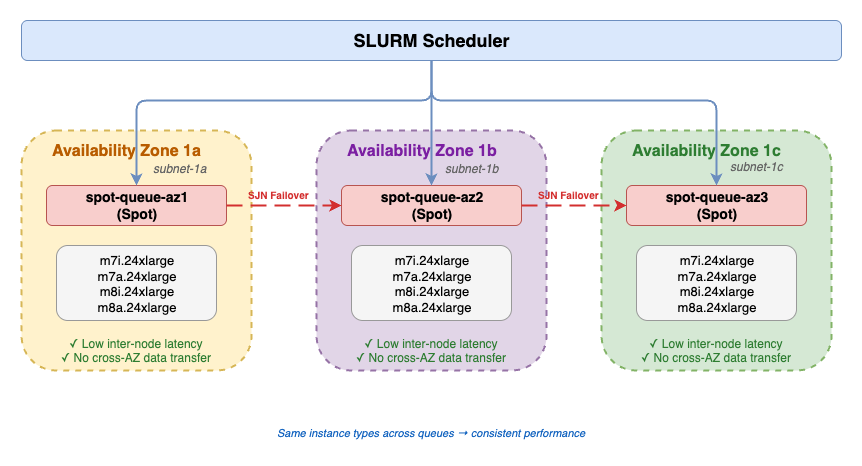
Figure 3 – Single-AZ queue configuration for latency-sensitive tightly-coupled workloads. Each Spot queue is pinned to a single Availability Zone with the same diversified instance types (m7i, m7a, m8i, m8a), eliminating cross-AZ data transfer and ensuring low inter-node latency. The Smart Job Navigator automatically fails over among queues when Spot capacity is interrupted in one Availability Zone.
Time-of-Day Scheduling
Spot capacity availability tends to be higher during off-peak hours and weekends in most AWS regions. For workloads where scheduling flexibility exists — such as batch simulations or overnight ML training runs – aligning job submission to these windows can further improve Spot availability and reduce interruption rates.
The cluster configuration and scheduling strategies above maximize your access to Spot capacity. However, even with optimal queue setup, Spot interruptions will still occur — and manually monitoring jobs, detecting failures, and resubmitting them across queues is not practical at scale.
This is where the Smart Job Navigator comes in. It continuously monitors your running jobs, automatically detects Spot interruptions, and intelligently resubmits failed jobs to the next queue with available Spot capacity. Let’s walk through how to deploy it.
Administrator Setup
Cluster administrators need to configure several components:
- Clone this repository to your ParallelCluster head node or PCS login node
TEMP_DIR=$(mktemp -d)
git clone https://github.com/aws-samples/sample-smart-job-navigator-for-tightly-coupled-hpc-workloads.git $TEMP_DIR
cd $TEMP_DIR
- Set up the Smart Job Navigator service:
# Create service directory and virtual environment
sudo mkdir /opt/sjn
sudo python3 -m venv /opt/sjn/venv

# Copy and configure service files
sudo cp sjn.service /opt/sjn/
sudo chown -R root:root /opt/sjn
sudo sed -i 's#/usr/bin/python3#/opt/sjn/venv/bin/python3#g' /opt/sjn/sjn.service
sudo cp /opt/sjn/sjn.service /etc/systemd/system/

# Install Python dependencies
sudo /opt/sjn/venv/bin/pip3 install -r requirements.txt

# Install executables
sudo cp sjn-daemon.py /usr/local/sbin/sjn-daemon.py
sudo cp sjn-submit.sh /usr/local/bin/sjn-submit
sudo cp sjn-history.py /usr/local/bin/sjn-history
sudo cp sjn-metrics.py /usr/local/bin/sjn-metrics
sudo chmod +x /usr/local/bin/sjn-submit /usr/local/bin/sjn-history /usr/local/bin/sjn-metrics
- Enable and start the Smart Job Navigator daemon:
sudo systemctl daemon-reload
sudo systemctl enable sjn --now
sudo systemctl status sjn  # Verify service is running
- A critical part of the setup is configuring queue priorities. These priorities guide the system’s decisions when moving jobs between queues. The daemon auto-creates
/etc/parallelcluster/sjn-queue-priority.confwith existing Slurm queues if the file doesn’t exist. Administrators should customize priorities as needed (lower priority numbers = higher priority):
spot_queue1:100
spot_queue2:200
spot_queue3:300
...
od_queue1:1000
- Ensure the AWS ParallelCluster head node or PCS login node’s IAM role has the following permissions for intelligent queue selection to work properly. Note that
ec2:DescribeSubnetsis specifically required for AZ-aware Spot scoring:
{
    "Version": "2012-10-17",
    "Statement": [
        {
            "Effect": "Allow",
            "Action": [
                "ec2:GetSpotPlacementScores",
                "ec2:DescribeInstances",
                "ec2:DescribeInstanceTypes",
                "ec2:DescribeSubnets"
            ],
            "Resource": "*"
        }
    ]
}
User Workflow
Users follow these steps to run their HPC jobs in a Spot-friendly manner.
- Configure Checkpointing
Enable application-specific checkpointing. For example, in STAR-CCM+:
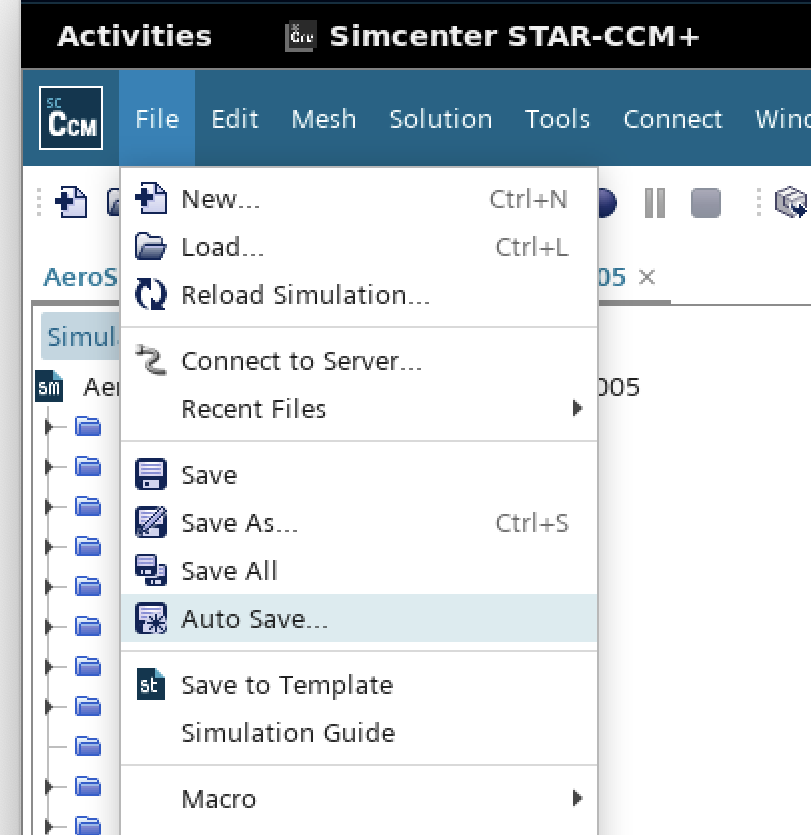
Figure 4 – STAR-CCM+ Auto Save (checkpointing) configuration interface
In STAR-CCM+ Checkpointing can be set up through Auto Save settings in the graphical user interface or using the Java API via a macro.
Simulation.getCheckpointController().setCheckpointDirectory("/fsx/checkpoints"); // Specify the location to save the simulation checkpoint file – could leave blank to save in the same directory as running sim
Simulation.getCheckpointController().setCheckpointFrequency(1800); // Auto-Save every 1800 iterations/time-steps
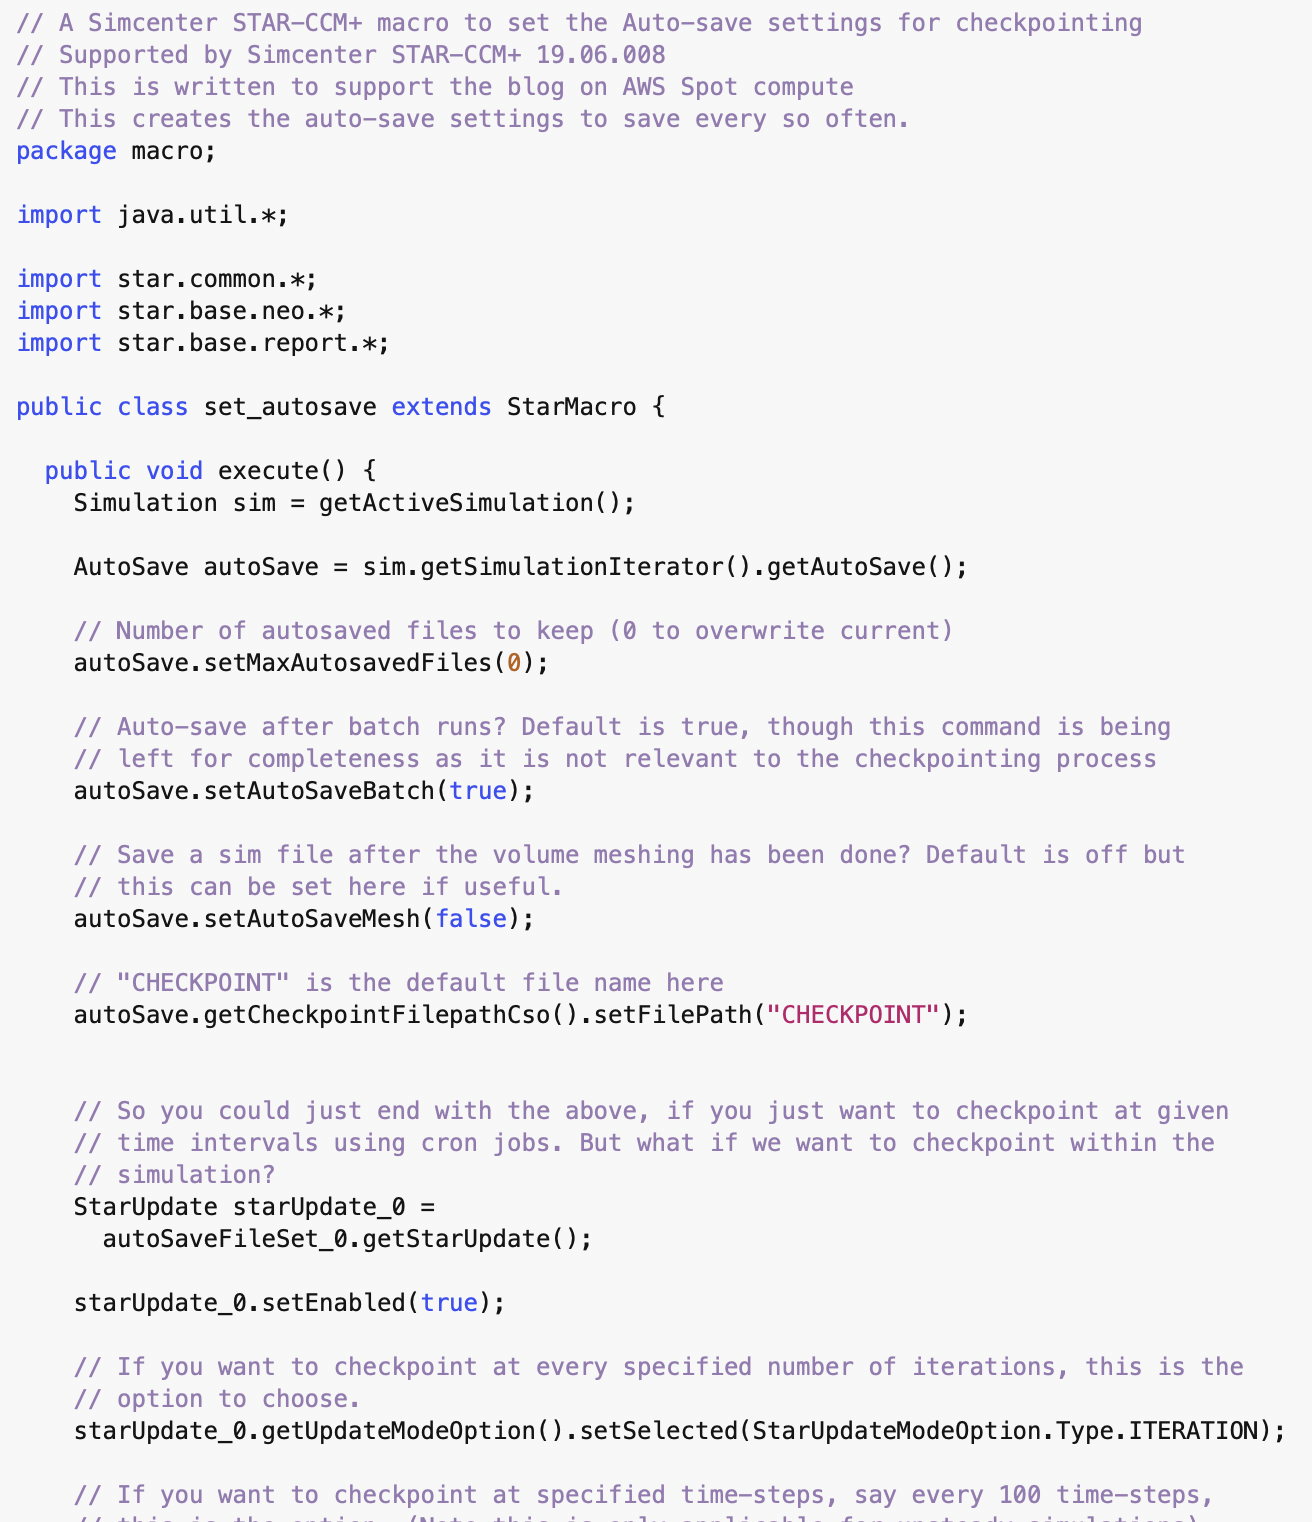
Figure 5 – Sample of STAR-CCM+ Auto Save (checkpointing) configuration through macro code
- Define custom Queue Strategy (Optional)
By default, sjn-queue-priority.conf will be used as the queue priority configuration. If needed, users can create custom queue priority files and specify them during job submission with sjn-submit --queue-config ./custom_queues.conf. Example configuration:
spot_queue3:100
spot_queue8:800
spot_queue9:900
spot_queue12:1200
od_queue1:2000
- Configure Job submission script
Set key parameters in job submission script. Setting --ntasks is important to ensure Slurm finds the correct number of nodes required for the job in specific queue:
#!/bin/bash
#SBATCH --job-name=cfd_sim
#SBATCH --ntasks=256

# Application commands
# Avoid using cd command in the script
...
- Submit Job
Use the sjn-submit , wrapper around sbatch to submit jobs with optional per-job configuration:
# Basic job submission (uses global settings)
sjn-submit myjob.sh

# Disable intelligent selection for this job only
sjn-submit --no-intelligent-q-selection compute_job.sh

# Use custom queue configuration
sjn-submit --queue-config custom_queues.conf myjob.sh
For workloads where scheduling flexibility exists, submitting jobs during off-peak hours and weekends – when Spot capacity tends to be higher – can further reduce interruption rates. Use Slurm’s – -begin flag to target these windows:
# Submit job to start at off-peak hours
sjn-submit --begin=22:00:00 myjob.sh
If your workload cannot wait for local/home region off-peak hours and your data and cluster setup can be replicated, consider targeting an AWS region where it is currently off-peak for better Spot experience.
- Monitor Progress
Check job status and history using built-in utilities:
# View current job status
squeue -u $USER

# Check comprehensive job history and transitions
sjn-history <job_id>

# View system-wide metrics
sjn-metrics

# View job-specific metrics (billable time, retries, queue changes)
sjn-metrics --job-id <job_id>

# Check service status and logs
sudo systemctl status sjn
journalctl -u sjn -f
Real World Examples
Let’s now look at how this solution performs in production environments. We ran the following test cases to compare the total run time and cost for running a STAR-CCM+ computational fluid dynamics project and a GROMACS molecular dynamics project. In each project, for comparison, we first ran the job without our sjn-submit script, on the first priority queue with On-Demand pricing. This is typically how customers run HPC jobs with On-Demand capacity, and it serves as our reference case. Next, we ran the same job with our sjn-submit script and artificially injected three Spot interruptions using AWS Fault Injection Simulator while the job was running. After each Spot interruption occurred, the solution automatically restarted the job from the previous checkpoint, on the most optimal queue based on the latest Spot Placement Scores of instances in the various queues. When the job finally completed successfully, we recorded the total wall-clock runtime and the cost for the various Spot Instances used to run it. We compared this with the reference case to assess difference in total runtime and job cost.
STAR-CCM+ External Aerodynamics Simulation

Figure 6 – STAR-CCM+ vehicle external aerodynamics simulation used as a test case, running across 384 cores on multiple EC2 instances
This example demonstrates a STAR-CCM+ CFD job of vehicle aerodynamics simulation. This job ran on 384 cores in parallel, spread across multiple nodes (each being an exclusive EC2 instance). Such jobs – in particular transient CFD jobs – can typically run for 10 to 50 hours making them highly susceptible to Spot interruptions. If any of the nodes is interrupted during this long duration, the entire job will fail. Hence, it is a good candidate for usage of the smart job submission tool. In the current test, we only ran the job for a short time – not the complete transient aerodynamics simulation – just to test the change in time efficiency due to checkpointing and job restarting. Note also that by default STAR-CCM+ can save checkpoint simulation files with iteration number appended to the sim file; in this case the original simulation filename was used during each checkpoint save to ease the process of restarting from the last saved checkpoint simulation file.
#!/bin/bash
#SBATCH --job-name=starccm-spot
#SBATCH --ntasks=384

# Enable automated checkpointing for every 100 iterations
starccm+ -power -bs slurm -power \
  -licpath 1999@flex.cd-adapco.com \
  -podkey "STAR-CCM_POD_KEY" \
  -batch setAutoSave.java \
  -mpi openmpi \
  -pio \
  -np $SLURM_NTASKS \
  /fsx/vehicle/AeroSUV_Steady_Coupled_106M_V17_04_005.sim
The original simulation took 3 hours 25 mins on On-Demand instances. Running with Spot pricing and checkpointing every 1000 iterations (needing only 141 seconds for each checkpointing save with FSx for Lustre enabling parallel input/output with STAR-CCM+), increased the runtime to 3 hours 54 mins – a 14% wall-time overhead. Despite this overhead, the 61% Spot discount at run time still delivered a 55% reduction in job cost. Across the 3 injected Spot interruptions, the average recovery time was 8 minutes, driven by efficient checkpointing and queue management.
GROMACS
GROMACS is a popular, free and open-source software package to perform molecular dynamics simulations. For the purposes of our analysis, we chose Ribosome in water simulation benchmark with 2Million ATOM count from the Max Planck Institute for Biophysical Chemistry.
#!/bin/bash
#SBATCH --job-name=gromacs-spot
#SBATCH --ntasks=320
#SBATCH  --output=%x_%j.out

# Set checkpoint interval 20 mins (-cpt)
mpirun -np ${SLURM_NTASKS} gmx_mpi mdrun \
    -nsteps 1000000 \
    -pme cpu \
    -ntomp 1 \
    -s benchRIB.tpr \
    -cpt 20 \
    -cpi spot-cpu.cpt \
    -cpo spot-cpu.cpt \
    -e spot-cpu.edr \
    -g spot-cpu.log
This simulation achieved even better results, with only a 48 mins (27%) increase in runtime (from 2:11 hours to 2:59 hours) while delivering 58% cost savings. The checkpoint time of every 20 minutes proved manageable, allowing quick state saves without significant overhead.
When to save
It is worth noting that a decision has to be taken regarding how frequently to checkpoint (save state during run time) the process that is running. While some applications can save in seconds, for the typical file sizes seen in tightly-coupled workloads save times can be substantial, with some codes needing minutes to checkpoint. As with benchmarking compute instances, it is worth taking a representative case and benchmarking save and solve times from that to carry out a brief risk/reward analysis in a spreadsheet.
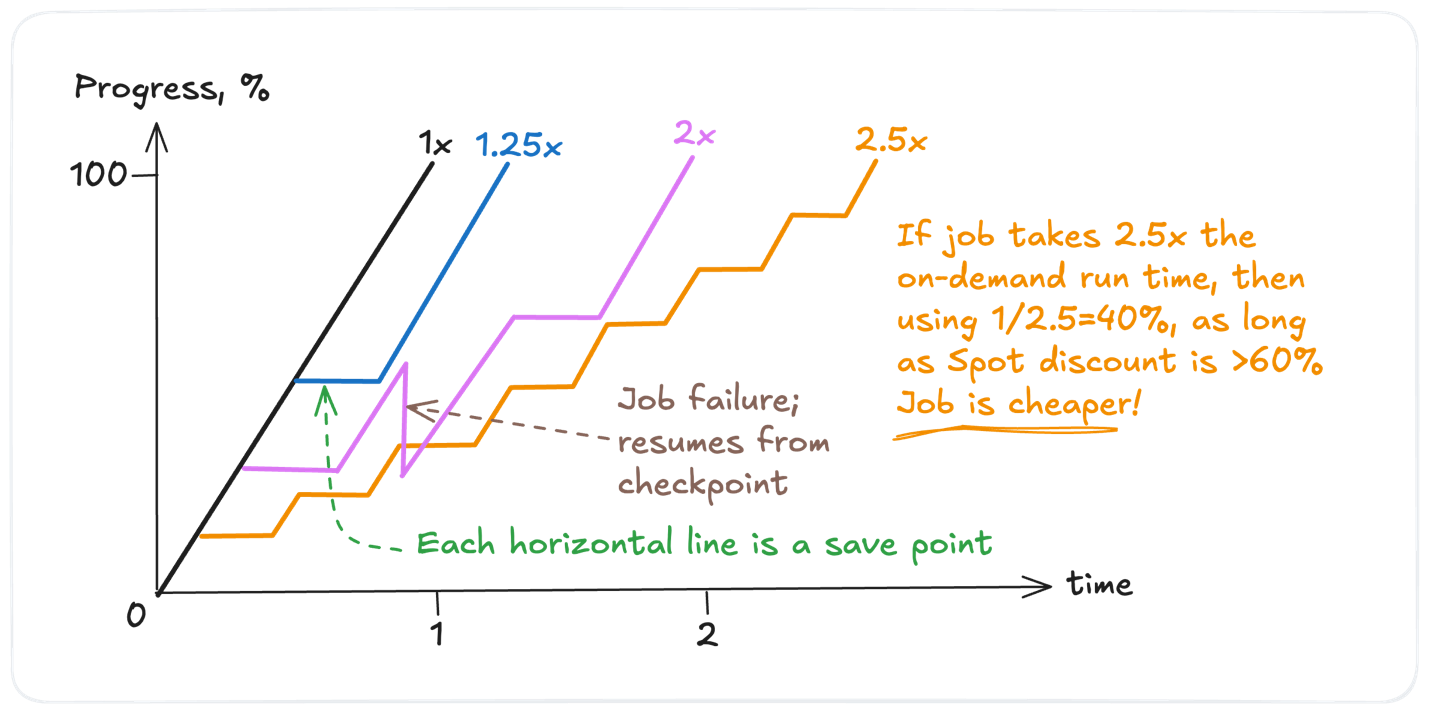
Figure 7 – Cost comparison of job completion scenarios across checkpoint frequencies and Spot interruptions, relative to an On-Demand baseline without checkpointing. Note: This is considered a worst-case scenario; use of Spot pricing doesn’t necessarily affect job run time and a job could run in the same wall time as an on-demand job.
As an example, consider a job running without interruption on On-Demand instances with no checkpointing as being our benchmark. Adding checkpointing stages to a long-running job is generally good practice, but it introduces pauses in compute progress while the wall-clock continues. This overhead may increase compute cost by approximately 25% in this example, assuming save time is long relative to overall job run time.
If the job runs on Spot Instances with an additional checkpoint to safeguard compute progress, the cost increases slightly. Should the job experience a Spot interruption, computation resumes from the last checkpoint. This is the 2x scenario in the plot: the job has taken double the original compute-only time, but has saved twice and experienced one interruption.
Even in a worst case where the job is repeatedly checkpointed yet completes uninterrupted — taking 2.5x the wall-clock time of the original benchmark – it would still be cheaper on Spot Instances, provided the Spot discount exceeds 60% (a conservative estimate for many instance types).
To determine the sweet spot for checkpoint frequency, a quick spreadsheet calculation based on the benchmark time to save and solve a job against the risk of interruption of a job on a given instance is a worthwhile exercise.
Smart Job Navigator Configuration and Best Practices
Key Configuration Options
The SJN behavior can be customized using following environment variables:
| Variable | Description | Default | |
| 1 | SJN_MAX_RETRY_COUNT | Maximum total retry attempts across all queues | 10 |
| 2 | SJN_RETRY_COUNT | Maximum retry attempts per queue | 1 |
| 3 | SJN_PENDING_THRESHOLD | Seconds before moving pending jobs | 240 |
| 4 | SJN_INTELLIGENT_QUEUE_SELECTION | Use intelligent queue selection | TRUE |
| 5 | SJN_FAIL_FAST_TO_OD | Fail directly to on-demand queues | FALSE |
Queue Selection Strategies
The system uses three queue selection strategies:
- Intelligent Selection(default): Uses AWS Spot Placement Scores filtered by queue-specific availability zones
- Fail-Fast-to-OD: Moves directly to on-demand queues after failure
- Legacy: Priority-based selection using configured queue priorities
Best Practices
- Configure Spot queues with at least 3 different instance types (more diversification is better) for intelligent selection
- Set up queues with same configuration across different availability zones when possible
- Queue AZ Strategy: Set up queues across all availability zones for maximum Spot availability, or configure queues with same configuration across different availability zones if inter-node communication is high to reduce inter-AZ data transfer costs
- Use per-job options (- -no-intelligent-q-selection , – -fail-fast-to-od ) for specific workload requirements
- Avoid using cd commands in job scripts as they may cause issues during queue transitions
Troubleshooting
Use the following commands to diagnose issues with the Spot Job Navigator (SJN) service:
# Check service status
sudo systemctl status sjn

# View service logs
journalctl -u sjn -f

# Check tracking file
cat /var/log/parallelcluster/sjn-tracking.json | jq

# View suspended queues
cat /var/log/parallelcluster/sjn-suspended-queues.json | jq

# Check default queue priorities
cat /etc/parallelcluster/sjn-queue-priority.conf
Conclusion
Our Smart Job Navigator solution transforms how organizations can approach HPC workloads on AWS. By intelligently managing Spot Instances, we’ve created a bridge between the cost advantages of Spot pricing and the reliability requirements of long-running tightly-coupled HPC jobs. In the above demonstration, the system delivered cost savings of more than 50% with a total wall-clock time increase of 14-27% compared to an equivalent On-Demand run – a worthwhile trade-off for most HPC workloads.
The solution’s success lies in its holistic approach: automatic handling of Spot interruptions through checkpointing, intelligent queue selection using real-time AWS APIs, comprehensive job tracking, configurable retry limits, and automatic capacity issue handling. The system provides detailed metrics including total active time, billable running time, and queue transition history, enabling precise cost analysis and optimization.
You can find the documentation at github repo sample-smart-job-navigator-for-tightly-coupled-hpc-workloads , allowing organizations to implement these capabilities in their own environments.
As we look to the future, we’re exploring enhancements like support for additional job schedulers, integration with AWS Fault Injection Simulator, and multi-region failover capabilities.
For organizations running HPC workloads on AWS, this solution opens new possibilities for cost optimization without sacrificing reliability or performance. It’s a practical demonstration of how thoughtful system design can transform what was once considered impossible – running tightly-coupled, multi-node, long-duration HPC workloads on Spot Instances – into a standard operating procedure.