IBM & Red Hat on AWS
Deploying IBM Cloud Pak for Data on Red Hat OpenShift Service on AWS (ROSA)
Amazon Web Services customers who are looking to deploy and use IBM Cloud Pak for Data (CP4D) on the AWS Cloud, can use Red Hat OpenShift Service on AWS (ROSA).
ROSA is a fully managed service, jointly supported by AWS and Red Hat. It is managed by Red Hat Site Reliability Engineers and provides a pay-as-you-go pricing model, as well as a unified billing experience on AWS.
With this, customers do not manage the lifecycle of Red Hat OpenShift Container Platform clusters. Instead, they are free to focus on developing new solutions and innovating faster, using IBM’s integrated data and artificial intelligence platform on AWS, to differentiate their business and meet their ever-changing enterprise needs.
In this post, we explain how to create a ROSA classic cluster and install an instance of IBM Cloud Pak for Data.
Cloud Pak for Data architecture
Here, we are implementing a highly available ROSA classic cluster with three Availability Zones (AZs), three control plane nodes, three infrastructure nodes, and three data plane nodes.
Review the AWS Regions and Availability Zones documentation and the regions where ROSA is available to choose the best region for your deployment.
Figure 1 demonstrates the solution’s architecture.
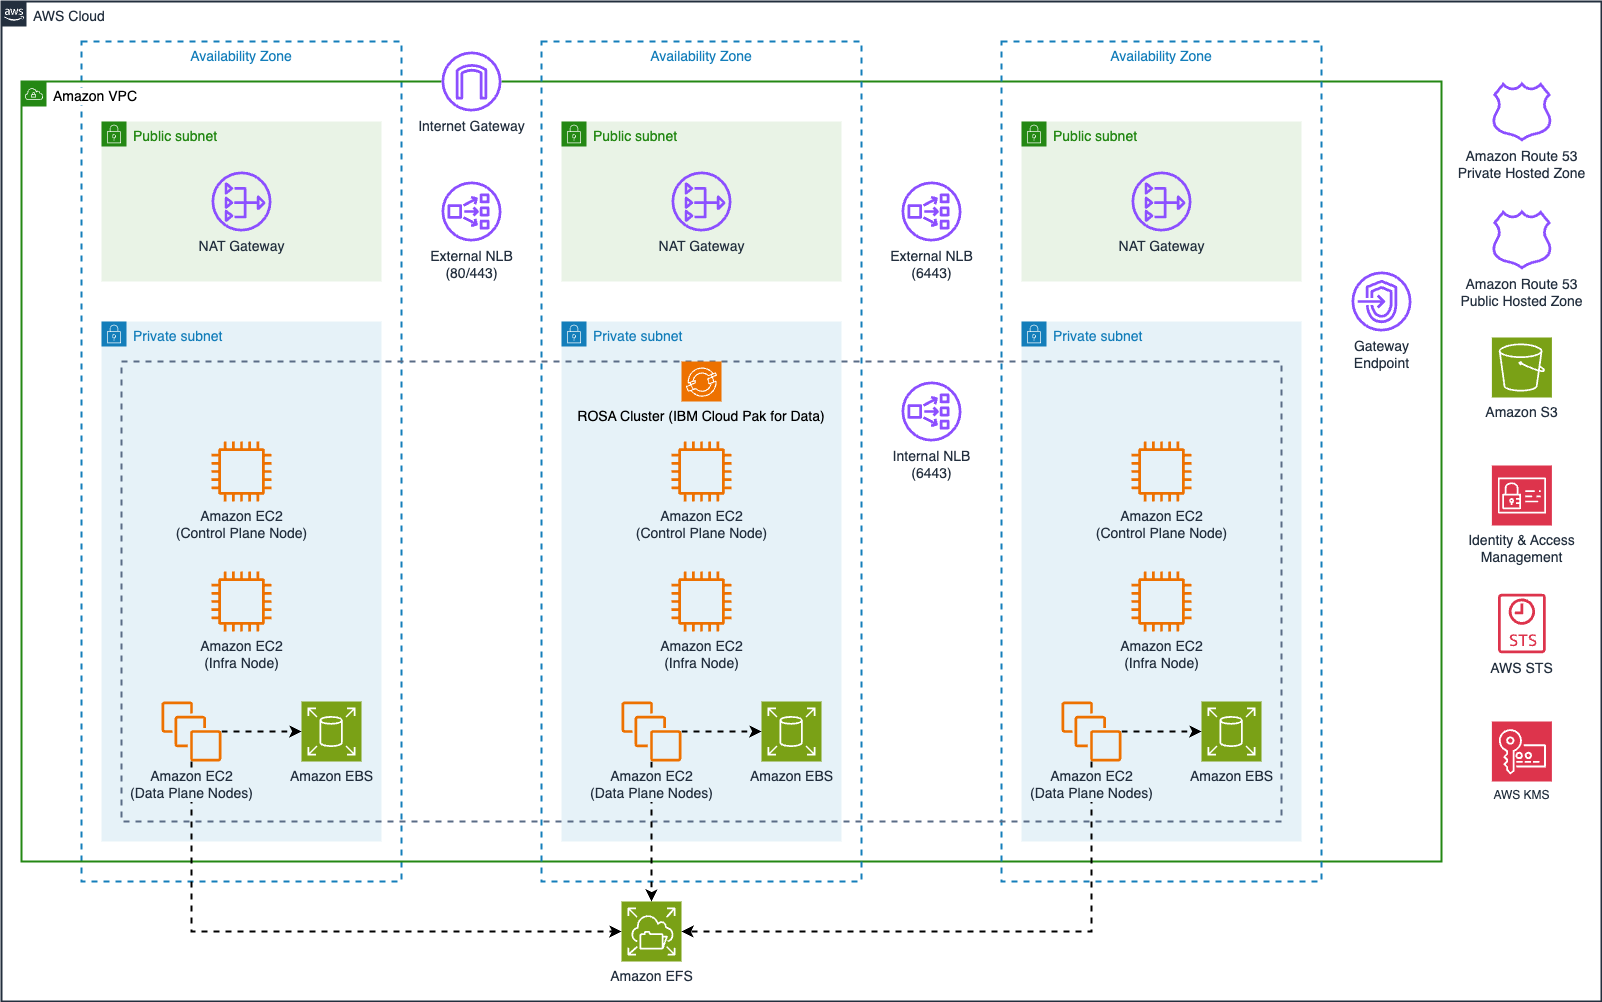
Figure 1. IBM Cloud Pak for Data on ROSA.
In our scenario, we are building a public ROSA classic cluster, with internet-facing Elastic Load Balancers providing access to our cluster.
If you require both your ROSA cluster and the CP4D workloads to be private, you can configure ROSA with AWS PrivateLink in your AWS account. CP4D is also compatible with ROSA hosted control planes (HCP). However, not all CP4D services can be deployed on ROSA HCP. For further details, refer to the IBM documentation.
We are using Amazon Elastic Block Store (Amazon EBS) for local storage and Amazon Elastic File System (Amazon EFS) for the cluster’s persistent storage. Review the IBM documentation for information about supported storage options.
Also, review the AWS prerequisites for ROSA and follow the Security best practices in IAM documentation, before deploying CP4D for production workloads, to protect your AWS account before deploying CP4D.
Cost
You are responsible for the costs associated with the AWS services utilized when deploying CP4D in your AWS account. For cost estimates, please refer to the AWS Pricing Calculator and the pricing pages for each service you’ll utilize in your implementation, including Amazon Elastic Compute Cloud (Amazon EC2), Amazon EBS, Amazon EFS, ROSA, Amazon Virtual Private Cloud (Amazon VPC), Elastic Load Balancing (ELB), and others.
Prerequisites
Before getting started, review the following prerequisites for this solution:
- This blog assumes familiarity with: CP4D, Terraform, Amazon EC2, Amazon EBS, Amazon EFS, Amazon VPC, and AWS Identity and Access Management (IAM).
- Access to an AWS account, with permissions to create the resources described in the installation steps section.
- An AWS IAM user, with the permissions described in the AWS prerequisites for ROSA documentation.
- Verification of the required AWS service quotas to deploy ROSA. You can request service-quota increases from the AWS console.
- Access to an IBM entitlement API key: either a 60-day trial or an existing entitlement.
- Access to a Red Hat ROSA token; you can register on the Red Hat website to obtain one.
- A bastion host with Amazon Linux , with required software packages to run the CP4D installer:
Installation steps
Complete the following steps to install a Classic ROSA cluster in a new Amazon VPC and deploy CP4D:
- Navigate to the ROSA console to enable the ROSA service:
- Choose Get started.
- On the Verify ROSA prerequisites page, select I agree to share my contact information with Red Hat.
- Choose Enable ROSA.
- Open the IAM console.
- In the navigation pane, choose Policies, and the choose Create policy.
- Refer to the Red Hat documentation for ROSA clusters using AWS STS to create an IAM policy with the required permissions to install your ROSA classic cluster for CP4D.
- From the IAM console navigation pane, choose Roles and then choose Create role:
- For Trusted entity type, choose AWS service, under Use case choose EC2, and choose Next.
- On the Add permissions page, use the Search field to locate and select the policy you’ve created in the previous step.
- Repeat the steps above for the the AmazonSSMManagedInstanceCore policy and choose Next.
- Provide a name to the new role, like cloudpak-installer-role, and choose Create role.
- Launch an EC2 instance to run the CP4D installation. We’ve used the following definitions:
- Instance name: cloudpak-installer-bastion.
- Amazon Machine Image (AMI): Amazon Linux 2023 AMI.
- Architecture: 64-bit (x86).
- Instance size: medium.
- Key pair: Select an existing Key pair or create one to securely access the EC2 instance.
- Network settings: Choose your preferred Amazon VPC for the EC2 instance.
- Security group: Create a new security group or choose an existing one. If you intend to access your bastion host via SSH, ensure that your source IP CIDR is allow-listed.
Consider using SSM-based access, a capability of AWS Systems Manager for enhanced security, avoiding public IPs and SSH. Make sure you have the necessary VPC endpoints for System Manager. Amazon Linux 2023 comes with the SSM Agent preinstalled, but you can verify it’s running by following this SSM Agent guide. Refer to the Guidance for Network Security on AWS for more information on how to design and implement security policies and controls on your networking stack.
-
- In the Configure storage panel set the storage size for your instance to 20 GiB.
- Expand the Advanced details section and choose the IAM role created on step 4 in the IAM instance profile
- Choose Launch instance.
- Once your EC2 instance is running, use Session Manager to connect and install the necessary packages:
$ sudo yum update -y
$ sudo yum install docker -y
$ sudo systemctl start docker
$ sudo systemctl enable docker
$ sudo usermod -a -G docker ec2-user
$ sudo yum install jq gettext -y
$ sudo wget -c https://mirror.openshift.com/pub/openshift-v4/clients/rosa/latest/rosa-linux.tar.gz -O - | sudo tar -xz -C /usr/local/bin/
$ export OPENSHIFT_VERSION=4.15.31
$ sudo wget -c https://mirror.openshift.com/pub/openshift-v4/x86_64/clients/ocp/${OPENSHIFT_VERSION}/openshift-client-linux-${OPENSHIFT_VERSION}.tar.gz -O - | sudo tar -xz -C /usr/local/bin/- Setup your AWS environment:
$ TOKEN=$(curl -X PUT "http://169.254.169.254/latest/api/token" -H "X-aws-ec2-metadata-token-ttl-seconds: 21600")
$ export AWS_REGION=$(curl -H "X-aws-ec2-metadata-token: $TOKEN" http://169.254.169.254/latest/meta-data/placement/region)
$ export ACCOUNT_ID=$(aws sts get-caller-identity --output text --query Account)
$ aws configure set default.region ${AWS_REGION}- Navigate to the Red Hat Hybrid Cloud Console, and copy your OpenShift Cluster Manager API Token.
- Use the token and log in to your Red Hat account:
$ rosa login --token=<<YOUR_ROSA_API_TOKEN>>- Verify that your AWS account satisfies the quotas to deploy your cluster:
$ rosa verify quota- When deploying ROSA for the first time, create the account-wide roles:
$ rosa create account-roles --mode auto --yes- Create your ROSA cluster:
$ export CLUSTER_NAME=<<YOUR_CLUSTER_NAME>>
$ rosa create cluster --cluster-name ${CLUSTER_NAME} --sts \
--multi-az \
--region ${AWS_REGION} \
--version ${OPENSHIFT_VERSION} \
--compute-machine-type m6i.4xlarge \
--replicas 3 \
--availability-zones ${AWS_REGION}a,${AWS_REGION}b,${AWS_REGION}c \
--operator-roles-prefix ${CLUSTER_NAME} \
--mode auto --yes \
--watch- Once your cluster is ready, create a cluster-admin user and take note of the cluster API URL, username, and password:
$ rosa create admin --cluster=${CLUSTER_NAME}- Log in to your cluster using the login information from the previous step. For example:
$ oc login https://<<YOUR_CLUSTER_API_ADDRESS>>:6443 \
--username cluster-admin \
--password <<YOUR_CLUSTER_ADMIN_PASSWORD>>- Create a KubeletConfig to change process IDs limits. Choose Yes when prompted to reboot your OpenShift nodes:
$ rosa create kubeletconfig -c ${CLUSTER_NAME} --pod-pids-limit=16384- Create an inbound rule in your worker nodes security group, allowing NFS traffic from your cluster’s VPC CIDR:
$ WORKER_NODE=$(oc get nodes --selector=node-role.kubernetes.io/worker -o jsonpath='{.items[0].metadata.name}')
$ VPC_ID=$(aws ec2 describe-instances --filters "Name=private-dns-name,Values=$WORKER_NODE" --query 'Reservations[*].Instances[*].{VpcId:VpcId}' | jq -r '.[0][0].VpcId')
$ VPC_CIDR=$(aws ec2 describe-vpcs --filters "Name=vpc-id,Values=$VPC_ID" --query 'Vpcs[*].CidrBlock' | jq -r '.[0]')
$ SG_ID=$(aws ec2 describe-instances --filters "Name=private-dns-name,Values=$WORKER_NODE" --query 'Reservations[*].Instances[*].{SecurityGroups:SecurityGroups}' | jq -r '.[0][0].SecurityGroups[0].GroupId')
$ aws ec2 authorize-security-group-ingress \
--group-id $SG_ID \
--protocol tcp \
--port 2049 \
--cidr $VPC_CIDR | jq .- Create an Amazon EFS file system with AWS Key Management Service (KMS) encryption:
$ EFS_ID=$(aws efs create-file-system --performance-mode generalPurpose --encrypted --region ${AWS_REGION} --tags Key=Name,Value=ibm_cp4d_fs | jq -r '.FileSystemId')
$ SUBNETS=($(aws ec2 describe-subnets --filters "Name=vpc-id,Values=${VPC_ID}" "Name=tag:Name,Values=*${CLUSTER_NAME}*private*" | jq --raw-output '.Subnets[].SubnetId'))
$ for subnet in ${SUBNETS[@]}; do
  aws efs create-mount-target \
    --file-system-id $EFS_ID \
    --subnet-id $subnet \
    --security-groups $SG_ID
done- Log in to Container software library on My IBM and copy your API key.
- In this blog, we are installing CP4D with IBM Watson Machine Learning and IBM Watson Studio.
- Review the IBM documentation to determine which CP4D components you need to install to support your requirements.
- Export environment variables for the CP4D installation. The COMPONENTS variable defines which services will be installed:
$ export OCP_URL=<<https://YOUR_CLUSTER_API_ADDRESS:6443>>
$ export OPENSHIFT_TYPE=ROSA
$ export IMAGE_ARCH=amd64
$ export OCP_USERNAME=cluster-admin
$ export OCP_PASSWORD=<<YOUR_CLUSTER_ADMIN_PASSWORD>>
$ export SERVER_ARGUMENTS="--server=${OCP_URL}"
$ export LOGIN_ARGUMENTS="--username=${OCP_USERNAME} --password=${OCP_PASSWORD}"
$ export CPDM_OC_LOGIN="cpd-cli manage login-to-ocp ${SERVER_ARGUMENTS} ${LOGIN_ARGUMENTS}"
$ export OC_LOGIN="oc login ${OCP_URL} ${LOGIN_ARGUMENTS}"
$ export PROJECT_CERT_MANAGER=ibm-cert-manager
$ export PROJECT_LICENSE_SERVICE=ibm-licensing
$ export PROJECT_SCHEDULING_SERVICE=ibm-cpd-scheduler
$ export PROJECT_CPD_INST_OPERATORS=cpd-operators
$ export PROJECT_CPD_INST_OPERANDS=cpd-instance
$ export STG_CLASS_BLOCK=gp3-csi
$ export STG_CLASS_FILE=efs-nfs-client
$ export IBM_ENTITLEMENT_KEY=<<YOUR_IBM_API_KEY>>
$ export VERSION=5.0.2
$ export COMPONENTS=ibm-cert-manager,ibm-licensing,scheduler,cpfs,cpd_platform
$ export EFS_LOCATION=${EFS_ID}.efs.${AWS_REGION}.amazonaws.com
$ export EFS_PATH=/
$ export PROJECT_NFS_PROVISIONER=nfs-provisioner
$ export EFS_STORAGE_CLASS=efs-nfs-client
$ export NFS_IMAGE=k8s.gcr.io/sig-storage/nfs-subdir-external-provisioner:v4.0.2- Download and install the CP4D cli as per supported Cloud Pak for Data version:
$ curl -v https://icr.io
$ mkdir -p ibm-cp4d
$ wget https://github.com/IBM/cpd-cli/releases/download/v14.0.2/cpd-cli-linux-EE-14.0.2.tgz -O - | tar -xz -C ~/ibm-cp4d --strip-components=1
$ export PATH=/home/ec2-user/ibm-cp4d:$PATH
$ cpd-cli manage restart-container- Log in to your ROSA cluster:
$ cpd-cli manage login-to-ocp --username=${OCP_USERNAME} \
--password=${OCP_PASSWORD} --server=${OCP_URL}- Setup persistent storage for your cluster:
$ cpd-cli manage setup-nfs-provisioner \
--nfs_server=${EFS_LOCATION} \
--nfs_path=${EFS_PATH} \
--nfs_provisioner_ns=${PROJECT_NFS_PROVISIONER} \
--nfs_storageclass_name=${EFS_STORAGE_CLASS} \
--nfs_provisioner_image=${NFS_IMAGE}- Create projects to deploy the CP4D software:
$ oc new-project ${PROJECT_CPD_INST_OPERATORS}
$ oc new-project ${PROJECT_CPD_INST_OPERANDS}
$ oc new-project ${PROJECT_CERT_MANAGER}
$ oc new-project ${PROJECT_LICENSE_SERVICE}
$ oc new-project ${PROJECT_SCHEDULING_SERVICE}- Configure the global image pull-secret to pull images from the IBM container repository:
$ cpd-cli manage add-icr-cred-to-global-pull-secret \
--entitled_registry_key=${IBM_ENTITLEMENT_KEY}- Install the Certificate Manager, License Service Operators, and the Scheduling Service:
$ cpd-cli manage apply-cluster-components \
--release=${VERSION} \
--license_acceptance=true \
--cert_manager_ns=${PROJECT_CERT_MANAGER} \
--licensing_ns=${PROJECT_LICENSE_SERVICE}

$ cpd-cli manage apply-scheduler \
--release=${VERSION} \
--license_acceptance=true \
--scheduler_ns=${PROJECT_SCHEDULING_SERVICE}
The IBM Certificate Manager, part of CP4D’s foundational services, automates the issuance and renewal of TLS/SSL certificates to ensure secure communication between services.
- Run the following command to allow the operators’ project to watch the control plane and services project:
$ cpd-cli manage authorize-instance-topology \
--cpd_operator_ns=${PROJECT_CPD_INST_OPERATORS} \
--cpd_instance_ns=${PROJECT_CPD_INST_OPERANDS}- Install the CP4D foundational services:
$ cpd-cli manage setup-instance-topology \
--release=${VERSION} \
--cpd_operator_ns=${PROJECT_CPD_INST_OPERATORS} \
--cpd_instance_ns=${PROJECT_CPD_INST_OPERANDS} \
--license_acceptance=true \
--block_storage_class=${STG_CLASS_BLOCK}- Create the operators and operator subscriptions for your CP4D installation:
$ cpd-cli manage apply-olm \
--release=${VERSION} \
--components=${COMPONENTS} \
--cpd_operator_ns=${PROJECT_CPD_INST_OPERATORS}- Install the CP4D platform and services:
$ cpd-cli manage apply-cr \
--components=${COMPONENTS} \
--release=${VERSION} \
--cpd_instance_ns=${PROJECT_CPD_INST_OPERANDS} \
--block_storage_class=${STG_CLASS_BLOCK} \
--file_storage_class=${STG_CLASS_FILE} \
--license_acceptance=true- Run the following commands to install Watson Machine Learning:
$ cpd-cli manage apply-olm \
--release=${VERSION} \
--cpd_operator_ns=${PROJECT_CPD_INST_OPERATORS} \
--components=wml

$ cpd-cli manage apply-cr \
--components=wml \
--release=${VERSION} \
--cpd_instance_ns=${PROJECT_CPD_INST_OPERANDS} \
--block_storage_class=${STG_CLASS_BLOCK} \
--file_storage_class=${STG_CLASS_FILE} \
--license_acceptance=true- Run the following commands to install Watson Studio:
$ cpd-cli manage apply-olm \
--release=${VERSION} \
--cpd_operator_ns=${PROJECT_CPD_INST_OPERATORS} \
--components=ws

$ cpd-cli manage apply-cr \
--components=ws \
--release=${VERSION} \
--cpd_instance_ns=${PROJECT_CPD_INST_OPERANDS} \
--block_storage_class=${STG_CLASS_BLOCK} \
--file_storage_class=${STG_CLASS_FILE} \
--license_acceptance=true- Get your CP4D URL and admin credentials:
$ cpd-cli manage get-cpd-instance-details \
--cpd_instance_ns=${PROJECT_CPD_INST_OPERANDS} \
--get_admin_initial_credentials=true- The command output will display the URL of your CP4D and the password for your Admin user (Figure 2):
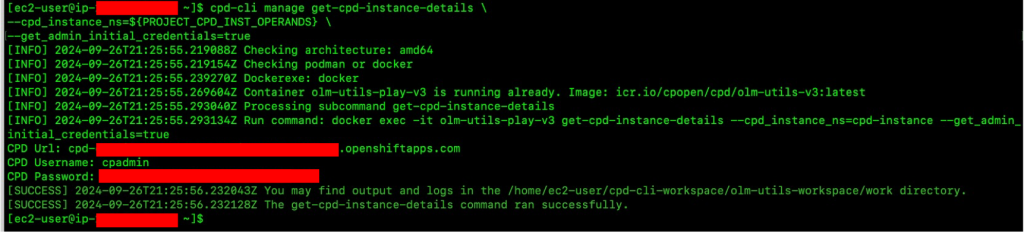
Figure 2. CP4D URL and admin credentials.
- Access your CP4D console using the information from the Step 35 (CP4D URL, user, admin password).
The Cloud Pak for Data console uses TLS encryption and HTTPS protocol to ensure secure connection and data transmission. Review the IBM documentation to setup security for your CP4D environment, including managing your TLS certificates.
- From the CP4D home (welcome page), choose Discover Services to be directed to the Services catalog.
- From the Services catalog page, you can see all CP4D available services.
- Expand the Status option on the navigation menu and choose Enabled. You will see the services that were enabled by running the installation of the Watson Machine Learning and Watson Studio components (Figure 3).
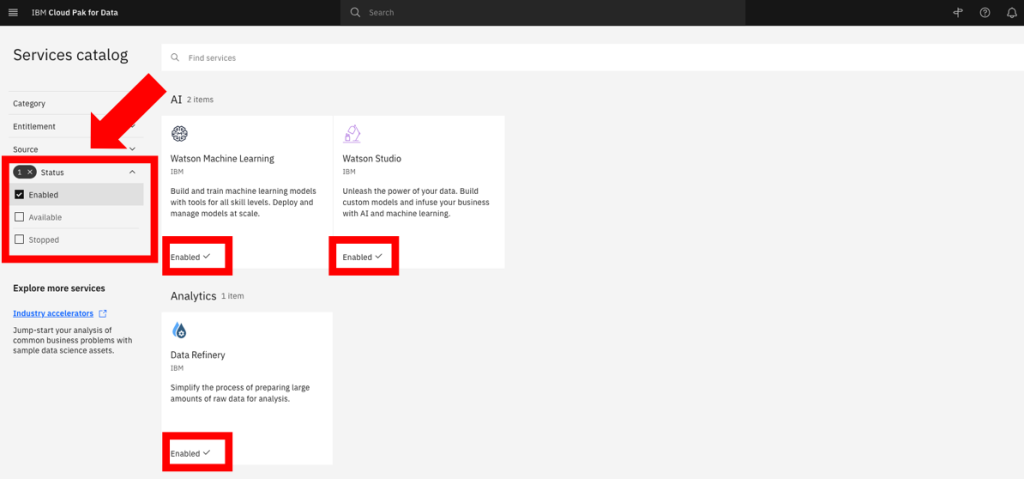
Figure 3. Services enabled in your CP4D catalog.
Congratulations! You have successfully deployed IBM CP4D on Red Hat OpenShift on AWS.
Post-installation
Review the following topics, when you installing CP4D on production:
- Review the IBM system requirements documentation to calculate the size of your ROSA cluster.
- Review the administrative tasks to enable security, maintenance, monitoring, managing users, and backing up your environment.
- How to setup services after you have installed the platform.
- Configure identity providers on ROSA.
- Enable auto scaling for your ROSA cluster.
- Review the Red Hat documentation for ROSA monitoring and logging.
Cleanup
Connect to your EC2 bastion host, and run the following steps to delete the CP4D installation, including ROSA. This avoids incurring future charges on your AWS account:
$ EFS_ID=$(aws efs describe-file-systems \
--query 'FileSystems[?Name==`ibm_cp4d_fs`].FileSystemId' \
--output text)

$ MOUNT_TARGETS=$(aws efs describe-mount-targets --file-system-id $EFS_ID --query 'MountTargets[*].MountTargetId' --output text)

$ for mt in ${MOUNT_TARGETS[@]}; do
  aws efs delete-mount-target --mount-target-id $mt
done

$ aws efs delete-file-system --file-system-id ${EFS_FS_ID}

$ rosa delete cluster -c ${CLUSTER_NAME} --yes --region ${AWS_REGION}
To monitor your cluster uninstallation logs, run:
$ rosa logs uninstall -c ${CLUSTER_NAME} --watchOnce the cluster is uninstalled, remove the operator-roles and oidc-provider, as informed in the output of the rosa delete command. For example:
$ rosa delete operator-roles -c <<OPERATOR_ROLES_NAME>> -m auto -y
$ rosa delete oidc-provider -c <<OIDC_PROVIDER_NAME>> -m auto -y
Conclusion
In summary, we explored how customers can take advantage of a fully managed OpenShift service on AWS to run IBM CP4D. With this implementation, customers can focus on what is important to them, their workloads, and their customers, and less on the day-to-day operations of managing OpenShift to run CP4D.
If you are interested in learning more about CP4D on AWS, explore the IBM Cloud Pak for Data (CP4D) on AWS Modernization Workshop.
Visit the AWS Marketplace for IBM Cloud Pak for Data offers:
- IBM Cloud Pak for Data
- IBM Cloud Pak for Data on Managed Openshift (BYOL)
- IBM DataStage for IBM Cloud Pak for Data
- IBM Db2 for IBM Cloud Pak for Data
- IBM OpenPages for IBM Cloud Pak for Data
- IBM Cognos Analytics for IBM Cloud Pak for Data
- IBM Planning Analytics for IBM Cloud Pak for Data
Further content:
- Accelerate Data Modernization and AI with IBM Databases on AWS
- Build a Modern Data Architecture on AWS with your IBM Z Mainframe
- Making Data-Driven Decisions with IBM watsonx.data, an Open Data Lakehouse on AWS
- Building a healthcare data pipeline on AWS with IBM Cloud Pak for Data
- IBM Cloud Pak for Data Simplifies and Automates How You Turn Data into Insights
- IBM on AWS Partner Page
- Red Hat OpenShift Service on AWS: architecture and networking
- Red Hat OpenShift Service on AWS: private clusters with AWS PrivateLink