AWS for Industries
Develop and deploy a customized workflow using Autonomous Driving Data Framework (ADDF) on AWS
Autonomous vehicles (AV) must be driven hundreds of millions of miles – and sometimes hundreds of billions of miles – to demonstrate their reliability in terms of fatalities and injuries. There is a need for alternative methods to supplement real-world testing including virtual testing and simulations, mathematic modeling and analysis, and scenario and behavior testing. In this AWS re:Invent session, we learned how BMW Group collects over 1 billion kilometers of anonymized perception data from its worldwide connected fleet of customer vehicles to develop safe and capable automated driving systems.
To support our automotive customers with addressing these pain points, we first created a reference architecture for advanced driver-assistance systems (ADAS) data lake, described by this AWS Architecture blog post. We also developed a blog series with GitHub repositories to cover the key aspects:
- Automated scene detection pipeline
- Running workload on Amazon Managed Workflow for Apache Airflow (MWAA)
- Automated image processing and model training pipeline
- Visualization of ROS Bag Data
Autonomous Driving Data Framework (ADDF) now industrializes the reference solution and offers pre-built sample data, centralized data storage, data processing pipelines, visualization mechanisms, search interface, simulation workload, analytics interfaces, and prebuilt dashboards. The goal is to process and provide searchable, high accuracy, labeled scenario-based data for downstream workloads including model training, synthetic data generation, and simulation.
Use Case and Solution Overview
The first release of ADDF covers the following four use cases (Figure 1):
- Scene Detection and Search: After data ingestion, metadata will be extracted from each ingested file and a scene detection pipeline determines scenes of interest, such as person-in-lane scenarios. The detected scene metadata is stored in Amazon DynamoDB and made available through Amazon OpenSearch Service, which enables users to find and locate relevant input data in the data lake based on scene metadata.
- Data Visualization: ADDF provides a Webviz-based data visualization module that can stream ROS bag files from the data lake and visualize them in a browser. The visualization module supports streaming of specific scenes detected in the previous step and enables users to verify or debug ROS bag files.
- Simulation: With ADDF, users can run their containerized workloads at scale on the ingested data. A simulation module provides high-level workflow orchestration using Amazon Managed Workflows for Apache Airflow (Amazon MWAA), which delegates compute intensive simulation tasks to dedicated services optimized for scalable parallel processing like AWS Batch or the managed Kubernetes service, Amazon Elastic Kubernetes Service (Amazon EKS).
- Develop and deploy: Bootstrapping, development, and deployment of modules 1–3 are enabled through the use of AWS open-source projects CodeSeeder and SeedFarmer. CodeSeeder utilizes AWS CodeBuild to remotely deploy individual modules. This enables modules to be developed using common infrastructure as code and deployment mechanisms like AWS Cloud Development Kit (AWS CDK), AWS CloudFormation, Terraform, and others. SeedFarmer utilizes declarative manifests to define an ADDF deployment and orchestrates module deployment, destruction, change detection, and state management. SeedFarmer enables automated GitOps management of ADDF deployments.

Figure 1: ADDF use cases
This solution architecture (Figure 2) has six key components:
- User interface for code development (AWS Cloud9), KPI reporting (Amazon QuickSight), web application for scenario search and visualization, deployment tool (SeedFarmer CLI) and modeling (Jupyter Notebook).
- Three pre-built workflows include Scene Detection and Search, Rosbag file virtualization, Simulation with EKS. Three additional workflows are on the roadmap: Model Training, Automatic Labeling, and KPI calculation.
- Orchestration service is Amazon MWAA with flexible compute backend (AWS Batch, Amazon EKS and Amazon EMR).
- Metadata storage includes AWS Glue Data Catalog for drive data, Amazon Neptune for file and data lineage, Amazon DynamoDB for drive metadata, and Amazon OpenSearch Service for OpenScenario Search.
- Amazon Simple Storage Service (Amazon S3) is the data storage for the raw data and Amazon Redshift is the data storage for numeric sensor data.
- CI/CD automation leverages AWS CDK, AWS CodeBuild, and AWS CodeSeeder.

Figure 2: ADDF solution overview
Deploying a Non-production ADDF Environment with Demo Notebook
Prerequisites
To simplify deployment and reduce the number of dependencies and prerequisites, the ADDF makes use of two AWS open-source projects: CodeSeeder to enable remote execution of Python code in AWS CodeBuild and SeedFarmer to orchestrate the deployment of ADDF modules by CodeSeeder.
By utilizing CodeSeeder and SeedFarmer, we are able to reduce the local prerequisites to:
- Python version 3.7 or greater
- git CLI
- AWS Credentials
- AWS CLI
- aws-cdk CLI version 2.20
Deployment
Step 1: Clone the ADDF repository from GitHub. We recommend checking out the most recent, official release branch. Since the ADDF is intended to be managed by automated CI/CD processes tied to customer’s own git repositories, we also suggest setting our remote GitHub repository as the upstream remote.
Step 2: Create a Python Virtual Environment and install the dependencies.

Demo Use Case
Log into JupyterHub
After the successful deployment, you can access JupyterHub module deployed on Amazon EKS and follow the below instructions to access the JupyterHub dashboard:
JupyterHub is recommended only for demo-related workloads and it is not recommended for production grade interaction with data/services involving production data. We recommend that you leverage Amazon EMR Studio for any non-demo related workloads.
- Open the Amazon EC2 console at https://console.aws.amazon.com/ec2/.
- On the navigation bar, choose the Region you have deployed ADDF to retrieve the DNS of the load balancer created for JupyterHub.
- Select the load balancer, which starts with
k8s-jupyteras shown below: - Copy the DNS name of the load balancer and append
jupyterto it, and below is how it should look like:
- Then you will be prompted to enter the JupyterHub
usernameandpasswordthat was initially created using the helper scriptsetup-secrets-example.shand stored in AWS Secrets Manager. They can be retrieved from the AWS Secrets Manager console, then selectjh-credentialsfrom the search bar and retrieve the credentials. - Once you have logged into the JupyterHub environment, you can create a sample notebook.
Run the Scene-Detection Pipeline
- You can download the two publicly available sample ROS bag files (file 1 and file 2) and copy them into your
raw-bucketthat would have been deployed by thedatalake-bucketsmodule. You can identify the bucket name using the naming patternaddf-demo-raw-bucket-<<hash>>and copy them to a prefix`rosbag-scene-detection` - Once the above files are uploaded, the
scene-detectionmodule driven by AWS Step Functions will be triggered and you should be expecting the module-specific DynamoDB tables, namelyRosbag-BagFile-MetadataandRosbag-Scene-Metadata, populated with the results. Following is the screenshot (Figure 4) of a successful run ofscene-detectionpipeline.
Figure 4: Scene Detection Pipeline with AWS Step Functions
- As a prerequisite of running the below commands inside the JupyterHub notebook, you should install a few binaries as below:
pip install boto3 pandas awscli
- You can execute the below to query the OpenSearch domain and get the list of tables:
You should be replacing the OpenSearch domain and the table name in the above command with the physical IDs deployed in your account and Region.
- Select the table (copy the table name) that starts with
rosbag-metadata-scene-search-<<date>>and construct the below query:You should be replacing the OpenSearch domain and the table name in the above command with the physical IDs deployed in your account and Region.
This use case provides an end-to-end scene detection pipeline for ROS bag files, ingesting the ROS bag files from S3, and transforming the topic data into parquet format to perform scene detection in PySpark on Amazon EMR. This then exposes scene descriptions via DynamoDB to Amazon OpenSearch.
Visualize the ROS bag file
You can query a private REST API powered by Amazon API Gateway to generate the Webviz endpoint and then construct the final endpoint by appending the query string parameters scene-id and record-id to get the signed URL.
You should be replacing the Private REST API link in the above command with the physical ID deployed in your account and Region.
Then, copy the value of the url key from the response body and open it in a Google Chrome browser (preferred). Once the URL is loaded, custom layouts for Webviz can be imported through JSON configs. This custom layout contains the topic configurations and window layouts specific to our ROS bag format and should be modified according to your ROS bag topics. Follow the below:
- Select Config → Import/Export Layout
- Copy and paste the contents of layout.json from
modules/visualization/layout.jsoninto the pop-up window and play the content.
You should be seeing a sample detected scene output as in Figure 5:
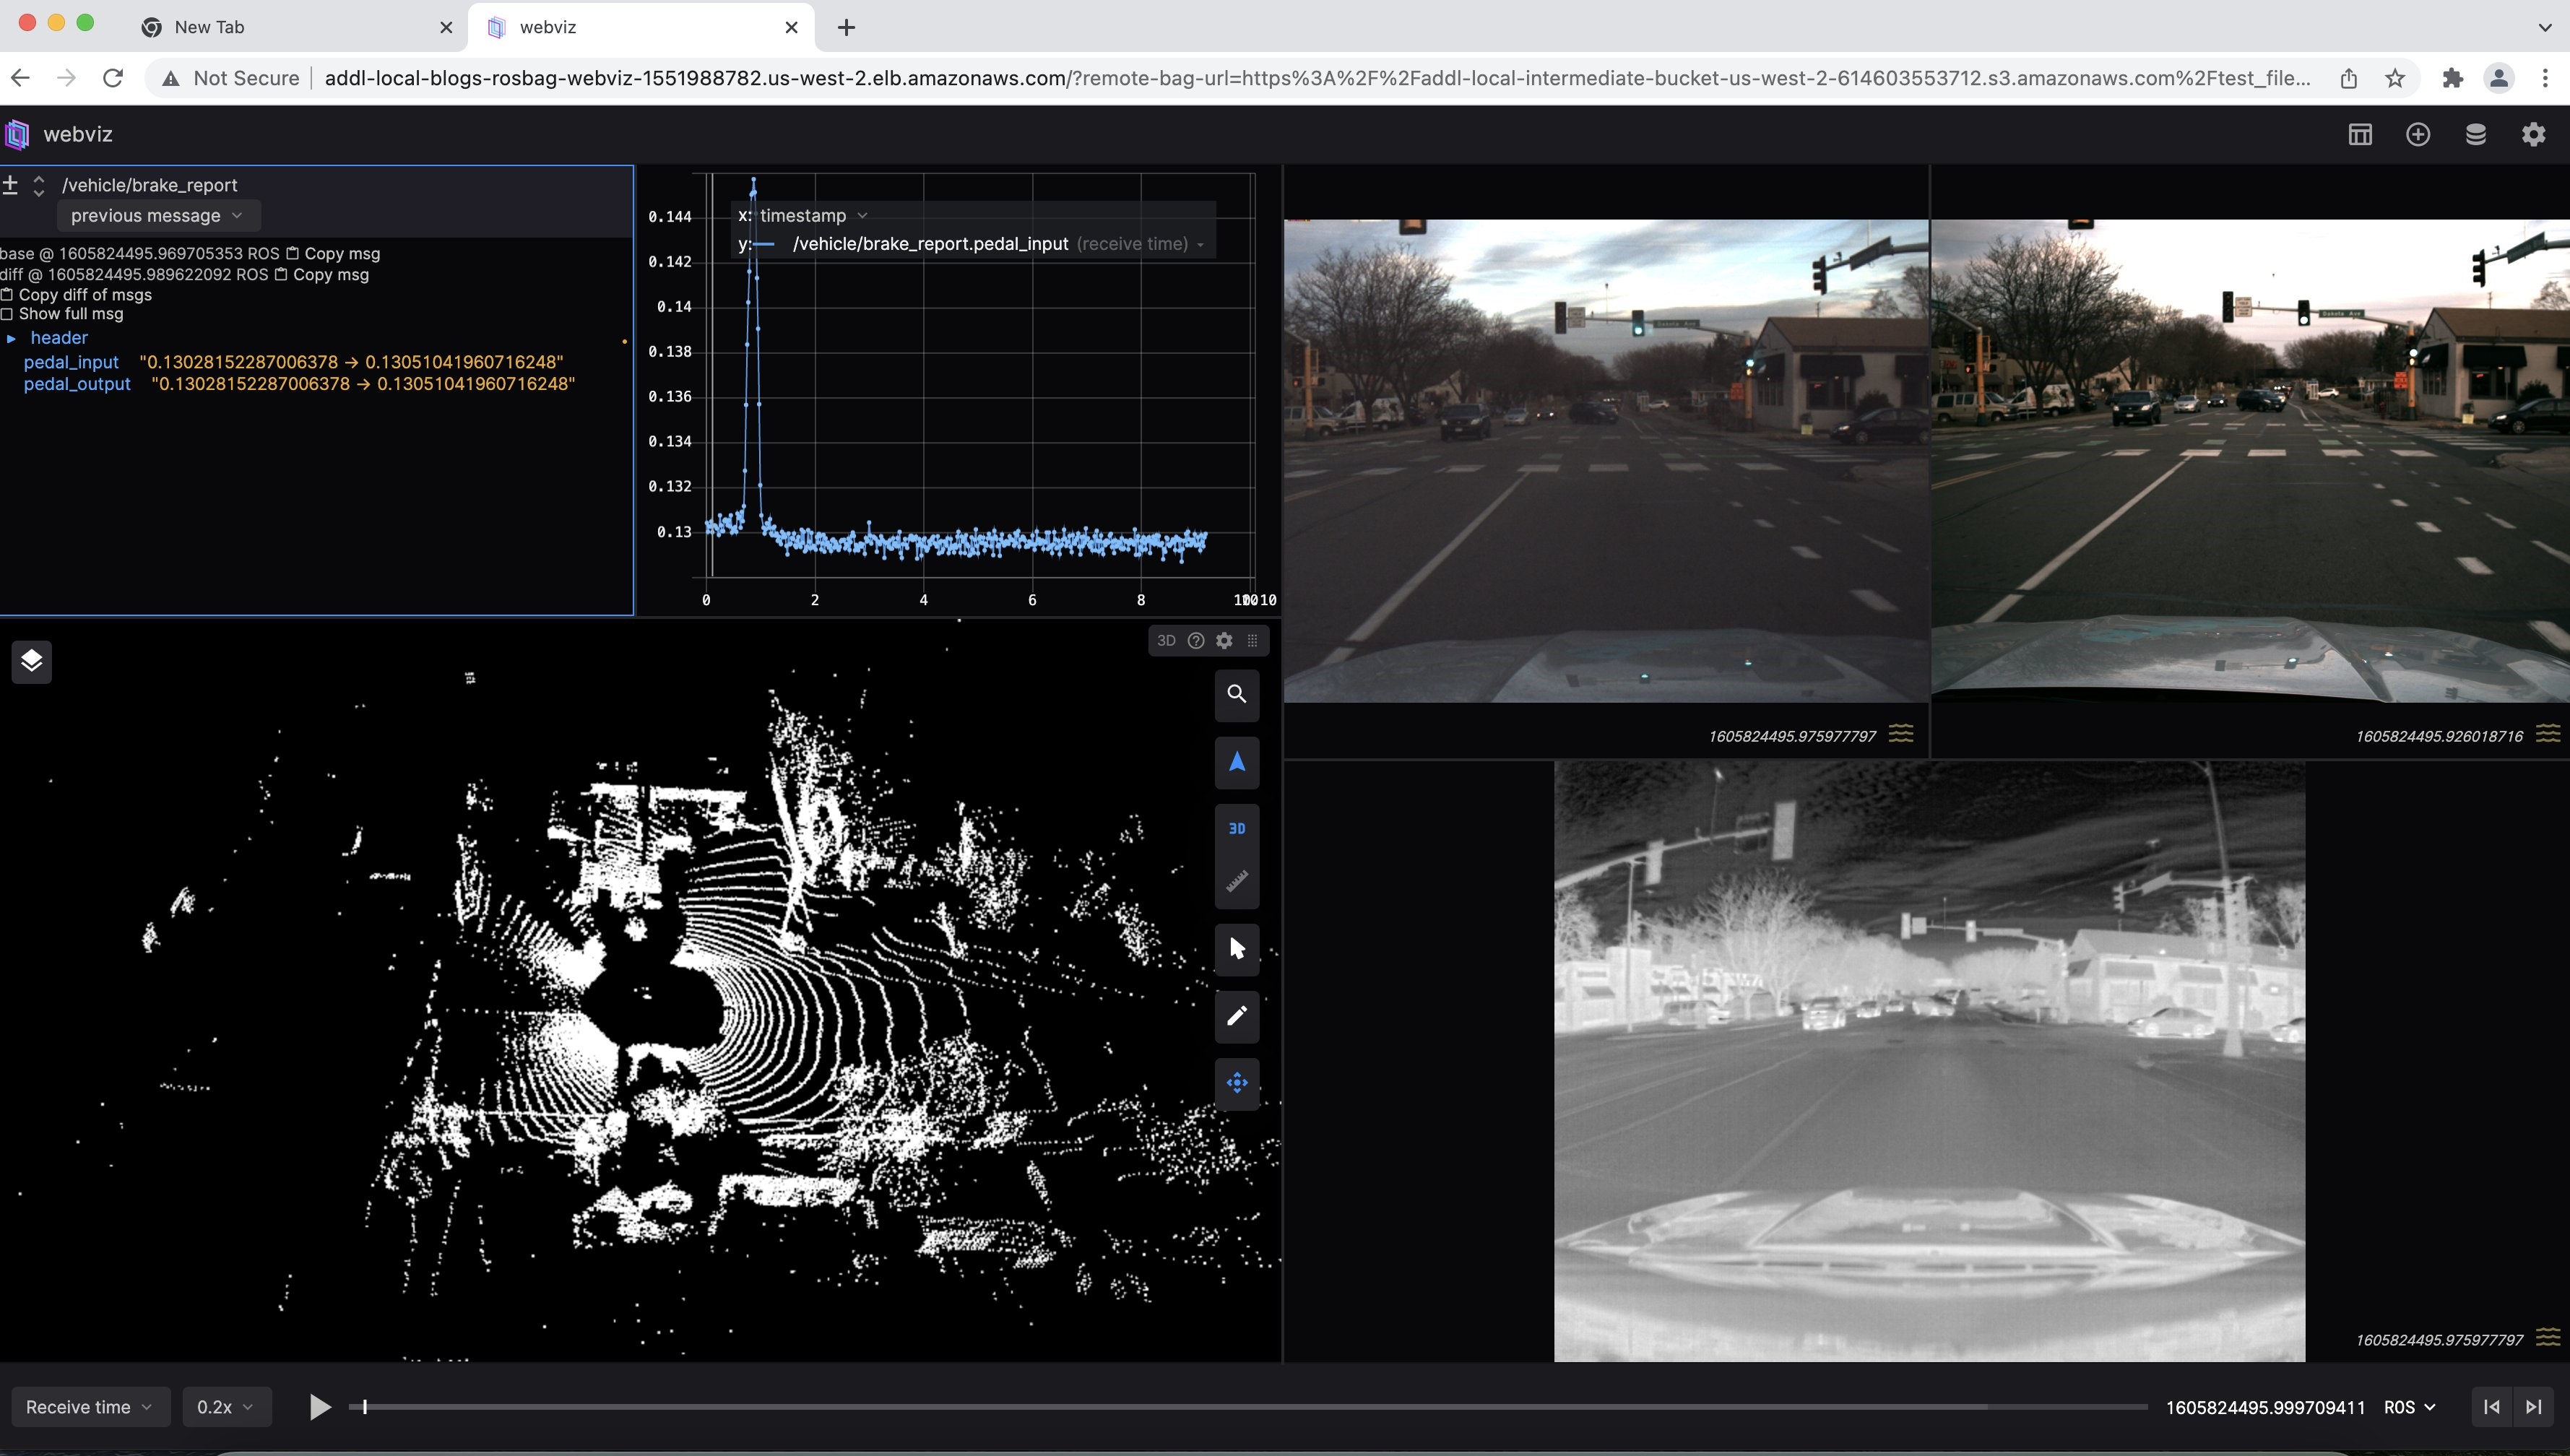
Figure 5: Example visualization of ROS bag file streamed from Amazon S3
Customize the Pipelines
The code base is segmented for management. A deployment is comprised of groups, which are made up of modules. The modules house the code whereas the groups and deployment are for logical separation. Modules can have dependencies on other modules (for example, a networking module can be reused by other modules) that belong to different groups, but module(s) declared as a part of a group cannot declare their dependencies within the same group. The groups are deployed in a specified order and are destroyed in the reverse of that order to natively handle dependencies. When deciding the list of the modules and their order, the ordering is critical (for example, you should deploy your networking module before you deploy compute resources that require a VPC). Each module can define input parameters for customization and output parameters to be leveraged by other modules, which gives the modules of the code base a level of abstraction from one another. In other words, we can modify a deployed module (for example, by adding new functionality or change an input parameter) without impacting other modules in the same deployment, where the SeedFarmer CLI will detect the changeset and execute it accordingly without impacting the dependent modules.
The manifests determine the inputs for each module in the project. There is a primary manifest (deployment.yaml in Figure 6) that drives the name of the deployment (also known as the project), the groups and their order in the deployment, and where to find the manifests for each group.
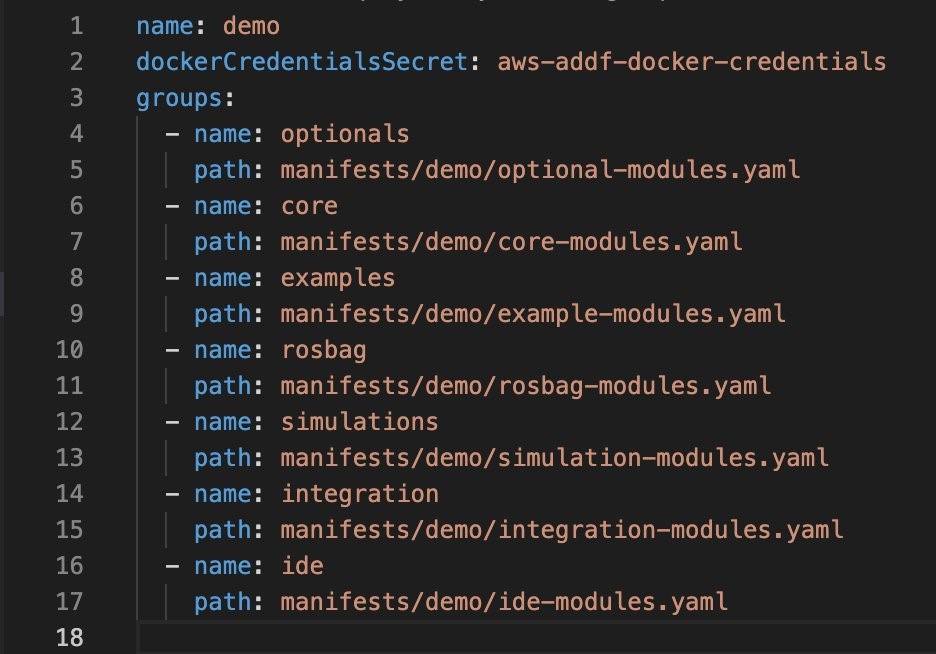
Figure 6: Primary manifest file
Each group manifest defines the modules, where the code is located, and their input parameters in key-value format (this is where you can also reference a module’s output from another group).

Figure 7: Manifest file of a given module
Now that you have a basic understanding, let’s explore how this is an advantage to us. The module rosbag-scene-detection is defined in the manifest manifests/demo/rosbag-modules.yaml (Figure 7) and the code is located at modules/analysis/rosbag-scene-detection. If you want to modify the code, such as adding a new step for data processing after the module has been deployed, you can add changes to the code and save them. For the changes to take effect and be deployed, you would need to rerun the deployment from a terminal:
SeedFarmer will detect that there has been a change to the code base for that module, and redeploy that module. In the background, SeedFarmer is comparing the deployment.yaml content to what is already deployed and applying the changes (in the order specified in deployment.yaml). Since each module has a level of abstraction, only the modules that have changed will be redeployed, leaving the unchanged modules alone.
Cleanup
To destroy the modules for a given deployment demo, you can run the below command:
You should be replacing the string
demowith the environment name you have set, if you have it customized. You can pass an optional--debugflag to the above command for getting debug level output.
Outlook and Conclusion
ADDF is a ready-to-use, open-source framework for ADAS workload. First, we described its architecture and what use cases it covers. Second, we showed how to deploy ADDF from scratch to get started quickly. Third, we described how to customize the scene detection pipeline to incorporate individual needs.
The test strategy blueprint provided by the ASAM Test Specification study group defined the test methods and use cases to validate AV and driving functions safely and reliably. ADDF covers the test methods including scenario-based test and fault injection. We are committed to extend and further develop ADDF to meet the demands of our customers—more workflows, multi-tenancy, and synthetic scene generation to name a few.
OEMs, Tier-N suppliers, and startups can benefit from this open-source solution. We are strong believers in open-source and value the feedback and contribution from the community.
References
- Reference Architecture for Autonomous Driving Data Lake
- Field Notes: Building an Autonomous Driving and ADAS Data Lake on AWS
- Field Notes: Building an automated scene detection pipeline for Autonomous Driving – ADAS Workflow
- Field Notes: Deploying Autonomous Driving and ADAS Workloads at Scale with Amazon Managed Workflows for Apache Airflow
- Field Notes: Building an Automated Image Processing and Model Training Pipeline
- Field Notes: Deploy and Visualize ROS Bag Data on AWS using rviz and Webviz for Autonomous Driving
- Developing a Platform for Software-defined Vehicles with Continental Automotive Edge (CAEdge)
- How to Run Massively Scalable ADAS Simulation Workloads on CAEdge