AWS Architecture Blog
Field Notes: Deploy and Visualize ROS Bag Data on AWS using rviz and Webviz for Autonomous Driving
In the automotive industry, ROS bag files are frequently used to capture drive data from test vehicles configured with cameras, LIDAR, GPS, and other input devices. The data for each device is stored as a topic in the ROS bag file. Developers and engineers need to visualize and inspect the contents of ROS bag files to identify issues or replay the drive data.
There are a couple of challenges to be addressed by migrating the visualization workflow into Amazon Web Services (AWS):
- Search, identify, and stream scenarios for ADAS engineers. Visualization tool should be ready instantly, load the data for a certain scenario over a search API, and show the first result through data streaming, to provide a good user experience.
- Native integration with the tool chain. Many customers implement the Data Catalog, data storage, and search API in AWS native services. This visualization tool should be integrated into such a tool chain directly.
Overview of solutions
This blog post describes three solutions on how to deploy and visualize ROS bag data on AWS by using two popular visualization tools:
- rviz is the standard open-source visualization tool used by the ROS community and has a large set of tools and plugin support.
- Webviz is an open-source tool created by Cruise that provides modular and configurable browser-based visualization.
In the autonomous driving data lake reference architecture, both visualization tools are covered in the step 10: Provide an advanced analytics and visualization toolchain including search function for particular scenarios using AWS AppSync, Amazon QuickSight (KPI reporting and monitoring), and Webviz, rviz, or other tooling for visualization.

Prerequisites
- Confirm you have followed the guide for working with the AWS CDK in TypeScript
- Install the AWS Command Line Interface (AWS CLI) v2
- Configure the AWS CLI
- For solution 2: Any Virtual Network Computing (VNC) compatible viewer can be used. You can find the binaries for your OS for TigerVNC from GitHub.
Solution 1 – Visualize ROS bag files using rviz on AWS RoboMaker virtual desktops
AWS RoboMaker provides simulation and testing infrastructure for robotics as a managed service. This includes out of the box support for virtual desktops with ROS tooling preconfigured and installed. When you launch a virtual desktop, AWS RoboMaker launches the NICE DCV web browser client. This client provides access to your AWS Cloud9 desktop and streaming applications.
Launch rviz on AWS RoboMaker virtual desktop
Follow the guide on creating a new development environment to provision a new integrated development environment (IDE) and open it. After your AWS Cloud9 IDE is open, you can launch a new virtual desktop by pressing the Virtual Desktop button at the top center of the IDE, and selecting Launch Virtual Desktop. This might take a couple of seconds to open in a new browser tab.
After your virtual desktop is loaded, you can run rviz by opening the terminal and running the following commands:
$ source /opt/ros/melodic/setup.bash
$ roscore &
$ rosrun rviz rviz
Solution 2 – Visualize ROS bag files using rviz on EC2 and TigerVNC
Note: We strongly recommend using the AWS RoboMaker managed solution for provisioning virtual desktops for your visualization needs. In cases where this is not possible due to different Linux distributions or versions, this solution allows an alternative method for setting up a virtual desktop on EC2.
In this solution (source code) we use AWS Cloud Development Kit (AWS CDK) to deploy a new Ubuntu 18.04 AMI EC2 instance to your AWS account and preconfigure it with rviz, TigerVNC, and Ubuntu Desktop.
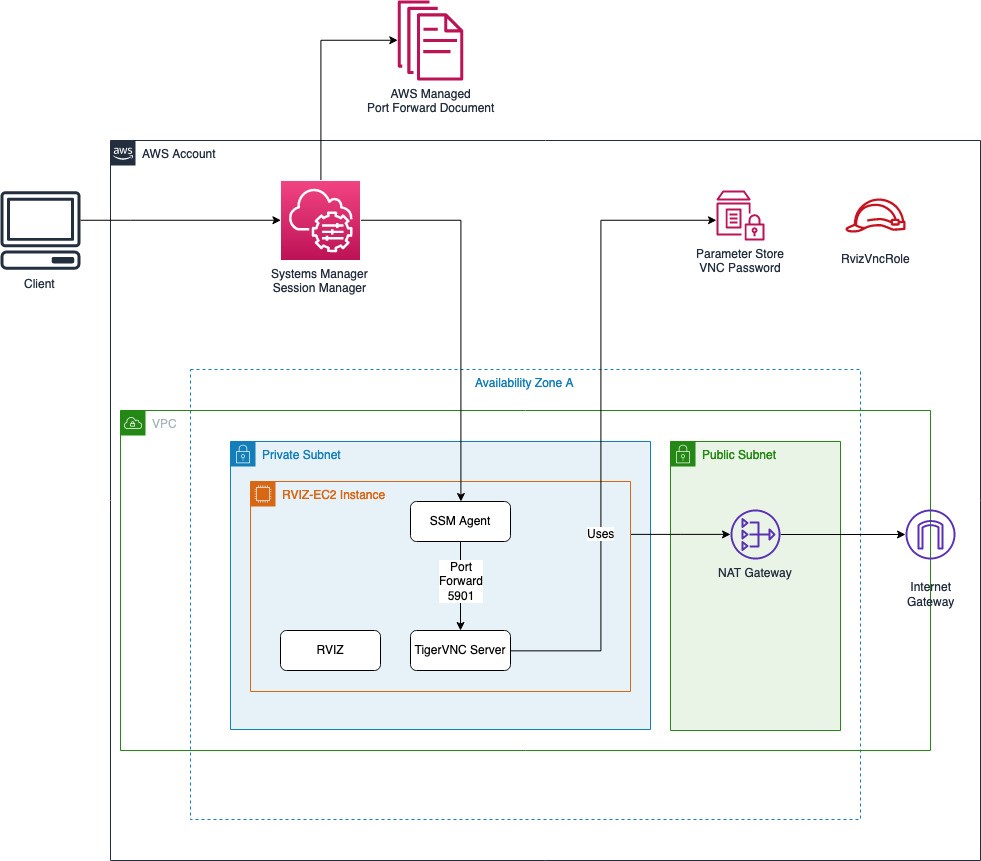
Figure 1. Architecture for solution 2 (visualize ROS bag files using rviz on EC2 and TigerVNC)
Open a shell terminal that has your AWS CLI configured. Run the following commands to clone the code and install the corresponding nodejs dependencies.
$ git clone https://github.com/aws-samples/aws-autonomous-driving-data-lake-ros-bag-visualization-using-rviz.git rviz-infra
$ cd rviz-infra
$ npm install
Note: Review the README to understand the project structure and commands.
Next, configure your project-specific settings, like your AWS Account, Region, VNC password, VPC to deploy the Amazon EC2 machine into, and EC2 instance type by running the bootstrap script:
$ npm run project-bootstrap
You will be prompted for various inputs to bootstrap the project, including the VNC password to use. Most of these input values will be stored into your cdk.json file, and the VNC password will be stored in the AWS Systems Manager Parameter Store, a capability of AWS Systems Manager.
Run the following command to deploy your stack into your AWS account.
$ cdk deploy
After the stack has been deployed, and the EC2 instance provisioned, its user-data script will initiate and install TigerVNC and the required ROS tooling.
To see the progress, let’s connect to the instance using SSH and then tail the bootstrapping log.
$ ./ssm.sh ssh
$ sudo su ubuntu
$ tail -f /var/log/cloud-init-output.log
It takes approximately 15 minutes for the user-data bootstrapping script to finish. When it finishes, you will see the message “rviz-setup bootstrapping completed. You can now log in via VNC”.
Open a new shell terminal in the project root and start a port forwarding session using SSM through the ssm helper script:
$ ./ssm.sh vnc
After you see the waiting for connections output, you can open your VNC viewer and connect to localhost:5901.
When prompted for a password, enter the one you used when previously running the bootstrapping script.
You now have access to your Ubuntu Desktop environment.
Running rviz
If you opted to install sample data, the Ford AV Sample Data has been downloaded and installed on the EC2 instance already. To visualize it in rviz, a few helper scripts have been created and can be run by opening a new terminal and initiating the following commands:
$ cd /home/ubuntu/catkin_ws
$ ./0-run-all.sh
This helper script will open and run rviz on the Ford sample data.
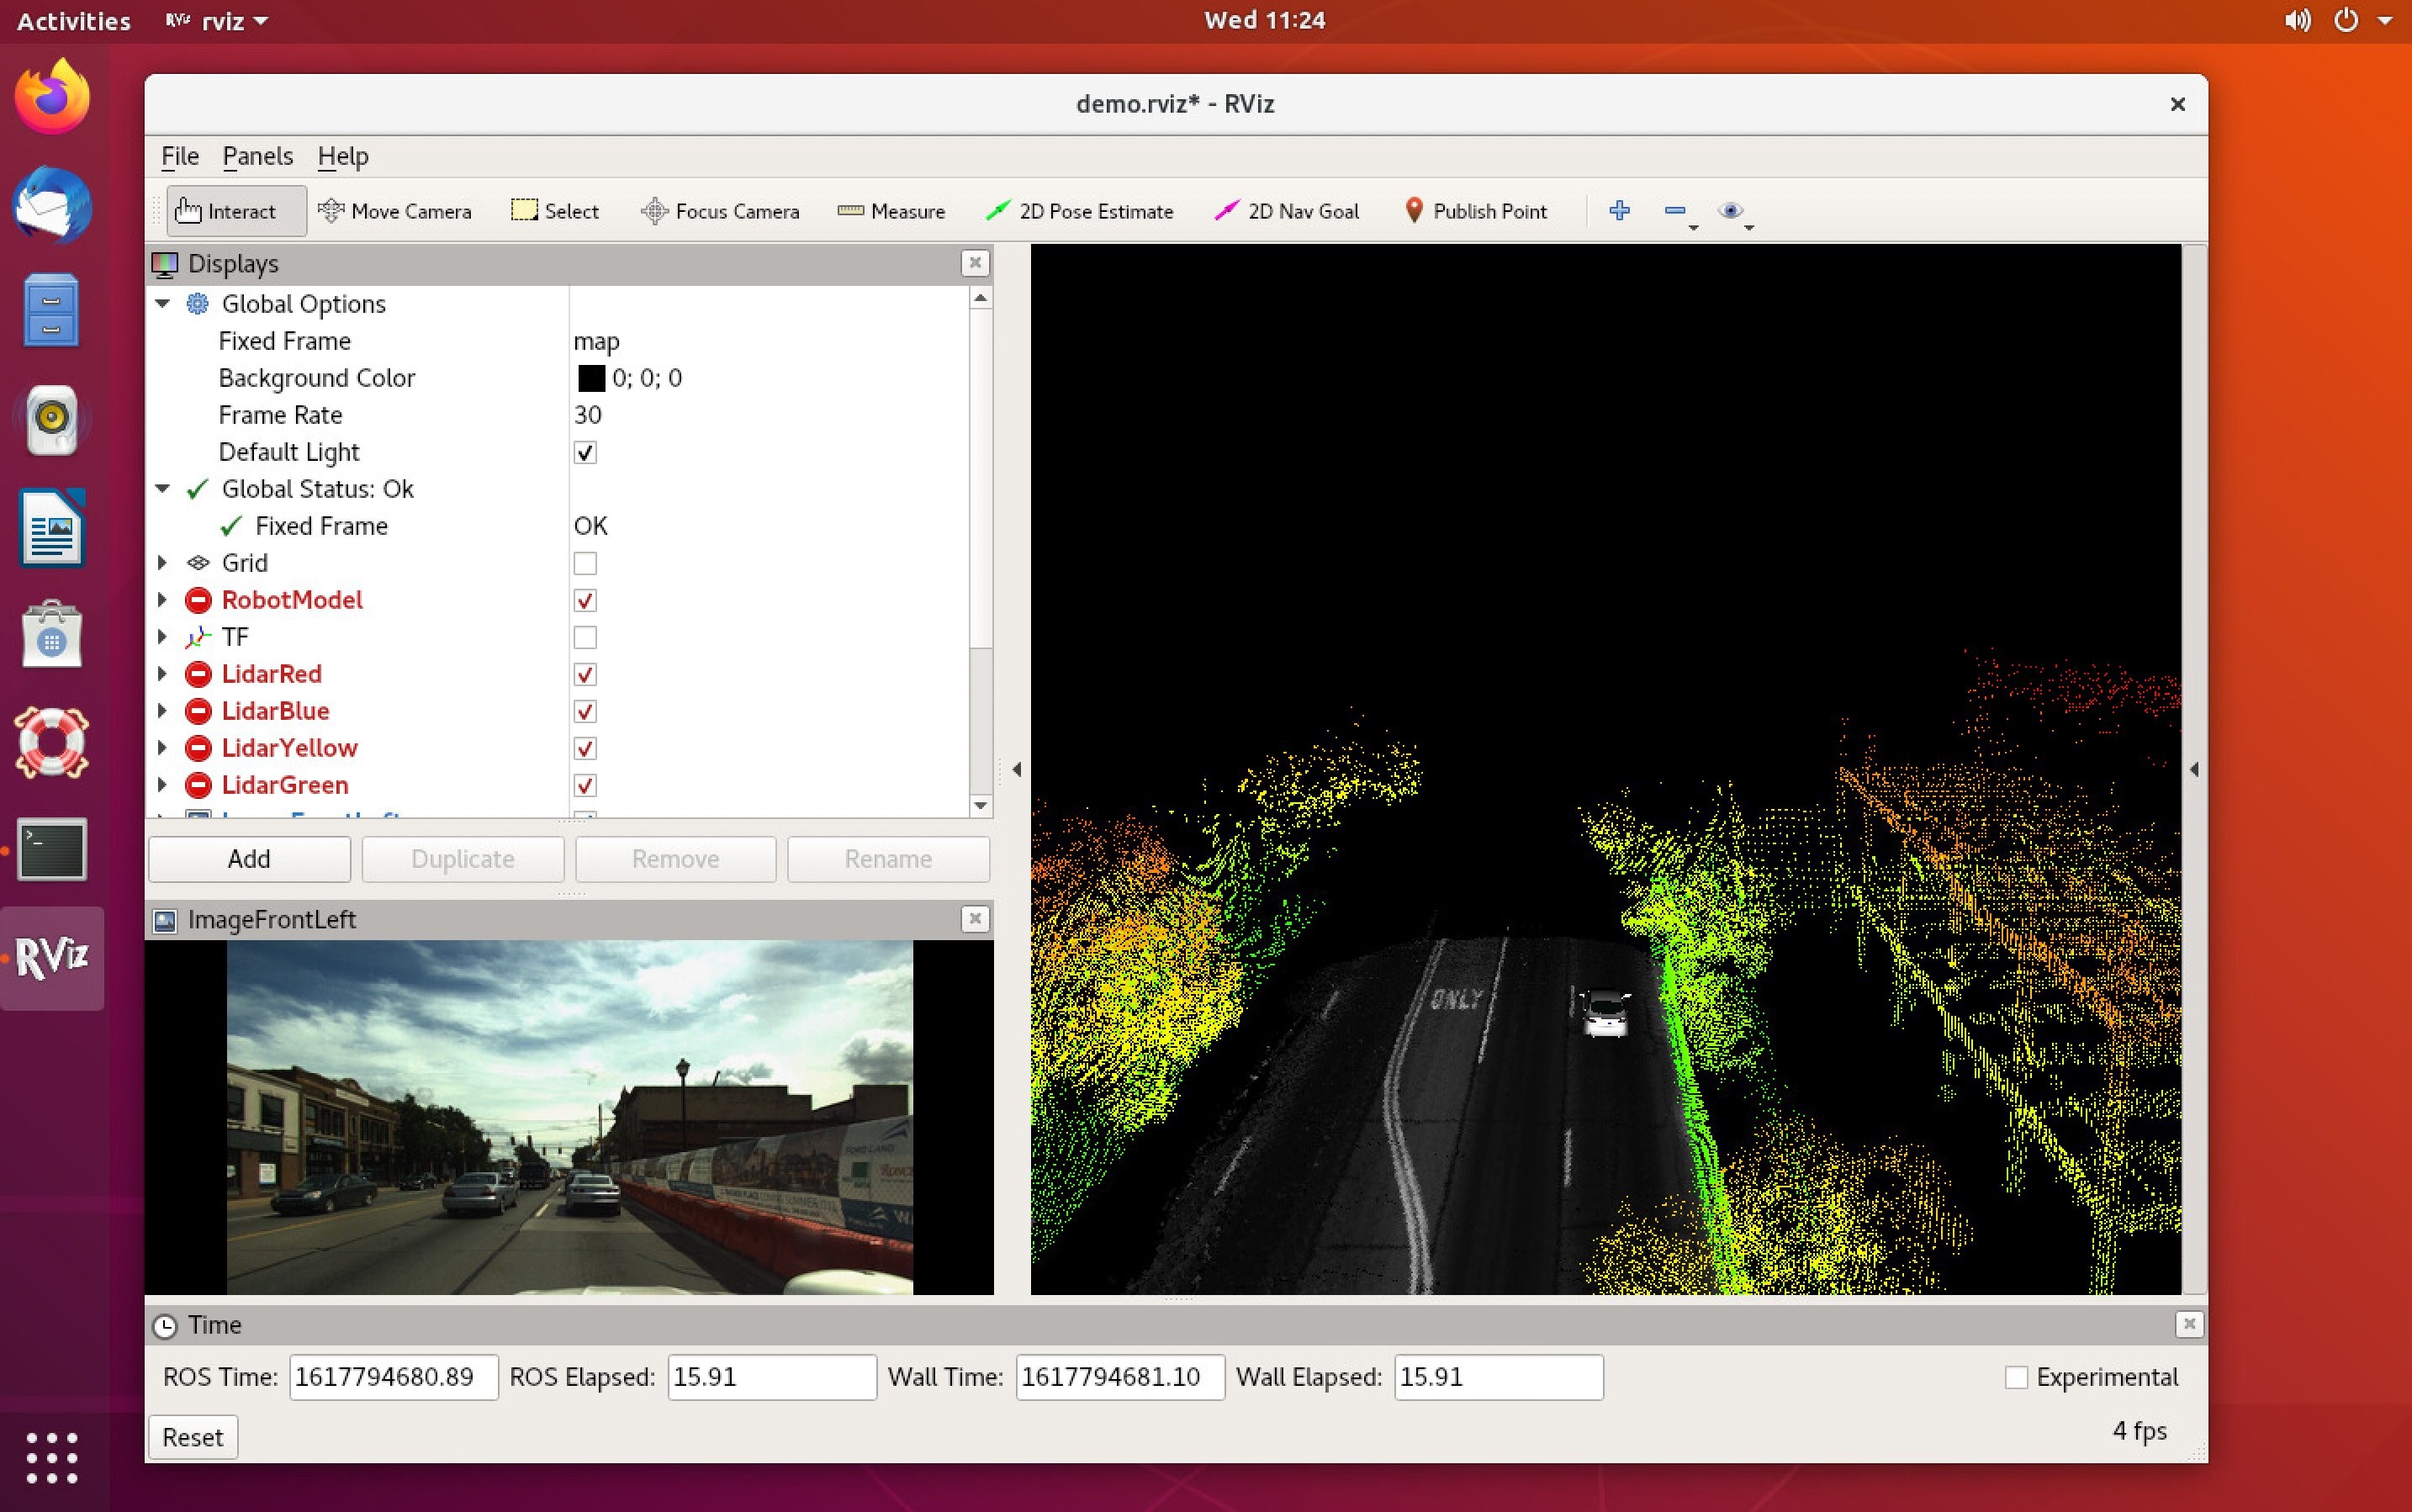
Figure 2. Ford AV Dataset visualized with rviz on Ubuntu Desktop
You should now be able to use this server to run and visualize your ROS bag files using rviz.
Solution 3 – Visualize ROS bag files using Webviz on Amazon Elastic Container Service (Amazon ECS)
The third solution (source code) uses AWS CDK to deploy Webviz as a container running on AWS Fargate, fronted by an Application Load Balancer (ALB). In addition, the Infrastructure as Code (IaC) can either create a new Amazon S3 bucket or import an existing one. The S3 bucket would have its cross-origin resource sharing (CORS) rules updated to allow streaming bag files from your ALB domain.
The bucket and ROS bag files won’t need to be made public since we will use presigned Amazon S3 URLs for authorizing the streaming of the files.
Finally, the AWS CDK code deploys an AWS Lambda function that can be invoked to generate a properly formatted Webviz streaming URL that contains the HTTP encoded and presigned URL for streaming your bag files directly in the browser.
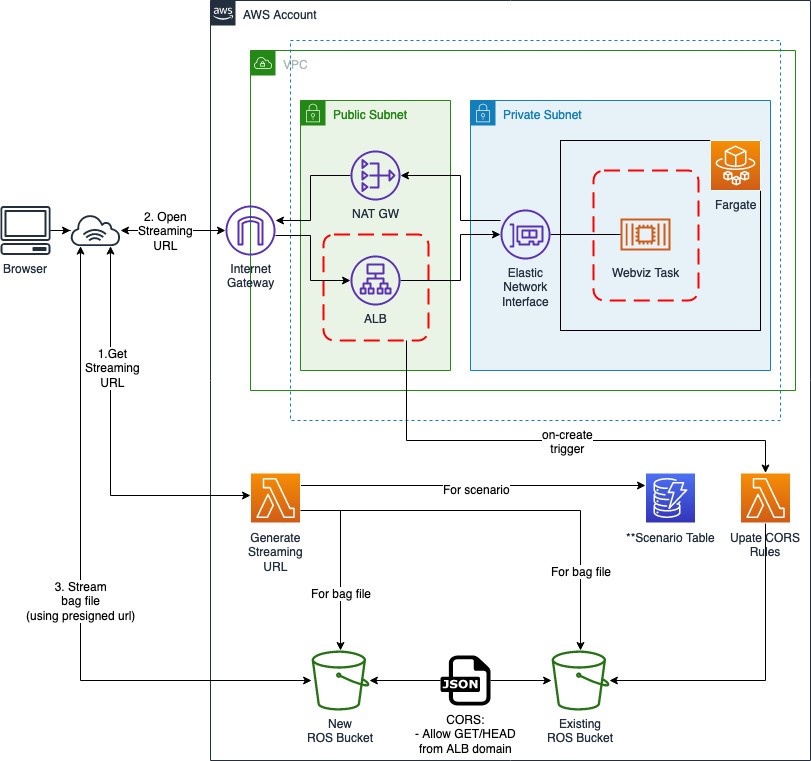
Figure 3. Architecture for solution 3 (visualize ROS bag files using Webviz on Amazon ECS)
To clone the repository and install its dependencies.
$ git clone https://github.com/aws-samples/aws-autonomous-driving-data-lake-ros-bag-visualization-using-webviz.git webviz-infra
$ cd webviz-infra
$ npm install
Note: Review the project README to understand the different files, project structures, and commands.
Next, modify the cdk.json to specify your specific project configurations (for example, region, bucket name, and whether you wish to import an existing bucket or create a new one).
{
  "context": {
    ....
    "bucketName": "<bucket_name>", // [required] Name of bucket to use or create
    "bucketExists": true, // [required] Should create or update existing bucket
    "generateUrlFunctionName": "generate_ros_streaming_url", // [required] Name of lambda function
    "scenarioDB": { // [optional] Configuration of SceneDescription table
      "partitionKey": "bag_file",
      "sortKey": "scene_id",
      "region": "eu-west-1",
      "tableName": "SceneDescriptions"
    }
  }
}
To deploy the CDK stack into your AWS account run the following command.
$ cdk deploy
You can now access your Webviz instance by opening the URL value for the webvizserviceServiceURL output from the previous deploy command.

Figure 4. Example showing Webviz being served by our ALB
Custom layouts for Webviz can be imported through json configs. The solution contains an example config in the project root. This custom layout contains the topic configurations and window layouts specific to our ROS bag format and should be modified according to your ROS bag topics.
- Select Config → Import/Export Layout
- Copy and paste the contents of
layout.json

Figure 5. Configuring custom layout for Webviz
Next, you need some ROS bag files to stream into your S3 bucket. If you configured AWS CDK to use an existing bucket, and the bucket already contains some ROS bag files, then you can skip the next step.
Upload ROS bag files
You can use the AWS CLI to copy a local bag file to the specified S3 bucket using the aws s3 cp command. You can also copy files between S3 buckets with the aws s3 cp command.
Generate streaming URL with helper script
The code repository contains a Python helper script in the project root to invoke your deployed Lambda function generate_ros_streaming_url locally with the correct payload.
To run the helper script, run the following command in your terminal:
$ python get_url.py \
--bucket-name <bucket_name> \
--key <ros_bag_key>
Response format: http://webviz-lb-<account>.<region>.elb.amazonaws.com?remote-bag-url=<presigned-url>
The response URL can be opened directly in your browser to visualize your targeted ROS bag file.
Generate a streaming URL through Lambda function in the AWS Console
You can generate a streaming URL by invoking your Lambda function generate_ros_streaming_url with the following example payload in the AWS console.
{
"key": "<ros_bag_key>",
"bucket": "<bucket_name>",
"seek_to": "<ros_timestamp>"
}
The seek_to value informs the Lambda function to add a parameter to jump to the specified ROS timestamp when generating the streaming URL.
Example output:
{
"statusCode": 200,
"body":
"{\"url\": \"http://webviz-lb-<domain>.<region>.elb.amazonaws.com?remote-bag-url=<PRESIGNED_ENCODED_URL>&seek-to=<ros_timestamp>\"}"
}
This body output URL can be opened in your browser to start visualizing your bag files directly.
By using a Lambda function to generate the streaming URL, you have the flexibility to integrate it with other user interfaces or dashboards. For example, if you use Amazon QuickSight to visualize different detected scenarios, you can define a customer action to invoke the Lambda function through API Gateway to get a streaming URL for the target scenario.
Similarly, custom web applications can be used to visualize the scenes and their corresponding ROS bag files stored in a metadata store. Invoke the Lambda function from your web server to generate and return a visualization URL that can be use by the web application.
Using the streaming URL
Open the streaming URL in your browser. If you added a seek_to value while generating the URL, it should jump to that point in the bag file.
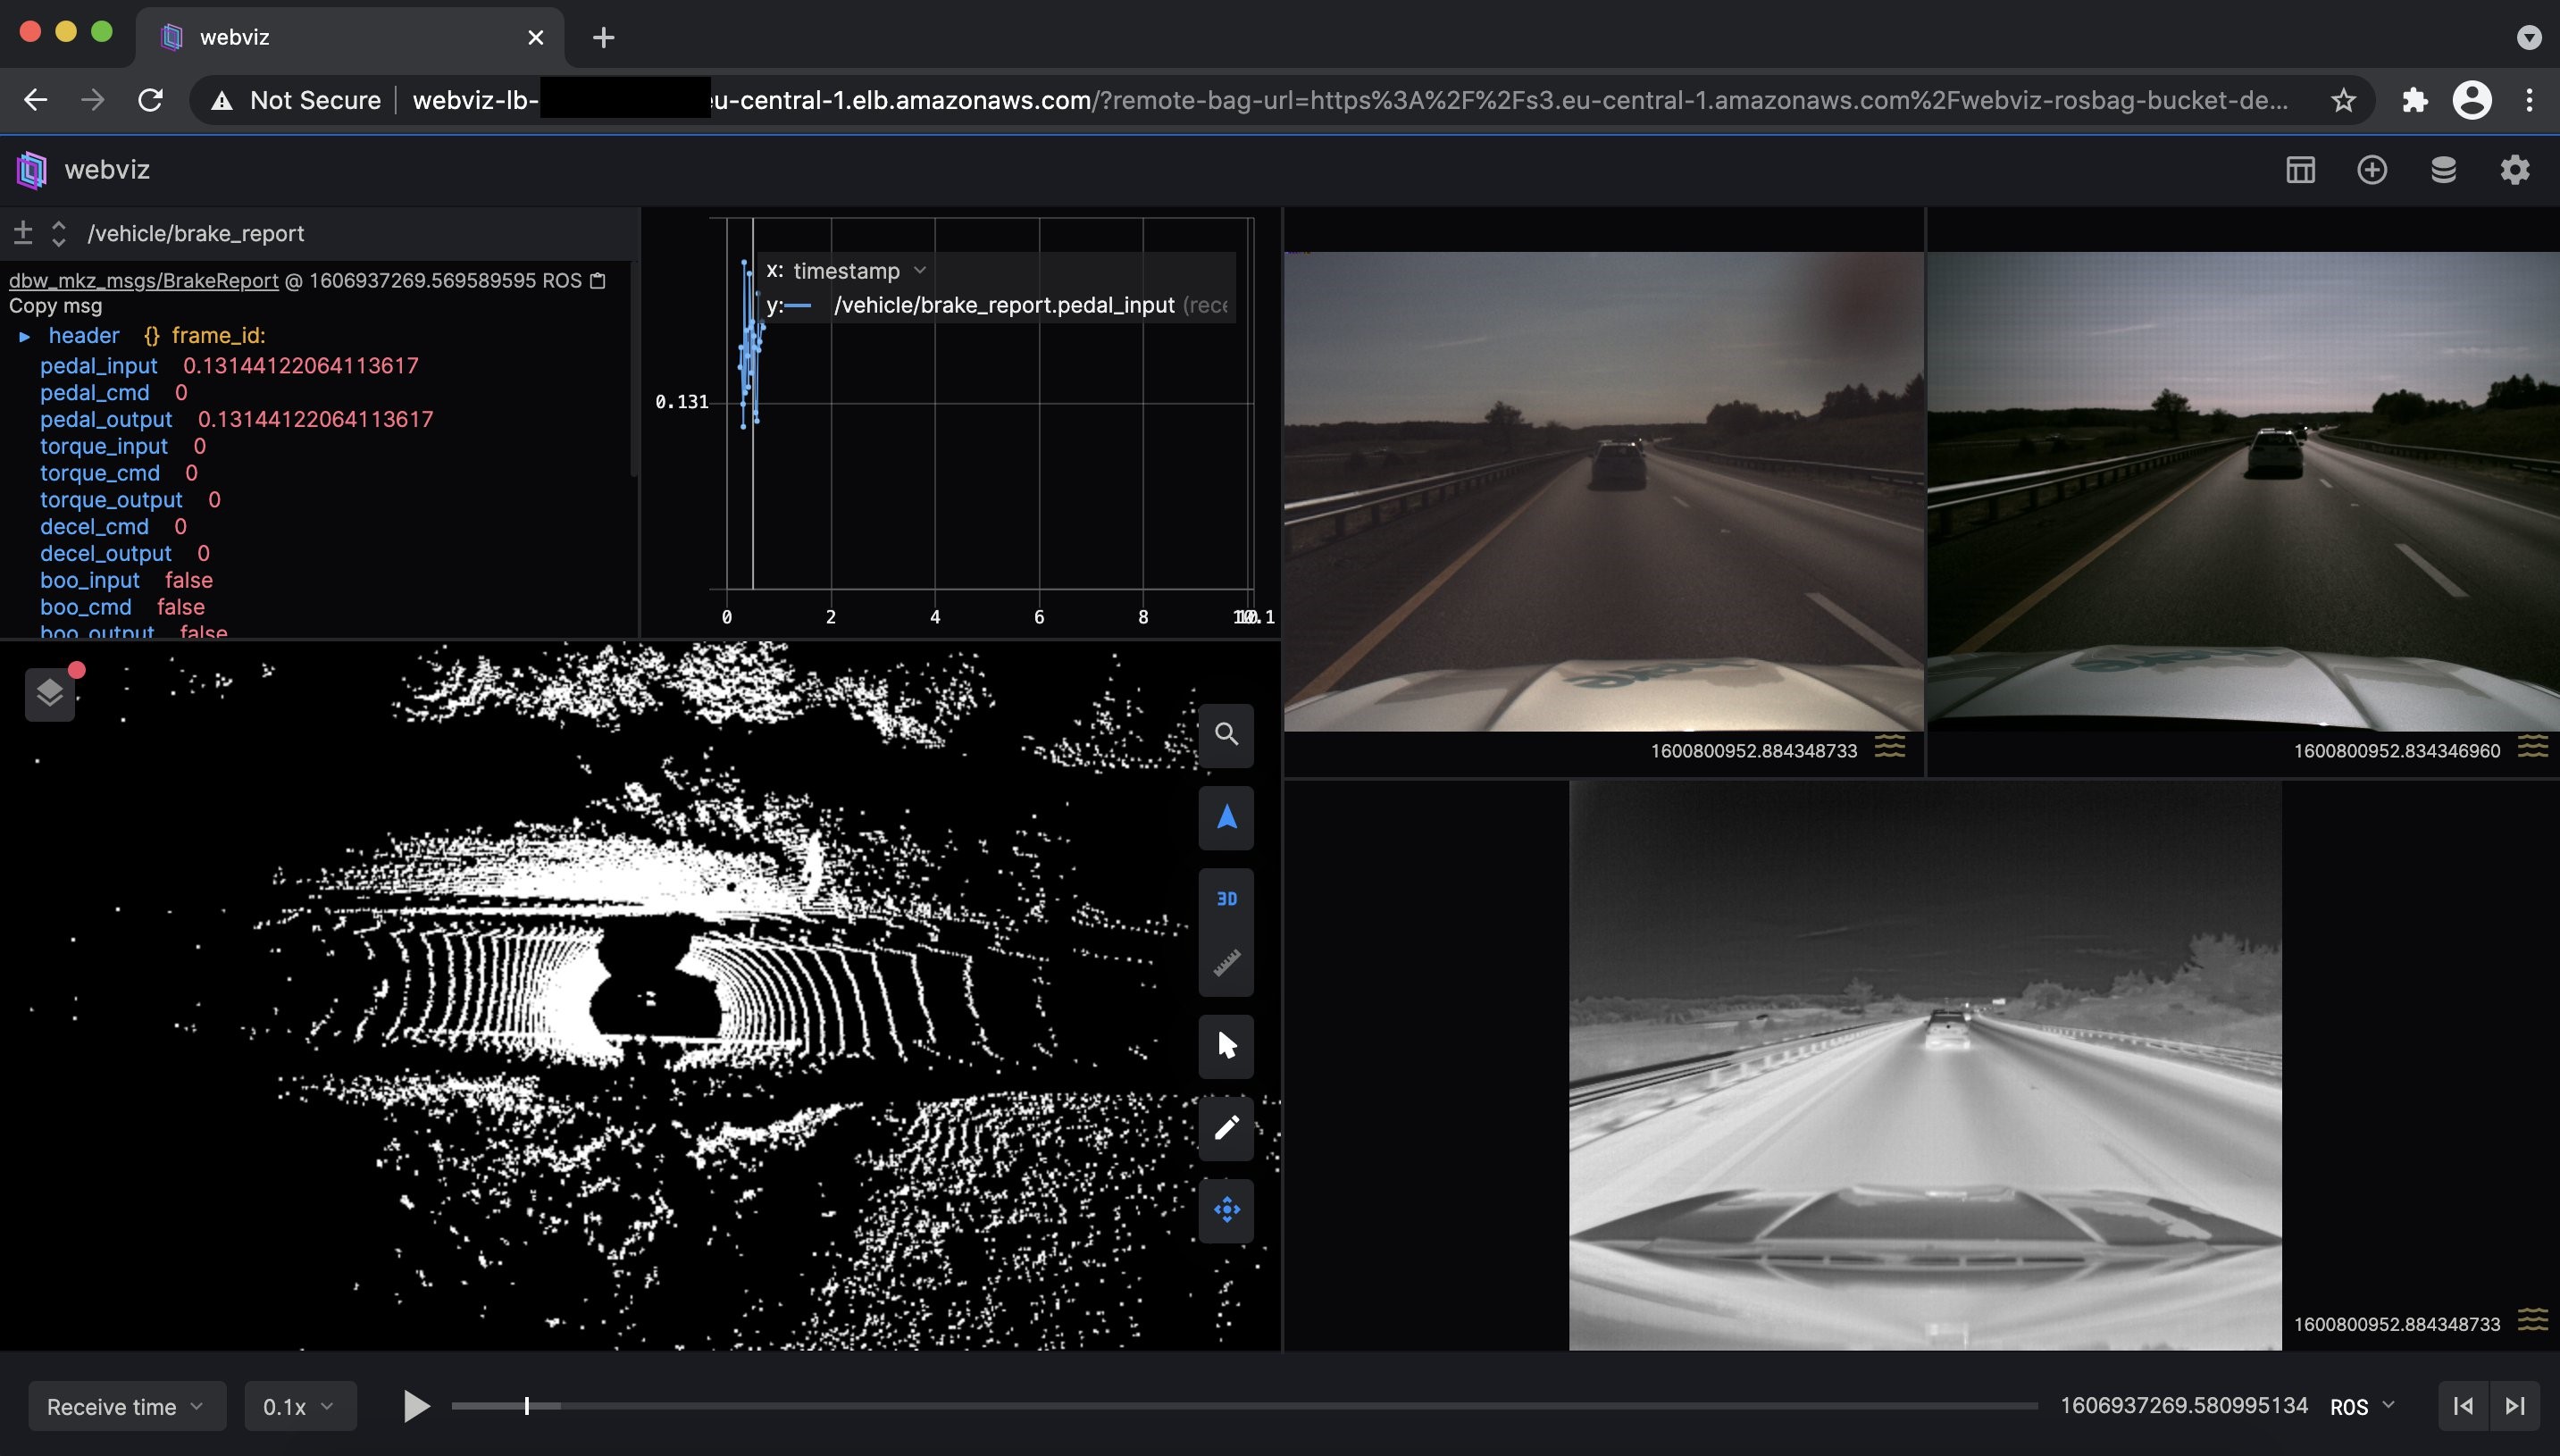
Figure 6. Example visualization of ROS bag file streamed from Amazon S3
That’s it. You should now start to see your ROS bag file being streamed directly from Amazon S3 in your browser.
Deploying Webviz as part of the Autonomous Driving Data Lake Reference Solution
This solution forms part of the autonomous driving data lake solution which consists of a reference architecture and corresponding field notes and open-source code modules:
- Building an automated scene detection pipeline for Autonomous Driving – ADAS Workflow
- Deploying Autonomous Driving and ADAS Workloads at Scale with Amazon Managed Workflows for Apache Airflow
- Building an Automated Image Processing and Model Training Pipeline for Autonomous Driving
If this Webviz solution is deployed in conjunction with Building an automated scene detection pipeline for Autonomous Driving – ADAS Workflow (ASD) it supports some out-of-the-box integration with solution 3.
You can configure the solution’s cdk.json to specify the relevant values for the SceneDescription table created by the ASD CDK code. Redeploy the stack after changing this using $ cdk deploy.
With these values, the Lambda function generate_ros_streaming_url now supports an additional payload format:
{
"record_id": “<scene_description_table_partition_key>”,
"scene_id": “<scene_description_table_sort_key>”
}
The get_url.py script also supports the additional scene lookup parameters. To look up a scene stored in your SceneDescription table run the following commands in your terminal:
$ python get_url.py –-record <scene_description_table_partition_key> --scene <scene_description_table_sort_key>
Invoking the generate_ros_streaming_url with the record and scene parameters will result in a lookup of the ROS bag file for the scene from DynamoDB, presigning the ROS bag file and returning an URL to stream the file directly in your browser.
Cleaning Up
To clean up the AWS RoboMaker development environment, review Deleting an Environment.
For the CDK application, you can destroy your CDK stack by running $ cdk destroy from your terminal. Some buckets will need to be manually emptied and deleted from the AWS console.
Conclusion
This blog post illustrated how to deploy two common tools used to visualize ROS bag files, using three different solutions. First, we showed you how to set up an AWS RoboMaker development environment and run rviz. Second, we showed you how to deploy an Amazon EC2 machine that automatically configures Ubuntu-Desktop with TigerVNC and rviz preinstalled. Third, we showed you how to deploy Webviz on Fargate and configure a bucket to allow streaming bag files. Finally, you learned how streaming URLs can be generated and integrated into your custom scenario detection and visualization tools.
We hope you found this post interesting and helpful in extending your autonomous vehicle solutions, and invite your comments and feedback.