Artificial Intelligence
Create your RStudio on Amazon SageMaker licensed or trial environment in three easy steps
RStudio on Amazon SageMaker is the first fully managed cloud-based Posit Workbench (formerly known as RStudio Workbench). RStudio on Amazon SageMaker removes the need for you to manage the underlying Posit Workbench infrastructure, so your teams can concentrate on producing value for your business. You can quickly launch the familiar RStudio integrated development environment (IDE) and scale up and down the underlying compute resources without interrupting your work, making it easy to build machine learning (ML) and analytics solutions in R at scale.
Setting up a new Amazon SageMaker Studio domain with RStudio support or adding RStudio to an existing domain is now easier, thanks to the service integration with AWS Marketplace and AWS License Manager. You can now acquire your new Posit Workbench license or request a trial directly from AWS Marketplace and set up your environment using the AWS Management Console. In this post, we walk you through this process in three straightforward steps:
- Acquire a Posit Workbench license or request a time-bound trial in AWS Marketplace.
- Create a license grant in License Manager for your AWS account.
- Provision a new Studio domain with RStudio or add RStudio to your existing domain.
Prerequisites
Before beginning this walkthrough, make sure you have the following prerequisites:
- An AWS account that will host your Amazon SageMaker domain. If you’re setting up a production environment, it’s recommended to have a dedicated account for your SageMaker domain and manage your licenses in a shared services account. For more information on how to organize your multi-account environment, refer to Organizing Your AWS Environment Using Multiple Accounts.
- An AWS Identity and Access Management (IAM) role with access to the following services (for details on the specific permissions required, refer to Create an Amazon SageMaker Domain with RStudio using the AWS CLI):
- AWS Marketplace
- License Manager
Step 1: Acquire your Posit Workbench license
To acquire your Posit Workbench license, complete the following steps:
- Log in to your AWS account and navigate to the AWS Marketplace console.
- In the navigation pane, choose Discover Products.
- Search for Posit, then choose Posit Workbench and choose Continue to Subscribe.

Fig 1: Posit Workbench product page on AWS marketplace
- Specify your settings for Contract duration, Renewal Settings, and Contract options, then choose Create Contract.

Fig 2: Posit Workbench product agreement page on AWS marketplace
You will see a message stating your request is being processed. This step will take a few minutes to complete.

Fig 3: AWS Marketplace manage subscriptions page
After few minutes, you see the RStudio Workbench product under your subscriptions.
Request a trial license
If you want to create a test environment or a proof of concept, you can use the Posit Workbench product page to request a trial license. Complete the following steps:
- Locate the evaluation request form link on the Overview tab in AWS Marketplace.

Fig 4: Contact from link in Posit Workbench product page
- Fill out the contact form and make sure you include your AWS account ID in the How we can help? prompt.
This is very important because that will allow you to get the trial license private offer directly to your email without any additional back and forth.
You will receive an email with a link to a $0 limited-time private offer that you can open while logged in to your AWS account. After you accept the offer, you will be able to follow the next steps to activate your license grant.
Step 2: Manage your license grant in License Manager
To activate your license grant, complete the following steps:
- Navigate to the License Manager console to view the Posit Workbench license.
- If you’re using License Manager for the first time, you need to grant permission to use License Manager by selecting I grant AWS License Manager the required permissions and choosing Grant permissions.
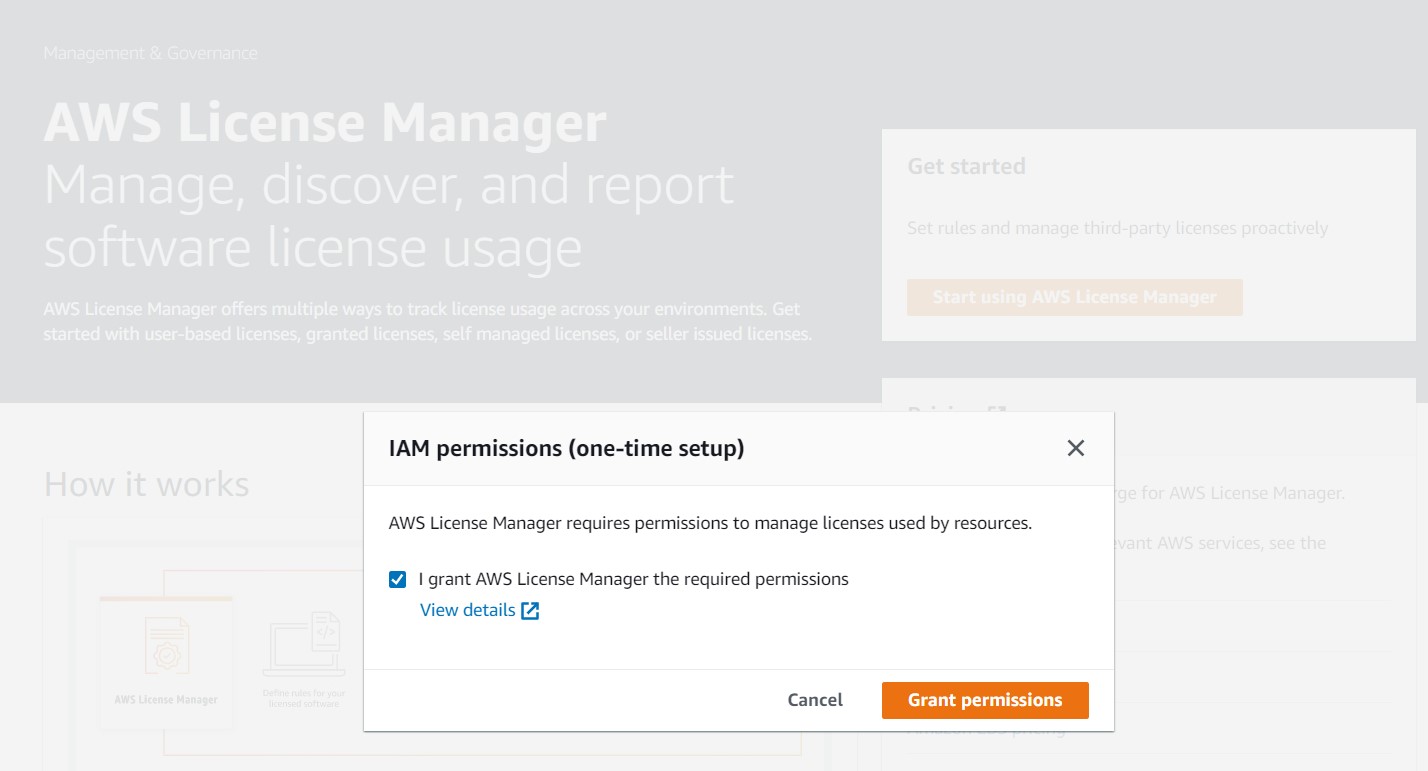
Fig 5: AWS License Manager one-time setup page for IAM Permissions
- Choose Granted licenses in the navigation pane.
You can see two entitlements related to Posit Workbench: one for AWS Marketplace usage and the other for named users. In order to be able to use your license and create a Studio domain with RStudio support, you need to accept the license.
- On the Granted licenses page, select the license grant with RStudio Workbench as the product name and choose View.
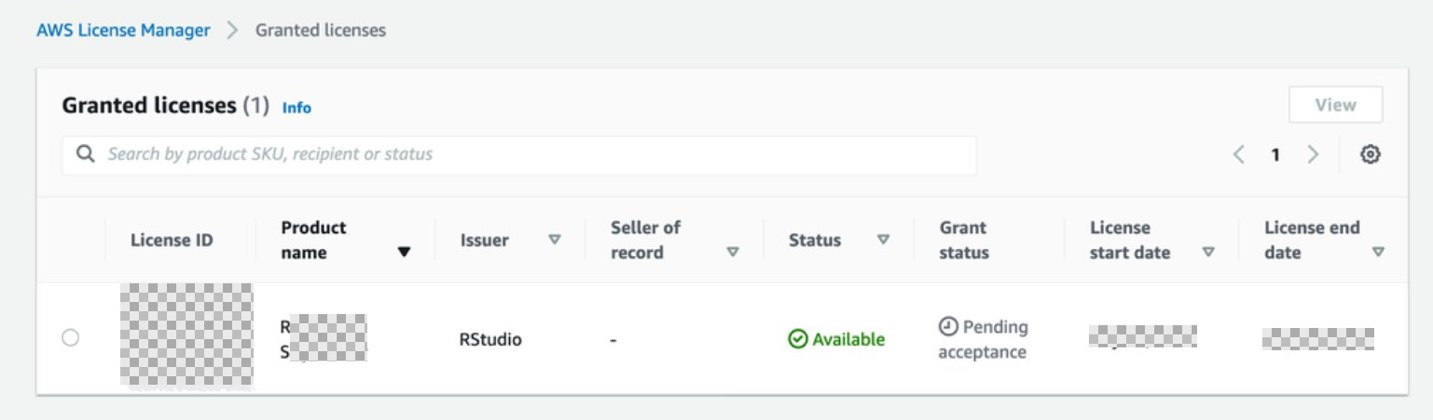
Fig 6: AWS License Manager console with Granted licenses
- On the license detail page, choose Accept & activate license.
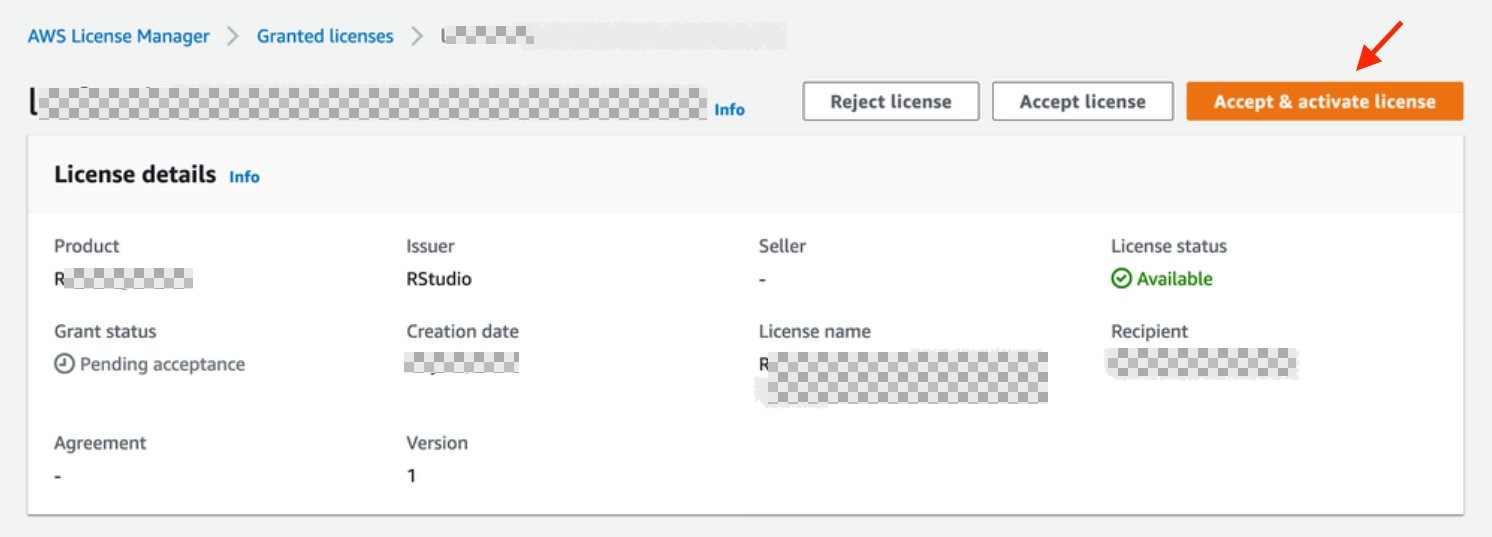
Fig 7: AWS License Manager console with License details
If you have a single account and want to create your Studio domain in the same account you’re managing your license, you can jump to Step 11. However, it’s an AWS recommended best practice to use a multi-account AWS environment where you have a dedicated shared services account to manage your licenses. If that’s the case, you need to create a license grant for the AWS account where you will create the Studio domain with RStudio.
- In the navigation pane, choose Granted licenses, then choose the license ID to open the license details page.
- In the Grants section, choose Create grant.
- Enter a name and AWS account ID of the grant recipient (the AWS account where you will create your RStudio-enabled Studio domain).
- Choose Create grant.

Fig 8: Create grant page in AWS License Manager console
- Log in to the AWS account where you will set up your RStudio on Amazon SageMaker domain and navigate to the License Manager console to accept and activate the granted license that appears as Pending acceptance.
The status changes to Active when you accept the grant or Rejected otherwise.
- Choose the license ID to see the details of the license.
- Choose Accept & activate license.

Fig 9: Amazon License Manager console with license status available
The license status changes to Available.
- To finalize, choose Activate license.

Fig 10: Amazon License Manager console with active license status
Now that you have accepted your Posit Workbench license, you’re ready to create your RStudio on Amazon SageMaker domain. Your license can be consumed by RStudio on Amazon SageMaker in any AWS Region that supports the feature.
Prerequisites to create a SageMaker domain
RStudio on Amazon SageMaker requires an IAM execution role that has permissions to License Manager and Amazon CloudWatch. For instructions, refer to Create DomainExecution role.
You can also use the following AWS CloudFormation stack template that creates the required IAM execution role in your account. Complete the following steps:
- Choose Launch Stack:
![]()
The link takes you to the us-east-1 Region, but you can change to your preferred Region. IAM roles are global resources, so you can access the role in any Region.
- In the Specify template section, choose Next.
- In the Specify stack details section, for Stack name, enter a name and choose Next.
- In the Configure stack options section, choose Next.
- In the Review section, select I acknowledge that AWS CloudFormation might create IAM resources and choose Create stack.
- When the stack status changes to
CREATE_COMPLETE, go to the Resources tab to find the IAM role you created.
Step 3: Create a Studio domain with RStudio
You can configure RStudio on Amazon SageMaker as part of a multi-step SageMaker domain creation process on the console. You can also perform the steps using the AWS Command Line Interface (AWS CLI) following the instructions on Create an Amazon SageMaker Domain with RStudio using the AWS CLI. To create your domain on the console, complete the following steps:
- On the SageMaker console, on the Setup SageMaker Domain page, choose Standard setup , and choose Configure.

Fig 11: Amazon SageMaker domain creation
- In Step 1 of the Standard setup, you will need to provide:
- Your domain name.
- Your chosen authentication method (IAM or AWS Identity Center)
- Your domain execution role (see the pre-requisites section above).
- Your network and storage selection.
- In Step 2 you will provide configuration of your Studio Jupyter Lab environment (you can keep the default values and proceed).
- In Step 3, Studio automatically detects your RStudio Workbench license after it’s added and accepted in License Manager, as seen below.

Fig12: Amazon SageMaker domain creation – general settings
You can choose the instance type for the RStudio server that is going to be shared by all users in your domain. ml.t3.medium is recommended for Domains with low UI use and is free to use. For more information about how to choose an instance type, see RStudioServerPro instance type page. Note that this is not the instance where your R sessions run their analysis and ML code.
The domain creation takes a couple of minutes. When it’s complete, we can add users for data scientists to access RStudio on SageMaker.
Add RStudio support to an existing Studio domain
If you already have a SageMaker domain, you can add RStudio support by using the update-domain API call from the AWS CLI. Complete the following steps:
- Delete all apps in your SageMaker domain. This is necessary because adding RStudio will update all your existing user profile security groups.
- Obtain a list of all existing apps by running the following command:
- Then delete every app by running the following command:
- Activate RStudio by updating your domain. Depending on the type of networking you have set up your domain with, you will choose between the following code examples:
- If your domain is in
VPCOnlymode: - If your domain is in
PublicInternetOnlymode:
- If your domain is in
Important: If you have modified the security groups for existing user profiles in your domain, you have to make an additional update to make sure you don’t run into the maximum number of security groups per Elastic Network Interface limit. For more information, refer to Add RStudio support to an existing Domain.
- You can now start adding new user profiles to your domain with RStudio support (by default, they will have access to RStudio). You can also add RStudio access to pre-existing user profiles. This is necessary because, by default, pre-existing user profiles in the domain are not granted access to RStudio on SageMaker.
- Run the following command to add RStudio access to existing user profiles:
Create a Studio domain user profile
Creating a user in your Studio domain allows access to both Studio and RStudio on SageMaker. You can configure both on the SageMaker console. If you prefer to use the AWS CLI to set up a user, refer to Manage users. To enable RStudio for a user via the console, complete the following steps:
- On the Domain details page, choose Add user.
- For Name, enter a user name.
- For Default execution role, create the user profile’s execution role.
- Choose Next.

Fig 13: Amazon SageMaker Add user– General Settings tab
- Next, you can configure the access to SageMaker project templates and JumpStart. You can keep it default even though we don’t use this feature in this post; you can always edit it later.
- Choose Next to proceed.
- For License Authorization, Studio automatically detects and adds RStudio Workbench licenses to the domain for you to choose from:
-
- RStudio Admin – Has access to the RStudio IDE and RStudio administrative dashboard
- RStudio User – Has access to the RStudio IDE
- Unauthorized – Doesn’t have access to the RStudio IDE
Note that all options grant access to Studio.
- Choose either RStudio Admin or RStudio User and choose Next to proceed.
- Choose Submit.
The user profile creation takes less than a minute.

Fig 14: Amazon SageMaker Add user – RStudio setting tab
- To open RStudio on SageMaker, on the Launch app menu in the user list, choose RStudio.

Fig 15: Amazon SageMaker Domain users
You will see the RStudio Workbench home page and a list of sessions, projects, and published content.
- To create a new session, choose New Session.
- Choose a desired instance on the Instance Type menu and choose Start Session.

Fig 16: Creating a new RStudio session in RStudio workbench
When you launch your RStudio session, the Base R image serves as the basis of your instance. This Docker image includes R v4.0, AWS tools such as awscli, sagemaker, and boto3 Python packages, and the reticulate package for the interoperability between Python and R.

Fig 17: RStudio Workbench session
Clean up
As part of this walkthrough, you provisioned a SageMaker domain, user profiles, and RStudio session. To delete these resources, refer to Delete an Amazon SageMaker Domain.
Conclusion
In this post, we showed how you can easily set up your RStudio on Amazon SageMaker environment in three straightforward steps. You can now either acquire a new paid Posit Workbench license or request a trial directly from AWS Marketplace and quickly import your license using License Manager. We also showed you how, after you accept the license grant, Studio automatically detects your new license and allows you to create a Studio domain with Posit Workbench support. We encourage you to try out RStudio on Amazon SageMaker today by following these steps and give us your feedback in the comments section!
About the Authors
 Venkata Kampana is a Senior Solutions Architect in the AWS Health and Human Services team and is based in Sacramento, CA. In that role, he helps public sector customers achieve their mission objectives with well-architected solutions on AWS.
 Eric Peña is a Senior Technical Product Manager in the AWS Artificial Intelligence Platforms team, working on Amazon SageMaker Interactive Machine Learning. He currently focuses on IDE integrations on SageMaker Studio. He holds an MBA degree from MIT Sloan and outside of work enjoys playing basketball and football.