Artificial Intelligence

Integrate Atlassian Confluence Cloud with Amazon Quick

Teams can integrate Atlassian Confluence Cloud with Amazon Quick to search and manage documentation without switching between multiple systems. When documentation lives in Confluence, but related data sits in other systems, teams waste time switching tools, re-searching for context, and manually gathering information. These interruptions slow decisions and create gaps between available knowledge and actionable insights. The direct integration with Confluence Cloud reduces context switching by making your Confluence content searchable through natural language queries directly from the Quick interface. Teams can query Confluence pages, retrieve documentation, and update content while accessing data from other integrated systems such as Amazon Simple Storage Service (Amazon S3), Atlassian JIRA, or other business applications.

In this post, you will learn how to set up the Confluence Cloud integration with Quick. This includes creating a knowledge base for semantic search, setting up Actions to query and manage Confluence pages, and organizing resources in Quick Spaces. Quick integrates with your current enterprise technology stack, from internal knowledge repositories and corporate intranets to business-critical applications and AWS data services. These integrations span three categories: Actions for executing tasks across connected applications, knowledge bases for indexing unstructured content like documents and wikis, and Topics and Datasets for natural language querying over structured data sources like Amazon Redshift. This post focuses on setting up Knowledge bases and Actions.

Actions connect Quick to external systems at the time of prompt or query. You can read, write, and automate tasks directly within Quick. There are three ways to set up an Action integration:

  • Through a built-in connector (a pre-built, configuration-driven integration for popular tools like Confluence Cloud, Jira, and Salesforce)
  • Using a custom REST API using an OpenAPI specification (for connecting your own or third-party APIs)
  • Through an Model Context Protocol server (MCP) (a flexible, standards-based approach that allows dynamic tool discovery from custom or third-party MCP servers).

Some services, like Confluence Cloud, support multiple integration paths. This post will focus on setting up an action integration using the built-in connector.

Knowledge bases index content before users query it. When you create a knowledge base, Quick connects to external systems like Confluence Cloud or JIRA, retrieves your documents and wikis, and builds a searchable index. When users ask questions, Quick retrieves relevant information from this pre-built index rather than connecting to the external system in real time. This approach makes unstructured content instantly searchable through natural language queries.

Together, Actions and knowledge bases give you flexible, complementary ways to bring your enterprise data and workflows into Quick.

Prerequisites

Before you set up Confluence integration, make sure that you have the following:

  • Atlassian Confluence Cloud and developer account with administrator permissions to create OAuth 2.0 applications and manage API scopes
  • Amazon Quick subscription: Quick Enterprise (to create integrations) or Quick Professional (to use existing integrations)
  • AWS account with appropriate AWS Identity and Access Management (IAM) permissions to access Quick and create integrations

The integration in this post follows the AWS shared responsibility model: AWS manages the security of the infrastructure and underlying services, while you’re responsible for configuring OAuth permissions, managing API scopes, controlling access to your Confluence content through the permission settings, and verifying alignment with your organization’s data governance policies.

Amazon Quick maintains security of data throughout this integration with encryption at rest and in transit. For more information, see AWS security in Quick.

Solution overview

Now that you understand the benefits, you will now create the Confluence Cloud integration in Quick, create knowledge bases and actions to sync your Confluence content, configure permissions, and interact with your Confluence cloud space through natural language queries. By the end, you can use the content in your Confluence wiki pages to create meaningful insights.

Creating the Atlassian Confluence Cloud knowledge base

A knowledge base in Quick is an organized, indexed collection of documents or content from data sources that Quick improves on for generative AI-powered retrieval and question answering. You can use Knowledge base integrations to create searchable repositories of information from external sources.

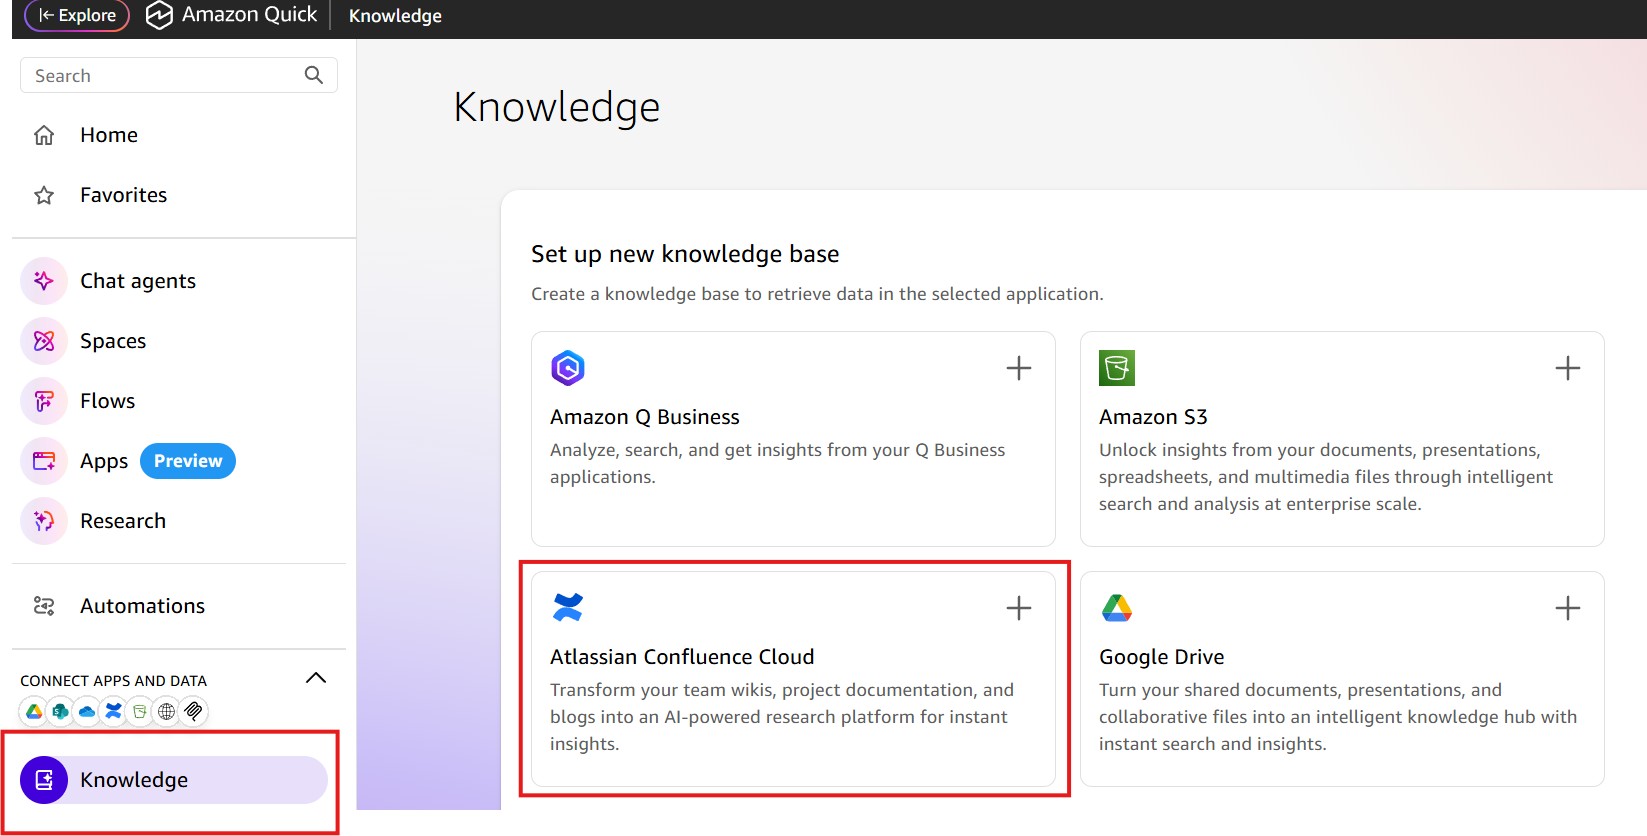
In the Quick Console, choose the Knowledge button to set up a new integration. In the Set up new knowledge base section, select the plus (+) icon in the Atlassian Confluence Cloud card. The Atlassian Confluence Cloud card is displayed alongside other available knowledge base integrations such as Amazon S3 and Atlassian Jira Cloud.

Screenshot of the Amazon Quick Knowledge page displaying the 'Set up new knowledge base' panel. Available connectors include Amazon Q Business, Amazon S3, Atlassian Confluence Cloud (highlighted with a red border), and Google Drive. The left navigation sidebar shows sections for Chat agents, Spaces, Flows, Apps, Research, Automations, and a Knowledge option selected at the bottom. This image illustrates how to access the Confluence knowledge base setup in Amazon Quick.

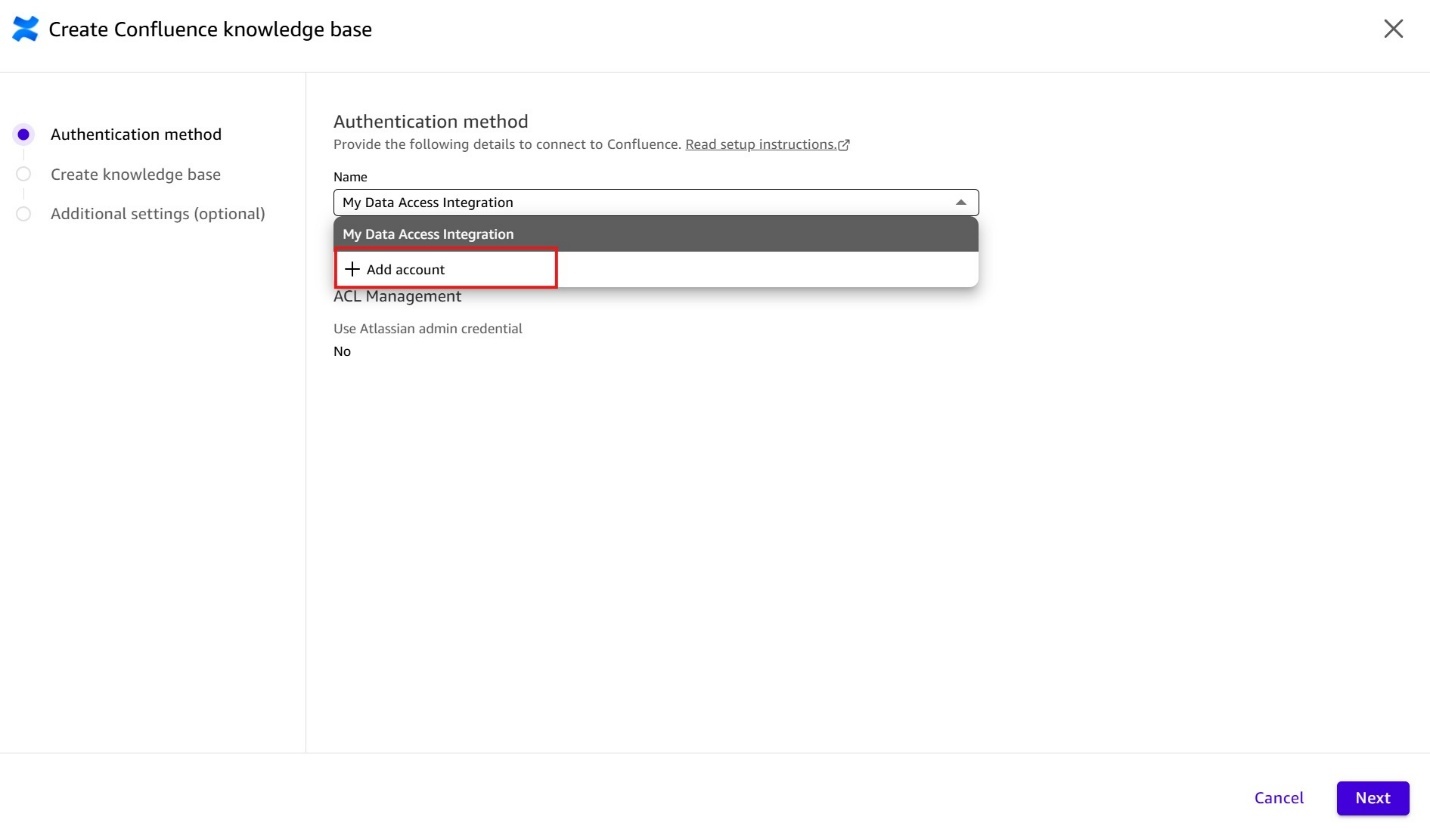
In the Create Confluence Knowledge base page, choose the My Data Access Integration dropdown menu and select Add account to connect your Confluence Cloud instance.

Screenshot of the 'Create Confluence knowledge base' wizard dialog in Amazon Quick, showing Step 1: Authentication method. A dropdown menu labeled 'Name' displays 'My Data Access Integration' as the currently selected option, with an '+ Add account' option highlighted in a red box below it. The left panel shows a three-step wizard: Authentication method (active), Create knowledge base, and Additional settings. This image demonstrates how to select or add a Confluence data access integration account.

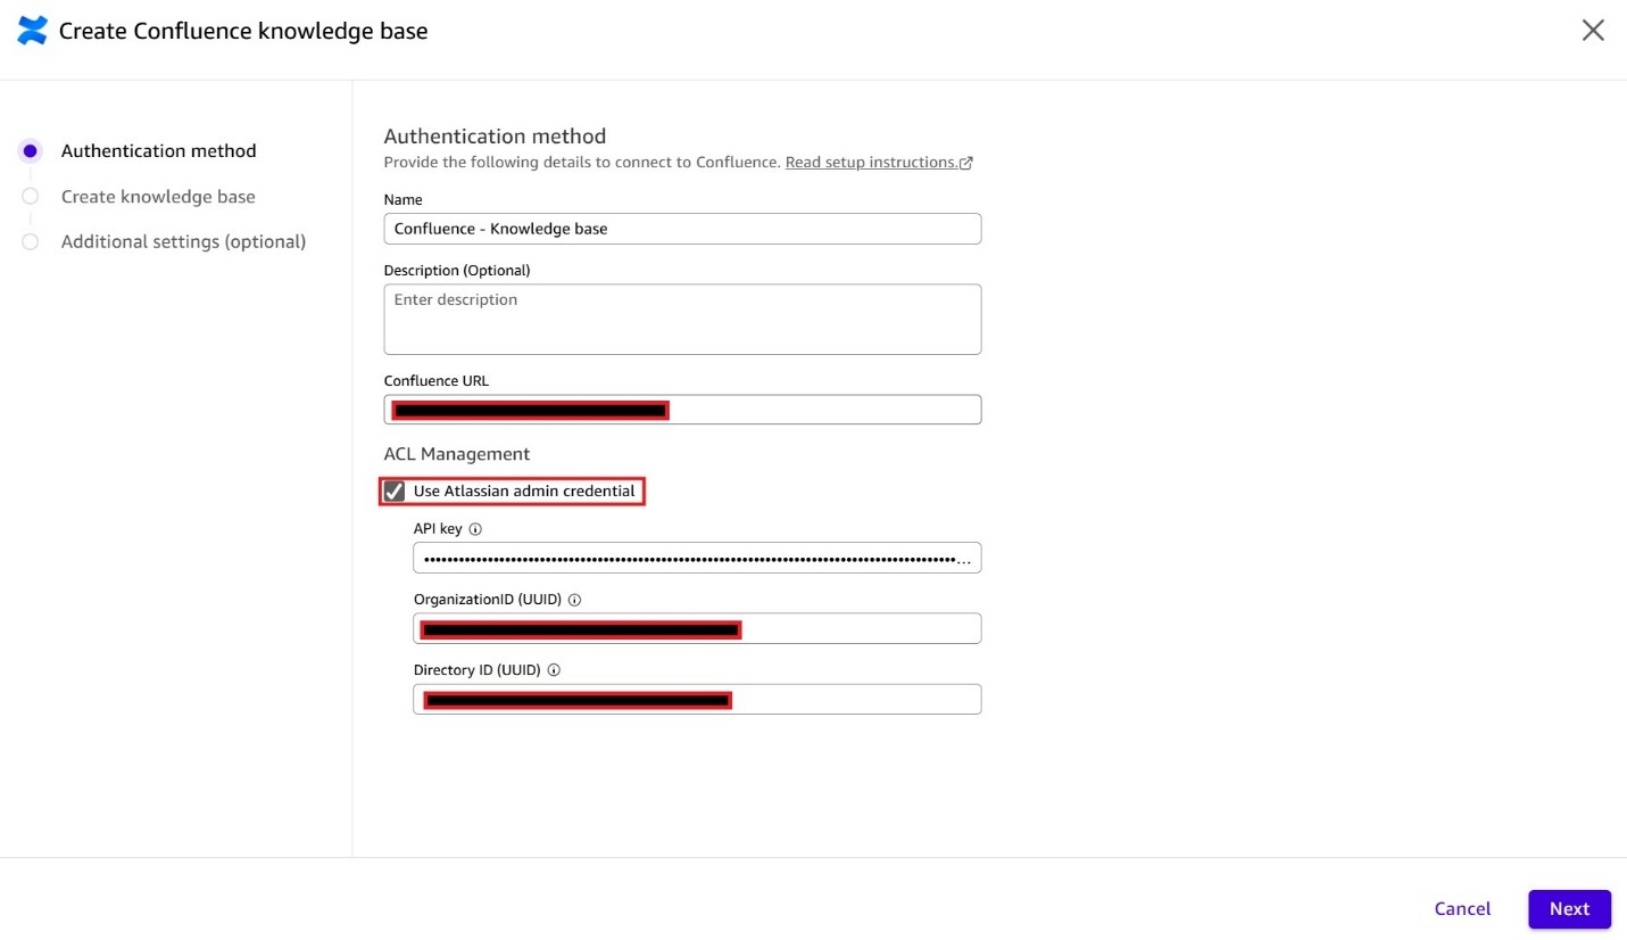
In the Authentication Method screen, enter your base Confluence URL in the Confluence URL text box. The URL for Confluence Cloud must be the base URL, ending with .atlassian.net (for example, yourinstance.atlassian.net).

Connecting Confluence Cloud to a Quick knowledge base requires no administrator involvement. Enter your Confluence URL and accept the OAuth permission prompt. Quick handles the authentication for you. Any user can set this up independently, without needing API keys, admin console access, or IT involvement.

Document-level access controls (ACLs) is an optional advanced feature for organizations that need Quick to enforce per-user Confluence permissions — ensuring users only see answers from content they’re already authorized to access. Enabling ACLs requires Atlassian admin credentials (API key, Organization ID, and Directory ID).

For more information, see Document-level access controls. If you do not enable ACLs, access is controlled at the knowledge base level. Anyone who has access to the knowledge base can get insights from all the content within it.

This blog post uses the ACL-enabled connection.

To enable document-level access controls, check the Use Atlassian admin credential check box under ACL Management and fill in the API Key, Organization ID and Directory ID fields. Please see here on how to obtain these Atlassian admin credentials.

When enabled, Amazon Quick verifies a user’s access in real time and crawls the following Confluence ACL resources:

  • Spaces – Space permissions apply to all documents in the space by default.
  • Pages – Pages can be restricted to specific users and groups. Nested pages inherit restrictions from the parent page and can have their own restrictions.
  • Blogs – Blog posts can be restricted to specific users and groups in the space.
  • Attachments – Files attached to pages or blog posts inherit the access controls of their parent document.

Screenshot of the 'Create Confluence knowledge base' dialog in Amazon Quick showing the Authentication method configuration form. Fields include Name ('Confluence - Knowledge base'), Description, and Confluence URL (redacted). Under ACL Management, the 'Use Atlassian admin credential' checkbox is checked (highlighted with a red border). Additional fields for API key, OrganizationID (UUID), and Directory ID (UUID) are visible with sensitive values redacted. This image shows how to configure Atlassian admin credentials for document-level access control.

When the Amazon Quick requesting access to your Atlassian account pop-up window appears, review the permissions listed and choose Accept to complete the authorization and sign-in process.

Screenshot of the Atlassian OAuth authorization consent screen requesting access to a user's Atlassian account on behalf of Amazon Quick. The screen displays the Amazon Quick app icon connected to the Atlassian logo, a list of Confluence permissions being requested (including content attachments, blog posts, comments, space details, user details, and more), and an 'Accept' button highlighted with a red border. This image illustrates the OAuth permission grant flow for connecting Amazon Quick to Atlassian Confluence.

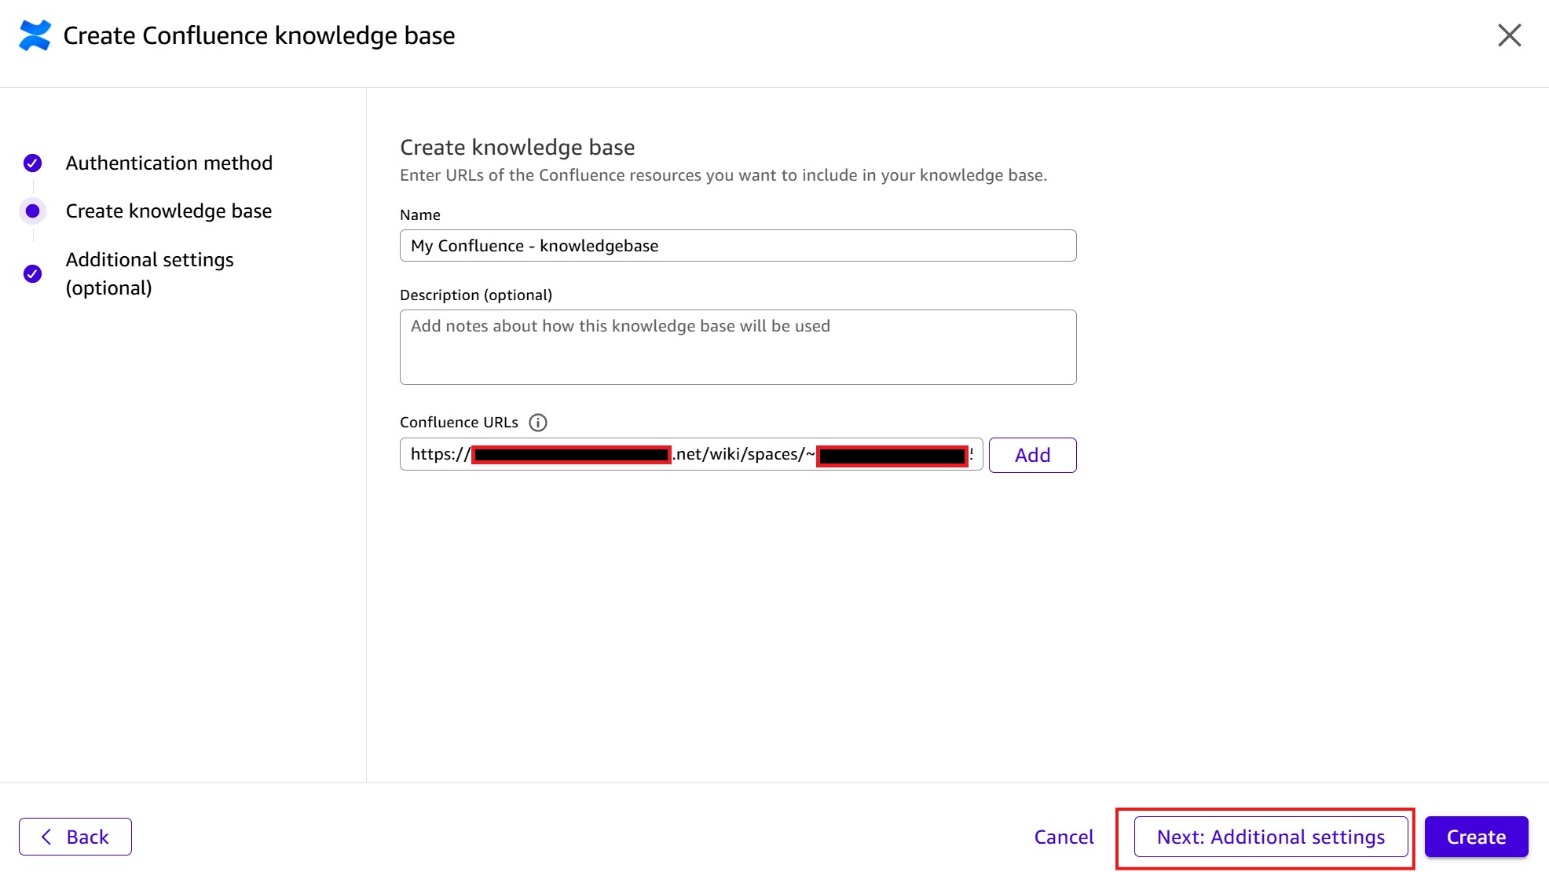
After you’re signed in, enter a descriptive name for your knowledge base and provide the Confluence URL including the space key (for example, yourinstance.atlassian.net/wiki/spaces/SPACEKEY).

Choose Add and then Next: Additional settings to complete the knowledge base setup.

Screenshot of the 'Create Confluence knowledge base' dialog in Amazon Quick, showing Step 2: Create knowledge base. The form includes a Name field ('My Confluence - knowledgebase'), an optional Description field, and a Confluence URLs field pre-filled with a redacted Atlassian wiki URL. The left panel shows all three steps with Authentication method completed. Navigation buttons 'Back', 'Cancel', 'Next: Additional settings', and 'Create' are visible at the bottom. This image demonstrates how to specify Confluence content sources when creating a knowledge base.

After you successfully create the knowledge base, it appears in the Existing Knowledge bases section. The Status column shows the current sync state of your knowledge base.

Screenshot of the Amazon Quick Knowledge page showing the expanded 'Set up new knowledge base' panel with all available connectors: Amazon Q Business, Amazon S3, Atlassian Confluence Cloud, Google Drive, IDC, Microsoft OneDrive, Microsoft SharePoint Online, and Webcrawler. Below, the 'Existing knowledge bases' section lists 'My Confluence - knowledgebase' with Status: Available, Sync status: Completed, Visibility: Personal, Owner: Me, and Last Modified: May 3, 2026 (highlighted with red border). This image shows a successfully created and synced Confluence knowledge base in Amazon Quick

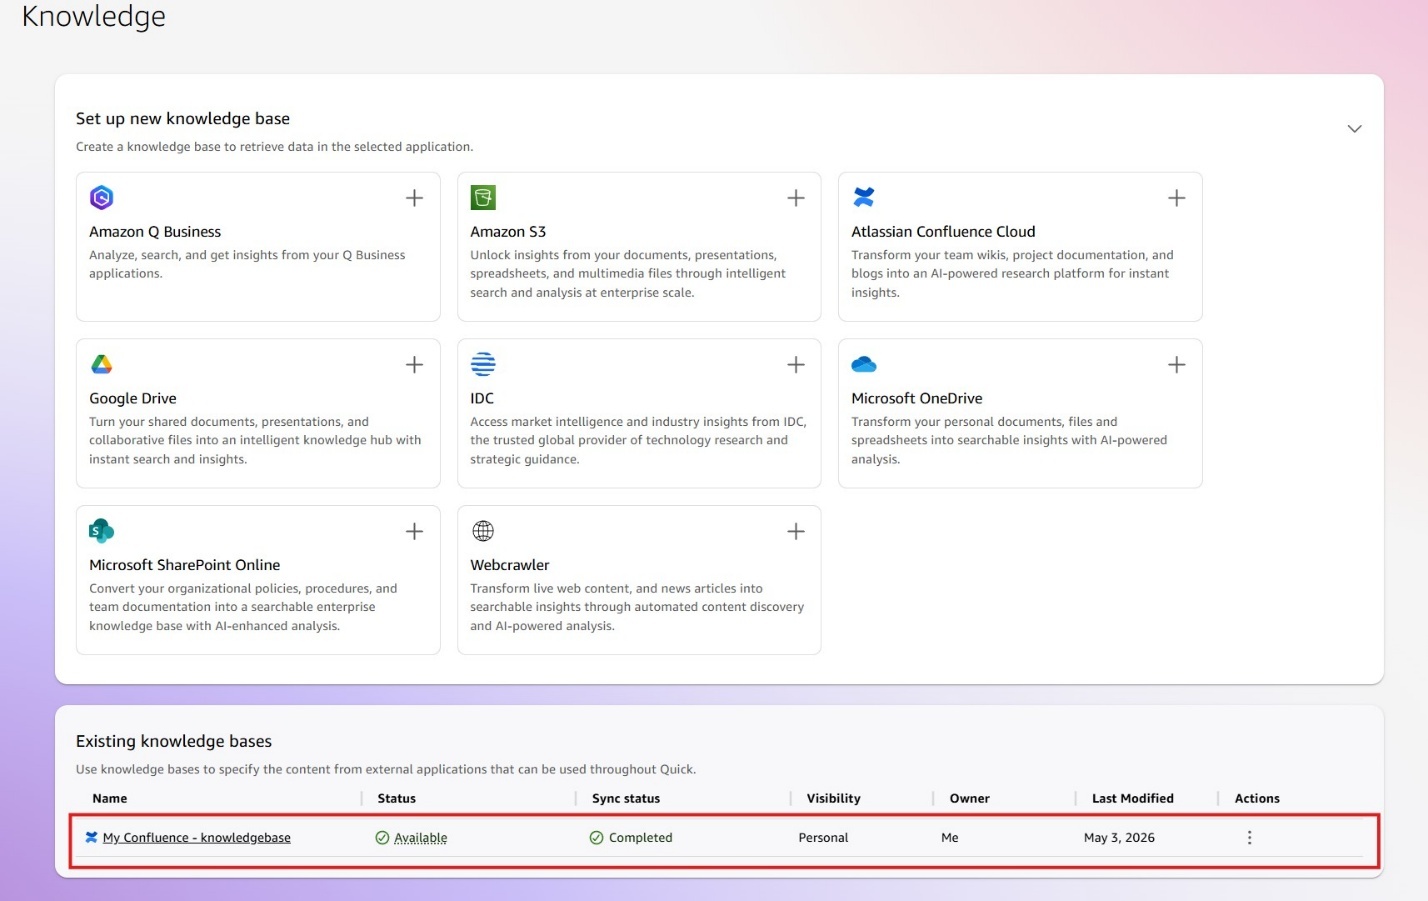
A successfully created knowledge base in Quick syncs with the available content in Confluence Cloud. After the sync is complete, the Status field changes to Available.

You can view more details about the knowledge base by choosing the ellipsis (…) button in the Action column and selecting View knowledge base.

Screenshot of the Existing knowledge bases table in Amazon Quick showing 'My Confluence - knowledgebase' entry with an open actions dropdown menu (highlighted with a red border). The dropdown displays options: View knowledge base, Share knowledge base, Edit knowledge base, Delete knowledge base, and Edit integration. This image illustrates the management actions available for an existing Confluence knowledge base in Amazon Quick.

In the knowledge base details page, you can view the Summary, Sync Schedules, Sync Reports, and Permissions for that knowledge base.

The Summary tab of the knowledge base details page displays the knowledge base status, its last refresh timestamp, and the content URL that Quick crawled. You can choose Sync now to trigger a manual refresh or Edit to modify the knowledge base configuration, such as adding additional content URLs and other advanced indexing settings.

Screenshot of the 'My Confluence Knowledge Base' detail page in Amazon Quick, showing the Summary tab (highlighted with a red border). The page displays the About section with Name, Knowledge base ID, and Sync status (Completed, last sync February 20, 2026). A Content section shows the configured Confluence URL (redacted). An Advanced settings section is collapsed at the bottom. In the top-right, a 'Sync now' button and a three-dot menu showing 'Edit' and 'Delete' options are visible (highlighted). The right panel shows the linked Integration: 'My Data Access Integration'.

The Sync Schedules tab displays the current sync schedules and the history of refreshes. You can change the current schedule by choosing Add new Schedule or run an on-demand refresh by selecting Sync now.

Screenshot of the 'My Confluence Knowledge Base' detail page in Amazon Quick on the Sync schedules tab. The Sync schedule table shows a Daily schedule with Start time of February 20, 2026 at 11:22 AM PST and Email notification On. A three-dot actions menu is open showing 'Edit' (highlighted with red border) and 'Delete' options. An 'Email on sync failure' toggle is highlighted in the top-right. The Sync activity section below shows the last 90 days of sync history with timestamps, durations, item counts, sync types (Manual, FULL_CRAWL), and View report links. The 'Sync now' button is highlighted in the top-right corner.

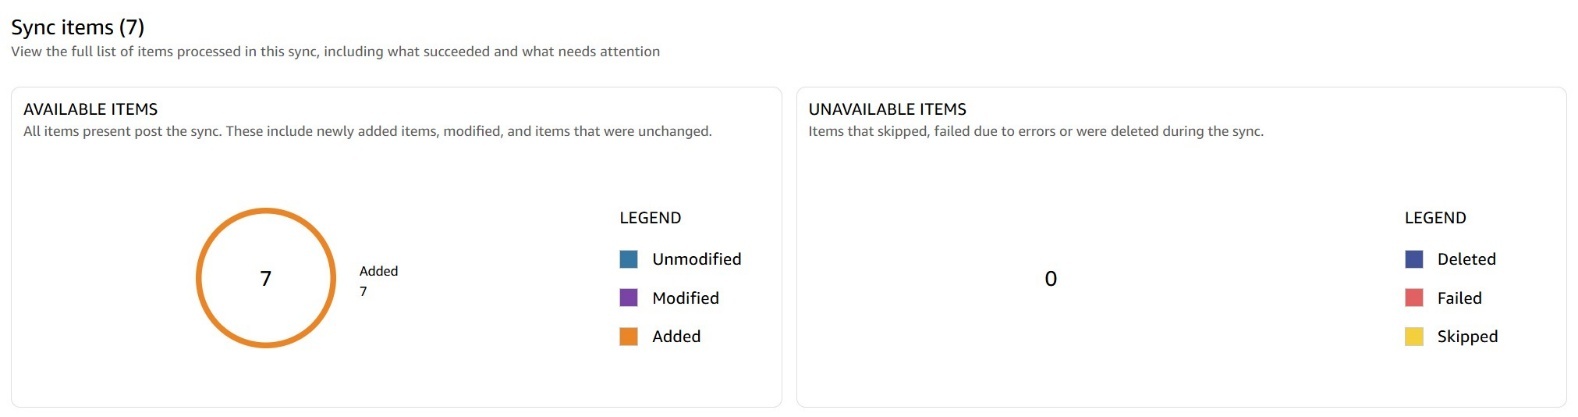
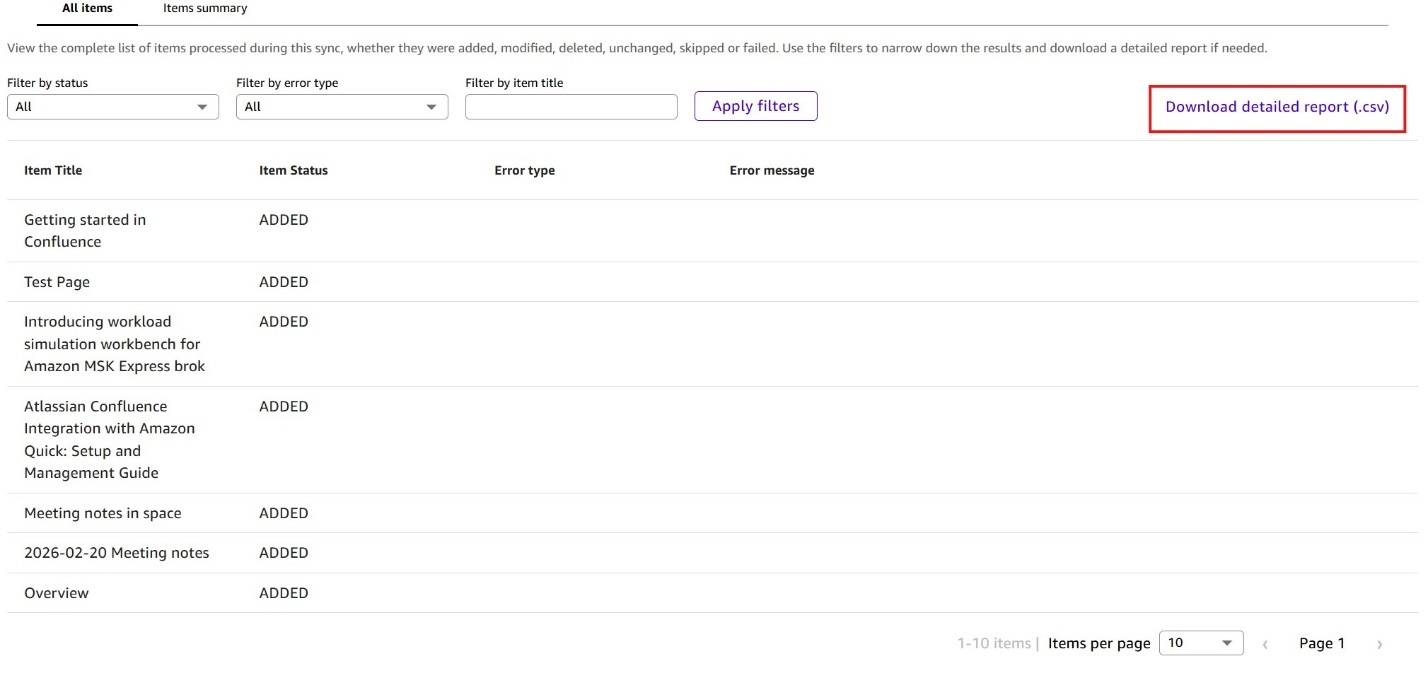
The Sync Reports tab gives you an overview of items that Quick synced or refreshed along with items that skipped or failed. Here, you can also download a detailed CSV report for further analysis of sync results.

Screenshot of the 'Sync reports' tab (highlighted with a red border) on the My Confluence Knowledge Base page in Amazon Quick. A date selector shows 'May 3, 2026 at 1:36 PM PDT'. The Overview section displays Sync status: Completed, Sync type: 1 minute, Sync start time: May 3, 2026 at 1:36 PM PDT, and Sync end time: May 3, 2026 at 1:37 PM PDT. This image shows how to review sync report details for a Confluence knowledge base in Amazon Quick.

Screenshot of the Sync items summary for a Confluence knowledge base sync in Amazon Quick. The 'Available Items' panel shows a donut chart indicating 7 items Added (orange), with a legend for Unmodified (blue), Modified (purple), and Added (orange). The 'Unavailable Items' panel shows 0 items, with a legend for Deleted (dark blue), Failed (red), and Skipped (yellow). This image illustrates a successful full sync that added 7 Confluence pages to an Amazon Quick knowledge base.

Screenshot of the 'All items' tab in the Sync report for a Confluence knowledge base sync in Amazon Quick. The table shows 7 synced items with columns for Item Title, Item Status, Error type, and Error message. Items include: 'Getting started in Confluence', 'Test Page', 'Introducing workload simulation workbench for Amazon MSK Express brok', 'Atlassian Confluence Integration with Amazon Quick: Setup and Management Guide', 'Meeting notes in space', '2026-02-20 Meeting notes', and 'Overview', all with status ADDED. A 'Download detailed report (.csv)' button is highlighted in the top-right corner.

Configuring knowledge base permissions

You can manage the knowledge base permissions on the Permissions tab. Add or remove users and groups to control who has access to query the indexed Confluence content within Quick.

Screenshot of the Permissions tab on the 'My Confluence Knowledge Base' detail page in Amazon Quick. The 'Manage knowledge base permissions' section shows a table with a single user' listed with Owner permissions. An 'Add users & groups' button is prominently displayed in the top-right corner (highlighted with a red border). This image demonstrates how to manage access control and user permissions for a Confluence knowledge base in Amazon Quick.

Querying your knowledge base

With your knowledge base configured, you can now start asking questions to validate that Quick indexed your Confluence content correctly before wiring everything together. Optionally, you can also consider adding your Knowledge base to a Quick Space. We will cover this in a later section of this blog. You can now query your knowledge base. Quick searches your indexed Confluence content and returns a response with source references pointing back to the original Confluence pages.

Screenshot of a Sources citation panel in Amazon Quick's AI assistant, shown after clicking a citation reference. The panel displays Source 1 as a Confluence URL (redacted) with the document title 'Document-level access controls', confirming the AI response was sourced from the connected Confluence knowledge base. An X button is visible to close the panel. This image shows how Amazon Quick attributes AI responses to specific Confluence source documents.

Creating Quick Actions

Knowledge bases handle breadth, ingesting and indexing Confluence content so Quick can perform semantic search and Retrieval Augmented Generation (RAG) across your documentation. Actions deliver precision. Actions connect Quick directly to live Confluence Cloud APIs, powering real-time, targeted queries and write operations: creating pages, updating content, retrieving specific records, and triggering workflows.

Quick supports Confluence cloud action integration via user authentication (3LO) and service authentication (API key). This blog focuses on user authentication (3LO).

For more information, refer to the Amazon Quick’s Confluence Cloud Action integration.

To integrate Quick actions with Confluence Cloud using user authentication (3LO), you must first create an OAuth 2.0 application in Atlassian’s developer console. The following section walks through these steps.

Creating the OAuth 2.0 application

Log in to your account from the Atlassian Developer Page.

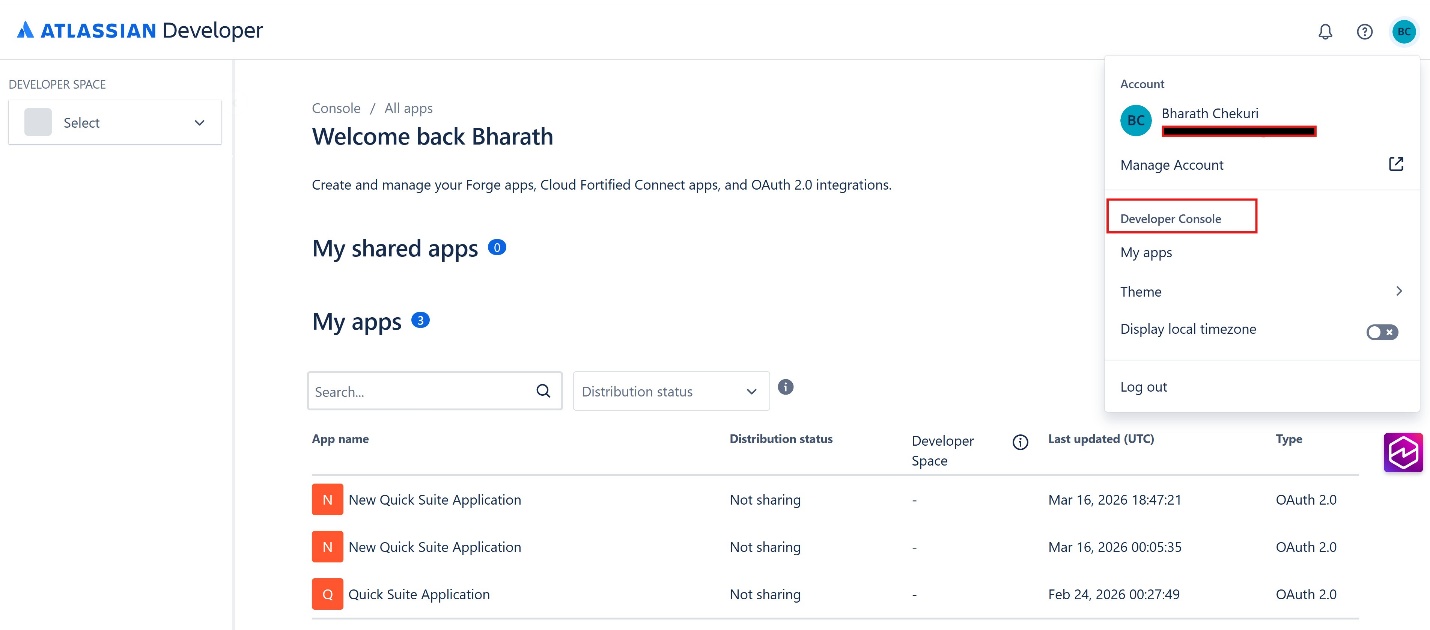
Log in to your account from the Atlassian Developer Page. Select the profile icon from the top-right corner. Then, from the menu that opens, select Developer Console.

Screenshot of the Atlassian Developer Console showing the 'All apps' page for user Bharath Chekuri. The page displays 'My shared apps (0)' and 'My apps (3)' sections. Three apps are listed: two named 'New Quick Suite Application' (OAuth 2.0, Not sharing) and one 'Quick Suite Application' (OAuth 2.0, Not sharing). An account dropdown menu is open in the top-right showing options including Manage Account, Developer Console (highlighted with red border), My apps, Theme, Display local timezone, and Log out. This image shows the Atlassian Developer Console used to manage OAuth apps for Amazon Quick integration.

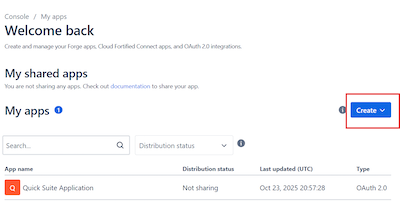
From the Welcome page, select Create and then select OAuth 2.0 Integration.

On the Create a new OAuth 2.0 (3LO – Three-legged OAuth) integration page, for Name, enter a descriptive name for the OAuth 2.0 application. Select the I agree to be bound by Atlassian’s developer terms checkbox, and choose Create.

Screenshot of the Atlassian Developer Console showing the 'Create a new OAuth 2.0 (3LO) integration' form. An informational banner explains that rotating refresh tokens are enabled for new OAuth 2.0 integrations. The form contains: (1) a Name field pre-filled with 'New Quick Suite Application' (labeled with a red arrow marked '1'), (2) a checkbox to agree to Atlassian's developer terms (labeled '2'), and (3) a blue 'Create' button (labeled '3'). This image shows the required steps to create a new OAuth app for connecting Amazon Quick to Atlassian Confluence.

The console displays a summary page outlining the details of the OAuth 2.0 app that you created. You will use this application’s credentials in later steps to configure the action integration in Quick.

Screenshot of the Atlassian Developer Console showing the Overview page for the newly created 'New Quick Suite Application' OAuth 2.0 app. The page displays App details (App ID shown), Distribution status (Not sharing), Permissions (API scopes: None), and Authorization type (OAuth 2.0 (3LO)). The left navigation sidebar shows Overview (active), Distribution, Permissions, Authorization, and Settings sections. This image confirms the successful creation of a new OAuth 2.0 app in Atlassian for Amazon Quick integration.

Authorizing the configuration

From the left navigation menu, choose Authorization. On the Authorization page, choose Add next to OAuth 2.0 (3LO) to add three-legged OAuth authorization to your application.

Screenshot of the Authorization page within the 'New Quick Suite Application' OAuth 2.0 app in the Atlassian Developer Console. The page shows the Authorization type table with 'OAuth 2.0 (3LO)' listed, described as 'Allows your app to access APIs for Atlassian apps and services on a user's behalf.' Two action buttons are shown: 'Add' (highlighted with red arrow labeled '2') and 'Documentation'. The left sidebar shows 'Authorization' as the active section (highlighted with red arrow labeled '1'). This image demonstrates how to configure OAuth 2.0 authorization for a new Atlassian app.

In the OAuth 2.0 authorization code grants (3LO) for apps section, enter the Callback URL and choose Save changes. Note that this is a temporary Callback URL that you must update after you create an action integration in Amazon Quick. Quick generates a callback URL in the following format: https://{region}.quicksight.aws.amazon.com/sn/oauthcallback

Replace {region} with the AWS Region where you deployed your Quick instance.

Screenshot of the OAuth 2.0 authorization code grants (3LO) configuration page in the Atlassian Developer Console. The form shows a Callback URL field pre-filled with a partial Atlassian URL (labeled with red arrow '1'), and 'Save changes', 'Cancel', and 'Discard changes' buttons (labeled '2'). An informational note explains the purpose of OAuth 2.0 authorization code grants with links to Jira Cloud and Confluence Cloud documentation. This image shows how to configure the OAuth callback URL for an Amazon Quick Atlassian integration.

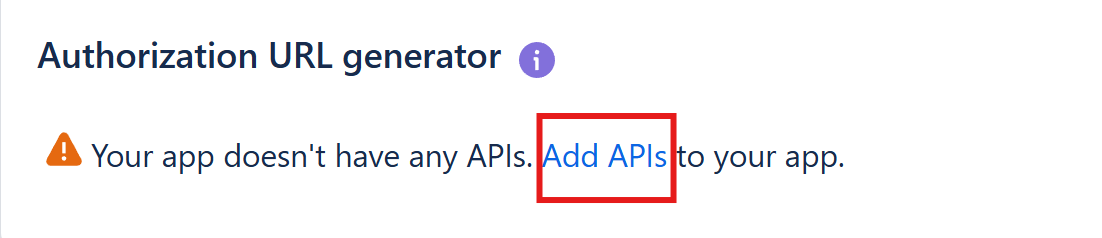
From the Authorization URL generator section that appears at the bottom of the Authorization page, choose Add APIs to navigate to the Permissions page where you will configure the required API scopes.

Screenshot of the Authorization URL generator section in the Atlassian Developer Console showing a warning message: 'Your app doesn't have any APIs. Add APIs to your app.' with an 'Add APIs' link highlighted in a red border. This image illustrates the prerequisite step of adding API permissions before generating an OAuth authorization URL for an Amazon Quick Confluence connector.

Setting API scopes

On the Permissions page, for Scopes, navigate to User Identity API. Choose Add, and then choose Configure to set the required scopes.

Screenshot of the Permissions page in the Atlassian Developer Console for the 'New Quick Suite Application' OAuth 2.0 app. The page shows 'Scopes Used: 0' and a list of available APIs with Add and Documentation action buttons: Personal data reporting API, User identity API (highlighted with a red border), Confluence API, Jira API, Compass GraphQL API, and BRIE API. An informational note recommends not adding more than 50 scopes. This image shows the available Atlassian API permissions that can be configured for Amazon Quick integration.

On the User Identity API page, choose Edit Scopes, and then add the following read scopes:

  • read:me – View active user profile
  • read:account – View user profiles

Screenshot of the User Identity API configuration page in the Atlassian Developer Console showing 'Scopes Used: 2'. The page displays an information panel about choosing scopes, and an 'Edit Scopes' button (highlighted with a red border). A table shows two selected scopes: 'View active user profile' (code: read:me) and 'View user profiles' (code: read:account), both with checkmarks. This image illustrates the minimal identity scopes required for Amazon Quick's OAuth integration with Atlassian.

Return to the Permissions page. From Scopes, navigate to Confluence API. Choose Add, and then choose Configure to set the required Confluence scopes.

Screenshot of the Permissions page in the Atlassian Developer Console after configuring User Identity API scopes. The page shows 'Scopes Used: 2' and the API list with User identity API now showing 'Configure' (2 scopes configured) instead of 'Add'. The Confluence API row is highlighted with a red border, showing it still has 0 scopes with an 'Add' button. This image illustrates the next step in the setup: adding Confluence API permissions for Amazon Quick.

Select the following required scopes from the Classic scopes and Granular scopes tabs.

  • search:confluence – Search Confluence content. This is a classic scope in Confluence.
  • read:page:confluence – Read page content. This is a granular scope in Confluence.
  • write:page:confluence – Create and modify pages. This is a granular scope in Confluence.
  • read:space:confluence – Access space information. This is a granular scope in Confluence.

For more information, see Implementing OAuth 2.0 (3LO) and Determining the scopes required for an operation in Atlassian Developer.

Screenshot of the Confluence API granular scopes configuration page in the Atlassian Developer Console showing 'Scopes Used: 3'. The page shows a 'Granular scopes' tab (active) with search and filter options. An 'Edit Scopes' button is highlighted in the top-right corner (red border). Three scopes are checked (highlighted with red border): 'View pages' (read:page:confluence), 'Create and update pages' (write:page:confluence), and 'View spaces' (read:space:confluence). This image demonstrates the minimum Confluence API scopes needed for Amazon Quick page management and knowledge base access.

Retrieve the Client ID and Secret from the Settings page. Copy these values and store them securely. You will need them when configuring the action integration in Amazon Quick.

Screenshot of the Settings page in the Atlassian Developer Console for the 'New Quick Suite Application' OAuth 2.0 app. The Authentication details section (highlighted with a red border) shows a Client ID field displaying 'X39fmFgtCKN3fhEc1ea34ZqVdlEGJ30S' with a copy button, and a Secret field with the value masked as dots, with copy and refresh buttons. An Audit logs section with a Download button is also visible. The Settings item is highlighted in the left navigation sidebar. This image shows where to retrieve the OAuth credentials needed to configure the Amazon Quick Confluence connector.

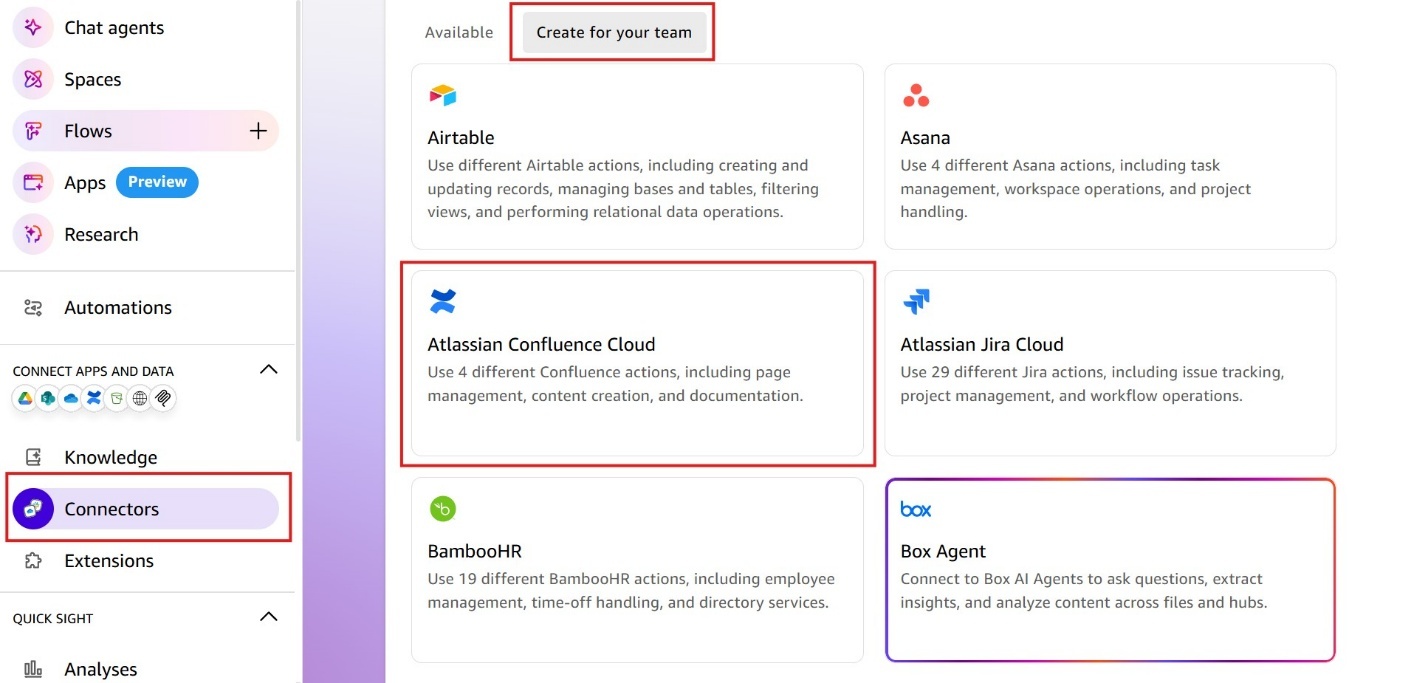
Now that you have configured the OAuth application, it’s time to create an Action integration. From the Connectors page, select the Create for your team tab and simply click the Atlassian Confluence Cloud card.

Screenshot of the Amazon Quick Connectors page showing the 'Create for your team' tab with available connectors. The page displays cards for Airtable, Asana, Atlassian Confluence Cloud (highlighted with a red border, noting 4 available actions including page management, content creation, and documentation), Atlassian Jira Cloud, BambooHR, and Box Agent. The left navigation sidebar shows Connectors selected under 'Connect Apps and Data'. This image illustrates the Atlassian Confluence Cloud connector option available for teams in Amazon Quick.

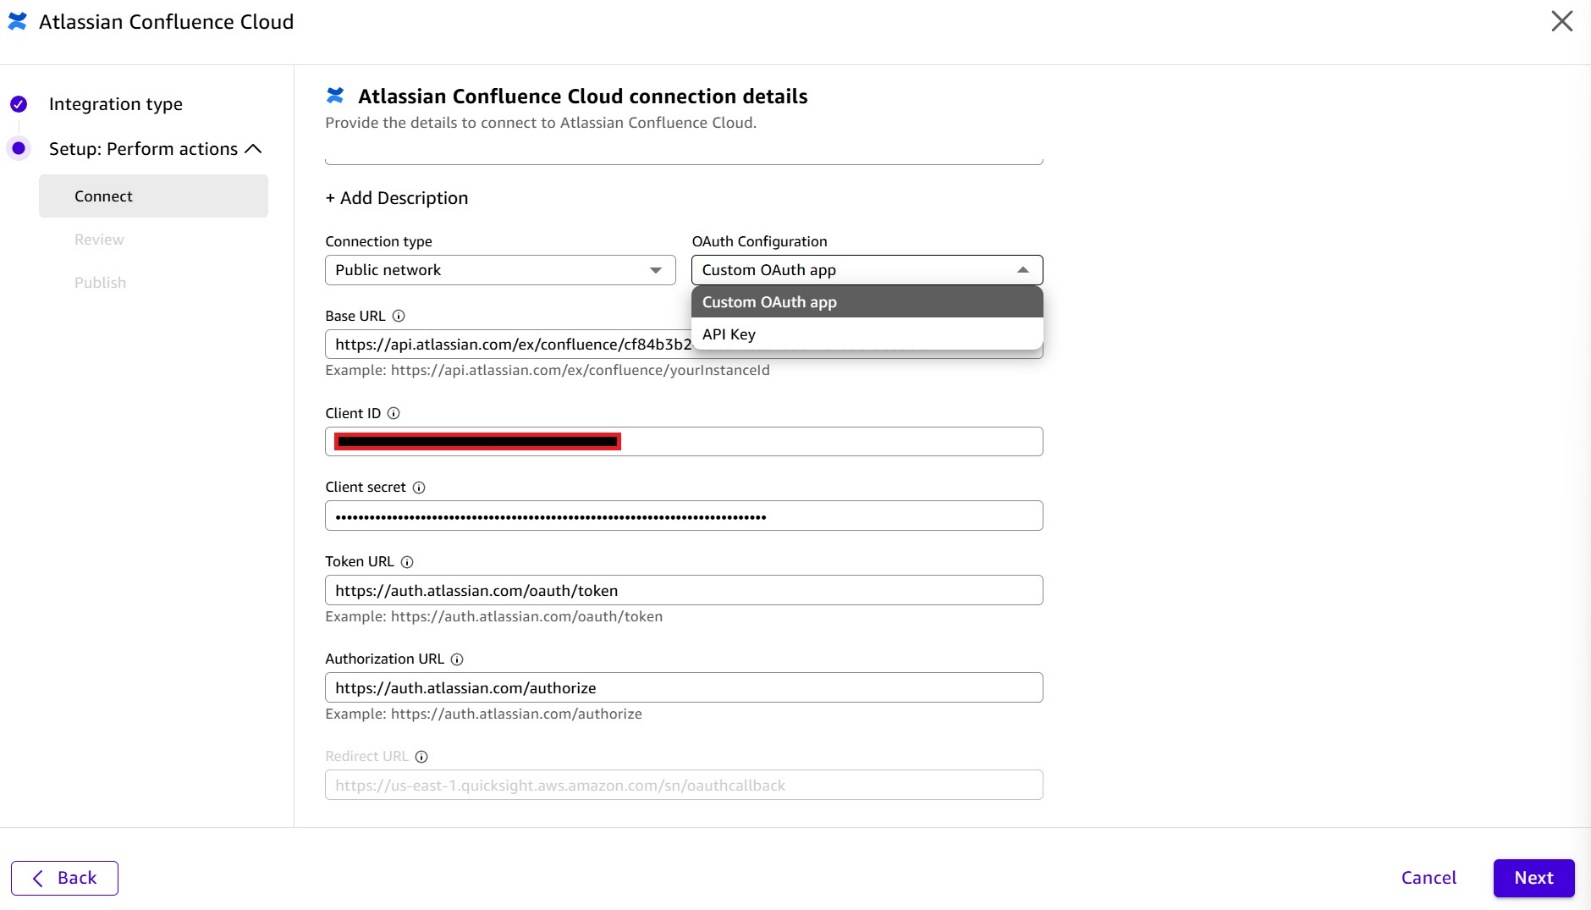
On the Atlassian Confluence Cloud connection details page, choose Custom OAuth app in the OAuth Configuration drop down. Provide the Base URL, Client ID, Client Secret, Token URL, Authentication URL, and Redirect URL and then choose Next.

For more information about each of these fields, see Atlassian Confluence Cloud integration.

BaseURL – is in the following format – Example: https://api.atlassian.com/ex/confluence/yourInstanceId“yourInstanceId” as it shows in the previous example can be found by navigating to https://support.atlassian.com/jira/kb/retrieve-my-atlassian-sites-cloud-id/

Client ID and Client secret – Refer to the “Creating the OAuth 2.0 application section of this document.

TokenURL and AuthorizationURL – you can use the default examples displayed under each of the textboxes in the Create Integration page.

RedirectURL – You can keep the default as it is.

Screenshot of the 'Atlassian Confluence Cloud connection details' setup dialog in Amazon Quick. The form shows Connection type: 'Public network', OAuth Configuration dropdown set to 'Custom OAuth app' (with a dropdown showing 'Custom OAuth app' and 'API Key' options), a Base URL field (partially redacted), Client ID (redacted, highlighted with red border), Client secret (masked), Token URL (https://auth.atlassian.com/oauth/token), and Authorization URL (https://auth.atlassian.com/authorize). Navigation buttons Back and Next are visible at the bottom. This image shows how to configure custom OAuth credentials when setting up a Confluence Cloud connector in Amazon Quick.

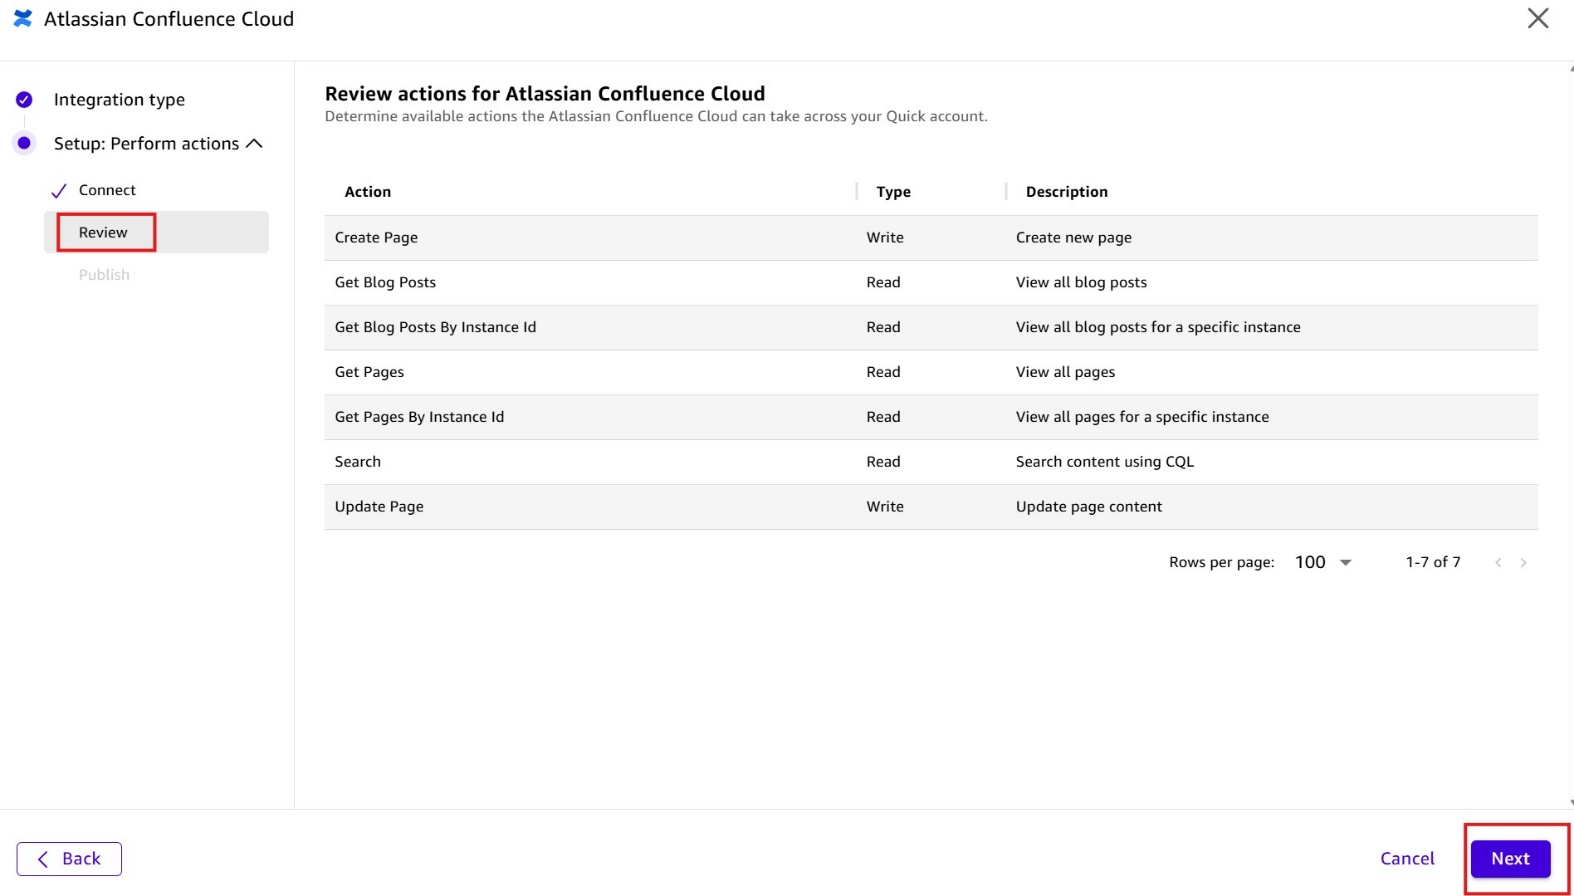
In the Review actions for Atlassian Confluence Cloud page, review the available actions that Quick will expose through this integration. Choose Next to proceed.

Screenshot of the 'Review actions for Atlassian Confluence Cloud' page in Amazon Quick's connector setup wizard. A table shows 7 enabled actions with their type and description: Create Page (Write), Get Blog Posts (Read), Get Blog Posts By Instance Id (Read), Get Pages (Read), Get Pages By Instance Id (Read), Search (Read), and Update Page (Write). The 'Review' step is active in the left wizard panel. 'Next' and 'Cancel' buttons are visible at the bottom (Next highlighted with red border). This image shows the available Confluence actions that will be enabled through the Amazon Quick connector.

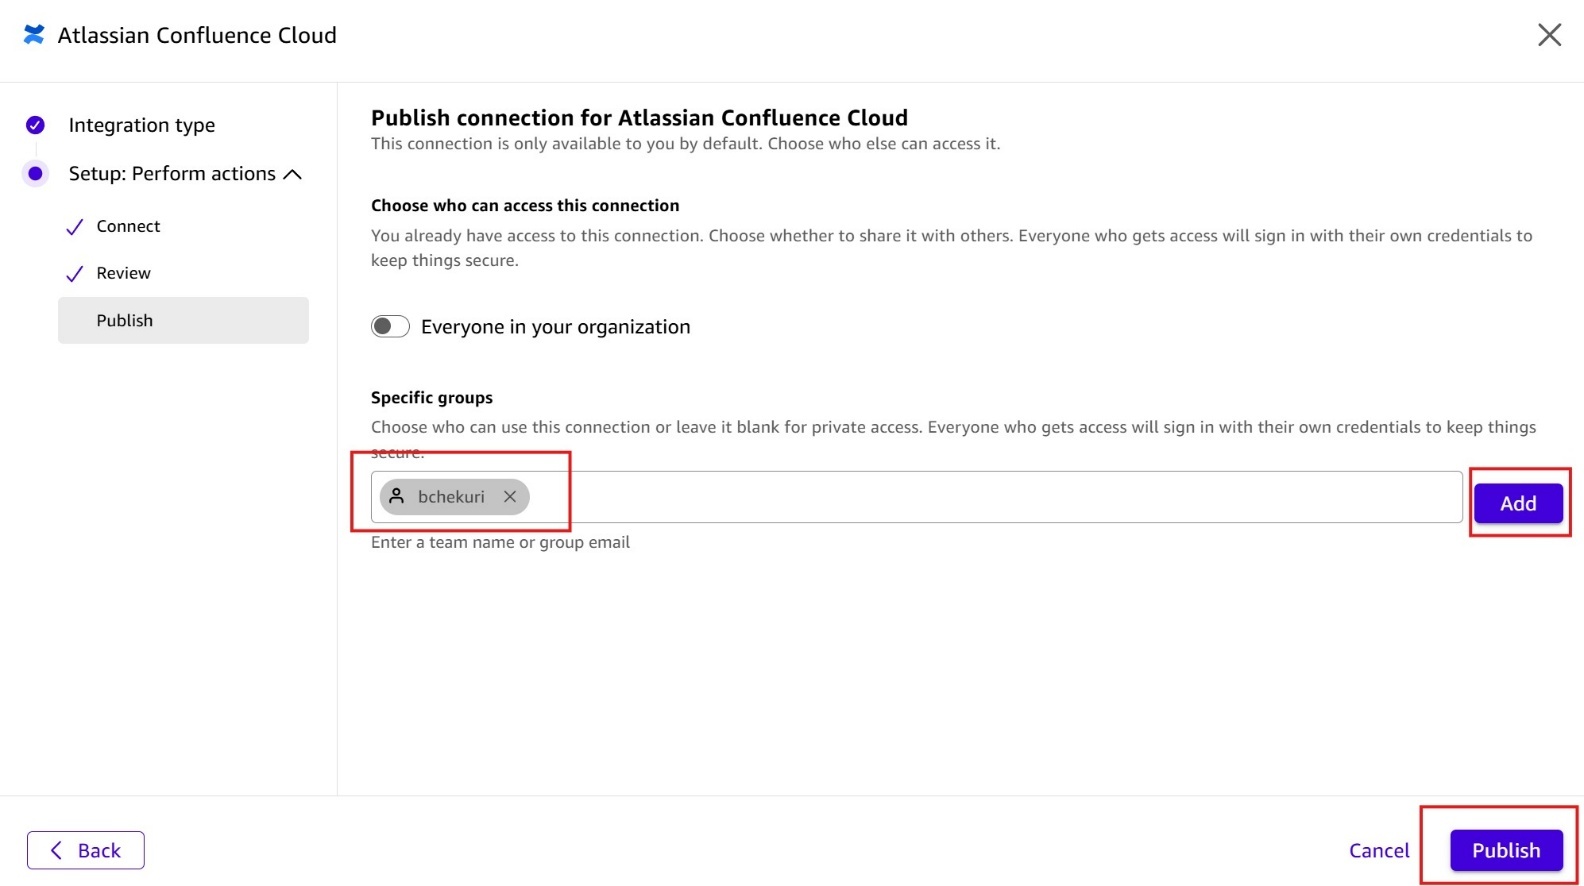
Optionally, you can share this integration with other team members on the Share Integration page. Choose Publish to finalize and publish the action integration.

Screenshot of the 'Publish connection for Atlassian Confluence Cloud' step in Amazon Quick's connector setup wizard. The page shows options to choose who can access the connection — 'Everyone in your organization' toggle (off) or 'Specific groups'. A specific user 'bchekuri' is shown as an added member (highlighted with red border). An 'Add' button is also highlighted with a red border for adding more users. A 'Publish' button (highlighted) is visible at the bottom-right. This image demonstrates how to configure sharing permissions when publishing a Confluence connector in Amazon Quick.

After you successfully create the action integration, the Atlassian Confluence Cloud Integration card shows a Connected status.

Screenshot of the Amazon Quick Connectors page showing the Atlassian Confluence Cloud Integration connector card with a green 'Connected' status badge (highlighted with a red border). Other available connectors visible on the page include Slack and Zoom (both showing a 'Connect' button). The left sidebar shows 'Connectors' selected. This image confirms a successful Atlassian Confluence Cloud integration connection in Amazon Quick.

Click the Atlassian Confluence Cloud Integration card to view its details. On the Atlassian Confluence Cloud Integration page, the Connection Details section shows Not signed in. Choose Sign in to authorize Quick to access your Confluence account using the OAuth 2.0 credentials you configured earlier.

Screenshot of the 'Atlassian Confluence Cloud Integration' connector detail page in Amazon Quick. The Connection Details panel shows Status: Ready, Last Updated At: 05/03/2026, Connection purpose: On-demand actions, Authentication type: Custom user based OAuth, Base URL (Atlassian API URL), Authorization URL, and Token URL. A 'Not signed in' status indicator is highlighted in a red border under Connection Details. The Enabled Actions table lists 7 actions. 'Sign in' (highlighted with red border) and 'Try it' buttons are visible at the top-right. This image shows the connector is configured but requires the user to sign in with their Atlassian credentials.

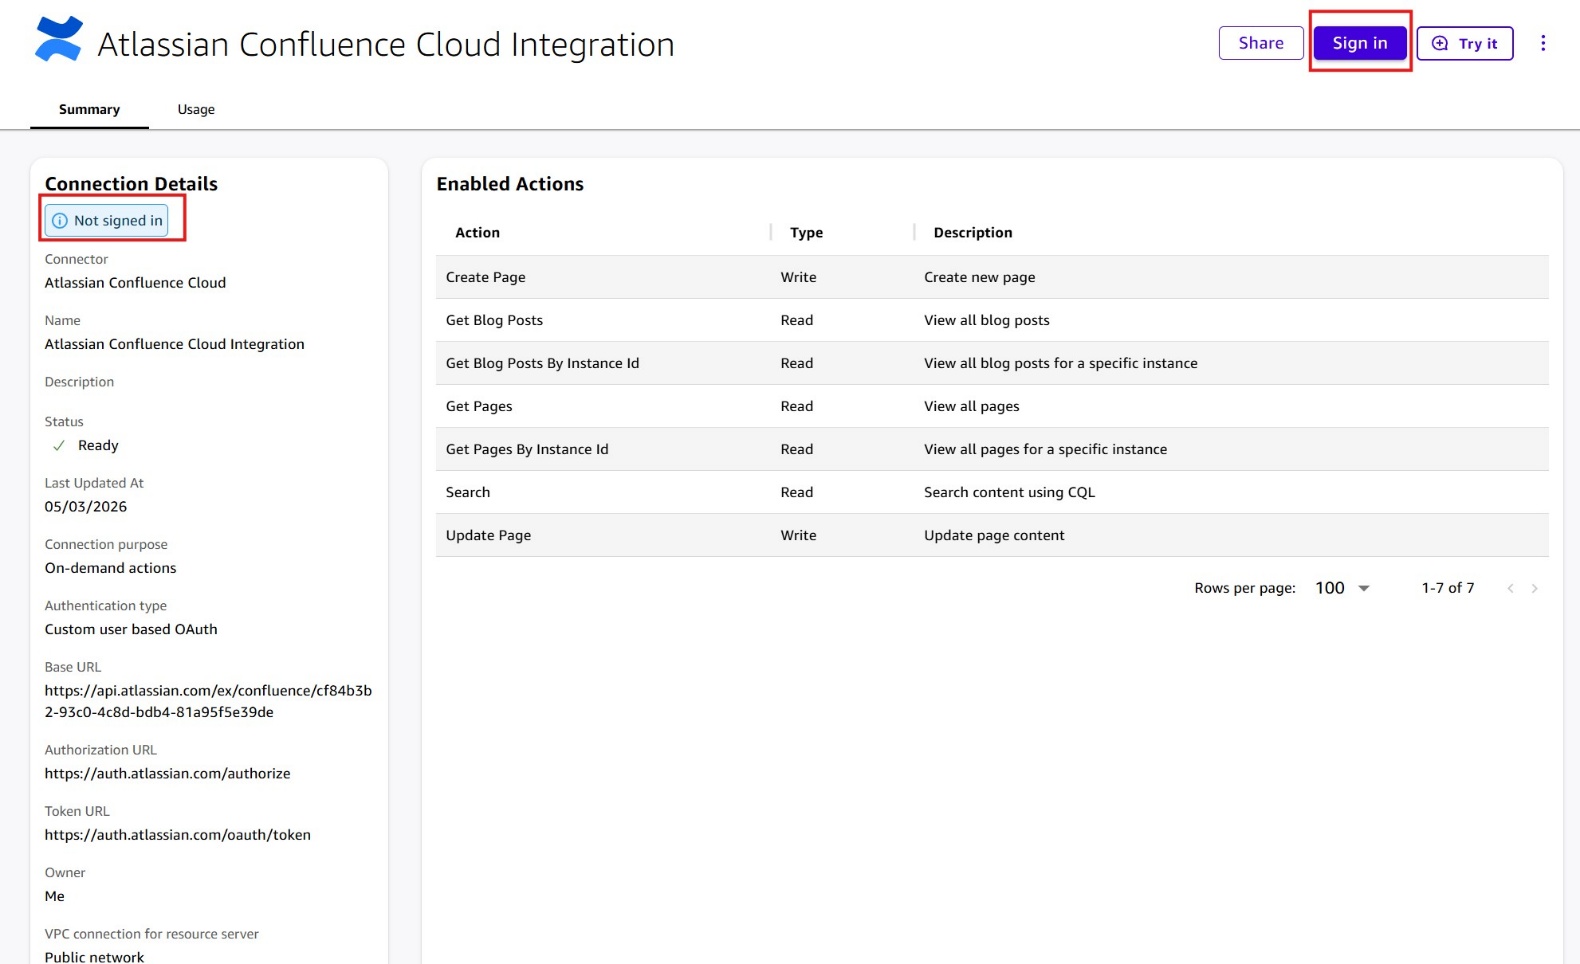
After you choose Sign in, a pop-up window appears requesting you to approve access to your Confluence Cloud account. Choose Accept. If the connection is successful, the Connection Details section updates to Signed in.

Screenshot of the Atlassian OAuth consent screen for 'Quick Suite Application' requesting access to a user's Atlassian account. The screen shows the app icon connected to the Atlassian logo, with the Confluence permissions requested: View (Page, Space details), Update (Page), and Search (confluence). A yellow warning banner states 'This app is in development mode' and advises caution. An 'Accept' button is highlighted with a red border at the bottom. A note shows '1 user has consented to using Quick Suite Application'. This image shows the OAuth authorization step for connecting a custom Amazon Quick app to an Atlassian Confluence Cloud account.

You have now successfully created and configured your action integration with Confluence Cloud.

Quick Spaces

While you can use Quick to work with Knowledge Bases and Actions separately, Spaces offer a better way to organize your Confluence integration. A Space groups your Confluence resources: Knowledge Bases, Actions, files, and dashboards into one collection for streamlined access and collaboration. This unified workspace means that you can access Confluence components together instead of switching between individual resources, and focused Spaces help Quick understand your full resource set for more accurate responses. Additionally, you can share entire collections with colleagues for consistent access across your organization. Grouping Confluence integrations in a Space creates an organized hub that improves both individual efficiency and team workflows.The next sections show you how to create and use Spaces in Quick to query and perform actions in Confluence Cloud.

Creating Quick Spaces

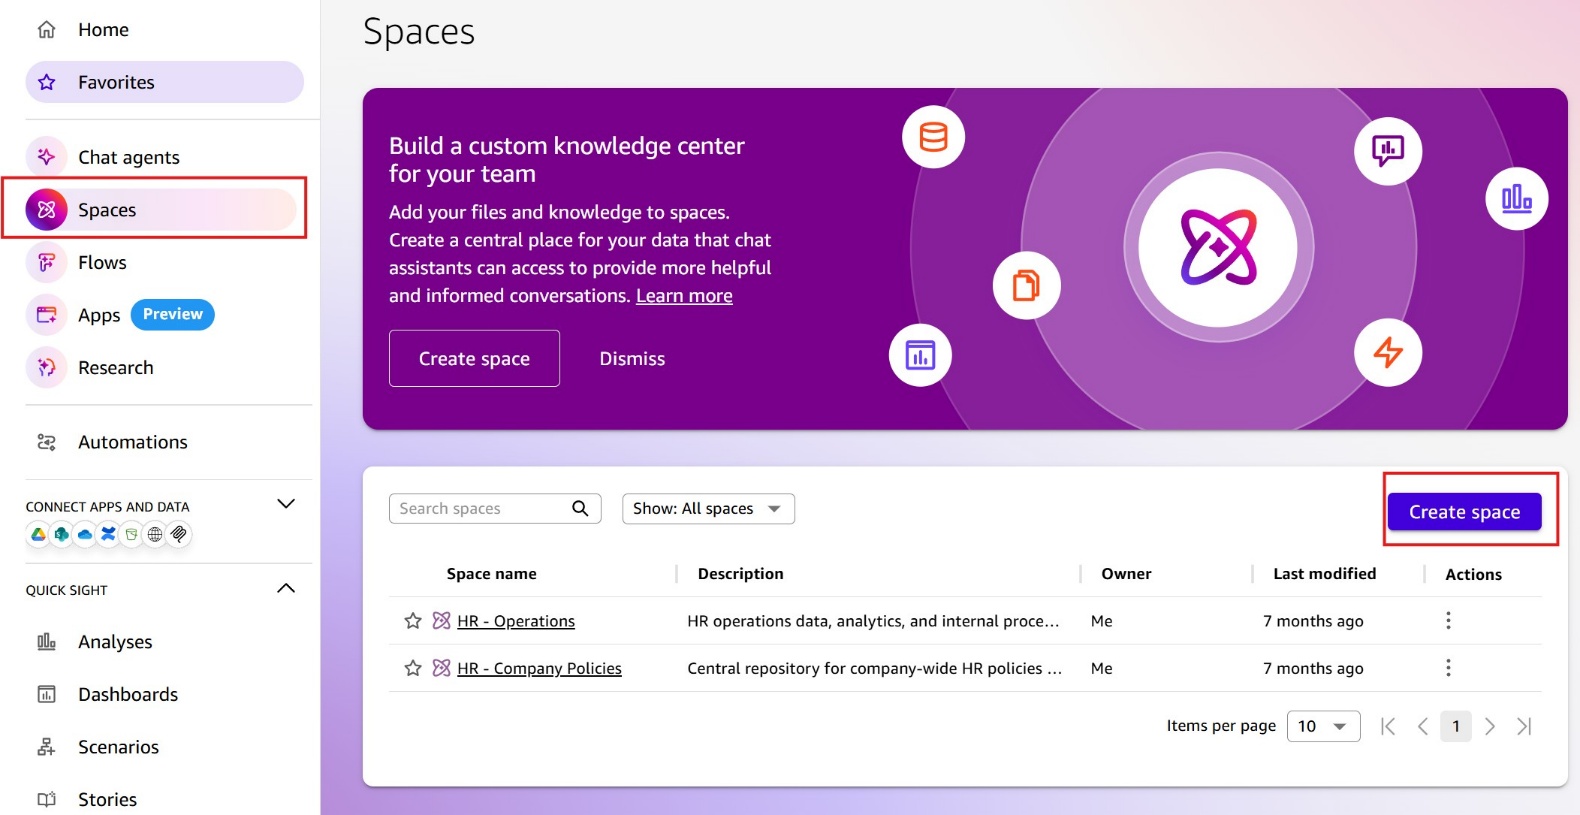
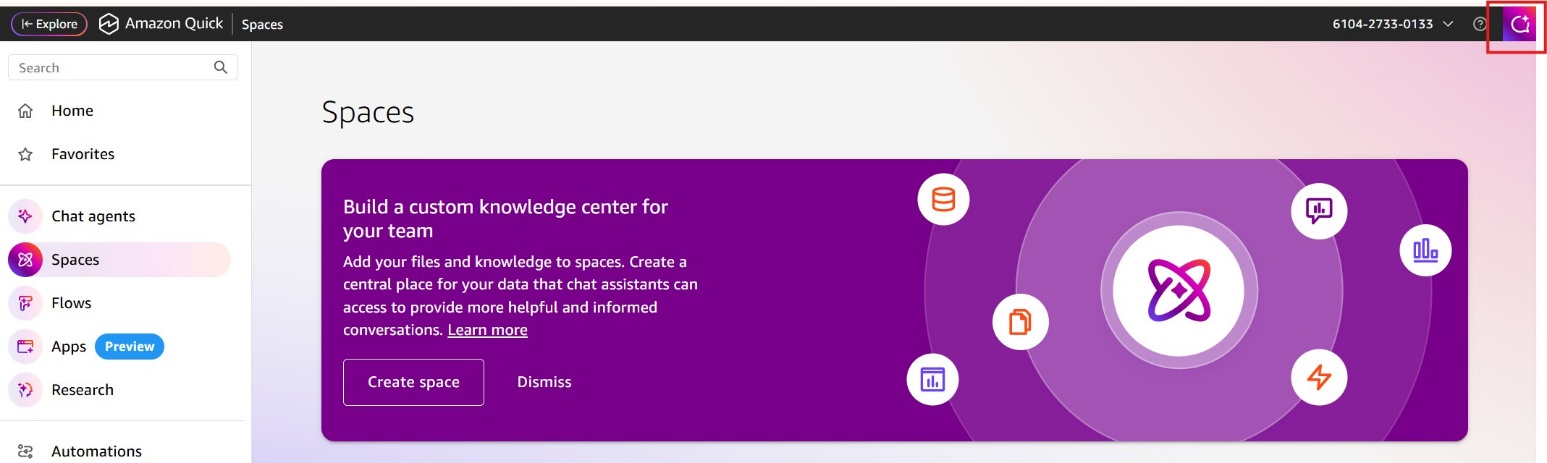
To create a Space in Quick, select Spaces in the navigation panel in the console and choose the Create Space button.

Screenshot of the Amazon Quick Spaces page showing an informational banner promoting custom knowledge centers. The banner reads 'Build a custom knowledge center for your team' with 'Create space' and 'Dismiss' buttons. Below, a Spaces table shows two existing spaces: 'HR - Operations' and 'HR - Company Policies', both owned by Me and last modified 7 months ago. A 'Create space' button is highlighted in the top-right corner with a red border. The 'Spaces' navigation item is highlighted in the left sidebar. This image demonstrates the Amazon Quick Spaces overview page and space creation workflow.

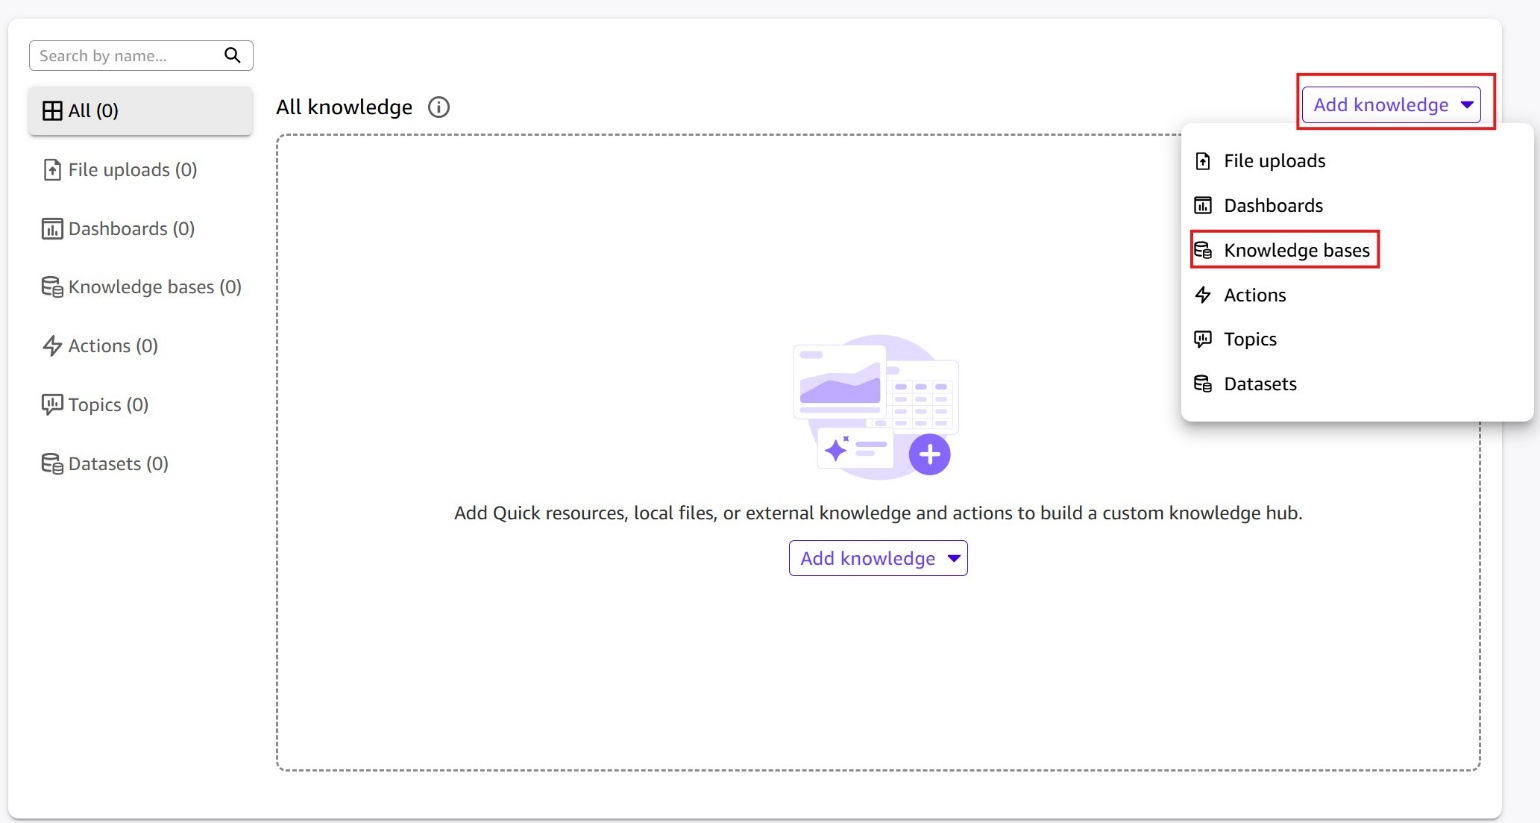
Give the Space a descriptive name, choose Add Knowledge, and then select knowledge bases from the dropdown menu to add your Confluence knowledge base to this Space.

Screenshot of a Space's knowledge management page in Amazon Quick showing 'All knowledge (0)' with an empty state. The left panel shows categories: File uploads (0), Dashboards (0), Knowledge bases (0), Actions (0), Topics (0), and Datasets (0). An 'Add knowledge' dropdown button in the top-right is highlighted with a red border and shows a menu with options: File uploads, Dashboards, Knowledge bases (highlighted), Actions, Topics, and Datasets. An empty state illustration shows a '+' button with the message 'Add Quick resources, local files, or external knowledge and actions to build a custom knowledge hub.' This image shows how to add a Confluence knowledge base to an Amazon Quick Space.

In the Add knowledge bases dialog, select the checkbox next to your Confluence Cloud knowledge base and choose Add.

Screenshot of the 'Add knowledge bases' dialog in Amazon Quick. The dialog shows tabs for Recent, Favorite, and 'All knowledge bases' (currently active). A table lists one available knowledge base: 'My Confluence Knowledge Base' owned by Me, last modified 3 hours ago, with its checkbox checked (highlighted with a red border). A 'Create a knowledge base' button appears in the top-right. At the bottom, 'Show 1 selected' toggle, 'Clear All' button, Cancel, and 'Add' button (highlighted with red border) are visible. This image illustrates how to link an existing Confluence knowledge base to a Space in Amazon Quick.

Now that your Confluence knowledge base is added to a Space, it becomes available across Quick’s full ecosystem — not just for chat queries. Team members can use the Space for collaboration (sharing a consistent, governed view of Confluence content across your organization), custom agents (building purpose-built agents that draw on your Confluence documentation as their knowledge source), Quick Flows (automating workflows that reference or update Confluence content), and Quick Research (running in-depth analysis reports grounded in your Confluence knowledge base). This means a single knowledge base setup unlocks value across the full range of Quick capabilities your team uses every day.

To add the newly configured action integration to your Quick Space, navigate to the Actions button and choose Add actions.

Screenshot of the Actions section within an Amazon Quick Space's knowledge management page. The left panel shows 'Actions (0)' selected, while the main area shows an empty state with a lightning bolt icon and the message 'Add actions to your space to fetch data on demand from external applications.' An 'Add actions' button is highlighted in the top-right corner (red border), and a second 'Add actions' button appears in the empty state area. The left panel also shows Knowledge bases (1) has been successfully added. This image shows how to add application actions to a Space in Amazon Quick

Screenshot of the 'Add application actions' dialog in Amazon Quick. The dialog shows tabs for Recent, Favorite, and 'All application actions' (active). A table lists two available actions: 'Atlassian Confluence Cloud Integration' (Type: Atlassian Confluence Cloud, Owner: Me, Last modified: 35 minutes ago) with its checkbox checked (highlighted with a red border), and 'Workshop APIs' (Type: OpenAPI Specification). A 'Create an action' button appears in the top-right. 'Show 1 selected', Cancel, and 'Add' (highlighted with red border) buttons are at the bottom. This image shows how to add the Atlassian Confluence Cloud Integration action connector to an Amazon Quick Space.

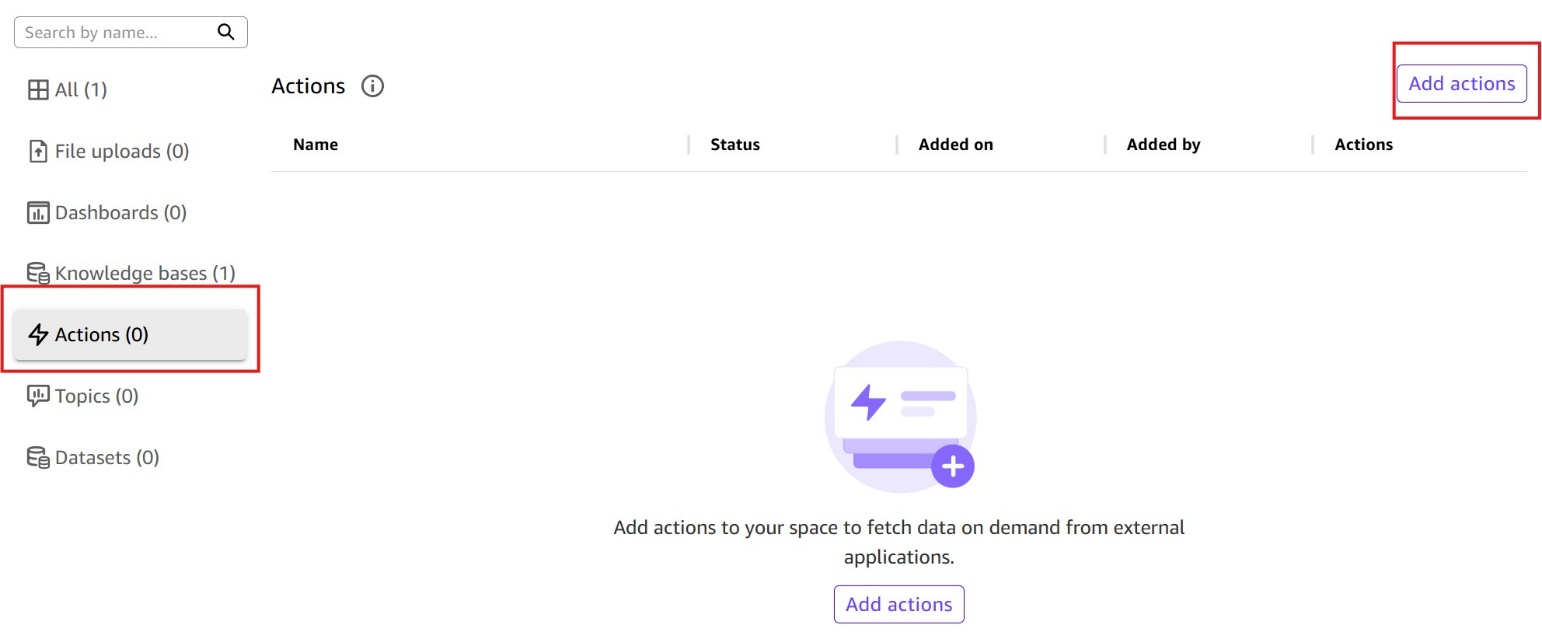
After adding both resources, you will see the knowledge base and the action integration displayed in the All Knowledge section of the Quick Space.

Screenshot of an Amazon Quick Space's 'All knowledge' page showing 2 configured knowledge items (highlighted with a red border): 'Atlassian Confluence Cloud Integration' (type: action, Status: Ready, Added a few seconds ago) and 'My Confluence Knowledge Base' (Status: Ready, Added 5 minutes ago). The left panel shows updated counts: Knowledge bases (1) and Actions (1). Both items are listed under Added by 'BharathAdminRole/bchek Isengard'. An 'Add knowledge' dropdown button is in the top-right corner. This image confirms successful setup of both a Confluence knowledge base and action connector in an Amazon Quick Space.

Now that you have successfully added both the knowledge base and the action to your Quick Space, it’s time to interact with Confluence Cloud using Quick Spaces.

Using Quick Spaces to interact with Confluence Cloud

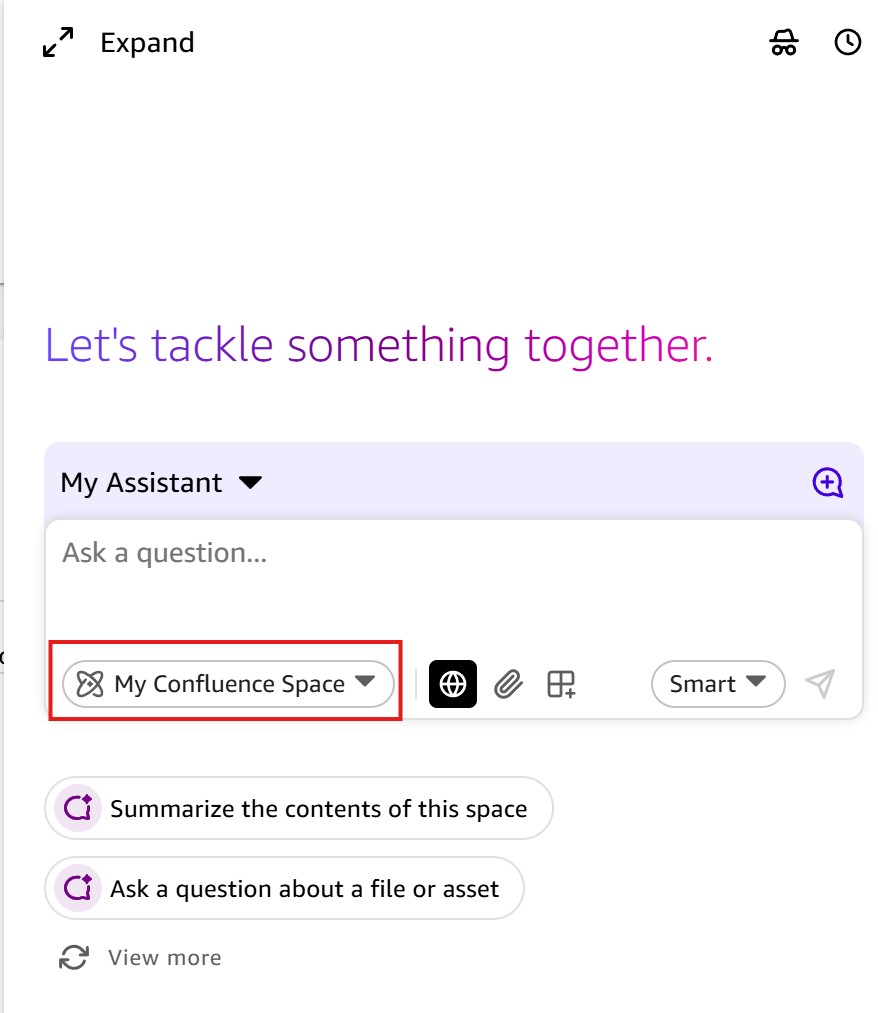
To use this Space and ask questions about the content in the configured Confluence Cloud, choose the Open Chat icon in your browser from anywhere in Quick.

Screenshot of the Amazon Quick Spaces page (accessible via the Amazon Quick navigation bar) showing the 'Spaces' section in the left sidebar. The top navigation bar shows 'Amazon Quick | Spaces' branding. A user profile icon button is highlighted in the top-right corner of the navigation bar with a red border. The main area shows the knowledge center promotional banner and the Spaces list. This image highlights the user profile/account icon location in the Amazon Quick Spaces interface.

In the chat window, notice that your configured Confluence Cloud Space is already selected and ready to answer your questions.

Screenshot of an Amazon Quick AI assistant chat interface inside a Space. The chat window shows a 'Let's tackle something together.' welcome prompt. The chat composer at the bottom shows 'My Assistant' selected, a text input field, and a Space selector showing 'My Confluence Space' (highlighted with a red border). Additional toolbar icons include a globe (web search), paperclip (attachments), grid (layouts), and a 'Smart' model selector. Suggested prompt buttons are visible: 'Summarize the contents of this space', 'Ask a question about a file or asset', and 'View more'. This image shows how to select and use a Confluence Space context in the Amazon Quick assistant.

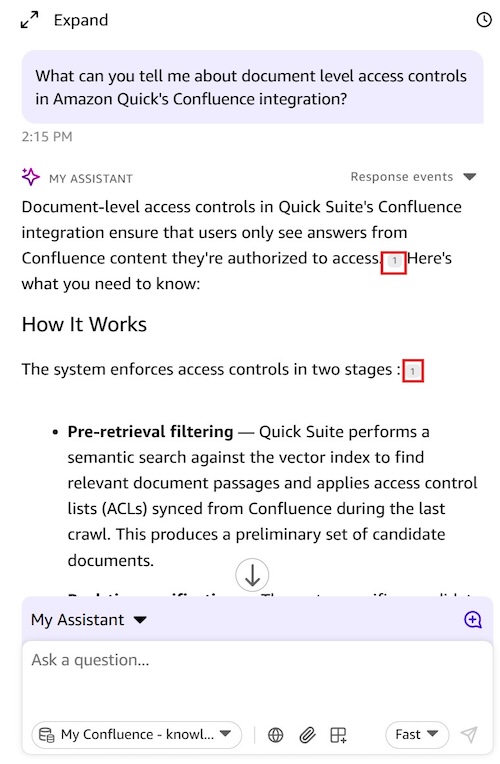
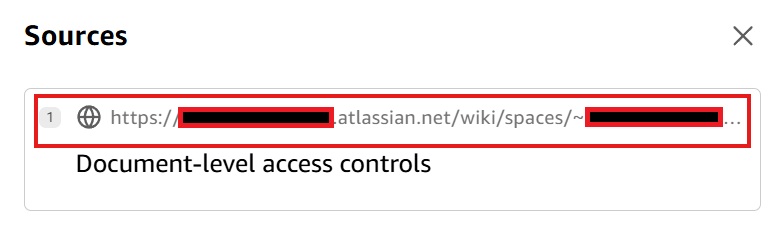
You can now start asking questions about your Confluence Cloud content. To demonstrate this functionality, I’ll use a test blog post about Confluence-Quick integration. When you submit a question, Quick provides a detailed response to your query, along with source references for the information. You can choose the Sources button to see where Quick pulled the information from. In this example, you will notice that the source is singular, pointing to our test Confluence page.

Screenshot of an Amazon Quick AI assistant conversation in a Space context. A user asks 'In my confluence space is there any documentation on integrating Confluence with Quick?' The AI assistant ('MY ASSISTANT') responds confirming it found comprehensive documentation on the topic, listing Integration Capabilities including Knowledge Base Creation and Action Connectors, and Key Features. A citation marker [1] appears after the source attribution. A 'Response events' dropdown is visible. This image demonstrates Amazon Quick's ability to search and retrieve information from a connected Confluence knowledge base.

Screenshot of the Sources citation panel in Amazon Quick's AI assistant showing the reference for the Confluence integration documentation response. Source 1 is listed as a Confluence URL (redacted, highlighted with a red border) with the document title 'Atlassian Confluence Integration with Amazon Quick: Setup and Management Guide'. An X button allows closing the panel. This image shows how Amazon Quick attributes AI responses to specific Confluence source documents within a Space.

Performing actions on Confluence pages

With Confluence actions, you can create, update, and manage pages, spaces, and other Confluence objects directly through Quick. With these action capabilities, you can streamline content management tasks without leaving your Quick environment. To perform Confluence actions, you can ask in the chat window what actions are available. Quick provides a list of supported actions and the Confluence spaces that you have access to.

Screenshot of an Amazon Quick AI assistant conversation in a Confluence Space. The user asks 'What actions can I perform in Confluence?' and the AI assistant provides a structured response listing: Content Creation & Management capabilities (highlighted with a red border) including creating pages, updating pages, setting page status, organizing hierarchies, and creating private pages. Other sections include Content Retrieval & Search, Space Management, and Advanced Features. A 'Your Current Access' section (highlighted with red border) shows two Confluence spaces: bchekuri1 (Personal, ID: 131074) and IT support (Global, ID: 425988). This image illustrates Amazon Quick's awareness of available Confluence actions and space access.

A good use case for performing actions is using generated responses from multiple sources and posting a consolidated response into Confluence. In the following example, a query about all integrations supported by Amazon Quick is sourced from the Internet since this content does not exist in the attached Confluence space.

Screenshot of an Amazon Quick AI assistant conversation where the user asks 'What are the different integrations supported by Amazon Quick?' (highlighted with a red border). The AI response lists Key Integration Categories including Atlassian Integrations (Confluence Cloud), Cloud Storage & Content Management (Google Drive, Box), and Data & Productivity Tools (Airtable). It also describes Integration Capabilities covering Action Connectors, Knowledge Bases, and Data Ingestion. This image demonstrates Amazon Quick's ability to answer product questions using knowledge from a connected Confluence knowledge base.

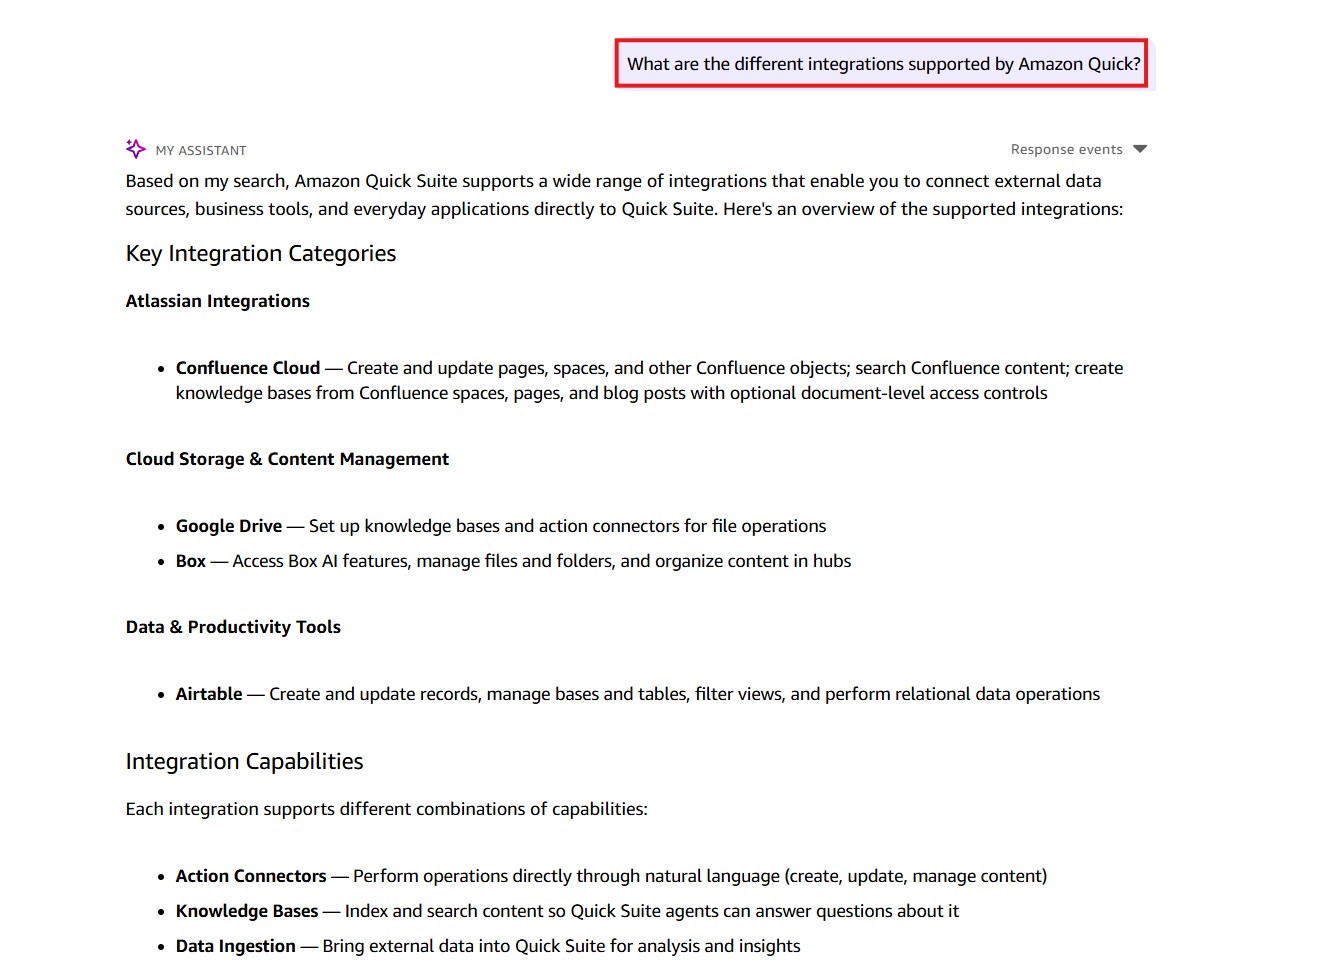
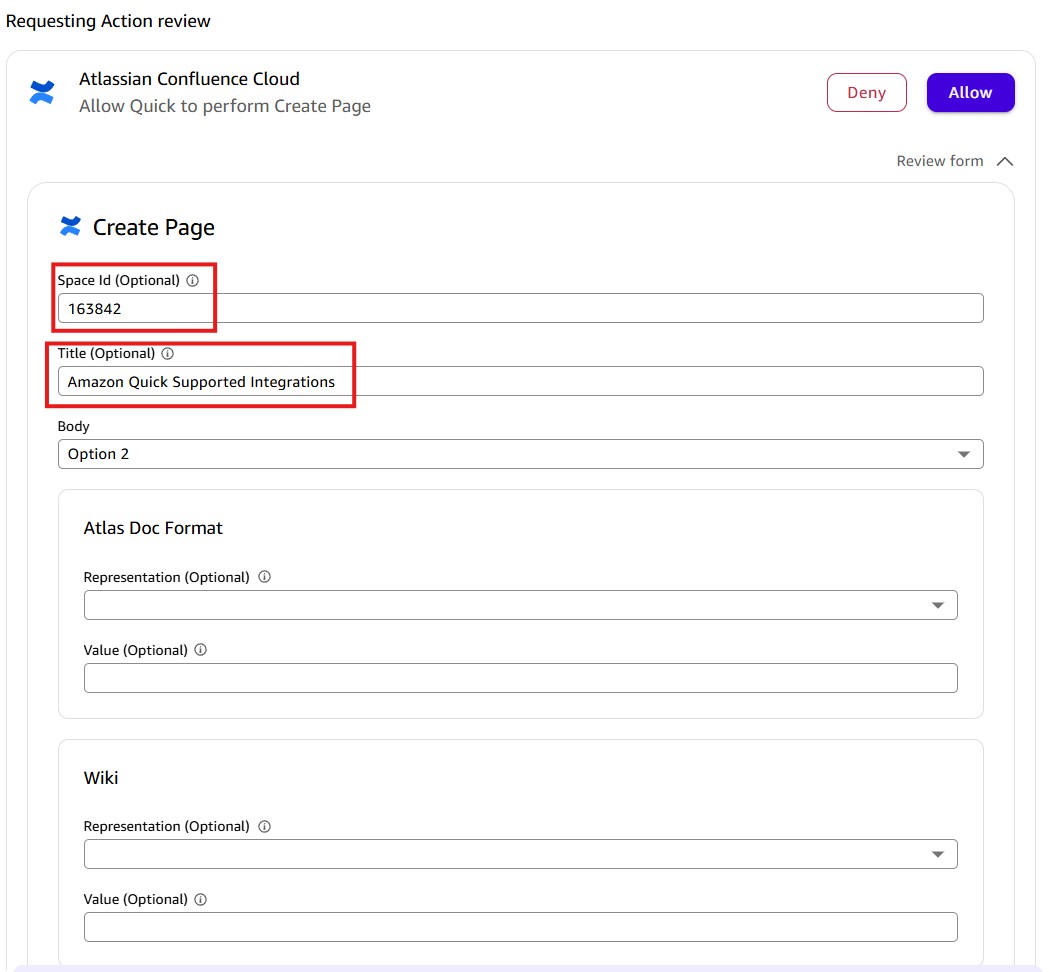
When you ask Quick to post the above content into your Confluence space, it presents an Requesting Action review card with Allow and Deny buttons and a Review Form option to inspect the page details before approving the request.

Screenshot of an Amazon Quick 'Requesting Action review' dialog for creating a Confluence page. The dialog shows the Atlassian Confluence Cloud app icon with the message 'Allow Quick to perform Create Page'. Deny and Allow buttons are visible, with a 'Review form' expandable section highlighted with a red border at the bottom. This image illustrates Amazon Quick's action approval workflow before executing write operations in Confluence.

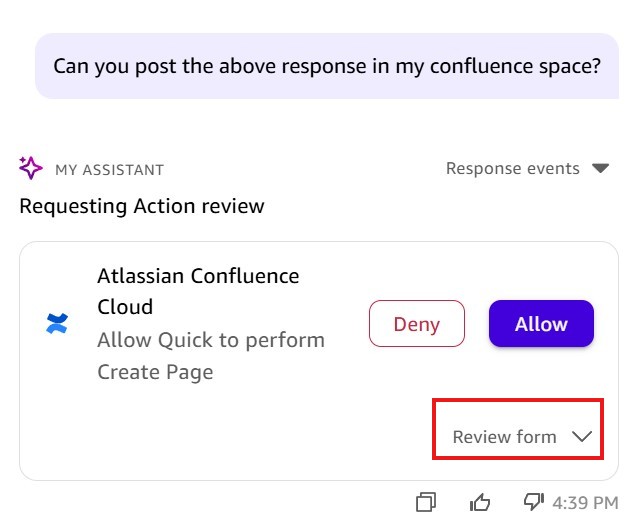
Review the page details in the Create Page form, including the page title, space ID, and content. Note that Quick selected a default space ID based on your previous conversation and provided a page title. Verify the details are correct and choose Allow to publish the content to Confluence.

Screenshot of the expanded 'Requesting Action review' form in Amazon Quick for the Atlassian Confluence Cloud 'Create Page' action. The form displays: Space Id field set to '163842' (highlighted with red border), Title field set to 'Amazon Quick Supported Integrations' (highlighted with red border), a Body dropdown set to 'Option 2' with Atlas Doc Format and Wiki format sections. Deny and Allow buttons are visible at the top. This image shows the details of a Confluence page creation request being reviewed in Amazon Quick before execution.

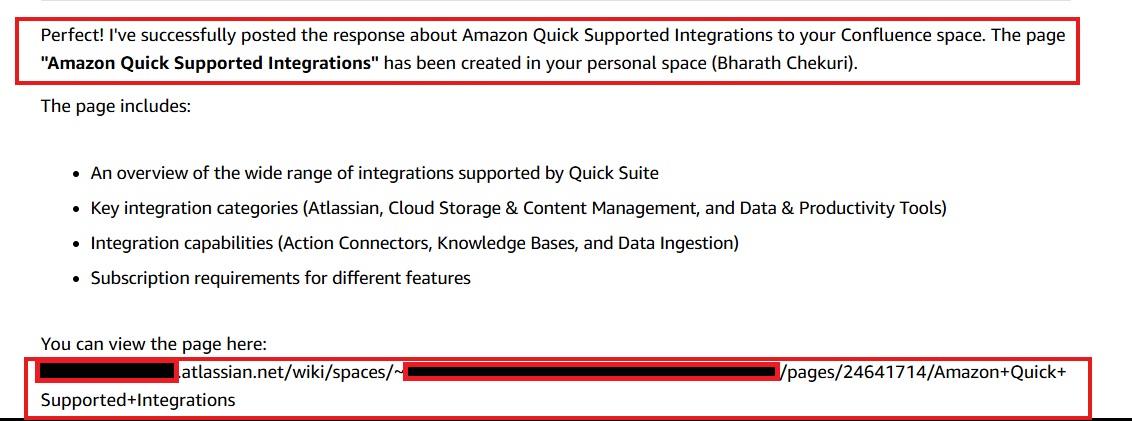
If the page creation is successful, Quick provides a success response along with the page creation details and a direct URL link to the newly created page in your Confluence Cloud space.

Screenshot of an Amazon Quick AI assistant confirmation message after successfully creating a Confluence page. The highlighted text (red border) reads: 'I've successfully posted the response about Amazon Quick Supported Integrations to your Confluence space. The page "Amazon Quick Supported Integrations" has been created in your personal space (Bharath Chekuri).' Below, a list of page contents is provided, and a Confluence URL link (redacted with red border) is shown for viewing the new page. This image confirms successful Confluence page creation via Amazon Quick's Confluence action connector.

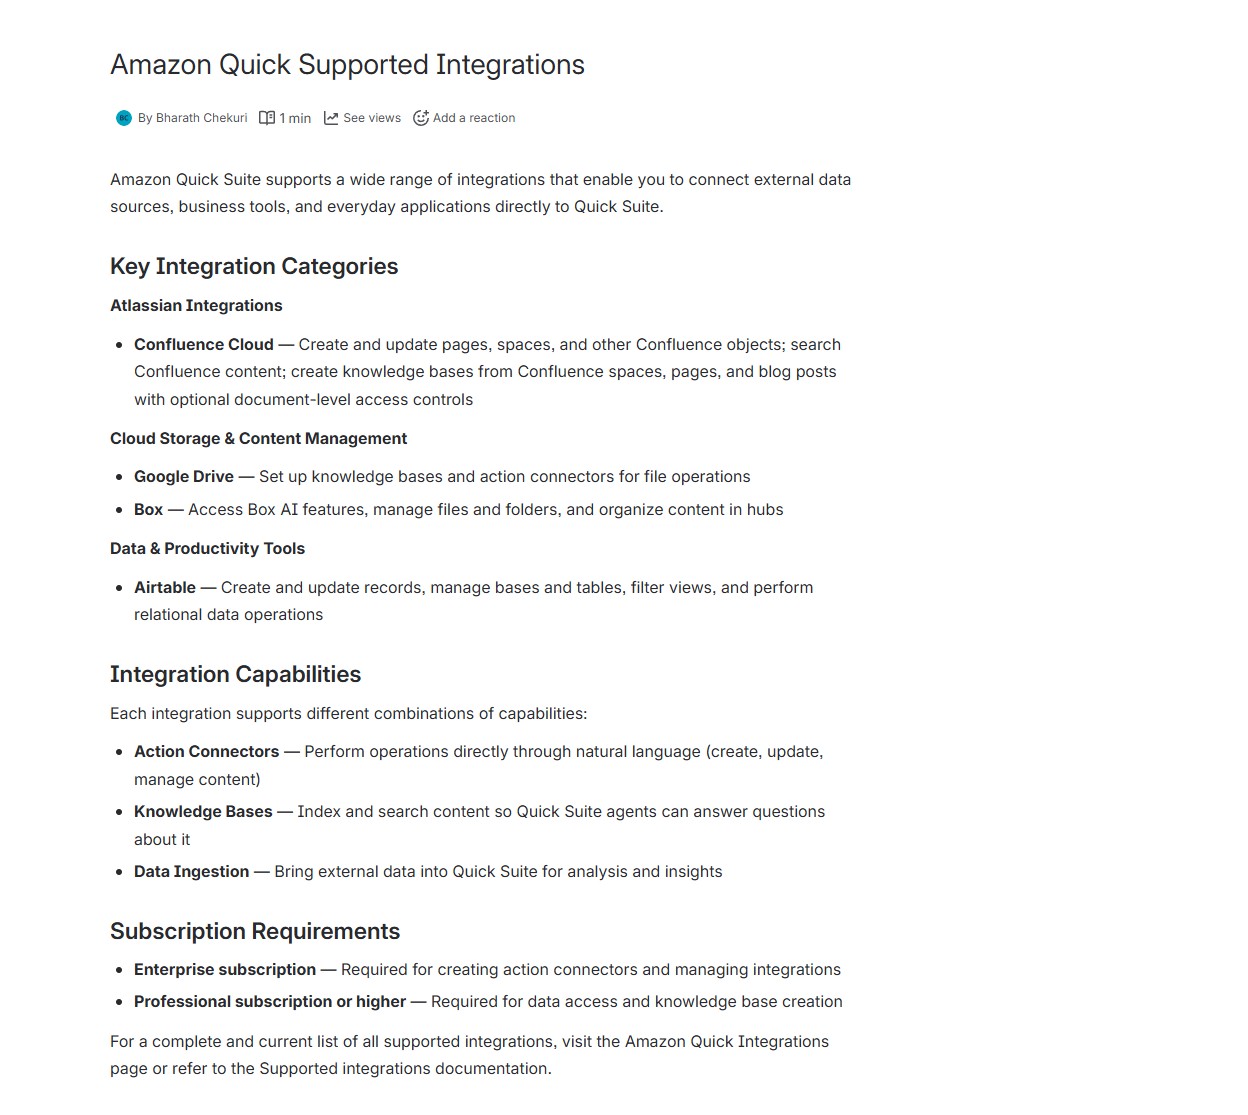
You can confirm the page creation in your Confluence Cloud Space. Quick automatically preserves the formatting from the response when creating the page in Confluence, including headings, lists, and structured content, eliminating the need for manual formatting work.

Screenshot of the newly created Confluence page titled 'Amazon Quick Supported Integrations' authored by Bharath Chekuri. The page content describes Amazon Quick Suite's integration capabilities, organized into sections: Key Integration Categories (Atlassian Integrations — Confluence Cloud, Google Drive, Box; Cloud Storage & Content Management; Data & Productivity Tools — Airtable), Integration Capabilities (Action Connectors, Knowledge Bases, Data Ingestion), and Subscription Requirements (Enterprise subscription and Professional subscription). This image demonstrates a successfully AI-generated Confluence page created via Amazon Quick's Confluence connector.

Troubleshooting and FAQs

For information about troubleshooting your connector, see Troubleshooting your Atlassian Confluence Integration. Refer to Quick FAQs for frequently asked questions.

Conclusion

The Confluence Cloud integration demonstrates how Quick approaches enterprise knowledge management. By combining semantic search through knowledge bases with targeted operations through Actions, you can search, retrieve, and update Confluence content using natural language while accessing data from other integrated systems. As organizations generate and rely on more data, Quick helps teams find, connect, and act on information more efficiently.Ready to improve your enterprise knowledge management? Explore the capabilities of Quick by:

For detailed implementation guidance and best practices, visit the Quick User Guide.


About the authors

Bharath

Bharath Chekuri is a Senior Solutions Architect at Amazon Web Services (AWS)

Meena Menon is a Senior Customer Solutions Manager at Amazon Web Services (AWS)