Artificial Intelligence
Operationalize your Amazon SageMaker Studio notebooks as scheduled notebook jobs
Amazon SageMaker Studio provides a fully managed solution for data scientists to interactively build, train, and deploy machine learning (ML) models. In addition to the interactive ML experience, data workers also seek solutions to run notebooks as ephemeral jobs without the need to refactor code as Python modules or learn DevOps tools and best practices to automate their deployment infrastructure. Some common use cases for doing this include:
- Regularly running model inference to generate reports
- Scaling up a feature engineering step after having tested in Studio against a subset of data on a small instance
- Retraining and deploying models on some cadence
- Analyzing your team’s Amazon SageMaker usage on a regular cadence
Previously, when data scientists wanted to take the code they built interactively on notebooks and run them as batch jobs, they were faced with a steep learning curve using Amazon SageMaker Pipelines, AWS Lambda, Amazon EventBridge, or other solutions that are difficult to set up, use, and manage.
With SageMaker notebook jobs, you can now run your notebooks as is or in a parameterized fashion with just a few simple clicks from the SageMaker Studio or SageMaker Studio Lab interface. You can run these notebooks on a schedule or immediately. There’s no need for the end-user to modify their existing notebook code. When the job is complete, you can view the populated notebook cells, including any visualizations!
In this post, we share how to operationalize your SageMaker Studio notebooks as scheduled notebook jobs.
Solution overview
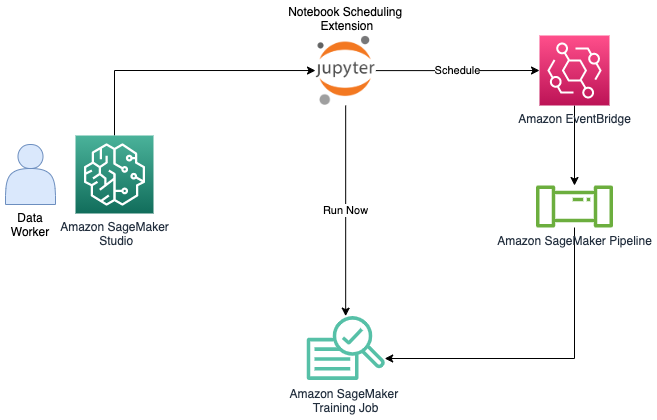
The following diagram illustrates our solution architecture. We utilize the pre-installed SageMaker extension to run notebooks as a job immediately or on a schedule.
In the following sections, we walk through the steps to create a notebook, parameterize cells, customize additional options, and schedule your job. We also include a sample use case.
Prerequisites
To use SageMaker notebook jobs, you need to be running a JupyterLab 3 JupyterServer app within Studio. For more information on how to upgrade to JupyterLab 3, refer to View and update the JupyterLab version of an app from the console. Be sure to Shut down and Update SageMaker Studio in order to pick up the latest updates.
To define job definitions that run notebooks on a schedule, you may need to add additional permissions to your SageMaker execution role.
First, add a trust relationship to your SageMaker execution role that allows events.amazonaws.com to assume your role:
Additionally, you may need to create and attach an inline policy to your execution role. The below policy is supplementary to the very permissive AmazonSageMakerFullAccess policy. For a complete and minimal set of permissions see Install Policies and Permissions.
Create a notebook job
To operationalize your notebook as a SageMaker notebook job, choose the Create a notebook job icon.

Alternatively, you can choose (right-click) your notebook on the file system and choose Create Notebook Job.

In the Create job section, simply choose the right instance type for your scheduled job based on your workload: standard instances, compute optimized instances, or accelerated computing instances that contain GPUs. You can choose any of the instances available for SageMaker training jobs. For the complete list of instances available, refer to Amazon SageMaker Pricing.

When a job is complete, you can view the output notebook file with its populated cells, as well as the underlying logs from the job runs.

Parameterize cells
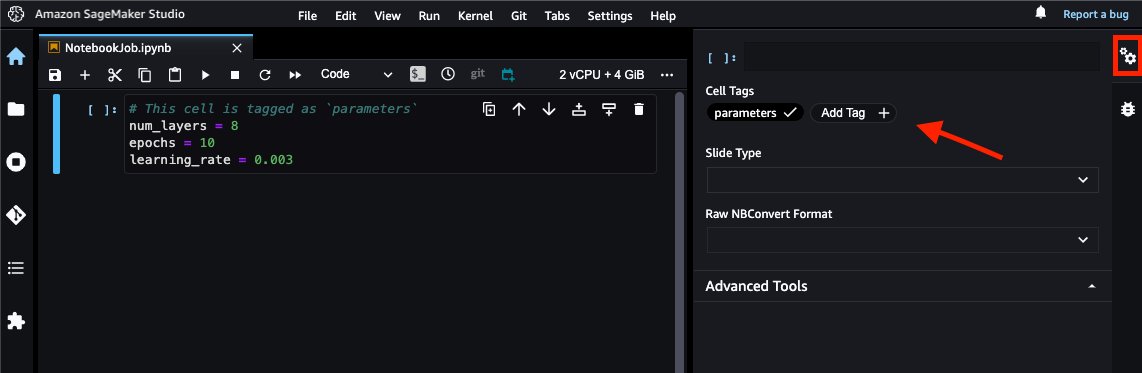
When moving a notebook to a production workflow, it’s important to be able to reuse the same notebook with different sets of parameters for modularity. For example, you may want to parameterize the dataset location or the hyperparameters of your model so that you can reuse the same notebook for many distinct model trainings. SageMaker notebook jobs support this through cell tags. Simply choose the double gear icon in the right pane and choose Add Tag. Then label the tag as parameters.
By default, the notebook job run uses the parameter values specified in the notebook, but alternatively, you can modify these as a configuration for your notebook job.

Configure additional options
When creating a notebook job, you can expand the Additional options section in order to customize your job definition. Studio will automatically detect the image or kernel you’re using in your notebook and pre-select it for you. Ensure that you have validated this selection.
You can also specify environment variables or startup scripts to customize your notebook run environment. For the full list of configurations, see Additional Options.
Schedule your job
To schedule your job, choose Run on a schedule and set an appropriate interval and time. Then you can choose the Notebook Jobs tab that is visible after choosing the home icon. After the notebook is loaded, choose the Notebook Job Definitions tab to pause or remove your schedule.

Example use case
For our example, we showcase an end-to-end ML workflow that prepares data from a ground truth source, trains a refreshed model from that time period, and then runs inference on the most recent data to generate actionable insights. In practice, you might run a complete end-to-end workflow, or simply operationalize one step of your workflow. You can schedule an AWS Glue interactive session for daily data preparation, or run a batch inference job that generates graphical results directly in your output notebook.
The full notebook for this example can be found in our SageMaker Examples GitHub repository. The use case assumes that we’re a telecommunications company that is looking to schedule a notebook that predicts probable customer churn based on a model trained with the most recent data we have available.
To start, we gather the most recently available customer data and perform some preprocessing on it:
We train our refreshed model on this updated training data in order to make accurate predictions on todays_data:
Because we’re going to schedule this notebook as a daily report, we want to capture how good our refreshed model performed on our validation set so that we can be confident in its future predictions. The results in the following screenshot are from our scheduled inference report.

Lastly, you want to capture the predicted results of today’s data into a database so that actions can be taken based on the results of this model.

After the notebook is understood, feel free to run this as an ephemeral job using the Run now option described earlier or test out the scheduling functionality.
Clean up
If you followed along with our example, be sure to pause or delete your notebook job’s schedule to avoid incurring ongoing charges.
Conclusion
Bringing notebooks to production with SageMaker notebook jobs vastly simplifies the undifferentiated heavy lifting required by data workers. Whether you’re scheduling end-to-end ML workflows or a piece of the puzzle, we encourage you to put some notebooks in production using SageMaker Studio or SageMaker Studio Lab! To learn more, see Notebook-based Workflows.
About the authors
 Sean Morgan is a Senior ML Solutions Architect at AWS. He has experience in the semiconductor and academic research fields, and uses his experience to help customers reach their goals on AWS. In his free time Sean is an activate open source contributor/maintainer and is the special interest group lead for TensorFlow Addons.
 Sumedha Swamy is a Principal Product Manager at Amazon Web Services. He leads SageMaker Studio team to build it into the IDE of choice for interactive data science and data engineering workflows. He has spent the past 15 years building customer-obsessed consumer and enterprise products using Machine Learning. In his free time he likes photographing the amazing geology of the American Southwest.
 Edward Sun is a Senior SDE working for SageMaker Studio at Amazon Web Services. He is focused on building interactive ML solution and simplifying the customer experience to integrate SageMaker Studio with popular technologies in data engineering and ML ecosystem. In his spare time, Edward is big fan of camping, hiking and fishing and enjoys the time spending with his family.